UNI_PBM_25/32 - Washing machine Uniprodo - Free user manual and instructions
Find the device manual for free UNI_PBM_25/32 Uniprodo in PDF.


| Product type | Badge making machine |
| Brand | Uniprodo |
| Model | UNI_PBM_25/32 |
| Dimensions (L × D × H) | 300 × 170 × 510 mm |
| Weight | 9.8 kg |
| Compatible badge diameters | 25 mm and 32 mm |
| Actuation type | Manual lever |
| Included dies | Die A and die B |
| Cutting tool included | Yes, with replaceable snap-off blade |
| Included accessories | Metal washer, transparent film, metal clasp, cutting tool |
| Power supply | None (manual device) |
| Intended use | Private badge making |
| Installation surface | Flat, stable, clean, non-flammable and dry |
| Cleaning | Soft damp cloth, without corrosive agents |
| Repairability | Repair exclusively by the manufacturer |
| Spare parts | Cutting knife blade |
| Safety | Protective devices and detailed instructions in the manual |
| Delivery contents | Machine, dies, cutting tool, accessories, user manual |
| Manual languages | French, German, English, Spanish, Italian, etc. |
Frequently Asked Questions - UNI_PBM_25/32 Uniprodo
User questions about UNI_PBM_25/32 Uniprodo
0 question about this device. Answer the ones you know or ask your own.
Ask a new question about this device
Download the instructions for your Washing machine in PDF format for free! Find your manual UNI_PBM_25/32 - Uniprodo and take your electronic device back in hand. On this page are published all the documents necessary for the use of your device. UNI_PBM_25/32 by Uniprodo.
USER MANUAL UNI_PBM_25/32 Uniprodo

WICHTIG
The user manual is designed to assist in the safe and trouble-free use of the device. The product is designed and manufactured in accordance with strict technical guidelines, using state-of-the-art technologies and components. Additionally, it is produced in compliance with the most stringent quality standards.
DO NOT USE THE DEVICE UNLESS YOU HAVE THOROUGHLY READ AND UNDERSTOOD THIS USER MANUAL.
To increase the product life of the device and to ensure trouble-free operation, use it in accordance with this user manual and regularly perform maintenance tasks. The technical data and specifications in this user manual are up to date. The manufacturer reserves the right to make changes associated with quality improvement. The device is designed to reduce noise emission risks to a minimum, taking into account technological progress and noise reduction opportunities.
LEGEND

Read instructions before use.
ATTENTION! Hand crush hazard!

PLEASE NOTE! Drawings in this manual are for illustration purposes only and in some details may differ from the actual product.
The original operation manual is written in German. Other language versions are translations from the German.
2. USAGE SAFETY

ATTENTION! Read all safety warnings and all instructions. Failure to follow the warnings and instructions may result in serious injury or even death.
The terms „device“ or „product“ are used in the warnings and instructions to refer to BUTTON MACHINE.
2.1. SAFETY IN THE WORKPLACE
a) Make sure the workplace is clean and well lit. A messy or poorly lit workplace may lead to accidents. Try to think ahead, observe what is going on and use common sense when working with the device.
b) If you are unsure about whether the product is operating correctly or if you find damage, please contact the manufacturer's service centre.
c) Only the manufacturer's service centre may make repairs to the product. Do not attempt to make repairs yourself!
d) Please keep this manual available for future reference. If this device is passed on to a third party, the manual must be passed on with it.
e) Keep packaging elements and small assembly parts in a place not available to children.
2.2. PERSONAL SAFETY
a) Do not use the device when tired, ill or under the influence of alcohol, narcotics or medication which can significantly impair the ability to operate the device.
b) The device is not designed to be handled by persons (including children) with limited mental and sensory functions or persons lacking relevant experience and/or knowledge unless they are supervised by a person responsible for their safety or they have received instruction on how to operate the device.
c) The device is not a toy. Children must be supervised to ensure that they do not play with the device.
2.3. SAFE DEVICE USE
a) When not in use, store in a safe place, away from children and people not familiar with the device who have not read the user manual. The device may pose a hazard in the hands of inexperienced users.
b) Keep the device in perfect technical condition. Before each use check for general damage and especially check for cracked parts or elements and for any other conditions which may impact the safe operation of the device. If damage is discovered, hand over the device for repair before use.
c) Device repair or maintenance should be carried out by qualified persons, only using original spare parts. This will ensure safe use.
d) The device is not a toy. Cleaning and maintenance may not be carried out by children without supervision by an adult person.
e) It is forbidden to interfere with the structure of the device in order to change its parameters or construction.
f) Keep the device away from sources of fire and heat.
ATTENTION! Despite the safe design of the device and its protective features, and despite the use of additional elements protecting the operator, there is still a slight risk of accident or injury when using the device. Stay alert and use common sense when using the device.
3. USE GUIDELINES
The product is intended for making buttons. The product is intended for home use only!
The user is liable for any damage resulting from unintended use of the device.
3.1. DEVICE DESCRIPTION
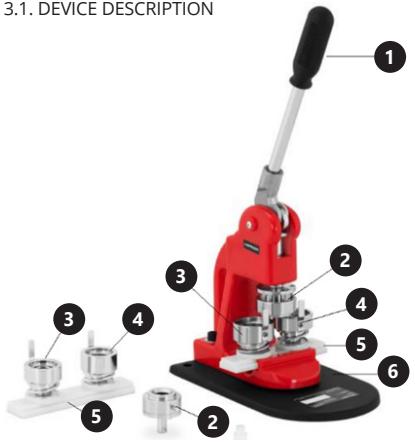
- Lever handle
- Upper mold
- „A” mold
- „B" mold
- Sliding mold base
- Base of the machine
ACCESSORIES:
- Cutting device
- Metal cover
- Transparent foil
- Metal clasp
3.2. PREPARING FOR USE
3.2.1. APPLIANCE LOCATION
The device should always be used when positioned on an even, stable, clean, fireproof and dry surface, and be out of the reach of children and persons with limited mental and sensory functions.
3.2.2. ASSEMBLING THE DEVICE


- Prepare the base of the device. Screw the body to the base of the machine using a small hexagonal (Allen) key.
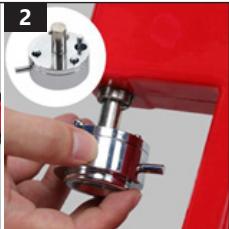
- The upper mold should be inserted into the hole under the lever. Make sure that the pin is inserted into a special hole.
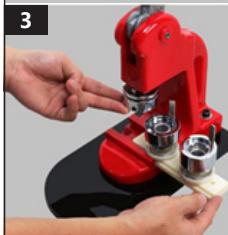
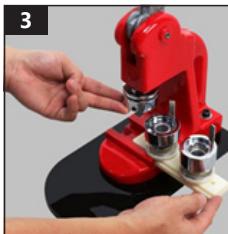
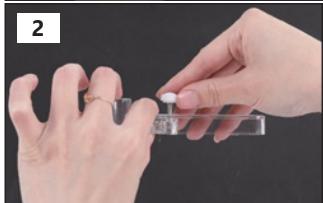
- Slide the mold base (together with the molds) into the special guides (as shown on the picture).
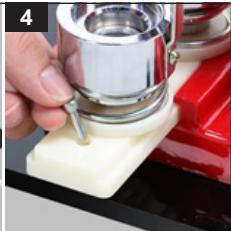
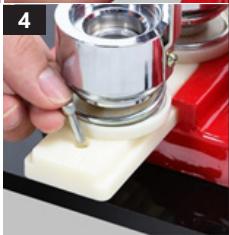
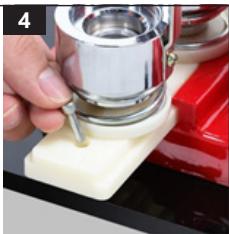
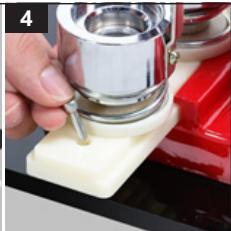
- Move the base so that the upper mold is between the lower molds. Place the positioning pins in the holes on both sides of the sliding base.
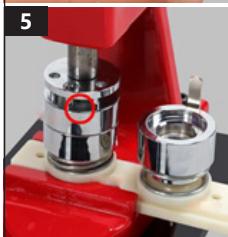
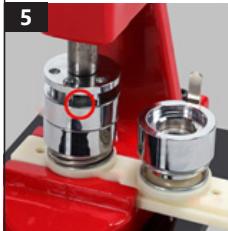
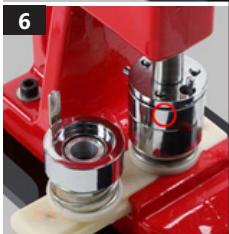
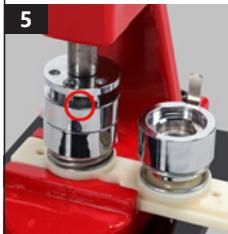
- Checking the operation. Move the „A“ mold under the lever (under the upper mold) and press down. CAUTION! There will be a gap in the upper mold, but there will be no gap between the upper mold and the „A“ mold.
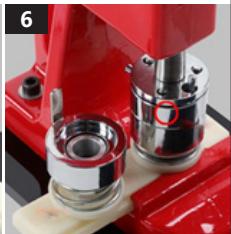
- Checking the operation. Move the „B“ mold under the lever (under the upper mold) and press down. CAUTION! There will be no gap in either the upper mold or between the upper mold and the „B“ mold.
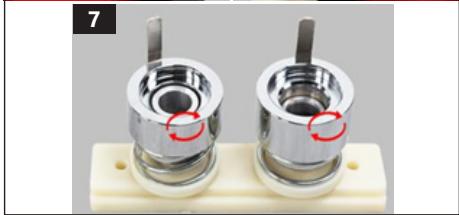
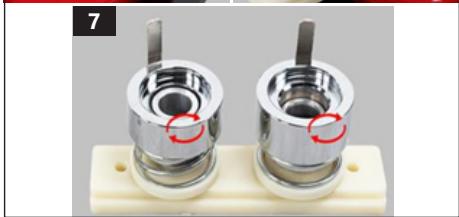
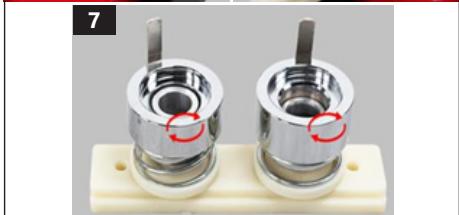
- Mold setting adjustment. If the lower molds are not aligned, adjust them manually (gently turn the mold the right way round).
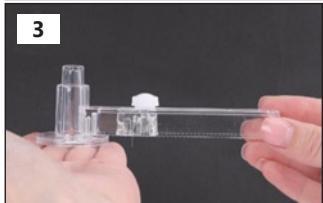
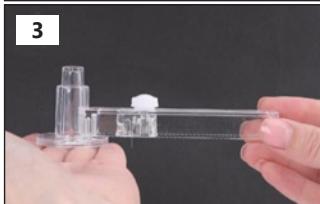
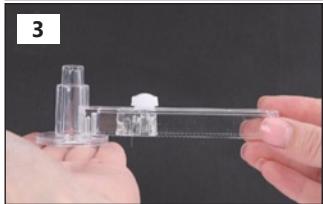
3.2.3. CUTTING TOOL ASSEMBLY
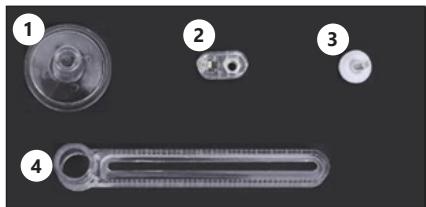
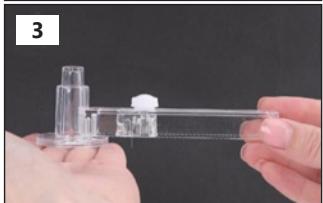
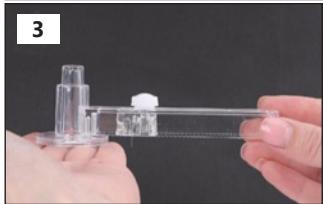
- Position locator
- Knife
- Knob (adjustable)
- Handle (adjustable)
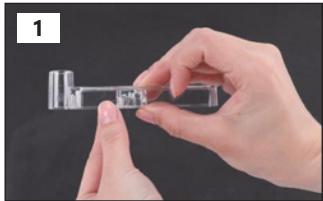
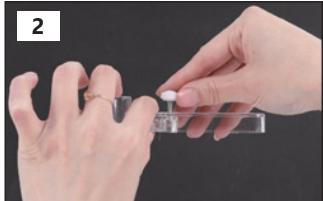
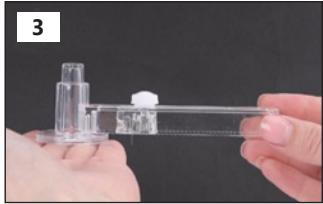

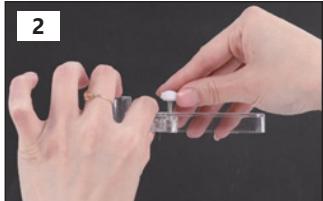
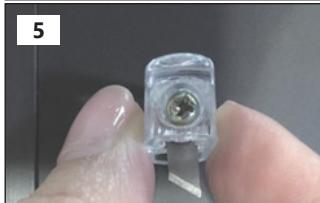
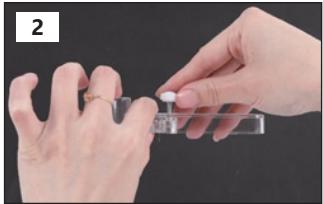
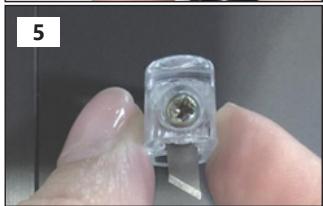
- Place the blade in the handle as shown on the picture.
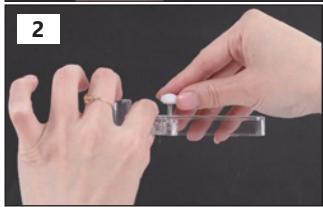
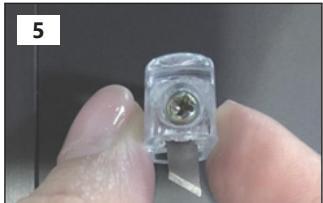
- Put the knob securing the knife blade in the right place (as shown on the picture) and adjust it.
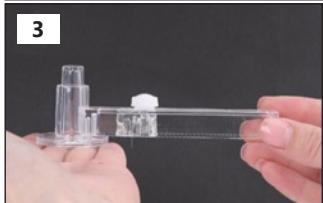
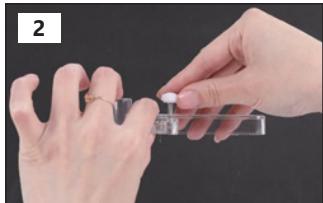
- Put the position locator in the designated place.
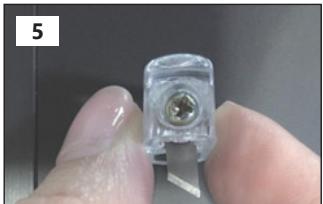
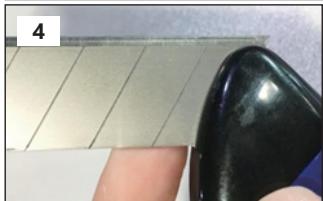
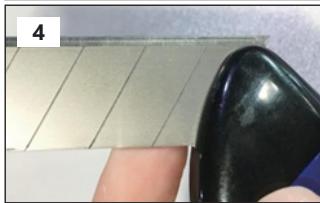
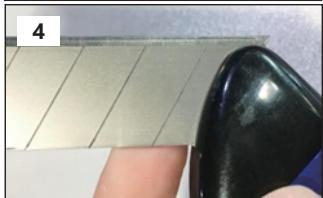
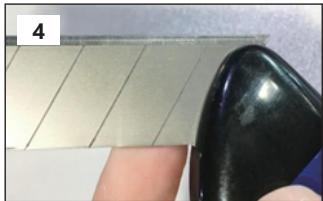
- The knife blade is replaceable. To replace it, break off a piece of the blade from the technical knife (with a broken blade).
- Remove the screw and replace the blade.
3.3. DEVICE USE
3.3.1. PREPARING THE PATTERN
WITH A CUTTING DEVICE
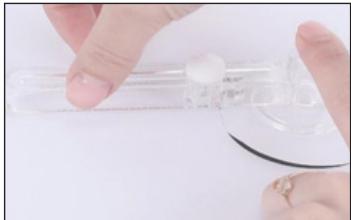
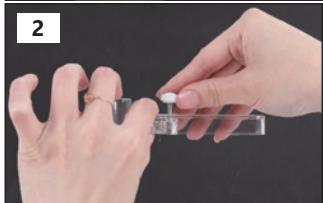
- Place the position locator on the printed (or drawn) pattern/design. With one hand, grab the position locator and press it against the paper, and with the other hand, rotate the handle until the pattern disc is cut out.
3.3.2. PREPARING BUTTONS
- Place the metal cap in the „A“ mold. Then place the previously prepared pattern on it (cut out in the correct size). Put a transparent foil at the end.
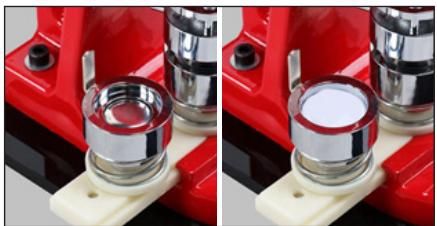
- Place the metal clasp in the „B“ mold. CAUTION! Remember that the clasp (safety pin) is pointing downwards.

- Move the „A“ mold under the lever and press down. All items will be in the upper mold.

- Move the „B“ mold under the lever and press down.
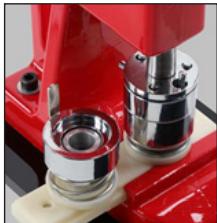
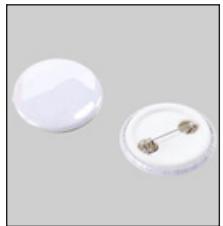
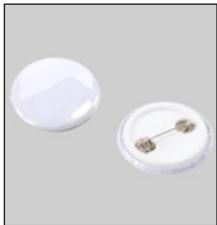
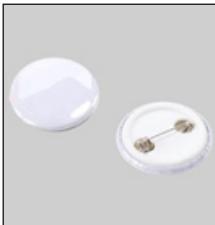
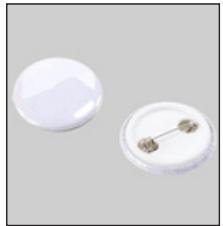
- The button is ready.
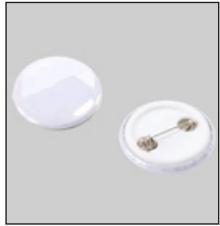
IMPORTANT:
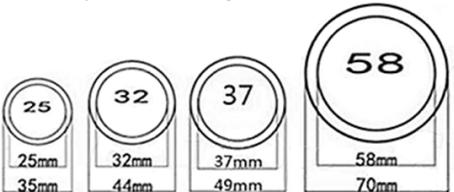
- The transparent foil must be sufficiently larger than the badge. For example, a badge with a diameter of 25 mm should be covered with a transparent foil with a minimum diameter of 35 mm.
- Only badges and transparent foil covers are delivered with the device in sizes depending on the device model.
• Here is a drawing showing the dimensions of the badges and the corresponding dimensions of the transparent foil coatings:
3.4. CLEANING AND MAINTENANCE
a) Use only non-corrosive cleaners to clean the surface.
b) After cleaning the device, all parts should be dried completely before using it again.
c) Store the unit in a dry, cool place, free from moisture and direct exposure to sunlight.
d) Do not spray the device with a water jet or submerge it in water.
e) The device must be regularly inspected to check its technical efficiency and spot any damage.
f) Use a soft, damp cloth for cleaning.
g) Do not use sharp and/or metal objects for cleaning (e.g. a wire brush or a metal spatula) because they may damage the surface material of the appliance.
INSTRUKCJA OBSŁUGI
DANE TECHNICZNE
| Opis parametru | Wartość parametru | ||
| Nazwa produktu | MASZYNKA DO PRZYPINEK | ||
| Model | UNI_PBM_25/32 | UNI_PBM_58 | UNI_PBM_37PLUS |
| Wymiary [mm] | 300x170x510 | 290x170x510 | 290x170x500 |
| Cieżar [kg] | 9,8 | 14,26 | 8,1 |
1. OGÓLNY OPIS
2.1. BEZPIECZEŃSTWO W MIEJSCU PRACY
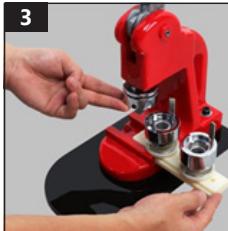




3.3.2. PRZYGOTOWANIE PRZYPINKI
WAŻNE

3.3.2. PŘÍPRAVA PLACKY
- Placka je hotová.
DŮLEŽITÉ
3.4. ČIŠTĚNÍ A ÚDRŽBA



3.3.2. PREPARATION DU BADGE
- Le badge est prêt
IMPORTANT
3.4. NETTOYAGE ET ENTRETIEN


- La spilla è fatta.
IMPORTANTE

IMPORTANTE



3.3.2. A KITÜZÖ ELKÉSZÍTÉSE
- A kitűző kész van.
FONTOS
Our customers' satisfaction is our main goal!
Please contact us with questions AT:



- WICHTIG
- DO NOT USE THE DEVICE UNLESS YOU HAVE THOROUGHLY READ AND UNDERSTOOD THIS USER MANUAL
- LEGEND
- USAGE SAFETY
- SAFETY IN THE WORKPLACE
- PERSONAL SAFETY
- SAFE DEVICE USE
- USE GUIDELINES
- ACCESSORIES
- PREPARING FOR USE
- APPLIANCE LOCATION
- DEVICE USE
- PREPARING THE PATTERN
- WITH A CUTTING DEVICE
- PREPARING BUTTONS
- IMPORTANT
- CLEANING AND MAINTENANCE
- INSTRUKCJA OBSŁUGI
- OGÓLNY OPIS
- BEZPIECZEŃSTWO W MIEJSCU PRACY
- PRZYGOTOWANIE PRZYPINKI
- WAŻNE
- DŮLEŽITÉ
- ČIŠTĚNÍ A ÚDRŽBA
- PREPARATION DU BADGE
- NETTOYAGE ET ENTRETIEN
- IMPORTANTE
- A KITÜZÖ ELKÉSZÍTÉSE
- FONTOS
- OUR CUSTOMERS' SATISFACTION IS OUR MAIN GOAL
- PLEASE CONTACT US WITH QUESTIONS AT
Brand : Uniprodo
Model : UNI_PBM_25/32
Category : Washing machine