USER MANUAL FAIT MAISON LAGRANGE
CONDITIONS DE GARANTIE P.30
RECETTES P.31
CHARACTERISTIQUES
CONDITIONS DE GARANTIE
Cake aux fruits confits
| CEufs battus | 3 |
| Beurre ramolli | 100 g |
| Sucre en poudre | 125 g |
| Sel | 1 pincee |
| Rhum | 1 cs |
| Farine T45 ou T55 | 300 g |
| Levure chimique | 1 sachet |
| Raisins secs | 100 g |
| Fruits confits (cerises, citrons...) | 150 g |
- DESCRIPTION OF THE APPLIANCE -
- Open button
- Cover of the appliance
- Control window-plug
- Seal
- Space for the trough
- Control panel
- Base of the appliance
- Spoon case
-
Location of the power supply
-
Kneading blade
- Small bread trough
- Large rice trough
- 1 container and 1 strainer for "fromage blanc"
- 8 glass yoghurt jars with plastic covers
- Separator grate for yoghurt
- Rice spoon
- Ladle ("fromage blanc", jam, etc.)
- Hook (to remove the kneading blade from the "bread" after baking)
- Rice measure
-
Measuring spoon (teaspoon/tablespoon)
-
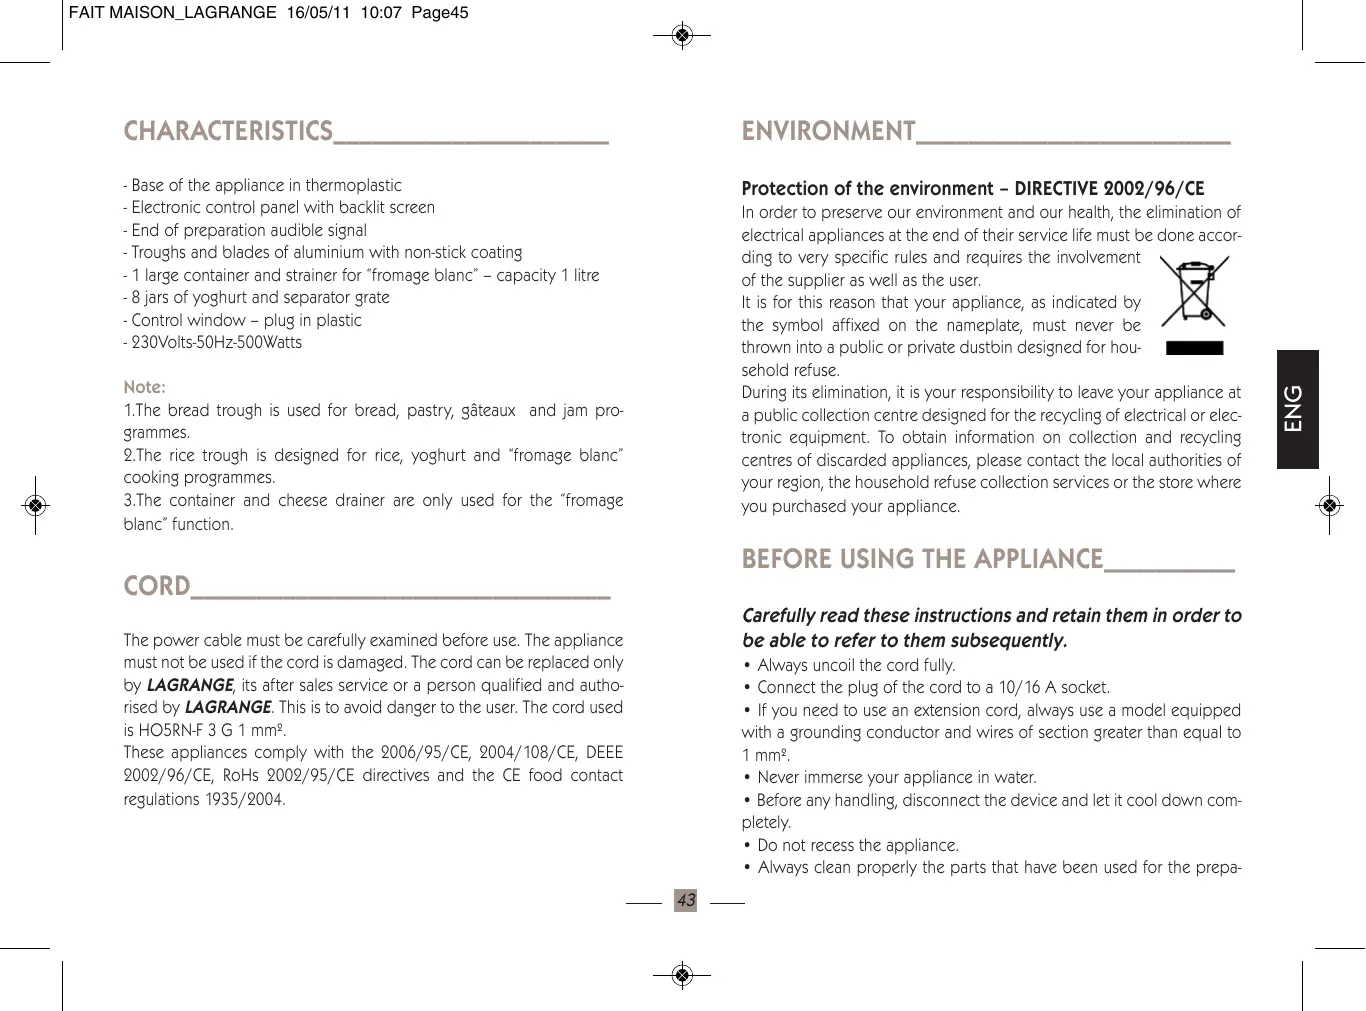
THE CONTROL PANEL
Buttons for selecting and adjusting the deferred start and the modification of the dairy produce programme time
TABLE OF CONTENTS
CHARACTERISTICS P. 43
CORD P.43
ENVIRONMENT P.43
BEFORE USING THE APPLIANCE P.43
PRACTICAL ADVICE P. 44
THE INGREDIENTS AND PREPARATION TIME FOR "BREAD" TYPE PROGRAMMES P. 44
THE INGREDIENTS AND PREPARATION TIME FOR JAM TYPE PROGRAMMES P.47
THE INGREDIENTS AND PREPARATION TIME FOR RICE TYPE PROGRAMMES P.48
THE INGREDIENTS AND PREPARATION TIME FOR YOGHURT TYPE PROGRAMMES P.49
THE INGREDIENTS AND PREPARATION TIME FOR "FROMAGE BLANC" TYPE PROGRAMMES P.50
COMMISSIONING AND USE P.51
1STUSE P.51
OPERATING ENVIRONMENT P.51
USING THE CONTROL PANEL P.52
PREPARING BREAD-BUNS-GATEAU P.56
PREPARING JAM P.58
PREPARING RICE P.59
- Base of the appliance in thermoplastic
- Electronic control panel with backlit screen
- End of preparation audible signal
- Troughs and blades of aluminium with non-stick coating
- 1 large container and strainer for "fromage blanc" - capacity 1 litre
- 8 jars of yoghurt and separator grate
- Control window - plug in plastic
- 230Volts-50Hz-500Watts
Note:
1.The bread trough is used for bread, pastry, gâteaux and jam programmes.
2.The rice trough is designed for rice, yoghurt and "fromage blanc" cooking programmes.
3.The container and cheese drainer are only used for the "fromage blanc" function.
CORD
The power cable must be carefully examined before use. The appliance must not be used if the cord is damaged. The cord can be replaced only by LAGRANGE, its after sales service or a person qualified and authorised by LAGRANGE. This is to avoid danger to the user. The cord used is HO5RN-F 3 G 1 mm².
These appliances comply with the 2006/95/CE, 2004/108/CE, DEEE 2002/96/CE, RoHs 2002/95/CE directives and the CE food contact regulations 1935/2004.
ENVIRONMENT
Protection of the environment - DIRECTIVE 2002/96/CE
In order to preserve our environment and our health, the elimination of electrical appliances at the end of their service life must be done accor-
ding to very specific rules and requires the involvement of the supplier as well as the user.
It is for this reason that your appliance, as indicated by the symbol affixed on the nameplate, must never be thrown into a public or private dustbin designed for household refuse.

During its elimination, it is your responsibility to leave your appliance at a public collection centre designed for the recycling of electrical or electronic equipment. To obtain information on collection and recycling centres of discarded appliances, please contact the local authorities of your region, the household refuse collection services or the store where you purchased your appliance.
BEFORE USING THE APPLIANCE
Carefully read these instructions and retain them in order to be able to refer to them subsequently.
Always uncoil the cord fully.
- Connect the plug of the cord to a 10/16 A socket.
- If you need to use an extension cord, always use a model equipped with a grounding conductor and wires of section greater than equal to 1mm^2 .
- Never immerse your appliance in water.
- Before any handling, disconnect the device and let it cool down completely.
- Do not recess the appliance.
- Always clean properly the parts that have been used for the prepa
ration and do this after every use.
- It is recommended to keep an eye on children to ensure that they do not play with the appliance.
- Persons (including children) who are not capable of using the appliance safely, either because of their physical, sensorial or mental capacities, or because of their lack of experience or knowledge, may on no account use the appliance without supervision or instructions from a responsible person.
- Check that the wiring of your electrical installation is compatible with that of the appliance. It is recommended that you connect the appliance to an installation featuring a residual differential current device having a triggering current of not more than 30mA .
- These appliances are not designed to be operated using an external timer or by a separate remote control system.
- Place the appliance on a flat surface.
- Never place the appliance on a hot surface or close to a flame.
- Do not leave the appliance connected without using it
- Do not move the appliance when it is operating.
- Do not operate the appliance in a confined space
- Never cover the appliance when it is operating in order to let the heat and steam come out freely from the appliance. Otherwise, the appliance may catch fire by coming in contract with combustible material.
- Never obstruct the air vents.
- Never place the appliance on top of another appliance.
- Before connecting the appliance, always check that the trough is properly in place; place all the ingredients in the trough and close the appliance.
- Never use metal accessories in the trough as there is a risk of damaging the non-stick coating.
- Never touch the bread trough or blades when the appliance is operating.
-
Refer properly to the compatible recipes in function of the size of bread and never exceed the quantities indicated for these sizes. Dough overflowing from the trough onto the heating element may catch fire.
-
Never force or tap on the edges of the trough to remove it as this can damage it.
- Do not touch the window during and just after the operation of the appliance as its temperature may be high.
- At the end of the programme, always use oven mitts to handle the trough or hot parts of the appliance. The appliance becomes very hot during use.
- Always be careful of hot spatters and steam jets when the cover is opened.
- For your safety, it is recommended never to use or leave your appliance in an area exposed to bad weather and humidity.
- Never use the appliance for back-up heating, and more generally do not use the appliance for any other purpose than its primary function.
- If your appliance is damaged do not use it and contact the LAGRANGE ASS.
- For your safety, use only LAGRANGE accessories and spare parts adapted to the appliance.
PRACTICAL ADVICE
For yoghurt and "fromage blanc"programmes, never place the appliance on a vibrating surface (such as the top of a refrigerator) or exposed to air currents. Keep the appliance stationary during the process, do not move it during the operating cycle at the risk of jeopardizing the success of dairy products.
THE INGREDIENTS AND PREPARATION TIME FOR "BREAD" TYPE PROGRAMMES
Flour
Preferably use bread making or bakery flour as it contains more gluten than standard flour and will thus provide more elasticity, softness and volume to your bread. The use of T55 flour is recommended.
The use of heavier flour (wholemeal, rye) will result in a smaller, less risen bread. For thicker bread, you can mix wholemeal flour with white flour.
Flour that is too fine can make the bread rise too much. In this case, it is recommended to reduce the quantity of yeast used.
Caution: Each flour brand has its own characteristics. It may be necessary to adapt the recipe according to the flour used.
Liquids (water, milk)
Water is important as its rehydrates and activates the yeast. It is the flour mixed with water that forms the gluten, required for the rising of bread. Water must be used at a temperature of between 20 and 25^ , but for the ultra-fast programme, it is recommended to use water at 45 - 50^ to facilitate the quick rising of the bread.
For a recipe containing eggs, it is preferable to put them in before the water.
Water can be replaced, fully or partially by fresh milk (or milk powder diluted in water) in order to obtain beautiful gilding and a lovely appearance of the fresh breadcrumbs and thereby increase the flavour of the bread. Certain recipes require the use of fruit juices (apple, lemon, orange) that also increase the flavour of the bread.
Fats (oil, butter)
The use of fats enables to obtain softer bread. For an optimal result, do not use hot butter and avoid the fats coming into direct contact with the yeast as this will slow down the rising. It is recommended to cut the butter into small pieces for a homogenous distribution in the preparation.
Eggs
Eggs enable to obtain bread that is richer and make the crust more golden. If you are using eggs in a recipe where they are not planned, reduce the quantity of water as a result.
Sugar
Sugar is an important ingredient as it increases the flavour of the bread and makes the crust more golden. It also enables to preserve the bread for longer as it absorbs a part of the humidity. Prefer white sugar or powdered brown sugar. Caution, the use of diced sugar can damage the non-stick coating of your trough.
Salt
Salt enables to obtain well risen and golden bread. It increases the flavour of the bread and regulates the activity of yeast. Never put too much salt as this will prevent the bread from rising. Never put the salt in direct contact with the yeast.
Yeast
Yeast enables the bread to rise. This also enables a release of gas that forms bubbles and thus lightens the texture of the bread, making it easier to digest. Prefer active dried baker's yeast in packets, which comes in the form of small grains.
If you are using fresh yeast, take into account the following equivalence relation: 25g of fresh yeast = 7g of dried yeast.
It is essential to dilute fresh yeast in approximately 2 tablespoons of warm water.
Be careful to always check the use-by date indicated on the yeast packaging.
Fresh yeast must be used, once opened, within 48h and must never be used with a deferred start-up of your appliance.
Order of ingredients
CAUTION, for executing "bread" type programmes, the order of ingredients is essential for your preparation to succeed. (Cf. "Preparing the dish" paragraph page 56)
Guide of cycles per programme
| 1.Basic bread | 2.French bread | 3.Whole-wheat bread | 4.Sweet bread | 5.Ultra-fast bread | 6.Gâteau |
| Weight | 700g | 900g | 700g | 900g | 700g | 900g | 700g | 900g | 700g | 900g | |
| Time | 02:53 | 03:00 | 03:40 | 03:50 | 03:32 | 03:40 | 02:50 | 02:55 | 0:58 | 01:15 | 01:15 |
| Kneading 1 | 9 min | 10 min | 16 min | 18 min | 9 min | 10 min | 10 min | 10 min | 12 min | 16 min | 10 min |
| Rising 1 | 20 min | 20 min | 40 min | 40 min | 25 min | 25 min | 5 min | 5 min | - | - | - |
| Kneading 2 | 5 min | 5 min | 5 min | 2 min | 5 min▼ | 5 min▼ | 5 min | 5 min |
| 4 min▼ | 5 min▼ | 12 min▼ | 15 min▼ | 8 min | 10 min | 5 min▼ | 5 min▼ |
| 5 min | 5 min | 5 min | 5 min | 5 min | 5 min | 10 min | 10 min |
| Rising 2 | 25 min | 25 min | 30 min | 30 min | 35 min | 35 min | 30 min | 30 min |
| Rising 3 | 45 min | 45 min | 50 min | 50 min | 70 min | 70 min | 50 min | 50 min | 11 min | 19 min | |
| Baking | 60 min | 65 min | 65 min | 70 min | 55 min | 60 min | 55 min | 60 min | 35 min | 40 min | 65 min |
| Warming | 60 min | 60 min | 60 min | 60 min | 60 min | 60 min | 60 min | 60 min | 60 min | 60 min | 60 min |
| 7.Cake | 8.Pastry | 9.Pizza dough | 10.Kneading | 11.Jam | 12.Baking only |
| 01:58 | 01:30 | 01:00 | 00:15 | 01:20 | 01:00 |
| Kneading 1 | 7 min | 20 min | 20 min | 15 min | - | - |
| Rising 1 | 5 min | - | - | - | 15 min |
| Kneading 2 | 8 min | - | - | - |
| Rising 2 | 28 min | 30 min | 40 min | - |
| Rising 3 | - | 40 min | - | 45 min |
| Baking | 70 min | - | - | 20 min | 60 min |
| Warming | 60 min | - | - | 60 min | - |
- Never put Thai rice for soaking (only rinse it), as it will then cook very poorly, unlike basmati rice, which can be soaked for up to 30 minutes before cooking.
- These proportions are given for "tender" cooking. For firmer cooking, it is recommended to slightly reduce the proportion of water, or to add
rice or additional cereals (1/2 rice measure, for example).
- Warming can slightly dry up the cooked rice or the cereals. Ideally, limit its duration to less than 30min .
- The table above is approximate. It is possible that the rice or the cereal that you will use has a slightly different time. It is recommended for each one to adjust the proportions in function of their culinary tastes.
THE INGREDIENTS AND PREPARATION TIME FOR JAM TYPE PROGRAMMES
Jam is very simple to prepare provided a subtle balance between the sugar intake, the pectin content and the acidity of fruits comprising it is respected.
Fruits
- The choice of fruits is very important in the quality of the jam obtained
- Too ripe, the fruit does not contain sufficient pectin, a natural gelling agent that it contains in more or less quantity.
- If, on the other hand, it is too unripe, it contains the pectin required for good gelling, but lacks taste.
-
Frozen products or those that have been thawed must not be used. It is therefore strongly recommended to use season fruits:
-
Spring: Kiwi, Citrus fruits, Rhubarb, Strawberries
- Summer: Cherries, Raspberries, Blueberries, Blackcurrants,
- Redcurrants, Mulberries, Mirabelles, Plums, Apricots, Peaches, Figs
- Autumn: Quinces, Pumpkin, Apples, Pears, Citrus fruits
- Winter: Kiwi, Apples, Citrus fruits, Pineapples
Sugar and gelling agent
- It is the sugar that enables the jam to be preserved. Lack of sugar can cause fermentation and mould. If you want jams very rich in fruits, you must nevertheless not descend below a certain proportion of sugar. If the fruits are properly ripe and sweet, you can reduce the quantity of sugar at the most to 600g for 1 kg of fruits.
- Jams can be prepared with a wide variety of sugars: White granulated sugar, brown sugar, etc. but we mainly use granulated sugar (for fruits containing sufficient pectin) or jam sugar, added with pectin and citric acid.
- Pectin is a natural gelling agent that enables the jam to "set" and gives its jelly consistency. It is present in large quantities in seeds and zests. Thus, pectin is naturally contained in: Citrus fruits, reductrants, mulberries, apples, plums, quinces, etc.
- For fruits not containing pectin (cherries, strawberries, peaches, pears, etc.), we use "special jam sugar" that contains it. We can also use apple pectin powder or infuse apple seeds wrapped in muslin. More simply, you can add an apple to the preparation.
- The acidity acts also, along with the heat, by transforming the sugar from fruits into glucose. It contributes significantly to this equilibrium specific to the jam: If the fruits are not very sour (quince, kiwi, peach, pear), lemon juice (or recurrant) must be added before cooking, otherwise crystals will form at the surface and in the body of the jam, which will become too sweet.
Assistance in Proportions and choice of ingredients
| Fruits | Sugar | Other addition |
| Strawberries, raspberries, rhubarb | Granulated sugar with gelling agent
(or replace the gelling agent with an apple) | |
| Citrus fruits, redlcurrents, apples,
blackcurrants | Granulated sugar | |
| Apricots, peaches, pears, figs, kiwis | Granulated sugar with gelling agent
(or replace the gelling agent with an apple) | Lemon juice |
| Cherries, quinces, redlcurrents,
plums, mirabelles | Granulated sugar | Lemon juice |
THE INGREDIENTS AND PREPARATION TIME FOR RICE TYPE PROGRAMMES
Rice
There are many varieties of rice: Thai, basmati, short grain, wild, wholemeal, etc. This will enable you to prepare several recipes.
Remember to properly rinse the rice before cooking it (approximately three rinsings) to remove impurities and starch from it and thus prevent it from sticking. The last rinsing water must be clear.
Water
The quantity of water necessary is different depending on the type of rice that you use. The water absorption capacity is different for each kind of rice. For example, wholemeal rice requires a little more water than white rice. The measurement on the trough is indicated for Thai or Basmati type white rice.
The rice is cooked when all the water is absorbed and small holes form on the surface, between the grains.
Assistance in Proportions and choice of ingredients
- Never put Thai rice for soaking (only rinse it), as it will then cook very poorly, unlike basmati rice, which can be soaked for up to 30 minutes before cooking.
- These proportions are given for "tender" cooking. For firmer cooking, it is recommended to slightly reduce the proportion of water, or to add rice or additional cereals (1/2 rice measure, for example).
- Warming can slightly dry up the cooked rice or the cereals. Ideally, limit its duration to less than 30 min.
- The table above is approximate. It is possible that the rice or the cereal that you will use has a slightly different time. It is recommended for each one to adjust the proportions in function of their culinary tastes.
| For 4 persons (complement) | Rice | Water | Time |
| Basmati white rice | 2 rice measures | Level 2 of the trough | Approximately 20:30 min |
| Thai white rice | 2 rice measures | Level 2 of the trough | Approximately 20:30 min |
| Short-grain white rice (glutinous rice) | 2 rice measures | Level 2 of the trough | Approximately 20:30 min |
| Wholemeal rice | 2 rice measures | Level 2 of the trough + 1/2 rice measure | Approximately 45 min |
| For 4 persons (complement) | Cereals | Water | Time |
| Couscous | 2 1/2 rice measures + 1 tablespoon of olive oil | Level 2 of the trough | Approximately 8-10 min (do not warm) |
| Bulgar wheat | 2 rice measures | Level 2 of the trough | Approximately 35 min |
| Precooked wheat | 2 1/2 rice measures | Level 2 of the trough | Approximately 15 min |
| Quinoa | 2 1/2 rice measures | Level 2 of the trough | Approximately 35 min |
THE INGREDIENTS AND PREPARATION TIME FOR YOGHURT TYPE PROGRAMMES
Milk
- Preferably select whole milk or semi-skimmed ultra-high temperature milk (these types of milk do not require boiling)
- Untreated or pasteurised milk (homogenised, 2% or skimmed) must be boiled (it will be dangerous to use untreated milk without boiling it beforehand) then cooled and strained to remove skins.
- Whole milk enables to obtain a thicker result and increases the flavour of the yoghurt.
- Prefer whole milk as it enables to obtain a denser result and increases
- For yoghurts with firmer consistency, add approximately 5 teaspoons of milk powder.
- Allow 8 hours for the preparation of whole milk yoghurt, 10 hours for semi-skimmed milk and 12 hours for skimmed milk yoghurt.
Ferment
You can use several types of ferments:
Natural commercial yoghurt
- Yoghurt from a previous preparation (note: Do not use more than 10 times yoghurt from your preparation as this will lower the result)
- Dry freeze-dried ferment (in this case, allow for 2 more hours for your preparation)
Assistance in Proportions and choice of ingredients
| Milk | Ferment | Incubation time |
| 1 litre of whole milk | 1 commercial yoghurt
or 1 yoghurt from the previous batch
or 1 packet of freeze-driedferment | 8 to 10 hours |
| 1 litre of semi-skimmed milk | 1 commercial yoghurt
or 1 yoghurt from the previous batch
or 1 packet of freeze-driedferment | 10 to 12 hours |
| 1 litre of skimmed milk | 1 commercial yoghurt
or 1 yoghurt from the previous batch
or 1 packet of freeze-driedferment | 12 to 14 hours |
INGREDIENTS AND PREPARATION TIME FOR "FROMAGE BLANC" TYPE PROGRAMMES
Milk
- Preferably select whole milk or semi-skimmed ultra-high temperature milk or fresh milk (these types of milk do not require boiling)
- Untreated milk must be boiled (it will be dangerous to use untreated milk without boiling it beforehand) then cooled to remove the skins the flavour of the "fromage blanc"
- The quality of milk selected is the main factor that determines the quality of the "fromage blanc" prepared
Ferment
You can use several types of ferments:
- Commercial "fromage blanc", ideally curd cheese (in the case of single cheese drainer, you can add whey)
- "fromage blanc" from a previous preparation (note: Do not use more than 5 times "fromage blanc" from your preparation as this will lower the result)
- Whey from a previous preparation
Rennet
You can find rennet in the form of a pharmaceutical dropper.
Assistance in Proportions and choice of ingredients
| Milk | Ferment | Rennet | Time |
| First use ("fromage blanc" or commercial petit-suisse) |
| Fresh milk | 1 litre | 1 tablespoon or 1/2 cheese drainer or 1 petit-suisse | 3 drops | 10 hours |
| UHT Whole milk | 1 litre | 1 tablespoon or 1/2 cheese drainer or 1 petit-suisse | 6 drops | 12 hours |
| UHT semi-skimmed milk | 1 litre | 1 tablespoon or 1/2 cheese drainer or 1 petit-suisse | 3 drops | 14 hours |
| Untreated milk | 1 litre | 1 tablespoon or 1/2 cheese drainer or 1 petit-suisse | 6 drops | 12 hours |
| Regeneration ("fromage blanc" or whey from the previous round) maximum 5 times |
| Fresh milk | 1 litre | 2 tablespoons or 1 cheese drainer or 1 glass of whey | 3 drops | 8 hours |
| UHT Whole milk | 1 litre | 2 tablespoons or 1 cheese drainer or 1 glass of whey | 6 drops |
| UHT semi-skimmed milk | 1 litre | 2 tablespoons or 1 cheese drainer or 1 glass of whey | 6 drops |
| Untreated milk | 1 litre | 2 tablespoons or 1 cheese drainer or 1 glass of whey | 6 drops | 10 hours |
Note: To use farm milk, boil it beforehand to avoid any contamination of the milk. To do this, raise its temperature until it boils, and do this for a maximum of one minute, then let it cool to ambient temperature.
COMMISSIONING AND USE
1st use
- While unpacking your appliance, make sure that you remove all wedging elements.
- Make sure that all parts and accessories are present and without defect.
- Before using your appliance, clean all the parts properly (see "maintenance" paragraph).
- Select the "Baking only" programme (refer to the "selecting the baking programme" paragraph) and let the programme run empty for approximately 10 minutes.
- Let the appliance cool for approximately 20 minutes then remove the bread trough.
Clean it once again.
Operating environment
The appliance is designed to operate optimally within a temperature range. We recommend that you maintain the room temperature between 15 and 34^ . A temperature that is too cold will be detrimental to a good rising of dough. A temperature that is too high will be detrimental to the taste of the bread.
Before every operation, check properly that the appliance is dis connected. When powering on the appliance, a beep will be heard, and a display reading "0:00" will flash on the blue illuminated screen. This means that the appliance is awaiting instructions.
Using the control panel
1. Choice of the trough

Pressing the trough selection button once enables to use a programme requiring kneading or shaking, i.e. the small trough with the kneading blade. This deals with programmes of the menu (from 1 to 12) visible under the
screen, i.e. "bread type" programmes (basic bread, French bread, whole-wheat bread, sweet bread, ultra-fast bread, gâteau, cake, pastry, pizza dough, kneading, jam, or baking only).
When pressed once, the red LED situated under the bread/cake marking lights up. By default, the programme displayed is the first from the list, i.e. "basic bread" with its different characteristics.
Pressing the button a second time enables to switch to rice cooking, fast rice cooking, yoghurt making and "fromage blanc" making programmes that require the large rice trough. They are situated to the left and to the right of the screen, and the choice will be made by successively pressing the button to switch from one to the other.
An arrow symbol “ ” or “ ” points to the selected programme.
When pressed a second time, the green LED situated under the yoghurt/rice marking lights up. By default, the programme selected is that of rice cooking. The duration of the programme is directly displayed on the screen (40 minutes in this case).
Note: The "choice of trough" button is inactive when the appliance is executing a programme and it remains so during its entire duration.
2. Selecting the cooking programme

Once the trough is selected, a programme must be selected. To do this, use the programme selection button. Every time the button is pressed, a new programme is displayed on the LCD screen and an audible signal sounds.
Note: To start a programme, press the "start/stop" button once. When you hear an audible signal and the ": character flashes, this means that the programme has started. However, as soon as the programme starts, you can no longer modify it. The only buttons that you can use during the bread making process are the "pause" and "start/stop" buttons. To stop the programme, keep the "start/stop" button pressed for approximately 2 seconds. The audible signal indicates that the programme is correctly stopped.
The following are the 12 programmes accessible when the bread rough has been selected:
- Basic bread: Kneading, rising and traditional baking of bread. Is also suitable for white or brown bread, adorned according to your wish, with spices, herbs or other ingredients.
2.French bread: Kneading, rising and baking with a greater rising time. Baking of a sandwich bread, dimpled and light with a crispy crust.
-
Whole-wheat bread: Kneading, rising and baking of bread with wholemeal flour. This programme requires a longer preheating time, and the bread obtained is softer and tenderer. For better results, it is not recommended to use a deferred start with this programme.
-
Sweet bread: Kneading, rising and baking of sweet bread. To prepare recipes with more fats and sugar (such as buns for example). The bread obtained is soft with a crispy crust.
- Ultra-fast: Kneading, rising and baking of a bread of 700g in a shorter time. The bread obtained is generally smaller and the crumbs more packed together. The water used in the ingredients will have to be of a temperature of approximately 48 - 50^ . Use a cooking thermometer to measure the temperature.
- Gâteau: Kneading and baking of a gâteau without yeast.
7.Cake: Kneading, rising and baking of a cake with yeast.
- Pastry: Kneading, rising but without baking to prepare yeast based pastries. This programme is suitable for preparations requiring work of the dough before baking such as flat loaf, for example. You can then use a traditional oven for the baking.
9.Pizza dough: Kneading, rising of pizza dough without baking. The rising time for the pizza dough is shorter than that for the bread dough. You can then shape your dough and use a traditional oven for baking.
10.Kneading: Only kneading of any dough, without rising or baking. This programme is particularly recommended for making short crust pastry or short bread before being spread for making a tart or a quiche, for example.
11.Jam: Simmered jams and marmalades. The fruits must be cut beforehand into small pieces or chopped in a mixer before incorporating them into the bread trough.
- Baking only: No kneading, no rising, only baking. This programme
enables particularly to make an already baked and cooled bread crispier. You can adjust the baking time and the temperature just as you please.
The following are the 4 programmes accessible when the large trough has been selected:
Rice cooking: Cook rice without supervision in 40 minutes
Fast rice cooking: Cook rice without supervision in 30 minutes
Yoghurts: Prepare up to 8 yoghurts from one litre of milk and a ferment.
"fromage blanc": Obtain "fromage blanc" from 1 litre of milk, a few drops of rennet and a ferment.
3. Size of the bread

When you select a basic, French, whole-wheat, sweet or ultra-fast type bread programme, you have the option of selecting between 2 bread sizes, i.e. 700 and 900g . By default, the appliance is set to 900g . Press the weight
selection button until the arrow is facing the desired weight.
Note: The preparation time of the bread depends on the weight.
4. Gilding/Temperature

When you select a bread programme (basic, French, whole-wheat, sweet, ultra-fast, gâteau, cake or baking only), you can select the baking temperature that will provide a more or less marked gilding to your preparation.
An arrow symbol "▲" enables you to position on one of the 3 different levels of gilding, i.e. light, medium, dark. By default, the medium position is activated.
5. Deferred
HEURE
DIFFERE
MINUTE
If you wish to start the programme later (such as, for example to get your morning bread still hot), you can use this function to defer the starting time. This function cannot be accessed for the following programmes: ultra fast, gâteau, cake, kneading, jam, yoghurt and cheese. The maximum time adding up to the deferred time and the programme duration is 12h.
Note : For yoghurt and "fromage blanc" programmes, the delay does not work. However, the delay adjustment buttons enable to modify the preparation time which is initialised to 8 h. We can thus select (depending on the type of milk) a preparation time ranging from 1 to 15h.
Once your programme is selected, press "DEFERRED". A beep is heard and the LCD screen then lights up and flashes the final time before the end of the programme. The execution time is included. Thus, programme the total time from the moment of programming until the desired time at the end of preparation. (E.g.: If it is 20h30 and you want that your bread must be ready at 7h the next morning, programme an additional 10h30 to the selected programme)
Then, use the "HOUR" and "MINUTE" buttons to adjust the desired time, then press once again on "DEFERRED" to confirm the time entered, the flashing then stops. To start the countdown of the delay, press the "start/stop" button. At the end of the time lag, the programme will automatically start. When entering the time, if you exceed the maximum possible time (by 12h), the screen once again displays the initial duration of the selected programme. Caution, the time lag displayed represents the duration until the end of the programme and not that of the start of the programme. When your time is programmed, press the "start/stop" button. : " flashes to indicate that the programme has been launched properly and will start after the selected time lag.
CAUTION: When using this function, do not use rapidly perishable ingredients (eggs, fresh milk, fresh yeast, fresh fruits, onions, etc.).
6. Start/stop

This button is used to start and stop the selected programme. Once the programme parameters have been selected, simply press this button for the programme to
start with or without a deferred start. A short beep is heard, the screen flashes once and displays the time remaining (except for yoghurt and "fromage blanc" programmes where the time already elapsed is displayed) and the machine starts its programme. From this moment onwards, all the other buttons apart from this one become inactive. When the appliance executes a bread programme and the appliance is mixing or kneading, the symbol is displayed on the screen.
When rising or baking, the _i=1^n f_i symbol is displayed on the screen.
When the appliance switches to "warming" mode, the corresponding red LED will come on at the top left of the control panel, and the symbol will be displayed on the screen.
When the appliance is executing a rice cooking programme, the appliance will display the symbol during the cooking stage and until the end of this stage. The device will then enter the warming stage; this same symbol will be displayed always on the screen and the red "warming" LED will come on. To stop the programme, press the Start/Stop button for approximately 2 seconds until a beep is heard. This confirms that the appliance has returned to the initial point. The screen then once again displays the default programme, i.e. either "basic bread" if the bread trough is installed, or the "rice cooking" programme if the rice trough is installed.
7. Warming/Reheating

Once a programme has ended, the appliance will automatically launch the "warming" function except for the "pastry, pizza dough, kneading, jam, "fromage blanc" and yog
hurt"programmes.
By default, this warming will be carried out for 1 hour.
Pressing the "Warming/reheating" button after selecting the desired programme activates the "warming" programme. The red LED is illuminated and a beep is heard. The screen displays "0:00". If you wish to cut-off this warming cycle and remove the bread from the trough, press the "start/stop" button for 2 seconds.
CAUTION: Always disconnect the appliance before handling the bread trough.
You can press the "Warming/reheating" button to heat cold rice in the same manner. Once the rice is correctly heated, the programme will automatically stop and a long beep will indicate the end of reheating.
Note 1 :
- The red LED is illuminated during the warming
- The green LED is illuminated during the reheating.
Note 2 :
- Pressing the "warming/reheating" button in a bread programme triggers the warming programme
- Pressing the "warming/reheating" button in a rice programme triggers the reheating programme
PREPARING BREAD-BUN-GATEAU
Preparing the appliance
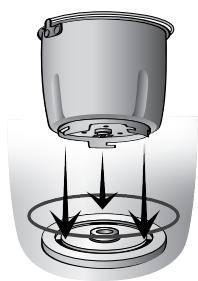
- Place the bread trough inside the appliance so that it is correctly set.
-1-

-2-
- Place the blade at the bottom of the trough, on the part provided for this purpose.
Practical advice: You can fill the hole with margarine before placing the blade at the bottom of the trough. This will prevent the dough from sticking to the blade and thus make it easier to remove the blade at the end of baking.
Preparing the dish
- Place the ingredients in the trough by following the order below:
- Liquid or humid ingredients (including water, oil or butter, eggs)
- Sugar, salt and flour
- Yeast

Yeast
Sugar, salt and flour
Liquid or humid ingredients
- Make a small hole with your finger in the flour and place the yeast in it by making sure that it does not come in contact with liquids or salt.
- Respect the quantities indicated in the recipes, and do not exceed the maximum quantities indicated.
Executing a programme
- Close the cover and connect the appliance to the mains. If the trough is incorrectly positioned, the LCD screen will display the following symbol: , which will flash when the "Start/stop" button is pressed. You must then properly set the trough to be able to launch the programme.
- Select the suitable trough, i.e. the bread trough.
- Select the programme for the bread that you wish to prepare by successively pressing the programme selection button.
- Select the gilding from among the 3 possible choices by successively pressing the gilding/temperature selection button. By default, the temperature arrow is on the "medium" position. This button is inactive for the "jam, kneading, pastry, pizza dough" programmes.
- Select the size of the bread (700 or 900g) that you want using the weight selection button. By default, the arrow is on the "900g" position. This button is inactive for the "gâteau, cake, pastry, pizza dough, kneading, jam, baking" programmes.
- Programme the duration according to the time when you want your bread to be ready (optional). (Cf. "Deferred" paragraph page 54).
-
Press the "start/stop" button to launch the programme. The : symbol starts flashing.
-
For the "basic bread, whole-wheat bread, French bread, quick, and sweet bread" programmes, an audible signal will sound 10 times during the process (Cf. "Guide of cycle per programme" table page 46). This allows you to add ingredients, according to your taste. You can then open the cover of the appliance to add ingredients (dry fruits, chocolate chips, seeds, walnuts, etc.).
- CAUTION: Steam may escape when the cover is opened.
- Once the programme is complete, an audible signal will sound 10 times. You can then press the "start/stop" button to stop the programme.
If you are not in the room or if you do not press the start/stop button, the warming cycle will automatically start for 60 minutes.
Retrieving the dish
- To remove the bread from the trough, open the cover and always use oven mitts. Rotate the trough counter clockwise to unlock the trough and remove it from the appliance.
- CAUTION: Be careful when handling the trough and the bread as they can both be very hot.
- Before removing the bread from its trough, wait for it to cool down.
- Once the trough has cooled down, use a spatula (of wood, plastic or silicon) to turn the bread out of the mould.
- Place the bread trough upside down on a clean surface and shake or gently tap the trough until the bread drops on the surface.
- Let the bread cool down for approximately 15-30 minutes.
- Before cutting your bread or your gâteau, use the hook to remove the blade. Never remove it with bare hands as it may be hot.
- It is recommended to slice the bread with an electric knife or a bread knife. A kitchen knife (without teeth) will cause the bread to deform when slicing it.
Note: The bread can be stored for 3 days at ambient temperature in a plastic bag or airtight box, or 10 days if you keep the bag or the box in the refrigerator. The bread that you prepare yourself does not contain any preservative, that is why its storage life is shorter than bread sold in shops.
PREPARING JAM.
Preparation
- Place the bread trough in the appliance, along with the kneading blade.
- Peel and cut the fruits into pieces.
- Wash the fruits if they don't need to be peeled beforehand.
- Place the fruits in the bread trough.
- Add sugar.
- Add the gelling agent (an apple or dehydrated pectin) for fruits with low pectin content (strawberries, pears, peaches, etc.) or use "special jam" sugar with gelling agent
- Add half a glass of water (to help the sugar melt)
- Add lemon juice (for fruits that are not sufficiently sour)
Executing the programme
- Close the cover and connect the appliance to the mains. If the trough is incorrectly positioned, the LCD screen will display the following symbol: 空 , which will flash when the "Start/stop" button is pressed. You must then properly set the trough to be able to launch the programme.
- Select the suitable trough, i.e. the bread trough.
- Select the programme "11: jam" by successively pressing the programme selection button.
- Press the "start/stop" button to launch the programme. The : symbol starts flashing.
- Once the programme is complete, an audible signal will sound 10 times. You can then press the "start/stop" button to stop the programme.
- Open the cover and test the consistency by taking a tablespoon sample of the mixture. Be careful not to burn yourself on the edges of
the trough or with the jam that is still hot.
- Pour out a little jam on a cold dish: If the jam is properly cooked, it gently slides in the dish and congeals rapidly.
- If the jam is too liquid, it is often because the cooking was insufficient. Simply extend the cooking by restarting a cycle.
Retrieving the dish
- At the end of cooking, use the ladle to pour out the jam into clean jars sterilised with boiling water. Close the covers immediately and place the jars upside down. Let them cool in this position.
- To remove the trough, open the cover and always use oven mitts. Rotate the trough counter clockwise to unlock the trough and remove it from the appliance.
- CAUTION: Be careful when handling the trough as it can be very hot.
PREPARING RICE
Preparation
Measure out your rice using the rice measure provided.
- For information, one rice measure is sufficient for two persons, but this varies depending on the type of dish envisaged and the appetite of persons.
- Fill your measure to the brim.
- Start by washing the rice with cold water and drain it. Do not wash in the trough as there is a risk of damaging it.
- If you fail to wash it, your cooking will be mediocre and/or there will be condensation in the appliance.
- Place the clean rice in the rice trough and level the surface. Fill water up to the corresponding graduation, inscribed on the trough. N.B. The number marked on the trough corresponds to the number of rice measures. e.g. to cook 6 rice measures, place the washed rice in the inner trough and fill it with water up to the graduation 6.
Note that the minimum quantity is 2 measures.
- If you want softer rice, add some more water and for firmer rice, reduce the quantity of water.
- Place the large rice trough inside the appliance.
Executing the programme
- Close the cover and connect the appliance to the mains. If the trough is incorrectly positioned, the LCD screen will display the symbol that will flash when the "Start/stop" button is pressed. You must then properly replace the trough to be able to launch the programme.
- Select the suitable trough, i.e. the large rice trough, using the trough selection button.
- Select the "rice cooking" or "quick rice cooking" programme depen
ding on your requirement from among the 4 possible programmes (rice cooking, quick rice cooking, yoghurt, «fromage blanc" ) by successively pressing the programme selection button
- Programme the duration according to the time when you want your rice to be ready (optional). (Cf. "Deferred" paragraph page 54)
- Caution: Do not try to lift the plug during cooking. You risk burning yourself with the steam.
- Press the "start/stop" button to launch the programme. The symbol starts flashing.
- The cooking stops automatically when the liquid is absorbed.
Retrieving the dish
- Once the programme is complete, an audible signal will sound 10 times. The "Warming" function will be automatically activated and will be maintained for one hour (Cf. "Warming/Reheating" paragraph page 55)
- You can then press the "start/stop" button to stop the programme.
- Then disconnect the appliance and let it cool.
- CAUTION: Condensation may form on the window of the appliance. When opening the cover, take care not to let the accumulated water drip into the rice.
- Remove the rice after cooking. It is ready to eat. Remove it from the trough using the rice spoon provided, which will also help aerate the rice.
- You can reheat the rice if it has cooled down by once again pressing the "Warming/reheating" button (Cf. "Warming/Reheating" paragraph page 55).
PREPARING YOGHURTS
Preparation
- Carefully clean the large trough and the glass jars and sterilise the trough with boiling water before wiping it with a clean cloth.
- All ingredients can be purchased from a superstore (or from a chemist's shop for the powdered ferment). Use them at ambient temperature. Higher the ambient temperature, more the time to be provided for.
- Mix 1 litre of milk with the selected ferment (Cf. the practical advice part page 49). If you use yoghurt, for an optimum result, whisk only the yoghurt. Add a little milk and whisk once again until a consistent and smooth mixture is obtained. Then add the rest of the milk while continuing to whisk. Distribute the mixture in the glass jars.
- Place the large trough inside the appliance.
- Place the jars, without their covers, in the large trough of the machine. You can place them on 2 levels thanks to the separator grate provided.
Executing the programme
- Close the cover and connect the appliance to the mains. If the trough is incorrectly positioned, the LCD screen will display the symbol that will flash when the "Start/stop" button is pressed. You must then properly replace the trough to be able to launch the programme.
- Select the suitable trough, i.e. the large rice trough, using the trough selection button.
- Select the "yoghurt" programme from among the possible 4 (yoghurt, "fromage blanc", rice cooking, quick rice cooking) that you can execute by successively pressing the programme selection button.
- Programme the preparation time according to the ingredients. (Cf. "Assistance in proportions and choice of ingredients" paragraph page 49)
- For yoghurt and "fromage blanc" programmes, the delay does not
work. However, the delay adjustment buttons enable to modify the preparation time which is initialised to 8 h. We can thus select (depending on the type of milk) a preparation time ranging from 1 to 15h. Press "Defferred" and "hour" to select the time of preparation and press "Deffered" again to confirm.
- Press the "start/stop" button to launch the programme. The : symbol starts flashing.
Retrieving the yoghurt
- Once the programme is complete, an audible signal will sound 10 times. You can then press the "start/stop" button to stop the programme.
- Then disconnect the appliance and let the appliance cool then remove the glass jars.
- CAUTION: Condensation may form on the window of the appliance. When opening the cover, take care not to let the accumulated water drip into the yoghurt.
- Screw on the covers on the glass jars and place them in the refrigerator at least 24h before savouring them.
- Preserve the yoghurts in the refrigerator.
- Do not preserve them for more than 8 to 10 days.
PREPARING FROMAGE BLANC
Preparation
- Carefully wash the large trough, the jar and the cheese drainer and sterilise them with boiling water before wiping them with a clean cloth dipped beforehand in boiling water.
- All ingredients can be purchased in superstores or at the chemist's shop. Use them at ambient temperature. Higher the ambient temperature, more the time to be provided for.
- Whisk the ferment before mixing it with other ingredients (Cf. the practical advice part page 50).
- In a small container of the size of a bowl approximately, mix the selected ferment with a little milk.
- Whisk the mixture until a consistent and smooth mixture is obtained. Add the rest of the milk (1l) and whisk again.
- Add rennet and gently stir.
- Place the large trough inside the appliance.
- Place the large jar and its "fromage blanc" drainer in the large trough of the machine. Place the "fromage blanc" drainer in the jar.
- The stops of the cheese drainer must be situated at the bottom, in the wave trough. Place the assembly in the trough of the appliance. Pour out the mixture in the "fromage blanc" jar.
Executing the programme
- Close the cover and connect the appliance to the mains. If the trough is incorrectly positioned, the LCD screen will display the symbol that will flash when the "Start/stop" button is pressed. You must then properly replace the trough to be able to launch the programme.
- Select the suitable trough, i.e. the large rice trough, using the trough selection button.
- Select the "fromage blanc" programme from among the possible 4 (yoghurt, "fromage blanc", rice cooking, quick rice cooking) that you
wish to execute by successively pressing the programme selection button.
- Programme the preparation time according to the ingredients. (Cf. "Assistance in proportions and choice of ingredients" paragraph page 50)
- For yoghurt and "fromage blanc" programmes, the delay does not work. However, the delay adjustment buttons enable to modify the preparation time which is initialised to 8 h. We can thus select (depending on the type of milk) a preparation time ranging from 1 to 15h.
Press "Deferred" and "hour" to select the time of preparation and press "Deferred" again to confirm.
- Press the "start/stop" button to launch the programme. The : symbol starts flashing.
Retrieving "fromage blanc"
- Once the programme is complete, an audible signal will sound 10 times. You can then press the "start/stop" button to stop the programme.
- Then disconnect the appliance and let it cool.
- CAUTION: Condensation may form on the window of the appliance. When opening the cover, take care not to let the accumulated water drip into the "fromage blanc".
- Carefully remove the "fromage blanc" jar from the trough.
- You can then start the draining by raising and rotating at the same time the cheese drainer in its jar until the small stops are engaged.
The wave shape will make the task easier for you.
- You can throw away a part of the accumulated whey.
- Continue the draining while putting the cheese drainer in high draining position in the refrigerator.
-
The whey will then be stored in the jar under the "fromage blanc". Depending on your taste, stop the draining when you want: Quickly for creamy and liquid "fromage blanc", later for more consistent "fromage blanc".
-
If you have left your "fromage blanc" drain for too long, you can add whey and whisk it to make it more liquid. You can also let the bottom of the cheese drainer soak in whey so that the "fromage blanc" does not "dry up" any more. On the other hand, do not hesitate to eliminate the whey as you go along if you do not wish to preserve it.
-
Store the "fromage blanc" in a cool place, in a refrigerator.
- Do not store it for more than a few days in the refrigerator.
TROUBLESHOOTING GUIDE
Appliance
Power failures:
- If a power failure of at the most 10 minutes occurs, the programme will be stored and will automatically restart when the power returns without you having to press the "start/stop" button.
- If the failure exceeds 10 minutes, the programme cannot be stored. In this case, if the rising cycle has not started, you can restart the programme by pressing the "start/stop" button. However, if the rising cycle is exceeded, you must remove all the ingredients from the trough and restart your preparation.
| No | Problem | Cause | Solution |
| 1 | Smoke emanates from the air vents during operation | Ingredients may have dropped on the heating section of the appliance | Disconnect the appliance and let it cool. Clean the interior of the appliance by taking care not to burn yourself. |
| 2 | The ingredients have not been mixed consistently. | A/ The selected programme is not suitable | Refer to the recipes adapted to the appliance. |
| B/ The cover has been lifted often | Do not lift the cover during the rising cycles |
| C/ The kneading blade does not rotate sufficiently or the density of the dough is too high. | Let the appliance run empty. If the blade is rotating abnormally, contact the ASS. |
| 3 | The motor rotates but the dough is not kneaded | The trough is incorrectly placed or the quantity of dough is too large. | Check the position of the trough and the quantities used. |
| 4 | The screen displays "HHH" after the programme starts. | The trough temperature is too high. | Open the cover and let the machine cool down for 10 to 20 minutes. |
| 5 | The screen displays "E E0" or "E E1" after you have pressed the "start/stop" button | The internal temperature sensor is incorrectly set | Contact the after sales service or a person authorised or qualified by LAGRANGE. |
| 6 | When using a bread type programme, "LLL" flashes on the screen and an alarm is heard | A probe assesses the ambient temperature before launching the programme and "LLL" flashes if the ambient temperature is less than -5°C. N.B. When using the "deferred" function, the check is carried out during the programming and just before the start of the programme. | Simply press the "start/stop" button to interrupt the programme. |
| 7 | When using a bread type programme, "HHH" flashes on the screen and an alarm is heard | A probe assesses the ambient temperature before launching the programme and "HHH" flashes if the ambient temperature is greater than 60°C. N.B. Not valid for Gâteau, jam and only baking programmes. | Simply press the "start/stop" button to interrupt the programme. |
| 8 | The ☑ or ☑ symbols flash and the appliance rings 10 times | When using the "deferred" function, the check is carried out during the programming and just before the start of the programme. 2 solutions: Either the wrong trough is in place, or the trough is incorrectly positioned. The appliance detects it after pressing the "start/stop" button | Simply put the correct trough in place or change the programme by pressing the trough selection button. You must also properly push in the trough so that it is engaged. |
Bread
| No | Problem | Cause | Solution |
| 1 | The bread becomes too thick | A/ Yeast, flour, water or sugar are too much. | Refer to the recipes adapted to the appliance.
Check the consistency of the dough when the audible signal sounds to add the ingredients.
The dough must form an elastic and slightly sticky ball.
If the dough is too compact or dry, add a teaspoon of water. If the dough is too soft or liquid, add one tablespoons of flour. Reduce the quantity of sugar or yeast if the consistency of the dough is good. |
| B/ The ambient temperature is too high | Use the appliance in a cooler place. |
| 2 | The bread is too small or has not risen. | A/ The cover has been lifted during the rising or the baking of the bread | Never lift the cover during rising or baking. Lift it as less as possible during the other phases. |
| B/ The quantity of water is not sufficient or the quantity of flour is too large. | Check the consistency of the dough when the audible signal sounds to add the ingredients.
The dough must form an elastic and slightly sticky ball.
If the dough is too compact or dry, add a teaspoon of water. |
| C/ The quantity of yeast is insufficient or there is no yeast. | Put the quantity of yeast indicated in your recipe and add a little yeast if necessary. |
| D/ You have replaced sugar with a sweetner | Sweeteners are not recommended, you can use honey or molasses instead of sugar. |
| E/ The type of flour used is not suitable | Use lighter flour. |
| F/ The yeast used is not suitable or has come in contact with water before kneading | Use bakers' yeast, ideally in instant dried form (dry yeast in grains) or if this is not available, fresh yeast. Place the yeast last in the trough, on top of the flour. |
| G/ The water temperature is not suitable | The water must be warm (approximately 27°C) except for the Ultra quick programme where it can rise to 45°C. |
| H/ The ingredients are too hot or too cold | All ingredients (except water) must be at ambient temperature. |
| 3 | The centre of the bread sags at the time of baking. | A/ The cover was lifted during the rising or baking of the bread | Never lift the cover during the rising or baking. Lift it as less as possible during the other phases. |
| B/ The quantity of water is too large or the quantity of flour is not sufficient | Verify the consistency of the dough when the audible signal sounds to add ingredients.The dough must form an elastic and slightly sticky ball. If the dough is too soft or liquid, add a tablespoon of flour. |
| C/ There is too much yeast | Slightly reduce the quantity of yeast during the next test |
| D/ The type of flour used is not suitable | Use lighter flour. |
| E/ The temperature of yeast is too high and causes a rising that is too fast | Use the yeast at a temperature of approximately 20-25°C. |
| 4 | The bread is difficult to turn out of the trough. | The kneading blade remains stuck on its shaft in the bread trough as the preparation residues have slipped between the blade and its shaft and then got burned. | Tap on the bottom of the trough to help the blade come off. The next time, brush the shaft of the blade with butter before inserting it. |
| 5 | The density of the bread is too high. | A/ The quantity of flour is too much or water is not sufficient. | Reduce the quantity of flour or add water. |
| B/ The quantity of wholemeal flour or fruits is too much. | Reduce the concerned ingredients and add a little bit of yeast. |
| 6 | The crust of the bread is too thick. | Too much water was removed (bread dried up underneath) by warming for too long in the appliance. | Remove the bread from the appliance before the warming starts. |
| 7 | After having cut the bread, it has several holes. | A/ The quantities of water or yeast are too large. | Reduce the quantities of water and/or yeast. |
| B/ The water temperature is too high. | The water must be warm (approximately 27°C) except for the Ultra quick programme where it can rise to 45°C. |
| 8 | The crust is too thick and the gilding is too dark during a bread or gâteau programme with a lot of sugar. | Certain recipes or ingredients have an effect on the colour of the gilding of the bread that will become very or even too dark because of the large quantity of sug | If the colour of the bread is too dark, press the "start/stop" button to interrupt the programme 5 to 10 minutes before its programmed end. Leave the bread in the trough, cover closed, for 20 minutes before taking it out and turning it out of the mould. |
Jam
| No | Problem | Cause | Solution |
| 1 | The jam is too liquid for your taste | The jam lacks a little cooking | Restart a 2nd cooking cycle |
Rice
| No | Problem | Cause | Solution |
| 1 | The cooked rice obtained is too dry or too humid. | A/ You have not added water as indicated by respecting the graduations or you have measured the rice incorrectly. | Measure the rice carefully with the plastic rice measure and pay attention to respecting the corresponding graduation at the time of adding water. |
| B/ The quality of rice to absorb water is different from common rices. | Adjust the quantity of water. |
| 2 | During rice cooking, broth passes through the ventilation holes. | A/ The quantity of water is too much. | Reduce the quantity of water. |
| B/ The quantity of rice is too much. | Respect the recommended proportions. |
| C/ The seal around the windowplug is missing | Check after cleaning that all parts have been properly reassembled. |
| 3 | During rice cooking, broth over-flows from the trough | The support seal of the trough is missing. | Check after cleaning that all parts have been properly reassembled. |
| 4 | There are lumps at the bottom of the rice and the rice is not correctly cooked (this can happen for quantities greater than or equal to 6 rice measures of rice). | After having been placed in the trough, the rice was not mixed with water. | It is recommended to use the rice spoon provided to mix the water and the rice before cooking. |
| 5 | The rice cooking time is longer than envisaged and the rice has not been correctly cooked. | There is a foreign body on the heating plate. | Always clean the heating plate properly and verify that no foreign body is present on the heating plate or at the bottom of the trough. |
Yoghurt
| No | Problem | Cause | Solution |
| 1 | The yoghurts obtained have an unpleasant smell. | A/ The ferment used is no longer effective or even out-of-date, or has been incorrectly stored. | Use a ferment kept refrigerated and purchased recently for powdered ferment. |
| B/ The large trough and the glass jars have not been sterilised. | Sterilise the containers with boiling water before use. |
| 2 | The yoghurts are too liquid | A/ The ferment is no longer working | Use a new ferment and respect the measure |
| B/ The milk is of poor quality | You can reuse yoghurt obtained for the next batch, by using milk of better quality. |
| Add 1 spoon of milk powder to the mixture before cooking. |
| C/ You have used semi-skimmed milk | It is strongly recommended to use whole milk as fats from the milk provide a more compact and creamy texture to the yoghurts. |
| Add 1 spoon of milk powder to the mixture before cooking. |
Fromage blanc
| No | Problem | Cause | Solution |
| 1 | The "fromage blanc" obtained has an unpleasant smell. | A/ The ferment or rennet used is no longer effective or is even out-of-date, or has been incorrectly stored. | Use a ferment or rennet kept refrigerated and purchased recently for powdered ferment. |
| B/ The large trough, the jar and the cheese drainer have not been sterilised. | Sterilise the containers with boiling water before use |
| 2 | The consistency of "fromage blanc" is too liquid | A/ The ferment is no longer working | Use a new ferment and respect the measure printed in the instructions. |
| B/ The milk is of poor quality | You can reuse the cheese obtained for the next batch, by using milk of better quality. |
| C/ The draining is not adequate | Let the "fromage blanc" drain for a little longer and remove the whey from the jar so that the cheese does not soak in it. |
| 3 | The consistency of "fromage blanc" is grainy | A/ The ferment is too old (the regeneration is no longer working) | Beat the "fromage blanc" with a whisk or fork and change the ferment for the next batch |
| B/ The preparation time was too long | Reduce the preparation time. To do this, refer to the table given above in the "Assistance in proportions and choice of ingredients" part on page 50. |
| C/ The mixture was not consistent before incubation. | Beat the ferment properly before adding milk so that there are no lumps. |
Maintenance
CAUTION: Never dip the base of the appliance or the plug in water. Always disconnect and let it cool down completely before cleaning.
Base and cover of the appliance: Clean with a damp sponge. Dry properly. Do not use aggressive or abrasive cloth or products to preserve the plastic and its sheen.
Caution: Never dip the base of the appliance in water. Never put it in a dishwasher.
Large bread trough and large rice trough: Clean the inside and outside using a damp sponge. Never use a cloth, sponge or abrasive products at the risk of damaging the non-stick coating. A trough must always be completely dry before being installed in the appliance.
Important: Never clean the troughs in a dishwasher.
Kneading blade: If this is difficult to remove from its shaft, fill the trough with hot water and let it soak for 30 minutes. The blade can then be removed easily to be cleaned with a damp sponge.
Caution: Never use abrasive products or metal accessories at the risk of damaging the non-stick coating.
Glass yoghurt jars: The jars can be put in a dishwasher. They have to be fully dry before being replaced in the appliance.
Covers for plastic yoghurt jars: Clean them with a damp sponge and a little dishwashing liquid.
Jar and "fromage blanc" drainer: After every use and after removal of "fromage blanc" from the mould or its consumption, soak, if necessary, the cheese drainers and the jars for a few minutes in hot water added
with detergent and clean them carefully.
Note: Always dry all items properly before repositioning them and putting them away.
Put away the appliance with the cover closed after cooling and cleaning.
Guarantee conditions
The appliance is guaranteed for 2 years.
To enjoy an additional year of guarantee, register on the LAGRANGE website (www.lagrange.fr). The guarantee includes parts and labour and covers manufacturing defects. The following are excluded from the guarantee: Damage resulting from an incorrect use or failure to respect the operating instructions, and breakage by falling.
THIS GUARANTEE APPLIES TO DOMESTIC USE, AND ON NO ACCOUNT TO PROFESSIONAL USE.
The legal guarantee owed by the seller in no way excludes the legal guarantee owed by the Manufacturer for faults or manufacturing defects according to articles 1641 and following of the Civil code. In case of breakdown or malfunction, contact your reseller. In case of a technical fault within 8 days following purchase, the appliances will be exchanged. After this period they will be repaired by the LAGRANGE after sales service.
RECIPES
Abbreviations and references:
cc Teaspoon (5 ml)
cs Tablespoon (20 ml)

Teaspoon
Tablespoon
"Bread" type programmes
1. Basic bread programme
White bread
Bread with nuts
| 700 g | 900 g |
| Water | 250 ml | 325 ml |
| Butter | 15 g | 20 g |
| Salt | 1 cc | 1 1/2 cc |
| Milk powder | 20 g | 25 g |
| Sugar | 20 g | 25 g |
| Bread flour (T55) | 450 g | 580 g |
| Baker's yeast | 6 g | 8 g |
| 700 g | 900 g |
| Water or milk | 250 ml | 325 ml |
| Butter | 30 g | 35 g |
| Salt | 1 1/2 cc | 2 cc |
| Sugar | 30 g | 35 g |
| Bread flour | 450 g | 520 g |
| Baker's yeast | 6 g | 8 g |
| Chopped nuts | 30 g | 40 g |
RK: add the nuts after the audible signal (see table of cycles)
2. French bread programme
Traditional bread
| 700 g | 900 g |
| Water | 230 ml | 300 ml |
| Salt | 1 cc | 1 1/3 cc |
| Sugar | 10 g | 15g |
| Bread flour | 390g | 500 g |
| Baker's yeast | 6 g | 7 g |
| Oil (optional) | 1 cs | 2 cs |
Olive bread
| 700g | 900g |
| Water | 250 ml | 325 ml |
| Salt | 1 cc | 2 cc |
| Sugar | 2 cs | 2 1/2cs |
| Flour | 500 g | 650 g |
| Baker's yeast | 6 g | 8 g |
| Oil | 2 cs | 2 1/2cs |
| Green olives | 50 g | 70 g |
| Black olives | 50 g | 70 g |
3. Whole-wheat bread programme
Whole-wheat bread
| 700 g | 900 g |
| Water | 250 ml | 320 ml |
| Butter | 20 g | 30 g |
| Salt | 1 cc | 1 1/2 cc |
| Sugar | 1 cc | 1 cc |
| Dusting T80 | 200 g | 260 g |
| Whole-meal T170 | 200 g | 260 g |
| Yeast | 5 g | 6 g |
Wholemeal bread
| 700 g | 900 g |
| Water | 250ml | 320 ml |
| Lemon juice | 1 cc | 1 1/2 cc |
| Sugar | 1 cc | 1 1/2 cc |
| Salt | 1 1/2 cc | 2 cc |
| Olive oil | 1 cs | 1 1/2 cs |
| Flour T150 | 235g | 300g |
| Spelt wheat flour T150 | 115 g | 150 g |
| Rye flour T130 | 70 g | 90 g |
| Yeast | 2 cc | 2 1/2 cc |
4. Sweet bread programme
Honey roll
| 700 g | 900 g |
| Fresh milk | 210 ml | 230 ml |
| Butter | 20 g | 30 g |
| Eggs | 1 | 2 |
| Salt | 1 cc | 1 cc |
| Honey | 1 1/2 cs | 2 cs |
| Sugar | 45 g | 60 g |
| Bread flour | 450 g | 520 g |
| Baker's yeast | 4 g | 6 g |
Sweet raisin bread
| 700 g | 900 g |
| Water | 120 ml | 190 ml |
| Eggs | 2 | 3 |
| Oil | 2 cs | 3 cs |
| Sugar | 30 g | 45 g |
| Salt | 1 1/2 cc | 2 cc |
| Bread flour | 400 g | 520 g |
| Dry raisins | 50 g | 75 g |
| Baker's yeast | 5 g | 7 g |
5.Quick bread programme
| 700 g | 900 g |
| Water | 250 ml | 350 ml |
| Oil | 1 cs | 1 1/2 cs |
| Lemon juice | 1 cc | 1 cc |
| Salt | 1 1/2 cc | 2 cc |
| Sugar | 1 cc | 2 cc |
| Flour T55 or T65 | 450 g | 550 g |
| Baker's yeast | 2 1/2 cc | 3 1/2 cc |
6.Cake programme ( without raising)
Chocolate and yogurt cake
Quick and simple recipe to prepare with children, as it is measured by "yogurt jars"
| Plain yogurt | 1 pot |
| Eggs | 2 |
| Vegetable oil | 1/2 pot |
| Sugar | 2 pots |
| Flour | 3 pots |
| Yeast | 1/2 sachet |
Chocolate cake
| Milk | 100 ml |
| Eggs | 2 |
| Melted butter | 125 g |
| Sugar | 120 g |
| Vanilla sugar | 1 sachet |
| Salt | 1 pinch |
| Flour | 250 g |
| Almond powder | 5 cs |
| Baking powder | ½ sachet |
| Chocolate chips | 125g |
Apple cake
| Eggs | 3 |
| Vegetable oil | 1½ glass |
| Sugar | 200 g |
| Vanilla sugar | 1 sachet |
| Flour | 125 g |
| Yeast | 1½ sachet |
| Apples | 3 or 4 |
Gingerbread
| Warm milk | 10cl |
| Liquid honey | 250 g |
| Melted butter | 100 g |
| Egg | 1 |
| Sodium bicarbonate | ½ cc |
| White flour | 100 g |
| Whole meal | 300 g |
| Soft brown sugar | 50 g |
| Baking powder | 1 sachet |
| Ginger powder | 1 cc |
| Cinnamon powder | 1 cc |
| Nutmeg | 1 cc |
| Anise powder | 1 cc |
| Orange-flower water | 1 cs |
| Lemon | 1 zest |
Turn out of the mould immediately after baking and wrap it in aluminum foil
It is better to wait for three days before eating the gingerbread, it will only taste better!
7.Cake programme (with raising)
Chocolate and yogurt cake
Candied fruit cake
| Natural yogurt | 1 pot |
| Eggs | 2 |
| Butter | 110 g |
| Melted chocolate | 220 g |
| Sugar | 150 g |
| Flour | 150 g |
| Baking powder | ½ sachet |
| Whipped eggs | 3 |
| Soft butter | 100 g |
| Powdered sugar | 125 g |
| Salt | 1 pinch |
| Rum | 1 cs |
| Flour T45 or T55 | 300 g |
| Baking powder | 1 sachet |
| Dry raisins | 100 g |
| Candied fruits
(cherries, lemons, etc.) | 150 g |
N.B. Roll the candied fruits in some flour.
Add the candied fruits and the dry raisins at the end of the first kneading.
Olive cake
| 700g | 900g |
| Milk | 90 ml | 100 ml |
| Salt | 1 cc | 1 1/2 cc |
| Flour | 230 g | 250 g |
| Baking powder | 1 sachet | 1 sachet |
| Oil | 90 ml | 100 ml |
| Grated Gruyere (cheese) | 45 g | 50 g |
| Herbs of Provence | 1 cs | 1 1/2 cs |
| Pitted green olives | 50g | 70g |
| Chopped black olives | 50g | 70g |
3. Pastry
Short crust pastry
| Flour | 200 g |
| Butter or oil | 100 g |
| Salt | 1 pinch |
| Cold water | 3 cc |
N.B. Wait until the butter and flour begin to blend to add water and salt.
Short bread
| Soft butter | 125 g |
| Flour | 200 g |
| Egg | 1 |
| Sugar | 125 g |
Quick sweet pie pastry
| Hot water | 150 ml |
| Soft butter | 125 g |
| Sugar | 1 cs |
| Flour | 275 g |
| Salt | 1 pinch |
Quick salty pastry
| Hot water | 200 ml |
| Oil | 100 ml |
| Flour | 300 g |
| Salt | 1 pinch |
- Pizza dough
| An average size pizza |
| Water | 210 ml |
| Oil | 2 cc |
| Sugar | 1 cc |
| Salt | 1 cc |
| Flour T55 or T65 | 350 g |
| Whole-meal T130 | 180 g |
| Baker's yeast | 1 cc |
10. Kneading
Baguettes
| 4 baguettes |
| Water | 90 ml |
| Oil | 1.5 cs |
| Lemon juice | 1 cc |
| Sugar | 2 cc |
| Salt | 2 cc |
| Flour T55 or T65 | 425 g |
| Whole-meal T130 | 180 g |
| Baker's yeast | 3 1/2 cc |
Braided bun
| 1 bun |
| Milk | 110mL |
| Egg yokes | 2 |
| Soft butter | 50g |
| Sugar | 25g |
| Vanilla sugar | 1 sachet |
| Salt | 1 pinch |
| Flour | 275g |
| Baker's yeast | ½ sachet |
+1 egg for the gilding
Kneading programme to be run twice (the bun will rise better).
Remove the dough piece and divide it into 3 equal portions. Make lumps and braid them together.
Let it rise for 45 minutes to 1 hour.
Glaze it with whipped eggs (you can also sprinkle some bead sugar on top)
Bake for 20 to 25 minutes at 180^
| Warm water | 200ml |
| Olive oil | 2 cs |
| Salt | 1 pinch |
| Flour | 350 g |
| Baker's yeast | 1 sachet |
| Nuts | 80 g |
| Bacon cubes | 100 g |
| Grated Comté | 100 g |
| Herbs of Provence (later) | 1 cc |
Remove the dough from the trough at the end of the programme and spread it into an oval shape. Make four parallel oblique incisions on top. Stretch the dough to open the slits. Brush it with olive oil and sprinkle with some herbs of Provence. Preheat the oven at 220^ , and bake for 25 minutes until golden brown. Let it cool on a tray; enjoy it with a nice green salad.
11. Jam programme
Strawberry jam
Mulberry jam
| Strawberries | 500 g |
| Granulated sugar with gelling agent | 400 g |
Apricot jam
| Mulberries | 500 g |
| Granulated sugar | 400 g |
| Lemon juice | 1 cs |
| Apricots | 500 g |
| Granulated sugar with gelling agent | 400 g |
| Lemon juice | 1 cs |
Kiwi jam
| Kiwis | 500 g |
| Apple | 1 |
| Granulated sugar | 400 g |
| Lemon juice | 1 lemon |
| Water | ½ glass |
12. Baking only programme
You can use any commercial instant preparation and cook it in your FAIT MAISON®.
Rice based recipes
Pilau rice
| For 4 persons |
| Basmati or Thai rice | 2 measures |
| Chopped onion | 1 |
| Butter | 50g |
| Salt | 1 pinch |
| Chicken broth | 2 glasses |
Sushi rice
Select a round grain Japanese rice "sushi special".
| For 1kg ofsushi rice |
| White round grain rice | 4 measures |
| Water | 4 measures |
| Rice vinegar | 100 ml |
| Sugar | 50 g |
| Salt | 2 pinches |
| Rice wine (Mirin) | 2 cs |
Prepare the rice after having washed it well by mixing the rice with the quantity of water indicated. Follow the instructions given on page 44.
Meanwhile, prepare the vinegar seasoning by heating the following mixture over low heat: Rice vinegar, sugar, salt and rice wine
When the rice has been cooked, open the lid and let the rice settle for 10 min.
Spread the rice in a non-metallic flat base container.
Using a rice paddle spread the rice and split it to avoid lumps, while sprinkling it with vinegar mixture.
Note that the rice must not be reduced to pulp; therefore stop the operation as soon as the rice is humid and shiny. Aerate the rice using your
fingers by lifting it and turning it over from the outside of the container towards the inside (as when the egg whites are folded in) and fan it with the other hand until its warm. The rice must be shiny, slightly sticky but without lumps. Keep it aside under a wet cloth while your sushi gets ready.
Sautéed prawn rice
Preferably select Basmati rice
| For 4 persons |
| Basmati rice | 2 measures |
| Water | Level 2 |
| Cooked prawns | 300 g |
| Red pepper | 2 |
| Cloves of garlic | 3 |
| Thinly sliced lemon grass | 1 cs |
| Fresh ginger | 2 cs |
| Oil | 2 cs |
| Soy sauce | 4 cs |
| Lemon juice | 2cs |
| Rice wine (optional) | 2cs |
Prepare the rice by mixing it with the quantity of water indicated. Follow the instructions given on page 44.
Clean the prawns then keep them aside in a cool place.
Chop some garlic and ginger, and brown them in oil in a hot frying pan with the lemongrass. Over low heat, add the finely shredded peppers. Stir and cover. Let it cook for 5-10 minutes.
Then add the prawns. Stir and let it cook for a while. Add the cooked rice and let fritter until ready. Serve hot.
Sautéed chicken rice
| For 4 persons |
| Basmati rice | 2 measures |
| Water | Level 2 |
| Sliced chicken | 350 g |
| Chopped shallot | 1 |
| Cloves of garlic | 2 |
| Basil | 5 leaves |
| Ground pepper | 1 pinch |
| Oil | 1 cs |
| Soy sauce | 2 cs |
| Sugar | ½ cc |
| Roasted peanuts | 30 g |
| Cashew nuts | 30 g |
Prepare the rice by mixing it with the quantity of water indicated. Follow the instructions given on page 49.
Heat some oil in a frying pan; add the shallot and the chicken.
Over high heat, add the pepper and garlic and stir.
Add the soy sauce, sugar, and coarsely chopped basil.
Finally add the rice and mix well.
Sprinkle the crushed peanuts and cashew nuts, and serve hot.
Yoghurt recipes
Sweet yogurt
You could either prepare natural yogurt following the advice of the "commissioning" paragraph then add some powdered sugar, or sweeten before the preparation. To do this, add the sugar at the same time as milk and ferment and beat well until the sugar has dissolved.
Alternative method: You could replace the sugar by vanilla sugar when preparing.
Yoghurt with fresh fruits
Note: If you are using fresh fruits containing a lot of acidity, it is recommended to add them to the yoghurt after its preparation. In fact, the acidity of fruits can kill the ferments and spoil the yoghurt preparation.
1 cup of fresh chopped fruits - 4 to 5 cs. (Tablespoon) of sugar (accor-ding to taste) - 1 natural yogurt or 1 sachet of ferment - 1 litre of milk
Mix the milk and the ferment until you have a uniform consistency. Add the chopped fruits while mixing. Divide the mixture into jars.
Jam yoghurts
4 cs. of jam or fruit jelly - 1 natural yogurt or 1 sachet of ferment - 1 litre of milk
Heat the jam or jelly on very slow fire Add the milk little by little, then add the ferment. Beat well until you have a uniform consistency. Let it cool down then divide the mixture into jars.
If you are using jam that is not very thick, you could directly mix it with the milk without heating it beforehand.
Coffee yoghurts
2 cs. of sugar (according to taste) - 1 cs. of Instant coffee- 1 natural yoghurt or 1 sachet of ferment- 1 litre of milk
Mix 1 natural yogurt or 1 sachet of ferment with instant coffee and sugar. Beat well. Add the milk little by little. Mix until you have uniform consistency then divide the mixture into the jars.
Alternative method: Use caramel or chocolate powder instead of coffee.
"Fromage blanc" based recipes
"Cervelle de Canuts" (Soft cheese spread) (6 pers.)
This speciality of Lyons is very simple to prepare.
1 big cheese drainer with a base of 1I of UHT cow milk.
1 jar of 20cl of fresh cream - 200 g shallots- 1/2 bunch of chives - 1 bunch of flat parsley - 1/2 bunch of chervil - 1 dl of oil - 1 dl of dry white wine - salt/pepper
Prepare your cheese drainer 48h in advance by following the instructions (allow one day or night for draining). Note that your cheese must be thick (remove as much whey as possible).
Wash and finely snip the herbs and the shallots.
Beat together the cream and the cheese, season with salt and pepper then add the other ingredients.
You can serve the "cervelle de Canuts" with boiled or pot roasted potatoes or spread on bread.
Tsatziki (6 pers.)
1 big cheese drainer with a base of 11 of whole or semi-skimmed UHT cow milk.
1 cs of thick cream - 2 cucumbers - 1 bunch of fresh mint - 2 cloves of garlic - 1 cs of mustard - 1 cs of olive oil - Salt and pepper.
Prepare your cheese drainer 48h in advance by following the instructions (allow one day or night for draining).
Peel and deseed the cucumbers then grate them and drain in a strainer with coarse salt for many hours.
Beat the cheese drainer to obtain smooth "fromage blanc" and not too thick (add some whey if required). Add the fresh cream.
Add to the "fromage blanc", the clove crushed beforehand, the finely chopped mint, the mustard and the oil, then season with salt and pepper.
Squeeze the grated cucumber in a cloth to remove the remaining water. Finally, add the grated cucumber to the preparation.
Strawberry whisked "fromage blanc" (4 pers.)
1 large cheese drainer with a base of 1l of whole or semi-skimmed UHT cow milk.
500g of strawberries (400g to mix / 100 g to cut into pieces) - 100 g of powdered sugar
Prepare your cheese drainer 48h in advance by following the instructions (allow one day or night for draining).
Beat the "fromage blanc" with a foot mixer.
Mix 400g of strawberries with 100g of powdered sugar. Put in a saucepan on low heat with the remaining 100g of strawberries cut into pieces. Let it stew but do not let it boil. When the coulis glazes the spoon, let it cool.
Add it to the "fromage blanc" and serve fresh in glass bowls.
17 Chemin de la Plaine
ZA les Plattes
69390 VOURLES
France
www.lagrange.fr
LAGRANGE