
COOKYOO 3000 - Food processor YOO DIGITAL - Free user manual and instructions
Find the device manual for free COOKYOO 3000 YOO DIGITAL in PDF.
| Product type | Cooking robot |
| Brand | YOO DIGITAL |
| Model | COOKYOO 3000 |
| Power supply | 220-240 V, 50/60 Hz, household current |
| Motor power | 300 W |
| Heating power | 900 W |
| Bowl capacity | 1.7 liters |
| Main functions | Chunky soup (30 min), Creamy soup (20 min), Blend/Mix (5 min), Pulse, Keep warm/Reheat (10 min), Reheat (10 min) |
| Manual settings | Speed (1-5), mixing time (1-15 min), temperature (40°C-120°C in 10°C increments), delayed programming (30 min-24h) |
| Automatic programs | P1 to P4 |
| Types of preparation | Soups, creamy soups, smoothies, purées, sauces, vinaigrettes, reheating |
| Safety | Lockable lid, minimum liquid level sensor, overflow sensor, safety switch on the base, overheating protection |
| Bowl material | Metal with integrated blade |
| Included accessories | Electric base, bowl with blade, lid, measuring cup, user manual, sponge and brush |
| Maintenance and cleaning | Unplug before cleaning; do not immerse; clean the base and outside of the bowl with a soft damp cloth; rinse the lid with soapy water; do not wash in dishwasher; self-cleaning program with water and mild detergent |
| Cord storage | Cord storage compartment at the back |
| Warranty | 1 year against mechanical and electrical defects, household use only |
| Spare parts and repairability | Repairs by authorized technician only; no spare parts available for the user |
| End-of-life instructions | Do not dispose with household waste; follow WEEE directives for recycling |
| Country of origin | Not specified in the manual |
Frequently Asked Questions - COOKYOO 3000 YOO DIGITAL
User questions about COOKYOO 3000 YOO DIGITAL
0 question about this device. Answer the ones you know or ask your own.
Ask a new question about this device
Download the instructions for your Food processor in PDF format for free! Find your manual COOKYOO 3000 - YOO DIGITAL and take your electronic device back in hand. On this page are published all the documents necessary for the use of your device. COOKYOO 3000 by YOO DIGITAL.
USER MANUAL COOKYOO 3000 YOO DIGITAL
IMPORTANT : safety advice
- When using electrical appliances, basic safety precautions should always be followed.
-
- Check that the voltage indicated on the rating label corresponds with that of the local network before connection the appliance to the mains power supply.
-
- This soup maker is not intended for use by persons (including children) with reduced physical, sensory or mental capabilities or lack of experiences or knowledge, they should be given supervision and instruction in the use of the appliance by a person responsible for their safety.
- Children should be supervised to ensure that they do not play with the soup maker.
-
- If the supply cord is damaged, a qualified engineer must replace it in order to avoid a hazard, or send the unit to the authorized after-sales service center to repair.
-
- Take care to keep hands, loose clothing and other items away from the rotating blades.
-
- Do not use the soup maker if the rotating blades are damaged.
-
- Do not use the soup maker without the lid being securely clipped in place.
- Do not immerse the soup maker (Jug, cord, motor housing) in water or any other liquids.
-
- This appliance contains no user-serviceable parts. All repairs should only be carried out by a qualified engineer. Improper repairs may place the user at risk of harm.
-
- Do not operate the soup maker after a malfunction or if it has been dropped or damaged in any way.
-
- Do not leave the soup maker unattended whilst connected to the mains power supply.
-
- This appliance must be unplugged from the power supply after use and whilst any maintenance such as cleaning is carried out.
- Always use the soup maker on a stable, heat-resistant surface.
-
- Ensure there is sufficient ventilation around the soup maker to allow the escape of heat the steam.
-
- The jug body becomes hot during use, always hold using the handle provided.
- Do not use the soup maker for any purpose other than that for which it is designed.
-
- Ensure that the supply cord is kept away from heat or sharp edges that could cause damage.
-
- Do not allow the supply cord to hang over the edge of work surface or tabletops.
-
- The soup maker is intended for domestic use only. It should not be used for commercial purposes.
-
- Do not use any accessories or attachments with this appliance other than those recommended by supplier.
-
- Wipe out the spills around the jug including its filter properly after use.
Your safety and the safety of others are very important.
We have provided many important safety messages in this manual and on your appliance. Always read and obey all safety messages.

This is the safety alert symbol. This symbol alerts you to potential hazards that can kill or hurt you and others. All safety messages will follow the safety alert symbol and either the word "DANGER" or "WARNING." These words mean:

DANGER

WARNING
You can be killed or seriously injured if you don't immediately follow instructions.
You can be killed or seriously injured if you don't follow instructions.
All safety messages will tell you what the potential hazard is, tell you how to reduce the chance of injury, and tell you what can happen if the instructions are not followed.
ELECTRICAL REQUIREMENTS
Volts:220/240 V.A.C.Hertz:50/60 Hz
The wattage rating for your stand mixer is printed on a tag under the mixer base. It is also listed on the trim band. If the power cord is too short, have a qualifi ed electrician or serviceman install an outlet near the appliance. The maximum rating is based on the attachment that draws the greatest load (power). Other recommended attachments may drawsignifi cantly less power.

WARNING

Electrical Shock Hazard
Plug into a grounded 3 prong outlet.
Do not remove ground prong.
Do not use an adapter.
Do not use an extension cord.
Failure to follow these instructions can result in death, fire, or electrical shock.
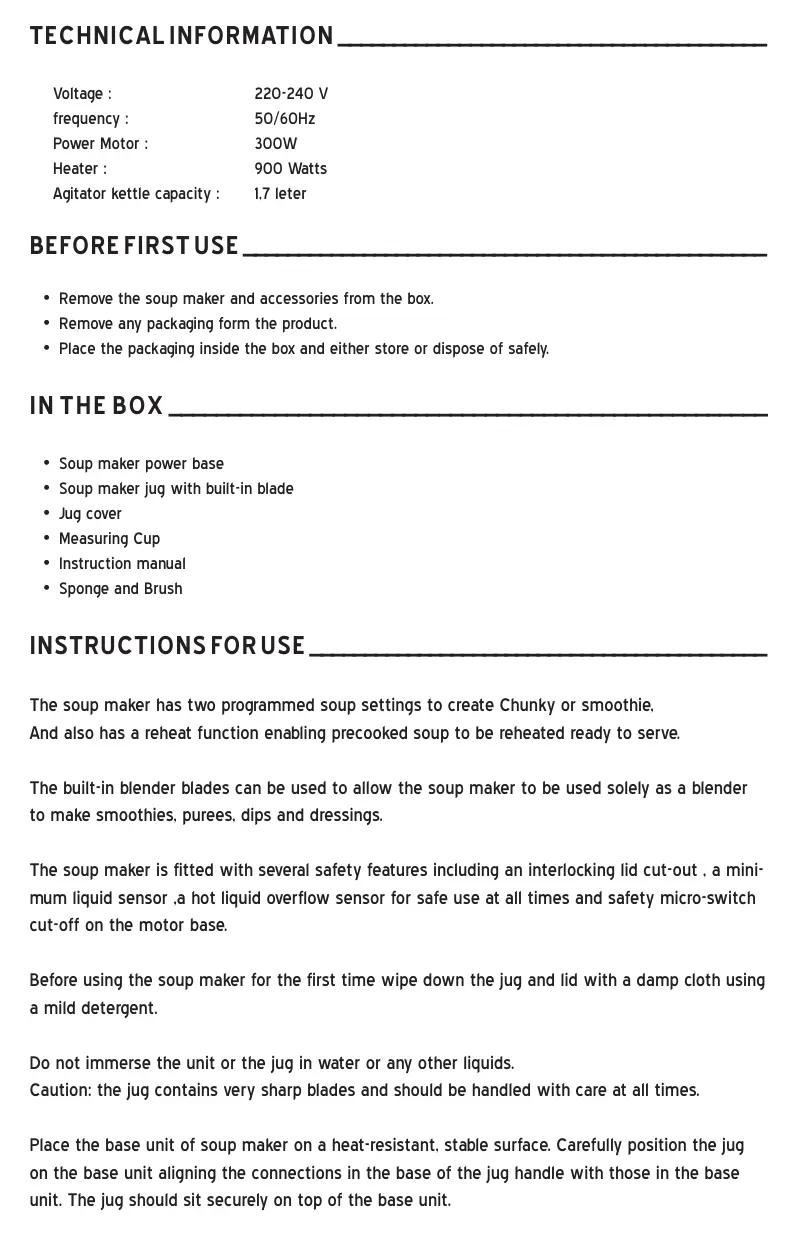
DESCRIPTION
Mesuring cup
Jug cover
Egg stemer
Filter
Jug andle
High and low water level
Electrical socket
Power cord
Main body
Control panel
Bottom cover
Rubber feet
Voltage: 220-240 V
frequency: 50/60Hz
Power Motor : 300W
Heater : 900 Watts
Agitator kettle capacity : 1.7 liter
BEFORE FIRSTUSE
- Remove the soup maker and accessories from the box.
- Remove any packaging form the product.
- Place the packaging inside the box and either store or dispose of safely.
IN THE BOX
- Soup maker power base
- Soup maker jug with built-in blade
Jug cover - Measuring Cup
- Instruction manual
- Sponge and Brush
INSTRUCTIONS FOR USE
The soup maker has two programmed soup settings to create Chunky or smoothie.
And also has a reheat function enabling precooked soup to be reheated ready to serve.
The built-in blender blades can be used to allow the soup maker to be used solely as a blender to make smoothies, purees, dips and dressings.
The soup maker is fitted with several safety features including an interlocking lid cut-out, a minimum liquid sensor, a hot liquid overflow sensor for safe use at all times and safety micro-switch cut-off on the motor base.
Before using the soup maker for the first time wipe down the jug and lid with a damp cloth using a mild detergent.
Do not immerse the unit or the jug in water or any other liquids.
Caution: the jug contains very sharp blades and should be handled with care at all times.
Place the base unit of soup maker on a heat-resistant, stable surface. Carefully position the jug on the base unit aligning the connections in the base of the jug handle with those in the base unit. The jug should sit securely on top of the base unit.
Fit the lid to the soup maker by aligning the lock open symbol on the lid with the datum mark on the top of the handle. Once aligned, turn the lid in the direction of the arrows until the lid lock symbol aligns with the datum mark.
Ensure the measuring cup stopper is fitted to the top of the lid.
When everything is positioned is correctly, connect the soup maker to the mains power supply and press the on/off button to turn the soup maker on. The button will illuminate indicating the soup maker is on.
If at this point the alarm sounds, disconnect the soup maker from the mains power supply and check that the lid is properly fitted and the fluid level is correct as described on trouble shooting. Once checked, reconnect to the mains and power up.
To start the cooking process, choose either soup functions based on how much soup you want to make.
Pressing buttons, you have 6 options as attached bellow.
| Option | Description | Time |
| Soup Chunky | Heat and blend hard,non-soaked vegetables, fruits, soya bean, etc. | 30 min |
| Soup Smooth | Heat and blend soft,tender vegetables,fruits,etc. | 20 min |
| Keep warm/Reheat | Keep the soup warm, or reheat the soup | 10 min |
| Blend/Mix | Blend .mix vegetables or fruits,etc | 5 min |
| Pulse | Hand press blend quickly | |
| Reheat/Keep Warm | Reheat leftover, or keep warm soup, milk, chocklate, etc. | 10 min |
Press “- +” to set the PRESET time, from 30 mins to 24 hours by every 5 mins.
PS: The preset time includes waiting time and cooking time. If the PRESET time is less than 30 mins, the machine will start cooking without any delay.
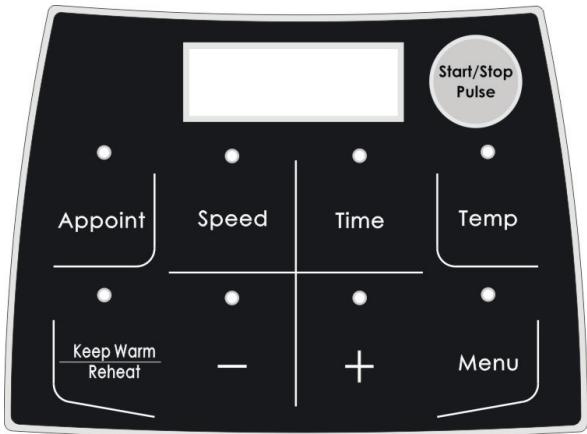
"Speed"
Press "speed" to start the Motor speed setting:
To set the motor speed by pressing -+ from 1234 to 5 speed.
The default motor speed is 3.
"Time":
Press "Tiempo" to start the blending time setting:
To set the motor speed by pressing - + from 1 min 2 3 4... to 15 mins.
The default motor speed is 1 minute.
"Temp"
Press "Temp" to start the cooking temperature setting:
To set the cooking temperature by - + from 40, 50,60,70 ... to 120 celsuis.
The default temperature is 100 celsuis.
PS.: For soup: boiling blending boiling blending simmer
"Keep warm/Reheat":
Press "keep warm/Reheat" to keep warm, the LCD will show 50 celsui. After 3 seconds, the machine starts to keep warm. (The food must be lower than 50 celsuis)
If we press "keep warm/Reheat" once more, then the machine starts the "Reheat" function. The LCD shows 70 celsuis. (the food must be lower than 70 celsuis)
"Menu":
Press "Menu" to start the "Menu" setting:
To choose the automatic menu functions by - + from P1.P2.P3 to P4.

WARNING
Injury Hazard
Unplug mixer before touching beaters.
Failure to do so can result in broken bones, cuts or bruises.
NOTE : Do not scrape the bowl while the stand mixer is operating.
The bowl and beater are designed to provide thorough mixing without frequent scraping. Scraping the bowl once or twice during mixing is usually suffi cients. Turn the stand mixer off before scraping.
The stand mixer may warm up during use. Under heavy load with extended mixing time, you may not be able to comfortably touch the top of the stand mixer. This is normal.
Important
Never exceed the maximum capacities stated - you overload the machine.
Movements at the mixer head is normal when mixing heavy ingredients such as bread dough.
The ingredients mix best if you pour the liquid first.
Stop periodically and scrape the mixture with the dough hook.
- Turn the device, whip the egg whites without stopping for about 5 minutes, according to the size of the eggs until stiff.
- Maximum quantity 12 eggs.
- For whipped cream, whip 250ml fresh cream at high speed for about 5 minutes.
- When filling the agitator kettle with fresh milk, cream or other ingredients, please ensure that the maximum quality is not exceeded.
- The egg beater should be used.
- No longer use than10 minutes continuously at a time.
MIXING SHAKES, COCKTAILS OR OTHER LIQUIDS
- Mix the ingredients according to the available recipe, at high speed for about 5 minutes.
- Do not exceed the maximum quantity for the agitator kettle.
- The mixer beater should be used.
- No longer use than10 minutes continuously at a time.
INSTALLING AND USING THE SPLASHGUARD
- Place the bowl on the base and add the ingredients.
- Install the pan.
- Place the bowl on the protection by sliding the open around the mixer head.
- To remove the splashguard, repeat the above procedure in reverse order.
The ingredients can be added directly into the bowl through the opening during operation of the device.
CLEANING AND MAINTENANCE
- Do not clean the soup maker in a dishwasher.
- Always disconnect the soup maker from the mains power supply before cleaning.
- Do not immerse the soup maker in water or any liquids.
- Clean the surface of the base unit and the outer of the jug with a soft, damp cloth.
- Rinse the lid in warm, soapy water.
- To clean the inside of the jug, rinse to remove any remaining soup or large food particles. Wipe away any food remains using a soft cloth and mild detergent before rinsing again.
- Caution: the blades inside the jug are not removable and are very sharp; extreme caution should be taken when cleaning the inside of the jug.
- Use the soup maker's programs to aid the removal of stubborn stains.
- Simply assemble the soup maker as previously described and add 800ml of water and a small amount of mild detergent. Fit the lid and switch the soup maker on. Press the BLENDER or PULSE and the blades will rotate to clean the jug. You can stop the cleaning process at any time by switching off the appliance.
- Alternatively, the soup making function can be used to loosen any stubborn stains.
- Add 800ml of water and a small amount of detergent and fit the lid. Press the soup-making button to start the program to clean the jug.
- You can stop the cleaning process at any time by switching off the appliance.
| Problems | Solutions |
| The unit is not working and beeping | 1. The jug is not fitted to the base carefully. 2. The lid is not fitted correctly. 3. There is not enough liquid in the jug. 4. There are some spills around over-flow sensor. 5. The soup maker is working too long time, the overheating program works, after cooling down, it can work again. |
| The unit has stopped in the mid-program (during the operation) | 1. The lid is loose. 2. Liquid level is too low due to evaporation during cooking. 3. Liquid is too much than the maximum. 4. The jug is loose connect with the base. |
| Ingredients pieces are still too large after the cycle is completed (food is not well blended.) | 1. Pieces were possibly too large initially-use the blend function after the cooking program. 2. Wrong function was selected: try new 3. Poured less water: add in sufficient water. |
| The ingredients are hard after the cooking cycle. (food cooked not well) | 1. Chop the ingredients into small pieces before adding. 2. The wrong soup cycle has been used for the volume added. 3. Too much water or food, filter is clogged. 4. Some food require longer cooking: select Any heating function till food fully cooked. |
| The soup is not hot and the cooking cycle appeared to finish early. | There was too much hot liquid in the jug-movement of the soup during cooking reached the upper overflow sensor. |
| Food is burnt, and stuck to the bottom | 1. Caused by high sugar, starch: use proper sugar, starch. 2. Too much food and too little liquids. |
WHEN YOU NEED SERVICE

WARNING

Electrical Shock Hazard
Unplug before servicing.
Failure to do so can result in death or electrical shock.
Please read the following before calling your service center.
- The Stand Mixer may warm up during use. Under heavy loads with extended mixing time periods, you may not be able to comfortably touch the top of the unit. This is normal.
- The Stand Mixer may emit a pungent odor, especially when new. This is common whit electric motors.
- If the flat beater hits the bowl, stop the stand mixer.
If your Stand Mixer should malfunction or fail to operate, please check the following
- Is the Stand Mixer plugged in?
- Is the fuse in the circuit to the Stand Mixer in working order? If you have a circuit breaker box, be sure the circuit is closed.
- Turn the Stand Mixer off for 10-15 seconds, then turn it back on. If the mixer still does not star, allow it to cool for 30 minutes before turning it back on.
| Error: | E1 | E2 | E3 | E4 | E5 |
| Problem: | Loose connect for the jug and Base, or Resistor problem. | Lid is open or Not well fit. | The water or liquid is lower than the anti-dry sensor. | Cooking too long time, the motor or Heating element is under HIGH temperature environment. | The water or liquid is more than the Maximum, the over-flow sensor works. |
| Solution: | Fit well the jug and base. | Close the lid or fit well the lid. | Add more water or lid until over the sensor. | Just to cool down the machine. | Pour out some water or liquids. |
1. Broccoli and Potato Soup
Ingredients
85g cheddar cheese
4 garlic cloves
- 1 medium onion, cut into 2.5cm pieces
- 30ml extra virgin olive oil
- 1 tbsp sea salt
- 2 tsp freshly ground black pepper, divided
200g peeled potatoes
- 0.8kg broccoli, stems peeled and florets separated
- 60ml sherry
0.8L hot vegetable stock
- 112 tsp lemon zest
Method
- Place all ingredients in the jug, power on the soup maker, then select "soup 30"
- This will take around 30 minutes, from boiling to blending and simmering.
- Simmer until vegetables are tender
- Taste and adjust seasoning accordingly.
2. Fresh fruit smoothie
Ingredients
125ml orange juice
1/2 cantaloupe melon, cut into 2.5cm piece
150g raspberries (fresh or frozen)
- 200g pineapple chunks, cut into 2.5cm pieces (fresh or canned, drained)
2 navel oranges, peeled and segmented
200g strawberries, hulled and halved
- 1 mango, peeled, stoned and cut into 2.5cm pieces
- 1 banana. peeled and cut into 2.5cm pieces
- 6-10 ice cubes
Method
- Layer the ingredients in the jug in the order listed. Fit the lid and select "Blender" button. Turn blender off and serve in tall glasses.
1. Potato soup Ingredients
- 1 tbsp olive oil
- 1 onion, diced
1 clove of garlic, crushed
2 medium potatoes cubed - 2 medium or 3 small leeks sliced
- 500ml water (or chicken soup)
- 3 tbsp double cream (optional)
- Sea salt and freshly ground black pepper to season
Method
Prepare all ingredients before beginning.
- Add 500ml water and chopped potatoes in the jug. cover the lid and turn on the soup maker, then press "Soup smoothie".
- Allow the boiling around 8 minutes, add the olive oil to heat and immediately follow with the onion and garlic from the top cover middle-hole.(Do not open the whole cover, otherwise the cooking will stop), the whole soup takes around 30 minutes.
- Add seasoning to taste. Finally add the double cream and hold the button "Pulse for several seconds until mixed through.
4. Aioli
Ingredients
- 1 tbsp lemon juice
2 egg yolks
Pinch chilli powder - 2 cloves garlic, peeled and crushed
Pinch salt
1 litre olive oil
Method
Serves 4
- Place the lemon juice, egg yolks, chilli, garlic and salt into the jug , power on the soup maker, then select the "Blender" button.
- While mixing, gradually add the oil, and through 1 hole of the lid. Process until the sauce emulsifies, it takes around 5 minutes.
Broccoli and stilton soup
Ingredients
25g butter
- 1 tbsp olive oil
- 1 onion, roughly chopped
- 1 leek, green head removed. chopped
- 350g broccoli, cut into small florets
1 small potato, peeled and roughly chopped
- 700ml water
- 4 tbsp double cream
Salt and freshly milled black pepper
- 125g stilton, rind removed, crumbled
Method
- Place the butter and olive oil in the Soup Maker. Add the broccoli, potato and water in the jug, turn on the soup maker and select the "Soup smooth" button. After 30 seconds, add the onion and leek and cook until soften, finally until smoothie. It takes around 20 minutes.
- Finally, add the double cream, season well and finally add the cheese, stir until just melted(power on soup maker, and hold the button "Pulse" several seconds), do not allow to boil.
- Pour the soup between 4 bowls and serve.
Carrot and ginger soup
Ingredients
- 6 large carrots, peeled and chopped
- 1 onion, peeled, cut to fit large feed tube
- 2cm piece fresh ginger, peeled
- 1 tbsp olive oil
- 800ml chicken stock
20g fresh coriander
Method
- Put all ingredients in the soup maker jug, power on and press "Soup 30" for hard food, it takes around 30 minutes, from boiling .blending .cooking .blending to simmering (several cycles)
- Serve hot with crusty bread
Tropical slushy
Ingredients
440ml water
75g granulated sugar
330ml concentrated orange juice
550ml milk or coconut milk
2 tsp vanilla extract
Method
- Combine water and sugar and stir until sugar is completely dissolved. Stir in remaining ingredients.
- Pour the mixture into jug, Turn the soup maker on, select the "Blender" function, let mix until thickened and slushy, about 10 minutes, depending on thickness preferred. Transfer to tall glasses and serve with straws and a maraschino cherry garnish.
8. Real hot chocolate
Ingredients
800ml milk
- 4 tsp cocoa powder
- 200g milk chocolate, broken into small pieces
To Serve
- Mini marshmallows
Whipped cream
Method
- Place all the ingredients in the Soup Maker. Power on the soup maker, select the "Reheat" function, let it mix and simmer about 5 minutes (the hot chocolate is around 70 celsuis)
- Serve in mugs with whipped cream and marshmallows on top
Tips: Keeping the hot chocolate warm in the soup maker on the reheat setting makes it perfect for Bonfire night or children's parties
9. Tomato soup
Ingredients
2 × 400g cans chopped tomatoes, drained.
1 clove garlic, peeled and chopped
1 small onion, peeled and chopped
1 carrot, peeled and chopped
1 stalk celery, trimmed and chopped
500ml chicken or vegetable stock
1 bay leaf
Pinch dried basil
Pinch thyme
Method
- Place the tomatoes, garlic, carrot and celery in the soup maker jug
- Add the stock, bay leaf, basil and thyme. Cover & cook on 'soup 20" or until the vegetables are tender. (put thick vegetables outside the Stainless steel filter to avoid mixing as your desired)
- Serve immediately for a rustic soup, or blend until smooth.
10 Soya bean & rice soup
1). Rinse 80 grams (use Measuring Cup) of brown rice and 200 grams soya bean. Soak in warm water for about 2 to 4 hours. Rinse again after soaking.
2). Add water to machine between the water marks.
3). Add the soaked rice & soya bean to machine. Please keep in mind that put the rice & soya bean inside the stainless steel filter to make sure better taste.
4). Press the ON/OFF button, and choose "Soup chunky". When the machine beeps, the rice & soya bean soup is ready. Serve hot or cold. Add your flavorings before use.
The soup is very plain and can be flavored with oil, vanilla, salt, etc.
WARRANTIE
This product is guaranteed for a period of 1 year from the date of purchase against mechanical and
electrical defects.
This guarantee is only valid if the appliance is used solely for domestic purposes in accordance with the instructions and provided that it is not connected to an unsuitable electricity supply or dismantled or interfered with in any way or damaged through misuse.
Under this guarantee we undertake to repair or replace free of charge any parts found to be defective. Reasonable proof of purchase must be provided.
Nothing in this guarantee or in the instructions relating to this products excludes, restricts or otherwise affects your statutory rights.
In line with our policy of continuous development we reserve the right to change this product, packaging and documentation specification without notice.
Consumables are not guaranteed i.e. plug and fuse.

This marking indicates that this product should not be disposed with other household wastes throughout the EU. To prevent possible harm to the environment or human health from uncontrolled waste disposal, recycle it responsibly to promote the sustainable reuse of material resources. To return your used device, please use the return and collection systems or contact the retailer where the product was purchased. They can take this product for environmental safe recycling.

- IMPORTANT : safety advice
- Your safety and the safety of others are very important.
- DANGER
- WARNING
- ELECTRICAL REQUIREMENTS
- Electrical Shock Hazard
- DESCRIPTION
- BEFORE FIRSTUSE
- IN THE BOX
- INSTRUCTIONS FOR USE
- "Speed"
- "Time":
- "Temp"
- "Keep warm/Reheat":
- "Menu":
- Injury Hazard
- Important
- MIXING SHAKES, COCKTAILS OR OTHER LIQUIDS
- INSTALLING AND USING THE SPLASHGUARD
- CLEANING AND MAINTENANCE
- WHEN YOU NEED SERVICE
- Please read the following before calling your service center.
- If your Stand Mixer should malfunction or fail to operate, please check the following
- Broccoli and Potato Soup
- Ingredients
- Method
- Fresh fruit smoothie
- Potato soup Ingredients
- Aioli
- Broccoli and stilton soup
- Carrot and ginger soup
- Tropical slushy
- Real hot chocolate
- Tomato soup
- Soya bean & rice soup
- WARRANTIE
Brand : YOO DIGITAL
Model : COOKYOO 3000
Category : Food processor