
TFT-1021 - Tablet LENCO - Free user manual and instructions
Find the device manual for free TFT-1021 LENCO in PDF.


| Product type | Portable digital TV / multimedia tablet |
| Brand | LENCO |
| Model | TFT-1021 |
| Screen size | 10.1 inches (25.7 cm) |
| Screen resolution | 800 × 480 pixels (RGB) |
| Screen type | LCD TFT |
| Dimensions (W × D × H) | 286 mm × 178 mm × 39.5 mm |
| Weight | Approximately 1.5 kg (estimate) |
| External power supply | AC 100-240 V ~ 50/60 Hz, 0.5 A max; output DC 9 V, 2 A |
| Built-in battery | Rechargeable lithium-ion 7.4 V / 2200 mAh |
| Battery life | Approximately 2 hours (after full charge) |
| Charging time | Approximately 4 hours |
| TV reception | DTT (DVB-T): VHF 177.5-226.5 MHz, UHF 474-858 MHz |
| Supported video formats | MPEG-1/2 (.DAT, .MPG), MPEG-4 (.AVI), DivX (.AVI, .DivX) |
| Supported audio formats | MP3, WMA (bitrate up to 320 kbps) |
| Supported photo formats | JPEG (baseline, progressive, lossless) |
| Connectivity | USB 2.0 port (host); SD card reader (up to 16 GB) |
| Audio output | 3.5 mm headphone jack; built-in speakers |
| Remote control | Yes, with CR2025 battery included |
| Maintenance and cleaning | Unplug before cleaning; use a soft, dry cloth; do not use solvents |
| Safety | Do not block ventilation; avoid humidity and heat sources; do not open the casing |
| Operating temperature | 0 °C to 40 °C (75% RH non-condensing) |
| Box contents | TV, remote control, power adapter, car adapter, antenna, manual |
| Warranty | The warranty does not cover damage caused by improper use (screen burn, etc.) |
Frequently Asked Questions - TFT-1021 LENCO
User questions about TFT-1021 LENCO
0 question about this device. Answer the ones you know or ask your own.
Ask a new question about this device
Download the instructions for your Tablet in PDF format for free! Find your manual TFT-1021 - LENCO and take your electronic device back in hand. On this page are published all the documents necessary for the use of your device. TFT-1021 by LENCO.
USER MANUAL TFT-1021 LENCO
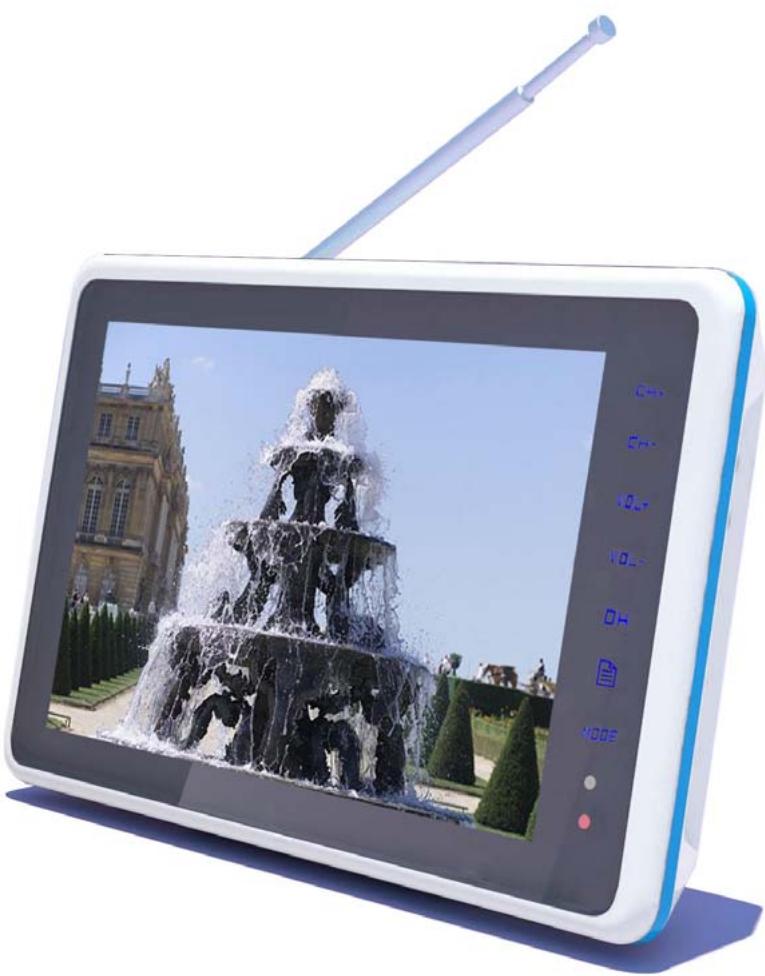
PORTABLE DIGITAL LCD TV
TFT-1021
USER'S MANUAL
For information and support, www.lenco.eu
Important Notes
Before you use this product, please read carefully the corresponding parts about the signs on the product you have bought and keep it properly for future reference.
-
In order to ensure the reliable operation of this television and to prevent it from getting overheated, do not stop or cover these notches and holes.
-
Do not cover the notches and holes with cloth or other materials.
-
Do not put this television on bed, sofa, carpet, or on the surface of other similar object, in order to avoid causing the blockage of the notches and holes.
-
Do not put this television in a limited space, such as bookcase or embedded cupboard unless there is proper ventilation conduction.
-Please keep an interval of 10cm (4 inch) between this product and the wall.
-In the process of use, this television may get slightly hot, and this is the normal condition and does not indicate that any failure occurs to it.
-
Do not put this television near or above electric heater or heating plate, or a place with direct sunlight.
-
Do not put heat-generation articles such as candle, ashtray, incense, flammable materials or explosive materials near this product.
-
Do not place any container containing water on this television, which will lead to fire hazard or electric shock.
-
Do not expose this television in the rain or somewhere near water (such as somewhere near bathtub, water basin, water trough in a kitchen or laundry pool, damp basement, or near swimming pool). If this television gets wet accidentally, please immediately unplug the power adapter, turn off the power switch of this television, and then contact the authorized distributor of this television for help. When cleaning the television, please use dry and soft cloth that does not contain any volatile material. Before cleaning, please make sure to unplug the power adapter and turn off power switch of this television.
-
Do not overload socket on the wall, extended electric line or convenient socket, which will lead to fire hazard or electric shock.
-
The power adapter should be laid in a position where it will not be trodden or be extruded by objects above or near it, and special attention should be paid to the electric lines at plug, convenient socket and the television lead-out.
-
To better protect this television in thunder weather, unattended status or when it is unused for a long time, please remove the plug, and disconnect the antenna or the connection of the cable system. In this way, damage of the television in a thunder or when surge appears in power line can be prevented.
-
Connect the power adapter to the front of AC socket. Please make sure that the output voltage of the AC socket complies with the input voltage of the power adapter of this television.
-
Do not insert any metal object into the holes of this television. Otherwise it may lead to the danger of electric shock or the damage of the television.
-
In order to avoid electric shock, do not contact the inside of this television. Only qualified technical personnel can open of the cover of this television.
-
Please make sure to insert the power adapter firmly into the socket. When disconnecting the power adapter connection, please make sure to hold the outer cover of the power adapter, and then unplug the power adapter from the socket.
-
If this television fails to operate normally, especially when it gives out abnormal sound or emits unusual odor, please immediately unplug the power adapter and turn off the power switch of this television, and then contact the authorized distributor or service center of this television.
-
If this television is to be left unused for a long time or you leave home (especially when a child, elder or a disabled person is left at home alone), make sure to unplug the power adapter from the socket and turn off the power switch. The accumulated dust may make the input end of the power adapter emit sparks and heat or age in insulation, thereby causing electric shock, creepage or fire hazard.
-
There are rechargeable batteries within the television. If the television is to be left unused for a long time, please make sure to conduct charge, discharge on the television once every three months.
-
When the television is moved to a warm environment from a low-temperature environment, in order for the dew within the television to fully volatilize and become dry, the television should be left unused for a period of time before powering on and turning it on.
We strongly recommend you to use the original power adapter of our company.
- If the product is to be installed in an environment with much dust, high temperature or low temperature, high humidity and chemical materials, and in airport or railway station where the product is to be used 24 hours a day, please contact the authorized service center. Otherwise, the display may be seriously damaged, and the product may be seriously damaged.
- Please do not allow any child to play with this product.
- Please store the accessories in a place that children cannot get near or reach.
- Please do not put the product in an unstable position, such as rolling frame, slant ground or position influenced by external vibrations.
- Do not make the product fall or lashed. If this product is damaged, please disconnect the power adapter, turn off the power switch, and contact the service center.
- This television has a LCD; please do not press the screen at discretion to avoid causing screen breakage.
Refer to description provided by manufacturer: For color LCD screen, the defect of 0.01% of pixels is allowed, so please understand that when finding related phenomenon.. - The quality of the received image and sound of this product is related to the local signal and use environment. If the receiving performance is found to be not so ideal, an outdoor antenna is recommended.
- This product is hot-swappable. However, it is suggested to power off this product before plugging/unplugging your memory card, to protect the memory card or other devices.
Precautions for Displaying Still Image
Static image may cause perpetual damage to the television screen.
- Avoid displaying static image on LCD flat panel for over 2 hours as this may cause remnant shadow to the screen.
This remnant shadow is also called Screen burn.
To avoid this type of remnant image shadow, please lower the luminance and contrast of the screen when displaying still image.
The damage caused by the above-mentioned factors is out of the scope of warranty.

The product accord with the ROHS requirement.
CONTENT
GENERAL INFORMATION ABOUT THE TFT-1021 1
QUICK GUIDE. 1
PLUG IN YOUR TFT-1021 1
1. PANELS 2
2. INTRODUCTION 3
2.1. CHECK LIST 3
2.2.ABOUT TRANSMISSION 4
2.3. ANTENNA 4
2.4. CONNECTING TO EARPHONES 4
2.5. INSTALLING STAND 4
2.6. SD CARD AND USB JACK 4
2.7. REMOTE 5
2.8. ABOUT RECHARGEABLE BATTERY 6
3. BASIC FUNCTIONS 6
3.1. ENTER INTO SYSTEM AND POWER ON-OFF 6
3.2. MENU SUMMARIZE 7
3.2.1 Digital TV 7
3.2.2 Movie 22
3.2.3 Music 23
3.2.4 Photo 23
4. MAINTENANCE 24
4.1 HANDLING YOUR TFT-1021 24
4.2 CONSIDERATIONS ABOUT THE SCREEN 24
4.3 CLEANING RECOMMENDATIONS 25
4.4 CARE THE POWER SOURCE 25
4.5 CARE BATTERY 26
4.6 ABOUT THE HEADPHONE USING 26
5.TROUBLESHOOTING 26
6. TECHNICAL SPECIFICATIONS 28
TFT-1021 is a portable digital TV set; it can be used in a car or outdoor. Throughout this manual you will notice that everyday operation of your TFT-1021 is based on a series of user friendly on-screen displays and menus. These menus will help you get the most from your TFT-1021; guiding you through installation, channel selection, viewing and many other functions.
NOTICE:
The product supports the Micro TF memory card, since there are many memory card brands, it is recommended to test whether a card is compatible with this product. (Note; this product does not support illegal cards)
QUICK GUIDE
Plug in your TFT-1021
You can use either an AC adapter or a rechargeable Li-ion battery as a power source for your TFT-1021. NOTICE! To ensure safety, please do not arbitrarily replace the power adapter, the TFT-1021 only with the supplied AC adapter.
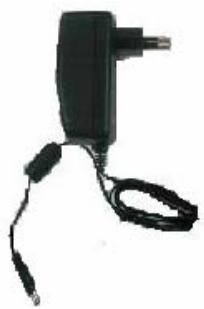
To use the AC adapter:
- Plug one end of the power cord into the AC outlet.
- Plug the cable attached to the AC adapter into the DC in port on the TFT-1021.
Attention:
Do not operate the unit or view video software while driving a vehicle.
Place the unit in a proper position for viewing.
1.1. Product overview
FRONT VIEW
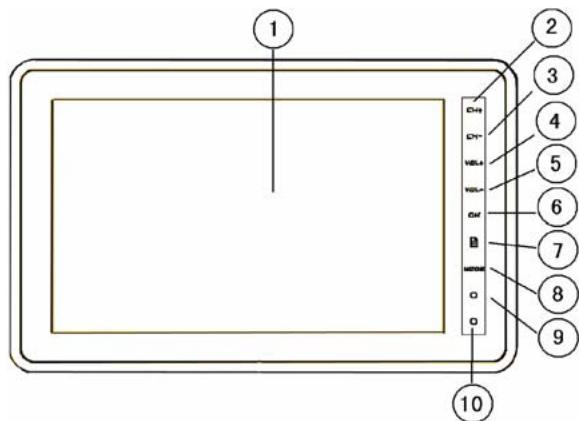
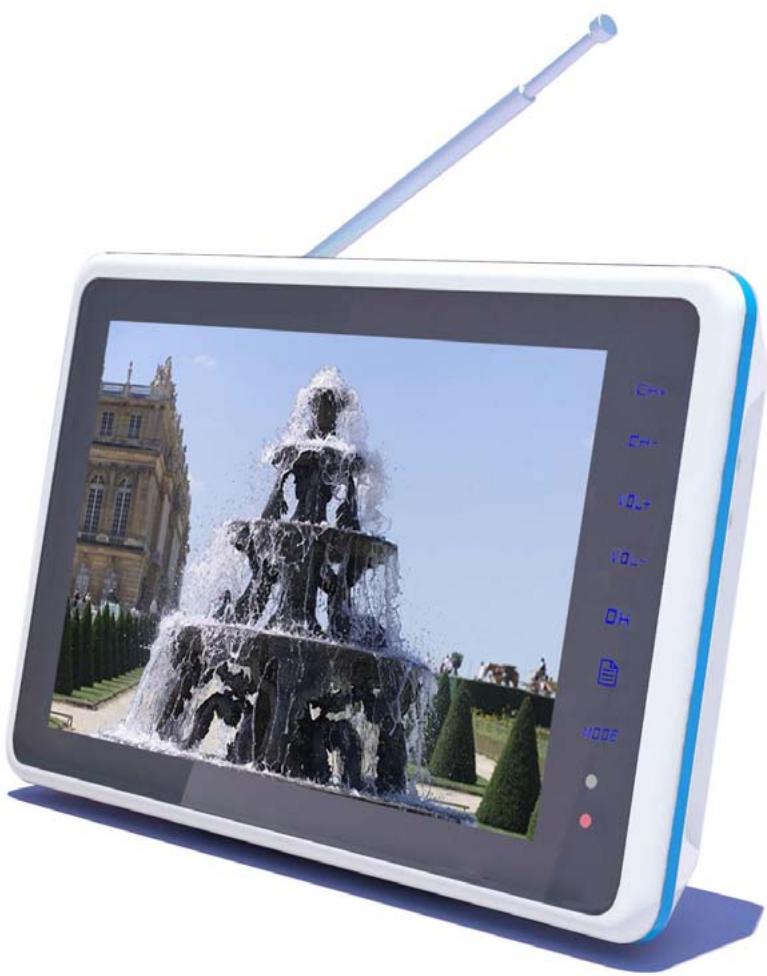
- 10.1"LCD Screen
- CH+
- CH-
- VOL+
- VOL-
- OK
- MENU
8.Mode - LED indicator
- Infrared remote receiver
The LED states are shown as:
Blue -charge battery full
Red -Machine turn on and charge battery, Machine turn off and charge battery
Null -Machine turn on or Machine turn off
Blue Flashing- Machine is going to turn off for low power (If you want to continue enjoying TV programs, first turn off Machine, connect it to AC adapter, and then turn on it to view programs while charging battery)
TOP VIEW
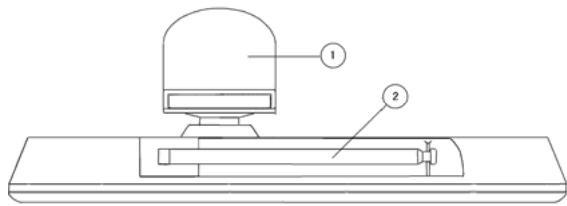
- Stand
- Antenna
SIDE VIEW
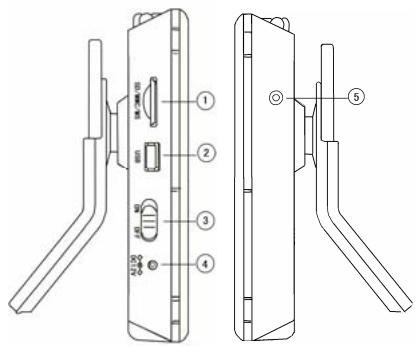
- SD-Card jack
- USB jack
- ON/OFF
- DC 9V Jack
- Earphone Jack
REAR VIEW
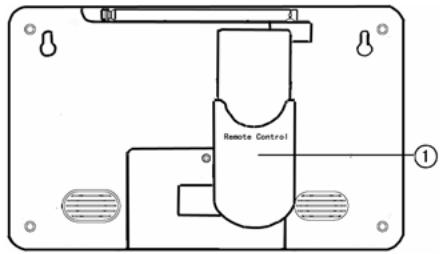
- Remote control jack
1.2. Keys definition
| CH+ | Move up in the menus and change to the previous channel in viewing mode. |
| CH- | Move down in the menus and change to the next channel in viewing mode. |
| VOL+ | Move right/change settings in menus. Increase the volume level in viewing mode. |
| VOL- | Move left/change settings in menus. Decrease the volume level in viewing mode. |
| OK | To confirm a selection |
| Press to open the menus /exit to go back to the topper menus. | |
| MODE | Press this button to switch display mode:4:3LB, 4:3PS,16:9 |
2. INTRODUCTION
2.1. Check list
The box for your TFT-1021 should contain the following items:
The TFT-1021 machine
Owner's manual
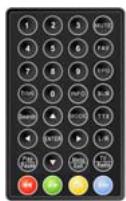
Remote control
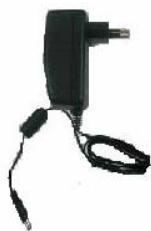
- Power supply adapter (AC adapter)
Car Power Adapter
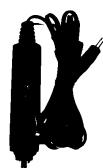
- Accessorial Antenna
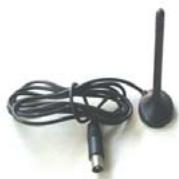
2.2. About transmission
Buildings, mountains and the surrounding terrain can block Radio and TV signals. Depending on whether the receiver is located in a valley, behind a mountain or in a concrete building, the quality of reception may vary considerably. As with most other transmissions, bad weather affects reception quality. We recommend use the external antenna instead of short antenna when the signal isn't good.
2.3. Antenna
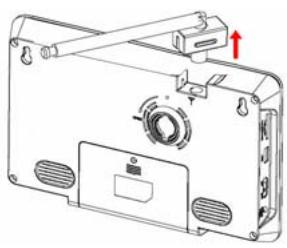
The TV unit is supplied with a telescoping antenna that will provide good reception in most situations. Be sure to keep the TV stationary when trying to receive a signal. Any movement of the TV can result in loss of the digital signal. C Please pull the Antenna just like the figure shows.
2.4. Connecting to Earphones
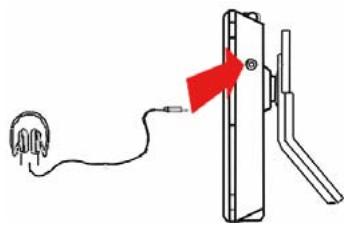
You may connect stereo earphones to the headphone jack for private listening.
When earphones are connected, the speakers will automatically turn off. Caution:
Loud volume can damage your hearing.
Decrease the volume before connecting earphones, and then raise the volume back to a comfortable level.
2.5. Installing Stand
Insert the front end of the support to the slot on the back cover, and then rotate the base as illustrated in bottom, until the support is locked properly.
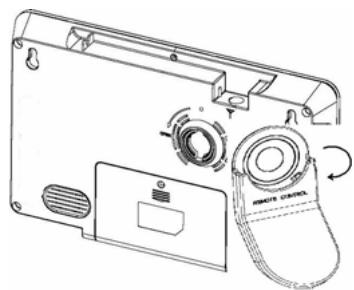
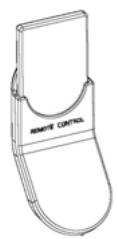
In order to storage remote control more expedient, insert the remote control to the slot on the back stand.
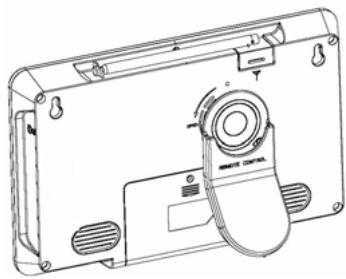
2.6. SD Card and USB jack
The TV unit is supplied with a SD Card jack that you can insert SD Card to operate the documents in the SD Card. The TV unit is supplied with a USB jack that will be connected to other observe devices.
After connect to observe devices, you can use the documents of the other device. Play music, or play video, just as you like!
2.7. Remote
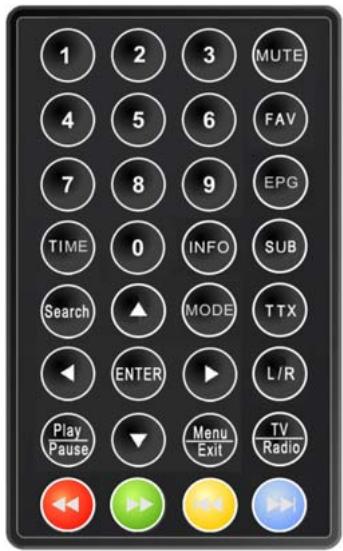
| NUM | Description |
| 1 | 0~9: To change the channel and to select individual menu options. |
| 2 | Mute: Press once to turn the sound off/on (mute control). |
| 3 | FAV: To operate the favorite channels. |
| 4 | EPG: Press this button to display Electronic Program Guide. |
| 5 | TIME: To switch time on or off. |
| 6 | INFO: Press to display the information of the current programs. |
| 7 | SUB: Subtitle. |
| 8 | Search: Start auto search TV and Radio Channel. |
| 9 | MODE: Press this button to switch display mode:4:3LB, 4:3PS,16:9 |
| 10 | TTX: Press to enter Teletext (if available). |
| 11 | ▲: Move up in the menus and change to the previous channel in viewing mode. |
| 12 | ▼: Move down in the menus and change to the next channel in viewing mode. |
| 13 | ENTER: To confirm a selection. Or to open the channel list Menu. |
| 14 | ►: Move right/change settings in menus. Increase the volume level in viewing mode. |
| 15 | ▲: Move left/change settings in menus. Decrease the volume level in viewing mode. |
| 16 | L/R: Press to change the sound of channel. |
| 17 | Menu/Exit: Press to open the menus and press again to exit. |
| 18 | TV/Radio: TV/Radio switch. |
| 19 | ▲: fast rewind the video playing. |
| 20 | ►: fast forward the video playing. |
| 21 | ■: Go to play previous file. |
| 22 | ►: Go to play next file. |
! Attention: The remote control range is 4M or less within a±45°horizontal and ±5°vertical angle from the remote sensor. If the remote's battery is low, the remote may not function properly, so replacing the battery immediately is recommended.
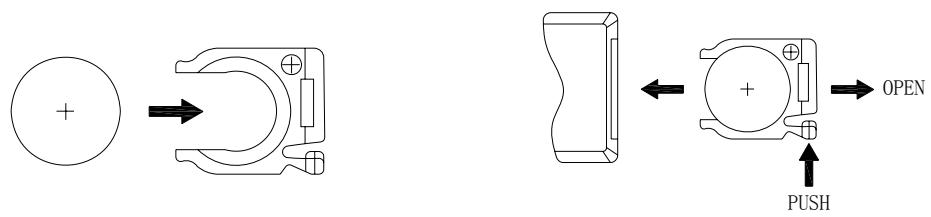
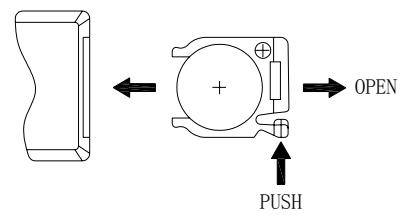
! If the remote controller does not operate properly, you may need to replace the battery. When the remote controller is not being used for extended periods of time, remove the batteries to avoid possible damage from battery leakage.
Caution: The remote control uses a CR2025 button battery. Does not recharge, disassemble, or heat the battery. Misuse of the battery may result in leakage that will damage the remote control.
2.8. About Rechargeable Battery
Your portable TV device comes with a built-in rechargeable Lithium-iron battery. Charge the battery fully before initial use. Charging time is normally about 4 hours. A fully charged battery delivers about 2 hours of use.
When the battery is weak, an indication symbol will appear on the LCD screen and the unit will power off automatically after a few minutes.
3. BASIC FUNCTIONS
3.1. Enter into system and power on-off
1. Enter into DVB system
It will enter DVB mode as soon as system power on. Figure 3.1 shows the system interface while none TV/RADIO programs in the database:
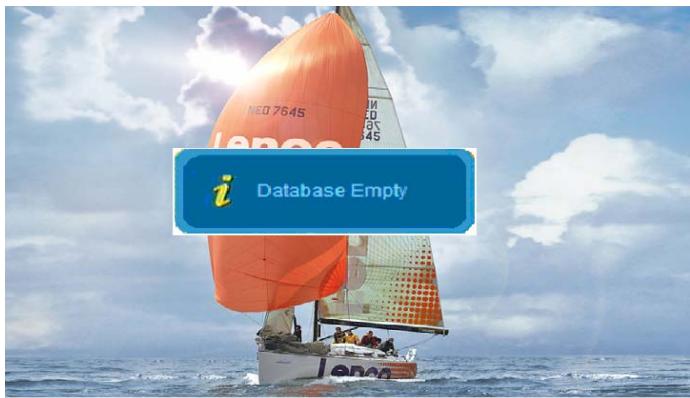
Figure 3.1
It will continue to play the latest program before previous power off if the database having a TV or RADIO program.

- Power On: Push ON/OFF button from OFF to ON.

-
Power Off: Push ON/OFF button from ON to OFF.
-
Press to switch to the previous or next program. And press to adjust the sound volume.
! Attention: The following describes the functions of your TFT-1021 while watching terrestrial digital TV. Some of the functions described here are dependent on the Service Provider and can only be used if they are included in the transmitted program information.
3.2. Menu summarize
You can open the main menu by pressing Menu/Exit. Figure 3.2 shows the system main menu interface, you can press to select mode which you want to enter.
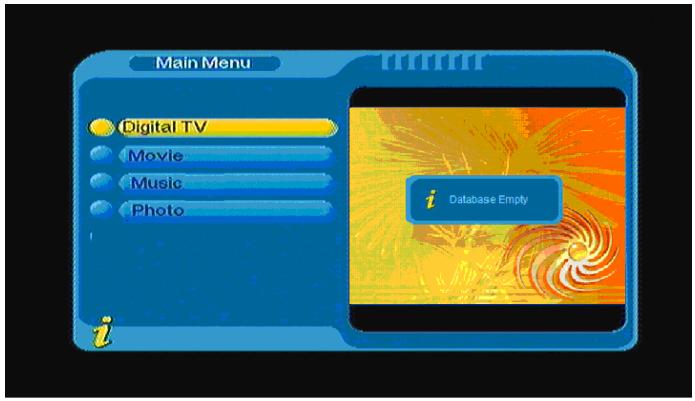
Figure 3.2
3.2.1 Digital TV
In Main Menu, press to choose Digital TV option and then Press ENTER once to enter Digital TV menu as shown in Figure 3.3. Under the Digital TV menu, there are such as options as auto TV search or broadcast programs, program management, system setup, software update and software version information view etc.
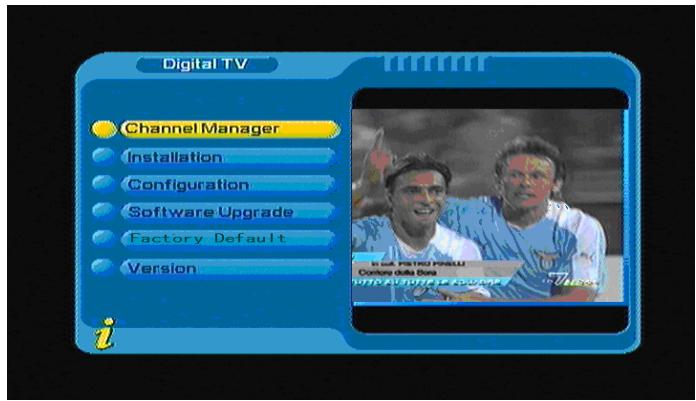
Figure 3.3
(1).Channel Manager:
System offer an efficient function of channel management such as channel deleting, marking, moving, sorting etc,
There are two independent pages for channel management, TV and RADIO. You can enter the page via "Digital TV Channel Manager", as shown in the figure below Figure 3.4:
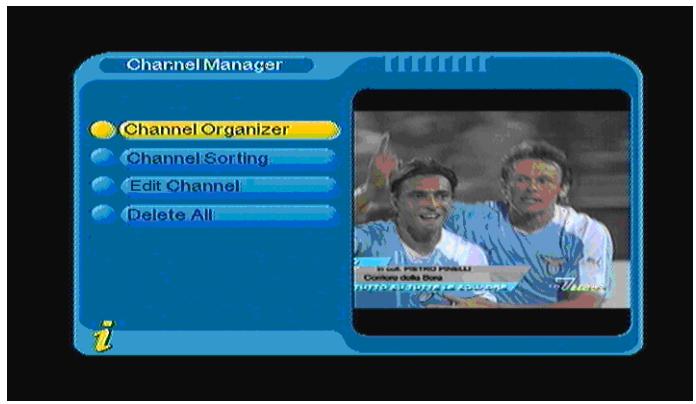
Figure 3.4
1. Channel Organizer
Under the channel manager menu, press ENTER to enter channel organizer menu. Channel organizer page includes favorite channels, moving and channel deleting.
It will pop up and dialogue box prompting that "Channel not available" when there are no channels in database to enter into, and it will not enter into channel organizer page. Press to select channel. Press to choose the line where Favorite Channel, move and delete, and press ENTER to set and cancel Favorite Channel, move or delete. After setting, corresponding figure will appear, as shown in Figure 3.5.
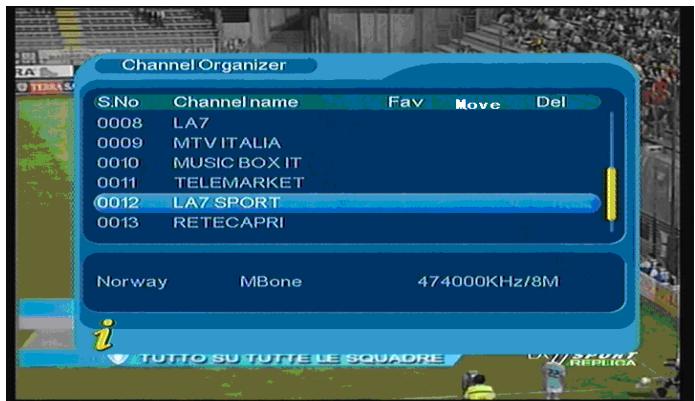
Figure 3.5
2. Channel sorting
Under the channel sorting, the channels shall be listed according to certain sequence so that the user can easily find them.
It will pop up and dialogue box prompting that "Channel not available" when there are no programs in database to enter into, and it will not enter into channel sorting page. Press to choose Type. Press to set Sorting Parameters.
Before sorting, the type of sorting shall be set, including the following items: as shown in Figure 3.6
(1).First Option: choose the programs to be sorted via the selection area, such as: England, Italy, France, etc;
(2).Second Option: Press FTA (free of charge), Scramble (encrypted), ALL Free and Encrypted
Channels;
(3).Third Option: According to alphabetic order All, A-Z, Z-A, LCN+ , LCN-.
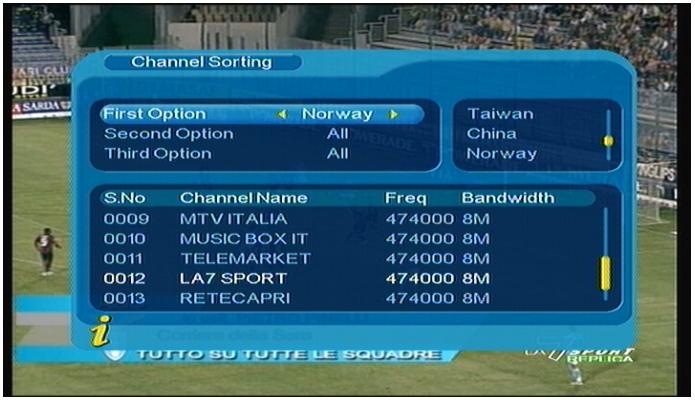
Figure 3.6
After sorting is set, to realize channel sorting, press ENTER, then the system will hint with the dialogue box "Are you sure?" as shown in Figure 3.7
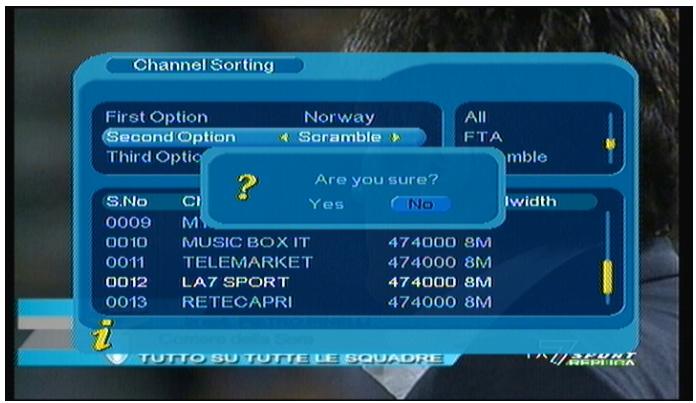
Figure 3.7
3. Edit Channels
Have such operations as Add, Delete and Rename to channels.
- You can enter the page as shown in the figure below via "MENU->Digital TV-> Channel Manager -> Edit Channel": As shown in Figure 3.8
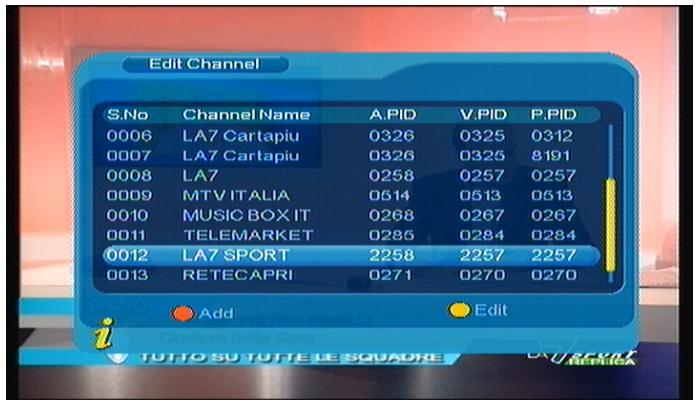
Figure 3.8
- It will pop up and dialogue box prompting that “No Carriers” when there are no programs in database to enter into, and it will not enter into ADD-Edit Channel page.
- Enter Add Channel menu, as shown in Figure 3.9
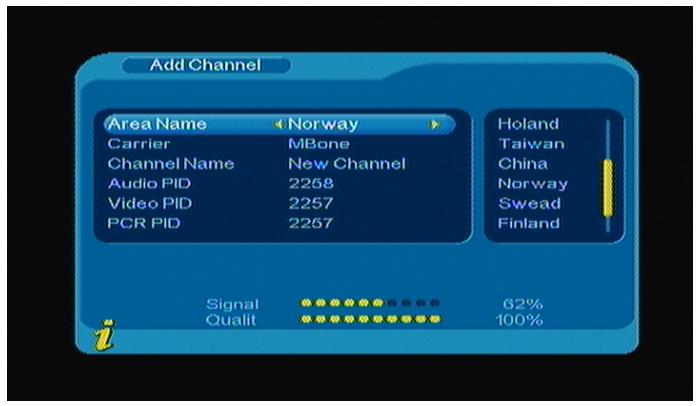
Figure 3.9
Under Add Channel menu, there are 6 parameters for adding one channel as follows:
(1). Area Name: For Area Name, press of the remote controller to enter the Area Name list on the right, then press to choose area name, press ENTER to confirm;
(2). Carrier: Press to choose;
(3). Channel Name: Press to enter Rename Channel page;
(4). Audio PID, Video PID, PCR PID, Press 0-9 number key to revise values;
(5). Press ENTER to confirm the adding, the system will hint with “Update succeeds” and return to Edit Channel menu;
(6). Press Menu/Exit to return to Edit Channel page.
4. Delete all
If you do not like one or some channels, you can delete it/them in Channel Organizer menu, but if you do not like all TV or Radio, you can enter Delete All menu to choose to delete all TV and Radio channels.
Under Channel Manager menu, press to choose Delete All option, press ENTER, then enter Delete All menu as shown in Figure 3.10
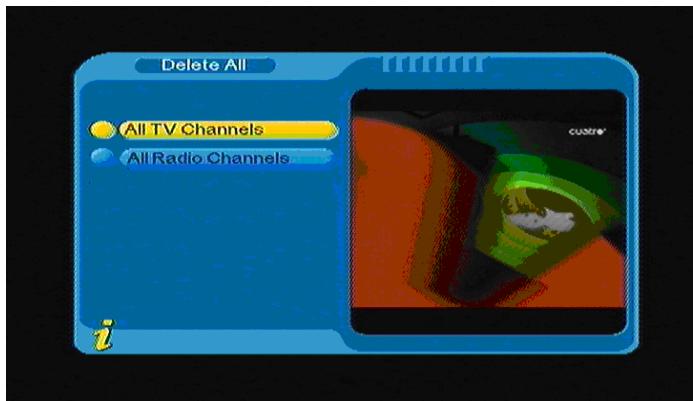
Figure 3.10
To delete all TV channels or all radio channels, press to move the cursor to All TV Channels option or All Radio channels option, press ENTER, then the system will hint the "Delete all TV Channels?" dialogue box as shown in Figure 3.11
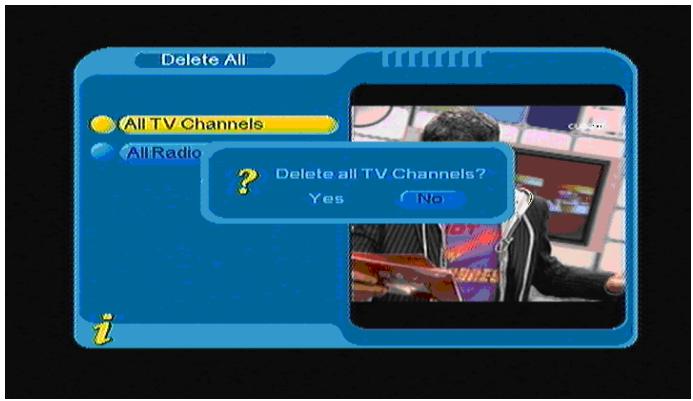
Figure 3.11
(2).Installation:
Under the installation menu, there are two kinds of Installation mode as follow: Auto Search and Manual Search. As shown in Figure 3.12
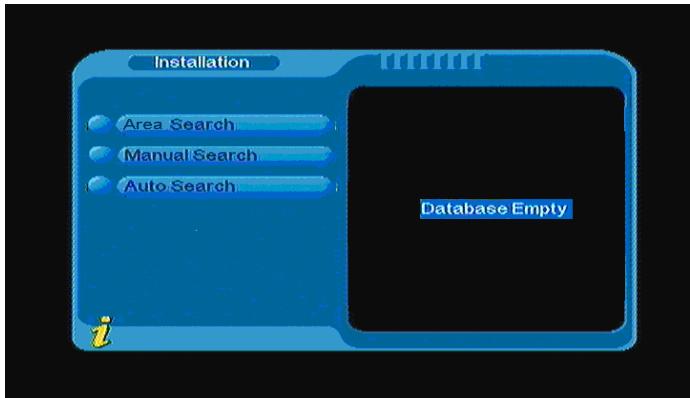
Figure 3.12
1. Auto search
You can move the cursor to "auto search" via press "▲▼" under "installation menu", then press "ENTER" to enter into auto searching page, As shown in the figure 3.13
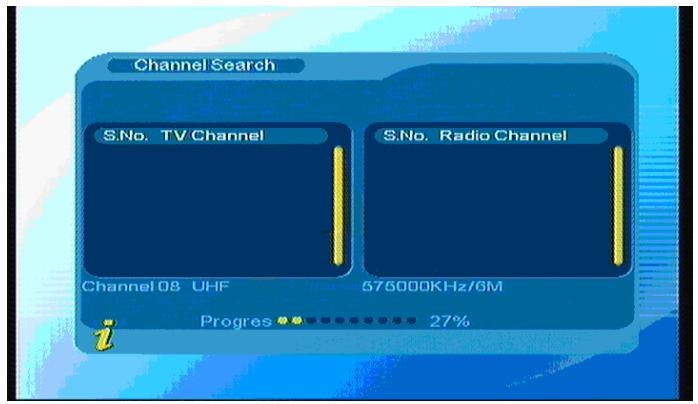
Figure 3.13
After entering into auto search page, system will scan all programs one by one under frequency points of current countries or regions selected automatically. During scanning, press Menu/Exit to stop and exit scanning. If any program is detected and the scanning process is finished, system will exit the scanning page and save the program, at the same time return to the installation menu and to play them in small window automatically.
2. Manual search
If you understand much about digital TV and know the frequency of the program or if you want to scan the program at any frequency required, you can select manual scanning which can save your much time.
You can move the cursor to "manual search" via press under Installation menu, and then press ENTER to enter into manual searching page, under the searching menu, display the relevant parameters Freq (KHz) and Band Width. As shown in the figure 3.14: then press ENTER to start search.
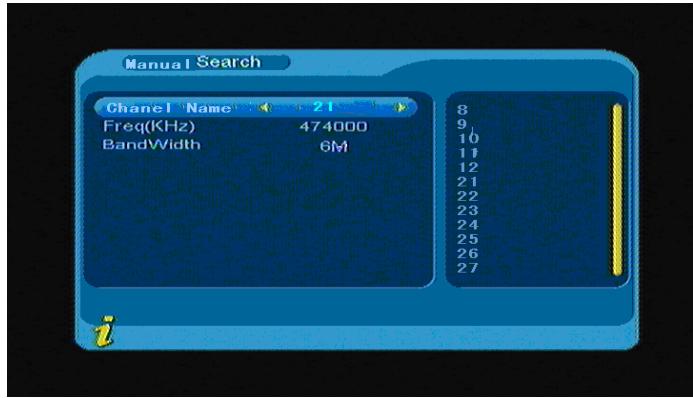
Figure 3.14
If any program is detected and the scanning process is finished, at the same time return and play them. Also you can press ENTER to open the submenu, as shown in Figure 3.15:
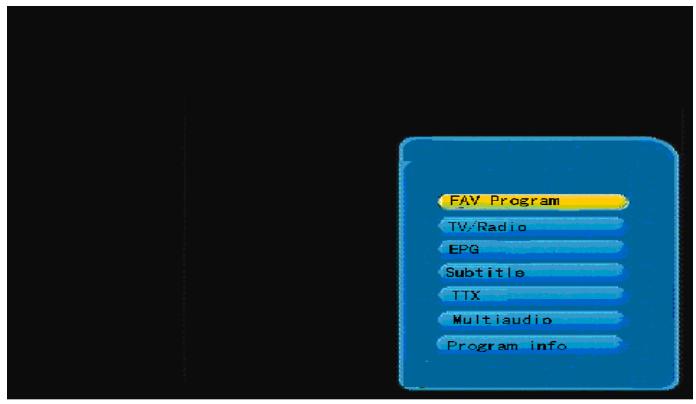
Figure 3.15
3. Area Search
Area search is a kind of intelligent and convenient mode of programs searching, which covers programs of all frequent points of target countries or regions.
At present, this system covers many targets countries and regions including: Germany/ England/ Italy/ France/ Spain, etc.
You can move the cursor to "Area Search" via press key under Installation menu, then press ENTER to enter into area searching page, as shown in Figure 3.16
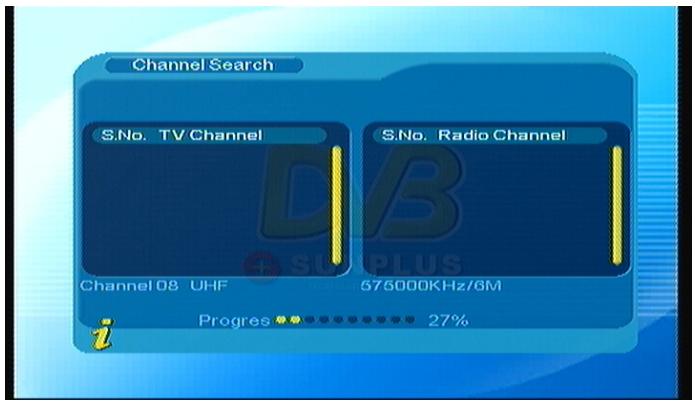
Figure 3.16
- After entering into area search page, system will scan all programs one by one under frequency points of current countries or regions selected automatically.
- During scanning, press Menu/Exit to stop and exit scanning.
- If any program is detected and the scanning process is finished, system will exit the scanning page and save the program, at the same time return to the "installation menu" and to play them in a small
window automatically. As shown in Figure 3.17
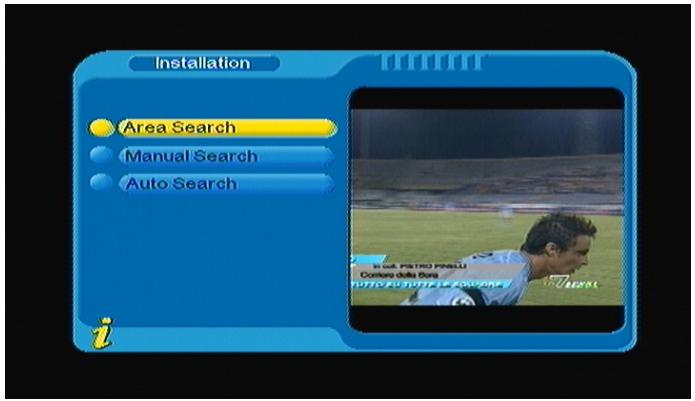
Figure 3.17
(3).Configuration:
Configuration provides individualized system setup function; you can configure the system according to your own hobby and demand.
You can enter Configuration menu via the menu (MENU->Digital TV->Configuration), as shown in Figure 3.18
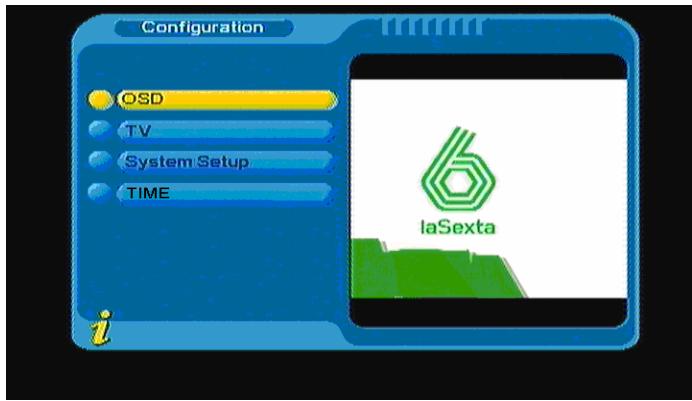
Figure 3.18
1. OSD
Via OSD option setup, you can set the user interface display mode according to your own demand. Via the menu (MENU->Digital TV->Configuration -> OSD), you can enter OSD menu, as shown in Figure 3.19:
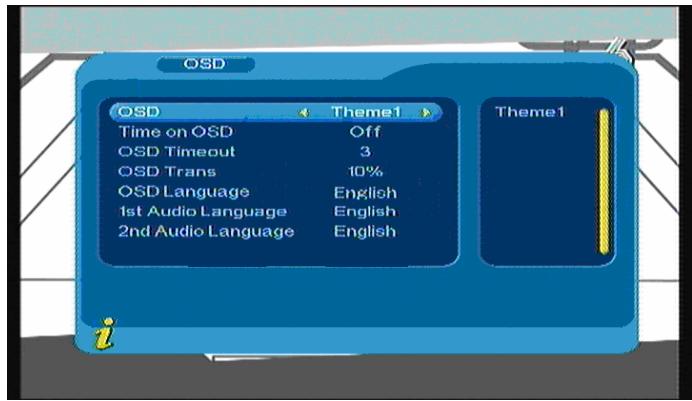
Figure 3.19
When the cursor moves on the option in OSD menu, the values corresponding to this option on the right of the menu press to move upward and downward to choose the options in OSD menu. There are following options in OSD menu:
(1).OSD Option sets system menu mode; five modes is supported.
(2). Time on OSD Option sets whether to display system time in full-screen play channel. Move the cursor to Time on OSD option, press to choose between ON and OFF.
(3).OSD Timeout Option sets some information hint dialogue box and displays time length, move the cursor to OSD Timeout Option, press▶ to choose among 1-6 seconds.
(4).OSD Trans option sets menu transparency, press to adjust value between 0 - % 60
(5).OSD Language option: The system has the user interface supporting a couple of languages; you can set language via OSD Language option:
Move the cursor onto OSD Language option, Press to enter OSD Language List as shown in Figure 3.20
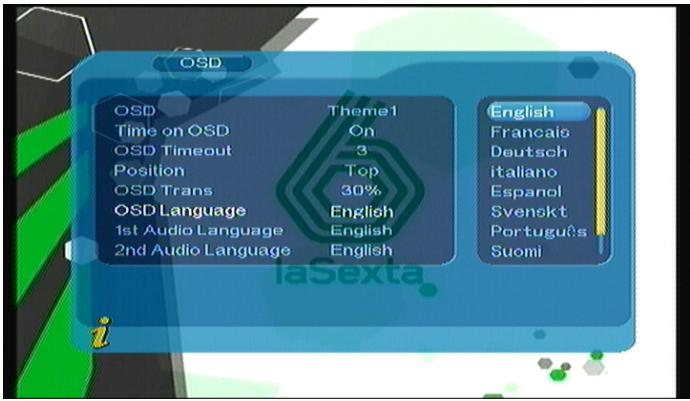
Figure 3.20
(6). 1st audio and 2nd audio Language option: Press to enter the currently supported Audio Language list, in the Audio Language list, press to choose language, press ENTER to confirm;
2. TV
TV setup provides convenient TV input mode, you can via menu (MENU->Digital TV->Configuration -> TV) enter TV set, as shown in Figure 3.21
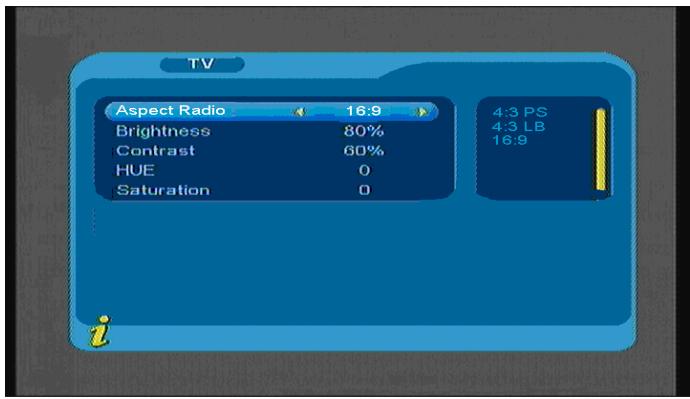
Figure 3.21
All options are listed on the left of the menu, when the cursor moves to the option on the left of the TV menu, the values corresponding to this option can be displayed on the right of the menu. Move the cursor to TV option, press to choose circularly among the options, and the TV mode set can be effective immediately; under the TV setup menu, it includes follows:
(1).Aspect Ratio: 4:3PS/4:3LB/16:9
You can adjust TV mode accord to the actual situation of you receiving equipment
(2). Brightness: 0% 100% .
(3).Contrast: 0% 100%
(4).HUE: -6,-5,-4,-3,-2,-1,0,1,2,3,4,5,6
(5).Saturation; 0~12
3. System setup
System Setup menu can provide convenient system setup, you can via menu (MENU->Digital TV->Configuration -> System Setup) enter System Setup menu, as shown in Figure 3.22
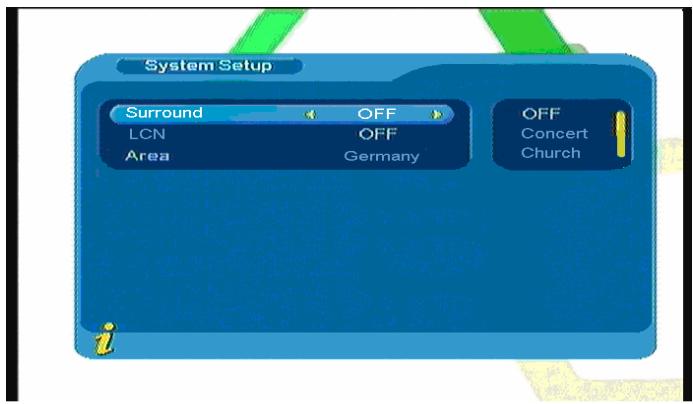
Figure 3.22
Press to move upward and downward the cursor to choose option. When the cursor stays on the option: press to move the cursor into the right list, press to move upward and downward the cursor to choose, press ENTER to confirm;
(1). Surround: To set stage effect, OFF, Concert, Church, Passive, Live
(2).LCN: To set the LCN on or off, if the LCN choose ON, the front of the programs display LCN number,
(3).Area: To set scanning area and choose, choose area to download preset channel settings.
Includes Germany, England, Italy, France, Spain, Holland and so on.
4. Time:
Via menu (MENU->Digital TV->Configuration -> Time), enter time set, as shown in Figure 3.23
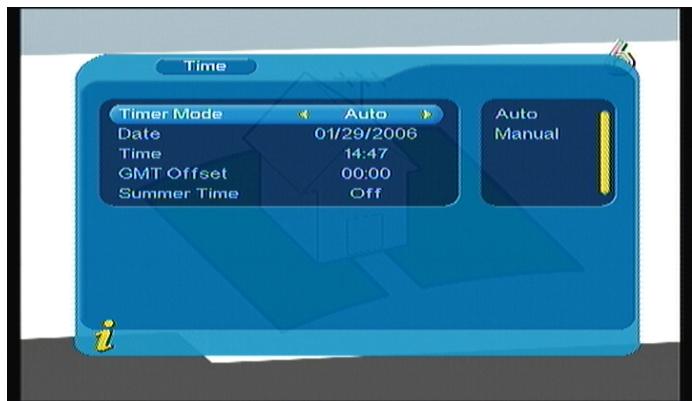
Figure 3.23
You can set Timer Mode in Time page: Timer Mode: set Time Mode, Date: set date, Time: set time, GMT Offset: set GMT Offset, Summer Time: set summer time.
In Time menu, there are two time modes, one is Auto setting: revise via setting GMT Offset, Summer Time options; the other is Manual setting: revise via setting Date, Time options. When the cursor moves onto Timer Mode option, Press to choose time mode.
- The system defaults the setting as Automatic, press to move upward and downward the cursor to move only between Timer Mode, GMT Offset and Summer Time.
(1).Move the cursor to GMT Offset option, Press▶ to move the cursor into the Properties list on the right, as shown in Figure 3.24
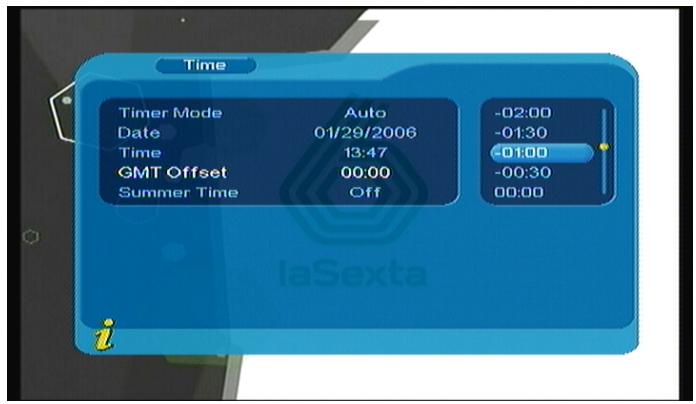
Figure 3.24
(2). Press to move upward and downward the cursor to choose, you can see corresponding change in Time option, press ENTER to confirm;
(3).Move the cursor to Summer Time option, and then press to set Summer Time.
- When the setting is Manual, press to move upward and downward the cursor to move only between Timer Mode, Date and Time.
(1). Set Date option, move the cursor upward and downward onto Date option, press to enter date setting menu, press to switch days, press to switch weeks, press / to switch months, press / to switch years, as shown in Figure 3.25
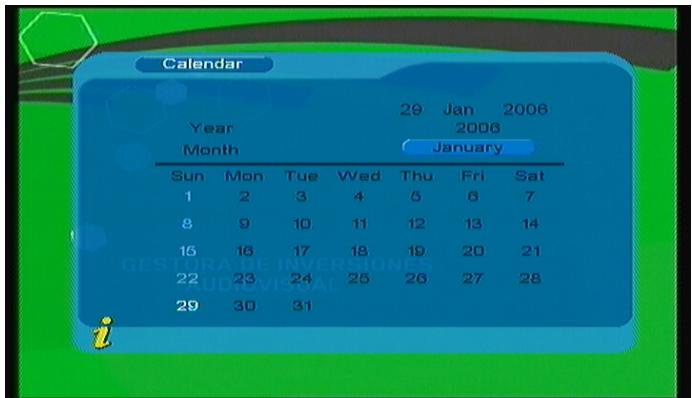
Figure 3.25
(2). Move the cursor upward and downward to Time option, press 0-9 number key to revise values.
3. After time is set, Press ENTER to save the setting, the system will hint with" Update succeeds".
(4)Software Upgrade:
You can automatically update the software of the equipment. The software of the new version can support more areas and more functions or solve more problems. Via menu (MENU->Digital TV-> Software Upgrade) enter Software Upgrade menu, as shown in Figure 3.26
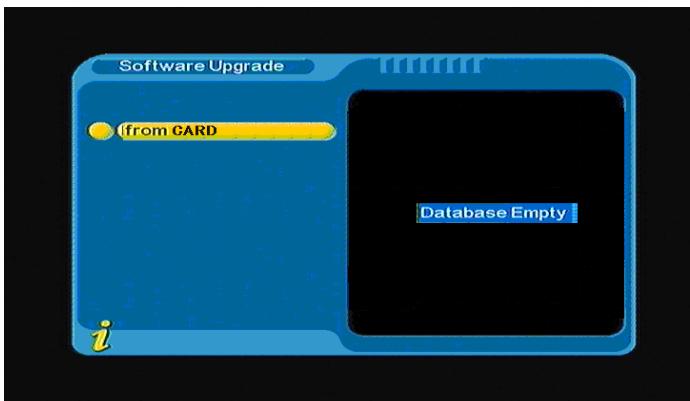
Figure 3.26
(5)Factory default:
Under the factory default menu you can enter factory default. Press to select "YES" or "NO", and select "YES" to come back the factory default.
(6)Version:
Under the version menu you can be provided with system software information, including H/W Version, S/W Version, F/W version, Checksum, Build Date, and Build Time. Press Menu/Exit to return to previous menu.
<1> FAV Program
If there are some favorite programs that been set up, just press ENTER to open DTV basic function menu. Press enter into the favorite program list, as shown in Figure 3.27
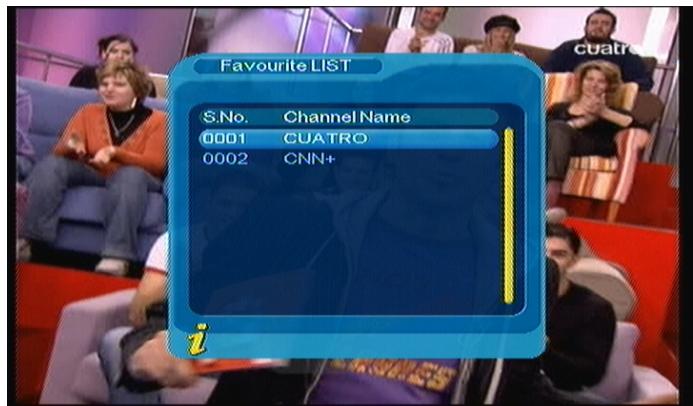
Figure 3.27
Press to select favorite program, Press ENTER to affirm the selection, press Menu/Exit to exit.
<2>TV/Radio
Press TV/RADIO to switch the programs when it is in full screen.
<3>EPG (Electronic programs guide)
! The program signal must contain EPG date.
You can choose EPG submenus press ENTER to into the EPG page to know more about the programs to be played. As shown in Figure 3.28
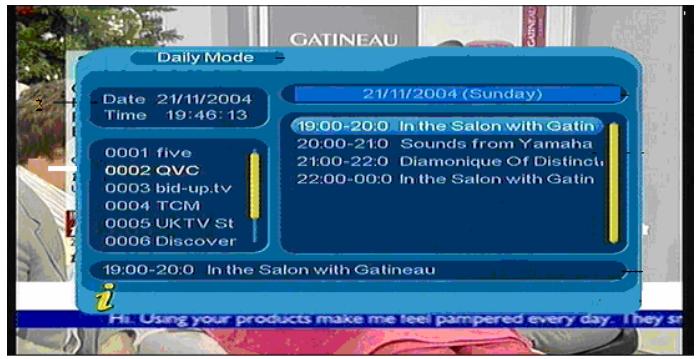
Figure 3.28
<4>Subtitle
Subtitle is defaulted to be off; to see the capitation information, choose the Subtitle menu and press ENTER to enter the Subtitle menu of the current programs, as shown in Figure 3.29
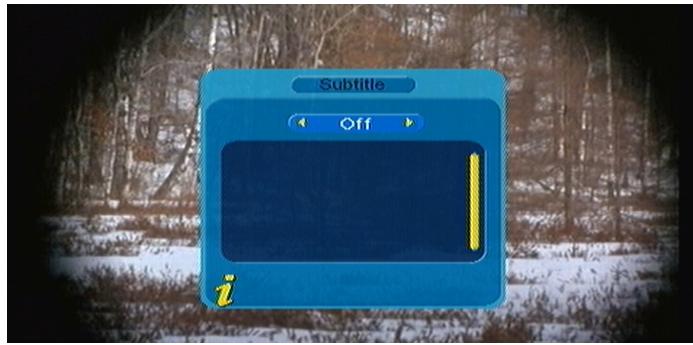
Figure 3.29
Press to choose whether to open Subtitle, press to move upward and downward to choose language.
<5>TTX (Teletext)
! The program signal must contain TTX date.
If you want to watch teletext, please select "TTX" to enter into TTX page. As shown in Figure 3.30
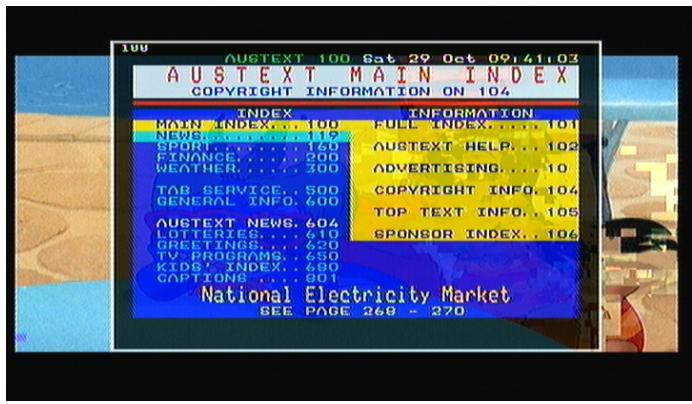
Figure 3.30
Press to go to the previous page, while press to go to the next page; Press to back for 100 pages, while press to advance for 100 pages. Press TTX or Menu/Exit to exit.
<6>Multiaudio: Audio language switch and L/R channel switch
Select Multiaudio submenu to switch among "Stereo" "Left" "Right" (stereo left channel right channel). Press to switch among "Stereo" "Left" "Right" (stereo left channel right channel), press
to switch the language of sound. As shown in Figure 3.31
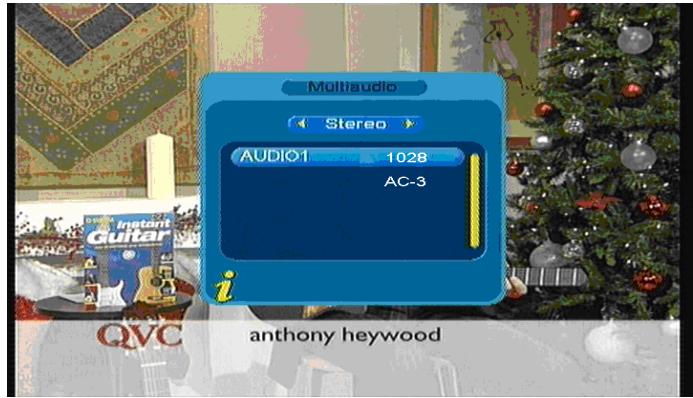
Figure 3.31
<7>Program info: Display information of programs
Press INFO to select Program info that shows the information of current program when it is in normal playing state. As shown in Figure 3.32
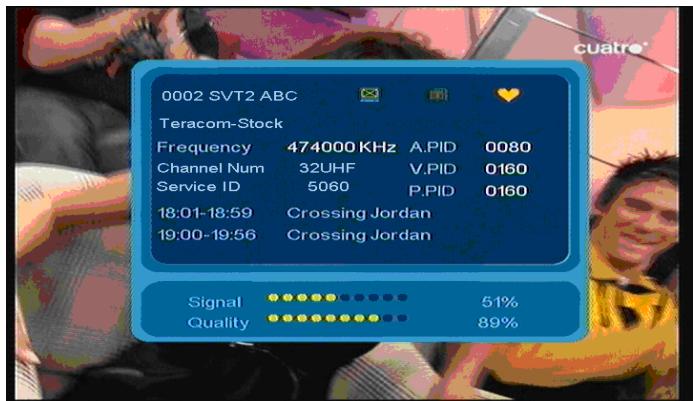
Figure 3.32
3.2.2 Movie
Press to choose Movie option. Press ENTER to confirm, enter main directory as shown in Figure 3.33
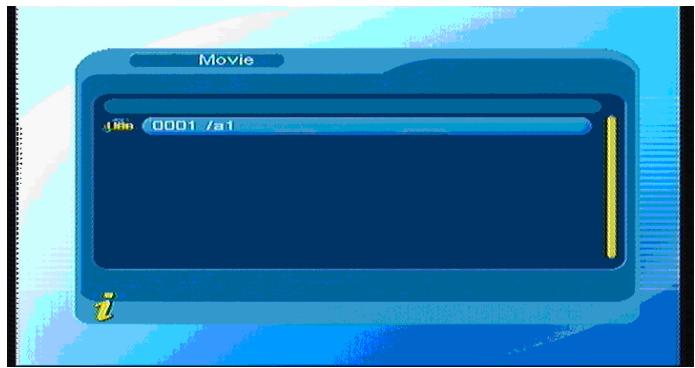
Figure 3.33
Press ENTER key to enter next directory, every directory displays only movie file and folder name, as shown in Figure 3.34
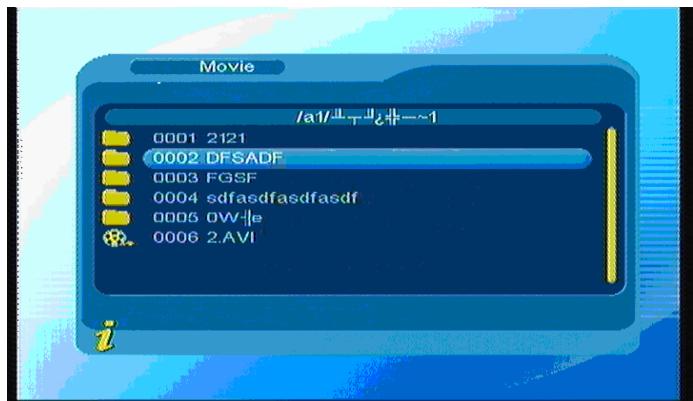
Figure 3.34
Press Menu/Exit to return previous directory; Press to choose movie files; Press ENTER to play movies; during playing press ENTER can pause or play.
Press to play previous video, press to play next video; and pressing or is previous or next fasting.
3.2.3 Music
Press to choose Music option, and to press ENTER to confirm, enter main directory as shown and press ENTER to enter next directory, every directory can show music file and folder name only, as shown in Figure 3.35
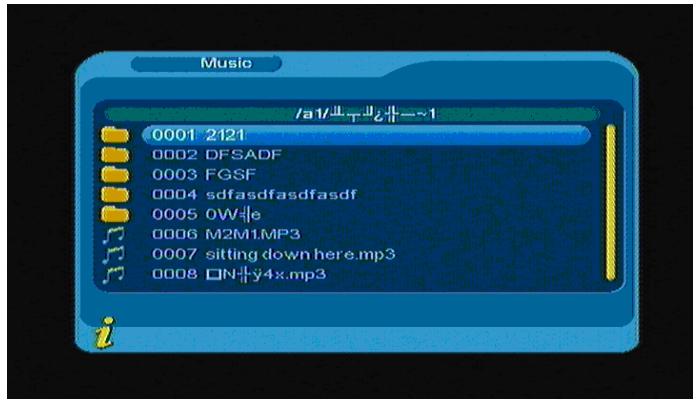
Figure 3.35
Press Menu/Exit to return to the previous directory; press to choose music file name; and press ENTER to play music file, its interface is as shown in Figure 3.36
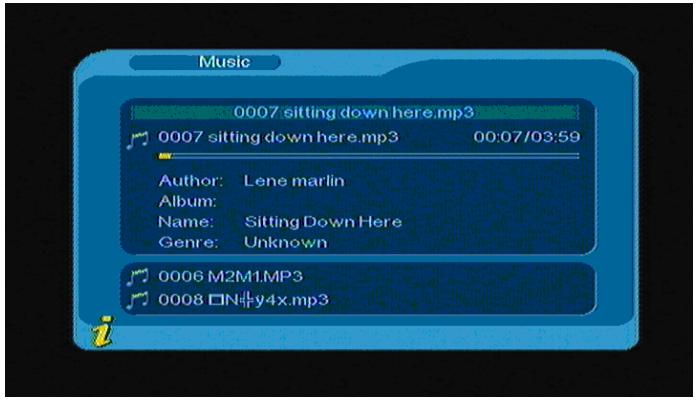
Figure 3.36
Press to play previous music, press to play next music; and press ENTER to pause or play music; and pressing or is previous or next fasting.
. Press Menu/Exit to exit the music play mode and return to the file directory.
3.2.4 Photo
Press▲▼ to choose Photo option, press ENTER to confirm, and press ENTER to enter next directory, every
directory can show photo file and folder name, as shown in Figure 3.37
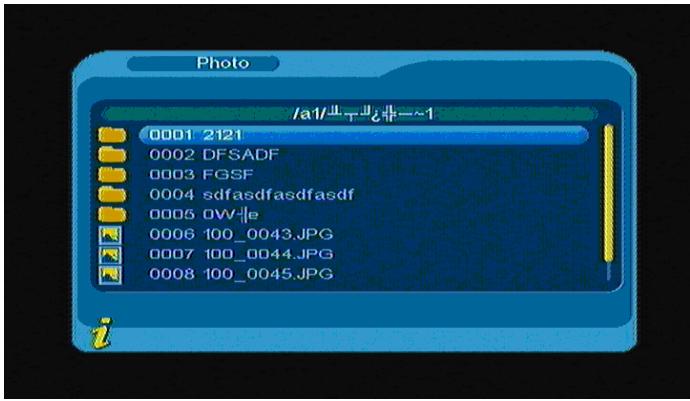
Figure 3.37
Press to choose photo file name; Press ENTER to play Photo file; Press to play previous Photo, to play next Photo; and press Menu/Exit to exit play mode and return to file directory.
4. MAINTENANCE
4.1 Handling your TFT-1021
- Do not drop the machine or heavy objects on top of the TFT-1021
- Do not place the machine in a location subject to: Heat sources, such as radiators or air ducts,
- Direct sunlight, Excessive dust, Moisture or rain, Mechanical vibration or shock, Strong magnets or speakers that are not magnetically shielded, Ambient temperature of more than 35^ or less than 5^ and High humidity.
- Do not place electronic equipment near the machine. The electromagnetic field of the machine may cause a malfunction.
- Provide adequate air circulation to prevent internal heat from building up. Do not place the machine on porous surfaces such as rugs or blankets, or near material such as curtains or draperies that may block its ventilation slots.
- The machine uses high-frequency radio signals and may cause interference to radio or TV reception. If this occurs, relocate the machine a suitable distance away from the set.
- Use only specified peripheral equipment and interface cables; otherwise, problems may occur.
- Do not use cut or damaged connection cables.
- If the machine is brought directly from a cold location to a warm one, moisture may condense inside the machine, In this case, allow at least one hour before turning on the machine, if any problems occur, unplug the machine and contact an authorized Service Centre. To find the nearest centre or agent, visit the online support Web site.
- Make sure you disconnect the power cord before cleaning the machine.
4.2 Considerations about the screen
-
Please read the details of this guidebook before using, and store safely in case use another day.
-
You may see tiny black points and/or bright points (red, blue, or green) that continuously appear on the LCD. LCD has a very few (0.01%) unlit pixels and always lit pixels. You may also see distortion in colours or brightness depending on your perspective. This is a normal result of the manufacturing process and does not indicate a malfunction.
- The LCD is manufactured using high-precision technology, do not apply a strong shock or drop it. Do not disassemble or refit yourself.
- Do not exert pressure on LCD screen. The LCD that is made from glass may be broken by pressure.
- Do not place your LCD in a location subject to direct sunlight or excessively high temperature. This may cause a malfunction.
- Do not place your LCD in a location subject to mechanical vibrations or in an unstable location.
- Do not place use a moist cloth to wipe the LCD. Liquid may cause a malfunction if it leaks into your LCD.
- Do not place or drop any object onto the LCD. Also, do not apply any force to the LCD. If the liquid leaves out, please use soap and clean water to clean.
- If you bring your LCD from a cold location to a warm one, moisture may condense on the LCD. In such a case, wipe off the moisture before using your LCD. It is recommended to use tissue papers to wipe off the moisture. If the LCD surface is still not warm enough, moisture may condense again. Leave LCD until its surface is warmed up to the ambient temperature. Do not use alcohol, gas or chemistry reagent to wipe.
- Close LCD after use or during in malfunction. Please switch off power in case safe.
- If you have any questions, please contact our company.
4.3 Cleaning recommendations
- To clean the cover, make sure the machine is disconnected.
- Do not use scented hydrocarbons or chloride solvents. Such products may attack the plastics used in the construction of the cover. The cover should be cleaned by means of a light solution of detergent and water applied with a soft cloth. Dry thoroughly before using the system again.
- Do not used for the cleaning of the front panel, alcohol or its derivatives, these products can attack the mechanical properties of the materials and diminish their useful time of life.
4.4 Care the power source
- Refer the online specifications to check the power operation of your machine.
- Do not share the AC outlet with other power-consuming equipment, such as a photocopier or shredder.
- You can purchase a power strip with a surge protector. This device prevents damage to the machine caused by sudden power surges, in an electrical storm.
- Do not place heavy objects on the power cord.
- To disconnect the cord, pull it out by the plug.
- Unplug the machine from the AC outlet if you are planning to not use the machine for a long time.
- Make sure that AC outlet is easily accessible.
- When the AC adapter is not used, unplug it from the AC outlet.
- Use the AC adapter supplied with the machine or authorized products. Do not use any other AC adapter as it may cause a malfunction.
4.5 Care battery
- Battery life is shorter in a cold environment. This is due to decreased battery efficiency at low temperatures.
- Charge the batteries at temperatures between 10^ to 30^ . Low temperatures require a long charging time.
- This machine is designed to operate only with special batteries. The battery design for only professional or Service Provider can open. Do not open or try to disassemble the battery cover on the back yourself.
- While the battery is in use or being charged, the battery pack heats up. This normal and is not cause concern.
- When the battery indicated iron on the screen flashes or when you have not used the battery for a long time, you need to recharge the battery.
- If the battery power is still low after charging it, the battery may be reaching the end of its life and should be replaced. Please contact your dealer or Service Provider.
4.6 About the headphone using
- Do not use headphones while driving, cycling, or operating any motorized vehicle. It may create a traffic hazard and is illegal in some areas. It can also be potentially dangerous to play loud music while walking, especially at pedestrian crossings.
- Avoid using headphones at high volume. Hearing experts advise and against continuous, loud and extended play. If you experience a ringing in your ears, reduce the volume or discontinue use.
5. TROUBLESHOOTING
| Problem | Possible causes | What to do |
| The LED does not light up/ not lit. | Mains cable is not connected. The battery isn’t installed or need to recharge. Condensed fluid may cause the machine to malfunction. | Check that the mains cable is plugged into the power socket Make sure the battery is installed properly and charged. Reattach the AC adapter and reinstall the battery, and press the power button to turn on the machine. Do not use the machine for at least one hour if there are some condensed fluids in it. |
| The screen is close and power LED is on. | Battery exhausted. | Change battery. |
| The remote control is not working. | Battery exhausted. Remote control is incorrectly aimed | Change battery. Aim the remote control at box. Check that nothing blocks the front panel. |
| Don’t display the subtitle | The program signal no subtitle date The subtitle don’t open or signal is too weak | Try press the S.TIT button open the subtitle. Make sure the signal is good |
| When the machine tries to find and store channels you get the message “No signal” | The aerial is not properly connected to the machine. | Check the aerial ins- tallation including its connections. |
| When only very few of the expected number of channels are found. | The aerial is not correctly directed towards the transmitter. The aerial is not suitable for digital channels. The signal is too weak for the connected aerial. There are no terrestrial digital transmissions in the area. | Check that the aerial is directed towards the transmitters. Check that digital transmissions are available in the area. If things does not work out as they should, let the local TV dealer check whether the aerial is intended for receiving digital transmissions or not. If not you have to exchange the aerial. |
| During the channel searching process, the buttons or remote controller's keys are insensitive. | Since the channel searching process use a lot of system resource, the system scan keys or buttons will become very slow. | Try press buttons or remote controller's keys several times. |
| Can’t play the music file correctly | The file is damaged or code is wrong | Change the right files. |
| Can’t play the video. | The format of the video doesn’t compatible or file has damaged. | The max bit-rate of the video is 8Mbps. |
| Picture or video doesn’t full screen | The resolution of the files not suitable | Change the files |
Note: If you have tried all of the actions suggested above, without solving the problem, please contact your dealer.
6. TECHNICAL SPECIFICATIONS
| LCD Panel | LCD Model Size | 10.1-inch Digital TFT LCD |
| Active area | 219.6(W) ×131.76(H) mm | |
| Resolution | 800*RGB x480 | |
| Digital television | RF input Frequency | VHF High: 177.5MHz ~226.5MHz UHF: 474MHz ~ 858MHz |
| RF input level range | -20dBm~—78dBm | |
| Demodulation | OFDM 2K and 8K | |
| 16QAM, 64QAM,QPSK | ||
| Photo Playback | JPEG | Baseline Sequential、Progressive、Lossless、Hierarchical |
| Postfix name : *JPG | ||
| VideoPlayback | MPEG1/2 | Video: MPEG I/II Up to 720*480 @ 30fps, 720*576 @ 25fps. Audio: MPEG-I/II Layer I/II/III |
| Postfix name : *.DAT、*.MPG | ||
| MPEG-4 | Video: MPEG-4 Simple Profile 720*480 @ 30fps, 720*576 @ 25fps Audio: MPEG-I/II Layer I/II/III | |
| Postfix name : *AVI、 | ||
| Divx | Divx 4.x 5.x | |
| Video: Up to 720*480 @ 30fps, 720*576 @ 25fps Audio: ADPCM or MPEG1 Layer I/II/III | ||
| Postfix name : *AVI、*.Divx | ||
| AudioPlayback | MP3 | Stereo、MPEG-1&2 Layer I/II/III, sample rate up to 48KHz, Bit rate: 24-320Kbps, CBR & VBR |
| Postfix name : *MP3 *.WMA | ||
| Memory Support | USB | 2.0 (only Host) |
| SD | Max. card capacity16 GB | |
| Insert Battery | Connect | 7.4V/2200mA |
| External power | input | AC100-240V, 50/60 Hz, Max.0.5A |
| Power consumption | ≤15W | |
| supply | DC power to the TFT-1021 | DC9V, 2 A |
| Operating temperature | 0℃~40℃(75%Non-Condensing) | |
| Storage temperature | -20℃~60℃(75%Non-Condensing) | |
| Dimensions (w×d×t) | 286mm×178mm×39.5mm | |
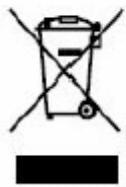
If at any time in the future you should need to dispose of this product please note that: Waste electrical products should not be disposed of with household waste. Please recycle where facilities exist. Check with your Local Authority or retailer for recycling advice. (Waste Electrical and Electronic Equipment Directive)
Lenco
TRAGBARER LCD-DIGITALFERNSEHER
TFT-1021
BENUTZERHANDBUCH
Wichtige Hinweise
OPEN = ÖFFNEN PUSH = DRÜCKEN
(4) Software-Upgrade:
(4)Software Upgrade:
<3>EPG (Electronic programs guide)
1. Channel Organizer
(4)Software Upgrade:
- PORTABLE DIGITAL LCD TV
- Important Notes
- The product accord with the ROHS requirement.
- CONTENT
- GENERAL INFORMATION ABOUT THE TFT-1021 1
- QUICK GUIDE. 1
- PANELS 2
- INTRODUCTION 3
- BASIC FUNCTIONS 6
- MAINTENANCE 24
- 5.TROUBLESHOOTING 26
- TECHNICAL SPECIFICATIONS 28
- NOTICE:
- QUICK GUIDE
- Plug in your TFT-1021
- To use the AC adapter:
- Attention:
- Product overview
- FRONT VIEW
- The LED states are shown as:
- TOP VIEW
- SIDE VIEW
- REAR VIEW
- Keys definition
- INTRODUCTION
- Check list
- About transmission
- Antenna
- Connecting to Earphones
- Installing Stand
- SD Card and USB jack
- Remote
- About Rechargeable Battery
- BASIC FUNCTIONS
- Enter into system and power on-off
- Enter into DVB system
- Menu summarize
- Digital TV
- (1).Channel Manager:
- Channel Organizer
- Channel sorting
- Channels;
- Edit Channels
- Delete all
- (2).Installation:
- Auto search
- Manual search
- Area Search
- (3).Configuration:
- OSD
- TV
- System setup
- Time:
- (4)Software Upgrade:
- (5)Factory default:
- (6)Version:
- <1> FAV Program
- <4>Subtitle
- <5>TTX (Teletext)
- <6>Multiaudio: Audio language switch and L/R channel switch
- <7>Program info: Display information of programs
- Movie
- Music
- Photo
- MAINTENANCE
- Handling your TFT-1021
- Considerations about the screen
- Cleaning recommendations
- Care the power source
- Care battery
- About the headphone using
- TROUBLESHOOTING
- TECHNICAL SPECIFICATIONS
- Lenco
- TRAGBARER LCD-DIGITALFERNSEHER
- Wichtige Hinweise
- Software-Upgrade:
- <3>EPG (Electronic programs guide)
Brand : LENCO
Model : TFT-1021
Category : Tablet