
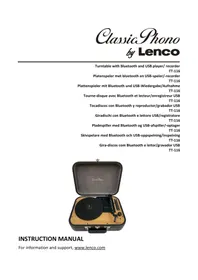
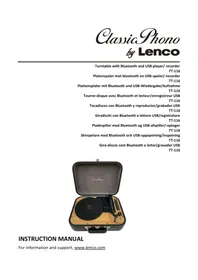
DF-241 - Turntable LENCO - Free user manual and instructions
Find the device manual for free DF-241 LENCO in PDF.


| Product type | Digital photo frame |
| Brand | LENCO |
| Model | DF-241 |
| Power supply | Integrated lithium battery (charges via USB), battery life up to 3 hours |
| Battery charging time | Approximately 2 hours via USB |
| Supported image formats | JPG, BMP, TIF, GIF, PNG |
| Main functions | Photo display, automatic slideshow, rotation, deletion, transfer from PC via Photo Viewer software |
| Connectivity | Mini USB (USB cable included) |
| Software installation | CD-ROM with Photo Viewer software (Windows 98/2000/ME/XP/Vista) |
| Screen orientation | Vertical (portrait) or horizontal (landscape) thanks to a reversible stand |
| Maintenance and cleaning | Do not expose to water or moisture; clean with a soft, dry cloth |
| Safety | Do not leave plugged in for more than 12 consecutive hours; avoid heat sources |
| Included items | Photo frame, stand, USB cable, installation CD-ROM, user manual |
| Repairability | No user-serviceable parts; contact qualified service |
| General information | Compliant with FCC and CE standards; recycling according to WEEE directive |
Frequently Asked Questions - DF-241 LENCO
User questions about DF-241 LENCO
0 question about this device. Answer the ones you know or ask your own.
Ask a new question about this device
Download the instructions for your Turntable in PDF format for free! Find your manual DF-241 - LENCO and take your electronic device back in hand. On this page are published all the documents necessary for the use of your device. DF-241 by LENCO.
USER MANUAL DF-241 LENCO
Table of Contents. 1
ENGLISH 2-11
DEUTsCH. 12-21
Espanol 22-31
NEDERLANDS 32-41
FRANCAIS 42-51
DIGITAL PHOTO FRAME
Read First
Quick Installation Guide
SYSTEM REQUIREMENTS:
Windows 98 / 2000/ ME / XP/Vista
INSTALLATIONPROCEDURE:
** Important: Install application software before connect deviceto PC. **
- Disconnect device USB cable from PC if it is connected.
- Insert CD and follow the on-screen instruction to install "Photo Viewer".
- After the application software has been successfully installed, you could connect device to PC with the provided USB cable.
- Windows OS will set up hardware driver automatically.
- Launch "Photo Viewer" and enjoy.
NOTE: The software can notinitialize with the unitif plugged in while running in automatic slide show mode.
For Windows 98 SEuser, you need to install the driver software in the CDprovided.
Introduction
This Digital Photo Frame is astand-alone device that is designed to transfer and store images from aPC and then display the images. Using the application software supplied with thisdevice, you can organize,edit, enhance and download the image inyour PC to this device usingUSB.
Important Safety Instructions
WARNING:
This device will be fullycharged after two hours charging through USB cable.
- Do not leave the deviceconnected to the USB forlonger than 12 consecutive hours otherwise damage andoverheating of the device may occur.
- Do not expose this deviceto water or moisture.
- Do not remove cover. No user serviceable partsinside. Refer servicing to qualified personnel.
- The device should be away from sources of high heat such as Radiators or stoves.
- The device should be connected to a power supplyonly of the type described in the operating instructions or as markedon the unit.
- Care should be taken so that objects are not placed on, nor liquids spilled on or inside the device.
- The user should not attempt to service the device beyond those means described in these operating instructions. All other servicing should be referred to qualified service personnel.
Placing the PhotoViewer
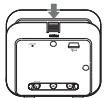
The Photo frame can be placed either vertically (portrait) or horizontally (landscape).
- Press down the locking tab and pull away the main unit from the frame to separate the main unit.
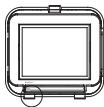
- Press down the left end of the rod, and grab the other end to remove the rod from the main unit.
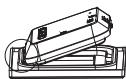
- Replace the frame by inserting the two tabs on the main unit to the two holes at the top of the frame.
Bring the main unit and frame together, then press at the bottom until it clicks in place.
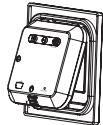
- Screw in the rod to one of the two screw holes on the back of the main unit.
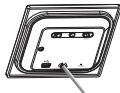
Installing the Software/ Hardware
IMPORTANT: You must install the software to your computer before connecting the device to your computer for the first time.
- Insert the CD-ROM andrun the file Photo ViewerSETUP; follow the onscreeninstructions.
- The application Photo Viewer will be installed on your computer and a shortcut to the application will appear on your desktop.
DO NOT LAUNCH THE SOFTWARE YET.
- After the softwareis installed, connect the device tothe computer with the USB cable supplied. The hardwaredrivers will be installed automatically. Follow the on-screen instructionsand accept the installation screens that appear.
- After hardware installationis complete, launch the PhotoViewer application from the shortcut on your PC desktop.
NOTE: If you are unable to launch the software or connect to your device, go to the Troubleshooting of this manual for more information.
Charging the Battery
The internal battery of the device may be charged using the USB cable when connected to a powered USB port(such as USB porton your computer) or hub. At full charge, the device can provide up to 3 hours of run time.
Downloading Photos from Your Computer to Photo Frame
Attention: You must connect the PhotoViewer to the PC before launching the software.
- Insert one end of the USB Cable into USB on your computer's USB port and the other end into the Photo Viewer.
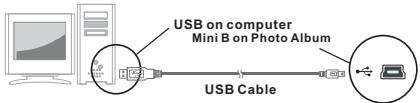
- "Connect?" appears on the Photo Viewer, press MODE to confirm, and "Download" appears, indicating the connection is complete, If no key is pressed during 1 minute, the Photo Frame will enter battery charging mode. You need to disconnect the USB cable and connect it again.
- Launch the software by double clicking the Photo Viewer shortcut on your computer's desktop.

Save selected photo on Collection Panel to your computer.

Delete selected photos.

- Click to download photos on Collection Panel to your Photo Viewer


-Click to rotate your photos

-Click to post photos in Preview Area to Collection Panel.
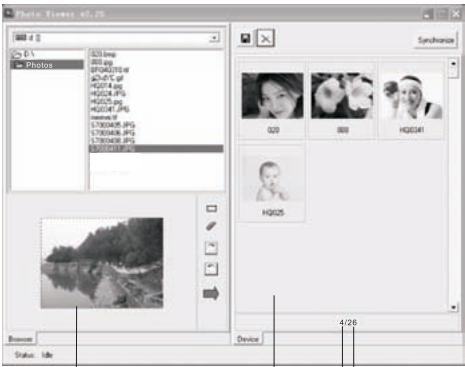
Preview Area.
Collection Panel.
- Number of photos on Collection Panel.
- Maximum number of photos can be stored in the Photo Frame.
- Browse your computer for photo(s) you want to download. The selected photo is displayed in the Preview Area.
Note: The Photo Frame reads.JPG/BMP/TIF/GIF/PNG images.
- If the photo is too big, a red box appears on the photo, and you can click the red box and mover around the box to crop the photo.
You can also rotate the photo by clicking"
- Click "to move the photo displayed in the Preview Area to the Collection Panel.
- If you want to delete the photo on Collection Panel, select the photo and press " l " to delete. If you want to save the photo on Collection Panel to your computer, select he photo and press " l " to save.
- Click " Synchronize" to download photos on Collection Panel onto your Photo Frame.
- Wait for download to complete, then close the software and remove the Photo Frame from your computer.
NOTE: If you want to download again, you need to re-start the Photo Viewer software.
Using the Function Keys
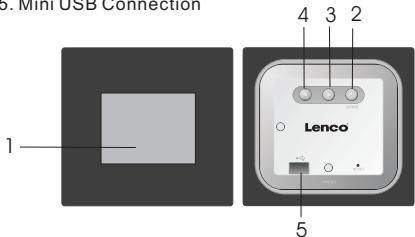
- Monitor
2.0/MODE - Previous Image Delete images
- Next Image Delete all Images.
- Mini USB Connection
Electromagnetic Emissions Statement
- This device complies with Part 15 of the FCC Rules and CE. Operation is subject to the following conventions:
(1) This device may not cause harmful interference.
(2) This device must accept any interference received, including interference that may cause undesired operation.
THIS CLASS DIGITAL APPARATUS COMPIES WITH CANADIAN ICES-003. / CÉT APPAREIL NUMérique DE LA CLASSE B EST CONFORMÉ À LA NORME NMB-003 DU CANADA.
Using the PhotoViewer
Press and hold /MODE for about 4 seconds to turn the unit on.
Press and hold again /MODE for about4 seconds to turn the unit off.
Note: You need to turn off the slideshow before you can turn off the Photo Viewer.
Viewing Photos
- Turn the Photo Frame on by pressing and holding down the /MODE for around 4 seconds.
- Press to browse through your photos. Press to return to a previous photo.
Using Slideshow (Automatic Display of Photos)
With the unit on, press /MODE. The Photo Frame scrolls through all photos automatically.
Press /MODE again to turn off the slideshow feature.
Deleting a SinglePhoto
- In browse mode, use and to locate the photo you want to delete.
- Press and hold for 3 seconds. "Delete" appears on the display.
- Press to delete the photo, or press to cancel the operation.
Deleting All Photos
- In browse mode, use and to locate the photo you want to delete.
- Press and hold for 3 seconds. "Delete All" appears on the display.
- Press to delete the photo, or press to cancel the operation.
Troubleshooting for Installation
If the device displayserror message "Device not connected" during installation, follow these steps to resolve:
A. For Software issues (PhotoViewer software cannot launch)
- Re-insert and launchthe installation CD and choose "Remove" or "Uninstall" from the InstallerMenu.
- Disconnect the USBcable and device fromthe computer and restart.
- After computerhas restarted, launch theinstaller again and reinstall the software.
Note: DO NOT connect the USB cable until after the software is installed.
B. For Hardware installation issues (Device not recognized)
- With the Viewer connected to the computer via USB goto the Start Menu / Control Panels/ Add Hardware.
- When the Dialogbox comes up, clickthe option that says"Yes, Ihave already connected the software".
- In the listof Devices-Find "Photo Viewer" click NEXT and this will give the status of the device. If a warning icon appears next to the Photo Viewer then double click the icon and select the option to "Reinstall the software".



- DIGITAL PHOTO FRAME
- Read First
- Quick Installation Guide
- SYSTEM REQUIREMENTS:
- INSTALLATIONPROCEDURE:
- Introduction
- Important Safety Instructions
- WARNING:
- Placing the PhotoViewer
- Installing the Software/ Hardware
- DO NOT LAUNCH THE SOFTWARE YET.
- Charging the Battery
- Downloading Photos from Your Computer to Photo Frame
- Using the Function Keys
- Electromagnetic Emissions Statement
- Using the PhotoViewer
- Viewing Photos
- Using Slideshow (Automatic Display of Photos)
- Deleting a SinglePhoto
- Deleting All Photos
- Troubleshooting for Installation
Brand : LENCO
Model : DF-241
Category : Turntable