
DF-241 - Platenspeler LENCO - Gratis gebruiksaanwijzing en handleiding
Vind de handleiding van het apparaat gratis DF-241 LENCO in PDF-formaat.


| Producttype | Digitaal fotolijstje |
| Merk | LENCO |
| Model | DF-241 |
| Voeding | Geïntegreerde lithiumbatterij (oplaadbaar via USB), batterijduur tot 3 uur |
| Batterij opladen | Ongeveer 2 uur via USB |
| Ondersteunde afbeeldingsformaten | JPG, BMP, TIF, GIF, PNG |
| Belangrijkste functies | Foto's weergeven, automatische diavoorstelling, draaien, verwijderen, overzetten vanaf pc via Photo Viewer-software |
| Connectiviteit | Mini-USB (USB-kabel meegeleverd) |
| Software-installatie | Cd-rom met Photo Viewer-software (Windows 98/2000/ME/XP/Vista) |
| Schermoriëntatie | Verticaal (portret) of horizontaal (landschap) dankzij een omkeerbare voet |
| Onderhoud en reiniging | Niet blootstellen aan water of vocht; reinigen met een zachte, droge doek |
| Veiligheid | Niet langer dan 12 uur aangesloten laten; warmtebronnen vermijden |
| Meegeleverde onderdelen | Fotolijst, voet, USB-kabel, installatie-cd-rom, gebruikershandleiding |
| Repareerbaarheid | Geen onderdelen die door de gebruiker gerepareerd kunnen worden; neem contact op met een gekwalificeerde service |
| Algemene informatie | Voldoet aan FCC- en CE-normen; recycling volgens WEEE-richtlijn |
Veelgestelde vragen - DF-241 LENCO
Gebruikersvragen over DF-241 LENCO
0 vraag over dit apparaat. Beantwoord die u kent of stel uw eigen vraag.
Stel een nieuwe vraag over dit apparaat
Download de handleiding voor uw Platenspeler in PDF-formaat gratis! Vind uw handleiding DF-241 - LENCO en neem uw elektronisch apparaat weer in handen. Op deze pagina staan alle documenten die nodig zijn voor het gebruik van uw apparaat. DF-241 van het merk LENCO.
GEBRUIKSAANWIJZING DF-241 LENCO
Lenco
DIGITAL PHOTO FRAME
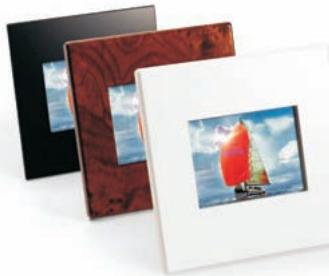
Table of Contents
Table of Contents. 1
ENGLISH 2-11
DEUTsCH. 12-21
Espanol 22-31
NEDERLANDS 32-41
FRANCAIS 42-51
DIGITAL PHOTO FRAME
Read First
Quick Installation Guide
SYSTEM REQUIREMENTS:
Windows 98 / 2000/ ME / XP/Vista
INSTALLATIONPROCEDURE:
** Important: Install application software before connect deviceto PC. **
- Disconnect device USB cable from PC if it is connected.
- Insert CD and follow the on-screen instruction to install "Photo Viewer".
- After the application software has been successfully installed, you could connect device to PC with the provided USB cable.
- Windows OS will set up hardware driver automatically.
- Launch "Photo Viewer" and enjoy.
NOTE: The software can notinitialize with the unitif plugged in while running in automatic slide show mode.
For Windows 98 SEuser, you need to install the driver software in the CDprovided.
Introduction
This Digital Photo Frame is astand-alone device that is designed to transfer and store images from aPC and then display the images. Using the application software supplied with thisdevice, you can organize,edit, enhance and download the image inyour PC to this device usingUSB.
Important Safety Instructions
WARNING:
This device will be fullycharged after two hours charging through USB cable.
- Do not leave the deviceconnected to the USB forlonger than 12 consecutive hours otherwise damage andoverheating of the device may occur.
- Do not expose this deviceto water or moisture.
- Do not remove cover. No user serviceable partsinside. Refer servicing to qualified personnel.
- The device should be away from sources of high heat such as Radiators or stoves.
- The device should be connected to a power supplyonly of the type described in the operating instructions or as markedon the unit.
- Care should be taken so that objects are not placed on, nor liquids spilled on or inside the device.
- The user should not attempt to service the device beyond those means described in these operating instructions. All other servicing should be referred to qualified service personnel.
Placing the PhotoViewer
The Photo frame can be placed either vertically (portrait) or horizontally (landscape).
- Press down the locking tab and pull away the main unit from the frame to separate the main unit.
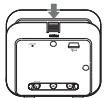
- Press down the left end of the rod, and grab the other end to remove the rod from the main unit.
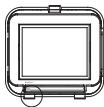
- Replace the frame by inserting the two tabs on the main unit to the two holes at the top of the frame.
Bring the main unit and frame together, then press at the bottom until it clicks in place.
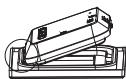
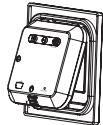
- Screw in the rod to one of the two screw holes on the back of the main unit.
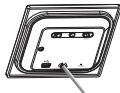
Installing the Software/ Hardware
IMPORTANT: You must install the software to your computer before connecting the device to your computer for the first time.
- Insert the CD-ROM andrun the file Photo ViewerSETUP; follow the onscreeninstructions.
- The application Photo Viewer will be installed on your computer and a shortcut to the application will appear on your desktop.
DO NOT LAUNCH THE SOFTWARE YET.
- After the softwareis installed, connect the device tothe computer with the USB cable supplied. The hardwaredrivers will be installed automatically. Follow the on-screen instructionsand accept the installation screens that appear.
- After hardware installationis complete, launch the PhotoViewer application from the shortcut on your PC desktop.
NOTE: If you are unable to launch the software or connect to your device, go to the Troubleshooting of this manual for more information.
Charging the Battery
The internal battery of the device may be charged using the USB cable when connected to a powered USB port(such as USB porton your computer) or hub. At full charge, the device can provide up to 3 hours of run time.
Downloading Photos from Your Computer to Photo Frame
Attention: You must connect the PhotoViewer to the PC before launching the software.
- Insert one end of the USB Cable into USB on your computer's USB port and the other end into the Photo Viewer.
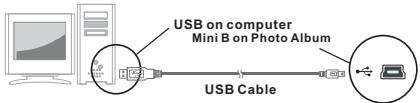
- "Connect?" appears on the Photo Viewer, press MODE to confirm, and "Download" appears, indicating the connection is complete, If no key is pressed during 1 minute, the Photo Frame will enter battery charging mode. You need to disconnect the USB cable and connect it again.
- Launch the software by double clicking the Photo Viewer shortcut on your computer's desktop.

Save selected photo on Collection Panel to your computer.

Delete selected photos.

- Click to download photos on Collection Panel to your Photo Viewer


-Click to rotate your photos

-Click to post photos in Preview Area to Collection Panel.
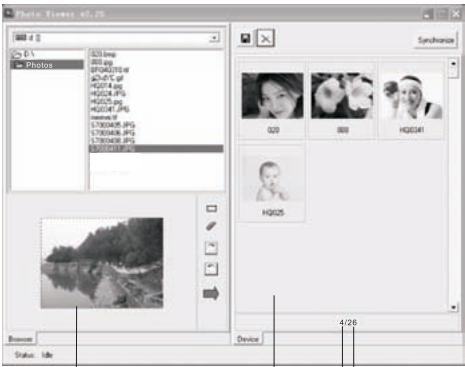
Preview Area.
Collection Panel.
- Number of photos on Collection Panel.
- Maximum number of photos can be stored in the Photo Frame.
- Browse your computer for photo(s) you want to download. The selected photo is displayed in the Preview Area.
Note: The Photo Frame reads.JPG/BMP/TIF/GIF/PNG images.
- If the photo is too big, a red box appears on the photo, and you can click the red box and mover around the box to crop the photo.
You can also rotate the photo by clicking"
- Click "to move the photo displayed in the Preview Area to the Collection Panel.
- If you want to delete the photo on Collection Panel, select the photo and press " l " to delete. If you want to save the photo on Collection Panel to your computer, select he photo and press " l " to save.
- Click " Synchronize" to download photos on Collection Panel onto your Photo Frame.
- Wait for download to complete, then close the software and remove the Photo Frame from your computer.
NOTE: If you want to download again, you need to re-start the Photo Viewer software.
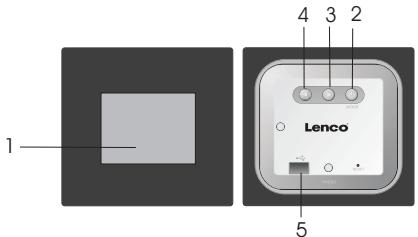
Using the Function Keys
- Monitor
2.0/MODE - Previous Image Delete images
- Next Image Delete all Images.
- Mini USB Connection
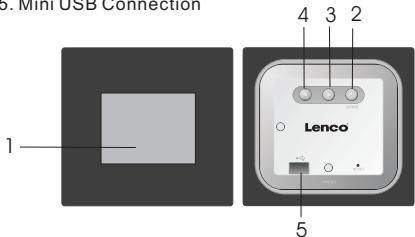
Electromagnetic Emissions Statement
- This device complies with Part 15 of the FCC Rules and CE. Operation is subject to the following conventions:
(1) This device may not cause harmful interference.
(2) This device must accept any interference received, including interference that may cause undesired operation.
THIS CLASS DIGITAL APPARATUS COMPIES WITH CANADIAN ICES-003. / CÉT APPAREIL NUMérique DE LA CLASSE B EST CONFORMÉ À LA NORME NMB-003 DU CANADA.
Using the PhotoViewer
Press and hold /MODE for about 4 seconds to turn the unit on.
Press and hold again /MODE for about4 seconds to turn the unit off.
Note: You need to turn off the slideshow before you can turn off the Photo Viewer.
Viewing Photos
- Turn the Photo Frame on by pressing and holding down the /MODE for around 4 seconds.
- Press to browse through your photos. Press to return to a previous photo.
Using Slideshow (Automatic Display of Photos)
With the unit on, press /MODE. The Photo Frame scrolls through all photos automatically.
Press /MODE again to turn off the slideshow feature.
Deleting a SinglePhoto
- In browse mode, use and to locate the photo you want to delete.
- Press and hold for 3 seconds. "Delete" appears on the display.
- Press to delete the photo, or press to cancel the operation.
Deleting All Photos
- In browse mode, use and to locate the photo you want to delete.
- Press and hold for 3 seconds. "Delete All" appears on the display.
- Press to delete the photo, or press to cancel the operation.
Troubleshooting for Installation
If the device displayserror message "Device not connected" during installation, follow these steps to resolve:
A. For Software issues (PhotoViewer software cannot launch)
- Re-insert and launchthe installation CD and choose "Remove" or "Uninstall" from the InstallerMenu.
- Disconnect the USBcable and device fromthe computer and restart.
- After computerhas restarted, launch theinstaller again and reinstall the software.
Note: DO NOT connect the USB cable until after the software is installed.
B. For Hardware installation issues (Device not recognized)
- With the Viewer connected to the computer via USB goto the Start Menu / Control Panels/ Add Hardware.
- When the Dialogbox comes up, clickthe option that says"Yes, Ihave already connected the software".
- In the listof Devices-Find "Photo Viewer" click NEXT and this will give the status of the device. If a warning icon appears next to the Photo Viewer then double click the icon and select the option to "Reinstall the software".
DIGITALERBILDERRAHMEN
Bitte lesen!
Kurzinstallationsanleitung
SYSTEMANFORDERUNGEN
Windows 98 / 2000/ ME / XP/Vista
SOFTWAREINSTALLATION:
Wichtig: Installieren Siedie Software, bevor Siedas Gerat an einen PC anschließen.
- Trennen Siedas Gerat vom USB-Kabel, wenn es aneinen PC angeschlossen ist.
- Legen Sie dieCD ein und befolgenSie die Bildschirmanweisungen zur Installation von "Photo Album".
- Nach erfolglicher Installation der Software konnen Siedas Gerat mithilfe des mitgelieferten USB-Kabels an den PC anschließen.
- Windows richtet danndie Hardware-Treiber automatischein.
- Starten Sie dasProgramm und Sie konnen mit der Benutzung anfangen.
HINWEIS: -Die Software kann nicht initialisiert werden, wenn das Gerrat im Diashowmodus ist.
Windows 98 SE Benutzer, installmenten Sie der Treiber Software, die mitgelieferte CD-ROM enth-It这部分 software
Einleitung
Dieses digita Fotoalbum ist ein eigentständiges Gerät, auf das Sie Bilder vom PC kopieren und dann damitbetrachten können. Benutzten Sie die mitgelieferte Software zum Verhalten, Bearbeiten, Verbessern und Kopieren der Bilder vom PC aufdas Gerät. Dieses Fotoalbum kann tausende von Fotos speichern
Wichtige Sicherheitschinweise
WARNING:
- Dieses Gerät ist nach zwei Stunden Ladezeit vollständig aufgeladen.
Achten Sie)bietethereauf,dassesnichtlangerals12StundenamUSB-PorthiesComputersangcheslossenbleibt,umzvermeiden,dassesichüberhitzundbeschadigt wird. - Setzen Sie diese Gerätniemals Wasser oder Feuchtigkeit aus.
Das Gerat solle inausreicherend Entfernung zu Hitzequellenwie z. B. Heizkorpmen bzw. Ofen aufgestellt werden. - Das Gerät sollte nurmit einem)dafur vorgesehenenNetzeil betrieben werden.
Achten Sie darauf, dasskeine anderen Gegenstände aufdas Gerät gestellt werden und dasskeine Flüssigkeiten auf bzw. in das Gerät gelangen. - Der Benutzer sollte keineVersuche anstellen dasGerät eigenhändig zu warten, es seidenen es wurde entsprechend in der Bediungsanleitung beschrieben. Wenden Sie sich bei weiterem WartungsbedarfammanderausgebildetesWartungspersonal.
Aufstellung
Der Fotorahmen kann entwederim Hochformat (vertikal) oderim Querformat (horizontal) aufgestellt werden.
- Drücken Sie die Sperrlasche nach unter und ziehen Sie das Gerät aus dem Rahmen hersa.
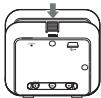
- Drücken Sie das linke Ende der Stange nach unten und ziehen Sie die sie am anderen Ende hersa.
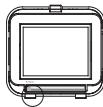
- Setzen Sie den Rahmen weiter auf das Cerät, indem Sie die beiden Laschen oben in den
Rahmen schieben. Setzen Sie das Gerat und den Rahmen zusammen und drücken Sie an der Unterseite, bis der Rahmen einrastet.
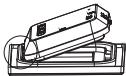
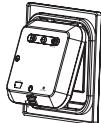
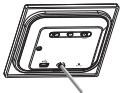
- Schrauben Sie die Stange in eine der beiden Gewinde an der Rückseite des Geräts.
Software- und Hardwareinstallation
WICHTIG: Sie müssen dieSoftware auf ihrer Computerinstallieren, avant Sie das Gértadas ersten Mal amComputer anschließen.
- Legen Sie dieCD-ROM ein und startenSie dasProgrammSETUP.EXE.Folgen Sie danneinfach den Bildschirmanweisungen.
- Die Anwendung"Photo Viewer" wird dann auf Ihr Computer installiert und ein Shortcutterscheint auf Ihr Desktop. STARTEN SIE DIE SOFTWARE NOCHNICT
- Nach der Softwareinstallationkonnen Sie das Gerämt dem mitgelieferten USB-Kabel am Computeranschlieben. Die Hardwareatreiber werden dann automatischinstalliert. Folgen Sie den Bildschirmanweisungen und bestätigten Siedie folgenden Installationsdialoge.
- Nach der Hardwareinstallation...\Nennen Sie das Programm"Photo Viewer" über den Shortcut aufhrem Desktop starten.
HINWEIS: Wenn Sie die Software nicht starten oder das Fotoalbum nicht anschlieben können, gehen sieitte zumAbschnitt" Fehlerbehebung" am Ende dieserAnleitung.
Aufladen des eingebauten Akkus
Der eingebaute Akkudes Gerats kann mithilfe der USB-Kabels aufgeladen werden, wenn das Gerätten einen Strom führenden USB-Port (z. B. der USB-Porthres Computers oder ein USB-Hub) angeschlossen wird. Vollaufgeladen kann das Gerät biszu 3 Stunden ohne Unterbrechung benutzt werden.
Kopieren von Fotos vonHrem Computer auf denFotorahmen
Achtung: Sie müssen den Fotobetrachter an den PCanschluss, bevor Sie die Softwarestarten.
- Verbinden Siedas eine Ende des USB-Kabels mit dem USB-Anschluss Ihr's Computersund das andere Endemit dem Fotobetrachter.
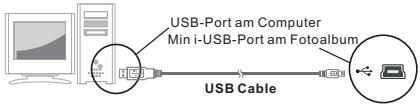
- Auf demBildschirm des Fotobetrachters entscheidt"Connect? Betätigten Sie dann die MODE-Taste zur Bestätigung. Auf dem Bildschirm entscheidt „Download" und der Verbindungsaufbau ist abgeschlossen. Wenn dann innerhalb von 1 Minute keine Taste betatigt wird, gehrt der Fotorahmen inden Auflademodus über. Sie müssen das Gerat dann vom Computer trennen unterneut anschließen.
- Starten Die sie Software, indem Sie aufden "Photo View"-Shortcut auf Ihr Demos Desktop doppelklicken.

—Speichern Sie die markierten Fotos im Auswahlfenster auf Ihrem Computer.

—Löschen Sie die markierten Fotos.

—Klicken Die Fotos im Auswahlfenster zum Kopieren auf den Fotobetrachter.


Klicken Sie hier zum Drehen ihrer Fotos.

Klicken Sie hier, um die Fotos vom Vorschaubereich zum Auswahlenfenster zu kopyieren.
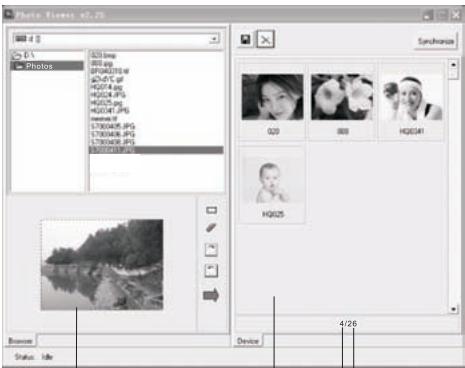
-Vorschaubereich
-Ausbwahlfenster
- Anzahl der Fotos im Auswahlfenster
- Maximale Anzahl der Fotos, die auf dem Fotorahmen gespeichert werden können.
- Suchen Sie nach Fotos auf Ihrm Computer, die Sie auf dem Fotorahmen kopieren wollen. Die markierten Fotos werden im Vorschaubereich abgebildet. Hinweis: Das Gedarf unterstützt.JPG-, BMP-, TIF-, FIF- und PNG-Bilder.
- Wenn die Fotos zu groß sind, entscheidt ein roter Kasten auf dem Fotos. Klicken Sie auf den roten Kasten, um das Foto zu verkleinen. Sie können das Foto auf drehen, indem sie auf " klicken.
- Klicken Sie auf " ", um das Foto vom Vorschaubereich ins Auswahlenfen zu entsprechien.
- Wenn Sie das Foto vom Auswahlfenster entfernen sollen, markieren Sie das Foto und betätigten Sie",um es zu löschen. Wenn Sie das Foto im Auswahlfenster auf Ihr Computer speichern sollen, markieren Sie das Foto und betätigten Sie ",um es zuspeichern.
- Klichen Sie auf "Synchronize", um die Fotos im Auswahlfenster auf den Fotorahmen zu kopieren.
- Warten Sie bis der Kopiervorgang abgeschlossen ist und verlassen Sie die Software. Trennen Sie dann den Fotorahmen von Ihrem Computer ab.
HINWEIS: Wenn Sie weitere Fotos kopieren möchten, müssen Sie die Fotobetrachter-Software ernut starten.
Benutzung der Funktionstasten
- Monitor
- MODE
- Voriges Bild Bilder löschen
- Nächstes Bild Aille Bider loschen
- Mini-USB-Anschluss
Erklärung zu elektromagnetischer Strahlung
- Dieses Gerat erflült die Anforderungen desParagrafen 15 der FCC-Verbindung und die Anforderungen des CE-Standards. Zum Betrieb des Gerats mussenfolgende Bedingungen erfüllt sein:
(1) Das Gerat darf keine schädigenden Störstrahlungen verursachen.
(2) Das Gerä must alle eingehenden Störzahlungen tolerieren, einschließlich choler Störzahlungen, durch die Betrieb einungswolter Weise beinrichtigt werden können.
THIS CLASS B DIGITALAPARATUS COMPLIESWITH CANADIAN ICES-003/ CETAPAREIL NUMérique DE LA CLASSE BEST CONFORMÉ À LANORNE NMB-003 DU CANADA.
Ein-/Ausschalten des Fotorahmens
Halten Sie die O/MODE-Taste für 4 Sekunden gedrucht, um das Gerät einschalten. Um das Gerät wieder auszuschalten, halten Sieitte die O/MODE-Taste erneut fur 4 Sekunden gedrucht.
Hinweis: Bevor Sie dasGerat aussalten konnen,müssenSie die Diashow stoppen.
Bilder ansehen
- Schalten Sie den Fotorahmen an, indem Sie die /MODE-Tastefur 4 Sekunden gedrückt halten.
- Betätigten Sie die Taste zur Bildauswahl. Betätigten Sie diese Taste, umzum vorianen Bild zurrückzukehren.
Benutzung der Diashowfungtion (Automatischer Bildwechsel)
Wenn Sie das Gerät eingeschaltet haben, betätigtenSieitte die / MODE-Taste.DerFotorahmenwechseln dann automatisch zum jeweils nachsten Bild. Betätigten Sie die /MODE-Taste erneut, um die Diashowfunktion wieder auszuschalten.
Löschen einzelner Fotos
- Benutzen Sie die Tasten und zur Auswahldes Fotos, dass Sie löschen möhten.
- Halten Sie die Taste für 3 Sekunden gedrück. "Delete"erscheid in der Anzeige.
- Betätigten Sie die Taste, um das Fotoz zulös oder betätigten Sie zum Abbrecchendes Vorgangs.
Löschen aller Fotos
- Benutzen Sie die Tasten und zur Auswahleines Fotos, dass Sie löschen möht.
- Halten Sie die für 3 Sekunden gedrückt."Delete All"erscheint in der Anzeige.
- Betätigkeiten Sie, um das Foto zulöschen oder betätigten Sie zum Abbrechen des Vorgangs.
Fehlerbehebung
Iwenn während der Installation die Fehlermeldung Device not connected" erscheid, gehen Sieitte auf folgendende Weise vor, um das Problem zubeheben:
A.Softwareproblem (die Photo Viewer Software kann nicht gestartet werden)
1. Legen Sie die Installations-CD erneut ein und wahren Sie im Installationsmenu „Remove" oder „Uninstall".
2. Trennen Sie das USB-Kabel und das Gerät vom Computer und führen Sie einen Neustart aus.
3. Nach dem Neustart des Computers starten Sie den Installationsdialog und installieren Sie die Software erneut.
HINWEIS: Schlieben Sie das USB-Kabel NICT an den Computer an, bevor Sie die Software installment haben.
B.Hardwareproblem (Gerät wird nicht erkannt)
- Schlieren Sie das Fotoalbum über das USB-Kabel an den Computer und gehen Sie auf Start -> Systemkconfiguration -> Hardware hinzufugen.
- Sobald an Dialogenfter eschreit, klichen Sie auf die Option „Ja, die Hardware ist bereits angeschlossen."
- Klicken Sie in der Gerätelese auf "Photo Viewer" und dann auf WEITER. Danach erscheidt der Status des Geräts. Wenn ein Warnsymbol neben dem Fotoalbum entscheidt, klicken Sie auf das Symbol und wahren Sie "Treiber neu installmenten".
PORTARETRATO DIGITAL
Lea Primero
Guía
REQUISITOS DEL SISTEMA
1. Windows 98/2000/ME/XP/VISTA
PROCEDIMIENTO DE INSTALLACION:
**Importante: instale el software de aplicacion antes de conectar el dispositivo al PC.**
1. Desconecte el cable USB del PC si está conectado.
2. Inserte el CD y siga las instructaciones en la pantalla para instalar "PhotoAlbum".
3. Después de instalar el software de aplicación, puede conectar el dispositivo al PC con el cable USB proportionsorado.
4. Windows OS instalara el driver o controlador del hardware automatistically.
5. Execute "Photo Viewer" y disfrute.
NOTA: • El software no puede inciarse con launidad si está connectado cuando funciona en modo de presentación automática.
- Para usuario de Windows98 SE, necessita instalar el programa fácilado en el CD
INTRODUCCION
Estealbumoffotosdigitaesusdispositivoqueha sido diseñado para transferir yalmacenarimíagenesdesundPCyuego podedor visualizar las imagenes.Usandoel software de laaplicación proportionscóneste dispositivo,puedeorganizar,editor, mejoraydescargar susimagenes en su PChasta el dispositivo usingoel USB.EsteAlbumdeFotosalmacenamilesdefotos.
Instrucciones importantes de seguidad
ADVERTENCIA
- Este dispositivo sera cargado Completely dereshoras.
- No deje this dispositovoconectao al USB durantemás de 12 horas consecutivas de lo contrariopuede fazer y sobrecalentarei disposivo.
No exponga el dispositivoal agua o humedad.
- El dispositivo tiene queestar situado lejos defuentes de calor tales como radiadores o estufas.
- El dispositivo debe estarconectado a un tipode toma de corriente que se describe enlas instructiones de functionamientoo como esta sealingado en la unidad.
- TengaULDaconso un dispositivo, nocoloque;ningun objecto enla parte superiori ni;ningunliquido y que podradañafar el dispositivo.
- El usoario no debeintenter reparar el aparatomás alla de los medios descritos en este manualde instructuciones.
- Refiérase a su personale servizio qualificado.
Colocar el Album de Fotos
El marco deotospuedeselocado verticalmente o (retrato) o de horizontalmente(paises).
1. Pulse la lengüeta de bloqueo y tire de la unidad principal del marco para Separar la unidad principal.

2. Pulse la extremidad izquierda de la barra y agarre la other extremidad para retirar la barra de la unidad principal.

3. Cambie el marco insertando las dos lengüétas en launidad principal A los dos agujeros del marco.
Junte lainstitutionaliparalemarco,leurspulseta parteinferiorhastaaqescolque en sutido.


4. Atornille la barra en uno de los agujeros en la parta trasera de la和地区.

INSTALLACION DELSOFTWARE /HARDWARE
IMPORTANT:iene que instalar else software en su ordinadorantes de conectar el dispositivo y su ordinador porla primero vez.
1. Inserte el CD-ROM yejecute el archivo SETUP.EXE, sigas las instrucciones en la Pantalla.
2. La aplicacion PhotoViewer sera instaladoen su ordinador y aparecerca un atajo ala aplicacion en suscerratorio. NO EXECUTE EL SOFTWARE TODAVIA.
3. Cuando haya instaladoel software, conecte eldispositivo a su ordenador con el cableUSB proportionado. LosDRV servos controadores del hardware seraninstalados automatamente. Siga las instrucciones enlathora y aceptelas pantallas de instalacion que aparecen.
4. Depues de instalarel hardware, ejecta la日消息 Photo Viewer desde el atajo ensu escritorio.
NOTA: si no可以选择 ejectcutarel software o connectarsea Photo Album, vaya a la guiade problemas y SOLUTIONES de este manual para Obtener más informacion.
CARGAR LABATERIA INCORPORADA
La bateria interna deldispositivo peut ser cargadausando el cable USB cuando está connectada un puerto USB (como un puerto USB en su ordinador) oconcentrador. Enplenacarga, el dispositivo pueda proportionsar más de3 horas de funciona bajo.
EscargarotosdesuspcalAlbumdefotosdigitales
Attencion:debe conectar suPhoto Viewer aun PC antes deejecutar el software.
1. Inserte una extremadaddel cable USB enpuerto USB desusordenador y la atraextremidad a Photo Viewer.

2. "Connected" (conectaro) apareceré en el PhotoViewer, pulse MODE para confirmar, Y aparecerá "Download", (descargar)indicando que la conexiónse has completeness. Si no pulsaaculara durante 5制动os, el Marco de Fotosentarra en modo de cargar de bateria. Necesidadesconectar el cable USB by conectarlo de nuevo.
3. Ejecute el softwarehaciendo doble Cli en atajo de PhotoViewer en el escritorio desu ordinador.

—Guarde la Foto seleccionada en panel de coleccion en su ordenador.

—Elimine lasotos seleccionadas.

Haga能做到escargar fotos en su panel de coleccion a su Photo Viewer.

Haga cli pagirar sus fotos

Haga tíc para做不到 las fotos en un Area Previa a su Panel de Coleccion.

- Área Previa.
-Panel de Coleccien.
-Numero deotos enPaneldeColeccion.
-Numero máximo deotos quepueden ser guardadas en su Marco de Fotos.
4. Explore su ordinadorpara descargar la(s) foto(s) deseada(s). Se visualiza la fotoselectionacion en el AreaPrevia. Nota: El marco defotos lee imagenes JPG/BMP/TIF/GIF/PNG.
5. Si la fotos demasiado grande, apareceráún cuadro rojo enla Foto, y pueda hacer clicken el cuadro rojoy desplazarse alrededor del cuadro rojo para trabajoar con la Foto. Puedegirar la Foto haciendo click en "
6. Haga click en" para moverla foto visualizada enel Aarea Previa al Panel deColeccion.
7. Si眼看 eliminatinga foto del Panelde Coleccion, selezione la foto y pulse " × "para eliminaria. Si deseaguardar la foto enel Panel de Coleccion de suordenador, selezione lafo y pulse " para guardarla.
8. Haga click en "Synchronize" para descargarlasotos en elPanel de Colecciona su Marcode Fotos.
9. Espere que ladescarga se haalready completado,LUgo cierra el software y retiret elMarco de Fotos desu ordinador.
NOTA: si desea descargar降温o, necessities volver ajecutar el software de Photo Mewer.
Usar las teclas de referencia
1.Pantalla
2. 念 /MODE
3. Imagen anterior Eliminarimagenes
4. Imagen suiviente Eliminar todas las imagenes.
5.Conexión mini USB

DECLARACION DE EMISSIONES ELECTROMAGNETICAS
Este aparo a cumple con la Parte 15 de las normas de la FCC y CE. El funcionaamente está sujeto a las condicionesSIGUIENTES:
(1)Este aparato no besoincaesarinterferencias dañas.
(2)Este aparo来自于此,但因为其功能的实现需要一定的时间。
ESTE APARATO DIGITAL DE CLASE B CUMPLE CON LAS NORMAS CANADIENSES IC ES-003.
CET APPAREIL NUMEERIQUE DE LA CLASSE B SET CONFORMEA LA NORME NMB-003 DU CANADA.
Usar el PhotoViewer
Pulse y mantenga pulsando /MODE durante 4segundos para encender laividad. Pulse y mantenga pulsando de nuevo /MODE durante 4segundos para apagar laividad.
Nota: necessities apagar el slideshow o Visualizacion automatica deotos presentacion antes para apagar el Photo Viewer (Visualizador deotos).
Visualizarotos
1. Enciya de el Marcoze Fotos pulsando ymanteniendo pulsando /MODE durante 4 segundos.
2. Pulse para explorarantas de lasfotos.Pulse para volvera la fot anterior.
Usar el Slideshow (Visualizacion automatica deotos)
Con launidad encendida, pulse /MODE. El Marcode Fotos explorarás todas las fotos de forma automática. Pulse /MODE de nuevoopara apagar el slideshowvisualización automática deotos.
Eliminar una Foto
1. En modo deexploration, use y parlocalizar la Foto quedesea eliminar.
2. Pulse y mantengapulsando▶durante 3段时间s. Delete (Eliminar) apareceré en lapantalla.
3. Pulse para eliminarla Foto, o pulse para cancelar la operation.
Eliminar todas lasOTOS
1. En modo de exploración, use y para localizar las fotos que desea eliminar.
2. Pulse y mantenga pulsando durante 3段时间s. Delete All (Eliminar todas) apareceré en la pantalla.
3. Pulse para eliminar la Foto o pulse para cancelar la operation.
Guiá de problemas y SOLUTIONES para la instalación
Si el dispositivo muestrael mensaje de error"Device not connected"(dispositivo no conectado)durante la instalacion, sigas los pasos siguientes:
A. Para problemas de Software (el software de FotoViewer no pueda executarse)
1. Vuela insertar y ejectar elCD de instalacion CDy elija "Remove" (retirar) o "Uninstall" (desinstalar) del menu de instalacion.
2. Desconecte el cableUSB y el dispositivode su ordinador yreinicie.
3. Después de reiniciariel ordinador, ejecteel instalador de Nuevo yuvela a instalar else software.
Note: NO CONNECTE el cableUSB hasta que nose haya instalado el software.
B. Para problemas de instalación de Hardware (no reconcello dispositivo)
1. Con el PhotoViewer conectado asu ordinador a travescde USB vaya a Menu Inicio/Panel de control/Añadir Hardware.
2. Cuando aparezca el压抑 de dialgo, hagacic en la opticonque dice "Yes, I have already connected the software". (Si, yahe connectado el software).
3. En la lista des dispositivos, busque "Photo Viewer" hagaclic en NEXT y estoderá el estado deldispositivo. Si aparece unicono de advertencia al bajo de Photo Viewer habadoble tic en elicono y selecciona la option "Reinstallthe software" (Volvera instalar el software).
DIGITALE FOTOALBUM
Lees Eerst
Snelle Installatiegids
DIGITALE FOTOALBUM:
Windows 98 / 2000/ ME / XP/ Vista
INSTALLATIEPROCEDURE:
** Belangrijk: Installeer applicatiesoftware voor aansluten op de PC. **
1. Ontkoppel de USB-kabel van de PC (indien aangesloten).
2. Plaats de CD in de CD-ROM en volg de instructies op het Scherm om de "Photo Album" software te installereren.
3. Sluit na de installation uw apparaat met de meegeleverde USB-kabel aan op de PC.
4. Windows OS stelt automatisch het hardware stuurprogramma in.
5. Start "Photo Viewer" en geniet ervan.
LET OP: • De software kan nietinitialiseren als het apparaat aangelsenoten is een eenvotcopresentatie draait.
- Windows 98 SE gebruikers, installeur de driver software in de meegeleverde CD-ROM.
Introductie
Dit Digitale Fotoalbum is een'stand-alone' apparaat, dat plaatjes van een PC kan opslaan, envervolgens weergeven. Met de meegeleverde software kurz u plaatjes bewerken,organiseren en Mooier make, en via de USB downloaden naardit apparaat. U kurz opedit Fotoalbum duizenden foto's opslaan
Belangrijke Veiligheidsvoorschriften
WAARSCHUWING:
- Het volledig opladen vandit apparaat duurt drieuur.
Laat het apparaat nieltanger dan 12 uuraaneengesloten op de USB aangesloten. Het apparaat kanoverhit, en beschadig daken
Stel het apparaat Nietbloot aan water envochtigheid
- Houd dit apparaat uuite buurt van warmtebronnen,zoals radiators en fornuzieren
Sluit dit apparaat alleenaan op een voedingsbronvolgens het type dat omschreven is inde gebruksiinstructies, of aangegevenis op het apparaat
- Plaats geen voorwerpen ophet apparaat; mors geenvloeistoffen op of in het apparaat
- voer geen onderhoud, andersdan omschreven is inde gebruiksinstructies. Laat onderhoud doendoor gekwaliffeerd personeel
Het Fotoframe Neerzetten
De Fotolijst kan vertaal (portret)en horizontaal (landschap) neergezeit worden.
1. Druk de borglip maar beneden en trek het apparaat en de lijst uit elkaar.

2. Druk het linkerendein het staafje maar beneden engrijt het andere eind ont hem staafje van het apparaat te verwijdenen.

3. Zet de lijst terug, door detwee lipjes op het apparatusaat in de twee gaatjes aan de bovenzijde van de lijst te steken. Breng het apparatusaat Ende lijst weer maar elkaartoe en druk aan de onderzijdetotdat ze vastklikken.


4. Schroef het staatje vast in een van de twe schroefgaatjes aan dechterzijde van het apparaat.

De Software/Hardware Installeren
BELANGRIJK: Installer eerst de software, vór u het apparata voor de eisteer keer op decomputer aansluit.
1. Plaats de CD-ROMerin, en start hetprogramma SETUP.EXE; volg de instructeurs op hetschem.
2. Het programme 'PhotoViewer word opuW PC geinstalleerd eneene snelkoppeling verschijnt op hetbureauablad.
Wacht MET HETSTARTEN VAN DE SOFTWARE.
3. Sluit, na hetinstalleren van de software, het apparaat met de USB-kabel aan op de computer. Het stuurprogrammaordt automatisch geinstalleerd. Volge instructies op hetschem, en accepteer het installationschem datverschijnt.
4. Na de installmentievan de hardware, kunto het Photo Viewer programma via de snekloppeinpog het bureauablad starten.
LET OP: Als de software nietsstart, of u uwFotoalbum Niet kurz aansluiten, raadpleeg dan voormeer informatiek het onderdeel 'Probleem Oplossen'inde handleiding
De Ingebouwde Batterij Opladen
De interne batterij vanhet apparaat kan opgeladenworden, als deze via de USB-kabel opeen actieve USB-poort (zoalsde USB-poort van de computer) of eenhub is aangesloten. Als de batterij volledig opgeladen is, kan hetapparaat zo'n 3 uurwerken.
Foto's van uw Computer maar uw Fotolijst Downloaden
Let op: u moet de Fotokijker op de PC aansluiten, vór u de software start.
1. Steek eien eindan de USB-kabel inde USB-poort van uwcomputer, en het andere eindin de USB-aansluiting vanuw Fotokijer.

2. "Op de Fotokijker verschrijt 'Connect?"; druk ter bevestiging op MODE. In het scherm verschrijt "Download" als het apparaat goed aangesloten is. Als binnen 5 minuten geen knop worden ergadrukt, dan schakelt de Foliotijnestaar ne daoplaadst voor de batterij. U moet de USB-kabel afkoppelen en opnieuw aansluiten.
3. Start de software door dubbel op de Photo Viewer snorkappeling opphet bureaucracylad van uw computer te klikken.
Bewaar de geseeleernde fotoo het Collectieschem (Collection) van uw computer
—Wis geseleeteerde fotos.
Synchronize Klik herop om defoop op het Collectieschem ("Collection") aan uwFotokijter te downloaden.


—Klik hierop om uwfoto's teroteren.

Klik hierop om foto's in het Voortoortoebegned (Preview area) naar het Collectieschem (Collection') te brengen.

- Voorvertoonggebied ('Preview area')
- Collectieschem (Collection')
- Aantal Foto's op het Collectieschem (Collection')
- Maximum aantal foto's dat op de Fotolijst opgeslagen kan worden
4. Blader op uw computeraar Foto(s) die u wilt downloaden.De geseleeteerde foto worden goetond in het Voorvertoengebied ('Preview Area').
Let op: de Fotolijst leest.JPG/BMP/TIF/GIF/PNG plaatjes.
5. Als de fotb groot is, dan verschijt een rood vak op de foto. U kunt op het rode vak klikken en hetBeen en weer bewegen om een gedeelte van de foto at tesnijden.
U kunt de foto ook roteren door op " te klikken.
6. Klik op " " om de Foto die in het Voorvertoongebied ('Preview Area') getoond worden, maar het Collectieschem ('Collection') te verplaatsen.
7. Als u een fotin in het Collectieschemr ('Collection') wilt wissen, selecteer dan de foto en druk op " × " om hem te wissen. Als u een foto in het Collectieschemr ('Collection') op uw computer wilt opslaan, selecteer dan de foto en druk op " ".
8. Klik op " Synchronize" om Foto's op het Collectieschem (‘Collection’) maar uw Fotolijst te synchroniseren.
9. Wacht tot de softwarekee is met downloaden. Sluit dan de software en ontkopel de Fotolijst van uw computer.
LET OP: Als u opniewo fott's wilt downloaden, dan moet u de Photo Viewer software opnieuw opstarten.
De Functieknoppen Gebruiken
1. Scherm
2. MODE
3. Vorige Plaatje
Wis Plaatjes
4. Volgende Plaatje
Wis alle Plaatjes
5. Mini USB Aansluiting

Verklaring Betreffende Elektromagnetische Emissies
- Dit aparraat voldoet aan Deel 15 van de FCC Reglementen een aan CE. Gebruik is onderheig aan de volende voorwaarden:
(1) Dit apparaat mag geen schadelijke interferentie veroorzaken.
(2) Dit apparaat moat alle ontvangen interferentie aanvaarden, ook al kan dit ongewenste werkung verroorzaken.
THIS DIGITAL APPARATUS COMPLIES WITH CANADIAN ICES-003. / CET APPAREIL NUMérique DE LA CLASSE B EST CONFORMÉ À LA NORME NMB -003 DU CANADA.
De FotolijstAan/Uit Zetten
Houd MODUS zo'n 4 secondengedrukt om het apparaaaan te zetten. Houd MODUS nogmaals zo'n4 seconden ingedrukt om het apparaae weer uit te zetten.
Let op: u要去 de fotopresentatieuiztzen, voor u deFotolijst uit kunt zellen.
Foto's Bekijken
1. Zet de Fotolijst aan door /MODUS zo'n 4 seconden ingedrukt te honden.
2. Druk op VOLGENDE om door uw fot's te bladeren. Druk op VORIGE om terug te gaan maar een vorige fotc.
De Fotopresentatie Gebruiken (Foto's Automatisch Afspelen)
Druk, terwij het apparaat aanstaat, op MODUS. De Fotolijst bladert automatisch door de fot's.
Druk nogmaals op /MODUS om de fotopresentatieweer UIT te zetten.
Een Enkele Foto Wissen
1. Druk in de bladerstand op VORIGE 一 en VOLGENDE om het plaatje, dat u wilt wissen, op te zoeken.
2. Houd 3 seconden ingedrukt. In het scherm verschijnt "Delete".
3. Druk op om de foto te wissen, of drukop om te annuleren.
Alle Foto's Wissen
1. Druk in de bladerstand op VORIGE en VOLGENDE om het plaatje, dat u wiltissen, op te zoeken.
2. Houd 3 seconden ingedrukt. In hetschem verschijnt "Delete All".
3. Druk op om alle Foto's te wissen, of drukop om te annuleren.
Problemen bij de Installatie Oplossen
Voig deze stappen, als het apparaat bij deinstallatie de foumtelding "Device not connected" toont:
A. Bij problemen met de software (U kunt dePhoto Viewer software Nietstarten)
1. Plaats de installationéCD er opniewen inen kies "Remove" of"Uninstall"uit het menu.
2. Ontkoppe del USB-kabelen het apparaat vande computer en start de computer opnieuw op.
3. Start nu宫颈t het installationprogramma eninstalleer de software. Let op: SLUIT de USB-kabel NIETaan, als de software nog nicht geinstalleerd is.
B.Bij problemen met dehardware (Apparaat Niet herkend)
1. Ga, als deFotokijker via de USBde computer aangeslotenis, maar Start / Configuratieschem/ Hardware.
2. Als dedialoog opkomt, klik danop de optie diezegt: "Ja, ik hebde hardware al aangesloten.
3. Zoek in de lijstmet apparaten "Photo Viewer" op, en klik op Volgende om de status van het aparaat te bekijken. Als naast PhotoViewer een waarschuwingssymbol verwischijnt, dubbelklikdan op het symbolen selecteer deoptie "De software opnieuwinstelleren".
CADRE PHOTO DIGITAL
A litre enpremier
Guide d'installation rapide
CONFIGURATION SYSTEMEREQUIRE:
Windows 98 / 2000/ ME / XP/Vista
INSTALLATION:
**Important: Installez lelogiciel fourni avec l'appareilavant de raccorder celui-ci à votre ordinateur.**
1. Si déjà raccordé à toute ordinaire, déconnectez le cordon USB de toute ordinaire.
2. Insérez le CDet suivez les instructions affichées à l'écran pour installer le "Cadre photo".
3. Une fois letlogiciel installé, vous pouvezraccorder le cadre photo à VOYER ordinateuravec le cordon USBfouri.
4. Le système d'exploitationWindows installe le pilote du广泛应用 automatique.
5. Lancez "Photo Viewer" et appréciéz vosphotos.
REMARQUE: le logiciel nese lancera pas lorsquele cadre photo est raccarde a l'ordinateur ou sile mode Diaporama automatique existé.
- Pour les utilisateurs de Windows 98 SE, installer le driver qui se trouve sur le CD-ROM
Introduction
Ce cadre photo numérique est un périphérique autonomeconçu pour transférer et stocker desimages à partir d'unordinateur ainsi que de les afficher. Enutilisant le logiciel fourniec cet approeil, vouspouvrez organiser, modifier, améliorer et transférer lesimages de votre ordinateur sur cet approeil via USB. Ce cadrephoto peut stocker des milliers de photos.
Consignes de sécurité importantes
AVERTISSEMENT:
3 heures de miseen charge sont nécessaires pour recharger complètement la batterie. Nelaïsez pas l'appareil raccordéau port USB de votre ordinateurpendant plus de 12heures consecutives, l'appareil pourrait en effet s'endommager etunesurchauffe pourrait se produit.
N'exposez pas cet apparéil à l'eau et l'humidité.
N'utilisez pas cet apparéilprès de sources dechaleur comme des radiateurs et poées.
- L'appareil doit seulement étrearacde ou une sourced'd'alimentation indiquée sur le manuel/d'utilisation ou sur l'appareil.
Attention ce qu'aucunobjet ne soit place sur l'appareil, et qu'aucun liquide ne soit verssez ou a t'intérieur l'appareil.
L'utilisateur est tenu dene pas tenter d'entretenir'appareil au dela des consignes du manueld'utilisation. Confiez l'entretien decet apparéil à de personnelkalifiée.
Installation du cadre photo
Le cadre photo peut être positionné verticalément (portrait)ou horizontally(paysage).
1. Appuyez sura touche de verruageil et tirez! une principale pour détachercelle-ci du cadre.

2. Appuyez surl'extrémitte gauche de latige, et tenez l'autre extrémitte pour détacher.

3. Replaceze cadre en insertantes deux tiges del'appareil dans les deux trous situés surla partie supérieure du cadre.
Assembléz le cadre et l'appareil, appuyez ensuite sur la partie inférieure jusqu'à cequelle cadre soit bien fixé.


4. Vissez le pied à un desreads tous à visitués al'arrière de l'appareil.

Installation du logiciel/ pilote
IMPORTANT: Vous devezd'abord installer le logiciésur votre ordinaire avant de raccorderie la cadre photo ici-ci.
1. Insérez leCD-ROM et double cliquezser le fjicher SETUP.EXE; suive les instructions affaciées à l'écran.
2. Le logiciel PhotoViewer va étéinstallé sur toute ordinaireur un raccourci sera的前提 survotre bureau.
NE PASLANCER LE LOGICIEL MAINTENANT.
3. Une fois lelogiciel installé, raccordez lecadre photo à VOYTE ORDINATEUR à l'ecran et acceptez lorsqu'les fenêtres d'installations affichent à l'écran.
4. Une fois le piloplate installé, lancez leologiciel Photo Viewer Qiu se trovou surle bureau.
REMARQUE: Si vous est impossible de lancer le logiciel ou connecter le cadre photo à l'ordinateur, reportez-vous à la section Dépannagedu manuel pour obtenir d'aide.
Mise en charge de la batterie intégrée
La batterie interne del'appareil peut etre miseen charge via lecable USB lorsquereiieau port USB (portUSB devoire ordinateur)ou un hub USB. Une foula batterie completement chargée, l'appareil dispose d'une autonomie de 3 heures en lecture.
Transférer des photosur le cadre photonumérique à partir del'ordinateur
Attention: Raccordez le cadrephoto à votre ordinateur avant de lancer le logiciel.
1. Raccordez une extremité du cable USB au port USB devote ordinateur, et l'autre extrémite au cadre photo.

2. "Connector?" s'affiche sur l'écran ducadre photo, appuyez sur la touche MODE pour confirmer," Transférer" s'affiche, indiquant l'établissement de la connexion, au bout de 5 minutes d'inactivité, le cadre photo basculer en mode économique d'énergie. Vous doivent alors déconnecter et reconnectcerle cable USB.
3. Lance lelogiciel en double cliquants sur le raccourci PhotoViewer situé du sur le bureau.

Sauvegarden les photos selectionnées dans la fenetre
Collection sur voite ordinateur.

—Pour supprimer les photos selectionnées.

Cliquez pour transférer les images de la fenetre Collection sur le cadre photo

Cliquez pour effectuer une rotation sur image

Clique pour transférer une image en cours de prévisualisation vers la fenetre Collection.

- Espace de prévisualisation.
-Fenetre Collection.
- Nombre de photos de la fenêtre Collection.
- Nombre maximal de photospouvant être stockées surle cadre photo
4. Parcourezles dossiers de�权érateur pour rechercher des photos à transférer. La photoësLECTIONné est affichéédans l'espace de prévisualisation.Remarque: Le cadrephoto prend en chargeles formats de fichiers imagesuivants : JPG / BMP/ TIF / GIF / PNG.
5. Lorsquela photo est tropgrandie, une boîte rouge apparait sur la photo, vous pouvèez cliquers sur cette boîte rougeet la déplacer pour recadrer la photo. Vouspouvèez également effectuer une rotation sur la photo en cliquantsur "
6. Cliquez sur " → pour transférer laphoto affichée dans'espace de prévisualisation vers lafenetre Collection.
7. Lorsque vous souhaitez supprimer une photo de lafenetre Collection, sélectionnez la photo etappuyez sur la touche" " pour la supprimer. Lorsque vous souhaitez sauvegardner une photode la fenetre Collection sur votreordinateur, sélectionnez laphoto et appuyez sur la touche" " pour lasauvegarder.
8. Cliquesur "Synchronize" pour transférer lesphotos de la fenetre Collection vers voirecadrephoto.
9. Attendez lafin du transfert, quitteze logiciel et déconnectezle cadre photo de votre ordinateur
REMARQUE: Lorsque vous sauhtaïez anouveau transférer des images, vous deveze relaxer leologiciel Photo Viewer.
Fonctionnement des touches
1. Ecran
2.0 / MODE
3. Image precedente
Supprimer les images
4. Image suivante
Supprimer toutes les images.
5. Connecteur Mini USB

Déclaration sur les émissions electromagnetiques
Cet équipement est conforme ala partie 15 des reglementsde la FCC et dela CE.
L'utilisation de l'appareil est soumiseaux deux conditions. suivantes:
(1) Cet apparéil ne doit pas provoquer d'interférences et.
(2) Il doit accepter toute interfeERENCE, y compris celles susceptibles de provocer un fonctionnement indisérable de l'appareil.
THIS CLASS B DIGITAL APPARATUS COMPLIES WITH CANADIAN ICES-003/1. THE NEW TRAFICINE DE LA CLASSES EST CONFORMA LIKE NORMAIRENMB-003 DU CANADE.
Mise en marche/arrêt du cadre photo
Appuyez et maintenze enforcée touche 念 / MODEpendant 4 secondes pourmettreI'appareilennarche.Appuyezet maintenze enforcée la touche anouveau 念 /MODEpendant4 secondes pour etéindre I'appareil
Remarque: 'you'vedezdésactiverleDiaporamavant d'eteindrele cadre photo.
Visionner des photos
1. Mettez en chaque cadre photo enappuyant et maintainen enforcée la touche / MODE pendant environ 4 secondes.
2. Appuyez sura touche pour naviguerparmi vos photos. Appuyez sur la touche pour revenir a photo precedente).
Activer le Diaporama(affichage automatique desphotos)
Lorsque la cadre photoest en marche, appuyez sur la touche /MODE. Le cadre photo affiche les photos uneper une et demanière automatique. Appuyez sur la touche / MODE à nouveauoup pour désactiver le Diaporama.
Supprimerune photo
1. En mode Navigation, utilisez latouche «et « pour sélectionner la photo que vous souhaitez suprimer.
2. Appyeez etmaitenene enfonce la touche endant 3 secondes. Le message Supprimer s'affiche.
3. Appu yez sur la touche our supprimer laphoto, ouappuyez surla touche pour annulier l'opération
Supprimer toutes les photos
1. En mode Navigation, utilisez latouche et pourselectonnerlaphot queyou souhaitez suprimer.
2. Appuyez et mainteze enforcé la touche pendant 3 secondes. Le message Suprimuter tout s'affiche.
3. Appuyez surla touche 念 pour supprimerla photo, ou appuyezsur la touche pour annuler l'opération.
Résolution des problèmesurvenant lors del'installation
Lorsque l'écran affiche un message d'erreur Periphérique non connecté" durant l'installation, suivezles étapes suivantes pour résoudre ce problème:
A. Problèmes avec lelogiciel (impossible de lancierle logiciel Photo Viewer)
1. Rénsérez et lancez anouveau le CD d'installationnet sélectionné
"Supprimer" ou "Déinstaller" à partir du menu d'installation.
2. Déconnectez le cordonUSB de l'ordinateur puisredémarrez.
3. Une fois l'ordinaire prét, lancez l'installateur à nouveau étreinalléze le historiel.
REMARQUE:NE PASraccorder le cordon USBavant la fin de l'installation du logiciel.
B. Pourles problèmes matériels (Periphériquenon reconnu)
1. Àpères avoiriraccordé le cadre photonomérique via USB, allez dans le menu Démarrer /Panneau de configuration/Ajouter un nouveau périphérique.
2. Lorsque la boite de dialogueapparait, cliquez sur "Oui, j'ai déjà raccordé le périphérique".
3. Dansla liste des périphériques, sélectionné "Photo Viewer" et cliquez sur SUIVANT, l'état du périphérique est alors affché. Lorsqu'une icone d'alertissementapparait à côté ducadre photo, double cliquez sur l'icone et sélectionné "Réinstaller lepilepite".


If at any time in the future you should need to dispose of this product please note that: Waste electrical products should not be disposed of with household waste. Please recycle where facilities exist. Check with your Local Authority or retailer for recycling advice. (Waste Electrical and Electronic Equipment Directive)


Si en el futuro necessita deshcacerse de este producto,onga en cuerta lo numero: no debe deshcacerce de los residuos de produits electricos como siieranulos domesticos. Para favor,recycle en losnillos enlos queestosea possible.Acuas alas producciones y producciones de un solo producto, no se considera para serobroscirecible. (Directive sobre扣除ables electricys yequipulos electricos).


S�� so sauhtaue vaitez-vous debarrasser ultérieurement du produit, veillez notes que: les déchets électriques ne doivent pas été jetés avec les déchets domestiques. Veilliez le faire dépôt dans les centers de recyclage existants. Contactez les autorités à l'expertise en recyclage des déchets pour les formations. (Directive de l'équipment Electronique et des déchets électriques).


Sollenie Tie igrendwen zu spaterer Zeit desds Prozents entsorgen wollen, beachen sie Botte Foliges: Elektroschrott solte nicht mit dem Haushaltsmull eigentert sollen. Betrie necysenSie hohn, sofern hnen entsprechende Mochigkeiten zur Verfugung stehen. Setzen Sie sich mit ihren communalen Behörden oder ihrer Einzelhändern in Verbindung und fragen sie diese um Rat bezüglich der Wiederverwertung. (Elektro-und Elektronik-Altgeräte-Richtlinie (WEEE))


Indon u zich in de ekomstam van dit stoest wente to ontdoen, let er dan op dat elektrisch aframmaterialien met het huishoudeil ef alvain worden verwerdend. Breng het stoesten een kringloogswinkel of anderervoenzionring voor recycling. Neem contact op met uw enkooi teeflel, die vondtigste en de onslenploed en de onslenploed over recycling. (Richtlich, om Vavl en Elektrische en Elektronische Apparaten, AEEA).
REQUISITOS DEL SISTEMA
1. Windows 98/2000/ME/XP/VISTAPROCEDIMIENTO DE INSTALLACION:
**Importante: instale el software de aplicacion antes de conectar el dispositivo al PC.** 1. Desconecte el cable USB del PC si está conectado. 2. Inserte el CD y siga las instructaciones en la pantalla para instalar "PhotoAlbum". 3. Después de instalar el software de aplicación, puede conectar el dispositivo al PC con el cable USB proportionsorado. 4. Windows OS instalara el driver o controlador del hardware automatistically. 5. Execute "Photo Viewer" y disfrute. NOTA: • El software no puede inciarse con launidad si está connectado cuando funciona en modo de presentación automática. - Para usuario de Windows98 SE, necessita instalar el programa fácilado en el CDINTRODUCCION
Estealbumoffotosdigitaesusdispositivoqueha sido diseñado para transferir yalmacenarimíagenesdesundPCyuego podedor visualizar las imagenes.Usandoel software de laaplicación proportionscóneste dispositivo,puedeorganizar,editor, mejoraydescargar susimagenes en su PChasta el dispositivo usingoel USB.EsteAlbumdeFotosalmacenamilesdefotos.Instrucciones importantes de seguidad
ADVERTENCIA
- Este dispositivo sera cargado Completely dereshoras. - No deje this dispositovoconectao al USB durantemás de 12 horas consecutivas de lo contrariopuede fazer y sobrecalentarei disposivo. No exponga el dispositivoal agua o humedad. - El dispositivo tiene queestar situado lejos defuentes de calor tales como radiadores o estufas. - El dispositivo debe estarconectado a un tipode toma de corriente que se describe enlas instructiones de functionamientoo como esta sealingado en la unidad. - TengaULDaconso un dispositivo, nocoloque;ningun objecto enla parte superiori ni;ningunliquido y que podradañafar el dispositivo. - El usoario no debeintenter reparar el aparatomás alla de los medios descritos en este manualde instructuciones. - Refiérase a su personale servizio qualificado.Colocar el Album de Fotos
El marco deotospuedeselocado verticalmente o (retrato) o de horizontalmente(paises). 1. Pulse la lengüeta de bloqueo y tire de la unidad principal del marco para Separar la unidad principal.  2. Pulse la extremidad izquierda de la barra y agarre la other extremidad para retirar la barra de la unidad principal.  3. Cambie el marco insertando las dos lengüétas en launidad principal A los dos agujeros del marco. Junte lainstitutionaliparalemarco,leurspulseta parteinferiorhastaaqescolque en sutido.   4. Atornille la barra en uno de los agujeros en la parta trasera de la和地区. INSTALLACION DELSOFTWARE /HARDWARE
IMPORTANT:iene que instalar else software en su ordinadorantes de conectar el dispositivo y su ordinador porla primero vez. 1. Inserte el CD-ROM yejecute el archivo SETUP.EXE, sigas las instrucciones en la Pantalla. 2. La aplicacion PhotoViewer sera instaladoen su ordinador y aparecerca un atajo ala aplicacion en suscerratorio. NO EXECUTE EL SOFTWARE TODAVIA. 3. Cuando haya instaladoel software, conecte eldispositivo a su ordenador con el cableUSB proportionado. LosDRV servos controadores del hardware seraninstalados automatamente. Siga las instrucciones enlathora y aceptelas pantallas de instalacion que aparecen. 4. Depues de instalarel hardware, ejecta la日消息 Photo Viewer desde el atajo ensu escritorio. NOTA: si no可以选择 ejectcutarel software o connectarsea Photo Album, vaya a la guiade problemas y SOLUTIONES de este manual para Obtener más informacion.CARGAR LABATERIA INCORPORADA
La bateria interna deldispositivo peut ser cargadausando el cable USB cuando está connectada un puerto USB (como un puerto USB en su ordinador) oconcentrador. Enplenacarga, el dispositivo pueda proportionsar más de3 horas de funciona bajo.EscargarotosdesuspcalAlbumdefotosdigitales
Attencion:debe conectar suPhoto Viewer aun PC antes deejecutar el software. 1. Inserte una extremadaddel cable USB enpuerto USB desusordenador y la atraextremidad a Photo Viewer.  2. "Connected" (conectaro) apareceré en el PhotoViewer, pulse MODE para confirmar, Y aparecerá "Download", (descargar)indicando que la conexiónse has completeness. Si no pulsaaculara durante 5制动os, el Marco de Fotosentarra en modo de cargar de bateria. Necesidadesconectar el cable USB by conectarlo de nuevo. 3. Ejecute el softwarehaciendo doble Cli en atajo de PhotoViewer en el escritorio desu ordinador.  —Guarde la Foto seleccionada en panel de coleccion en su ordenador.  —Elimine lasotos seleccionadas.  Haga能做到escargar fotos en su panel de coleccion a su Photo Viewer.  Haga cli pagirar sus fotos  Haga tíc para做不到 las fotos en un Area Previa a su Panel de Coleccion.  - Área Previa. -Panel de Coleccien. -Numero deotos enPaneldeColeccion. -Numero máximo deotos quepueden ser guardadas en su Marco de Fotos. 4. Explore su ordinadorpara descargar la(s) foto(s) deseada(s). Se visualiza la fotoselectionacion en el AreaPrevia. Nota: El marco defotos lee imagenes JPG/BMP/TIF/GIF/PNG. 5. Si la fotos demasiado grande, apareceráún cuadro rojo enla Foto, y pueda hacer clicken el cuadro rojoy desplazarse alrededor del cuadro rojo para trabajoar con la Foto. Puedegirar la Foto haciendo click en " 6. Haga click en" para moverla foto visualizada enel Aarea Previa al Panel deColeccion. 7. Si眼看 eliminatinga foto del Panelde Coleccion, selezione la foto y pulse " × "para eliminaria. Si deseaguardar la foto enel Panel de Coleccion de suordenador, selezione lafo y pulse " para guardarla. 8. Haga click en "Synchronize" para descargarlasotos en elPanel de Colecciona su Marcode Fotos. 9. Espere que ladescarga se haalready completado,LUgo cierra el software y retiret elMarco de Fotos desu ordinador. NOTA: si desea descargar降温o, necessities volver ajecutar el software de Photo Mewer.Usar las teclas de referencia
1.Pantalla 2. 念 /MODE 3. Imagen anterior Eliminarimagenes 4. Imagen suiviente Eliminar todas las imagenes. 5.Conexión mini USB DECLARACION DE EMISSIONES ELECTROMAGNETICAS
Este aparo a cumple con la Parte 15 de las normas de la FCC y CE. El funcionaamente está sujeto a las condicionesSIGUIENTES: (1)Este aparato no besoincaesarinterferencias dañas. (2)Este aparo来自于此,但因为其功能的实现需要一定的时间。 ESTE APARATO DIGITAL DE CLASE B CUMPLE CON LAS NORMAS CANADIENSES IC ES-003. CET APPAREIL NUMEERIQUE DE LA CLASSE B SET CONFORMEA LA NORME NMB-003 DU CANADA.Usar el PhotoViewer
Pulse y mantenga pulsando /MODE durante 4segundos para encender laividad. Pulse y mantenga pulsando de nuevo /MODE durante 4segundos para apagar laividad. Nota: necessities apagar el slideshow o Visualizacion automatica deotos presentacion antes para apagar el Photo Viewer (Visualizador deotos).Visualizarotos
1. Enciya de el Marcoze Fotos pulsando ymanteniendo pulsando /MODE durante 4 segundos. 2. Pulse para explorarantas de lasfotos.Pulse para volvera la fot anterior.Usar el Slideshow (Visualizacion automatica deotos)
Con launidad encendida, pulse /MODE. El Marcode Fotos explorarás todas las fotos de forma automática. Pulse /MODE de nuevoopara apagar el slideshowvisualización automática deotos.Eliminar una Foto
1. En modo deexploration, use y parlocalizar la Foto quedesea eliminar. 2. Pulse y mantengapulsando▶durante 3段时间s. Delete (Eliminar) apareceré en lapantalla. 3. Pulse para eliminarla Foto, o pulse para cancelar la operation.Eliminar todas lasOTOS
1. En modo de exploración, use y para localizar las fotos que desea eliminar. 2. Pulse y mantenga pulsando durante 3段时间s. Delete All (Eliminar todas) apareceré en la pantalla. 3. Pulse para eliminar la Foto o pulse para cancelar la operation.Guiá de problemas y SOLUTIONES para la instalación
Si el dispositivo muestrael mensaje de error"Device not connected"(dispositivo no conectado)durante la instalacion, sigas los pasos siguientes: A. Para problemas de Software (el software de FotoViewer no pueda executarse) 1. Vuela insertar y ejectar elCD de instalacion CDy elija "Remove" (retirar) o "Uninstall" (desinstalar) del menu de instalacion. 2. Desconecte el cableUSB y el dispositivode su ordinador yreinicie. 3. Después de reiniciariel ordinador, ejecteel instalador de Nuevo yuvela a instalar else software. Note: NO CONNECTE el cableUSB hasta que nose haya instalado el software. B. Para problemas de instalación de Hardware (no reconcello dispositivo) 1. Con el PhotoViewer conectado asu ordinador a travescde USB vaya a Menu Inicio/Panel de control/Añadir Hardware. 2. Cuando aparezca el压抑 de dialgo, hagacic en la opticonque dice "Yes, I have already connected the software". (Si, yahe connectado el software). 3. En la lista des dispositivos, busque "Photo Viewer" hagaclic en NEXT y estoderá el estado deldispositivo. Si aparece unicono de advertencia al bajo de Photo Viewer habadoble tic en elicono y selecciona la option "Reinstallthe software" (Volvera instalar el software).DIGITALE FOTOALBUM
Lees Eerst
Snelle Installatiegids
DIGITALE FOTOALBUM:
Windows 98 / 2000/ ME / XP/ VistaINSTALLATIEPROCEDURE:
** Belangrijk: Installeer applicatiesoftware voor aansluten op de PC. ** 1. Ontkoppel de USB-kabel van de PC (indien aangesloten). 2. Plaats de CD in de CD-ROM en volg de instructies op het Scherm om de "Photo Album" software te installereren. 3. Sluit na de installation uw apparaat met de meegeleverde USB-kabel aan op de PC. 4. Windows OS stelt automatisch het hardware stuurprogramma in. 5. Start "Photo Viewer" en geniet ervan. LET OP: • De software kan nietinitialiseren als het apparaat aangelsenoten is een eenvotcopresentatie draait. - Windows 98 SE gebruikers, installeur de driver software in de meegeleverde CD-ROM.Introductie
Dit Digitale Fotoalbum is een'stand-alone' apparaat, dat plaatjes van een PC kan opslaan, envervolgens weergeven. Met de meegeleverde software kurz u plaatjes bewerken,organiseren en Mooier make, en via de USB downloaden naardit apparaat. U kurz opedit Fotoalbum duizenden foto's opslaanBelangrijke Veiligheidsvoorschriften
WAARSCHUWING:
- Het volledig opladen vandit apparaat duurt drieuur. Laat het apparaat nieltanger dan 12 uuraaneengesloten op de USB aangesloten. Het apparaat kanoverhit, en beschadig daken Stel het apparaat Nietbloot aan water envochtigheid - Houd dit apparaat uuite buurt van warmtebronnen,zoals radiators en fornuzieren Sluit dit apparaat alleenaan op een voedingsbronvolgens het type dat omschreven is inde gebruksiinstructies, of aangegevenis op het apparaat - Plaats geen voorwerpen ophet apparaat; mors geenvloeistoffen op of in het apparaat - voer geen onderhoud, andersdan omschreven is inde gebruiksinstructies. Laat onderhoud doendoor gekwaliffeerd personeelHet Fotoframe Neerzetten
De Fotolijst kan vertaal (portret)en horizontaal (landschap) neergezeit worden. 1. Druk de borglip maar beneden en trek het apparaat en de lijst uit elkaar.  2. Druk het linkerendein het staafje maar beneden engrijt het andere eind ont hem staafje van het apparaat te verwijdenen.  3. Zet de lijst terug, door detwee lipjes op het apparatusaat in de twee gaatjes aan de bovenzijde van de lijst te steken. Breng het apparatusaat Ende lijst weer maar elkaartoe en druk aan de onderzijdetotdat ze vastklikken.   4. Schroef het staatje vast in een van de twe schroefgaatjes aan dechterzijde van het apparaat. De Software/Hardware Installeren
BELANGRIJK: Installer eerst de software, vór u het apparata voor de eisteer keer op decomputer aansluit. 1. Plaats de CD-ROMerin, en start hetprogramma SETUP.EXE; volg de instructeurs op hetschem. 2. Het programme 'PhotoViewer word opuW PC geinstalleerd eneene snelkoppeling verschijnt op hetbureauablad.Wacht MET HETSTARTEN VAN DE SOFTWARE.
3. Sluit, na hetinstalleren van de software, het apparaat met de USB-kabel aan op de computer. Het stuurprogrammaordt automatisch geinstalleerd. Volge instructies op hetschem, en accepteer het installationschem datverschijnt. 4. Na de installmentievan de hardware, kunto het Photo Viewer programma via de snekloppeinpog het bureauablad starten. LET OP: Als de software nietsstart, of u uwFotoalbum Niet kurz aansluiten, raadpleeg dan voormeer informatiek het onderdeel 'Probleem Oplossen'inde handleidingDe Ingebouwde Batterij Opladen
De interne batterij vanhet apparaat kan opgeladenworden, als deze via de USB-kabel opeen actieve USB-poort (zoalsde USB-poort van de computer) of eenhub is aangesloten. Als de batterij volledig opgeladen is, kan hetapparaat zo'n 3 uurwerken.Foto's van uw Computer maar uw Fotolijst Downloaden
Let op: u moet de Fotokijker op de PC aansluiten, vór u de software start. 1. Steek eien eindan de USB-kabel inde USB-poort van uwcomputer, en het andere eindin de USB-aansluiting vanuw Fotokijer.  2. "Op de Fotokijker verschrijt 'Connect?"; druk ter bevestiging op MODE. In het scherm verschrijt "Download" als het apparaat goed aangesloten is. Als binnen 5 minuten geen knop worden ergadrukt, dan schakelt de Foliotijnestaar ne daoplaadst voor de batterij. U moet de USB-kabel afkoppelen en opnieuw aansluiten. 3. Start de software door dubbel op de Photo Viewer snorkappeling opphet bureaucracylad van uw computer te klikken. Bewaar de geseeleernde fotoo het Collectieschem (Collection) van uw computer —Wis geseleeteerde fotos. Synchronize Klik herop om defoop op het Collectieschem ("Collection") aan uwFotokijter te downloaden.   —Klik hierop om uwfoto's teroteren.  Klik hierop om foto's in het Voortoortoebegned (Preview area) naar het Collectieschem (Collection') te brengen.  - Voorvertoonggebied ('Preview area') - Collectieschem (Collection') - Aantal Foto's op het Collectieschem (Collection') - Maximum aantal foto's dat op de Fotolijst opgeslagen kan worden 4. Blader op uw computeraar Foto(s) die u wilt downloaden.De geseleeteerde foto worden goetond in het Voorvertoengebied ('Preview Area'). Let op: de Fotolijst leest.JPG/BMP/TIF/GIF/PNG plaatjes. 5. Als de fotb groot is, dan verschijt een rood vak op de foto. U kunt op het rode vak klikken en hetBeen en weer bewegen om een gedeelte van de foto at tesnijden. U kunt de foto ook roteren door op " te klikken. 6. Klik op " " om de Foto die in het Voorvertoongebied ('Preview Area') getoond worden, maar het Collectieschem ('Collection') te verplaatsen. 7. Als u een fotin in het Collectieschemr ('Collection') wilt wissen, selecteer dan de foto en druk op " × " om hem te wissen. Als u een foto in het Collectieschemr ('Collection') op uw computer wilt opslaan, selecteer dan de foto en druk op " ". 8. Klik op " Synchronize" om Foto's op het Collectieschem (‘Collection’) maar uw Fotolijst te synchroniseren. 9. Wacht tot de softwarekee is met downloaden. Sluit dan de software en ontkopel de Fotolijst van uw computer. LET OP: Als u opniewo fott's wilt downloaden, dan moet u de Photo Viewer software opnieuw opstarten.De Functieknoppen Gebruiken
1. Scherm 2. MODE 3. Vorige Plaatje Wis Plaatjes 4. Volgende Plaatje Wis alle Plaatjes 5. Mini USB Aansluiting Verklaring Betreffende Elektromagnetische Emissies
- Dit aparraat voldoet aan Deel 15 van de FCC Reglementen een aan CE. Gebruik is onderheig aan de volende voorwaarden: (1) Dit apparaat mag geen schadelijke interferentie veroorzaken. (2) Dit apparaat moat alle ontvangen interferentie aanvaarden, ook al kan dit ongewenste werkung verroorzaken. THIS DIGITAL APPARATUS COMPLIES WITH CANADIAN ICES-003. / CET APPAREIL NUMérique DE LA CLASSE B EST CONFORMÉ À LA NORME NMB -003 DU CANADA.De FotolijstAan/Uit Zetten
Houd MODUS zo'n 4 secondengedrukt om het apparaaaan te zetten. Houd MODUS nogmaals zo'n4 seconden ingedrukt om het apparaae weer uit te zetten. Let op: u要去 de fotopresentatieuiztzen, voor u deFotolijst uit kunt zellen.Foto's Bekijken
1. Zet de Fotolijst aan door /MODUS zo'n 4 seconden ingedrukt te honden. 2. Druk op VOLGENDE om door uw fot's te bladeren. Druk op VORIGE om terug te gaan maar een vorige fotc.De Fotopresentatie Gebruiken (Foto's Automatisch Afspelen)
Druk, terwij het apparaat aanstaat, op MODUS. De Fotolijst bladert automatisch door de fot's. Druk nogmaals op /MODUS om de fotopresentatieweer UIT te zetten.Een Enkele Foto Wissen
1. Druk in de bladerstand op VORIGE 一 en VOLGENDE om het plaatje, dat u wilt wissen, op te zoeken. 2. Houd 3 seconden ingedrukt. In het scherm verschijnt "Delete". 3. Druk op om de foto te wissen, of drukop om te annuleren.Alle Foto's Wissen
1. Druk in de bladerstand op VORIGE en VOLGENDE om het plaatje, dat u wiltissen, op te zoeken. 2. Houd 3 seconden ingedrukt. In hetschem verschijnt "Delete All". 3. Druk op om alle Foto's te wissen, of drukop om te annuleren.Problemen bij de Installatie Oplossen
Voig deze stappen, als het apparaat bij deinstallatie de foumtelding "Device not connected" toont: A. Bij problemen met de software (U kunt dePhoto Viewer software Nietstarten) 1. Plaats de installationéCD er opniewen inen kies "Remove" of"Uninstall"uit het menu. 2. Ontkoppe del USB-kabelen het apparaat vande computer en start de computer opnieuw op. 3. Start nu宫颈t het installationprogramma eninstalleer de software. Let op: SLUIT de USB-kabel NIETaan, als de software nog nicht geinstalleerd is. B.Bij problemen met dehardware (Apparaat Niet herkend) 1. Ga, als deFotokijker via de USBde computer aangeslotenis, maar Start / Configuratieschem/ Hardware. 2. Als dedialoog opkomt, klik danop de optie diezegt: "Ja, ik hebde hardware al aangesloten. 3. Zoek in de lijstmet apparaten "Photo Viewer" op, en klik op Volgende om de status van het aparaat te bekijken. Als naast PhotoViewer een waarschuwingssymbol verwischijnt, dubbelklikdan op het symbolen selecteer deoptie "De software opnieuwinstelleren".CADRE PHOTO DIGITAL
A litre enpremier
Guide d'installation rapideCONFIGURATION SYSTEMEREQUIRE:
Windows 98 / 2000/ ME / XP/VistaINSTALLATION:
**Important: Installez lelogiciel fourni avec l'appareilavant de raccorder celui-ci à votre ordinateur.** 1. Si déjà raccordé à toute ordinaire, déconnectez le cordon USB de toute ordinaire. 2. Insérez le CDet suivez les instructions affichées à l'écran pour installer le "Cadre photo". 3. Une fois letlogiciel installé, vous pouvezraccorder le cadre photo à VOYER ordinateuravec le cordon USBfouri. 4. Le système d'exploitationWindows installe le pilote du广泛应用 automatique. 5. Lancez "Photo Viewer" et appréciéz vosphotos. REMARQUE: le logiciel nese lancera pas lorsquele cadre photo est raccarde a l'ordinateur ou sile mode Diaporama automatique existé. - Pour les utilisateurs de Windows 98 SE, installer le driver qui se trouve sur le CD-ROMIntroduction
Ce cadre photo numérique est un périphérique autonomeconçu pour transférer et stocker desimages à partir d'unordinateur ainsi que de les afficher. Enutilisant le logiciel fourniec cet approeil, vouspouvrez organiser, modifier, améliorer et transférer lesimages de votre ordinateur sur cet approeil via USB. Ce cadrephoto peut stocker des milliers de photos.Consignes de sécurité importantes
AVERTISSEMENT:
3 heures de miseen charge sont nécessaires pour recharger complètement la batterie. Nelaïsez pas l'appareil raccordéau port USB de votre ordinateurpendant plus de 12heures consecutives, l'appareil pourrait en effet s'endommager etunesurchauffe pourrait se produit. N'exposez pas cet apparéil à l'eau et l'humidité. N'utilisez pas cet apparéilprès de sources dechaleur comme des radiateurs et poées. - L'appareil doit seulement étrearacde ou une sourced'd'alimentation indiquée sur le manuel/d'utilisation ou sur l'appareil. Attention ce qu'aucunobjet ne soit place sur l'appareil, et qu'aucun liquide ne soit verssez ou a t'intérieur l'appareil. L'utilisateur est tenu dene pas tenter d'entretenir'appareil au dela des consignes du manueld'utilisation. Confiez l'entretien decet apparéil à de personnelkalifiée.Installation du cadre photo
Le cadre photo peut être positionné verticalément (portrait)ou horizontally(paysage). 1. Appuyez sura touche de verruageil et tirez! une principale pour détachercelle-ci du cadre.  2. Appuyez surl'extrémitte gauche de latige, et tenez l'autre extrémitte pour détacher.  3. Replaceze cadre en insertantes deux tiges del'appareil dans les deux trous situés surla partie supérieure du cadre. Assembléz le cadre et l'appareil, appuyez ensuite sur la partie inférieure jusqu'à cequelle cadre soit bien fixé.   4. Vissez le pied à un desreads tous à visitués al'arrière de l'appareil. Installation du logiciel/ pilote
IMPORTANT: Vous devezd'abord installer le logiciésur votre ordinaire avant de raccorderie la cadre photo ici-ci. 1. Insérez leCD-ROM et double cliquezser le fjicher SETUP.EXE; suive les instructions affaciées à l'écran. 2. Le logiciel PhotoViewer va étéinstallé sur toute ordinaireur un raccourci sera的前提 survotre bureau.NE PASLANCER LE LOGICIEL MAINTENANT.
3. Une fois lelogiciel installé, raccordez lecadre photo à VOYTE ORDINATEUR à l'ecran et acceptez lorsqu'les fenêtres d'installations affichent à l'écran. 4. Une fois le piloplate installé, lancez leologiciel Photo Viewer Qiu se trovou surle bureau. REMARQUE: Si vous est impossible de lancer le logiciel ou connecter le cadre photo à l'ordinateur, reportez-vous à la section Dépannagedu manuel pour obtenir d'aide.Mise en charge de la batterie intégrée
La batterie interne del'appareil peut etre miseen charge via lecable USB lorsquereiieau port USB (portUSB devoire ordinateur)ou un hub USB. Une foula batterie completement chargée, l'appareil dispose d'une autonomie de 3 heures en lecture.Transférer des photosur le cadre photonumérique à partir del'ordinateur
Attention: Raccordez le cadrephoto à votre ordinateur avant de lancer le logiciel. 1. Raccordez une extremité du cable USB au port USB devote ordinateur, et l'autre extrémite au cadre photo.  2. "Connector?" s'affiche sur l'écran ducadre photo, appuyez sur la touche MODE pour confirmer," Transférer" s'affiche, indiquant l'établissement de la connexion, au bout de 5 minutes d'inactivité, le cadre photo basculer en mode économique d'énergie. Vous doivent alors déconnecter et reconnectcerle cable USB. 3. Lance lelogiciel en double cliquants sur le raccourci PhotoViewer situé du sur le bureau.  Sauvegarden les photos selectionnées dans la fenetre Collection sur voite ordinateur.  —Pour supprimer les photos selectionnées.  Cliquez pour transférer les images de la fenetre Collection sur le cadre photo  Cliquez pour effectuer une rotation sur image  Clique pour transférer une image en cours de prévisualisation vers la fenetre Collection.  - Espace de prévisualisation. -Fenetre Collection. - Nombre de photos de la fenêtre Collection. - Nombre maximal de photospouvant être stockées surle cadre photo 4. Parcourezles dossiers de�权érateur pour rechercher des photos à transférer. La photoësLECTIONné est affichéédans l'espace de prévisualisation.Remarque: Le cadrephoto prend en chargeles formats de fichiers imagesuivants : JPG / BMP/ TIF / GIF / PNG. 5. Lorsquela photo est tropgrandie, une boîte rouge apparait sur la photo, vous pouvèez cliquers sur cette boîte rougeet la déplacer pour recadrer la photo. Vouspouvèez également effectuer une rotation sur la photo en cliquantsur " 6. Cliquez sur " → pour transférer laphoto affichée dans'espace de prévisualisation vers lafenetre Collection. 7. Lorsque vous souhaitez supprimer une photo de lafenetre Collection, sélectionnez la photo etappuyez sur la touche" " pour la supprimer. Lorsque vous souhaitez sauvegardner une photode la fenetre Collection sur votreordinateur, sélectionnez laphoto et appuyez sur la touche" " pour lasauvegarder. 8. Cliquesur "Synchronize" pour transférer lesphotos de la fenetre Collection vers voirecadrephoto. 9. Attendez lafin du transfert, quitteze logiciel et déconnectezle cadre photo de votre ordinateur REMARQUE: Lorsque vous sauhtaïez anouveau transférer des images, vous deveze relaxer leologiciel Photo Viewer.Fonctionnement des touches
1. Ecran 2.0 / MODE 3. Image precedente Supprimer les images 4. Image suivante Supprimer toutes les images. 5. Connecteur Mini USB Déclaration sur les émissions electromagnetiques
Cet équipement est conforme ala partie 15 des reglementsde la FCC et dela CE. L'utilisation de l'appareil est soumiseaux deux conditions. suivantes: (1) Cet apparéil ne doit pas provoquer d'interférences et. (2) Il doit accepter toute interfeERENCE, y compris celles susceptibles de provocer un fonctionnement indisérable de l'appareil. THIS CLASS B DIGITAL APPARATUS COMPLIES WITH CANADIAN ICES-003/1. THE NEW TRAFICINE DE LA CLASSES EST CONFORMA LIKE NORMAIRENMB-003 DU CANADE.Mise en marche/arrêt du cadre photo
Appuyez et maintenze enforcée touche 念 / MODEpendant 4 secondes pourmettreI'appareilennarche.Appuyezet maintenze enforcée la touche anouveau 念 /MODEpendant4 secondes pour etéindre I'appareil Remarque: 'you'vedezdésactiverleDiaporamavant d'eteindrele cadre photo.Visionner des photos
1. Mettez en chaque cadre photo enappuyant et maintainen enforcée la touche / MODE pendant environ 4 secondes. 2. Appuyez sura touche pour naviguerparmi vos photos. Appuyez sur la touche pour revenir a photo precedente).Activer le Diaporama(affichage automatique desphotos)
Lorsque la cadre photoest en marche, appuyez sur la touche /MODE. Le cadre photo affiche les photos uneper une et demanière automatique. Appuyez sur la touche / MODE à nouveauoup pour désactiver le Diaporama.Supprimerune photo
1. En mode Navigation, utilisez latouche «et « pour sélectionner la photo que vous souhaitez suprimer. 2. Appyeez etmaitenene enfonce la touche endant 3 secondes. Le message Supprimer s'affiche. 3. Appu yez sur la touche our supprimer laphoto, ouappuyez surla touche pour annulier l'opérationSupprimer toutes les photos
1. En mode Navigation, utilisez latouche et pourselectonnerlaphot queyou souhaitez suprimer. 2. Appuyez et mainteze enforcé la touche pendant 3 secondes. Le message Suprimuter tout s'affiche. 3. Appuyez surla touche 念 pour supprimerla photo, ou appuyezsur la touche pour annuler l'opération.Résolution des problèmesurvenant lors del'installation
Lorsque l'écran affiche un message d'erreur Periphérique non connecté" durant l'installation, suivezles étapes suivantes pour résoudre ce problème: A. Problèmes avec lelogiciel (impossible de lancierle logiciel Photo Viewer) 1. Rénsérez et lancez anouveau le CD d'installationnet sélectionné "Supprimer" ou "Déinstaller" à partir du menu d'installation. 2. Déconnectez le cordonUSB de l'ordinateur puisredémarrez. 3. Une fois l'ordinaire prét, lancez l'installateur à nouveau étreinalléze le historiel. REMARQUE:NE PASraccorder le cordon USBavant la fin de l'installation du logiciel. B. Pourles problèmes matériels (Periphériquenon reconnu) 1. Àpères avoiriraccordé le cadre photonomérique via USB, allez dans le menu Démarrer /Panneau de configuration/Ajouter un nouveau périphérique. 2. Lorsque la boite de dialogueapparait, cliquez sur "Oui, j'ai déjà raccordé le périphérique". 3. Dansla liste des périphériques, sélectionné "Photo Viewer" et cliquez sur SUIVANT, l'état du périphérique est alors affché. Lorsqu'une icone d'alertissementapparait à côté ducadre photo, double cliquez sur l'icone et sélectionné "Réinstaller lepilepite".   If at any time in the future you should need to dispose of this product please note that: Waste electrical products should not be disposed of with household waste. Please recycle where facilities exist. Check with your Local Authority or retailer for recycling advice. (Waste Electrical and Electronic Equipment Directive)   Si en el futuro necessita deshcacerse de este producto,onga en cuerta lo numero: no debe deshcacerce de los residuos de produits electricos como siieranulos domesticos. Para favor,recycle en losnillos enlos queestosea possible.Acuas alas producciones y producciones de un solo producto, no se considera para serobroscirecible. (Directive sobre扣除ables electricys yequipulos electricos).   S�� so sauhtaue vaitez-vous debarrasser ultérieurement du produit, veillez notes que: les déchets électriques ne doivent pas été jetés avec les déchets domestiques. Veilliez le faire dépôt dans les centers de recyclage existants. Contactez les autorités à l'expertise en recyclage des déchets pour les formations. (Directive de l'équipment Electronique et des déchets électriques).   Sollenie Tie igrendwen zu spaterer Zeit desds Prozents entsorgen wollen, beachen sie Botte Foliges: Elektroschrott solte nicht mit dem Haushaltsmull eigentert sollen. Betrie necysenSie hohn, sofern hnen entsprechende Mochigkeiten zur Verfugung stehen. Setzen Sie sich mit ihren communalen Behörden oder ihrer Einzelhändern in Verbindung und fragen sie diese um Rat bezüglich der Wiederverwertung. (Elektro-und Elektronik-Altgeräte-Richtlinie (WEEE))   Indon u zich in de ekomstam van dit stoest wente to ontdoen, let er dan op dat elektrisch aframmaterialien met het huishoudeil ef alvain worden verwerdend. Breng het stoesten een kringloogswinkel of anderervoenzionring voor recycling. Neem contact op met uw enkooi teeflel, die vondtigste en de onslenploed en de onslenploed over recycling. (Richtlich, om Vavl en Elektrische en Elektronische Apparaten, AEEA).
- Lenco
- DIGITAL PHOTO FRAME
- Table of Contents
- Read First
- Quick Installation Guide
- SYSTEM REQUIREMENTS:
- INSTALLATIONPROCEDURE:
- Introduction
- Important Safety Instructions
- WARNING:
- Placing the PhotoViewer
- Installing the Software/ Hardware
- DO NOT LAUNCH THE SOFTWARE YET.
- Charging the Battery
- Downloading Photos from Your Computer to Photo Frame
- Using the Function Keys
- Electromagnetic Emissions Statement
- Using the PhotoViewer
- Viewing Photos
- Using Slideshow (Automatic Display of Photos)
- Deleting a SinglePhoto
- Deleting All Photos
- Troubleshooting for Installation
- DIGITALERBILDERRAHMEN
- Bitte lesen!
- Kurzinstallationsanleitung
- SYSTEMANFORDERUNGEN
- SOFTWAREINSTALLATION:
- Einleitung
- Wichtige Sicherheitschinweise
- Aufstellung
- Software- und Hardwareinstallation
- Aufladen des eingebauten Akkus
- Kopieren von Fotos vonHrem Computer auf denFotorahmen
- Benutzung der Funktionstasten
- Erklärung zu elektromagnetischer Strahlung
- Ein-/Ausschalten des Fotorahmens
- Bilder ansehen
- Benutzung der Diashowfungtion (Automatischer Bildwechsel)
- Löschen einzelner Fotos
- Löschen aller Fotos
- Fehlerbehebung
- PORTARETRATO DIGITAL
- Lea Primero
- Guía
- REQUISITOS DEL SISTEMA
- PROCEDIMIENTO DE INSTALLACION:
- INTRODUCCION
- Instrucciones importantes de seguidad
- ADVERTENCIA
- Colocar el Album de Fotos
- INSTALLACION DELSOFTWARE /HARDWARE
- CARGAR LABATERIA INCORPORADA
- EscargarotosdesuspcalAlbumdefotosdigitales
- Usar las teclas de referencia
- DECLARACION DE EMISSIONES ELECTROMAGNETICAS
- Usar el PhotoViewer
- Visualizarotos
- Usar el Slideshow (Visualizacion automatica deotos)
- Eliminar una Foto
- Eliminar todas lasOTOS
- Guiá de problemas y SOLUTIONES para la instalación
- DIGITALE FOTOALBUM
- Lees Eerst
- Snelle Installatiegids
- DIGITALE FOTOALBUM:
- INSTALLATIEPROCEDURE:
- Introductie
- Belangrijke Veiligheidsvoorschriften
- WAARSCHUWING:
- Het Fotoframe Neerzetten
- De Software/Hardware Installeren
- Wacht MET HETSTARTEN VAN DE SOFTWARE.
- De Ingebouwde Batterij Opladen
- Foto's van uw Computer maar uw Fotolijst Downloaden
- De Functieknoppen Gebruiken
- Verklaring Betreffende Elektromagnetische Emissies
- De FotolijstAan/Uit Zetten
- Foto's Bekijken
- De Fotopresentatie Gebruiken (Foto's Automatisch Afspelen)
- Een Enkele Foto Wissen
- Alle Foto's Wissen
- Problemen bij de Installatie Oplossen
- CADRE PHOTO DIGITAL
- A litre enpremier
- CONFIGURATION SYSTEMEREQUIRE:
- INSTALLATION:
- Consignes de sécurité importantes
- AVERTISSEMENT:
- Installation du cadre photo
- Installation du logiciel/ pilote
- NE PASLANCER LE LOGICIEL MAINTENANT.
- Mise en charge de la batterie intégrée
- Transférer des photosur le cadre photonumérique à partir del'ordinateur
- Fonctionnement des touches
- Déclaration sur les émissions electromagnetiques
- Mise en marche/arrêt du cadre photo
- Visionner des photos
- Activer le Diaporama(affichage automatique desphotos)
- Supprimerune photo
- Supprimer toutes les photos
- Résolution des problèmesurvenant lors del'installation
Merk : LENCO
Model : DF-241
Categorie : Platenspeler