
HP250M1-U1 - Boiler HAIER - Free user manual and instructions
Find the device manual for free HP250M1-U1 HAIER in PDF.


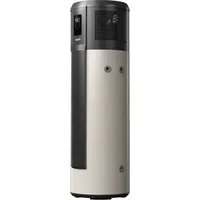
| Product Type | Heat Pump Water Heater (Boiler) |
| Brand | Haier |
| Model | HP250M1-U1 |
| Capacity | 250 liters |
| Energy Efficiency Class | A+ |
| Heating Technology | Air-source heat pump |
| Power Supply | 230 V ~ 50 Hz |
| Backup Heating Element | 2.0 kW electric immersion heater |
| Coefficient of Performance (COP) | 3.5 |
| Maximum Water Temperature | 60 °C |
| Dimensions (H × W × D) | 1900 × 600 × 600 mm |
| Weight | 115 kg |
| Installation Type | Floor-standing |
| Refrigerant | R134a |
| Insulation | High-density polyurethane foam (50 mm) |
| Water Connection | 3/4 inch BSP |
| Safety Features | Overheat protection, pressure relief valve, corrosion protection anode |
| Maintenance | Annual check-up and anode replacement recommended |
| Repairability | Modular design with easily accessible spare parts |
| Included Accessories | Temperature and pressure relief valve, user manual |
Frequently Asked Questions - HP250M1-U1 HAIER
User questions about HP250M1-U1 HAIER
0 question about this device. Answer the ones you know or ask your own.
Ask a new question about this device
Download the instructions for your Boiler in PDF format for free! Find your manual HP250M1-U1 - HAIER and take your electronic device back in hand. On this page are published all the documents necessary for the use of your device. HP250M1-U1 by HAIER.
USER MANUAL HP250M1-U1 HAIER
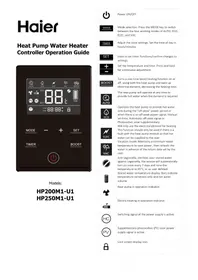
Heat Pump Water Heater Controller Operation Guide

Models:
HP200M1-U1
HP250M1-U1
 | Power ON/OFF. |
| Mode selection. Press the MODE key to switch between the four working modes of AUTO, ECO, ELEC, and VAC. | |
| Adjust the clock settings. Set the time of day in hours/minutes. | |
| Used to set timer functions/confirm changes to settings. | |
| Set the temperature and time. Press and hold for continuous adjustment. | |
| Turns a one-time boost heating function on or off, using both the heat pump and back-up electrical element, decreasing the heating time. | |
| The heat pump will operate at any time to provide hot water when the demand is required. | |
| Operates the heat pump to provide hot water only during the “off-peak” power period or when there is an off-peak power signal. Manual set time, Automatic off-peak signal or Photovoltaic solar supplementary. | |
| Will only use the electrical element for heating. This function should only be used if there is a fault with the heat pump module so that hot water can be supplied to the user. | |
| Vacation mode: Maintains a minimum water temperature to save power, then reheats the water in advance of the return date set by the user. | |
| Anti-Legionella, sterilizes your stored water against Legionella, the service will automatically turn on once every 7 days and raise the temperature to 65°C, or as user defined. | |
| Stored water temperature display. Bars indicate temperature variations only and not water volume. | |
| Heat pump in operation indicator. | |
| Electric heating in operation indicator. | |
| Switching signal of the power supply is active. | |
| Supplementary photovoltaic (PV) solar power supply signal is active. | |
| Lock screen display icon. |
Start Up Controls
This guide is designed to better explain the controls and operation of the basic modes currently available to you with your Heat Pump Water Heater.
- Temperature and Time
- AUTO mode (Automatic operation)
- ELEC mode (Electric element)
- VAC mode (Vacation)
- BOOST function
- Lock screen
- Service mode (advanced settings)
-
Fault codes (advanced settings)
-
Temperature and Time
01.1 Temperature
- Turn on the appliance by pressing the ⏻ key if in Standby, otherwise disregard this step.
- Press the + or - keys to adjust the temperature in 1°C increments until the desired temperature is reached.
Note: A minimum of 60° C is recommended for stored hot water to help prevent undesirable bacteria. - Once the desired set temperature is displayed, the settings will be confirmed after 6 seconds of keyless operation and you will return to the operational mode.
01.2 Time
- Turn on the appliance by pressing the ⏻ key if in Standby, otherwise disregard this step.
- Press the TIMER key until the display shows the hours flashing "OO:OO."
-
Press the + or - key to adjust the 24 hour time.
-
Press the TIMER key until the display shows the minutes flashing "00:00."
-
Press the + or - key to adjust the minutes.
-
Once the current time is displayed, the settings will be confirmed after 6 seconds of keyless operation and you will return to the operational mode.
02. AUTO mode
Note: This appliance must be connected to a power supply providing electricity 24 hours per day. This mode is designed to automatically operate the heat pump when the temperature has dropped by a specified amount, just like a thermostatically controlled hot water cylinder.
AUTO Mode (under default settings)
- Turn on the appliance by pressing the 🔊key.

-
Press the MODE keys until the display shows the AUTO icon. AUTO
-
Press the + or - key to adjust the temperature to the desired settings as described in step O1.1. A minimum of 60° C is recommended.
-
Your appliance should begin to operate in AUTO mode to reach the set temperature. It may take up to 5 minutes for the heat pump to initiate operation.
-
If hot water is required as soon as possible after installation, the BOOST BOOST key can operate the electric element in addition to the heat pump for a faster recovery. This is not a working mode but will assist until the set temperature is reached, returning to the previous working mode. As this is an energy efficient appliance, the heat pump should remain the main source of heating wherever possible.
-
Your appliance should reach the set temperature and hot water will be available for use.
-
The default temperature differential is 10° C for the HP200 model and 9° C for the HP250 model. This means that at any time of the day or night, when the actual water temperature drops by this amount below the set temperature, the heat pump will operate. The temperature differential can be adjusted in the Service mode further in this guide.
03. ELEC mode
Note: This mode is designed to provide heating if the heat pump is not operating for any reason. If there is a fault with the heat pump module, follow this guide to ensure available hot water until a technician can resolve the issue.
-
Turn on the appliance by pressing the 🔒 key if in Standby, otherwise disregard this step.
-
Press the MODE keys until the display shows the ELEC icon. ELEC
-
The water heater should now heat via the electric element until the set temperature is reached.
The element icon will be displayed to indicate its operation.
- If there is a fault with the heat pump module, call Fisher & Paykel for service support.
O4. VAC mode
Note: This mode is designed to maintain a minimum water temperature to conserve energy during a period of absence from the property. The unit automatically reheats the water in advance of the return date set.
-
Turn on the appliance by pressing the ⏻ key if in Standby, otherwise disregard this step.
-
Press the MODE keys until the display shows the VAC icon.
-
The two-digit temperature display flashes "O1." Press the + or - key to adjust the number of days you will be away on vacation. The selectable range is between 1-99 days.
-
Press SET key to confirm. The temperature display status will return and the value from the previous mode will be used.
-
If the appliance is switched off or the mode is changed, VAC mode will be reset and the number of days entered will be lost.
-
According to the vacation days entered by the user, heating will begin at 12:00 on the second to last day of the vacation period. The first heating cycle will heat to 65° C to ensure that the water sterilization requirements have been reached. After the heating is completed, the appliance with switch to AUTO mode.
05. Boost function
BOOST mode will take priority over other modes. This mode will run for a single heating cycle, then revert back to the previous mode set. In this mode, the heat pump and back-up electric element operate simultaneously to reduce the heating time.
When operating, the Bicon will appear. After the set temperature has been reach, the icon will disappear and the appliance will operate in the mode used prior to BOOST function.
06. Lock screen
-
With the appliance turned on, hold the TIMER and BOOST keys simultaneously for 6 seconds.
-
The controller will beep twice and the lock screen icon will appear, indicating the screen is locked.
-
To exit lock screen, hold the TIMER and BOOST keys simultaneously for 6 seconds. The controller will beep 4 times and the lock screen icon will disappear. The controller will now be adjustable.
07. Service mode
Note: Many of the features in service mode are for advanced configurations with connections to off-peak power switching or solar, however there are some settings in here that could be beneficial for adjustments to your system such as water sterilization, heat pump maximum working time, setting the day of the week and temperature differential.
Enter Service Mode:
- Enter the Standby Mode by pressing the Key, only the temperature and time will be displayed.
- Press and hold the + and SET keys for 6 seconds to enter Service Mode.
- "LL" will be displayed. The options are "NO" normally open (default) and "NC" normally closed. This setting is used for off-peak or solar switching signals. Advanced technical use only. Press SET key to enter the next setting.
- "LP" will be displayed. The options are for the off-peak logic type used in ECO mode;
"01" Manual timer (user defined time periods of operation)
"02" Off-peak power switching signals (for meters capable of off-peak automatic power switching.)
"O3" Photovoltaic (PV) switching signals (for supplementing with photovoltaic (PV) solar energy.)
Advanced technical use only. Press SET key to enter the next setting.
-
"LA" will be displayed. The PV function will work in AUTO mode, the options are "ON" or "OFF", Press + or - key to cycle through settings. This will switch PV operation mode on when there is a PV signal in AUTO mode, if using PV, we recommend this setting is "ON." Disregard if no PV in use. Press SET key to enter the next setting.
-
"Lb" will be displayed. This setting is used to set the heating temperature when connected to PV solar panels.
The adjustable range is between 65-75°C, the default is 65°C. Press + or - key to cycle through settings.
Disregard if no PV in use. Press SET key to enter the next setting.
- "LC" will be displayed. This setting is used to determine the heating source when connected to PV solar panels, a signal is active and there is sufficient solar electricity supply. The options are;
"O1" The heat pump and electric element will operate simultaneously. Default.
"02" The heat pump will operate and if set temperature is not reached within the differential setting, the electric element will assist in heating.
"03" Only the electric element will be used for heating.
Disregard if no PV in use. Press + or - key to cycle through settings. Press SET key to enter the next setting.
-
"AL" will be displayed. Periodic water sterilization by heating can be selected. The options are "ON" to enable this function (default) or "OFF" to disable the function, press + or - key to cycle through settings. Press SET key to enter the next setting.
-
"Ah" will be displayed. The temperature of water sterilization can be adjusted if the above function is "ON," press + or - key to cycle through settings between 65-75°C. Press SET key to enter the next setting.
-
"Ad" will be displayed. The frequency of the water sterilization can be adjusted by days between 7–30, the default is 7. Press + or - key to cycle through settings. Press SET key to enter the next setting.
-
"AA" will be displayed. This is the maximum working time of the heat pump before auxiliary heating activates. The hours can be adjusted between 5-15, the default is 10. Press + or - key to cycle through settings. Press SET key to enter the next setting.
- "Ct" will be displayed. This setting is used to set the current day of the week, adjustable from 1-7, with Monday being 1 and Sunday being 7. Press + or - key to cycle through settings. Press SET key to enter the next setting.
- "Bt" will be displayed. This is the temperature differential. This setting controls when the heat pump will start operation after the actual temperature drops below the set temperature. The adjustable range is between 5–15°C, the default is 10°C. Press + or - key to cycle through settings. Press SET key to confirm.
- You will now return to the standby mode display. Press the 🔒 key to enter operational mode. Your system should begin operating within the next 5 minutes.
08. Fault codes
Enter Fault code query:
- Enter the Standby Mode by pressing the ⏻key, only the temperature and time will be displayed.
- Press and hold the + and - keys for 6 seconds to enter Fault codes.
- "EO" will be displayed if there is no fault. If there is a fault, it will be displayed in order of the last known fault. Press in the - key to scroll back to previous faults until the oldest stored fault EO1 is displayed. The last 10 fault codes are stored in the appliance.
- If no keys are pressed for 6 seconds, the appliance will exit this mode. Pressing the Key will also exit and return to Standby Mode.
- To clear the fault code memory, press and hold the + and - key simultaneously for 6 seconds whilst in the fault code mode.
| E0 | No faults found | E4 | Ambient temperature sensor fault |
| F0 | Communication fault (Wi-Fi) | E5 | Evaporation temperature sensor fault |
| F2 | Operating temperature protection | E6 | Air exhaust temperature sensor fault |
| F3 | Air exhaust temperature protection | ED | Air intake temperature sensor fault |
| F5 | Evaporation high temperature protection | E7 | Communication fault (display-control panel) |
| F6 | Compressor over-current protection | E8 | Pressure switch protection |
| E1 | Electrical leakage alarm | E9 | Ambient temperature protection |
| E2 | Over temperature alarm (stored water) | EF | Off-peak power switching signal fault |
| E3 | Inner temperature sensor fault | L7 | Fan fault |
ECO Mode Controls
This guide is designed to better explain the controls and operation of the three economy modes currently available to you with your Heat Pump Water Heater
- Manual timer
- Off-peak power signal
- Photovoltaic (PV) solar power
01. Manual timer operation
Note: This appliance must be connected to a power supply providing electricity 24 hours per day. This mode is designed to manually set the times of operation for either the off-peak time, in preparation for periods of high hot water usage, to take advantage of higher ambient temperatures for maximum gains or to limit operational noise during certain periods (eg; night time.)
These settings should be available under the appliances default settings. If the settings are different to default this guide will also explain how to achieve the desired settings in the first 12 steps.
Enter Service Mode:
-
Enter the Standby Mode by pressing the key, only the temperature and time will be displayed. Note: Skip to step 12 if all settings remain default or the appliance is in its first-time use.
-
Press and hold the + and SET keys for 5 seconds to enter Service Mode.
-
"LL" will be displayed. Disregard if using manual timer. Press SET key to enter the next setting.
-
"LP" will be displayed. For manual timer, press + or - key to cycle through settings until "01" is displayed. Press SET key to enter the next setting.
-
Press the SET key to cycle through the next three settings, disregarding "LA" "Lb" "LC"
-
"AL" will be displayed. Periodic water sterilization by heating can be selected. The options are "ON" to enable this function (default) or "OFF" to disable the function, press + or - key to cycle through settings. Press SET key to enter the next setting.
-
"Ah" will be displayed. The temperature of water sterilization can be adjusted if the above function is "ON," press + or - key to cycle through settings between 65–75°C. Press SET key to enter the next setting.
-
"Ad" will be displayed. The frequency of the water sterilization can be adjusted by days between 7–30, the default is 7. Press + or - key to cycle through settings. Press SET key to enter the next setting.
-
"AA" will be displayed. This is the maximum working time of the heat pump before auxiliary heating activates. The hours can be adjusted between 5–15, the default is 10. Press + or - key to cycle through settings. Press SET key to enter the next setting.
-
"Ct" will be displayed. This setting is used to set the current day of the week, adjustable from 1–7, with Monday being 1 and Sunday being 7. Press + or - key to cycle through settings. Press SET key to enter the next setting.
-
"Bt" will be displayed. This is the temperature differential. This setting controls when the heat pump will start operation after the actual temperature drops below the set temperature. The adjustable range is between 5–15°C, the default is 10°C. Press + or - key to cycle through settings. Press SET key to confirm.
-
You will now return to the Standby Mode display. Press the ⏻ key to enter operational mode.

-
Press the MODE key until you are in ECO mode, the ECO icon will be displayed.
-
Press the SET key to begin entering times of operation.
-
"L1" will be displayed. This is the first time period during the week (Monday–Friday.) "START" will be displayed indicating the start time of the heating cycle, and the hours will begin flashing 00:00. Press + or - key to adjust the start hour of the first timer.
Press the SET key to move on to adjusting start minutes, the minutes will begin flashing 00:00. Press + or - key to adjust the start minutes of the first timer.
- Press the SET key to confirm and move on to "L1 STOP." The hours will begin flashing 00:00. Press + or - key to adjust the stop hour of the first timer.
Press the SET key to move on to adjusting start minutes, the minutes will begin flashing 00:00. Press + or - key to adjust the stop minutes of the first timer.
-
Press the SET key to confirm the first timer and move on to "L2 START." A second timer can be added during the week (Monday–Friday) using the same method described above. If no additional timer is required, this setting can remain as 00:00.
-
Press the SET key to confirm the first timer and move on to "L3 START." A timer can be added during the weekend (Saturday–Sunday) using the same methods described above.
-
Press the SET key to confirm the first timer and move on to "L4 START." A second timer can be added during the weekend (Saturday–Sunday) using the same methods described above. If no additional timer is required, this setting can remain as 00:00.
Note: This is user preference and settings may need adjustment over time depending on needs.
Considerations:
a) Does your power supplier provide an off-peak period of time that you can take advantage of?
b) At certain times of the day hot water usage will be higher, such as showering. The timer can be set to ensure a sufficient supply of hot water is available for these periods.
c) Do you want to take advantage of the peak ambient temperatures of midday-on, to assist the Heat Pump for maximum efficiency?
d) Do you want to limit the Heat Pumps operation during the night to keep noise levels to a minimum?
02. Off-peak power signal
Note: This appliance must be connected to a power supply providing electricity 24 hours per day. This mode is designed for situations where a meter (eg; smart meter) is constantly supplying electricity but automatically switches depending on peak hours.
This is not suitable for situations and meters where tariff or ripple control turns off electricity supply for a period of time (peak.)
Please engage your electrician or power provider for further information on the suitability of your electrical devices.
2.1 Off-peak power signal operation
- Enter the Standby Mode by pressing the 🔊 key, only the temperature and time will be displayed.
- Press and hold the + and SET keys for 5 seconds to enter Service Mode.
- "LL" will be displayed. The options are "NO" normally open (default) and "NC" normally closed. You must know if the signal from the switching device or meter are Normally Open or Normally Closed to meet this setting. Press SET key to enter the next setting.
- "LP" will be displayed. For Off-peak power signal, press + or - key to cycle through settings until "02" is displayed. Press SET key to enter the next setting.
- "LA" will be displayed. This setting is only used when connected to PV solar panels. Press SET key to enter the next setting.
- "Lb" will be displayed. This setting is only used when connected to PV solar panels. Press SET key to enter the next setting.
- "LC" will be displayed. This setting is only used when connected to PV solar panels. Press SET key to enter the next setting.
- "AL" will be displayed. Periodic water sterilization by heating can be selected. The options are "ON" to enable this function (default) or "OFF" to disable the function, press + or - key to cycle through settings. Press SET key to enter the next setting.
- "Ah" will be displayed. The temperature of water sterilization can be adjusted if the above function is "ON," press + or - key to cycle through settings between 65–75°C. Press SET key to enter the next setting.
-
"Ad" will be displayed. The frequency of the water sterilization can be adjusted by days between 7–30, the default is 7. Press + or - key to cycle through settings. Press SET key to enter the next setting.
-
"AA" will be displayed. This is the maximum working time of the heat pump before auxiliary heating activates. The hours can be adjusted between 5-15, the default is 10. Press + or - key to cycle through settings. Press SET key to enter the next setting.
-
"Ct" will be displayed. This setting is used to set the current day of the week, adjustable from 1–7, with Monday being 1 and Sunday being 7. Press + or - key to cycle through settings. Press SET key to enter the next setting.
-
"Bt" will be displayed. This is the temperature differential. This setting controls when the heat pump will start operation after the actual temperature drops below the set temperature. The adjustable range is between 5–15°C, the default is 10°C. Press + or - key to cycle through settings. Press SET key to confirm.
-
You will now return to the Standby Mode display. Press the ⏻ key to enter operational mode.
-
Press the MODE key until you are in ECO mode, the ECO icon will be displayed. Validation of operation will be confirmed by the HC icon being illuminated, confirming a signal between the appliance and off-peak metering.
Note: This mode operates the heat pump only when an off-peak connected signal is detected!
Confirm with your power provider the time and duration of this service to ensure suitability for ample heating time and household periods of high hot water usage are sufficient.
For example: If the power company provides off-peak metering between 0000-0500, the water heater will operate only during these hours until the set temperature is reached. If the main period of hot water usage is late evening or night time and hot water has been drawn off throughout the day without re-heating due to peak time, there may not be sufficient hot water for high demand fixtures such as showers or baths.

03. Photovoltaic (PV) solar power signal operation
- Enter the Standby Mode by pressing the ⏻key, only the temperature and time will be displayed.
- Press and hold the + and SET keys for 5 seconds to enter Service Mode.
-
"LL" will be displayed. The options are "NO" normally open (default) and "NC" normally closed. You must know if the signal from the switching device or solar controller are Normally Open or Normally Closed to meet this setting. Press SET key to enter the next setting.
-
"LP" will be displayed. For PV power signal, press + or - key to cycle through settings until "O3" is displayed. Press SET key to enter the next setting.
-
"LA" will be displayed. The PV function will work in AUTO mode, the options are "ON" or "OFF", Press + or - key to cycle through settings. This will switch PV operation mode on when there is a PV signal in AUTO mode, if using PV, we recommend this setting is "ON." Press SET key to enter the next setting.
-
"Lb" will be displayed. This setting is used to set the heating temperature when connected to PV solar panels. The adjustable range is between 65-75°C, the default is 65°C. Press + or - key to cycle through settings. Press SET key to enter the next setting.
-
"LC" will be displayed. This setting is used to determine the heating source when connected to PV solar panels, a signal is active and there is sufficient solar electricity supply. The options are;
"O1" The heat pump and electric element will operate simultaneously. Default.
"02" The heat pump will operate and if set temperature is not reached within the differential setting, the electric element will assist in heating.
"03" Only the electric element will be used for heating.
Press + or - key to cycle through settings. Press SET key to enter the next setting.
-
"AL" will be displayed. Periodic water sterilization by heating can be selected. The options are "ON" to enable this function (default) or "OFF" to disable the function, press + or - key to cycle through settings. Press SET key to enter the next setting.
-
"Ah" will be displayed. The temperature of water sterilization can be adjusted if the above function is "ON," press + or - key to cycle through settings between 65–75°C. Press SET key to enter the next setting.
-
"Ad" will be displayed. The frequency of the water sterilization can be adjusted by days between 7–30, the default is 7. Press + or - key to cycle through settings. Press SET key to enter the next setting.
-
"AA" will be displayed. This is the maximum working time of the heat pump before auxiliary heating activates. The hours can be adjusted between 5-15, the default is 10. Press + or - key to cycle through settings. Press SET key to enter the next setting.
-
"Ct" will be displayed. This setting is used to set the current day of the week, adjustable from 1-7, with Monday being 1 and Sunday being 7. Press + or - key to cycle through settings. Press SET key to enter the next setting.
-
"Bt" will be displayed. This is the temperature differential. This setting controls when the heat pump will start operation after the actual temperature drops below the set temperature. The adjustable range is between 5–15°C, the default is 10°C. Press + or - key to cycle through settings. Press SET key to confirm.
-
You will now return to the standby mode display. Press the Key to enter operational mode. You can now choose between ECO mode, or AUTO mode if selected "ON" in step 5 "LA."

- For AUTO mode: Press the MODE key until you are in AUTO mode, the AUTO icon will be displayed. Validation of operation will be confirmed by the PV icon being illuminated, confirming a signal between the appliance and PV solar.
Note: AUTO mode will operate via power company electrical supply if no PV signal is detected!

- For ECO mode: Press the MODE key until you are in ECO mode, the ECO icon will be displayed. Validation of operation will be confirmed by the PV icon being illuminated, confirming a signal between the appliance and PV solar.
Note: ECO mode operates the heat pump only when sufficient PV solar electricity supply is available!

Additional functions
This guide is designed to better explain the controls and operation of additional functions and controls available with your Heat Pump Water Heater.
-
Real-time parameter query
-
Sterilization (Anti-legionella)
-
Stored hot water display
-
Demo (display) mode
-
Parameter query
Enter parameter query:
-
Enter the Parameter Query Mode with the appliance powered on ⏻, The operational working mode will be displayed.
-
Press and hold the MODE and SET keys for 6 seconds to enter Parameter Query.
-
The controller will beep 8 times indicating you have entered the real-time parameter query mode. Press and hold the + and - key to scroll through parameters.
-
If no keys are pressed for 6 seconds, the appliance will exit this mode.
| Sensor | Code | Definition |
| Ambient temperature | n15 | Real-time ambient temperature reading |
| Exhaust temperature | n6 | Real-time exhaust temperature reading |
| Suction temperature | n18 | Real-time suction temperature reading |
| Evaporator temperature | n4 | Real-time evaporator temperature reading |
| Storage tank water temperature | n122 | Real-time water storage tank reading |
| Opening of electronic expansion valve | n123 | Flashing represents 360 steps |
| Fan speed | n124 | Blinking represents 580 revolutions |
02. Sterilization (Anti-legionella)
The sterilization function can be adjusted in the Service Mode. The settings below are relevant for this function:
-
"AL" will be displayed. Periodic water sterilization by heating can be selected. The options are "ON" to enable this function (default) or "OFF" to disable the function, press + or - key to cycle through settings. Press SET key to enter the next setting.
-
"Ah" will be displayed. The temperature of water sterilization can be adjusted if the above function is "ON," press + or - key to cycle through settings between 65–75°C. Press SET key to enter the next setting.
-
"Ad" will be displayed. The frequency of the water sterilization can be adjusted by days between 7–30, the default is 7. Press + or - key to cycle through settings. Press SET key to enter the next setting.
Note: If sterilization function is set "OFF," it is recommended that the set temperature be a minimum of 60°C.
03. Stored hot water display
This display indicates the temperature of water in the storage tank, not total volume. The hot water service is a pressurised system and should remain full of stored water.
| <35°C | 35-40°C | 41-45°C | 46-50°C | 51-55°C | 56-75°C |
| [7C08] | [D00K] |  | [4TA8] |  | [DC0A] |
04. Demo (Display) mode
This display mode allows for certain display functions to be operational, whilst the appliance itself is not operating. This setting should only be used for display purposes eg; retailers, wholesalers.
- Enter the Standby Mode by pressing the 🔊 key, only the temperature and time will be displayed.
- Press and hold the MODE key for 6 seconds to enter Service Mode.
- "A1" represents Operational Mode. "A2" represents display (demo) mode.
- Press + or - key to cycle through Operational or Demo modes.
- Press the ⏻ key to confirm and exit selection.
- The default is "A1" Operational Mode.



- HEAT PUMP WATER HEATER CONTROLLER OPERATION GUIDE
- START UP CONTROLS
- TEMPERATURE
- TIME
- AUTO MODE
- AUTO MODE (UNDER DEFAULT SETTINGS)
- ELEC MODE
- O4. VAC MODE
- BOOST FUNCTION
- LOCK SCREEN
- SERVICE MODE
- ENTER SERVICE MODE
- FAULT CODES
- ENTER FAULT CODE QUERY
- ECO MODE CONTROLS
- MANUAL TIMER OPERATION
- CONSIDERATIONS
- OFF-PEAK POWER SIGNAL
- OFF-PEAK POWER SIGNAL OPERATION
- NOTE: THIS MODE OPERATES THE HEAT PUMP ONLY WHEN AN OFF-PEAK CONNECTED SIGNAL IS DETECTED
- PHOTOVOLTAIC (PV) SOLAR POWER SIGNAL OPERATION
- ADDITIONAL FUNCTIONS
- ENTER PARAMETER QUERY
- STERILIZATION (ANTI-LEGIONELLA)
- STORED HOT WATER DISPLAY
- DEMO (DISPLAY) MODE
Brand : HAIER
Model : HP250M1-U1
Category : Boiler