
GV100REMB - Boiler HAIER - Free user manual and instructions
Find the device manual for free GV100REMB HAIER in PDF.
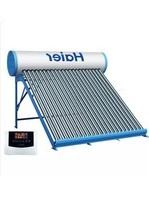


| Product Type | Gas Boiler |
| Model | GV100REMB |
| Brand | Haier |
| Dimensions (Width x Height x Depth) | 400 x 700 x 300 mm |
| Weight | 28 kg |
| Power Supply | 230 V / 50 Hz |
| Nominal Heat Output | 24 kW |
| Energy Source | Natural Gas / Propane |
| Efficiency Class | A |
| Heating Capacity Range | 5.5 - 24 kW |
| Domestic Hot Water Flow Rate | 11 L/min at 35°C rise |
| Expansion Vessel Capacity | 6 L |
| Safety Features | Flame supervision, overheat protection, frost protection |
| Control Type | Electronic with LCD display |
| Installation Type | Wall-mounted |
| Flue Type | Balanced flue (room sealed) |
| Maintenance Intervals | Annual service recommended |
| Spare Parts Availability | At least 10 years after purchase |
| Noise Level | < 50 dB(A) |
| Operating Temperature Range | Heating: 30-80°C, DHW: 35-60°C |
| CE Certification | Yes |
Frequently Asked Questions - GV100REMB HAIER
User questions about GV100REMB HAIER
0 question about this device. Answer the ones you know or ask your own.
Ask a new question about this device
Download the instructions for your Boiler in PDF format for free! Find your manual GV100REMB - HAIER and take your electronic device back in hand. On this page are published all the documents necessary for the use of your device. GV100REMB by HAIER.
USER MANUAL GV100REMB HAIER
Safety cautions ......2
Product features ....3
Technical parameters ....3
Installation instructions .....3-8
Troubleshooting 8
Operation instructions .....9
Packing list 9
Guarantee 10-11
Safety cautions (please read the cautions before use)
Description of symbols

Prohibit
Behaviors that are prohibited

Warning
Directions that must be followed

Caution
Directions that must be noted
Warning! Improper operation of the following may lead to personal injury or even death!

Prohibit
Do not touch glass vacuum tube, pipes and valves for supplying hot water during use to avoid being burned.

Personnel other than professional maintenance staff are prohibited from repairing, maintenance, dismantling or altering the water heater without authorization.

Warning
Please feel the water temperature by hand before use to make sure of proper water temperature while in use
Caution! Improper operation of the following may lead to personal injury or even death or property loss!

Prohibit
Please do not use the hot water in the heater for drinking or similar purposes.

Warning
The glass vacuum tube shall not be exposed for a long period without water inside after installation to avoid the shortening of the service life. If it cannot be used immediately, it shall be covered.

Caution
To guarantee effectiveness, do not feed water to the heater several times within one day in case of insufficient sunlight exposure.

Warning
The water heater is equipped with a special venting pipe and overflow pipe. To ensure normal operation, never refit or plug their outlets. Otherwise the water tank will shrink.

Warning
The glass vacuum tubes can withstand a low temperature of -70°C when they are not filled with water. When the auxiliary heating device is not to be used, on continuous cloudy days in winter or when the tubes are covered by snow, be sure to keep the water tank full of water and replace the cold water in the tank frequently (every 2 days). Otherwise the water retained in the tank will cause the vacuum tubes to break.

Warning
Water shall be fed in early morning or at night when the sunlight is insufficient. The water feeding after sunlight exposure of the glass vacuum tube will cause an explosion of the pipe.

Prohibit
When the heater with auxiliary electric heating function is used, ensure the auxiliary electric heater and electric heating accompanying strap are in OFF state.

Caution
The source of the energy for the water heater is solar energy. So it may be incapable of being used normally under cloudy, rainy and snowy weather conditions due to the failure to reach desired water temperature because of the insufficient sunlight exposure. If there is no electric heating as an auxiliary energy source, it may be unable to be used normally.
- Suggestions -
- This is a zero pressure system and care has to be taken that there is no pressure built up inside the tank. Install a vent pipe as indicated earlier. Maximum water head of the overhead tank should be 4 meters.
- When there is no water inside the system or when the system is not in use for more than 2-3 days, cover the vacuum tubes with an opaque cover, so that light will not pass to the tubes.
- The vacuum tubes, being fragile, should be handled with care and should be protected from any object falling on the tubes after installation.
Product features • Technical parameters • Installation instructions
Product features
- Inner cylinder made of 445 J1M stainless steel
The inner cylinder of the water tank is made of sanitary-grade 445 J1M stainless steel, offering strong corrosion resistance and durability.
- High-efficiency, energy-saving thermal insulation
With integrated polyurethane foam insulation for solar water heaters, it ensures good heat retention and minimizes heat loss.
- PCM color steel plate outer shell of water tank
PCM color steel plate, boasting outstanding corrosion resistance, oxidation resistance, and weather resistance, is the first choice for outdoor protective materials.
- Tower-type frame
The tower-type frame, made of carbon steel through spray processing, offers a stable structure, attractive appearance, and corrosion resistance.
Technical parameters
| Model | GV100REMB | GV150REMB | GV200REMB | GV300REMB | GV100RNF | GV150RNF | GV200RNF | GV300RNF |
| Specifications of the glass vacuum tubes | 58mm x 1800mm, all-glass vacuum tube collector | |||||||
| Frame form | Horizontal 35° | |||||||
| Number of the glass vacuum tubes | 12 16 22 | 30 16 22 | 3012 | |||||
| Aperture area | 1.51m2 | 2.02m2 | 2.80m2 | 3.83m2 | 1.51m2 | 2.02m2 | 2.80m2 | 3.83m2 |
| Usable water | 300L 150L | 200L 300L | 100L100L | 150L 200L | ||||
| Electric auxiliary heating | 1500W/220V; 1650W/230V | —— | ||||||
Note: The deviation of the aperture area is ≤ 3%; the permitted error limit for other parameters is ±10%.
Installation instructions
Selection of installation location

- The water heater shall be installed within the lightning-protected area of a building in locations prone to lightning strikes.
- The orientation of the water heater to be installed: 10° south by east and 15° south by west in the Northern Hemisphere; 10° north by west and 15° north by east in the Southern Hemisphere.
- There must be no shielding object in front of the installation location of the water heater. If an object exists, the space between the heater and the objective shall be more than L, L=H/tg(66.5-α)
(wherein: H- height of the shielding objective; α - local latitude)
Installation instructions
- Exterior and installation dimensions of horizontal water heater
| Models | Exterior dimensions(unit:mm) | Installation dimensions(unit:mm) | ||
| A BH D | ||||
| GV100REMBGV100RNF | 1095 1390 | 930 1710 | ||
| GV150REMBGV150RNF | 1480 1390 | 1235 1710 | ||
| GV200REMBGV200RNF | 1957 1390 | 1690 1710 | ||
| GV300REMBGV300RNF | 2597 1390 | 2295 1710 | ||
Note: The permitted error limit of the parameters above is ±10%.
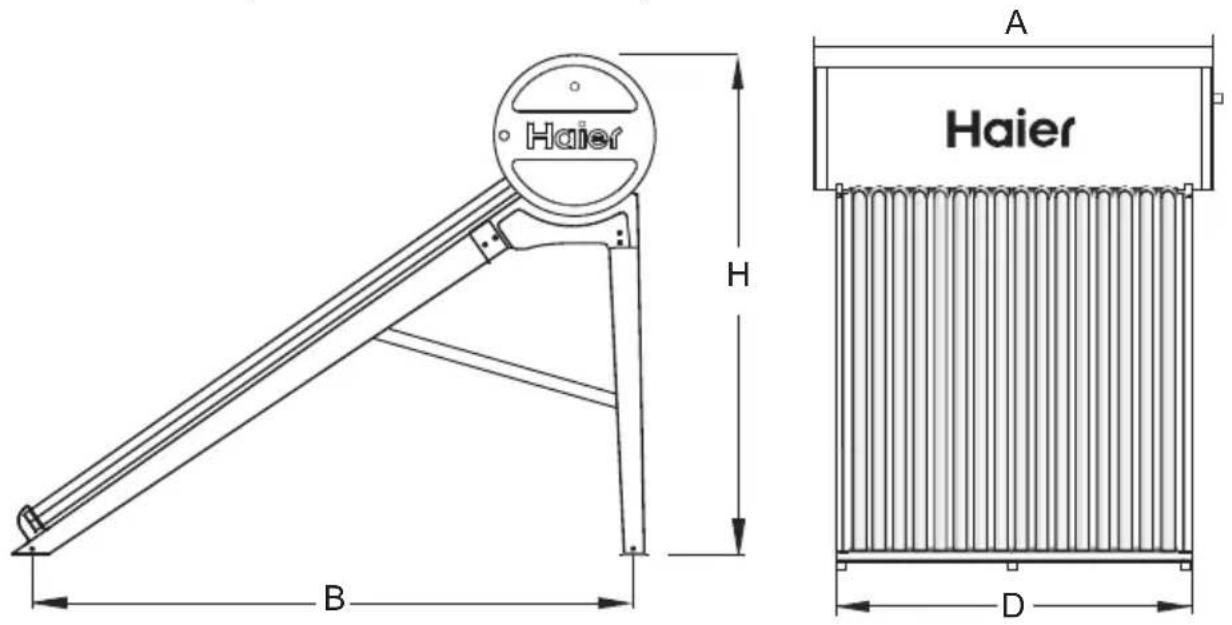
◆ Diagram of appearance structure

The diagram subject to GV150REMB is for reference only
Installation instructions
Frame assembly
Please see the related paper in the frame package for the diagram of the frame and packing list.
Frame fixation
- For horizontal water heaters, it is recommended to fix the feet of the heater onto the foot foundation with embedded iron parts or make a concrete brick with expansion bolts and then fix the feet of the heater to the expansion bolts.
- Adjust the height of the frame using the hard waterproof cushion to keep the horizontal tank and each foot evenly weighted.
Notice:
- Make sure that the feet all closely contact the supporting floor without any foot suspension to avoid damage to the product due to frame deformation.
- Please use the steel wire to firmly fasten the tank and frame if in a location where typhoons frequently occur.
- The water heater shall be stably and firmly installed to avoid severe damage or accidents due to harsh weather conditions.
Tank installation
- Unpack the tank, rip off the protection film. Uninstall the nut and cushion.
- Place the tank onto the tank bracket cradle, inserting protruding bolts into holes, and fasten with nuts.
Installation of Solderless Pipe Head
- Pipe fitting is connected to water pipe with a solderless connection.
- Outlet pipe and water inlet pipe both use solderless structure. To install, use a wrench to secure the water tank pipe head. In order to avoid damaging the seals, do not rotate water tank pipe head and do not apply force along the axial direction of the pipe.
- When installing the water inlet and outlet pipe, first use a wrench to secure the water tank pipe head, then unscrew the plastic cap and use inner ratchet teeth to directly connect to the PEX pipe. Before installation, check that the gasket ring of the water inlet and outlet pipe is intact.

Notice:
- Rip off the protection film after installation to avoid the destroy of the tank, and please do not use the sharp tool.
- Leave nuts loose since some adjustment may be necessary after fitting tubes.
- When assembling the water tank, keep the center line of the vacuum tube connecting holes parallel with the diagonal pillar of bracket.
- The inlet and outlet of the water tank can be also used as the drain.
Installation instructions

Installation of vacuum tubes
- Keep the tubes out of the sunlight before assembling the tubes to avoid being burned;
- The vacuum end use detergent or water soaked (Figure A);
- Insert the tubes into the seal ring with even pressure and a twisting motion. The resultant force direction shall be consistent with the axial direction of the vacuum tubes;
- Place the tubes into the tail support of the frame (Figure B) and then fix the tube onto the tail base (Figure C);
- Insert the tube into the seal ring at the depth of around 1cm, push the heat insulation ring to the water tank hole for sealing (Figure D);
- While assembling, install one tube on each end of the heater tank respectively first, so that the heater tank and frame are positioned as a whole.

A

B

C

D
Notice:
- Check whether the seal rings in tank holes are sufficiently installed and whether the sealing location is clean and free from foreign matters and damage.
- Make the pipe end wet before insertion for easy assembly.

Installation of Electric Heater and Operation Instructions
Please refer to the Operation Manual of the Solar Water Heater Controller Model HR-QBJ1-KSD included in the controller package.
Installation Instructions
Precautions on Pipeline Installation
- Any alteration to the structure of the solar water heater may cause problems in use.
- There are five ways to connect the water pipe to the room: flue, vent hole, through-hole in the wall, pipe well for solar pipes, and embedded sleeves. The former three types are commonly used. Before installation, the installation staff will consult the entry form and installation location of the pipe in a comprehensive way and in consideration of your convenience. A slope in the through-wall must be ensured during pipeline layout, and sealing shall be guaranteed to prevent the entry of rain or odors.
- Keep the smoothness of the air pipe to prevent the blockage of impurities, which may lead to collapse and deformation of the water tank under suction when using water.
- Do not install a valve in the overflow
pipeline to ensure that the flood signal can be sent out rapidly and accurately.
- To avoid the return of water in the tank, a non-return valve shall be installed at the joint of the water upward/downward pipes and the tap water.
- The installation project should be confirmed by our professional service personnel when installing several sets of the series of the products.
Diagram of Pipeline Installation if There Is No Controller
Diagram of Pipeline Installation![graph TD A["Electric heating tube (optional)"] --> B["Accompanying heating strap"] B --> C["Inlet/outlet pipe"] C --> D["Non-return valve"] D --> E["Mixing valve (hot water)"] E --> F["Solenoid valve Manual valve"] F --> G["Tap water"] G --> H["Mixing valve (cold water)"] H --> I["Solenoid valve wir…](/content/2026/06/1379149/images/043ce569d0436279622991c388b59dac16939d837ec83a281998850aa14e3f49.jpg)
The diagram subject to GV150REMB is for reference only.
Installation Instructions • Troubleshooting
Connection of water supply pipes when the solar water heater coexists with other water heaters
![graph TD A["Tap water"] --> B["Non-return valve"] B --> C["Mixing valve"] C --> D["Hot water pipe"] D --> E["Cold water pipe"] E --> F["Other water heater"] F --> G["To solar water tank"] G --> H["Non-return valve"] H --> I["Solar energy hot"] I --> J["Manual valve"] J --> K["Non-return valve"]](/content/2026/06/1379149/images/05b5baed03ae5fa0eab4d384edaf8b3e2cf1fdda51935c63dfdabb8f4c07d8bb.jpg)

Please install another non-return valve on the cold and hot water pipes respectively if the solar heater coexists with other water heaters so as to avoid accidents caused by water returned to the solar water tank through hot water pipe due to high pressure in the tanks.
Notice:
Improper operation of the water heater may lead to serious burns. When using the heater, do not make the high-temperature water of the nozzle aim directly at the body, mix the cold and hot water before use.
Troubleshooting
| Phenomena P | Possible causes Solutions | |
| No water supply | The tank is empty | Add water according to the tank |
| The pipeline or the connector falls off or is blocked | Maintain the pipeline or remove the blockage | |
| In the winter, water in the feeding/ outgoing pipe may become frozen | Start the accompanying heating strap or wait for natural ice-out | |
| The vacuum tube is damaged | Replace the tube | |
| Tap water supply stopped or low water pressure | Wait for normal water supply | |
| No water from the overflow pipe | Pipeline or connector may become broken | Repair or replace the pipeline or connector |
| In the winter, water in the feeding/ outgoing pipe may become frozen | Start the accompanying heating strap or wait for natural ice-out | |
| The temperature is not high enough | In bad weather or winter when the sun is relatively low, the sunlight time is short, atmosphere quality is poor, and sunshine radiation energy is insufficient | Use auxiliary electric heating as an option |
| The valve for water supply is loose or damaged | Tighten or replace the valve | |
| The vacuum tube cannot effectively collect heat due to a blockage in front of it | Remove the blockage or change the location for installation | |
| Dust on the tube | Clean the tube surface |
Operation instructions • Packing list
Operations
1) Before using water, the manual valve, mixing valve (hot water) and mixing valve (cold water) should be closed. 2) To fill water, use automatic function on the controller, or open the manual valve. 3) When using manual valve, when water flows from the overflow pipe, it indicates the water tank is full. Close the manual valve to finish filling water. 4) To use water, open the mixing valve (hot water) and the water comes from the shower nozzle. If the water is too hot, open the mixing valve (cold water) to adjust the water temperature. 5) After use of water, make sure the manual valve and mixing valves are closed.
Diagram of pipeline installation![graph TD A["Electric heating tube (optional)"] --> B["Accompanying heating strap"] B --> C["Inlet/outlet pipe"] C --> D["Non-return valve"] D --> E["Mixing valve (hot water)"] E --> F["Solenoid valve Manual valve"] F --> G["Tap water"] G --> H["Mixing valve (cold water)"] H --> I["Solenoid valve wir…](/content/2026/06/1379149/images/0e0cae876c9b4566273da14c6fc9149cfb8c09bcce5e0841955f660a58885e41.jpg)
The diagram subject to GV150REMB is for reference only. Refer to 1-5 terms and conditions
![graph TD A["Electric heating tube (optional)"] --> B["Air supply hole/ Sensor"] B --> C["Accompanying heating strap"] C --> D["Inlet/outlet pipe"] D --> E["Water from the tank"] E --> F["Mixing valve (cold water)"] F --> G["Mixing valve (hot water)"] G --> H["Plug"] H --> I["Outdoor Indoor"] I --> J…](/content/2026/06/1379149/images/2d2f728b89fbce2be188e4380ba320ef88398b5b062b690eb0078c9a35ecec73.jpg)
The diagram subject to GV150RNF is for reference only. Refer to 1, 4, 5 terms and conditions
Packing list
| Main parts | Quantity | ||||
| GV100RNF GV100REMB | GV150RNF GV150REMB | GV200RNF GV200REMB | GV300RNF GV300REMB | ||
| Water tank package | Water tank (PC) | 1 | 1 | 1 | 1 |
| Manual (Copy) | 1 | 1 | 1 | 1 | |
| Glass vacuum tube (PC) | 12 | 16 | 22 | 30 | |
| Frame (Set) | 1 | 1 | 1 | 1 | |
| Controller | optional | ||||
Guarantee
We Offer
5 Year Guarantee on insulated Tank. 2 Year Guarantee on Electrical Controller & Sensor. 2 Year Guarantee on Electrical Heating element. ☀️ No Guarantee for the breakage of Evacuate glass tubes.
* Subject to Terms & Conditions
Terms & Conditions
- We will repair or, if found necessary, replace a defective Solar Water Heater or any component for failure due to manufacturing defects.
- The "Haier" Solar Water Heater must be installed in accordance with "Haier" installation instructions.
- Where failed component or Solar Water Heater is replaced under guarantee: the balance of the original guarantee period will remain in effect. The repaired/replaced part does not carry a new guarantee.
- The Guarantee only applies to the solar water heater and therefore does not cover any plumbing or electrical part supplied by the installer/owner and not an integral part of solar water heater. E.g. Gate valve, Electric heater, Depressurize, etc.
- The “Haier” Solar Water Heater must be purchased from an authorized Haier Solar dealer / retailer to be eligible for guarantee coverage.
"GUARANTEE EXCLUSION"
Repair & Replacement work will be carried out as set in the above, but the following exclusions may cause the Solar Water Heater guarantee to become VOID and may incur a service charge and cost part/s of any:
- Where the Solar Water Heater is located in a location/position that does not comply with Haier installation instructions.
- Consequential loss either directly or indirectly in any form for any reason what so ever.
- Damage to the TANK/AIRVENT due to scaling, when water is hard. The hardness of the water should not be more than 300 PPM. The chloride level in the water should not be more than 250 PPM.
- Breakage of evacuated glass tubes for any reason, rust formation on supports and mounting stand. Improper selection of the model/ Capacity or misuse of any kind.
- Cleaning of scale deposits inside the evacuated tubes, if the system is connected to hard water supply. (More than 300 PPM)
- Damage(s) resulting from exceeding the maximum permissible water pressure as specified by Haier.
- Damage(s) resulting from absence of the maximum or installation of Air Vent Pipe.
- Damage(s) resulting from not grounding the supports properly.
- Heat loss resulting from not insulating the outlet plumbing properly and / or not providing a horizontal Non-return Valve at the inlet.
- Non cleaning of payment.
- Damage to component/s due to atmospheric/environmental conditions.
Guarantee
Note: "Negative pressure", if developed inside the Solar Water Heater storage tank, can lead to collapsing of the tank and high pressure, if developed inside the tank, can cause tank leakage. Please note that Negative pressure/ High pressure can develop inside the tank if airvent pipe is not provided or if the airvent pipe is not installed as per the procedure specified in the plumbing instruction. In such cases Haier will not be responsible and the tank replacement will be on a chargeable basis.
Please complete the following details:
Product : ____
Model no.: ____
Serial no.:
Puchaser's name & address : ____
Dealer's name & address : ____
Dealer's signature : ____
Cash memo no.: ____
Date of purchase: ____
Haier Appliances (India) P. Ltd.
B-1/A-14, Mohan Co-operative Industrial Estate, New Delhi-110044
Ph: 011-39496000/30674000
Fax: 011-26971562
Email: info@haierindia.com
Website: www.haierindia.com
Service ph: 1800-200-9999
The terms of this guarantee apply only to India.
Haier




- SAFETY CAUTIONS (PLEASE READ THE CAUTIONS BEFORE USE)
- WARNING! IMPROPER OPERATION OF THE FOLLOWING MAY LEAD TO PERSONAL INJURY OR EVEN DEATH
- CAUTION! IMPROPER OPERATION OF THE FOLLOWING MAY LEAD TO PERSONAL INJURY OR EVEN DEATH OR PROPERTY LOSS
- SUGGESTIONS
- PRODUCT FEATURES • TECHNICAL PARAMETERS • INSTALLATION INSTRUCTIONS
- PRODUCT FEATURES
- TECHNICAL PARAMETERS
- INSTALLATION INSTRUCTIONS
- SELECTION OF INSTALLATION LOCATION
- NOTICE
- INSTALLATION OF VACUUM TUBES
- INSTALLATION OF ELECTRIC HEATER AND OPERATION INSTRUCTIONS
- INSTALLATION INSTRUCTIONS • TROUBLESHOOTING
- OPERATION INSTRUCTIONS • PACKING LIST
- OPERATIONS
- GUARANTEE
- WE OFFER
- TERMS & CONDITIONS
- GUARANTEE EXCLUSION
- HAIER
Brand : HAIER
Model : GV100REMB
Category : Boiler