
WVC54GCA - Surveillance Camera LINKSYS - Free user manual and instructions
Find the device manual for free WVC54GCA LINKSYS in PDF.

| Product Type | Wireless Surveillance Camera |
| Brand | Linksys |
| Model | WVC54GCA |
| Video Resolution | 640 x 480 pixels (VGA) |
| Network Connectivity | Ethernet 10/100 and Wi-Fi 802.11b/g |
| Viewing Angle | Horizontal 45°, vertical 34° (estimated) |
| Night Vision | Not built-in (requires external lighting) |
| Motion Detection | Yes, configurable via web interface |
| Storage | On FTP server or email (no local storage) |
| Power Supply | Power adapter 5V DC, 2A |
| Dimensions | Approximately 100 x 100 x 75 mm |
| Weight | Approximately 200 g |
| Operating Temperature | 0°C to 40°C |
| Operating Humidity | 20% to 80% non-condensing |
| Main Features | Remote surveillance, motion detection, email alert sending, access via web browser |
| Installation | Provided camera utility (CD-ROM), configuration via web interface |
| Security | Password protection, WEP/WPA encryption for Wi-Fi |
| Maintenance and Cleaning | Clean with a soft, dry cloth. Avoid liquids. |
| Spare Parts and Repairability | Replaceable external power supply. No official spare parts identified. |
Frequently Asked Questions - WVC54GCA LINKSYS
User questions about WVC54GCA LINKSYS
0 question about this device. Answer the ones you know or ask your own.
Ask a new question about this device
Download the instructions for your Surveillance Camera in PDF format for free! Find your manual WVC54GCA - LINKSYS and take your electronic device back in hand. On this page are published all the documents necessary for the use of your device. WVC54GCA by LINKSYS.
USER MANUAL WVC54GCA LINKSYS
Wireless-G Internet Home Monitoring Camera

English

Deutsch

Espanol

Français

Italiano

Nederland

Portugues
Chapter 1: Product Overview 2
Front Panel. 2
Back Panel 2
Bottom Panel 2
Chapter 2: Setting Up and Mounting the Camera 3
Setup Wizard 3
Placement Options 7
Chapter 3: Installing and Using the Camera Utility 9
Overview. 9
Installing the Camera Utility. 9
Using the Camera Utility for the First Time. 9
Using the Camera Utility 10
Chapter 4: Advanced Configuration with the Web-based Utility 17
Overview. 17
How to Access the Web-based Utility 17
View Video. 17
Setup > Basic 19
Setup > Image 20
Setup > Administration. 21
Setup > Users. 22
Setup > Options 22
Setup > Motion Detection. 23
Setup > Status 25
Help. 25
Appendix A: Troubleshooting 27
Common Problems and Solutions 27
Frequently Asked Questions. 28
Appendix B: Wireless Security Checklist 30
General Network Security Guidelines 30
Additional Security Tips 30
Appendix C: Specifications 31
Appendix D: Warranty Information 32
Limited Warranty. 32
Exclusions and Limitations. 32
Obtaining Warranty Service 32
Technical Support 33
Assistant de configuration. 102
Support technique. 132
While reading through the User Guide you may see various icons that call attention to specific items. Below is a description of these icons:

NOTE: This check mark indicates that there is a note of interest and is something that you should pay special attention to while using the product.

WARNING: This exclamation point indicates that there is a caution or warning and it is something that could damage your property or product.

WEB: This globe icon indicates a noteworthy website address or e-mail address.
Online Resources
Website addresses in this document are listed without http:// in front of the address because most current web browsers do not require it. If you use an older web browser, you may have to add http:// in front of the web address.
| Resource | Website |
| Linksys | www.linksys.com |
| Linksys International | www.linksys.com/international |
| Glossary | www.linksys.com/glossary |
| Network Security | www.linksys.com/security |
Copyright and Trademarks
LINKSYS
A Division of Cisco Systems, Inc.
cisco
Linksys is a registered trademark or trademark of Cisco Systems, Inc. and/or its affiliates in the U.S. and certain other countries. Copyright © 2007 Cisco Systems, Inc. All rights reserved. Other brands and product names are trademarks or registered trademarks of their respective holders.
Chapter 1: Product Overview
Thank you for choosing the Linksys Wireless-G Internet Home Monitoring Camera. The Camera sends live video through the Internet to a web browser anywhere in the world! This compact, self-contained unit lets you keep an eye on your home, your kids, your workplace—whatever's important to you.
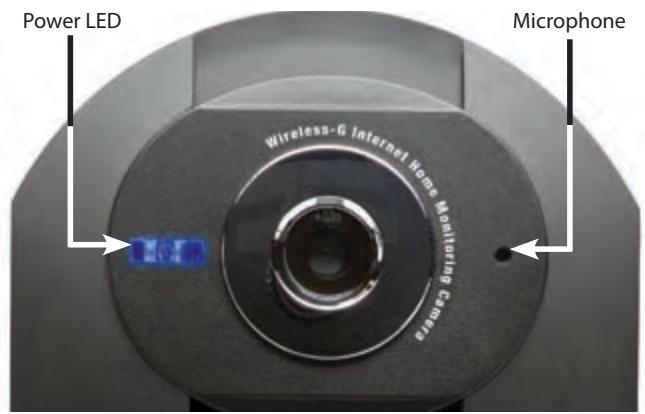
Front Panel

Power (Blue) This LED lights up when the Camera is powered on. It flashes while the Camera is booting up and remains lit when the Camera is ready for use.

Microphone The microphone is used to record the ambient sound.
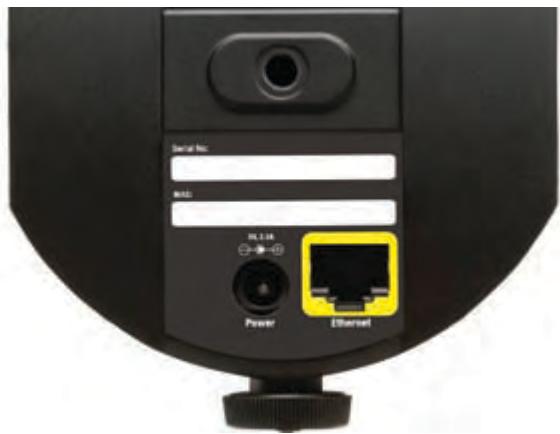
Back Panel

Power The Power port is where you will connect the power adapter.

Ethernet The Ethernet port is where you connect the Ethernet network cable.
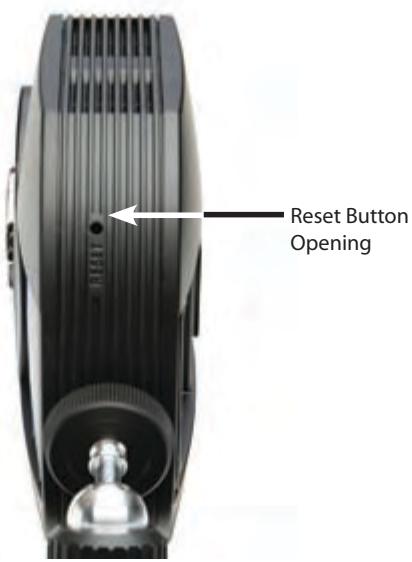
Bottom Panel

Reset This button is used to reset the Camera. Insert a paper clip into the opening. Then press the button and hold it in for five seconds.

WARNING: Resetting the Camera will erase all of your settings, such as encryption information, and replace them with the factory defaults. Do not reset the Camera if you want to retain your settings.

NOTE: The Camera's factory default settings are. user name: admin password:admin
Chapter 2: Setting Up and Mounting the Camera
Setup Wizard
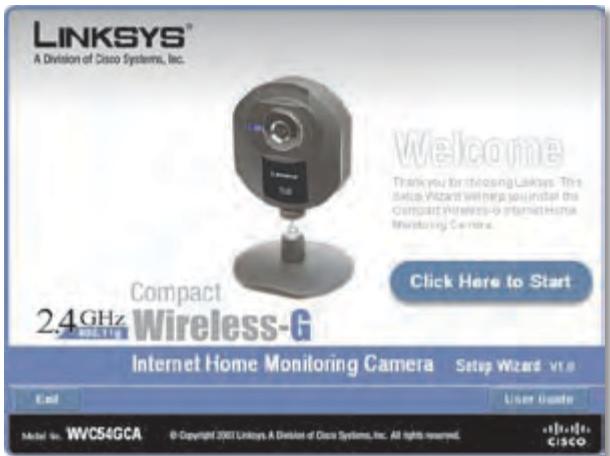
The Wireless-G Internet Home Monitoring Camera Setup Wizard will guide you through the installation and configuration procedure.
- Insert the Setup CD-ROM into your CD-ROM drive. The Setup Wizard should run automatically, and the Welcome screen should appear. If not, click Start, then select Run, and then in the field provided, enter D:\SetupWizard.exe (if "D" is the letter of your CD-ROM drive).
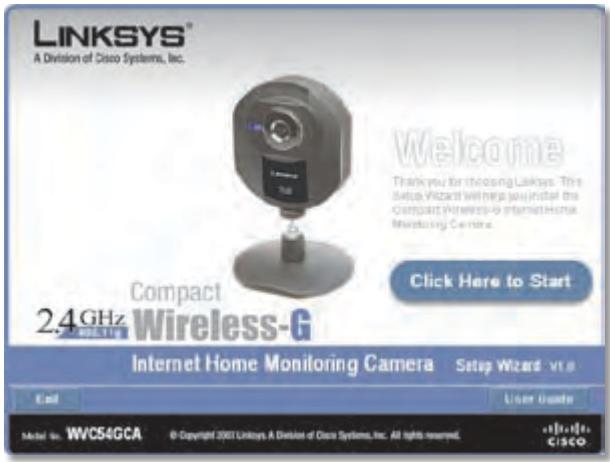
Setup Wizard - Welcome Screen
Click Next, then click Click Here to Start to continue.
-
The Setup Wizard displays the following options.
-
Setup Camera Click this to begin the installation process.
- Install Camera Utility Click this to install the Camera Utility on your PC.
- User Guide Click this to open the PDF file of this User Guide.
- Exit Click this to exit the Setup Wizard.
To install the Camera, click Setup Camera.
- On the End User License Agreement screen, check the box next to I accept the agreement and click Next if you agree and want to continue the installation, or click Exit to end the installation.
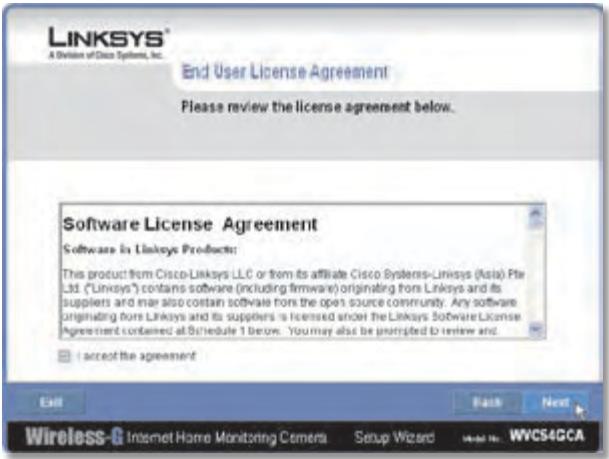
End User License Agreement
- Connect the included network cable to your network router or switch. Click Next.
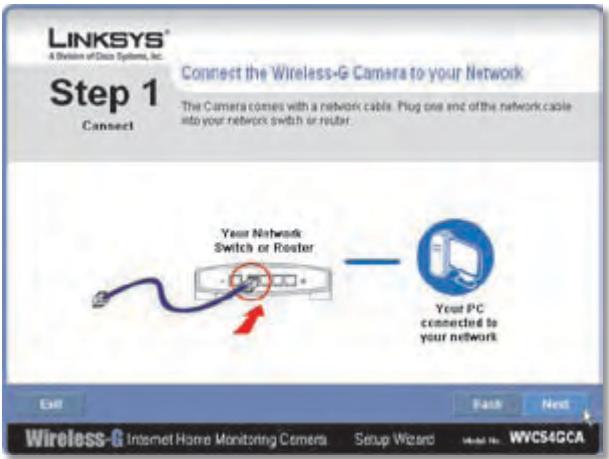
Connect Network Cable to the Switch or Router
- Connect the other end of the network cable to the Camera's Ethernet port. Click Next.
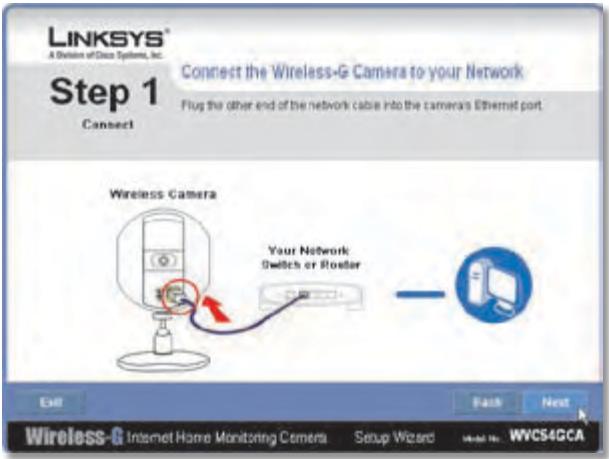
Connect Network Cable to the Camera
- Plug the included power adapter into the Camera's Power port. Plug the other end into an electrical outlet. Click Next.
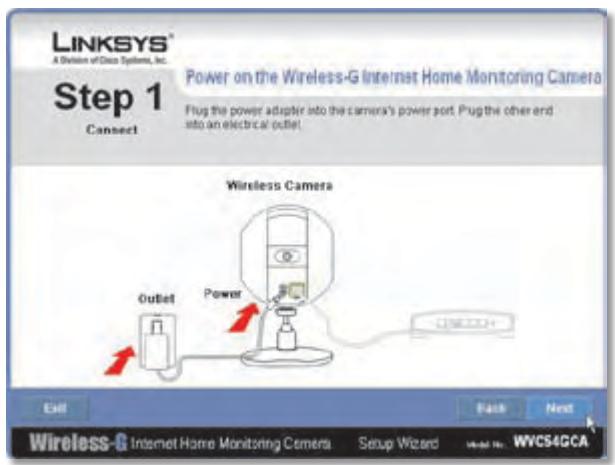
Power On the Camera
- Make sure the LED is lit on the Camera's front panel. If it is not lit, make sure the cables are properly connected to the Camera. Click Next.

Check the LED
- The Wizard searches for the Wireless-G Internet Home Monitoring Camera on your network, then displays the Camera found along with status information.
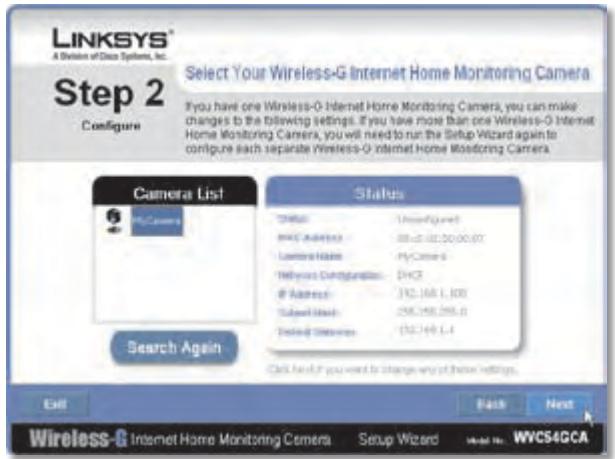
Camera Found on Network
If the Camera you want is not displayed, click Search Again to run a new search for Cameras.
Otherwise, in the Camera List box, click the name of the Camera you are installing. Write down the Camera's IP address shown in the Status box, so you can use it to access the Web-based Utility later. Click Next.
- Enter a name for the Camera. Memorable names are helpful, especially if you are using multiple Cameras on the same network. It should have 15 characters or fewer. After you have entered the name, click Next.

Assign the Camera Name
- Select how to assign an IP Address to the Camera, either automatically or manually. Then click Next.
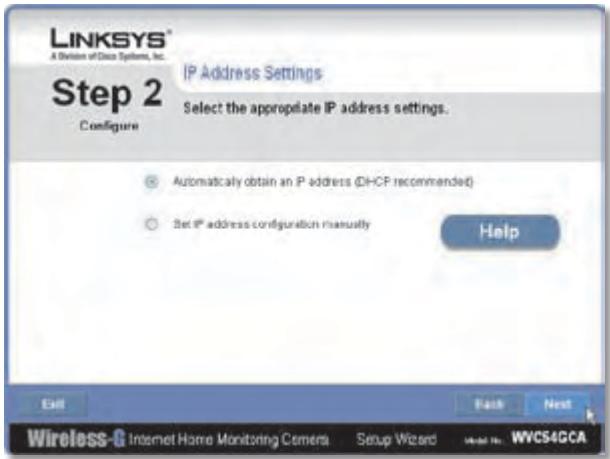
IP Address Settings
- Automatically obtain an IP Address Select this option if you want to automatically assign an IP address to the Camera using DHCP.
If you are not sure which option to choose, Linksys recommends this option.
- Set IP address configuration manually Select this option if you want to manually assign a static IP address to the Camera.
If you select this option, fill in the IP Address, Subnet Mask, and Gateway fields.
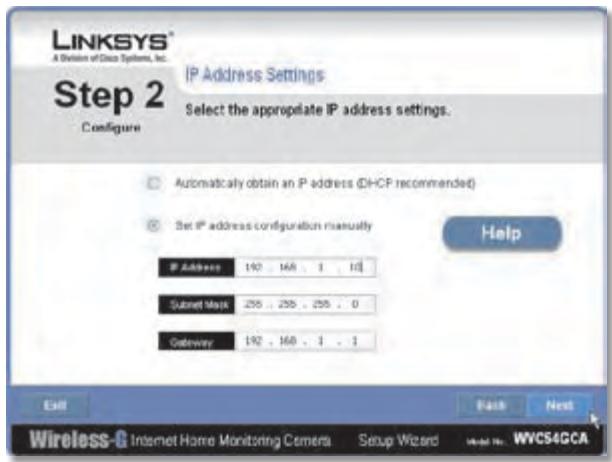
Enter the Static IP Address
- If you want to keep the Camera's default password (admin), leave the fields unchanged and click Next. If you want to change the password, enter the new password, re-enter to confirm, then click Next.
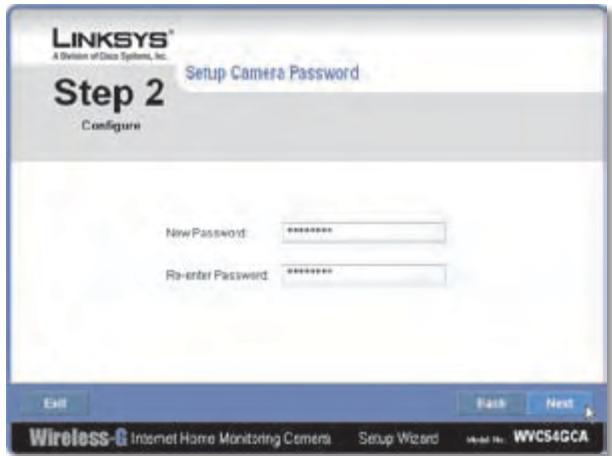
Enter the Camera Password
- The Wizard will search for wireless networks, then list the wireless networks found. If the wireless network you want to connect to is not listed, click Refresh to update the list. Select the wireless network that you want to connect the Camera to, then click Next.
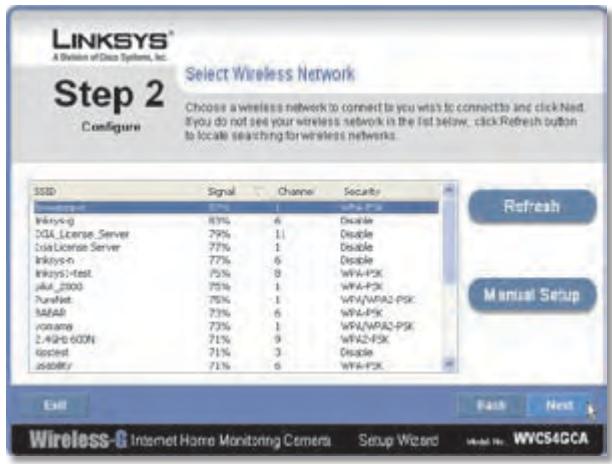
Select Wireless Network
-
The Wizard displays the wireless security method that your network is using: WPA/WPA2-Personal, WEP (128-Bit), or WEP (64-Bit). Follow the appropriate instructions below. If you are not using wireless security, select Disabled and go to step 14.
-
WPA/WPA2-Personal Enter a passphrase in the Passphrase field and click Next. The passphrase is case-sensitive and must be from 8 to 63 characters in length.
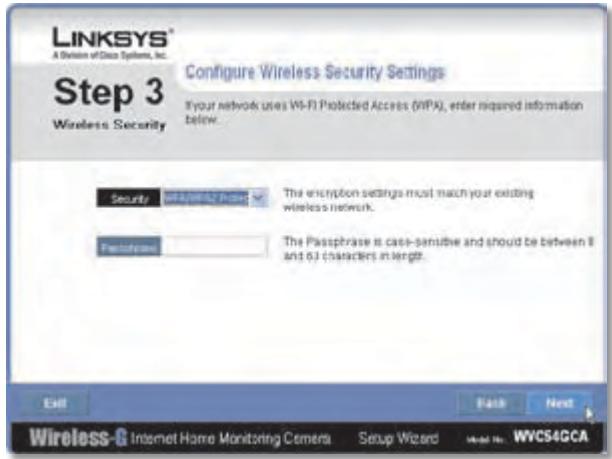
Security Settings - WPA/WPA2-Personal
- WEP (64-Bit) or WEP (128-Bit) To generate the WEP key automatically, enter a passphrase in the Passphrase field and click Next. The passphrase is case-sensitive and should not be longer than 16 characters. It must match the passphrase of your other wireless network devices and is compatible with Linksys wireless products only. (If you have any non-Linksys wireless products, enter the WEP key manually on those products.)
To manually enter a WEP key, leave the Passphrase field blank, click Next, and enter the WEP key on the next screen. This WEP key must match the WEP key of your wireless network. For 64-bit WEP encryption, enter exactly 10 hexadecimal characters. For 128-bit WEP encryption, enter exactly 26 hexadecimal characters. Valid hexadecimal characters are "0" to "9" and "A" to "F". After you have entered the WEP key, click Next.
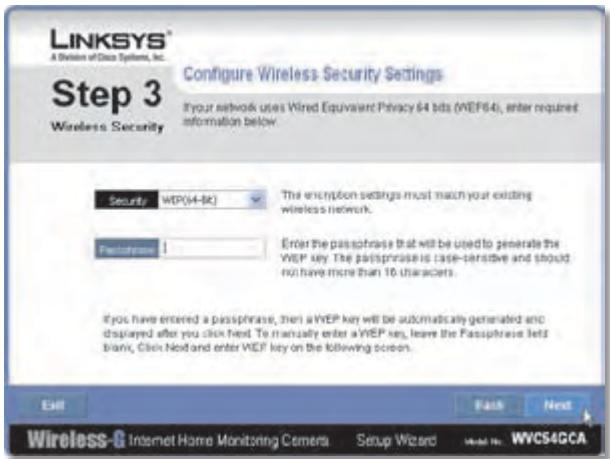
Security Settings - WEP (64-Bit) or WEP (128-Bit)
- Review the Camera's settings. To make changes to the settings, click Back to go back to the previous screen. If the settings are correct, click Save to continue.
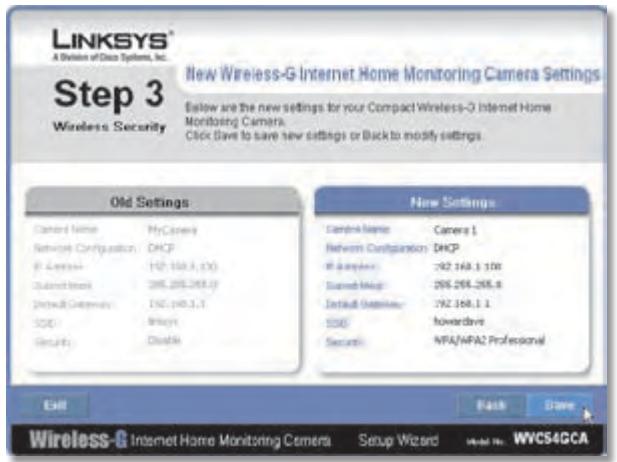
Save the Camera Settings
- When the Wizard informs you that the new Camera settings have been saved, click Continue.
- Disconnect the power from the camera. Click Next.
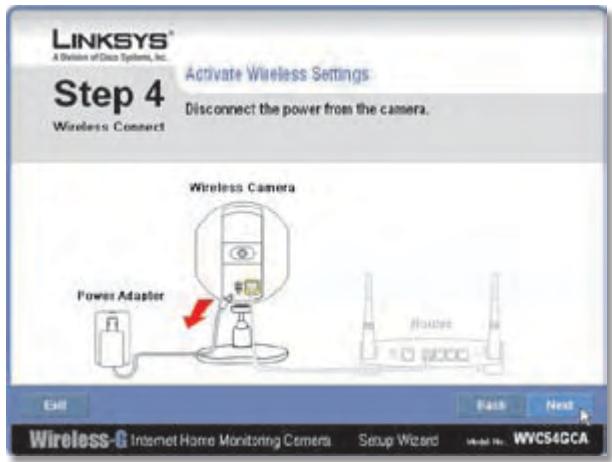
Disconnect the Power
- Disconnect the network cable from the Camera and from your switch or router. Click Next.
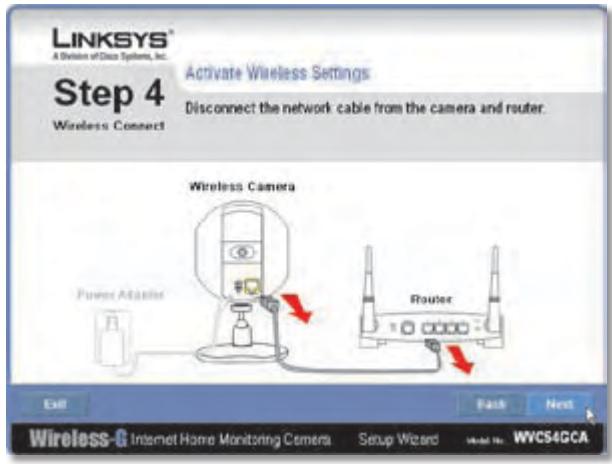
Disconnect the Network Cable
- Reconnect the power to the Camera. Click Next.
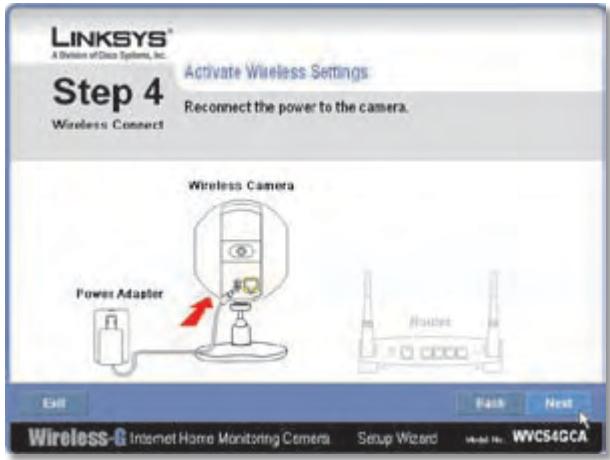
Reconnect the Power
- The Setup Wizard displays Camera successfully connected to network. Click Continue, then click Next on the following screen.

Camera Successfully Connected to Network
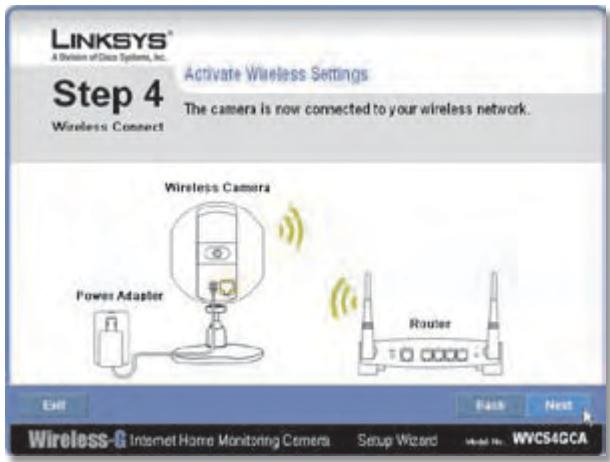
Camera Connected to Wireless Network
-
The Congratulations screen appears.
-
Install Camera Utility Click this to install the Camera's Utility.
- Online Registration Click this to register your Camera online.
- Exit Click this to exit the Setup Wizard and install the Camera's utility later.
Go to the "Placement Options" section.
Placement Options
The Camera can stand on a surface or be mounted on a wall. Depending on the positioning you want, you attach the Camera head to its stand at two different points.
Stand Option
Follow these steps to stand the Camera on a surface.
- Insert the screw end of the stand into the hole on the bottom panel.
- Tighten the screw and then the thumbscrew.
- Place the Camera, and adjust the tilt of its head accordingly, as described below in section "Camera Head Tilting".
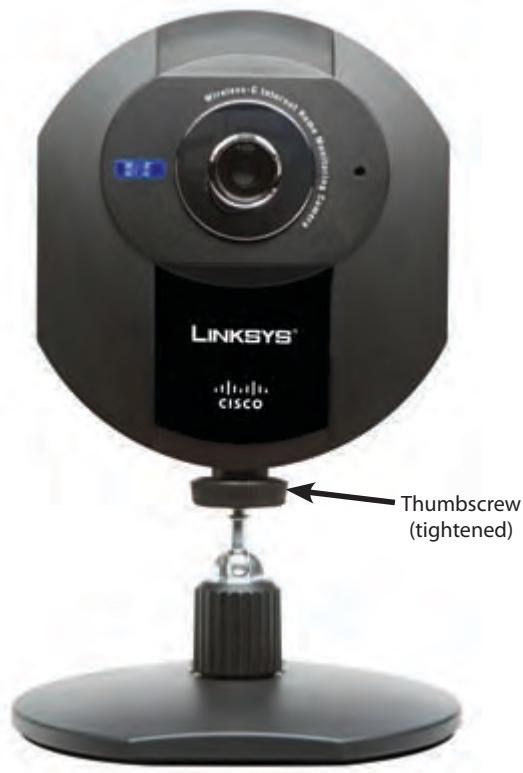
Camera in Standing Position
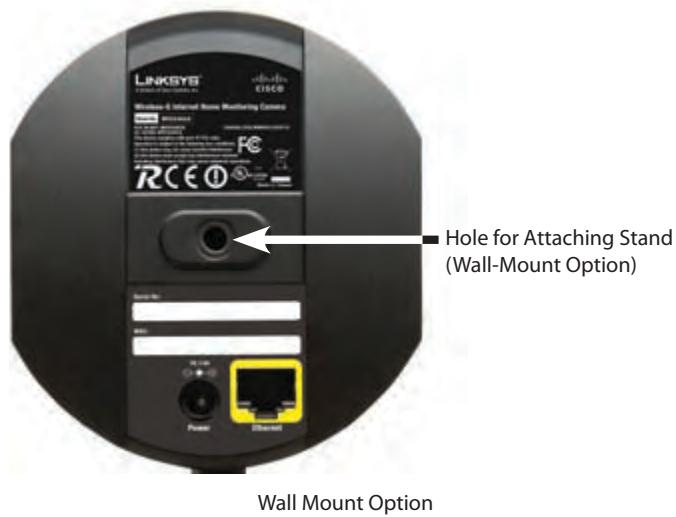
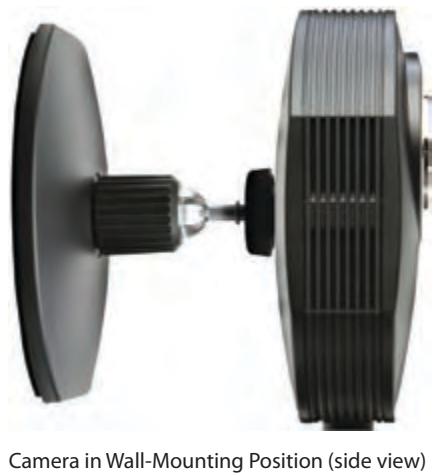
Wall Mount Option
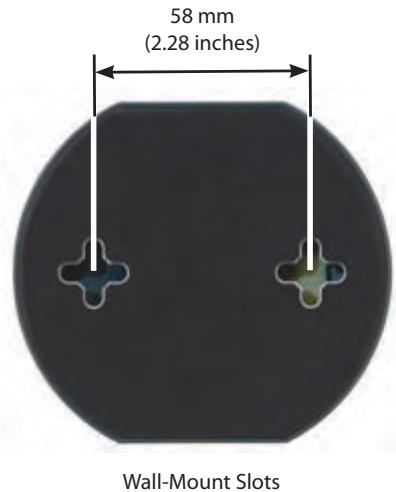
You use the Camera's stand to mount the Camera on a wall. The stand has two wall-mount slots that are spaced 58 mm apart.
- Insert the screw end of the stand into the hole on the back panel.
- Tighten the screw end and then the thumbscrew.
- Determine where you want to mount the Camera. Attach two screws to the wall, so that the Camera's wall-mount slots line up with the two screws.
-
Maneuver the Camera so the screws are inserted into the two slots.
-
Adjust the tilt of its head accordingly, as described below in section "Camera Head Tilting".
Camera Head Tilting
After the Camera is assembled, you can tilt the Camera head on its ball joint using the lock nut on the camera stand. Loosen the lock nut, tilt the camera head as desired, then tighten the lock nut to secure the position.
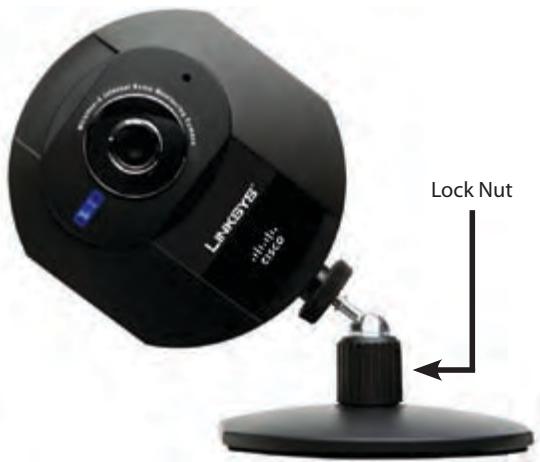
Camera Tilting Feature with Stand Option
The installation of the Wireless-G Internet Home Monitoring Camera is complete. Go to "Chapter 3: Installing and Using the Camera Utility."
For information about advanced configuration using the Camera's Web-based Utility, go to "Chapter 4: Advanced Configuration with the Web-Based Utility."
Chapter 3: Installing and Using the Camera Utility
Overview
This chapter will instruct you on how to install and use the Camera Utility on your PC. The Utility allows you to easily view and record the Camera's video.
If another Wireless-B or Wireless-G Internet Camera Utility is already installed on your PC, Linksys recommends that you uninstall it before installing this Camera Utility.

NOTE: To view video using a web browser, you must use Internet Explorer version 5.5 or higher. The View Video feature will not work with other web browsers. If you do not use Internet Explorer v5.5, use the Camera Utility instead.
Installing the Camera Utility
- On the Welcome or Congratulations screen of the Setup Wizard, click Install Camera Utility.
Install Camera Utility Screen
- The Setup Wizard begins to install the Camera Utility. The progress of the installation is displayed.
- When the Setup Wizard informs you that the installation is complete, click Continue. The Utility will automatically start up and display the Setup screen.

Camera Utility Installation Completed
Go to the "Using the Camera Utility for the First Time" section.
Using the Camera Utility for the First Time
The Camera Utility starts up automatically after the Utility is successfully installed. This section describes the steps to follow to set up the Camera.
- The Camera Utility displays the Setup screen and searches for your Wireless-G Camera.
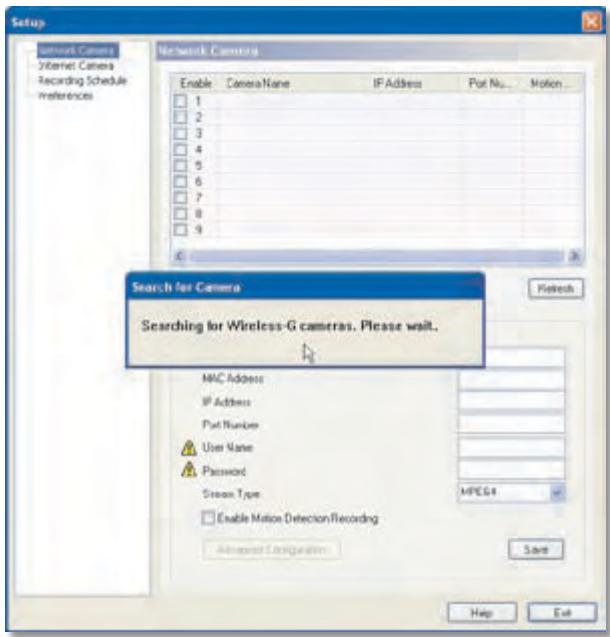
Setup Screen - Searching for Camera
-
When the Authorization screen appears, enter your User Name and Password:
-
User Name Enter admin in this field.
- Password If you did NOT change the password in Step 11 of section "Setup Wizard" in "Chapter 2: Setting Up and Mounting the Camera," enter admin in this field. Otherwise, enter the new password.
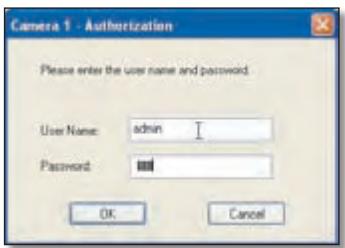
Authorization Screen
- Click Save, then Yes to save the Camera's settings.
To learn how to use the Camera Utility, go to "Using the Camera Utility."
Advanced users: If you want to use the Camera's Web-based Utility, go to "Chapter 4: Advanced Configuration with the Web-Based Utility."
Using the Camera Utility
After the Camera Utility is installed, its icon is displayed on the Desktop and in the System Tray of the Taskbar. To open the Camera Utility, use either icon as follows:
- Double-click the icon on your desktop
- Right-click the icon in the system tray, then click Wireless-G Internet Home Monitoring Camera.
Desktop Icon

System Tray Icon
When you are finished using the Camera Utility, exit the Utility as follows:
- Close each open Utility window by clicking Exit or by clicking the X button in the upper-right corner.
- Right-click the Utility's system tray icon and select Exit.
Monitor Window
After you open the Utility, the Monitor window is displayed. The Monitor window contains the following sections: Camera Status, Motion Detection Events, Hard Disk Quota, the viewing area containing video displays for Channels 1-9, video layout controls, and video control buttons.
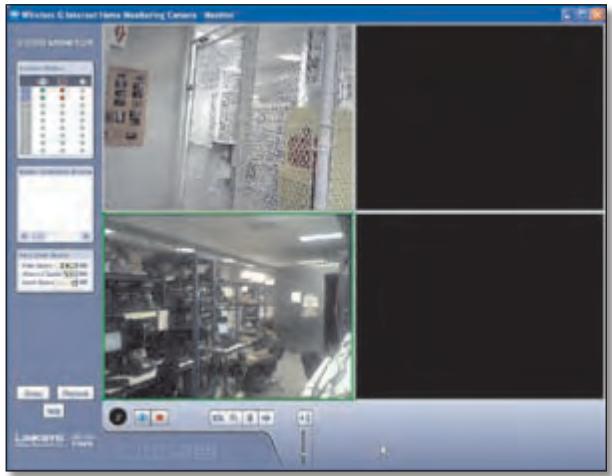
Monitor Window
To display the Setup window, click Setup. To display the Playback window, click Playback. To get help information, click Help.
Camera Status
This section of the Monitor window provides the following status information for all the Cameras the Utility has detected: Camera is being viewed, Camera is being recorded, motion detection is enabled on the Camera:
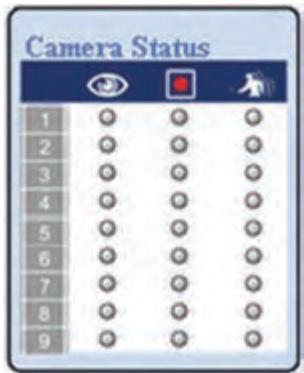
Camera Status
A blue channel number (1-9) means a Camera has been detected on that channel. Each Camera's status is given by colored indicators as described in the following table.
| Icon | Status Indications |
| Viewing Status: Clear - Camera's video is not being viewed. Green - Camera's video is being viewed. | |
| Recording Status: Clear - Camera's video is not being recorded. Red - Camera's video is being recorded. | |
| Motion Detection Status: Clear - Camera's motion detection is disabled. Yellow - Camera's motion detection is enabled. |
Motion Detection Events
If motion detection is enabled, this section of the Monitor window lists the most recent motion detection events.

Motion Detection Events
Hard Disk Quota
This section of the Monitor window lists information related to the amount of hard disk that is allocated for recorded video.

Hard Disk Quota
Viewing Area
The Viewing Area takes up most of the Monitor window. The Viewing Area can have four different layouts, with video windows for one, four, six, or nine Cameras. The layout is selected using the video layout controls described in "Video Layout Controls".
Viewing Area - Single-Camera Display
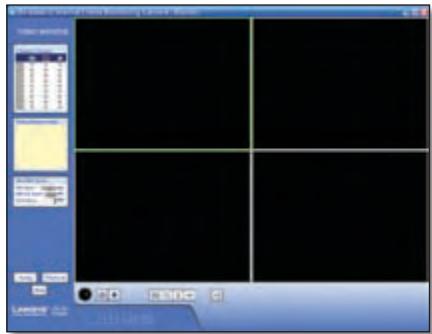
Viewing Area - Four-Camera Display
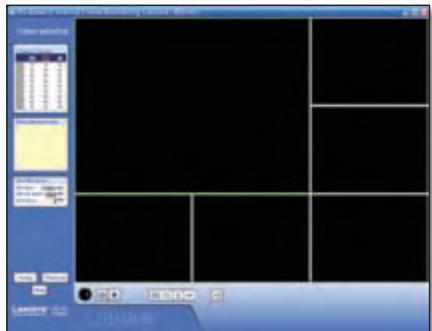
Viewing Area - Six-Camera Display
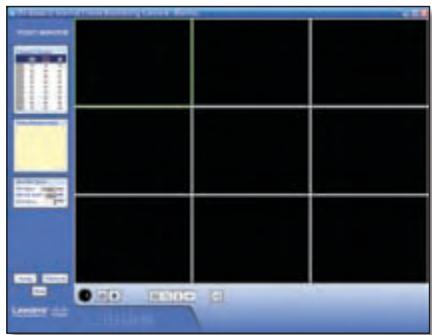
Viewing Area - Nine-Camera Display
Multiple-Camera Layouts
In a multiple-Camera layout, one of the video windows is always outlined in green. This indicates the currently selected Camera. The Video Control buttons can be used to perform various functions on the video from this Camera. For information on the video control buttons, refer to "Video Control Buttons" below.

Channel Number of Selected Camera
The channel number of the selected Camera is indicated below the lower left corner of the Viewing Area. To specify a different Camera as the selected Camera, click on that Camera's video window.
Each Camera can be displayed using any of the video windows in the layout. To move a Camera from one video window to another, click and drag the Camera's video window to another video window. The two Cameras originally assigned to each of the two windows will then swap places. This is especially useful for the six-Camera layout, which has one large video window and five smaller ones. A Camera assigned to one of the smaller windows can be quickly enlarged by dragging it to the large window.
To quickly view any Camera's video at full scale, double-click that Camera's video window. The layout will change to a single-camera display of the selected Camera's video.
Video Layout Controls
This section of the Monitor window lets you change the layout of the viewing area. To select a particular layout, click the layout's icon.

Video Layout Icons
| Icon | Function |
| Click this icon to display video from one Camera only. | |
| Click this icon to display video from up to four Cameras. The video windows are all of equal size. | |
| Click this icon to display video from up to six Cameras, with one large video window and five small video windows. | |
| Click this icon to display video from up to nine Cameras. The video windows are all of equal size. |
Video Control Buttons
The video control buttons are located along the lower left edge of the viewing area. These buttons act upon the selected Camera as explained below.
| Button | Function |
| View Click this button to view the current video. | |
| Record Click this button to record* the current video. | |
| Snapshot Click this button to take a snapshot of the current video image. | |
| Zoom Click this button to zoom into current video display. The zoom factor cycles through 1x, 2x, and 4x. | |
| Flip Click this button to flip the current video display top-to-bottom. | |
| Mirror Click this button to reverse the current video display left-to-right. | |
| Sound Click this button to toggle the sound on or off. | |
| Volume Slide this bar upward to increase the volume. Slide the bar downward to decrease the volume. |
- During recording, the Utility's System Tray icon turns into an animated icon (arrow moves up and down). When recording ends, the icon reverts to its original state.

Recording In Progress

No Recording In Progress
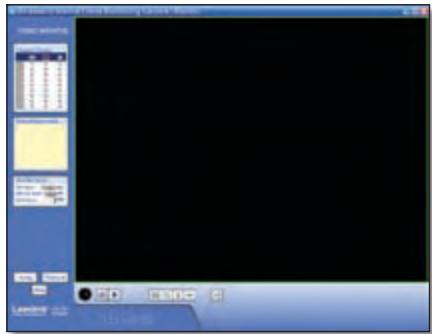
Playback Window
The Playback window is used to play back videos that you have recorded and saved.
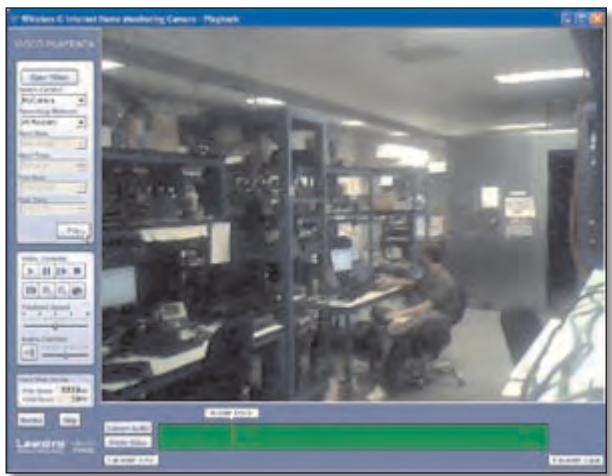
Playback Screen
Video Selection
This section of the Playback window lets you select the video(s) for playback.
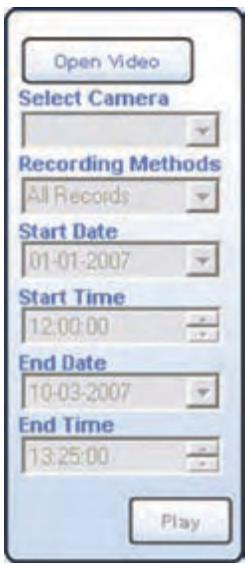
Playback Selection
Open Video Click this button if you want to select the folder containing the videos on your computer. Otherwise, use the remaining fields to select the video from the default recording folder (indicated by the Recording Path field of the Setup > Preferences screen).
Select Camera Select the Camera that recorded the video.
Recording Methods Specify the criteria to be used to select the video for the selected Camera:
- All Records Displays all recorded videos for the selected Camera.
- Select Period Limits the video selections to the range defined by Start Date/Time and End Date/Time.
- Motion Detection Limits the selections to videos that were recorded as a result of motion detection.
If the Recording Methods field is set to Select Period, define the date and time period by filling in the following fields.
- Start Date Specify the starting date in mm-dd-yyyy format.
- Start Time Specify the starting time in hh:mm:ss format.
- End Date Specify the ending date in mm-dd-yyyy format.
- End Time Specify the ending time in hh:mm:ss format.
Play Click this button to begin playing the selected videos.
Basic Video Controls
This section of the Playback window lets you perform basic functions on the video(s) you have selected for playback. The controls and their functions are described below.
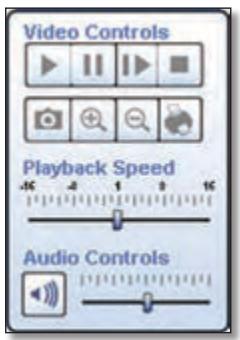
Basic Video Controls
| Control | Function |
| Play Click this button to play the video. | |
| Pause Click this button to pause the video. | |
| Frame by Frame Click this button to play exactly one video frame. Each successive click advances playback exactly one frame. | |
| Stop Click this button to stop video playback. | |
| Snapshot Click this button to capture a still image of the current video display. | |
| Zoom In Click this button to zoom in on the video display. | |
| Zoom Out Click this button to zoom out of the video display. | |
| Print Click this button to print the current video image. | |
| Playback Speed Slide this bar to adjust the playback speed. Slide it to the left for slower playback or to the right for faster playback. | |
| Sound Click this button to turn the sound on or off. | |
| Volume Slide this bar to adjust the sound volume. Slide it to the left to lower the volume or to the right to raise the volume. |
Hard Disk Quota
This section of the Playback window indicates how much hard disk is allocated for recorded video.

Hard Disk Quota
Advanced Video Controls
Advanced video functions are performed using the advanced video controls. These controls are located below the viewing area and consist of two buttons and three markers. Each marker displays the date and time of a specific point in the video. If you reposition a marker, the displayed date and time will change accordingly.

Video Controls
Convert to AVI To convert the currently playing video to AVI format, click this button, select a destination folder for the AVI file, and then click OK.
Delete Video Click this button to delete the video from your computer.
S
E
Other Buttons
Click Monitor to open the Monitor window. Click Help to display help information.
Setup Screen
The Setup screen is accessed by clicking the Setup button on the Monitor window of the Camera Utility. There are four tabs along the left side of the Setup screen: Network Camera, Internet Camera, Recording Schedule, and Preferences. By default, the Network Camera tab is selected when the Setup screen is opened. These tabs display screens whose functions are described below.
Setup > Network Camera
Click the Network Camera tab to set up a network Camera.
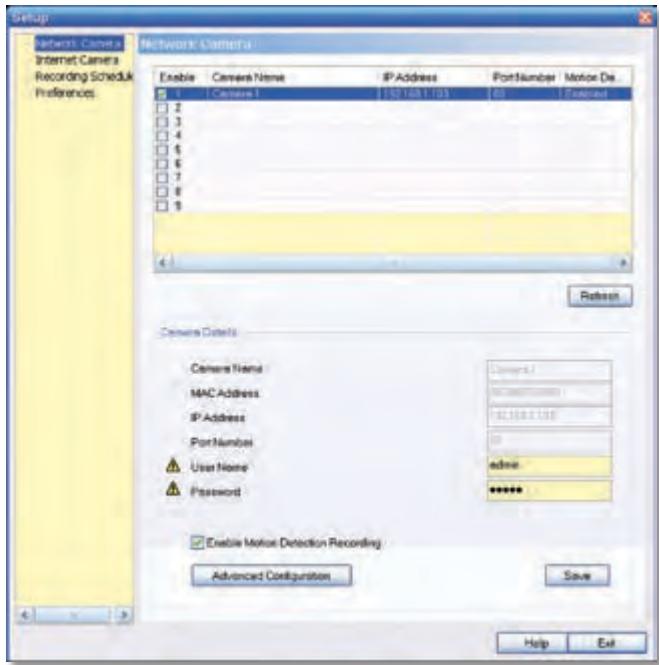
Setup > Network Camera
The upper section of the Setup > Network Camera screen contains a list of all Wireless-G Cameras that have been detected (up to 9). The Camera Details section of the screen provides information about the selected Camera.
Camera List
Enable Check this box to enable the Camera. Uncheck the box to disable the Camera.
Camera Name Displays the name of the Camera.
IP Address Displays the Camera's IP address.
Port Number Displays the Camera's port number.
Motion Detection Recording Indicates if motion detection recording is enabled or disabled.
Camera Details
Camera Name Displays the name of the Camera that you specified while running the Setup Wizard.
MAC Address Displays the Camera's MAC address.
IP Address Displays the Camera's IP address.
Port Number Displays the Camera's port number.
User Name and Password Displays the user name. The password is displayed as"......"for security reasons.
Enable Motion Detection To enable motion detection recording, check this checkbox. The default is disabled.
Click Advanced Configuration to open the Web-based Utility. Click Save to save your changes, or click Exit to exit without saving changes. Click Help to display help information.
Setup > Internet Camera
To set up a Camera located on the Internet, click the Internet Camera tab, then fill in the fields and click Add.

Setup >Internet Camera
Camera Name Enter the name assigned to the Camera.
MAC Address Enter the Camera's MAC address.
IP Address Enter the Camera's IP address.
Port Number Enter the Camera's port number.
```bash User Name and Password Enter the Camera's user name and password.
Stream Type Select either MJPEG or MPEG4 (default).
Enable Motion Detection Recording Check the box to enable motion detection recording. The default is disabled.
Add After you have entered all of the information for the Camera, click this button to add the Camera to the list.
Advanced Configuration Click this button to open the Web-based Utility in your web browser.
- Click Advanced Configuration to open the Web-based Utility. Click Exit to exit without saving your changes. Click Help to display help information.
Setup > Recording Schedule
To set up a recording schedule for a Camera, then click the Recording Schedule tab.
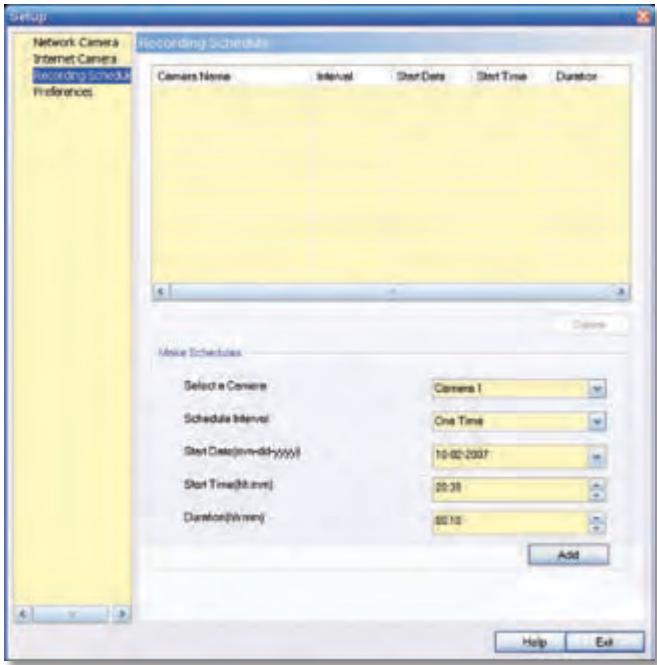
Setup > Recording Schedule
To schedule a recording for a Camera, follow these steps.
-
Fill in the following fields.
-
Select a Camera Select the Camera that will be recorded from the drop-down menu.
- Schedule Interval Select the days on which you want the Camera to record. The choices are One Time, Every Day, Mon-Fri, Sat-Sun, Sun, Mon, Tue, Wed, Thu, Fri, and Sat. (All settings except One Time cause recording to occur on a recurring basis.)
- Start Date (mm-dd-yyyy) Enter the date to start the recording, in mm-dd-yyyy format.
- Start Time (hh:mm) Enter the time to start the recording, in hh:mm format.
-
Duration (hh:mm) Enter the duration of the recording in hh:mm format.
-
Click Add to save the new scheduled recording information.
- The scheduled recording will appear in the list of scheduled recordings at the top of the screen.
To delete a scheduled recording, select the recording from the list, and click Delete.
Click Help to display help information. Click Exit to exit without saving your changes.
Memory Requirements for Video Recordings
You may find it helpful to know how much memory is required to hold a video recording. For information on estimated bit rates for a typical video recording at each available resolution and video, refer to the "Setup > Image" section of "Chapter 4: Advanced Configuration with the Web-Based Utility."

NOTE: In order for the scheduled recordings to occur, the Camera Utility must be running on a networked PC.

NOTE: The maximum length of a recording file is one hour. If a recording is more than one hour long, then multiple files will be saved.
Setup > Preferences
To configure the Camera's preference settings, click the Preferences tab.
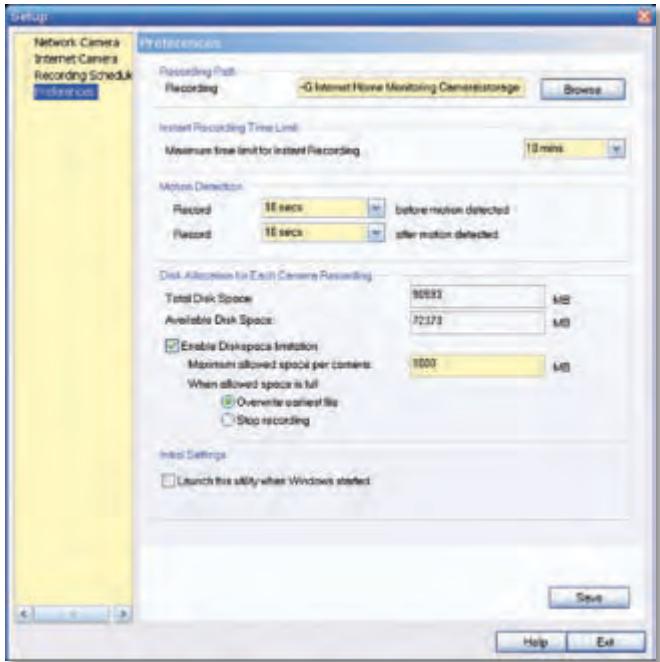
Setup > Preferences
The Setup > Preferences screen allows you to configure the following settings.
Recording Path
Recording This is the drive and folder where recorded video files will be saved on your computer. The default is C:\Program Files\Wireless-G Internet Home Monitoring Camera\storage.
Instant Recording Time Limit
Maximum Time Limit for Instant Recording This is the maximum length of a recording that is started by clicking the Record button on the Monitor window. The default is 10 min.
Motion Detection
The following two settings apply only if the Motion Detection Recording feature is enabled.
- Record before motion detected This is the length of time prior to the detection of motion that will be saved with the recording. Having this additional footage can help to show the motion more clearly when it occurs.
- Record after motion detected This is the length of time that the Camera will continue to record after motion is detected.
Disk Allocation for Each Camera Recording
Total Disk Space This is the total amount of storage space on your PC's hard drive.
Available Disk Space This is the total amount of remaining storage space on your PC's hard drive.
Enable Diskspace Limitation If you want to limit the amount of disk space used by each Camera, check this box, then fill in the fields below.
Maximum allowed space per camera Enter the maximum allowed space per camera in MB. The default is 1000 MB.
- When allowed space is full Select the action to take when the space limit is reached, either Overwrite earliest file (default), or Stop recording.
Initial Settings
Launch this Utility when Windows started Check this box if you want to have this utility started automatically whenever Windows is started.
- Click Save to save any settings you have changed on the screen, or click Exit to exit without saving your changes. Click Help to display help information.
If you want to use the Camera's Web-based Utility, go to "Chapter 4: Advanced Configuration with the Web-Based Utility."
Chapter 4: Advanced Configuration with the Web-based Utility
Overview
Use the Camera's Web-based Utility to access and alter its settings. This chapter will describe each web page in the Utility and its features. The Utility can be accessed via the web browser of a computer connected to the Camera.
How to Access the Web-based Utility
You can access the Utility using either of these methods.
- Launch Internet Explorer, and enter the Camera's IP address in the Address field. Then, press Enter.

Enter the Camera's IP Address
- From the Monitor window of the Camera Utility, select the Camera, then click the Setup button. (For instructions on how to launch the Camera Utility, refer to "Using the Camera Utility" in "Chapter 3: Installing and Using the Camera Utility."
The Welcome screen of the Web-based Utility will appear.
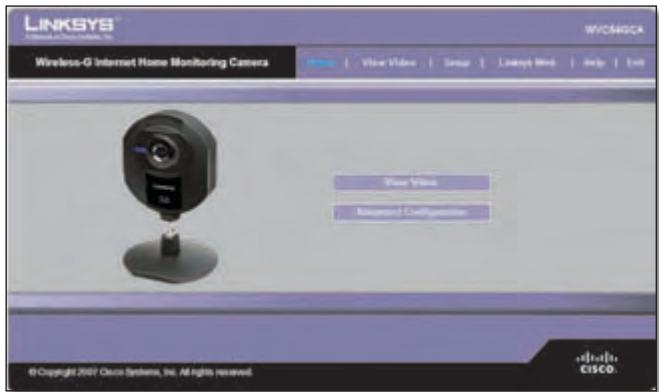
Web-Based Utility Welcome Screen
There are six tabs across the top of the Welcome screen: Home, View Video, Setup, Linksys Web, Help, and Exit.
- Home - Select this tab to return to the Welcome screen.
View Video - Select this tab to view the Camera's video. Go to the "View Video" section for more information. - Setup - Select this tab to alter the Camera's settings. Go to the "Setup" sections for more information.
-
Linksys Web - Select this tab to go to the Linksys website, www.linksys.com/uk.
-
Help – Select this tab to display the Help screen. Go to the "Help" section for more information.
- Exit - Select this tab to close the Utility.
View Video
Follow these instructions to view the Camera's video.
- Click the View Video tab on the Welcome screen.

NOTE: To view video using a web browser, you must use Internet Explorer version 5.5 or higher. The View Video feature will not work with Netscape. Netscape users should use the Camera Utility instead.
- The View Video screen appears, showing the live video from the Camera.
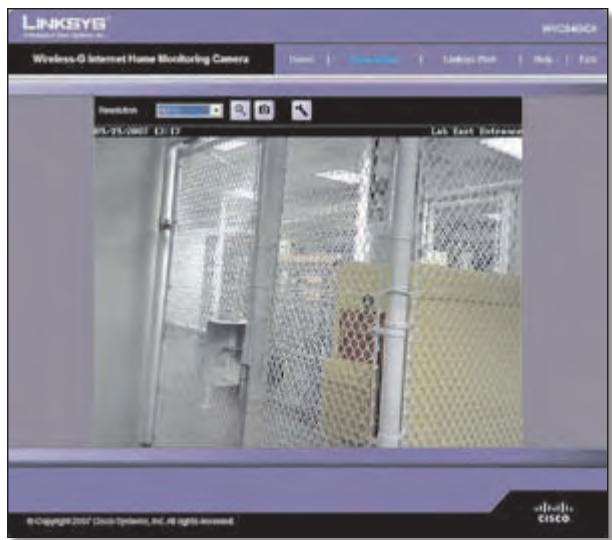
View Video Screen (640x480 Resolution)
The top of the View Video screen contains a number of controls that are used to adjust the video display. These controls and their functions are described in the sections below.
There are four selectable tabs across the top of the View Video screen: Home, Linksys Web, Help, and Exit.
- Home – Select this tab to return to the Welcome screen, or to edit the Camera's settings with the Web-based Utility (select Setup or Advanced Configuration on the Welcome screen).
- Linksys Web - Select this tab to go to the Linksys website, www.linksys.com/uk.
- Help – Select this tab to display the Help screen. Go to the "Help" section for more information.
- Exit - Select this tab to close the Utility.
Resolution
Use the Resolution drop-down menu to select the display resolution. Possible values are Auto (default), 640x480, 320x240, or 160x120. The display changes to the new resolution immediately after it is selected.

View Video Screen (320x240 Resolution)
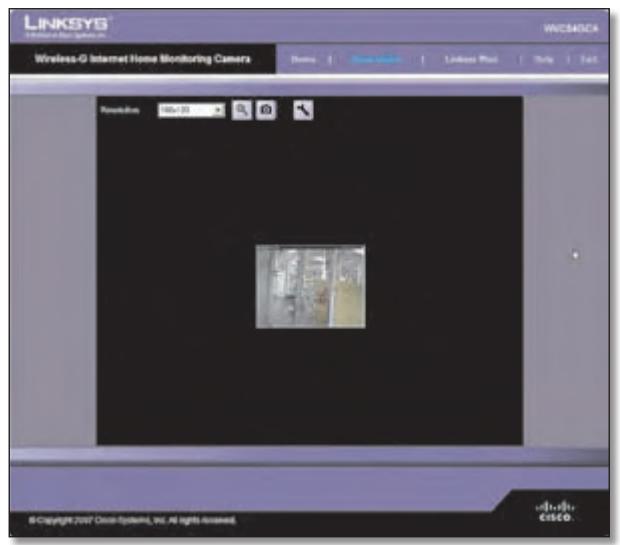
View Video Screen (160x120 Resolution)
Zoom Factor
You use the Zoom button to zoom in and out of the displayed video.

Zoom Button
When you click the button, the cursor changes to a magnifying glass labeled with the current zoom factor (cycles through 1x, 2x, and 4x). Position the cursor over the part of the image you want to magnify and click once.
Snapshot
You use the Snapshot button to capture a still image of the video display.

Snapshot Button
When you click this button, the Snap Shot window appears. Click Save to save the image, or click Cancel to exit without saving the image.
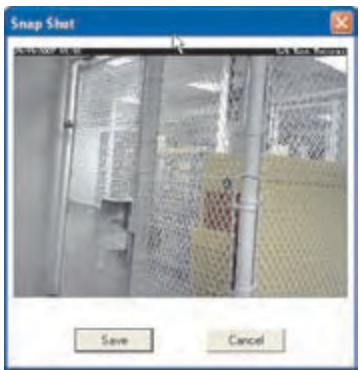
Snap Shot Window
Audio
Use the Audio button to toggle the sound on or off from the Camera's built-in microphone. The button's appearance indicates whether the sound is on or off. When the sound is on, you can adjust the volume by sliding the volume control to the left to lower the volume, or to the right to increase the volume.

Audio Button: Sound ON

Audio Button: Sound OFF
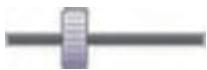
Volume Adjustment
Video Format
To select the video format, click the Video Format button, and the Video Format window appears. Select either MPEG-4 or MJPEG, then click Save. To exit without saving, click the X in the upper-right corner of the window.

Video Format Button
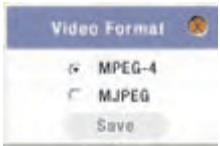
Video Format Window
Setup > Basic
The Setup > Basic screen appears when you click the Setup tab or Advanced Configuration on the Welcome screen. The Setup > Basic screen allows you to alter the Camera's Device settings, Network settings, Wireless settings, and Security settings.
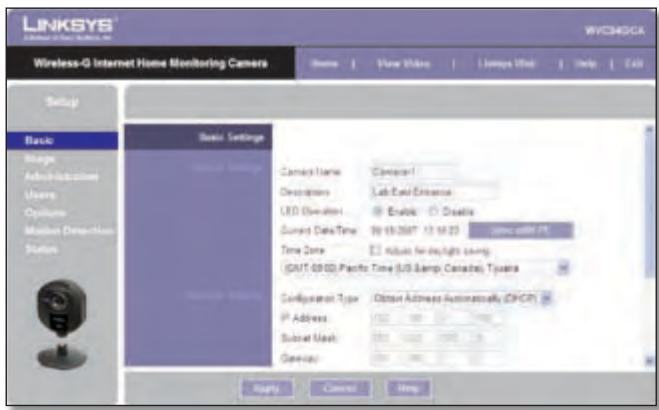
Setup > Basic Screen
Edit the settings on this screen as needed. Then, to save your changes, click Apply. To cancel any unsaved changes, click Cancel. To get additional information about the screen's features, click Help.
Device Settings
- Camera Name You may assign the Camera any name up to 15 characters long. Unique, memorable names are helpful, especially if you use multiple Cameras on the same wireless network.
- Description Enter information about the Camera in this field. You can enter up to 32 characters.
- LED Operation This feature allows you to enable or disable the Camera's LED.
- Current Date/Time This displays the Camera's current date and time. If it is incorrect, click Sync with PC to use your computer's date and time.
- Time Zone Select the time zone for the Camera's location.
- Adjust for Daylight Saving Time Select this to adjust the Camera's current time for Daylight Saving Time.

NOTE: You must unselect this option when Daylight Saving Time finishes.
Network Settings
- Configuration Type If you want to automatically assign the Camera an IP address from a DHCP server, then select Obtain Address Automatically (DHCP) (default). If you want to assign the Camera a static IP address, then select Fixed IP Address, and complete the IP Address, Subnet Mask, Gateway, Primary DNS and Secondary DNS fields.
- IP Address, Subnet Mask, Gateway, Primary DNS, Secondary DNS Complete these fields if you want to assign the Camera a static IP address. You need to enter at least one DNS address.
Wireless Settings
SSID Enter the network's SSID or network name here.
Network Type Select the network's mode, Ad-hoc or Infrastructure.
- Channel No If the Camera is set to Ad-hoc mode, select its channel setting from the drop-down menu.
- Security Click Edit Security Settings to display the Wireless Security screen.
Setup > Basic > Wireless Security
The Wireless Security screen is used to configure the Camera's wireless security settings to match your wireless network settings. The settings are as follows.
Security Mode Select the wireless security mode used by your wireless network:
- Disable (no wireless security)
WEP
WPA/WPA2 Personal.
The method selected determines which other fields are displayed on the screen. The different security modes and the fields that accompany them are described in detail below.
- Disable
This option implements no security on your wireless network. Data is not encrypted before transmission.

Wireless Security - Disable Security Mode
WEP
WEP is a basic encryption method, which is not as secure as later methods such as WPA-Personal or WPA2 Personal. However, it is supported by all clients.
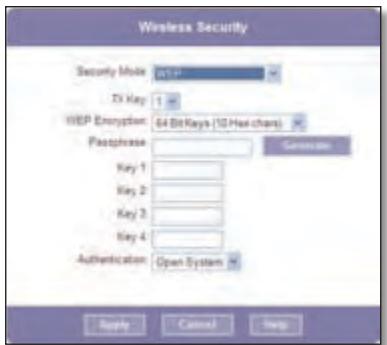
Wireless Security - WEP Security Mode
- TX Key Select the number of the key used on the wireless network.
- WEP Encryption Select the appropriate option for key length based on your network settings.
- Passphrase Type in the passphrase used to generate WEP keys on your network and click Generate.
Key 1 - Key 4 Key values can be entered manually or generated from a passphrase. - Authentication Select the appropriate authentication type used on the wireless network.
WPA/WPA2 Personal
This method offers TKIP encryption with dynamic encryption keys.
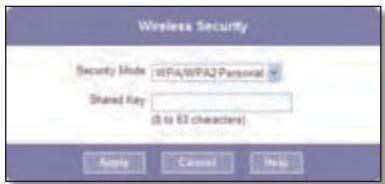
Wireless Security - WPA/WPA2 Personal Security Mode
- Shared Key Enter the shared key of 8 to 63 characters that will be used to access the wireless network.
When you are finished editing the Camera's wireless security settings, click Apply to save your changes and return to the Setup > Basic screen. Click Cancel at any time to cancel any unsaved changes and return to the Setup > Basic screen. To get additional information about the screen's features, click Help.
Setup > Image
The Setup > Image screen allows you to alter the Camera's video settings.
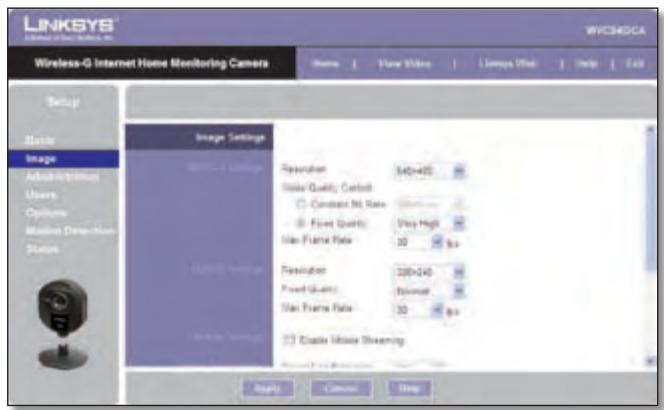
Setup > Image Screen
MPEG4 Settings
Resolution Set the resolution for viewing and recording the Camera's video: 640x480 (high resolution) 320x240 (medium resolution), or 160x120 (low resolution).
Video Quality Control Select either Constant Bit Rate or Fixed Quality for the video stream.
- Constant Bit Rate Select the bit rate you want for viewing or recording the Camera's video. The range varies from 64 Kbps to 1.2 Mbps.
- Fixed Quality Select the level of quality you want for viewing or recording the Camera's video. The range varies from Very Low to Very High.
Max Frame Rate Select the maximum frame rate for the camera. Reducing this lowers the amount of bandwidth required by the camera. The range is from 1 to 30.
MJPEG Settings
Resolution Set the resolution for viewing and recording the Camera's video: 640x480 (high resolution) 320x240 (medium resolution), or 160x120 (low resolution).
Fixed Quality Select the level of quality you want for viewing or recording the Camera's video. The range varies from Very Low to Very High.
Max Frame Rate Select the maximum frame rate for the camera. Reducing this lowers the amount of bandwidth required by the camera. The range is from 1 to 30.

NOTE: Video quality and/or performance may be affected by the number of users connected to the Camera.
It may be helpful to know the bit rates for video viewing or recording at different resolutions and image quality levels. The following table lists these estimated bit rates.
Estimated Bit Rates for Video Viewing or Recording
| Resolution | Quality Level | Bit Rate in kbps |
| 640 x 480 | Very High | 4000 |
| 640 x 480 | High | 3200 |
| 640 x 480 | Normal | 1200 |
| 640 x 480 | Low | 480 |
| 640 x 480 | Very Low | 160 |
| 320 x 240 | Very High | 1000 |
| 320 x 240 | High | 800 |
| 320 x 240 | Normal | 300 |
| 320 x 240 | Low | 120 |
| 320 x 240 | Very Low | 40 |
| 160 x 128 | Very High | 800 |
| 160 x 128 | High | 400 |
| 160 x 128 | Normal | 200 |
| 160 x 128 | Low | 100 |
| 160 x 128 | Very Low | 40 |
Mobile Settings
Enable Mobile Streaming Select this option to enable video streaming to a mobile device.
Video Adjustments
Power Line Frequency Select the power line frequency (50Hz or 60Hz) used in your region, to improve the picture quality under fluorescent lighting.
White Balance Select the desired option to match the current environment and lighting.
Brightness If necessary, you can adjust the brightness to obtain a better image. For example, if the camera is facing a bright light, the image may be too dark. In this case, you can increase the brightness. You can select a Brightness value between -3 and 3.
Sharpness Select the desired option for the sharpness. You can select a Sharpness value between -3 and 3.
Options
Enable Microphone Select this to enable audio. Using Audio increases the bandwidth requirements slightly.
Enable Time Stamp Select this to display a time stamp on the video.
Enable Text Display To display text on the video, select this, then enter up to 20 characters in the field.
To save your changes, click Apply. To cancel any unsaved changes, click Cancel. To get additional information about the screen's features, click Help.
Setup > Administration
The Setup > Administration screen allows you to change the Camera's login name and password, reset the factory defaults, upgrade the firmware, and set the language.
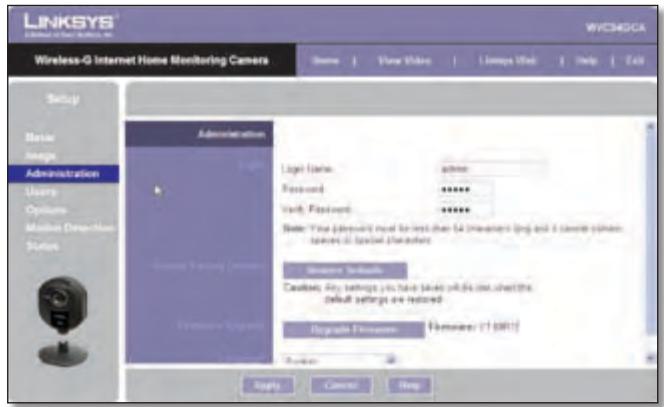
Setup > Administration Screen
Login
These fields are used to change the login name and password used to access the Camera. For security purposes, you should change these from the default values (both set to admin).
Login Name Enter the login name for the Camera.
Password Enter the password for the Camera.
Verify Password Re-enter the password to verify.
Restore Defaults To restore the Camera to its factory default settings, click Restore Defaults.

NOTE: This will overwrite the Camera's settings with the factory defaults. Any changes you made to the Camera's settings will be lost; you will not be able to recover them.
Firmware Upgrade
Upgrade Firmware New firmware versions are posted at www.linksys.com/international and can be downloaded for free. If the Camera is functioning satisfactorily, there is no need to download a newer firmware version, unless that version has a new feature that you want to use. Loading new firmware onto the Camera does not always enhance its performance.
Linksys recommends that you upgrade the Camera's firmware within your network; in other words, use a computer within the Camera's local network. If you attempt to upgrade the Camera's firmware from a remote location—using a computer outside of the Camera's local network—the upgrade will fail.
To upgrade the firmware:
- Go to the Linksys website, www.linksys.com/ international, and download the firmware upgrade file for the Camera. Then extract the file.
- From the Setup > Administration screen, click Upgrade Firmware.
- You will see the Upgrade Firmware screen. Click Browse to find the extracted file, and then double-click it.
- Click Start Upgrade, and follow the on-screen instructions. To cancel the upgrade, click Cancel.
Setup > Users
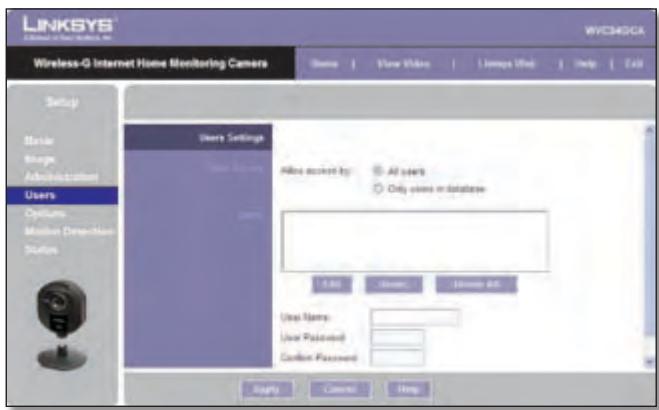
The Setup > Users screen lets you designate access rights for the Camera's users.
Setup > Users Screen
Users Settings
Use this to assign access rights to the Camera's users.
Allow access by Select how access is to be granted, either All users or Only users in database. If you select Only users in database, edit the user database as needed, as described below.
Users This lists the user database (the users who have access to the Camera).
Editing the Database
To add a user to the database:
- Enter the user's name in the User Name field.
- Enter the password in the Password and Confirm Password fields.
- Click Add User to save the user in the database.
To edit a user's record in the database:
- Select the user from the Users list, then click Edit.
- Edit the User Name and/or Password as needed.
- Click Add User to save the updated information.
Other operations:
- Clear While editing a user's information, click Clear to clear the User Name, Password, and Confirm Password fields and start over.
- Delete To delete a user's record from the database, select the user from the list, then click Delete.
- Delete All To clear the database, click Delete All, then click OK to confirm.
To save your changes, click Apply. To cancel any unsaved changes, click Cancel. To get additional information about the screen's features, click Help.
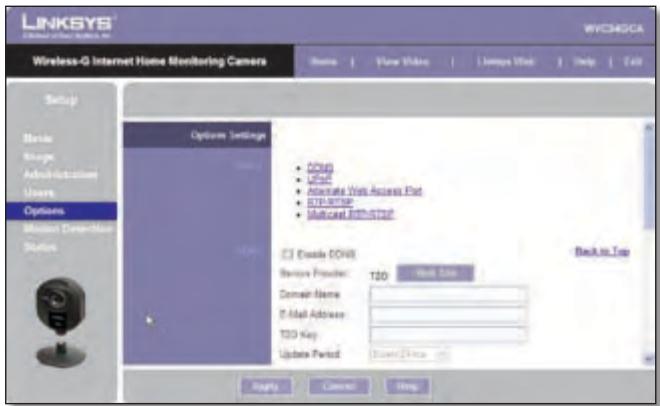
Setup > Options
The Setup > Options screen allows you to set up and configure DDNS Service, UPnP configuration, and Alternate Port settings. DDNS (Dynamic Domain Name System) lets you assign a fixed host and domain name to a dynamic Internet IP address.
Setup > Options Screen
DDNS
Enable DDNS Select this option to enable DDNS service with the Camera.
Service Provider This is the DDNS service provider, which is preset to TZO.
Domain Name Enter the domain name assigned to you by your DDNS service provider.
E-Mail Address Enter the E-mail address used to register the DDNS service.
TZO Key Enter the TZO key provided by your DDNS service provider.
Update Period Use this to set the schedule for checking whether the Internet IP address has been changed. Specify how often to check, from Every 10 mins to Every 24 hrs, as well as the time to start checking, in hh:mm format.

NOTE: If you use the Camera's DDNS feature, then you must also configure the port forwarding feature on your network router. Go to www.linksys.com/portfwd for instructions on how to configure a Linksys router. For other routers, refer to your router's documentation.
To save your changes, click Apply. To cancel any unsaved changes, click Cancel. To get additional information about the screen's features, click Help.
UPnP
Enable/Disable When enabled, the Camera's Universal Plug and Play (UPnP) feature allows a UPnP-enabled computer to easily detect the Camera. The Camera's UPnP feature is disabled by default. If your computer is UPnP-enabled, select this option.
Alternate Access Web Port
Enable/Disable If you want the Camera to be able to use an alternate port for communications, select this option. Then, enter the desired port number in the range from 1024 to 65534 in the Port Number field. The default port number is 1024.
If you already have a Web Server on your LAN, then you should enable the Alternate Port and use this port number instead of port 80.
RTP/RTSP
You can view a Camera's live video stream using various multimedia player applications such as QuickTime, RealPlayer, or Windows Media Player, or using a mobile phone that supports RTSP. To do this, first configure the RTP/RTSP settings in this section as needed, then open the multimedia player, then point the player to the appropriate URL listed below (where
- QuickTime or RealPlayer: rtsp://
/img/video.sav - Windows Media Player: http://
/img/video.asf - Mobile phone with RTSP support: http://
/img/video.asf
RTSP Port To change the RTSP Port number, enter the desired number in the range of 1024 to 65535. The default is 554.
RTP Data Port To change the RTP Data Port, enter the desired number in the range of 1024 to 65535.
Max RTP Data Packet To change the maximum length of RTP data packets, enter the desired maximum length in the range of 400 to 1400.
Multicast RTP/RTSP
Enable/Disable Select Enable to enable the Multicast RTP/RTSP feature, or Disable to disable the feature.
Video Address To change the Video Address, enter the new address in the field provided. The default Video Address, 224.2.0.1, can be used for multicasting and does not normally need to be reconfigured. If this address needs to be changed, contact your network administrator.
Video Port To change the Video Port, enter the new port number (even values only, from 1024 to 65534) in the field provided. The default Video Port, 2240, can be used for multicasting and does not normally need to be reconfigured. If this port number needs to be changed, contact your network administrator.
Audio Address To change the Audio Address, enter the new address in the field provided. The default Audio Address 224.2.0.1, can be used for multicast and does not normally need to be reconfigured. If this address needs to be changed, contact your network administrator.
Audio Port To change the Audio Port, enter the new port number (even values only, from 1024 to 65534) in the field provided. The default Audio Port, 2242, can be used for multicasting and does not normally need to be reconfigured. If this port number needs to be changed, contact your network administrator.
Time to Live Enter the maximum length of time (usually measured as the number of network routers that can be passed before the data arrives at its destination or is dropped) within which the data must reach its destination. The value must be from 1 to 255. The default value is 16.
To save your changes, click Apply. To cancel any unsaved changes, click Cancel. To get additional information about the screen's features, click Help.
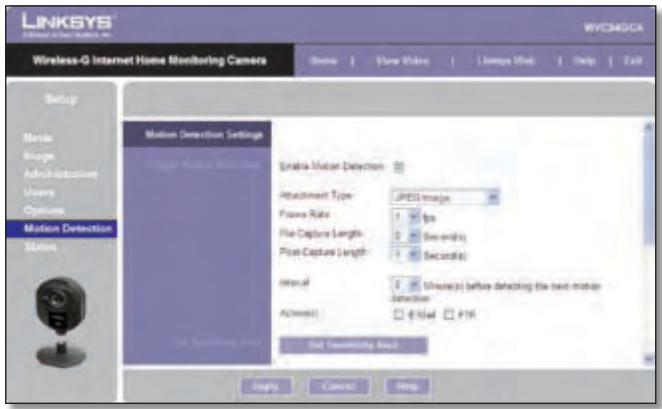
Setup > Motion Detection
The Setup > Motion Detection screen allows you to configure the Camera's motion detection settings.
Setup > Motion Detection Screen
Trigger Motion Detection
Enable Motion Detection Check this box to enable Motion Detection.
Attachment Type Select the type of attachment to be sent, either JPEG or Video. If JPEG is selected, a series of images will be attached to the e-mail as individual files. If Video is selected, a single video file will be attached.
Frame Rate If the Attachment Type field is set to JPEG, select the frame rate (number of frames to be captured per second), from 1 to 5. The default value is 1.
Video Format If the Attachment Type is set to Video, select the video format, either ASF, MPEG-4, or 3GP.
Pre-Capture Length This refers to video footage up to the moment when motion is detected. Select how many seconds' worth of this video will be saved. This value must be between 0 and 4 seconds.
Post-Capture Length Select how many seconds' worth of video will be saved starting from the moment motion is detected. This value must be between 1 and 5 seconds.
Interval Enter the time in minutes that must pass between motion detection events. Valid values are 0-5, 10, or 15. The default is 2. A value of 0 indicates no delay between events.
Action(s) Select the action(s) to be performed upon motion detection. Select E-Mail to send an e-mail with a video attachment to a selected recipient., or select FTP to send the video to a selected FTP server.
E-Mail Alert
If the Action(s) field is set to E-Mail, fill in the following fields:
Send To Enter the e-mail address where e-mail will be sent upon motion detection. You can optionally specify up to three addresses.
Show "From" as Enter the e-mail address to be used as the From field in the e-mail to be sent.
Subject Enter the Subject field for the e-mail, consisting of 48 alphanumeric characters or less.
SMTP Port Number Enter the SMTP port number from 1 to 65535. The default is 25.
SMTP Mail Server If you want to use an SMTP mail server, check the box next to Specify a SMTP Mail Server. Then enter the mail server's name in the field provided.
My Mail Server Requires Authentication If you are using an SMTP mail server that requires authentication (you must log in with a username and password), check this box, then fill in the Account Name and Password fields.
Test E-Mail Click this button to send a test e-mail to the address indicated by the Send To field.
FTP
If the Action(s) field is set to FTP, fill in the following fields:
FTP Server Enter the FTP server name.
Port Enter the FTP server's port number.
Login Name and Password Enter the login name and password for the account on the FTP server.
Passive Mode Select Enable (default) to enable passive mode, or Disable to disable it.
File Path Name Enter the path to the location where the file will be saved on the FTP server.
Set Sensitivity Area
Set Sensitivity Area If you want to specify the sensitivity area settings for motion detection, click this button to display the Set Sensitivity Area window. The Set Sensitivity Area window lets you specify the area of the video screen that is used to detect motion. This is either the full screen, or up to three user-defined custom areas within the full screen.
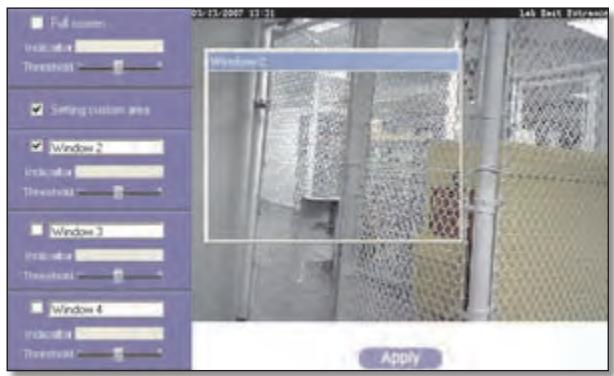
Set Sensitivity Area Window
The following fields appear on the left side of the Set Sensitivity Area window for each sensitivity area. Specify the settings as needed, then click Apply.
- Full Screen or Window 2-4 This is the name of the sensitivity area, either Full screen by default, or if Setting Custom Area is selected, Window 2, Window 3, or Window 4 (custom areas). To change a custom area name to a more appropriate name, such as Front Door, enter the new name in this field.
- Setting Custom Area To specify custom area(s) within the full screen, check this box, then configure up to three custom sensitivity areas. By default only one area, Window 2, is selected. To create an additional area, check the box next to its name. You can move or resize each area as needed. Custom areas may also overlap.
- Threshold Slide this to the left to reduce the area's sensitivity, or to the right to increase sensitivity.
New Motion Trigger Schedule
This section allows you to create a schedule that determines when motion detection will be active. To do this, you define one or more "trigger" events, or periods during which motion detection will be in effect. For each trigger event, fill in the following fields.
Trigger Motion Detection Specify how often this trigger event occurs: Every day, Weekdays (Mon - Fri), or on specific days of the week (Sunday to Saturday).
Start Time and End Time Select the starting and ending times for the event.
Add Click Add to add the new event to the schedule.
Clear Click Clear to clear the schedule of all events.
Delete To delete an event from the Schedule List, select the event, then click Delete.
Schedule List This displays all of the scheduled trigger events that you have defined and saved. It is empty by default.
To save your changes, click Apply. To cancel any unsaved changes, click Cancel. To get additional information about the screen's features, click Help.
Setup > Status
The Setup > Status screen allows you to view the Camera's status information and log.
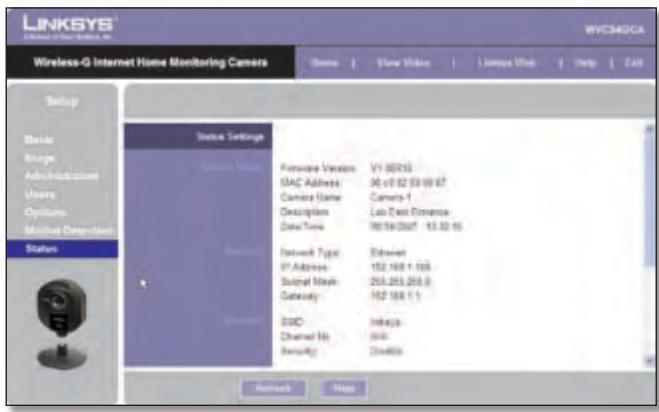
Setup > Status Screen
System Status
Firmware Version The version of the current firmware installed.
MAC Address The MAC Address of the Camera is displayed here.
Camera Name The name you gave to the Camera is displayed here.
Description Information about the Camera, such as location, is displayed here.
Date/Time The current date and time are shown here.
Network
Network Type The wireless network's mode is shown here.
IP Address The Camera's IP Address is displayed here.
Subnet Mask The Camera's Subnet Mask is shown here.
Gateway The Camera's Gateway address is displayed here.
Wireless
SSID The wireless network's SSID or name is shown here.
Channel No The wireless network's channel setting is displayed here.
Security The wireless network's encryption level is shown here.
Log
System Log This shows the Camera's activities. To empty the log, click Clear Log.
To get the Camera's most up-to-date information, click Refresh. To get additional information about the screen's features, click Help.
Help
Through the Help screen, you'll find links to additional resources for the Camera and its Utility. If you select the Help tab directly from the Welcome screen, then you will see the User Help screen and will only be able to access these resources. If you first log in to access the Camera's Setup and then select the Help tab, you will see the Administrator Help screen and will be able to restore factory defaults and upgrade the Camera's firmware.
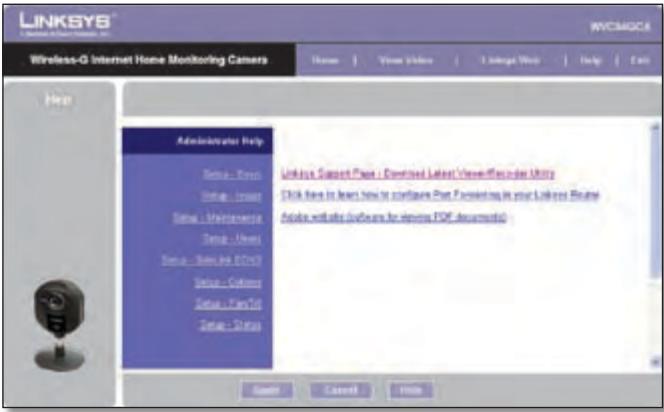
Setup > Help Screen
-
Setup Click any of the topics in the bar on the left to get help information.
-
Linksys Support Page - Download Latest Viewer/ Recorder Utility Click this link to download the most recent version of the Camera Utility from the Linksys website, www.linksys.com/international.
- Click heretolearnhow to configurePortForwarding in your Linksys Router If you are going to use the DDNS Service, you need to set up port forwarding on your router. For instructions on how to configure a Linksys router, click this link. If you have a different router, refer to your router's documentation.
Adobe website (software for viewing PDF documents) If you do not have Adobe Acrobat Reader, click this link to download it.
Appendix A: Troubleshooting
This appendix consists of two parts: "Common Problems and Solutions" and "Frequently Asked Questions." This appendix provides solutions to problems that may occur during the installation and operation of the Wireless-G Internet Home Monitoring Camera. Read the description below to solve your problems. If you can't find an answer here, check the Linksys website at www.linksys.com/ international.
Common Problems and Solutions
I can't view the Camera's video using Internet Explorer.
Make sure the OCX plug-in was correctly installed. If you're not sure, re-install the plug-in by following these instructions
- On the Welcome screen of the Camera's Web-based Utility, click View Video.
- A screen mentioning a security warning about an OCX plug-in will appear. Click Yes to allow the plug-in to be installed.
- You should then be able to view the Camera's streaming video.
If you still cannot view the video, make sure you have the rights to install the plug-in in your PC's Internet Explorer. If not, log into your computer as an administrator and install the plug-in.
Then you can check if the OCX plug-in has been installed. Follow these instructions:
- From Internet Explorer, go to Tools and Internet Options.
- On the General screen, click Settings under Temporary Internet files.
- Click View Objects. You should see a file named NetCamPlayerWeb Control installed.
The OCX plug-in is installed in Internet Explorer, but I cannot view any video.
Make sure Microsoft Internet Explorer 5.5 or higher is installed. Then delete the OCX plug-in by following these instructions:
- From Internet Explorer, go to Tools and Internet Options.
- On the General screen, click Settings under Temporary Internet files.
- Click View Objects.
-
You should see a file named NetCamPlayerWeb Control installed. Delete this file from the list.
-
The next time you click View Video from the web browser, you will be prompted to re-install the OCX plug-in.
When powering on the Camera, I can't immediately access the Camera from my computer.
Make sure the Camera's LED is continuously lit. When it is flashing, the Camera is initializing.
I'm not able to play my recording video files.
Make sure you have Microsoft Windows Media Player 7 or higher. If you don't, you can download the latest version from www.microsoft.com.
I have two Cameras and see two WVC54GCAs listed in my Camera Utility. When I click to view both Cameras, I see the video of only one Camera.
Make sure that the Cameras have different camera or device names. You can change this by using the Web-based Utility or running the Setup Wizard. If you use the Web-based Utility, log in and click the Setup tab. Then on the Basic screen, change the Camera Name.
When I view video remotely via the Internet, the video is very slow.
Video performance is greatly affected by your Internet connection speed. You can lower the Camera's image quality to speed up the video. Through the Camera's Web-based Utility, click the Setup and Image tabs, and then lower the image quality on the Image screen.
I cannot access the Setup tab of the Camera's Web-based Utility.
Make sure you have administrator rights. Only an administrator can change the Camera's settings.
I want to access the Camera when I'm away from home, but somehow I can't connect.
If your network uses a dynamic IP address supplied by your ISP, then the IP address you use to reach the Camera will change as well. You need to use the TZO DDNS Service, so you can access the Camera using its domain name while the service keeps track of the IP address changes. To set up a Dynamic Domain Name Service (DDNS) account, click the Setup tab of the Camera's Web-based Utility, then click the Options tab. Then configure the settings in the DDNS section of the screen.
Important: To allow remote access to the Camera, you will also have to use the port forwarding feature on your network router.
Frequently Asked Questions
Can I view video using a Macintosh or Netscape Navigator?
The Camera is designed for computers running a Windows operating system and Internet Explorer 5.5 or higher. You cannot view video on a Macintosh. If you only have Netscape, you can view video using the Camera Utility. See "Chapter 3: Installing and Using the Camera Utility."
Can I directly connect the Camera to wired and wireless networks at the same time?
No. Before powering on the Camera, you should decide if you want to connect the Camera to a wireless network via an access point or to a wired network. If your wireless and wired networks are bridged, then you can access the Camera from any networked computer, but the Camera must be directly connected to only one of the networks.
To connect the Camera to a wireless network, power on the Camera with no network cable attached. The Camera will be ready for use when the LED is lit continuously.
To connect the Camera to a wired network, connect the network cable to the Camera, and then power it on. The Camera will be ready for use when the LED is lit continuously.
Can I install the Camera outdoors?
No, the Camera was not designed for outdoors usage.
I've recorded video for a few hours. Why do I see multiple files saved on my computer?
The recording function saves video in chunks; each chunk is a maximum of one hour in duration. For example, if you have recorded five continuous hours, then you will see five files saved on your computer. This keeps files from getting too large.
Do I need to install the Linksys Multi-Camera Viewer and Recorder Utility?
Installation is optional. You can view video using Microsoft Internet Explorer 5.5 or higher. If you don't want to use the recording function, then you don't need to install the Multi-Camera Viewer and Recorder Utility.
Can I specify who gets to view the Camera's video?
Yes. Access the Camera's Web-based Utility, and click the Setup tab. After you log in, click the Users tab. You will be able to restrict access to users you have
entered in the database. See "Chapter 4: Advanced Configuration with the Web-based Utility."
Can I add a time stamp to the video?
Yes. Access the Camera's Web-based Utility, and click the Setup tab. After you log in, click the Image tab. You will be able to add a time stamp as well as descriptive text to the video. See "Chapter 4: Advanced Configuration with the Web-based Utility."
How many users can view the Camera's video at the same time?
Users at four different PCs can simultaneously view the Camera's video.
What is the IEEE 802.11b standard?
It is one of the IEEE standards for wireless networks. The 802.11b standard allows wireless networking hardware from different manufacturers to communicate, provided that the hardware complies with the 802.11b standard. The 802.11b standard states a maximum data transfer rate of 11Mbps and an operating frequency of 2.4GHz.
What is the IEEE 802.11g standard?
It is one of the IEEE standards for wireless networks. The 802.11g standard allows wireless networking hardware from different manufacturers to communicate, provided that the hardware complies with the 802.11g standard. The 802.11g standard states a maximum data transfer rate of 54Mbps and an operating frequency of 2.4GHz.
What IEEE 802.11b features are supported?
The product supports the following IEEE 802.11b functions:
CSMA/CA plus Acknowledge protocol
Multi-Channel Roaming
Automatic Rate Selection
RTS/CTS feature -Fragmentation
Power Management
What IEEE 802.11g features are supported?
The product supports the following IEEE 802.11g functions:
CSMA/CA plus Acknowledge protocol
OFDM protocol
Multi-Channel Roaming
Automatic Rate Selection
RTS/CTS feature
- Fragmentation
Power Management
What is ad-hoc mode?
When a wireless network is set to ad-hoc mode, the wireless-equipped computers are configured to communicate directly with each other. The ad-hoc wireless network will not communicate with any wired network.
What is infrastructure mode?
When a wireless network is set to infrastructure mode, the wireless network is configured to communicate with a wired network through a wireless access point or router.

WEB: If your questions are not addressed here, refer to the Linksys website, www.linksys.com/ international
Appendix B: Wireless Security Checklist
Wireless networks are convenient and easy to install, so homes with high-speed Internet access are adopting them at a rapid pace. Because wireless networking operates by sending information over radio waves, it can be more vulnerable to intruders than a traditional wired network. Like signals from your cellular or cordless phones, signals from your wireless network can also be intercepted. Since you cannot physically prevent someone from connecting to your wireless network, you need to take some additional steps to keep your network secure.

1. Change the default wireless network name or SSID
Wireless devices have a default wireless network name or Service Set Identifier (SSID) set by the factory. This is the name of your wireless network, and can be up to 32 characters in length. Linksys wireless products use linksys as the default wireless network name. You should change the wireless network name to something unique to distinguish your wireless network from other wireless networks that may exist around you, but do not use personal information (such as your Social Security number) because this information may be available for anyone to see when browsing for wireless networks.

2. Change the default password
For wireless products such as access points, routers, and gateways, you will be asked for a password when you want to change their settings. These devices have a default password set by the factory. The Linksys default password is admin. Hackers know these defaults and may try to use them to access your wireless device and change your network settings. To thwart any unauthorized changes, customize the device's password so it will be hard to guess.

3. Enable MAC address filtering
Linksys routers and gateways give you the ability to enable Media Access Control (MAC) address filtering. The MAC address is a unique series of numbers and letters assigned to every networking device. With MAC address filtering enabled, wireless network access is provided solely for wireless devices with specific MAC addresses. For example, you can specify the MAC address of each computer in your home so that only those computers can access your wireless network.

4. Enable encryption
Encryption protects data transmitted over a wireless network. Wi-Fi Protected Access (WPA/WPA2) and Wired Equivalency Privacy (WEP) offer different levels of security for wireless communication.
A network encrypted with WPA/WPA2 is more secure than a network encrypted with WEP, because WPA/WPA2 uses dynamic key encryption. To protect the information as it passes over the airwaves, you should enable the highest level of encryption supported by your network equipment.
WEP is an older encryption standard and may be the only option available on some older devices that do not support WPA.
General Network Security Guidelines
Wireless network security is useless if the underlying network is not secure.
- Password protect all computers on the network and individually password protect sensitive files.
- Change passwords on a regular basis.
- Install anti-virus software and personal firewall software.
- Disable file sharing (peer-to-peer). Some applications may open file sharing without your consent and/or knowledge.
Additional Security Tips
- Keep wireless routers, access points, or gateways away from exterior walls and windows.
- Turn wireless routers, access points, or gateways off when they are not being used (at night, during vacations).
- Use strong passphrases that are at least eight characters in length. Combine letters and numbers to avoid using standard words that can be found in the dictionary.

WEB: For more information on wireless security, visit wwwlinksys.com/security
Appendix C: Specifications
| Model | WVC54GCA |
| Standards | IEEE 802.11g, IEEE 802.3, IEEE 802.3u |
| Ports | Ethernet, Power |
| Buttons | Reset |
| LEDs | Power |
| Cabling Type | Cat5 |
| Number of Antennas | 1 Internal |
| Connector Type | N/A |
| Detachable Antenna | No |
| UPnP able/cert | UPnP Advertise |
| Security Features | WEP-64, WEP-128, WPA, WPA2 |
| Image Sensor | CMOS |
| Lens | Fixed Focus |
| Resolution | 640 x 480, 320 x 240, 160 x 128 |
| Relative Illumination | 5.1 Lux |
| Effective Focus | 3 mm |
| Sensitivity | 3.0 V/Lux-sec |
| Field of View | 61,48 degrees |
| Compression Algorithm | MPEG-4 and MJPEG |
| Record File Format | ASF |
| Brightness | Auto/Manual Adjustment |
| Environmental | |
| Dimensions | 90 x 120 x 37 mm |
| Weight | 0,13 kg |
| Power | 5V 1A |
| Certification | FCC, CE, CB, UL, C-Tick, PSB/SPRING, IDA |
| Operating Temp. | 0 to 40°C |
| Storage Temp. | -20 to 70°C |
| Operating Humidity | 10 to 80% Noncondensing |
| Storage Humidity | 0 to 90% Noncondensing |
Minimum System Requirements
| 1 Camera | PC with 2 GHz or faster processor |
| 512 MB RAM | |
| Microsoft Windows 2000, XP or Vista | |
| 500MB of available hard drive space | |
| Graphics card with a minimum of 128 MB | |
| Internet Explorer 6.0 (or above), Mozilla Firefox, Netscape 7.0 (or above) | |
| DirectX 9.0 (or above) | |
| CD-ROM Drive | |
| Windows Media Player 9 or higher | |
| Up to 9 Cameras | PC with 3 GHz dual-core processor |
| 1 GB RAM | |
| Microsoft Windows 2000, XP or Vista | |
| 4 GB of available hard drive space | |
| Graphics card with a minimum of 256 MB | |
| Internet Explorer 6.0 (or above), Mozilla Firefox, Netscape 7.0 (or above) | |
| DirectX 9.0 (or above) | |
| CD-ROM Drive | |
| Windows Media Player 9 or higher |
Specifications are subject to change without notice.
Appendix D: Warranty Information
Limited Warranty
Linksys warrants this Linksys hardware product against defects in materials and workmanship under normal use for the Warranty Period, which begins on the date of purchase by the original end-user purchaser and lasts for the period specified below:
Two years for new product
This limited warranty is non-transferable and extends only to the original end-user purchaser. Your exclusive remedy and Linksys' entire liability under this limited warranty will be for Linksys, at its option, to (a) repair the product with new or refurbished parts, (b) replace the product with a reasonably available equivalent new or refurbished Linksys product, or (c) refund the purchase price of the product less any rebates. Any repaired or replacement products will be warranted for the remainder of the original Warranty Period or thirty (30) days, whichever is longer. All products and parts that are replaced become the property of Linksys.
Exclusions and Limitations
This limited warranty does not apply if: (a) the product assembly seal has been removed or damaged, (b) the product has been altered or modified, except by Linksys, (c) the product damage was caused by use with non-Linksys products, (d) the product has not been installed, operated, repaired, or maintained in accordance with instructions supplied by Linksys, (e) the product has been subjected to abnormal physical or electrical stress, misuse, negligence, or accident, (f) the serial number on the Product has been altered, defaced, or removed, or (g) the product is supplied or licensed for beta, evaluation, testing or demonstration purposes for which Linksys does not charge a purchase price or license fee.
ALL SOFTWARE PROVIDED BY LINKSYS WITH THE PRODUCT, WHETHER FACTORY LOADED ON THE PRODUCT OR CONTAINED ON MEDIA ACCOMPANYING THE PRODUCT, IS PROVIDED "AS IS" WITHOUT WARRANTY OF ANY KIND. Without limiting the foregoing, Linksys does not warrant that the operation of the product or software will be uninterrupted or error free. Also, due to the continual development of new techniques for intruding upon and attacking networks, Linksys does not warrant that the product, software or any equipment, system or network on which the product or software is used will be free of vulnerability to intrusion or attack. The product may include or be bundled with third party software or
service offerings. This limited warranty shall not apply to such third party software or service offerings. This limited warranty does not guarantee any continued availability of a third party's service for which this product's use or operation may require.
TO THE EXTENT NOT PROHIBITED BY LAW, ALL IMPLIED WARRANTYES AND CONDITIONS OF MERCHANTABILITY, SATISFACTORY QUALITY OR FITNESS FOR A PARTICULAR PURPOSE ARE LIMITED TO THE DURATION OF THE WARRANTY PERIOD. ALL OTHER EXPRESS OR IMPLIED CONDITIONS, REPRESENTATIONS AND WARRANTYES, INCLUDING, BUT NOT LIMITED TO, ANY IMPLIED WARRANTY OF NON-INFRINGEMENT, ARE DISCLAIMED. Some jurisdictions do not allow limitations on how long an implied warranty lasts, so the above limitation may not apply to you. This limited warranty gives you specific legal rights, and you may also have other rights which vary by jurisdiction.
TO THE EXTENT NOT PROHIBITED BY LAW, IN NO EVENT WILL LINKSYS BE LIABLE FOR ANY LOST DATA, REVENUE OR PROFIT, OR FOR SPECIAL, INDIRECT, CONSEQUENTIAL, INCIDENTAL OR PUNITIVE DAMAGES, REGARDLESS OF THE THEORY OF LIABILITY (INCLUDING NEGLIGENCE), ARISING OUT OF OR RELATED TO THE USE OF OR INABILITY TO USE THE PRODUCT (INCLUDING ANY SOFTWARE), EVEN IF LINKSYS HAS BEEN ADVISED OF THE POSSIBILITY OF SUCH DAMAGES. IN NO EVENT WILL LINKSYS' LIABILITY EXCEED THE AMOUNT PAID BY YOU FOR THE PRODUCT. The foregoing limitations will apply even if any warranty or remedy provided under this limited warranty fails of its essential purpose. Some jurisdictions do not allow the exclusion or limitation of incidental or consequential damages, so the above limitation or exclusion may not apply to you.
Obtaining Warranty Service
If you have a question about your product or experience a problem with it, please go to wwwlinksys.com/support where you will find a variety of online support tools and information to assist you with your product. If the product proves defective during the Warranty Period, contact Linksys Technical Support for instructions on how to obtain warranty service. The telephone number for Linksys Technical Support in your area can be found in the product User Guide and at wwwlinksys.com/international. Have your product serial number and proof of purchase on hand when calling. A DATED PROOF OF ORIGINAL PURCHASE IS REQUIRED TO PROCESS WARRANTY CLAIMS. If you are requested to return your product, you will be given a Return Materials Authorization (RMA) number. You are responsible for properly packaging and shipping your product to Linksys at your cost and risk. You must include the RMA number and a copy of your dated proof of original purchase when returning your product. Products received without a RMA number and dated proof of
original purchase will be rejected. Do not include any other items with the product you are returning to Linksys. Defective product covered by this limited warranty will be repaired or replaced and returned to you without charge. Customers outside of the United States of America and Canada are responsible for all shipping and handling charges, custom duties, VAT and other associated taxes and charges. Repairs or replacements not covered under this limited warranty will be subject to charge at Linksys' then-current rates.
Technical Support
This limited warranty is neither a service nor a support contract. Information about Linksys' current technical support offerings and policies (including any fees for support services) can be found at:
www.linksys.com/support.
This limited warranty is governed by the laws of the jurisdiction in which the Product was purchased by you.
Please direct all inquiries to: Linksys, P.O. Box 18558, Irvine, CA 92623.
A Division of Cisco Systems, Inc.
.111
CISCO
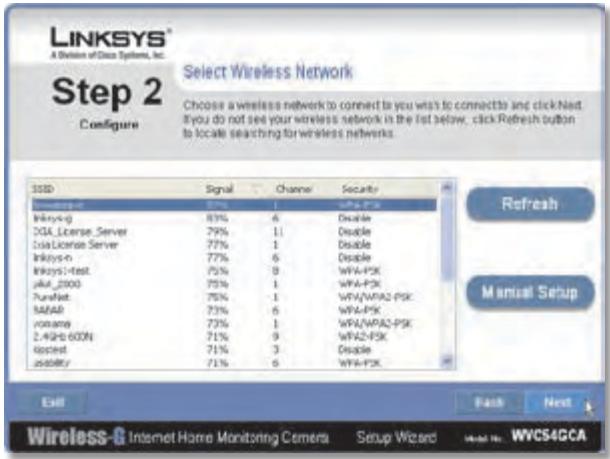
Select Wireless Network (Selectionar red inalambrica)

- Wireless-G Internet Home Monitoring Camera
- Chapter 1: Product Overview 2
- Chapter 2: Setting Up and Mounting the Camera 3
- Chapter 3: Installing and Using the Camera Utility 9
- Chapter 4: Advanced Configuration with the Web-based Utility 17
- Appendix A: Troubleshooting 27
- Appendix B: Wireless Security Checklist 30
- Appendix C: Specifications 31
- Appendix D: Warranty Information 32
- Online Resources
- Copyright and Trademarks
- Chapter 1: Product Overview
- Chapter 2: Setting Up and Mounting the Camera
- Setup Wizard
- Placement Options
- Stand Option
- Wall Mount Option
- Camera Head Tilting
- Chapter 3: Installing and Using the Camera Utility
- Overview
- Installing the Camera Utility
- Using the Camera Utility for the First Time
- Using the Camera Utility
- Monitor Window
- Camera Status
- Motion Detection Events
- Hard Disk Quota
- Viewing Area
- Multiple-Camera Layouts
- Video Layout Controls
- Video Control Buttons
- Playback Window
- Video Selection
- Basic Video Controls
- Advanced Video Controls
- Other Buttons
- Setup Screen
- Setup > Network Camera
- Setup > Internet Camera
- Setup > Recording Schedule
- Memory Requirements for Video Recordings
- Setup > Preferences
- Recording Path
- Instant Recording Time Limit
- Motion Detection
- Disk Allocation for Each Camera Recording
- Initial Settings
- Chapter 4: Advanced Configuration with the Web-based Utility
- How to Access the Web-based Utility
- View Video
- Resolution
- Zoom Factor
- Snapshot
- Audio
- Video Format
- Setup > Basic
- Device Settings
- Network Settings
- Wireless Settings
- Setup > Basic > Wireless Security
- - Disable
- WEP
- WPA/WPA2 Personal
- Setup > Image
- MPEG4 Settings
- MJPEG Settings
- Mobile Settings
- Video Adjustments
- Options
- Setup > Administration
- Login
- Firmware Upgrade
- Setup > Users
- Users Settings
- Editing the Database
- Setup > Options
- DDNS
- UPnP
- Alternate Access Web Port
- RTP/RTSP
- Multicast RTP/RTSP
- Setup > Motion Detection
- Trigger Motion Detection
- E-Mail Alert
- FTP
- Set Sensitivity Area
- New Motion Trigger Schedule
- Setup > Status
- System Status
- Network
- Wireless
- Log
- Help
- Appendix A: Troubleshooting
- Common Problems and Solutions
- I can't view the Camera's video using Internet Explorer.
- The OCX plug-in is installed in Internet Explorer, but I cannot view any video.
- When powering on the Camera, I can't immediately access the Camera from my computer.
- I'm not able to play my recording video files.
- I have two Cameras and see two WVC54GCAs listed in my Camera Utility. When I click to view both Cameras, I see the video of only one Camera.
- When I view video remotely via the Internet, the video is very slow.
- I cannot access the Setup tab of the Camera's Web-based Utility.
- I want to access the Camera when I'm away from home, but somehow I can't connect.
- Frequently Asked Questions
- What is ad-hoc mode?
- What is infrastructure mode?
- Appendix B: Wireless Security Checklist
- Change the default wireless network name or SSID
- Change the default password
- Enable MAC address filtering
- Enable encryption
- General Network Security Guidelines
- Additional Security Tips
- Appendix C: Specifications
- Minimum System Requirements
- Appendix D: Warranty Information
- Limited Warranty
- Two years for new product
- Exclusions and Limitations
- Obtaining Warranty Service
- Technical Support
Brand : LINKSYS
Model : WVC54GCA
Category : Surveillance Camera