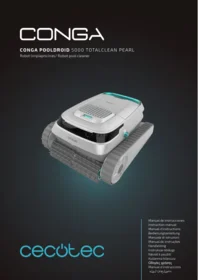
Conga Pooldroid 5000 Totalclean Pearl - Vacuum Cleaner CECOTEC - Free user manual and instructions
Find the device manual for free Conga Pooldroid 5000 Totalclean Pearl CECOTEC in PDF.


| Product type | Robotic pool cleaner |
| Brand | Cecotec |
| Model | Conga Pooldroid 5000 Totalclean Pearl |
| Category | Automatic pool vacuum |
| Dimensions (L × W × H) | 45 × 40 × 25 cm |
| Weight | 5 kg |
| Power supply | Rechargeable lithium-ion battery (18 V / 5200 mAh) |
| Battery life | Up to 100 minutes |
| Charging time | 4 hours |
| Power adapter | Included, 100-240 V, 50-60 Hz |
| Filtration system | High-capacity washable filter cartridge |
| Brushing system | Rotating brushes for floor and walls |
| Cleaning technology | Totalclean: complete pool coverage |
| Compatible pools | Above-ground and in-ground, up to 10 m in length |
| Power cable | Floating, 10 m (approximate) |
| Safety | Double electrical insulation; automatic shut-off out of water |
| Maintenance | Cleaning the filter and brushes after each cycle |
| Spare parts | Filters, brushes, seals, cables (Cecotec after-sales service) |
| Warranty | 2 years |
| Recycling | Disposal according to WEEE directive (electronic waste) |
Frequently Asked Questions - Conga Pooldroid 5000 Totalclean Pearl CECOTEC
User questions about Conga Pooldroid 5000 Totalclean Pearl CECOTEC
0 question about this device. Answer the ones you know or ask your own.
Ask a new question about this device
Download the instructions for your Vacuum Cleaner in PDF format for free! Find your manual Conga Pooldroid 5000 Totalclean Pearl - CECOTEC and take your electronic device back in hand. On this page are published all the documents necessary for the use of your device. Conga Pooldroid 5000 Totalclean Pearl by CECOTEC.
USER MANUAL Conga Pooldroid 5000 Totalclean Pearl CECOTEC
cecòtec
Safety instructions 10
-
Parts and components 72
-
Before use 72
-
Operation 72
-
Cleaning and maintenance 74
-
Troubleshooting 75
-
Technical specifications 76
-
Disposal of old electrical and
electronic appliances 77
-
Technical support and warranty 77
-
Copyright 77
-
Simplified EU Declaration of Conformity 78
SOMMAIRE
EN • The coding in this manual is generic and applies to all code variants of the appliance.
Read these instructions thoroughly before using the appliance. Keep this instruction manual for future reference or new users.
- Cecotec is not responsible for any damage caused by improper use of this robot.
- To reduce the risk of injury or damage, observe the following safety precautions when installing, operating and servicing the robot.
- If you wish to dispose of the robot, please take it to an appropriate waste collection point. For information on available collection systems, please contact your local authorities. If you dispose of this robot in a landfill or waste dump, harmful substances can leach into the groundwater and enter the food chain, damaging people's health and food.
- Do not use the robot while there are people or animals in the pool.
- Switch off the appliance when not in use.
- This appliance is not a toy. Do not sit or stand on it. Watch children and pets while the appliance is in operation.
- Only use approved power adapters.
- If the power cable or plug are damaged, contact the official Cecotec Technical Support Service.
- Before each use, check the battery for damage or leakage. If this is the case, do not charge the battery.
- Before charging the appliance, make sure that the charging port is completely dry.
- Do not cover the appliance while it is charging, since this may cause the components to overheat.
-
Do not switch on the appliance out of water, as it may overheat.
-
Do not use the pool cleaner and the pool filter at the same time.
- The motor oil pan gasket contains grease and can cause significant water contamination if the motor is damaged. If you think there may be a leak, stop using the appliance immediately.
- Do not press or disassemble the battery. Do not heat the battery or place it near heat sources.
- Do not crush or disassemble the robot.
- Make sure that the appliance is not connected to the power supply before assembling, disassembling or cleaning it.
- This appliance can be used by people with reduced physical, sensory or mental capabilities or lack of experience and knowledge if they have been given supervision or instruction concerning use of the appliance in a safe way and understand the hazards involved.
- Children must not play with the appliance.
- Pumps that are not marked as freeze-protected should not be left outside during freezing weather conditions.
- Contamination of the fluid may occur due to leakage of lubricants.
- The appliance must not be used by children. Cleaning and user maintenance must not be carried out by children.
- This appliance is designed for domestic use only and is not intended for bars, restaurants, farmhouses, hotels, motels and offices.
- The appliance may only be used with the power supply unit provided with the appliance.
- Check the charger cable and casing regularly for visible damage. Do not use the appliance if the charger cable, socket, or structure are damaged, do not work properly, or have fallen, and contact the official Cecotec Technical
Support Service immediately. If the power cable is damaged, it must be replaced with a special cable or set to be supplied by the official Cecotec Technical Support Service. The power cable is to be properly discarded.
- WARNING: To recharge the battery, use only the removable power supply unit provided with the appliance, model GM95-292300-2FG.
- The transformer must be located outside zone 1.
- This appliance contains a battery which may only be replaced by qualified people.
- The battery must not be replaced by the user.
- Always disconnect the appliance from the mains before installation, dismantling or cleaning. Children must not play with the appliance.
- Pumps which are not marked as frost-protected must not be left outside in case of frost.
Battery instructions
- Before charging the appliance, read the instructions carefully. Make sure that the charger is adapted to the local power supply.
- Batteries may leak under extreme conditions. In the event of a battery leak, keep your skin and eyes away from the liquid. If the liquid gets into contact with skin, wash immediately with soap and water. If the liquid gets into the eyes, wash them immediately with clean water for a minimum of 10 minutes and seek medical attention. Wear gloves to handle the battery and dispose of it immediately in accordance with local regulations.
-
Ensure that the connection between the charger and the battery is correct, and that the correct models are being used.
-
New and used batteries should not be mixed.
- Non-rechargeable batteries must not be recharged.
- The battery will last longer and perform better if you charge the battery when the temperature is between 18 °C and 25 °C. Do not charge the battery when the temperature is below 5 °C or above 40 °C. This is important, as failure to follow these instructions may result in damage to the battery.
- Do not disassemble, open, or break the battery.
- Do not tamper with the battery. Do not store the battery in an untidy manner in a box or drawer where they can short-circuit each other or be short-circuited by conductive materials. When the battery is not in use, keep it away from paper clips, coins, keys, nails, screws or other small metal objects that could create interference between terminals. Connecting the battery terminals may cause burns or fire.
- Do not expose the battery to heat or fire. Do not expose the battery to direct sunlight.
- Do not subject the battery to mechanical shock.
- In case of battery ingestion, please seek medical attention immediately.
- Only recharge the battery with the supplied charger. Do not use any charger other than the one provided. A charger is only suitable for a type of battery and could cause risk of fire if you use it with another battery.
- Do not use any battery that is not designed for use in this appliance.
- Keep the batteries out of the reach of children.
- Keep this instruction manual for future reference.
- Dispose of the battery correctly.
- Do not use a damaged or modified battery.
- WARNING: Failure to follow these instructions may result in electric shock, fire and/or serious injury.
INSTRUCTIONS DE SÉCURITÉ
- Power/Cleaning mode selection switch
- Water outlet
- Cleaning rollers
- Charging port (with protective cover)
- Indicator light
NOTE:
The graphics in this manual are schematic representations and may not exactly match the product.
2. BEFORE USE
- This appliance is packaged in a way as to protect it during transport. Take the appliance out of its box and remove all packaging materials. You can keep the original box and other packaging elements in a safe place to prevent damage to the appliance if you need to transport it in the future. In case the original packaging is disposed of, make sure all packaging materials are recycled accordingly.
- Make sure all parts and components are included and in good conditions. If there is any piece missing or in bad conditions, contact the official Cecotec Technical Support Service immediately.
- Do not remove the serial number of the appliance in order to keep a correct traceability of it in case of assistance.
Box content
- Robot pool cleaner (with built-in filter)
- Power adapter
- Hook
- Maintenance kit
- Instruction manual
3. OPERATION
Charging the robot
Fig. 2
Before using the robot for the first time, be sure to fully charge the battery by following these instructions:
- Remove the robot from the pool and switch it off.
- Check that the charging port, located on the side of the robot, is completely dry before connecting the charger.
Indicator light
Fig. 3
| Colour | Meaning |
| Green | Adequate battery level |
| Blue | Inadequate battery level |
| Orange | Battery level too low |
| Red | A malfunction has occurred |
Cleaning modes
Fig. 4
| Cleaning mode | Name | Cleaning area |
| Smart/automatic cleaning | AUTO | The robot will clean the floor, walls and waterline |
| Floor cleaning | FLOOR | The robot will only clean the floor |
| Wall cleaning | WALL | The robot will clean the walls and waterline |
Placing the robot in the pool
- Select the desired cleaning mode and place the robot in the pool as soon as possible. Fig. 5
- Slowly lower it into the water. The robot will expel the air inside and sink to the bottom of the pool.
- The robot will start working 10 seconds after reaching the bottom of the pool. Fig. 6
Taking the robot out of the pool
- The robot will automatically stop at the bottom edge of the pool when the cleaning cycle is complete or when the battery charge level is low. Fig. 7
- Use the hook to pull it out of the pool. Fig. 8
- Remove the robot from the pool and switch it off. Fig. 9
Cleaning the filter basket
It is highly recommended to clean the filter basket after each cleaning session.
To do that:
- Open the robot cover. Fig. 10
- Remove the filter basket. Fig. 11
- Open the lid of the basket and remove the waste. Fig. 12
- Rinse the basket. Fig. 13
Note: Clean the filter basket regularly. A clogged filter can affect the overall cleaning performance of the robot by hindering suction power or trapping dirt. If cleaning is not effective, the filter basket must be replaced.
4. CLEANING AND MAINTENANCE
For optimal robot performance, follow these maintenance instructions.
After daily use
- Clean the robot and filter basket after each cleaning session.
- Keep the robot out of the reach of direct sunlight.
- Before charging the robot, make sure that the charging port is completely dry.
Every 3-4 months or after a deep-cleaning cycle (when the pool is dirty)
Check that there is no debris on any part of the robot (roller brush, tracks and roller gears).
Every 12 months or when you notice that the speed of the robot has slowed down
Check the rollers or tracks for wear. If they are, replace them.
Storage
If the robot is not going to be used for a long time, follow the steps below:
- Thoroughly clean and dry the filter basket, rollers and tracks.
- Make sure that there is no residual water left in the robot.
- Fully charge the robot before storing it.
- Store it in a cool, well-ventilated place with a temperature between 5 °C and 45 °C and a relative humidity of less than 80 %.
- Avoid exposure to direct sunlight, rain or extremely low temperatures.
- The battery should be charged at least every 3 months to avoid over-discharging.
Maintenance
Replacing parts
A Replacing the rollers
1. Remove the rollers by unhooking the silicone latches that hold them in place.
2. Replace the rollers. Then align the silicone latches with the corresponding slots and press them into place until they are completely fixed. Fig. 14
B Replacing the tracks
- Remove the side panels: Remove the screw caps. Use a Philips screwdriver to remove the two screws holding the side panels and tracks. Remove the side panels and tracks. Fig. 15
- Clean the robot: Wipe the inside of the side panels and dry them with paper towels or a cloth. Fig. 16
- Replacing the tracks: Replace the tracks with new ones. Fig. 17
5. TROUBLESHOOTING
| PROBLEM | POSSIBLE CAUSE | POSSIBLE SOLUTION |
| The robot does not charge. | - The socket is not receiving current.- The power cord is not properly plugged.- The connection between the power adapter and the robot is loose.- The power adapter does not work.- Water has entered the charging port.- The robot does not have enough battery. | - Check if the power socket works.- Check the connection between the power cord and the power socket.- Check the connection between the robot and the power adapter.- Check if the charging indicator light comes on when the power adapter is connected to the robot. If not, replace the charger.- Dry the charging port and try to charge the robot again.- Charge the robot completely. |
| The robot does not work, or the indicator light does not come on. | - The robot does not have enough battery.- The switch on the robot is faulty. | - Charge the robot.- Try switching the robot off and on again. |
| The robot does not climb up the walls. | - Low battery.- Check that the FLOOR cleaning mode is not selected.- The filter basket is clogged.- There is algae on the walls and the pH of the water is not appropriate.- The tracks and rollers are worn. | - Charge the robot completely.- Select the WALL cleaning mode.- Clean the filter basket.- Check the pH level of the water. Poor water quality can promote algae growth, causing the walls to become slippery. In this case, adjust the pH level of the water and remove algae from the walls.- Replace the tracks or rollers. |
| The robot moves in circles. | - The filter basket is clogged.- Debris gets stuck in the tracks or rollers. | - Clean the filter basket.- Remove debris from the tracks or rollers. |
| The robot stops under water and the malfunction indicator light comes on, indicating that the motor or water pump is jammed. | - Debris gets stuck in the tracks or rollers.- Debris jams the impeller of the water pump motor.- All robots undergo rigorous testing before leaving the factory, including underwater testing. Therefore, some water droplets or debris may remain inside the robot. Use the robot normally. | - If the motor is jammed, check if both tracks can be moved manually. If not, check the tracks for any obstructions.- If the water pump motor is jammed, there may be an obstruction in the impeller.- This does not affect its operation. |
6. TECHNICAL SPECIFICATIONS
Product reference: EU01_108205
Product: Conga Pooldroid 5000 TotalClean Pearl
Voltage: 100-240 V \~
Frequency: 50/60 Hz
Rated power: 80 W
Battery: 25.2 V = 4800 mAh 120.96 Wh
Rated charger output: 29.2 V = 3 A
Charging time: 2.5 hours
Moving speed: 10-15 m/min
Robot weight: 9.9 kg
Applicable pool size: 100 m²
Pool depth: 0.5 - 2.5 m
IP68
Technical specifications may change without prior notification to improve product quality.
Made in China | Designed in Spain
7. DISPOSAL OF OLD ELECTRICAL AND ELECTRONIC APPLIANCES
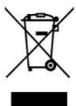
This symbol indicates that, according to the applicable regulations, the appliance and/or batteries must be disposed of separately from household waste. When this product reaches the end of its shelf life, you should dispose of the cells/batteries/accumulators and take them to a collection point designated by the local authorities.
Consumers must contact their local authorities or retailer for information concerning the correct disposal of old appliances and/or their batteries.
Compliance with the above guidelines will help protecting the environment.
8. TECHNICAL SUPPORT AND WARRANTY
Cecotec shall be liable to the end user or consumer for any lack of conformity that exists at the time of delivery of the product under the terms, conditions and deadlines established by the applicable regulations.
Repairs should be carried out by qualified personnel.
If at any moment you detect any problem with your product or have any doubt, do not hesitate to contact the official Cecotec Technical Support Service at +34 96 321 07 28.
9. COPYRIGHT
The intellectual property rights over the texts in this manual belong to CECOTEC INNOVACIONES, S.L. All rights reserved. The contents of this publication may not, in whole or in part, be reproduced, stored in a retrieval system, transmitted, or distributed by any means (electronic, mechanical, photocopying, recording or similar) without the prior authorization of CECOTEC INNOVACIONES, S.L.
10. SIMPLIFIED EU DECLARATION OF CONFORMITY
Cecotec Innovaciones hereby declares that this appliance complies with the essential requirements and other relevant provisions of the regulations applicable in the European Union. This appliance has been designed, manufactured and tested to meet the required safety and quality standards. The full text of the EU Declaration of Conformity can be found on the following website: https://cecotec.es/es/information/declaration-of-conformity
1. PIÈCES ET COMPOSANTS
Image 1
5. PROBLEEMOPLOSSING
https://cecotec.es/es/information/declaration-of-conformity "

Fig./Img./Abb./Afb./ Rys. 1

Fig./Img./Abb./Afb./Rys. 2

Fig./Img./Abb./Afb./Rys. 3

Fig./Img./Abb./Afb./ Rys. 4

Fig./Img./Abb./Afb./Rys. 5
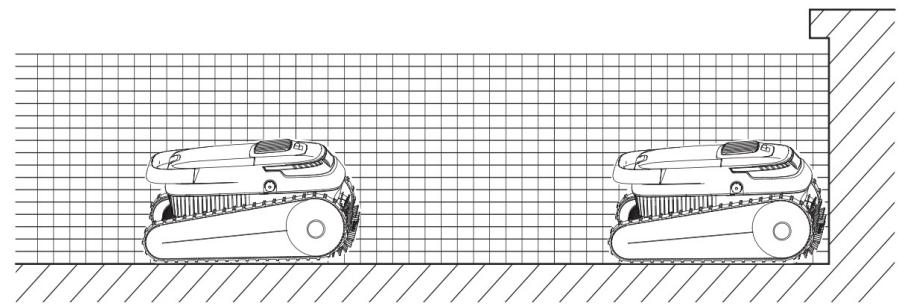
Fig./Img./Abb./Afb./ Rys. 7
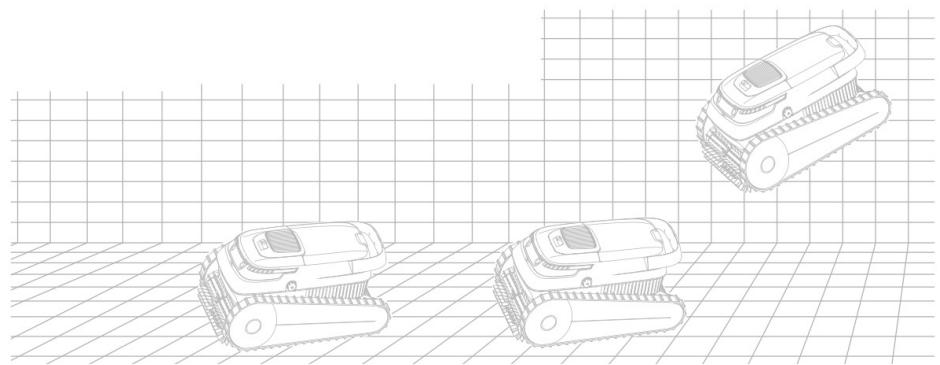
Fig./Img./Abb./Afb./Rys. 6

Fig./Img./Abb./Afb./ Rys. 8

Fig./Img./Abb./Afb./ Rys. 9
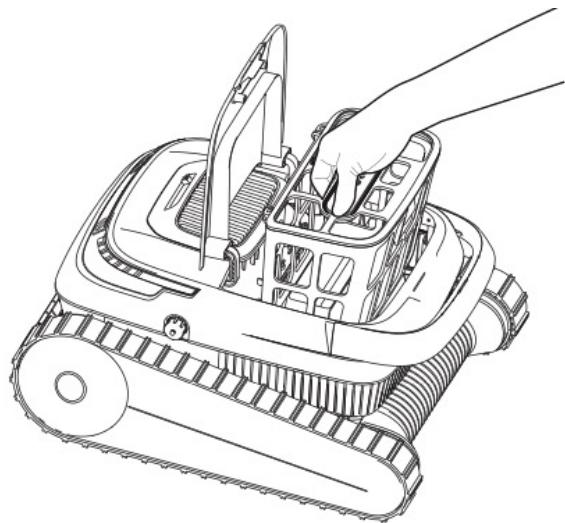
Fig./Img./Abb./Afb./ Rys. 11

Fig./Img./Abb./Afb./ Rys. 10
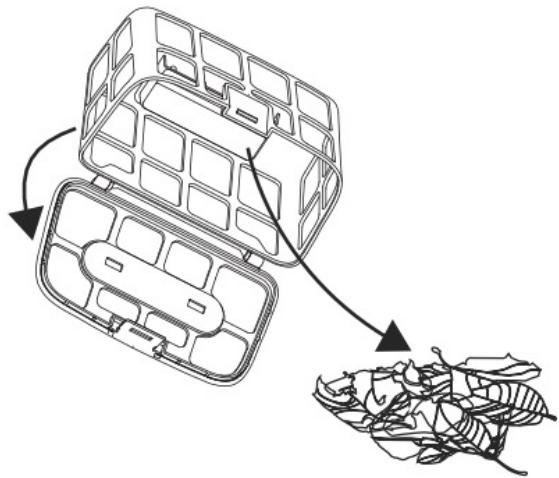
Fig./Img./Abb./Afb./ Rys. 12
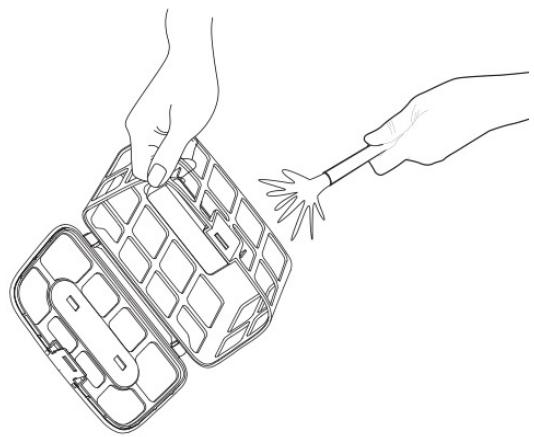
Fig./Img./Abb./Afb./ Rys. 13

Fig./Img./Abb./Afb./ Rys. 15

Fig./Img./Abb./Afb./ Rys. 14

Fig./Img./Abb./Afb./ Rys. 16

Fig./Img./Abb./Afb./ Rys. 17
www.cecotec.es


- SOMMAIRE
- BATTERY INSTRUCTIONS
- INSTRUCTIONS DE SÉCURITÉ
- BEFORE USE
- BOX CONTENT
- OPERATION
- CHARGING THE ROBOT
- INDICATOR LIGHT
- CLEANING MODES
- PLACING THE ROBOT IN THE POOL
- TAKING THE ROBOT OUT OF THE POOL
- CLEANING THE FILTER BASKET
- CLEANING AND MAINTENANCE
- AFTER DAILY USE
- EVERY 3-4 MONTHS OR AFTER A DEEP-CLEANING CYCLE (WHEN THE POOL IS DIRTY)
- EVERY 12 MONTHS OR WHEN YOU NOTICE THAT THE SPEED OF THE ROBOT HAS SLOWED DOWN
- STORAGE
- MAINTENANCE
- REPLACING PARTS
- B REPLACING THE TRACKS
- TROUBLESHOOTING
- TECHNICAL SPECIFICATIONS
- DISPOSAL OF OLD ELECTRICAL AND ELECTRONIC APPLIANCES
- TECHNICAL SUPPORT AND WARRANTY
- COPYRIGHT
- SIMPLIFIED EU DECLARATION OF CONFORMITY
- PIÈCES ET COMPOSANTS
- PROBLEEMOPLOSSING
Brand : CECOTEC
Model : Conga Pooldroid 5000 Totalclean Pearl
Category : Vacuum Cleaner