
CARTE PCI EXPRESS™ FIREWIRE 800 ET USB 2.0 #F5U602EA - PCI Express Expansion Card BELKIN - Free user manual and instructions
Find the device manual for free CARTE PCI EXPRESS™ FIREWIRE 800 ET USB 2.0 #F5U602EA BELKIN in PDF.


User questions about CARTE PCI EXPRESS™ FIREWIRE 800 ET USB 2.0 #F5U602EA BELKIN
0 question about this device. Answer the ones you know or ask your own.
Ask a new question about this device
Download the instructions for your PCI Express Expansion Card in PDF format for free! Find your manual CARTE PCI EXPRESS™ FIREWIRE 800 ET USB 2.0 #F5U602EA - BELKIN and take your electronic device back in hand. On this page are published all the documents necessary for the use of your device. CARTE PCI EXPRESS™ FIREWIRE 800 ET USB 2.0 #F5U602EA by BELKIN.
USER MANUAL CARTE PCI EXPRESS™ FIREWIRE 800 ET USB 2.0 #F5U602EA BELKIN
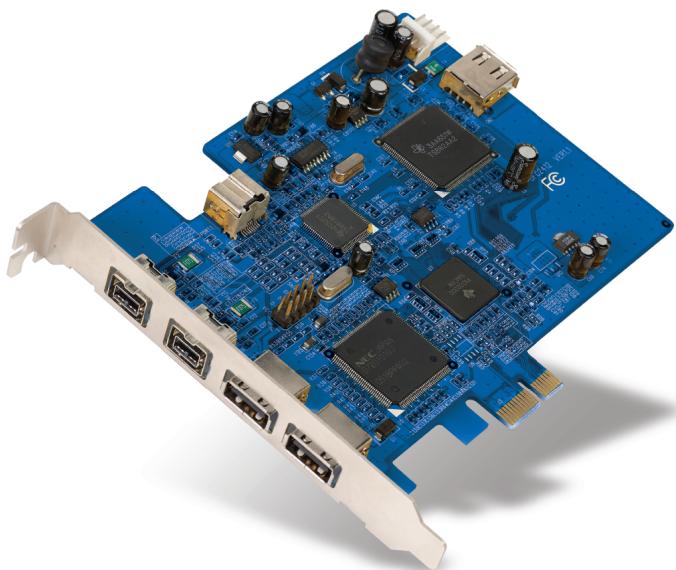
FireWire 800 and USB 2.0 PCI Express™ Card
Add FireWire® 800 and Hi-Speed USB 2.0 ports to your computer using PCI Express technology
EN
FR
DE
NL
ES
IT
User Manual
F5U602ea
Table of Contents
- Introduction 1
Features 2
Specifications. 2
Environment 2
Minimum System Requirements 3
Package Contents. 3 - Software Setup 4
3.Hardware Installation 6 - Verifying Proper Installation 8
- Information 10
Introduction
Introduction to PCI Express
For the last 10 years, PCI has been the mainstream interface for personal PCs, with nearly every computer using the same PCI bus specification—32-bit, running at 33MHz, and yielding a maximum data-transfer rate of only 133.3Mbps. In today's information age, with data size growing exponentially, there is increased demand for faster transfer rates. This demand led to Intel's development of the PCI Express standard, which offers increased speed and stability for data transfers.
Common PCI Express bus forms include x1, x2, x4, x8, and x16, with each form being characterized by a unique slot design. A one-path transmission on a one-lane (x1) PCI Express bus can reach speeds of up to 250MB—nearly double the standard PCI transmission speed. A 16-lane (x16) PCI Express bus can reach speeds of up to 16Gbps.
1
2
3
4
5
EN
1
2
3
4
5
Features
- Complies with one-lane 2.5Gbps PCI Express specifications
- Offers USB 2.0 transfer rate of up to 480Mbps and 1394b data transfer rate of up to 800Mbps
Specifications
- Interface: One-lane PCI Express
Mode: USB2.0/1394b Combo PCI Express Card - Controller: NEC UPD720101+ TI TSB82AA2+ TI XIO2000
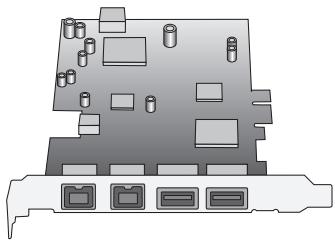
- Channels: 2 external USB 2.0 ports and 1 internal port 2 external 1394b ports and 1 internal port
Environment
Operation Temperature: 0^ 57^
Storage Temperature: -20^ 85^
Operation Temperature: 5 95% RH
Minimum System Requirements
- Windows®-based computer with available PCI Express slot*
- Windows 2000, XP, 2003 Server
*Note: Enclosed Card will not fit into a standard PCI slot.
Package Contents
- FireWire 800 and USB 2.0 PCI Express Card
- User Manual
CD Driver
1
2
3
4
5
EN
Software Setup
1
2
3
4
5
IMPORTANT NOTE: You must install the FireWire 800 and USB 2.0 PCI Express Card drivers prior to installing the hardware in your computer.
- Insert the FireWire 800 and USB 2.0 PCIe installation CD into your CD-ROM drive. After a few moments, the main menu will automatically start.
NOTE: If the main CD does not auto-start, click the "Start" button and select "Run". From the "Run" dialogue box, enter "\setup.exe" and click "OK" (where " " represents the letter that identifies your CD-ROM drive under "My Computer"-e.g., if the CD is in drive D, enter "D:\setup.exe"). -
Select "Install Driver". The Software Installation Wizard will appear and begin to download drivers.
-
If you receive the following "Software Installation" notice, click on "Continue Anyway" to continue with the installation process.
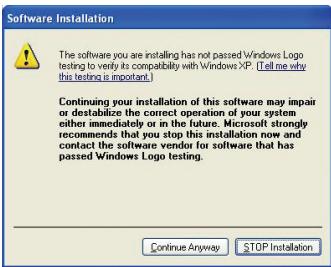
- After the files have been successfully copied over, a window will appear to confirm that driver installation is complete. Click "OK" to complete the installation process.
- You will be asked if you want to restart your computer now or later. Select "No, I will restart my computer later" and perform a manual shutdown through the "Start" menu.
Hardware Installation
- After completion of software setup, shut down your computer and disconnect all connected devices and peripherals.
- Remove the cover from your computer. Refer to your computer manufacturer's user manual for details on how to do this. Touch any bare metal portion of your computer case to discharge yourself of any static electricity. This prevents damage to your computer and the PCI Express Card.
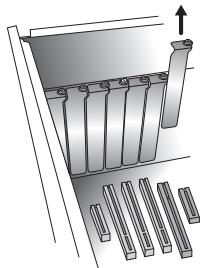
- Locate the PCI Express slot on your computer's main circuit board. Remove the metal plate that covers the rear slot corresponding to the PCI Express slot you have selected (see image below).
-
Remove the PCI Express Card from its protective anti-static packaging. Handle it by the metal bracket; do not touch the gold-edged connectors. Insert the PCI Express Card into the PCI Express slot, carefully aligning the rear bracket to the computer case. Make sure that the edge of the PCI Express Card is fully inserted into the slot.
-
Replace the slot-cover screw.
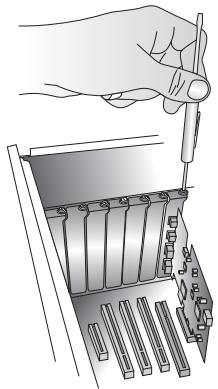
- After installing the PCI Express Card, replace your computer's outer cover and turn on your computer.
NOTE: Do not plug any devices into the PCI Express Card until driver installation is completely finished.
- The New Hardware Wizard will launch and recognize the PCI Express Card.
- Windows will automatically install the correct driver.
Installation is now complete. The PCI Express Card is now ready to use.
1
2
3
4
5
EN
Verifying Proper Installation
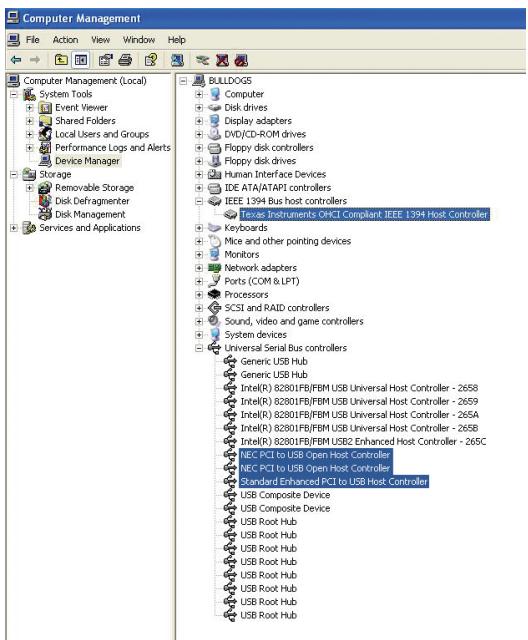
Check the Windows Device Manager to confirm that your PCI Express Card has been properly installed.
- Right-click on "My Computer" and select "Manage".
- Select the "Device Manager" tab.
- Click the (+) sign next to "IEEE 1394 Bus host controllers". The "IEEE 1394 Bus host controllers" will now include one "Texas Instruments OHCI Compliant IEEE 1394 Host Controller" entry.
- Click the (+) sign next to "Universal Serial Bus controllers". It will now include two "NEC PCI to USB Open Host Controller" entries and one "Standard Enhanced PCI to USB Host Controller" entry.
Verifying Proper Installation
9
Information
1
2
3
4
5
FCC Statement
DECLARATION OF CONFORMITY WITH FCC RULES FOR ELECTROMAGNETIC COMPATIBILITY
We, Belkin Corporation, of 501 West Walnut Street, Compton, CA 90220, declare under our sole responsibility that the product, F5U602ea
to which this declaration relates, Complies with Part 15 of the FCC Rules. Operation is subject to the following two conditions: (1) this device may not cause harmful interference, and (2) this device must accept any interference received, including interference that may cause undesired operation.
CE Declaration of Conformity
We, Belkin Corporation, declare under our sole responsibility that the F5U602, to which this declaration relates, is in conformity with Generic Emissions Standard EN 55022:1998 Class B, EN50081-1 and with Generic Immunity Standard EN50082-1 1992.
Modifications
The FCC requires the user to be notified that any changes or modifications to this device that are not expressly approved by Belkin Corporation may void the user's authority to operate the equipment.
Belkin Corporation Limited Lifetime Product Warranty
Belkin Corporation warrants this product against defects in materials and workmanship for its lifetime. If a defect is discovered, Belkin will, at its option, repair or replace the product at no charge provided it is returned during the warranty period, with transportation charges prepaid, to the authorized Belkin dealer from whom you purchased the product. Proof of purchase may be required.
This warranty does not apply if the product has been damaged by accident, abuse, misuse, or misapplication; if the product has been modified without the written permission of Belkin; or if any Belkin serial number has been removed or defaced.
THE WARRANTY AND REMEDIES SET FORTH ABOVE ARE EXCLUSIVE IN LIEU OF ALL OTHERS, WHETHER ORAL OR WRITTEN, EXPRESSED OR IMPLIED. BELKIN SPECIFICALLY DISCLAIMS ANY AND ALL IMPLIED WARRANTYES, INCLUDING, WITHOUT LIMITATION, WARRANTYES OF MERCHANTABILITY AND FITNESS FOR A PARTICULAR PURPOSE.
Information
No Belkin dealer, agent, or employee is authorized to make any modification, extension, or addition to this warranty.
BELKIN IS NOT RESPONSIBLE FOR SPECIAL, INCIDENTAL, OR CONSEQUENTIAL DAMAGES RESULTING FROM ANY BREACH OF WARRANTY, OR UNDER ANY OTHER LEGAL THEORY, INCLUDING BUT NOT LIMITED TO, LOST PROFITS, DOWNTIME, GOODWILL, DAMAGE TO OR REPROGRAMMING, OR REPRODUCING ANY PROGRAM OR DATA STORED IN, OR USED WITH, BELKIN PRODUCTS.
Some states do not allow the exclusion or limitation of incidental or consequential damages or exclusions of implied warranties, so the above limitations or exclusions may not apply to you. This warranty gives you specific legal rights, and you may also have other rights that vary from state to state.
1
2
3
4
5
EN
BELKIN
www.belkin.com
Belkin Ltd.
Express Business Park
Shipton Way, Rushden
NN10 6GL, United Kingdom
+44 (0) 1933 35 2000
+44 (0) 1933 31 2000 fax
Belkin GmbH
Hanebergstrasse 2
80637 Munich, Germany
+49 (0) 89 143405 0
+49 (0) 89 143405 100 fax
Belkin B.V.
Boeing Avenue 333
1119 PH Schiphol-Rijk, The Netherlands
+31 (0) 206547300
+31 (0) 20 654 7349 fax
Belkin SAS
Express Business Park
Shipton Way, Rushden
Assistance Technique Belkin
Europe:0080022355460
Express Business Park
Shipton Way, Rushden
Software Installation

The software you are installing has not passed Windows License 2.0, and it is probably with Windows 365. [Tell me this testing is important.]
Continuing your installation of this software may impair or destabilize the correct operation of your system either immediately or in the future. Microsoft strongly recommends that you stop this installation now and contact the software vendor for software that has passed Windows Logo testing.
Continue Anyway
STOP Installation
Express Business Park
Shipton Way, Rushden
Express Business Park
Shipton Way, Rushden