
PHOTON25 - MIDI Controller ALESIS - Free user manual and instructions
Find the device manual for free PHOTON25 ALESIS in PDF.

| Product Type | USB MIDI Controller |
| Brand | Alesis |
| Model | Photon 25 |
| Keyboard | 25 full-size, velocity-sensitive keys |
| Assignable Knobs | 12 rotary 270° knobs with 3 layers (36 assignments per preset) |
| Control Lever | X/Y lever with independent axis assignment |
| Display | 4-segment display with 7 graphic groups |
| Connectivity | USB (type B), MIDI In/Out (5-pin), sustain pedal input |
| Power | USB bus, 4 C batteries, or external 6V DC 1000 mA adapter (not included) |
| Dimensions | 45.5 x 24.75 x 9.5 cm |
| Weight | 2.0 kg |
| Compatible Operating Systems | Windows XP and later, Mac OS X (USB 1.1 or higher) |
| Preset Memory | Up to 20 complete configurations |
| MIDI Functions | MIDI channel, program, assignment, predefined faders, panic (All Notes Off) |
| Maintenance and Cleaning | Clean with a soft dry cloth; avoid liquids and solvents |
| Safety | Use only the specified adapter; do not expose to moisture |
| Spare Parts and Repairability | Contact Alesis support; no user-serviceable parts |
Frequently Asked Questions - PHOTON25 ALESIS
User questions about PHOTON25 ALESIS
0 question about this device. Answer the ones you know or ask your own.
Ask a new question about this device
Download the instructions for your MIDI Controller in PDF format for free! Find your manual PHOTON25 - ALESIS and take your electronic device back in hand. On this page are published all the documents necessary for the use of your device. PHOTON25 by ALESIS.
USER MANUAL PHOTON25 ALESIS
Quick Start Owner's Manual
BOX CONTENTS
PHOTON 25 USB MIDI CONTROLLER
USB CABLE
- QUICK START OWNER'S MANUAL
IMPORTANT SAFETY INSTRUCTIONS
This page intentionally left blank.
PHOTON 25 QUICK START OWNER'S MANUAL (ENGLISH)
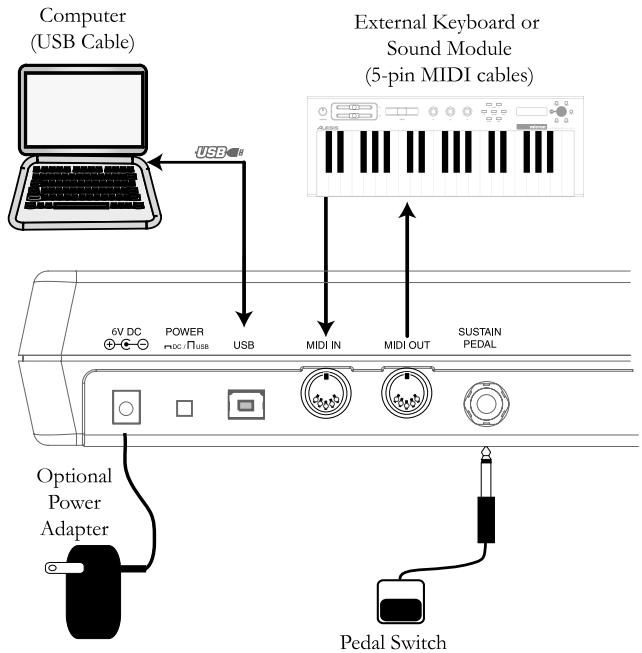
Connection Diagram
Introduction
Congratulations on your purchase of the Alesis Photon 25 MIDI controller!
The Photon 25 combines portability with a host of cutting-edge features:
- 25 full-size keys and easily accessible octave shift buttons provide maximum playability with a minimal footprint.
- 270^ assignable knobs. Three layers of twelve knobs each provide the equivalent of 36 knobs per preset.
- Simultaneously active USB and 5-pin MIDI connections allow the Photon to interface easily with both computers and standalone audio hardware.
- Pre-programmed setups and templates work with popular software right out of the box. You can easily design your own custom setups and templates, too. Up to 20 complete setups can be stored.
Product Registration
Please go to http://www.alesis.com to register your new Photon 25. Registration helps you by ensuring that we can keep you up to date on any last-minute product issues. If you want, Alesis can also send you information on other products that might interest you.
Registration helps us, too. When you let us know the types of music products you use and dream about, you help us bring you cutting-edge products like the Photon 25.
Minimum Computer Requirements
The Photon 25 requires either Windows XP or Mac OS X and a USB 1.1 or higher connection. Earlier operating systems are not supported.
Any MIDI application which allows you to select your MIDI device should be compatible with the Photon 25. Very basic MIDI programs will not allow you to take advantage of the Photon 25's joystick and knobs.
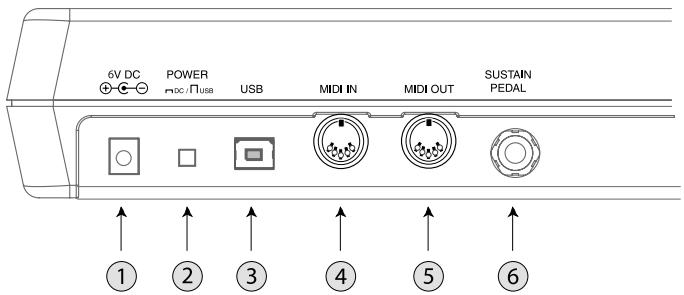
Rear-Panel Connections
- External Adapter Jack - Plug in the AC adapter if you don't want to power the Photon 25 through either the USB connection or four "C"-size batteries. (Use a 6VDC, negative tip, 1000mA device.)
- Power Source Selector - Press this switch IN to power the Photon 25 from either four "C"-size batteries or an optional external power adapter. If both an AC adapter and batteries are present, the AC adapter will be used rather than the batteries.
Leave this switch OUT to power the Photon 25 from a computer's USB connection or to turn off the unit when USB power is not present.
Notes: When using a laptop computer, consider using batteries to prolong the laptop's operating time between charges.
Load batteries on the bottom of the Photon 25.
- USB Connector - Plug a standard USB cable into this outlet and into a USB 1.1 or higher connector on your computer.
- MIDI IN Connector - Use a five-pin MIDI cable to connect the OUTPUT of an external MIDI controller to the MIDI IN of the Photon 25.
If you use an external MIDI IN device, your computer will recognize it as a second MIDI IN controller.
- MIDI OUT Connector - Use a five-pin MIDI cable to connect the MIDI OUT of the Photon 25 to the INPUT of an external MIDI device.
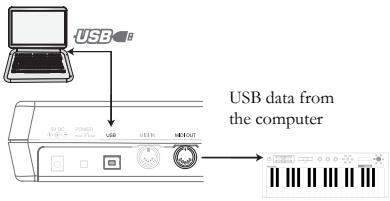
The operation of the MIDI OUT port changes depending on whether or not a USB cable is connected to the Photon.
- USB cable connected:
MIDI data from your computer is passed to the MIDI OUT port.
Note: When a USB cable is connected, you should activate "MIDI echo" in your sequencer if you want the Photon to control another MIDI device.
- USB cable not connected:
Whatever you play on the Photon is sent to the
MIDI OUT port.
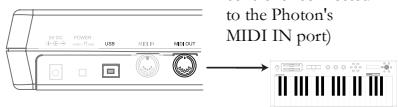
Note: If you have another device
connected to the Photon's MIDI IN port, that device's MIDI
information will be ignored.
- Sustain Pedal Input – Connect a keyboard sustain pedal (not included). Use any manufacturer's sustain pedal: when you turn on the Photon 25, it will automatically calibrate itself to the pedal.
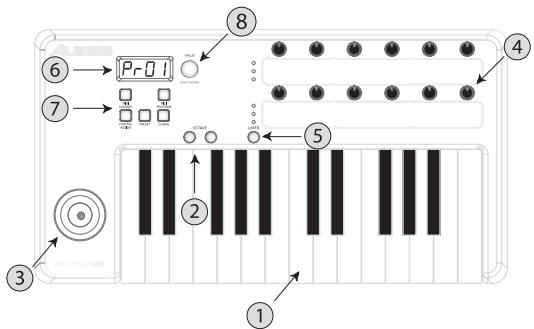
Top Panel Controls
- Keyboard - A full-size, 25-note, velocity-sensitive keyboard.
- Octave Up/Down Buttons - Transpose the keyboard in octaves using these buttons. Press them both at the same time to reset the keyboard range.
- X/Y Joystick - Control pitch bend, modulation, and other functions with this 2-way joystick. The X axis and Y axis can be assigned independently.
- 270^ Knobs - 12 knobs each transmit MIDI values from 0 to 127. The knobs can be assigned to various MIDI parameters.
- Layer Button - Press the LAYER button to cycle through the Photon 25's three independent knob layers. The lights above the LAYER button indicate which one of the three available layers is currently active.
Knob assignments can be made on each layer for a total of 36 knob assignments per preset.
- Display - The display shows current status information.
- Configuration buttons - Call up and save presets, set global parameters and more using the configuration buttons. See below for additional detail.
- Encoder - Twirl the encoder to select various parameters and values. Press the encoder to toggle between parameter and value assignments and to accept your entries.
Plug-and-Play Connection to a Computer
Both Windows XP and Mac OS X see the Photon as a plug-and play MIDI controller. Simply plug the Photon into your computer using a USB cable and allow the operating system to install it automatically.
Depending on your operating system, the Photon 25 may be identified by your MIDI software applications as either a "Photon" controller or a "USB Audio Device." No need to worry: the Photon will work regardless of its designation.
The Photon is not compatible with earlier versions of Windows or Mac OS.
Operation:
1. Using the Keyboard with your MIDI software
Once you're plugged in and powered up, go to your sound module or software application and set the incoming MIDI channel.
If you're using software, you will probably need to configure it to use the Photon or "USB" device. Look for the MIDI device setup menu in your application and ensure that the Photon is designated as an active MIDI device before proceeding.
On the Photon, press MIDI CHANNEL and turn the clear encoder knob to select the MIDI channel you specified in your sound module or software.
Play the keyboard. Your sound module or software should respond to the Photon 25's MIDI data. If not, refer to the troubleshooting instructions later in this guide.
Experiment with the Photon 25's OCTAVE buttons and X/Y joystick. Since the joystick is mapped by default to MIDI's standard pitch and modulation commands, it should work as expected in most cases right off the bat.
2. Using the Knobs with the Supplied Controller Templates
If one of the supplied template sets matches your MIDI software, lift the plastic template covers with your fingernail, position the templates, and then replace the covers.
Press the PRESET button and turn the clear cursor knob to reach the program number indicated on the templates. Press the cursor knob to enter this program. You should now be able to control the software according to the templates.
Press the LAYER button as needed to cycle through the three knob layers. Each layer is independent (though a knob can be assigned to the same controller value on two or three of the layers).
The lights on the top and bottom rows are simply duplicates of one another. It's not possible to have, say, Layer 1 on the top row and Layer 2 on the bottom row.
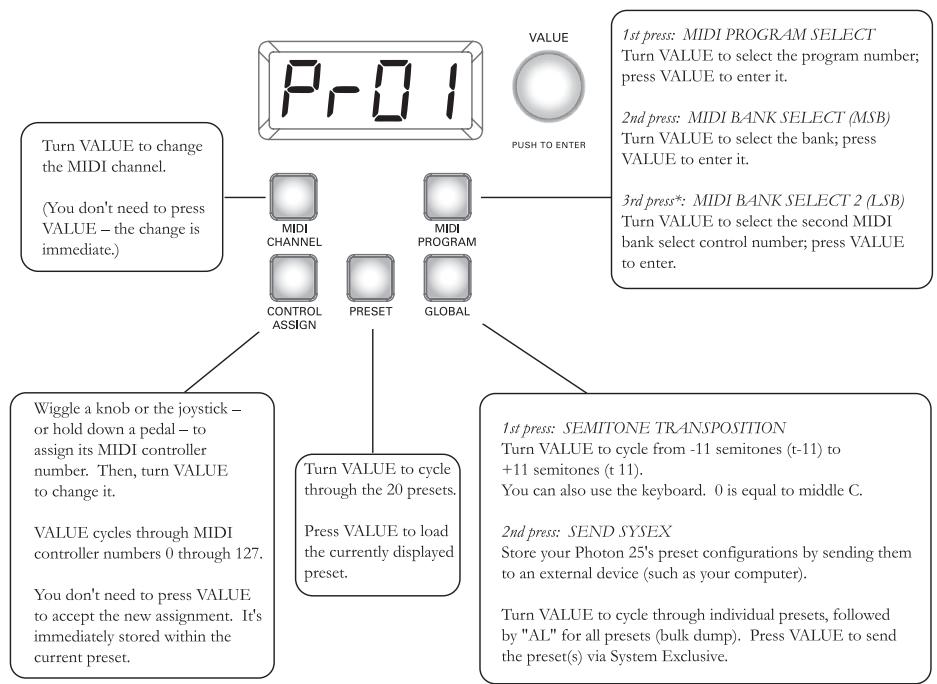
3. Using the Configuration Controls
4. Panic Command (All Notes Off)
Press MIDI CHANNEL and MIDI PROGRAM at the same time to send the ALL NOTES OFF command to your computer and external devices.
Reference: List of Common MIDI Controller Values
Use this table for reference as you configure the Photon 25.
| Controller | Description | Range of Values |
| 1 | Modulation Wheel | 0 through 127 |
| 2 | Breath Controller | 0 through 127 |
| 4 | Foot Controller | 0 through 127 |
| 5 | Portamento Time | 0 through 127 |
| 7 | Master Volume | 0 through 127 |
| 8 | Balance | 0 through 127 |
| 10 | Pan | 0 through 127 |
| 11 | Channel Volume | 0 through 127 |
| 64 | Sustain Pedal | 0-63 = off. 64-127 = on. |
| 65 | Portamento Pedal | 0-63 = off. 64-127 = on. |
| 66 | Sostenuto Pedal | 0-63 = off. 64-127 = on. |
| 67 | Soft Pedal | 0-63 = off. 64-127 = on. |
| 67 | Hold 2 Pedal | 0-63 = off. 64-127 = on. |
| 91 | External Effects | 0 through 127 |
| 92 | Tremolo Depth | 0 through 127 |
| 93 | Chorus Depth | 0 through 127 |
| 94 | Detune Depth | 0 through 127 |
| 95 | Phaser Depth | 0 through 127 |
| 123 | All Notes Off | 0 |
| 126 | Monophonic Mode On | 1 = on |
| 127 | Polyphonic Mode On | 0 = on |
Troubleshooting:
| Symptom | Cause | Solution |
| The display does not light up. | No power. | If you are using USB power, check that the USB power switch on the back of the Photon is OUT. If you are using batteries or an AC adapter, check to see that the batteries are not drained or that the adapter is plugged in to a live power outlet and that the power switch is IN. |
| No sound from target device. | Photon USB not properly connected. | Check your computer's USB connections to confirm that the Photon is recognized and installed. Turn you computer off and then on again if necessary. (Choose "shut down" rather than "restart" to ensure that the USB devices are properly reset.) |
| Problems caused by use of a USB hub. | Try unplugging the Photon from any USB hubs and connecting directly to the computer. | |
| Software application not set up to receive MIDI data from Photon controller. | Ensure that the Photon or "USB" MIDI device is listed as an active MIDI source in your application. | |
| Software application not receiving MIDI data. | Many software applications have MIDI IN and OUT indicator lights. Play some keys and look for the MIDI IN light to indicate activity. | |
| Photon's MIDI channel not the same as application's incoming MIDI channel. | Be sure that the Photon is sending MIDI data on the channel that the target device expects. | |
| Sound source's notes out of range of Photon's keyboard. | Try using a piano sound as you're first getting connected. Drums and basses and some other instruments may have a limited MIDI note range or other idiosyncracies. Use "easier" instruments like pianos when you're setting up the Photon for the first time. | |
| Sound source not active or volume set to 0. | Try using an instrument that has a virtual keyboard built in. Will the instrument sound when you use that virtual keyboard? If not, the problem may be with the software synthesizer, not the Photon connection. | |
| MIDI Echo not enabled in sequencer software. | If the Photon is both (a) connected to a computer via USB and (b) connected to an external sound source via MIDI OUT, be sure that a computer sequencer program is active and that it is set to "MIDI Echo." | |
| An external MIDI IN device is present. | If you are using the 5-pin MIDI OUT port to connect to another MIDI device and another device is connected to the Photon's MIDI IN, the MIDI OUT port only sends information from the MIDI IN device, not the Photon. | |
| Photon's 5-pin MIDI OUT not connected to sound source's MIDI IN. | Ensure that any 5-pin cables are connected to the proper inputs and outputs. | |
| Notes sustain continuously. | Sustain pedal was plugged in after power was turned on. | Turn the unit's power off, wait a moment, and then turn it on again. |
| Stuck notes due to incomplete MIDI data. | Try sending the Panic command by pressing MIDI CHANNEL and MIDI PROGRAM at the same time. If that does not solve the problem, turn the unit's power off, wait a moment, and then turn it on again. | |
| Sustain pedal works in reverse. | Sustain pedal was plugged in after power was turned on. | Turn the unit's power off, wait a moment, and then turn it on again. |
Specifications
Keyboard: 25-note, full-size, velocity sensitive.
MIDI Controllers: X/Y joystick, Octave Up and Down buttons, 12 270^ knobs (3 layers)
Master control section: MIDI Channel, MIDI Program, Control Assign, Preset, and Global buttons.
360^ turn-and-push encoder.
4-position, 7-segment display.
Power options: USB bus power, 4 "C"-size batteries, or external adapter (6VDC, negative tip, 1000mA ).
Dimensions: 18^ 9.75^ 3.75^ / 45.5cm× 24.75cm× 9.5cm
Weight (net): 4.5 lbs / 2.0 kg
This page intentionally left blank.
PHOTON - MANUAL DE INICIO RÁPIDO DEL USUARIO (ESPÁÑOL)
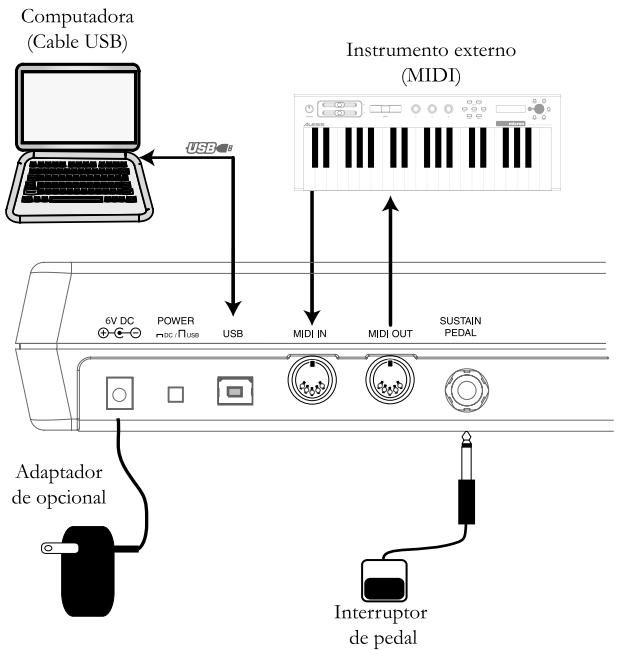
Diagrama de connexion