
CD DIRECT - CD Player ION - Free user manual and instructions
Find the device manual for free CD DIRECT ION in PDF.


| Product type | CD recorder with built-in turntable |
| Brand | ION |
| Model | CD DIRECT |
| Category | CD player |
| Main functions | Convert vinyl to CD, record on CD-R/RW, CD playback, turntable (33/45/78 RPM), auxiliary input, USB output to computer |
| Power supply | Mains via included power cable |
| Turntable speed | 33, 45, 78 RPM |
| Inputs | Line input (RCA), AUX input, USB port |
| Outputs | Headphone output (1/8 in), AUX OUT (RCA), internal speaker |
| Display | LCD (operation information display) |
| Included software | EZ Vinyl/Tape Converter (PC), EZ Audio Converter (Mac) |
| Supported CD formats | CD-R, CD-RW |
| Recording capacity | Up to 99 tracks per CD |
| Finalization | Required for CD-R; unfinalization possible for CD-RW |
| Special features | Transport screw to secure the platter, built-in 45 RPM adapter, tonearm clip, cue lever |
| Maintenance and cleaning | Use a soft dry cloth; do not use abrasive products |
| Safety | Read safety instructions before use; do not expose to moisture |
Frequently Asked Questions - CD DIRECT ION
User questions about CD DIRECT ION
0 question about this device. Answer the ones you know or ask your own.
Ask a new question about this device
Download the instructions for your CD Player in PDF format for free! Find your manual CD DIRECT - ION and take your electronic device back in hand. On this page are published all the documents necessary for the use of your device. CD DIRECT by ION.
USER MANUAL CD DIRECT ION
Make sure that the items listed below are included in the box:
CD DIRECT
EZ Vinyl Software Disc
Software Quickstart Guide
USB Cable
- Quickstart Guide
- Safety Instructions & Warranty Information Booklet
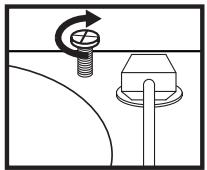
ATTENTION:
Before using the turntable, loosen the "transport screw" (at the far end of the platter, near the tonearm) by turning it CLOCKWISE.
READ SAFETY INSTRUCTION BOOKLET BEFORE USING THE PRODUCT
INTRODUCTION
CD DIRECT easily converts your treasured vinyl records and external audio sources to CD. CD DIRECT can also connect to a computer through its USB port. We have included two software packages to aid you in converting your vinyl recordings. You should install one of the following applications to take advantage of computer recording:
EZ Vinyl/Tape Converter (PC only) is the quickest and easiest way to turn your recordings into digital media. EZ Vinyl/Tape Converter conveniently saves your recordings in your iTunes* library. Novice users may find this application preferable. We have included a handy Software Quickstart Guide with step-by-step instructions on software installation and operation.
- EZ Audio Converter (Mac only) is a basic converter application for Mac OS X and is ideal for novice users. Please refer to the included Software Quickstart Guide for step-by-step instructions on software installation and operation.
To install the software: simply insert the included CD into your computer and follow the on-screen instructions. After you finish converting your vinyl, you can then burn to CD or load onto portable media devices.
Visit http://www.ionaudio.com/computer-optimization for more information on optimizing your computer for audio.
- iTunes is a trademark of Apple, Inc., registered in the U.S.A. and other countries.
Windows Vista and Windows 7 Audio Setup:
Once the EZ Converter software is installed on your computer, connect the CD DIRECT to an available USB port on your computer using the included USB cable.
- Click the Windows Start button in the lower-left of your screen, and select Control Panel.
- Double-click Hardware and Sound.
- Double-click Sound.
- Select the Playback tab. Choose your computer's soundcard (such as Speakers - High Definition Audio Device or Headphones - High Definition Audio Device. Some common PC soundcard names are Realtek, Soundmax, and Sigmatel.
- Click Set Default.
- Select the Recording tab at the top of the Sound Control Panel window. Under Recording, choose Microphone - USB Audio Codec as the default device.
- Click Set Default.
- Select the Advanced tab.
- Set the Default Format setting to 2-channel, 16 bit 44100Hz (CD Quality).
- Un-check the two boxes listed under Exclusive Mode. Then Click Apply.
- Select the Levels tab from the top of the window.
- Under Levels, set the level slider to 5.
- Click Apply, and then click Ok to close the window.
Windows XP Audio Setup Procedure:
Once the EZ Converter is installed on your computer, connect the CD DIRECT using the included USB cable to an available USB port on your computer.
- Select the Windows Start menu.
- Select Settings then Control Panel.
- Double-click the Sounds and Audio Devices control panel. If you do not see a choice called Sounds and Audio Devices, choose the Switch to Classic View option.
- Select the Audio tab.
- Under Sound Playback, choose your computer's internal soundcard. Some common PC soundcard names are Realtek, Soundmax, and Sigmatel.
- Under Sound Recording, select USB Audio Codec for your default device.
- Check the box titled Use only default devices.
- Click Apply (if possible), and then click OK.
Mac Audio Setup Procedure:
Once the EZ Converter is installed on your computer, connect the CD DIRECT using the included USB cable to an available USB port on your computer.
- Click the Apple icon in the upper-left corner of your computer screen and choose System Preferences.
- In the window that opens, under Hardware, click the item labeled Sound.
- Click on the Input tab. Underneath Choose a device for sound input, select USB AUDIO CODEC (or USB AUDIO DEVICE).
- Click on the Outputs tab. Underneath Choose a device for sound input, select Headphones (Built-in Output).
- Close the system preferences Window.
TOP PANEL
- PLATTER - Place your record here.
- TRANSPORT SCREW - Secures the platter and tonearm assembly to prevent damage during transport. If you transport the turntable, tighten the screw to re-secure the platter and tonearm assembly. Before first using the turntable, please turn the TRANSPORT SCREW clockwise to loosen it.
- 45 RPM ADAPTER HOLDER - Holds the included 45 RPM adapter. When not using the adapter, please place it in this holder.
- TONEARM - CD DIRECT comes with a ready to use pre-balanced TONEARM and cartridge. The TONEARM can be raised and lowered by hand, or by pressing the RAISE / LOWER LEVER. Please note that the TONEARM needs to be moved away from its resting position (on the ARM CLIP) for the turntable motor to activate. When the TONEARM is placed back in its resting position, the turntable motor will deactivate.
- ARM CLIP - This specially designed arm clip secures the tone arm while at rest or when not in use. The arm clip has been designed to remain in the up position while unlocked.
- RAISE / LOWER LEVER - Raises and lowers the tonearm.
- 33/45/78 RPM SWITCH - This switch controls the RPM of the turntable platter.
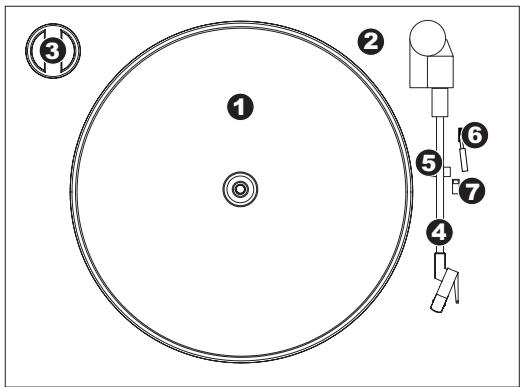
Remove the plastic cartridge cover (needle cover) before operating the turntable.
FRONT PANEL
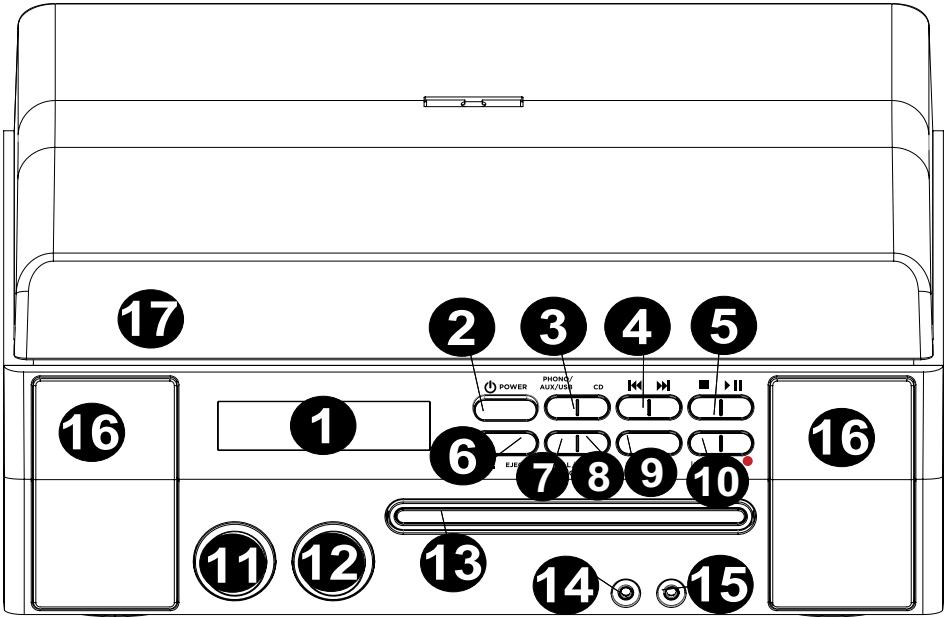
- LCD - Displays information about CD DIRECT's functions.
- POWER ON/OFF - Turns CD DIRECT on or off.
- PLAY MODE SELECTORS - Selects what media format you want to use. Press this button to cycle through and set CD DIRECT to be in turntable (PHONO), LINE IN jack (AUX), computer (USB), or CD player (CD) mode.
- MUSIC SKIP Press one of these buttons once to skip to the previous/next track when playing music from a CD. Press and hold one of these buttons to scan back/forward through the current track.
- STOP/PLAY/PAUSE - Controls the operation of the CD transport.
- OPEN/CLOSE Opens/closes the CD tray.
- MANUAL/AUTO - Selects the volume level (in dB) at which tracks will be separated automatically or the track can be manually separated using this button.
- FINALIZE/ ERASE - Press this button once to either finalize a CD (you will not be able to add any more tracks to a finalized CD) or double press the button to erase one track or all tracks from a CD-RW.
- TRACK SPLIT - Creates a new track while recording.
- ENTER/RECORD - Press the left side of this button to confirm recording, erasing or finalizing of a CD. Press the right side of this button to prepare the CD player for recording.
- LEVEL - Adjusts the signal level being recorded to CD as well as the incoming signal sent through the USB port, the Line input and the Aux input.
- VOLUME - Adjusts the internal speaker volume and headphone output volume.
- CD TRAY - Use the OPEN/CLOSE button to open/close the tray and place your disc here.
- LINE IN - Use a 1/8" stereo cable to connect another audio device (e.g., iPod, computer, etc.) to this jack, allowing you to record and/or play it through CD DIRECT's speakers.
- PHONES - Connect 1/8" headphones here.
- SPEAKER - Listen to your music source through here.
- DUST COVER - This cover protects the turntable from dust and abuse while not in use or while in transport.
BACK PANEL
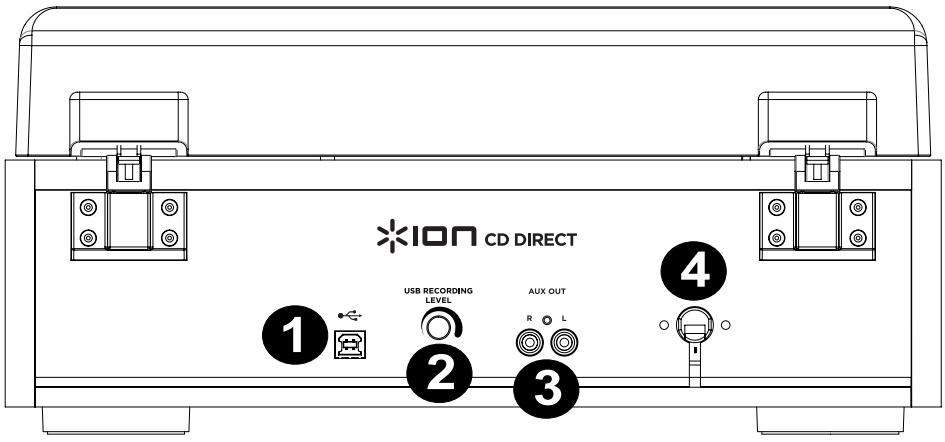
- USB PORT - Connect a USB cable from the CD DIRECT to a computer to record or listen to audio.
- GAIN ADJUSTMENT - Before recording through a USB connection, use this knob to adjust the recording gain. The level should be high enough so that the loudest part of the song does not distort or "clip".
- AUX OUT - RCA Audio outputs to connect to external speakers or an amp.
- POWER CONNECTION - The built-in power cable is located here.
BEFORE RECORDING TO CD
Before you start recording, make sure that you understand the following points:
- CD specifications limit the number of tracks to 99.
- You can not create recording tracks shorter than 10 seconds.
- Once you have recorded on a CD-R disc, the data cannot be erased.
- A recorded CD-R can be played back in a regular CD player only after finalizing.
- To add more recordings to a finalized CD-RW, uninitialize it.
- When all available space on a CD-RW has been recorded, you can record additional tracks by erasing previously recorded tracks. Note that you can only erase all tracks or the last track.
- If the STOP button or PLAY/PAUSE button is pressed within 10 seconds from the beginning of recording, the unit will not stop recording.
- When the recording is finished, "REC" and "- ENd - " blink for a few seconds, and the unit then goes into stop mode. Do not apply any shock or vibration to the unit during blinking.
- If the disc reaches the end during recording, the unit will automatically finalize the disc.
- If the disc reaches the end of the 99th track during recording, the unit will finalize the disc automatically.
- The recording time of a track may differ slightly from the original source.
- When a partially recorded disc is inserted, recording will begin after the last recorded track.
- The AUTO REC function automatically separates tracks when it detects the volume level (in dB) set by the MANUAL/AUTO button. When using this function, your CD may have more or fewer tracks than its source due to unexpected quiet or noisy parts, which may trigger -- or not trigger -- the automatic track separation in unexpected ways. If this occurs, use the MANUAL/AUTO button to adjust the volume level appropriately.
- When the disc which was recorded by this unit is played back by some other players, a small noise may be heard at the point that the track is divided.
RECORDING
Recording audio from the turntable or AUX sources on the CD recorder:
- Press the PHONO/AUX/USB button repeatedly to select which source is to be recorded, either PHONO or AUX.
- Press the OPEN/CLOSE button and place a recordable CD-R or CD-RW disc into the disc tray with the printed label side up, and then press the OPEN/CLOSE button to close the disc tray. Note: Make sure "NO TOC" and "CD-R" (or "CD-RW") indicators lights on the display, or the RECORD button will not work.
- Select the mode of track number assignment using the MANUAL/AUTO REC button. When the MANUAL/AUTO REC button is pressed once, the current mode is displayed. Press the MANUAL/AUTO REC button repeatedly to select any other mode.
(MANUAL)
In this mode track numbers are not given automatically. Use the TRACK SPLIT button to divide tracks. MANUAL is recommended for recording an analog source such as a record. The settings will be reset to "Manual" when the unit is powered off.
- 20db, -30db or -40db (AUTO REC)
In this mode the unit will automatically insert a track division in the recorded material when the sound level has dropped below the threshold for more than 2 seconds, and sound has re-started. -20db requires a louder signal to trigger the track increment. -30db means that a relatively quiet signal will trigger the track increment. -40db is suitable for recording a noiseless source such as a CD. When recording from a source with unwanted noise or an analog source in auto track setting, more track numbers may be assigned than actual tracks recorded. In this case, use the "Manual" setting and press the TRACK SPLIT button to assign the track numbers at the points that you want.
- AUTO REC may not work properly with analog sources that contain low-level noises.
AUTO REC may not work properly with some genres (classical musical, spoken word, etc.) that have extended periods of silence within a single track. - The AUTO TRACK indicator lights when -20dB , -30dB or -40dB is selected.
- The default setting is MANUAL (off). When the unit is turned on or the OPEN/CLOSE button is pressed, the setting is automatically reset to MANUAL (off).
- The MANUAL/AUTO REC button does not work during recording.
-
Use of the MANUAL/AUTO REC mode is disabled when a disc is being inserted in the drive. Use of this mode is possible when "NO TOC" is displayed.
-
Press the RECORD button. The unit will enter record pause mode. During recording, the indicator lights red. In record pause mode, the "REC" indicator blinks and the Pause II indicator lights on the display.
-
Button presses will not work while "bUSY" is displayed. Wait about 10 seconds until "bUSY" disappears from the display.

LCD while recording
-
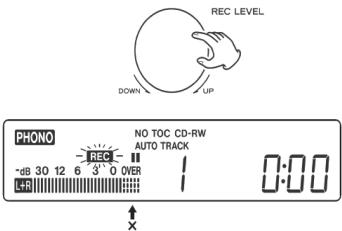
Adjusting the recording level. Once the Record button has been pressed, play the source to be recorded as a test to adjust the recording level so that the loudest sound does not exceed the "OVER" indicator on the level meter. The level can be adjusted from -8 (-12dB) to +8(+12dB) .
-
The default setting is 0. Every time the recording is finished, the setting is automatically reset to 0.
- Different sources (Phono, Line In, CD) have different volumes. In order to record at the optimal volume for different sources, it is necessary to adjust the recording level for each source. Adjust the recording level so that the loudest sound does not exceed the "OVER" indicator on the level meter.
6. Prepare the recording source.
To record from a record:
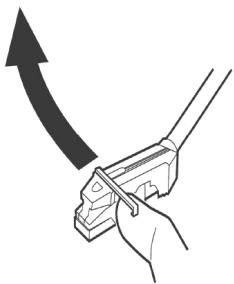
Please ensure that the white protective cover has first been removed from the turntable stylus.
Then move the tonearm to the edge of the record or a position on the record and slowly put it down.
While the turntable is stopped, the PLAY/PAUSE button will not work and you cannot start recording.
To record a sound played by an audio device connected to the LINE IN terminal:
Play the unit connected to the Line In terminal.
- To prevent the beginning part from being cut out, cue the unit and pause playback temporarily, then after starting recording, release the pause of the unit to start playback.
- If the unit does not have the pause function, after starting recording, start playback of the unit.
7. Press the PLAY/PAUSE button to start recording.
When the playback of the source finishes, press the STOP button to stop recording. When playback of a record finishes and the turntable stops rotating, recording automatically ends.
To prevent unwanted noise from the tone arm, stop the recording manually by using the STOP button as soon as the playback of numbers you want to record finishes. When recording is stopped, "REC" and "-End-" blink for several seconds. Do not turn OFF the power or shake the unit during recording or when "REC" and "---" are blinking. Such actions prevent proper recording.
To stop recording
Press the STOP button to stop recording.
To pause recording
Press the PLAY/PAUSE button. "bUSY" briefly appears on the display, and the recording is paused. To restart recording, press the PLAY/PAUSE button
- You cannot restart recording while "bUSY" is displayed.
- Remember that every time recording is paused or stopped, a new track number will always be assigned. It is not possible to record in two "stages" within one track.
- The unit will not stop or pause even if the PLAY/PAUSE button is pressed within 10 seconds after recording has started.
Manual track division
It is possible to divide the recording into tracks while recording. While recording is taking place, press the TRACK SPLIT button. The current track number will be increased by one.
- The TRACK SPLIT button works regardless of the MANUAL/AUTO REC setting.
- You cannot divide the track manually to make a track of less than 10 seconds. Up to 99 tracks can be made on a disc depending on the CD specifications.
- When the TRACK SPLIT button is pressed while recording the recorded sound will be cut for a moment.
FINALIZING A CD
In order for a disc to become a standard CD, it must have a Table of Contents (TOC) written to it. This process is known as finalizing. Once finalized, no more tracks can be recorded on CD-R discs. However CD-RW discs can be "unfinalized" and if there is space, further material can be recorded on them.
- You cannot finalize a blank disc.
-
When the disc has reached its maximum recordable time, it will automatically finalize even if recording is still in progress.
-
Press the CD button to select "CD" and open the CD tray by pressing the button.
- Load an unfinalized (recordable) disc into the tray.
- Press the FINALIZE button in the stop mode. "FINAL" will appear on the display. To cancel the finalizing process, press the STOP button.

- Press the ENTER button to start finalizing. "NO TOC" and "REC" indicators will blink and the remaining time for the finalizing operation will appear in the display. When the operation has been finished, the NO TOC indicator turns off and the display returns to the track/time display. During finalizing, no buttons will work.

NOTE: Never turn the power off or unplug the power cord when in operation.
- Although finalized CD-R discs may play on ordinary CD players, remember that finalized CD-RW discs may not play on ordinary CD players.
The time for the finalizing varies with the type of the disc.
ERASE OR UNFINALIZE A CD-RW
It is not possible to perform any erase or unfinishize procedures on a CD-R disc. Erase procedures are possible only on an unfinalized CD-RW disc. If a CD-RW disc has been finalized, unfinishize it prior to erasure. On a CD-RW, it is possible to erase the last recorded track or to erase the whole disc. Erasing cannot be undone. If you are going to erase a track or tracks, make sure that they are recordings that you really want to erase.
- Press the CD button to select "CD".
- Load a recorded CD-RW by pressing the button.
- Press the FINALIZE/ERASE button in the stop mode. Each time the FINALIZE/ERASE button is pressed, the display changes as follows:
"UnFINAL" (unfinalize) appears when a finalized disc is loaded. Select this to uninitialize the disc.
"FINAL" appears when the disc has not been finalized. If you press the FINALIZE/ERASE button again,
"ErASE XX" (the number of the last track recorded on the disc) will appear. Select this to erase the last track on the disc. This will not appear when only one track is recorded on the disc. If you press the FINALIZE/ERASE button again, ErASE ALL will appear. Select this to erase all the tracks. To cancel the erasing or unfinalizing process, press the STOP button.
4. Press the ENTER button to start finalizing. The remaining time for the operation appears in the display. When the operation has been finished, the display returns to the track/time display. During erasing/unfinalizing, no buttons will work. Never turn the power off or unplug the power cord when the unit is finalizing or this will make the disc unplayable.
GUIA DE INICIO RAPIDO (ESPAÑOL)
CONTENIDO DE LA CAJA
- 2W x 2@ 4 ohm
2" Speaker
EXTERNAL CONNECTION
1/8" (3.5mm) Phones jack
1/8" (3.5mm) AUX In jack
RCA stereo jack
USB port
POWER SUPPLY
AC Operated
DIMENSIONS (WxDxH)
15" x 14.5" x 6"; 381mm x 368mm x 152mm (with the cover closed)
WEIGHT
12.1lb (5.46kg)
www.ionaudio.com/supporthome www.ionaudio.com/CDDIRECT
CLASS 1 LASER PRODUCT
www.ionaudio.com
- ATTENTION:
- READ SAFETY INSTRUCTION BOOKLET BEFORE USING THE PRODUCT
- INTRODUCTION
- Windows Vista and Windows 7 Audio Setup:
- Windows XP Audio Setup Procedure:
- Mac Audio Setup Procedure:
- TOP PANEL
- FRONT PANEL
- BACK PANEL
- BEFORE RECORDING TO CD
- Before you start recording, make sure that you understand the following points:
- RECORDING
- Prepare the recording source.
- To record from a record:
- To record a sound played by an audio device connected to the LINE IN terminal:
- Press the PLAY/PAUSE button to start recording.
- To stop recording
- To pause recording
- Manual track division
- FINALIZING A CD
- ERASE OR UNFINALIZE A CD-RW
- GUIA DE INICIO RAPIDO (ESPAÑOL)
- CONTENIDO DE LA CAJA
- EXTERNAL CONNECTION
- POWER SUPPLY
- DIMENSIONS (WxDxH)
- WEIGHT
- www.ionaudio.com
Brand : ION
Model : CD DIRECT
Category : CD Player