R660 GT FORCE FEEDBACK WHEEL - Simulation Steering Wheel SAITEK - Free user manual and instructions
Find the device manual for free R660 GT FORCE FEEDBACK WHEEL SAITEK in PDF.


User questions about R660 GT FORCE FEEDBACK WHEEL SAITEK
0 question about this device. Answer the ones you know or ask your own.
Ask a new question about this device
Download the instructions for your Simulation Steering Wheel in PDF format for free! Find your manual R660 GT FORCE FEEDBACK WHEEL - SAITEK and take your electronic device back in hand. On this page are published all the documents necessary for the use of your device. R660 GT FORCE FEEDBACK WHEEL by SAITEK.
USER MANUAL R660 GT FORCE FEEDBACK WHEEL SAITEK
Congratulations on purchasing the Saitek R660 GT Force Feedback wheel. The R660 GT features perfectly positioned controls, a semi-automatic gearstick which can be mounted on either side of the wheel, powerful Force Feedback for increased realism, stable pedal unit and highly secure clamping mechanism
Setting up your controller
1 Before connecting the R660 GT Force Feedback Wheel to your PC, you need to connect it to your mains supply using the AC/DC adapter (supplied). This connects via the rear of the unit next to the USB cable.
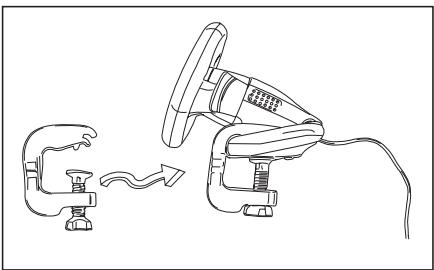
2 Attach the main wheel unit and the desk clamp as shown in the diagram.
3 Position the steering wheel unit on the edge of your desktop, and turn the clamp grip clockwise until the unit is securely attached to the desk. Do not overtighten!
4 Plug the cable from the pedal unit into the socket in the steering wheel unit, making sure the connector clicks firmly into place.
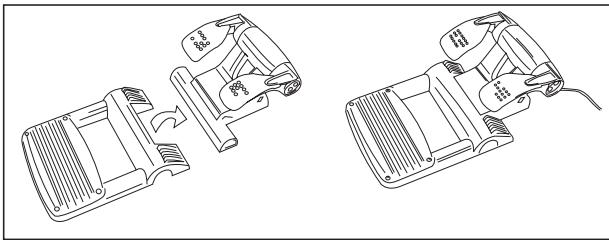
5 Attach the main pedal unit to the pedal unit base, making sure it clicks firmly into place. Next, place the complete pedal unit floor for your optimum driving position.
6 To switch gearstick sides, pull the stick out of the socket and clip into place on the other side of the wheel.
System Compatibility
PC running Windows XP/XP64/Vista (all versions)
Software installation for users of Windows® XP, XP64 and Vista (all versions)
A) Drivers Only
-
With your computer switched on, close down any programs that are currently running and insert the Installation CD into your CD-ROM drive.
-
When the Introduction Screen appears, click Install Software to continue. If the CD does not run automatically, select Start from the Windows® Taskbar, then Run and type D:\Setup.exe and click OK - where D:\ is letter of your CD-ROM drive. For Vista users, the screen will ask Do you want to run this file? Press Run. A screen will now appear saying A program needs your permission to continue. Press Continue.
- When the Welcome screen appears, click Next to continue.
- After reading the Disclaimer, select the I accept the terms of the Disclaimer option and click Next to continue.
- Plug the USB cable into one of your computer's USB ports and click on Next.
- At the Registration screen, select Check this box to register now and follow the on-screen instructions, or you can choose to select this option later.
- Click on Finish to complete the installation.
B) Drivers and Programming Software
Follow points 1 - 7 of the install procedure in A), then at the Software Setup screen, select Install the SST Programming Software and click Next. For Vista users, the screen will once again ask Do you want to run this file? Press Run. A screen will now appear saying A program needs your permission to continue. Press Continue.
In the following Software Setup screen, click Next and follow the on-screen instructions. At this point Vista users will be asked to install the Saitek Magic Bus and XP users asked to install the Saitek Magic Mouse, HID-compliant mouse, Saitek Magic Keyboard and HID Keyboard Device (these are what Windows calls the Programming elements of your Saitek controller). Continue to click on Next and Finish to accept the installation until the Registration screen appears.
At the Registration screen, select Check this box to register now and follow the on-screen instructions, or do not select this option and register later.
Upon completion of the installation, you have the option to Run Profile Editor, which will give you a view of the programming environment. If you do not wish to see the Profile Editor at this point, just uncheck the box and click on Finish to complete the installation.
Important Information
Driver updates
From time to time there may be updates to the driver and programming software for this product. You can check for the latest software updates by visiting the Saitek website (www.saitek.com) and clicking on Downloads. A drop down menu will appear. Select Drivers and Software.
Configuring your controller
To open the R660 GT Force Feedback Wheel panel, click on the Windows Start icon, then select Settings, Control Panel, Games Controllers. Highlight R660 GT Force Wheel and click on Properties. This will open the panel to the right.
Test
The Test screen shows you whether your controller is working correctly. Moving your controller and pressing the various buttons should result in a response onscreen.
Force
Click on the Force tab to adjust the strength of the force feedback on your controller. The Default Gain slider will adjust the amount of force feedback felt through the controller.
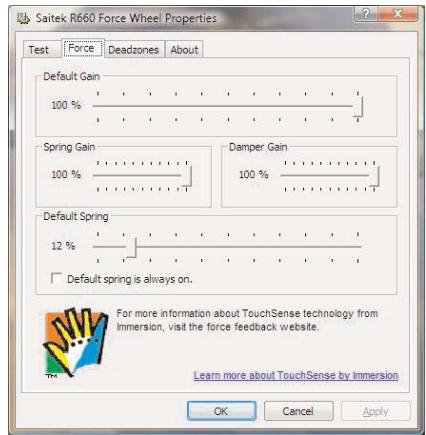
The Spring Gain slider will adjust the strength of harsh effects such as crashes or bumps.
The Damper Gain slider will adjust the strength of softer effects such as cornering resistance.
The Default Spring setting affects the centering mechanism of the controller. Check the Always On
box so the motors in the controller will return the wheel to centre if you let go of the wheel when you have turned it in a direction; unchecking this box means that the wheel will not centre itself. Please note that the force feedback effects will feel slightly stronger if this box isn't checked. The slider allows you to adjust the strength with which the wheel will centre itself if the Always On box is ticked.
Deadzones
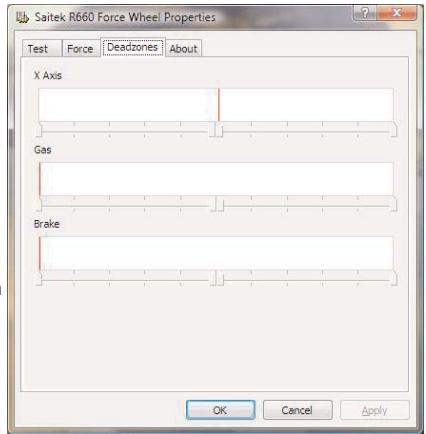
The Deadzones tab allows you to change how far you move the wheel or pedals before they have an effect.
Increasing the X Axis deadzone means you have to turn the wheel more to the left or right before it steers your car left or right.
Increasing the Gas and Brake deadzones means you have to press down further on the pedals before they increase power or apply brakes.
Technical Support
Nearly all the products that are returned to us as faulty are not faulty at all - they have just not been installed properly. If you experience any difficulty with this product, please first visit our website www.saitek.com. The technical support area will provide you with all the information you need to get the most out of your product and should solve any problems you might have.
If you do not have access to the internet, or if the website cannot answer your question, please contact your local Saitek Technical Support Team. We aim to offer quick, comprehensive and thorough technical support to all our users so, before you call, please make sure you have all the relevant information at hand.
To find your local Saitek Technical Support Center, please see the separate Technical Support Center sheet that came packaged with this product.
Information for Customers in the United States
FCC Compliance and Advisory Statement
Warning: Changes or modifications to this unit not expressly approved by the party responsible for compliance could void the user's authority to operate the equipment.
This device complies with Part 15 of the FCC Rules. Operation is subject to the following two conditions:
1 This device may not cause harmful interference, and;
2 This device must accept any interference received, including interference that may cause undesired operation.
NOTE: This equipment has been tested and found to comply with the limits for a Class B digital device, pursuant to Part 15 of the FCC Rules. These limits are designed to provide reasonable protection against harmful interference in a residential installation. This equipment generates, uses and can radiate radio frequency energy and, if not installed and used in accordance with the instructions, may cause harmful interference to radio communications. However, there is no guarantee that interference will not occur in a particular installation. If this equipment does cause harmful interference to radio or television reception, which can be determined by turning the equipment off and on, the user is encouraged to try to correct the interference by one or more of the following measures:
Reorient or relocate the receiving antenna;
- Increase the separation between the equipment and receiver;
- Connect the equipment into an outlet on a circuit different from that to which the receiver is connected;
- Consult the dealer or an experienced radio/TV technician for help.
Saitek Industries, 2295 Jefferson Street, Torrance, CA 90501, USA
Canada ICES-003
Operation is subject to the following two conditions:
1 This device may not cause interference, and;
2 This device must accept any interference, including interference that may cause undesired operation of the device.
This Class B digital apparatus complies with Canadian ICES-003.
Conditions of Warranty
1 Warranty period is 2 years from date of purchase with proof of purchase submitted.
2 Operating instructions must be followed.
3 Specifically excludes any damages associated with leakage of batteries.
Note: Batteries can leak when left unused in a product for a period of time, so it is advisable to inspect batteries regularly.
4 Product must not have been damaged as a result of defacement, misuse, abuse, neglect, accident, destruction or alteration of the serial number, improper electrical voltages or currents, repair, alteration or maintenance by any person or party other than our own service facility or an authorized service center, use or installation of non-Saitek replacement parts in the product or the modification of this product in any way, or the incorporation of this product into any other products, or damage to the product caused by accident, fire, floods, lightning, or acts of God, or any use violative of instructions furnished by Saitek plc.
5 Obligations of Saitek shall be limited to repair or replacement with the same or similar unit, at our option. To obtain repairs under this warranty, present the product and proof of purchase (eg, bill or invoice) to the authorized Saitek Technical Support Center (listed on the separate sheet packaged with this product) transportation charges prepaid. Any requirements that conflict with any state or Federal laws, rules and/or obligations shall not be enforceable in that particular territory and Saitek will adhere to those laws, rules, and/or obligations.
6 When returning the product for repair, please pack it very carefully, preferably using the original packaging materials. Please also include an explanatory note.
7 IMPORTANT: To save yourself unnecessary cost and inconvenience, please check carefully that you have read and followed the instructions in this manual.
This warranty is in lieu of all other expressed warranties, obligations or liabilities. ANY IMPLIED WARRANTYES, OBLIGATIONS, OR LIABILITIES, INCLUDING BUT NOT LIMITED TO THE IMPLIED WARRANTYES OF MERCHANTABILITY AND FITNESS FOR A PARTICULAR PURPOSE, SHALL BE LIMITED IN DURATION TO THE DURATION OF THIS
WRITTEN LIMITED WARRANTY. Some states do not allow limitations on how long an implied warranty lasts, so the above limitations may not apply to you. IN NO EVENT SHALL WE BE LIABLE FOR ANY SPECIAL OR CONSEQUENTIAL DAMAGES FOR BREACH OF THIS OR ANY OTHER WARRANTY, EXPRESS OR IMPLIED, WHATSOEVER. Some states do not allow the exclusion or limitation of special, incidental or consequential damages, so the above limitation may not apply to you. This warranty gives you specific legal rights, and you may also have other rights which vary from state to state.

This symbol on the product or in the instructions means that your electrical and electronic equipment should be disposed at the end of its life separately from your household waste. There are separate collection systems for recycling in the EU.
For more information, please contact the local authority or your retailer where you purchased the product.

SAITEK R660 GT FORCE FEEDBACK WHEEL
© 2007 Saitek Ltd. Made and printed in China.
All trademarks are the property of their respective owners.
V.1.1 12/09/07
PW12