
GAMING MOUSE - Gaming Mouse SAITEK - Free user manual and instructions
Find the device manual for free GAMING MOUSE SAITEK in PDF.


| Product Type | Optical Gaming Mouse |
| Brand | SAITEK |
| Model | GAMING MOUSE |
| Detection Technology | Optical |
| Resolution | 800 / 1600 DPI (switchable via Turbo button) |
| Number of Buttons | 6 buttons + scroll wheel |
| Programmable Buttons | Yes, up to 62 functions via software |
| Scroll Wheel | Yes, with vertical and horizontal scrolling (dual virtual wheel) |
| Turbo Function | DPI switching (800/1600) with indicator light |
| Connection | USB |
| Cable Length | Approximately 1.8 m |
| System Compatibility | Windows 98SE/2000/ME/XP |
| Power Supply | USB bus (5 V, 100 mA max) |
| Dimensions (L x W x H) | Approximately 125 x 70 x 40 mm |
| Weight | Approximately 120 g |
| Housing Material | ABS Plastic |
| Included Software | Driver on CD-ROM (Auto-Run) |
| Recommended Surface | Light-colored, smooth surface (avoid glass or mirror) |
| Care and Cleaning | Clean with a soft, dry cloth. Do not use liquids. |
| Safety | Ergonomic use recommended to avoid musculoskeletal disorders. Take regular breaks. |
| Spare Parts and Repairability | No spare parts available. Repair only by authorized after-sales service. |
| Warranty | 2 years from date of purchase |
Frequently Asked Questions - GAMING MOUSE SAITEK
User questions about GAMING MOUSE SAITEK
0 question about this device. Answer the ones you know or ask your own.
Ask a new question about this device
Download the instructions for your Gaming Mouse in PDF format for free! Find your manual GAMING MOUSE - SAITEK and take your electronic device back in hand. On this page are published all the documents necessary for the use of your device. GAMING MOUSE by SAITEK.
USER MANUAL GAMING MOUSE SAITEK
SAITEK GAMING MOUSE - USER MANUAL
GETTING STARTED
Congratulations on purchasing the Saitek Gaming mouse. The mouse offers a range of programmable desktop and gaming tools, combined with the ability to switch from 800 dpi to 1600dpi resolution for high-speed, highly accurate tracking.
Contents
Your Saitek Gaming Mouse package includes the following:
Optical Mouse
- User's manual
- CD-ROM Driver for Windows 98SE/2000/ME/XP
Please contact your dealer immediately if any components are missing.
IMPORTANT INFORMATION
Some experts believe that using any mouse or trackball may cause serious injury to hands, wrists, arms, neck, or back. If you feel pain, numbness, or weakness in these areas, please consult a qualified health professional immediately.
To reduce the risk of injury, please follow these precautions:
Take frequent breaks, get up and walk around several times every hour.
- Vary your tasks throughout the day.
- Keep your shoulders relaxed with your elbows at your side. Position your keyboard and mouse so you do not have to reach.
- Adjust your chair and keyboard so your upper arms and wrists are straight.
- Avoid resting your wrists on sharp edges.
Please note that the Saitek Gaming Mouse will not function correctly on a glass or mirror surface. For best results we strongly recommended that you use your Gaming Mouse on a bright surface with a smooth texture.
System Requirements
Standard mouse functions, 3rd button and wheel functions are compatible with all Microsoft operating systems.
The 4th and 5th buttons require Windows 2000/XP to function, or will require the installation of an additional driver included with this product.
The 6th button requires the installation of an additional driver included with this product.
Before you begin
- Do not plug your Gaming mouse into your computer's USB port until the installation procedure has finished.
- Keep your PS/2 mouse as a back-up device.
- If your computer's operating system uses Windows98/98SE, please have the Windows98 or Windows SE system disk to hand during the installation of the mouse.
Software Installation
1 Insert the Auto-Run CD-ROM into your PC's CD-ROM drawer. The installation menu will open automatically. (If the menu does not open automatically, double-click the "setup" icon in the CD files directory)
2 The setup program will guide you step by step through the installation.
3 For users of Windows 98/ME/2000: After you finish the installation, select "Restart" to reboot your system to activate hot keys and wheel scrolling functions.
For users of Windows XP: After finishing the installation, connect (or reconnect) your Gaming Mouse's USB plug to one of your computer's USB ports.
Connecting the mouse
With your PC on, insert the Gaming Mouse's USB plug into one of your PC's USB sockets.
Follow the device installation wizard to complete the registration of the new USB device to the system.
Installation of the Programmable software driver.
The Gaming Mouse hot keys will be enabled when you install the software driver on the installation disc.
Turbo-Key
Press this key to toggle between 800DPI and 1600DPI mouse resolution for high-speed, highly accurate tracking. This button will light up when 1600DPI is selected.
GAMING CENTER ICON POP-UP MENU
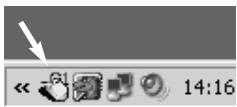
Click on the Gaming Center icon on the bottom right corner of your Windows desktop to open the Gaming Mouse menu.
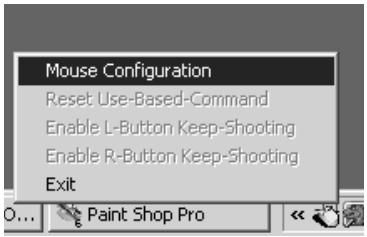
Mouse Configuration
Function: Opens the "Mouse Properties" page for configuring mouse functions and characteristics.
Reset Use-Based Command
This clears all the input macros recorded by the Use-Based Command Function. This function is only enabled when you have programmed a mouse button to use the "Use-Based Command" function.
Enable L-Button Keep-Shooting
This enables you to continue to send out continuous left button clicked messages when you have depressed the left mouse button.
This function is only enabled when you have checked the "Enable Keep Shooting Option" on the "Mouse Properties" page.
Enable R-Button Keep-Shooting
This enables you to continue to send out continuous right button clicked messages when you have depressed the R-Button.
This function is only enabled when you check the "Enable Keep Shooting Option" on the "Mouse Properties" page.
Disable L-Button Keep-Shooting
This stops the sending out of continuous L-Button clicked messages.
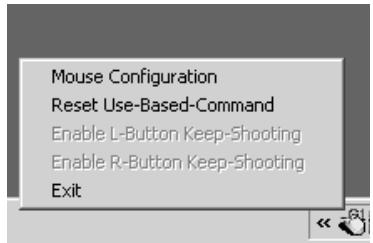
This option is only displayed as enabled when you have already activated the "Enable L-Button Keep Shooting" function.
Disable R-Button Keep-Shooting
This disables the sending out of continuous R-Button clicked messages.
This option is only displayed as enabled when you have already activated the "Enable R-Button Keep Shooting" function.
Exit
This closes the Gaming Center Software function.
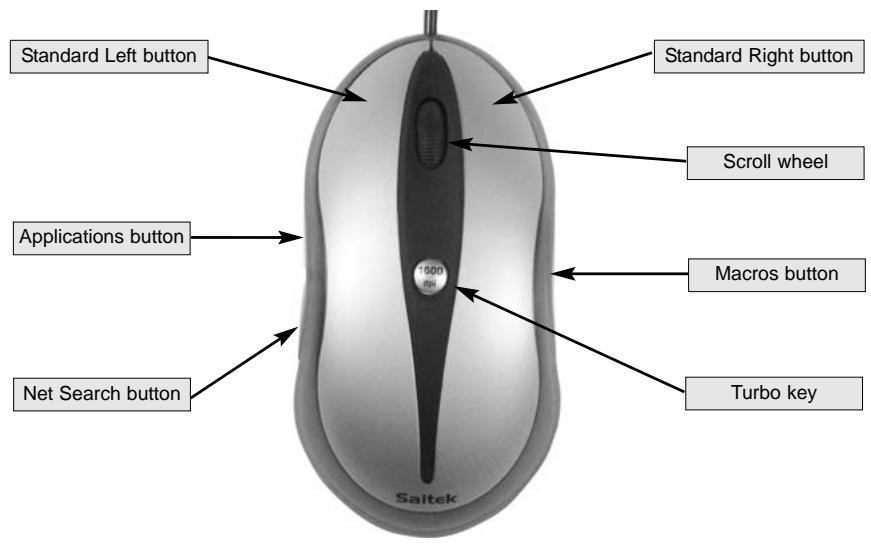
Gaming Mouse functionality
PROGRAMMING YOUR GAMING MOUSE
After successfully installing your Saitek Gaming Mouse you can customize it either by clicking on Start on the Windows® Taskbar, Settings, Control Panel, then Mouse, or by clicking on the Gaming Center icon on the bottom right corner of your windows desktop, and then Mouse Configuration. There are many options in the Mouse Properties window, including selecting new pointers, adjusting the pointer's speed and acceleration and configuring the mouse as left- or right-handed.
Configuring your Mouse
First click on the Mouse Configuration option on the Gaming Center menu.
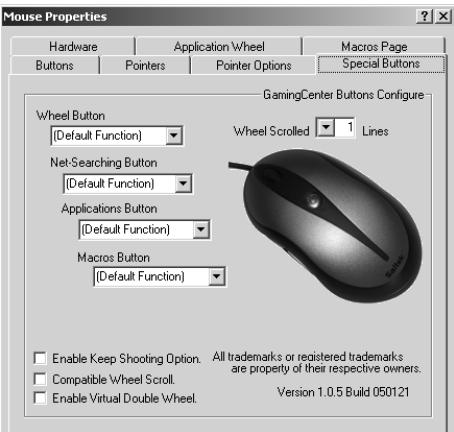
Special Buttons
This configures all the mouse buttons and wheel scrolling.
Wheel Scrolled Lines
This field is used to configure the number of lines scrolled with each click of the mouse wheel.
Wheel Button
This field is used to program the special Gaming Center function for this wheel button. You will find detailed descriptions below.
Note: The default button setting is Windows wheel-button function.
Net-Searching Button
This field is used to program the special Gaming Center function for this button. Detailed descriptions follow:
Note: The default button setting is "Net-Wheel" function.
Applications Button
This field is used to program the special Gaming Center function for this button. Detailed descriptions follow.
Note: The default button setting is "Applications Wheel" function.
Macros Button
This field is used to program the special Gaming Center function for this button. Detailed descriptions follow:
Note: The default button setting is "Macros Wheel" function.
Enable Keep Shooting Option
This option is used to control the "Keep-Shooting".
Checked: Enables the mouse L/R-Button to work with "keep-shooting".
Unchecked: Enables the mouse L/R-Button to work with "keep-shooting".
Note: This option works with the pop-up menu of the Gaming Center Icon.
Compatible Wheel Scroll
This option is used only for software compatibility problems with some applications that are not designed to support mouse scrolling:
Checked: The scrolling message defaults to same as Windows standard mouse scrolling message.
Unchecked: The mouse scrolling message can be customized.
Enable Virtual Double Wheel
This option is used to control the vertical/horizontal scrolling function on applications when the user's mouse has only one wheel button.
Checked: Enables the wheel button to control scrolling in a vertical or horizontal direction.
Unchecked: Enables the wheel button to control scrolling in a vertical direction only.
Note: When this option is checked, programming of the wheel button will be disabled.
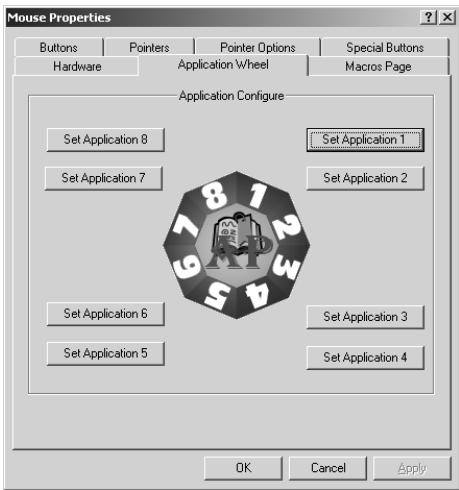
Application Wheel
This configures applications which are selected by the application wheel. As a default, the activation wheel is activated by the Application button on the front left side of the Gaming Mouse.
Set Application 1
This button is used to set up field 1 of the Applications Wheel, such as the application execution file location, and the name assigned to the application.
These options are:
1 Assigned Name: This field can only be completed when you have selected the application execution file.
2 Select Application: Shows the application execution file you have selected.
3 Search: Use the pull-down lists to locate the execution file for the application.
Set Applications 2-8
The process is identical to "Set Application 1".
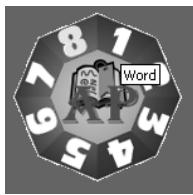
To open an application, open the application wheel and place your mouse pointer over the number of the desired application and click the left button on the top of the mouse.
Macros Page
The Macros page allows you to configure all macros, included recording sequences of commands which are activated by the Macros button. For instance, you may want to program a macro to autotype a lengthy address or to find and replace a piece of text.
Assign Macro 1:
This button is used to setup up field 1 of the Macros Wheel
These options of the pop-up configuration window are:
1 Macro Name: Any text you type in this field appears as the highlighted text when you run your cursor over the macro number on the macros wheel. This field can be completed when you have set or recorded the macro.
2 Start to record: This starts recording of input commands such as keystroke or mouse actions which are then saved in the "Use Based Command (and Macros) config" area.
3 Stop: This stops the collection of input commands.
4 Assign Name: This is used to assign the name of the Macro.
5 Save: Saves these recorded input commands as the Macro 1.
6 Cancel: Cancels the recording of the macros and closes the pop-up menu.
Set Macros 2-8:
The process is identical to "Set Macro 1".
To run a pre-recorded macro, open the macro wheel by clicking the button on the right of the mouse, place your mouse pointer over the number of the desired macro number and click the left button on the top of the mouse.
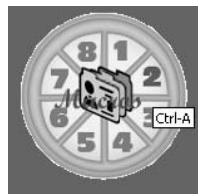
Internet Wheel
The internet wheel is activated by pressing the Net wheel on the back left side of the Gaming Mouse. The internet wheel allows you to open your browser, select your web favourites, carry out word, image or directory web searches or create and send email messages.
Gaming Center Programmable Button Functions
The additional buttons and wheel of the Gaming Mouse can be programmed to perform many commands. You can assign any one of up to 62 standard functions to the wheel, and right- and left-hand side buttons to suit the way you work or to play games.
Gaming Center software options
| 1 | Default Function | Default button specific function |
| Wheel Button: Windows Middle Button | ||
| Net-Search Button: Quick highlighted keyword search | ||
| Application Button: Application Wheel functions | ||
| Macros Button: Macros Wheel functions | ||
| 2 | Start Window | Same as "Windows Logo Key" on keyboard |
| 3 | Close Window | Closes selected window |
| 4 | Context Help | Opens help window for selected application |
| 5 | Restore Window | Restores selected window size |
| 6 | Maximizing Windows | Maximizes selected window |
| 7 | Minimizing Windows | Minimizes selected window |
| 8 | Next Window | Opens next window - similar to "Alt+Shift+Tab" |
| 9 | Previous Window | Opens previous window - similar to "Alt+Tab" |
| 10 | Screen Saver | Starts the Windows Screen Saver |
| 11 | Page Up | Moves cursor to previous page |
| 12 | Page Down | Moves cursor to next page |
| 13 | Home | Moves cursor to home position. |
| 14 | End | Moves cursor to end position. |
| 15 | Calculator | Runs Calculator. |
| 16 | F1 | Emulates pressing "F1" |
| 17 | F2 | Emulates pressing "F2" |
| 18 | F3 | Emulates pressing "F3" |
| 19 | F4 | Emulates pressing "F4" |
| 20 | F5 | Emulates pressing "F5" |
| 21 | F6 | Emulates pressing "F6" |
| 22 | F7 | Emulates pressing "F7" |
| 23 | F8 | Emulates pressing "F8" |
| 24 | F9 | Emulates pressing "F9" |
| 25 | F10 | Emulates pressing "F10" |
| 26 | F11 | Emulates pressing "F11" |
| 27 | F12 | Emulates pressing "F12" |
| 28 | Screen Snapshot | Captures screenshot of Desktop |
| 29 | Window Snapshot | Captures screenshot of selected window |
| 30 | Control-C | Emulates pressing "Ctrl-C" |
| 31 | Control-V | Emulates pressing "Ctrl-V" |
| 32 | Control-A | Emulates pressing "Ctrl-A" |
| 33 | Control-H | Emulates pressing "Ctrl-H" |
| 34 | Control-G | Emulates pressing "Ctrl-G" |
| 35 | Control-F | Emulates pressing "Ctrl-F" |
| 36 | Control-X | Emulates pressing "Ctrl-X" |
| 37 | Control-Z | Emulates pressing "Ctrl-Z" |
| 38 | Control-W | Emulates pressing "Ctrl-W" |
| 39 | Control-N | Emulates pressing "Ctrl-N" |
| 40 | Control-O | Emulates pressing "Ctrl-O" |
| 41 | Control-S | Emulates pressing "Ctrl-S" |
| 42 | Control-P | Emulates pressing "Ctrl-P" |
| 43 | Control-R | Emulates pressing "Ctrl-R" |
| 44 | Run... | Executes the Microsoft Windows "Run..." function |
| 45 | MS-Outlook | Starts Microsoft Office Outlook |
| 46 | MS-Word | Starts Microsoft Office Word |
| 47 | MS-Excel | Starts Microsoft Office Excel |
| 48 | MS-PowerPoint | Starts Microsoft Office PowerPoint |
| 49 | MS-Finder | Starts Microsoft Office Finder |
| 50 | Outlook Express | Starts Microsoft Outlook Express |
| 51 | Internet Explorer | Opens Microsoft Internet Explorer |
| 52 | File Manager | Opens File Manager (or Explorer) |
| 53 | Notepad | Opens Notepad |
| 54 | CD Player | Opens Default CD Player Application |
| 55 | MS-Paint | Opens Windows Paint |
| 56 | Address Book | Opens Windows Address Book |
| 57 | Office-Wheel | Opens MS Windows Office applications Wheel, allowing you to select and open any of the MS Office applications. |
| 58 | Net-Wheel | Opens Internet Wheel, allowing you to open your web favourites or carry out word, image or directory web searches. |
| 59 | Application-Wheel | Opens Application Wheel, allowing you to select and open any of the applications you have programmed as selectable by the wheel. |
| 60 | Macros-Wheel | Opens the Macros Wheel, allowing you to start any of the macros you have programmed. |
| 61 | Double-Clicks | Emulates pressing Left-Button double-clicks |
| 62 | Keep-On-Line Wheel | The Keep-On-Line wheel allows you to make your mouse perform automatic movements which will prevent you being timed out of certain web sites through lack of activity. To stop this function, just click the same button that you configure to use "Keep-On-Line" function. |
| 63 | Use-Based System | One-touch to input commands record and play. Recording Stage: Press the button or wheel once to start recording the macro for keyboard/mouse commands. Press the button or wheel once more when you have finished recording. Play Stage: After recording, you can activate the recorded input command by clicking the button or wheel once. |
| Note: To reset the recorded macro, click the Gaming Mouse icon on the bottom right corner of your Windows desktop, and select the "Reset Use-Based-Command". | ||
| You can configure the macros recording method (keyboard-command, both keyboard and mouse command, etc.): Click the Gaming Mouse ICON, Select "Mouse configuration" and select "Macro Page" property page. |
| 64 Normal Function | This reverts the button or wheel function to the default Microsoft-assigned function: |
| Wheel Button: Windows Middle Button | |
| Net-Search Button: Backward Navigation Button in Internet Explorer. | |
| Keep-On-Line Macro Button: Forward Navigation Button in Internet Explorer. | |
| Macros Button: No Function. |
TROUBLESHOOTING
The Saitek Gaming Mouse functions best on surfaces with details for tracking. It may not function on reflective, reflective pattern or non-visible detail surfaces!
Mouse not detected
Please note that USB mice are only supported under Windows 98/SE, Windows ME, Windows 2000 and Windows XP.
Make sure the mouse cable is plugged into the correct USB port. A USB mouse can only connect to a USB port.
Make sure your USB port is properly configured. Refer to your computer documentation for the correct port configuration.
You may have other system devices (eg, a modem card) that conflict with the mouse. Check the IRQ/address settings of these devices for conflicts, and change the setting as required. Refer to your computer documentation to make these changes.
Determine whether the problem is related to the mouse or the system, try the mouse on a second system or a different mouse on your current system.
Technical Support
Can't get started - don't worry, we're here to help you!
Nearly all the products that are returned to us as faulty are not faulty at all - they have just not been installed properly.
If you experience any difficulty with this product, please first visit our website www.saitek.com. The technical support area will provide you with all the information you need to get the most out of your product and should solve any problems you might have.
If you do not have access to the internet, or if the website cannot answer your question, please contact your local Saitek Technical Support Team. We aim to offer quick, comprehensive and thorough technical support to all our users so, before you call, please make sure you have all the relevant information at hand.
To find your local Saitek Technical Support Center, please see the separate Technical Support Center sheet that came packaged with this product.
Information for Customers in the United States
FCC Compliance and Advisory Statement
Warning: Changes or modifications to this unit not expressly approved by the party responsible for compliance could void the user's authority to operate the equipment.
This device complies with Part 15 of the FCC Rules. Operation is subject to the following two conditions:
1 This device may not cause harmful interference, and;
2 This device must accept any interference received, including interference that may cause undesired operation.
NOTE: This equipment has been tested and found to comply with the limits for a Class B digital device, pursuant to Part 15 of the FCC Rules. These limits are designed to provide reasonable protection against harmful interference in a residential installation. This equipment generates, uses and can radiate radio frequency energy and, if not installed and used in accordance with the instructions, may cause harmful interference to radio communications. However, there is no guarantee that interference will not occur in a particular installation. If this equipment does cause harmful interference to radio or television reception, which can be determined by turning the equipment off and on, the user is encouraged to try to correct the interference by one or more of the following measures:
Reorient or relocate the receiving antenna;
- Increase the separation between the equipment and receiver;
- Connect the equipment into an outlet on a circuit different from that to which the receiver is connected;
- Consult the dealer or an experienced radio/TV technician for help.
Saitek Industries, 2295 Jefferson Street, Torrance, CA 90501, USA
Conditions of Warranty
1 Warranty period is 2 years from date of purchase with proof of purchase submitted.
2 Operating instructions must be followed.
3 Specifically excludes any damages associated with leakage of batteries.
Note: Batteries can leak when left unused in a product for a period of time, so it is advisable to inspect batteries regularly.
4 Product must not have been damaged as a result of defacement, misuse, abuse, neglect, accident, destruction or alteration of the serial number, improper electrical voltages or currents, repair, alteration or maintenance by any person or party other than our own service facility or an authorized service center, use or installation of non-Saitek replacement parts in the product or the modification of this product in any way, or the incorporation of this product into any other products, or damage to the product caused by accident, fire, floods, lightning, or acts of God, or any use violative of instructions furnished by Saitek plc.
5 Obligations of Saitek shall be limited to repair or replacement with the same or similar unit, at our option. To obtain repairs under this warranty, present the product and proof of purchase (eg, bill or invoice) to the authorized Saitek Technical Support Center (listed on the separate sheet packaged with this product) transportation charges prepaid. Any requirements that conflict with any state or Federal laws, rules and/or obligations shall not be enforceable in that particular territory and Saitek will adhere to those laws, rules, and/or obligations.
6 When returning the product for repair, please pack it very carefully, preferably using the original packaging materials. Please also include an explanatory note.
7 IMPORTANT: To save yourself unnecessary cost and inconvenience, please check carefully that you have read and followed the instructions in this manual.
This warranty is in Lieu of all other expressed warranties, obligations or liabilities. ANY IMPLIED WARRANTYES, OBLIGATIONS, OR LIABILITIES, INCLUDING BUT NOT LIMITED TO THE IMPLIED WARRANTYES OF MERCHANTABILITY AND FITNESS FOR A PARTICULAR PURPOSE, SHALL BE LIMITED IN DURATION TO THE DURATION OF THIS WRITTEN LIMITED WARRANTY. Some states do not allow limitations on how long an implied warranty lasts, so the above limitations may not apply to you. IN NO EVENT SHALL WE BE LIABLE FOR ANY SPECIAL OR CONSEQUENTIAL DAMAGES FOR BREACH OF THIS OR ANY OTHER WARRANTY, EXPRESS OR IMPLIED, WHATSOEVER Some states do not allow the exclusion or limitation of special, incidental or consequential damages, so the above limitation may not apply to you. This warranty gives you specific legal rights, and you may also have other rights which vary from state to state.

SOURIS DE JEU SAITEK - MANUEL D'UTILISATION
Premiers pas
Bouton 'Applications'
"Gaming-Center" Pop up Menu
© 2005 Saitek Ltd. Made and printed in China.
All trademarks are the property of their respective owners.
PM12A

- SAITEK GAMING MOUSE - USER MANUAL
- GETTING STARTED
- Contents
- IMPORTANT INFORMATION
- System Requirements
- Before you begin
- Software Installation
- Connecting the mouse
- Installation of the Programmable software driver.
- Turbo-Key
- GAMING CENTER ICON POP-UP MENU
- Mouse Configuration
- Reset Use-Based Command
- Enable L-Button Keep-Shooting
- Enable R-Button Keep-Shooting
- Disable L-Button Keep-Shooting
- Disable R-Button Keep-Shooting
- Exit
- PROGRAMMING YOUR GAMING MOUSE
- Configuring your Mouse
- Special Buttons
- Wheel Scrolled Lines
- Wheel Button
- Net-Searching Button
- Applications Button
- Macros Button
- Enable Keep Shooting Option
- Compatible Wheel Scroll
- Enable Virtual Double Wheel
- Application Wheel
- Set Application 1
- Set Applications 2-8
- Macros Page
- Assign Macro 1:
- Set Macros 2-8:
- Internet Wheel
- Gaming Center Programmable Button Functions
- TROUBLESHOOTING
- Mouse not detected
- Technical Support
- Information for Customers in the United States
- FCC Compliance and Advisory Statement
- Conditions of Warranty
- SOURIS DE JEU SAITEK - MANUEL D'UTILISATION
- Premiers pas
- Bouton 'Applications'
- "Gaming-Center" Pop up Menu
Brand : SAITEK
Model : GAMING MOUSE
Category : Gaming Mouse