
DIGITAL EMS TENS - EMS and TENS devices SANITAS - Free user manual and instructions
Find the device manual for free DIGITAL EMS TENS SANITAS in PDF.
| Product Type | Electrical Muscle Stimulation (EMS) and TENS device |
| Brand | SANITAS |
| Model | DIGITAL EMS TENS (SEM40) |
| Dimensions | 130 × 68 × 29 mm (with belt clip) |
| Weight | 105 g (without batteries), 140 g (with clip and batteries) |
| Power Supply | 3 AAA 1.5 V batteries (alkaline) |
| Stimulation Channels | 2 independent channels with separate adjustment |
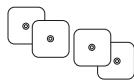
| Provided Electrodes | 4 self-adhesive electrodes (45 × 45 mm) |
| Main Functions | TENS (pain relief), EMS (muscle stimulation), MASSAGE (massaging effect) |
| Number of Programs | Over 50 preset programs and individual programs (11-20) |
| Pulse Shape | Biphasic angular pulses |
| Pulse Duration | 40-250 μs |
| Pulse Frequency | 1-120 Hz |
| Max. Output Voltage | 90 Vpp (at 500 ohms) |
| Max. Output Current | 180 mA (at 500 ohms) |
| Treatment Time | Adjustable from 5 to 90 minutes |
| Intensity | Adjustable from 0 to 15 per channel |
| Special Function | Doctor's Function (settings lock) |
| Care and Cleaning | Device: soft damp cloth; electrodes: non-linting damp cloth, air dry |
| Safety | Automatic shut-off after 3 minutes of inactivity, electrostatic discharge protection |
| Spare Parts and Reparability | Optional electrodes (50 × 100 mm, ref. 661.21); repairs only by after-sales service |
| Operating Conditions | 10 °C to 40 °C, relative humidity 30-85% |
| Storage Conditions | -10 °C to 50 °C, relative humidity 10-95% |
| Standards | CE, EN60601-1, EN60601-1-2, EN60601-2-10, Medical Device Directive 93/42/EC |
Frequently Asked Questions - DIGITAL EMS TENS SANITAS
User questions about DIGITAL EMS TENS SANITAS
0 question about this device. Answer the ones you know or ask your own.
Ask a new question about this device
Download the instructions for your EMS and TENS devices in PDF format for free! Find your manual DIGITAL EMS TENS - SANITAS and take your electronic device back in hand. On this page are published all the documents necessary for the use of your device. DIGITAL EMS TENS by SANITAS.
USER MANUAL DIGITAL EMS TENS SANITAS
1A-2A/1B-2B 1A-1B/2A-2B
1A-1B/2A-2B
1A-1B/2A-2B
1A-2A/1B-2B 1A-1B/2A-2B
1A-2A/1B-2B 1A-1B/2A-2B
1A-2A/1B-2B 1A-1B/2A-2B 1A-2B/2A-1B

1A-1B/2A-2B 1A-2B/2A-1B
1A-1B/2A-2B
1A-2A/1B-2B 1A-1B/2A-2B
1A-1B/2A-2B
1A-1B/2A-2B
1A-2A/1B-2B 1A-1B/2A-2B
1A-2A/1B-2B 1A-1B/2A-2B
1A-2A/1B-2B 1A-1B/2A-2B 1A-2B/2A-1B
1A-1B/2A-2B
1A-2A/1B-2B 1A-1B/2A-2B 1A-2B/2A-1B
1A-2A/1B-2B 1A-1B/2A-2B 1A-2B/2A-1B
1A-2A/1B-2B 1A-1B/2A-2B
1A-2A/1B-2B 1A-1B/2A-2B
1A-2A/1B-2B 1A-1B/2A-2B
1A-2A/1B-2B 1A-1B/2A-2B
1A-2A/1B-2B 1A-1B/2A-2B 1A-2B/2A-1B
1A-2A/1B-2B 1A-1B/2A-2B 1A-2B/2A-1B
1A-2A/1B-2B 1A-1B/2A-2B 2A-1B/1A-2B
1A-1B/2A-2B 1A-2B/2A-1B
1A-2A/1B-2B 1A-1B/2A-2B 2A-1B/1A-2B
DEUTSCH
Inhaltsverzeichnis
7.5 Doctor's Function
- Getting to know your machine 16
1.1 What is Digital EMS/TENS and what can it do? 16
1.2 Scope of supply 17
- Important information 17
- Current parameters 19
3.1 Pulse shape 19
3.2 Pulse frequency 19
3.3 Pulse width 20
3.4 Pulse intensity 20
3.5 Cycle-controlled pulse parameter variation 20
- Unit description 20
4.1 Description of components 20
4.2 Key functions 20
5.Start-up 21
6. Programme overview 21
6.1 Basic information 21
6.2 TENS programmes 22
6.3 EMS programmes 23
6.4 MASSAGE programmes 24
6.5 Information on placing the electrodes 24
7.Application 25
7.1 Advice on application 25
7.2 Procedure for TENS, EMS and MASSAGE programmes 01-10 .......25
7.3 Procedure for TENS/EMS programmes 11-20 (ind. prog.) 25
7.4 Changes to settings 26
7.5 Doctor's Function 26
- Cleaning and storage 26
- Disposal 26
0.Problems and solutions 27 - Technical details 27
Please read these instructions for use carefully and keep them for later use, be sure to make them accessible to other users and observe the information they contain.
1. Getting to know your machine
1.1 What is Digital EMS/TENS and what can it do?
Digital EMS/TENS belongs to the group of electrical stimulation systems. It has three basic functions, which can be used in combination:
- Electrical stimulation of nerve tracts (TENS).
- Electrical stimulation of muscle tissue (EMS).
- A massage effect generated by electrical signals.
For this, the device has two independent stimulation channels and four self-adhesive electrodes. It has various versatile functions in order to increase general wellbeing, alleviate pain, maintain physical fitness, relaxation, revitalise muscles and combat fatigue. You can either select these functions from preset programmes or determine them yourself according to your requirements.
The operating principle of electrical stimulation equipment is based on simulating the body's own pulses which are transmitted transcutaneously to nerve or muscle fibres by means of electrodes. The electrodes can thereby be attached to many parts of the body, whereby the electrical stimuli are safe and practically painless. You merely feel a gentle prickling or vibrating in some applications. The electrical pulses transmitted to the tissue affect the transmission of stimulation in nerve conductions as well as neural nodes and muscle groups in the field of application.
The effect of electrical stimulation is generally only recognisable after regularly repeated application. Electrical stimulation does not replace regular exercising of the muscle, but is able to reasonably supplement the effect thereof.
TENS, transcutaneous electrical nerve stimulation, means electrical stimulation of nerves through the skin. TENS is recognised as a clinically proven, effective, non-medication method of treating pain from certain causes. It is free from side-effects when used properly, and can also thereby be used as a simple means of self-treatment. The pain-alleviating or suppressing effect
is also achieved by preventing pain from being passed on into nerve fibres (above all through high-frequency pulses) and increasing the secretion of the body's own endorphines which reduce awareness of pain through their effect on the central nervous system. The method is scientifically underpinned and medically approved.
Any symptoms indicating TENS application must be clarified with the doctor in charge of your treatment. The latter will also give you information on the respective benefits of TENS self-treatment.
TENS is clinically tested and approved with the following applications:
- Back pain, particularly also lumbar and cervical spine problems
- Joint pain (e.g. knee joint, hip joint, shoulder)
Neuralgia - Headaches
Women's period pains - Pain after injuries to musculoskeletal system
- Pain with circulatory problems
- Chronic pain through various causes
Electrical muscle stimulation (EMS) is a widespread and generally recognised method and has been used for years in sports and rehabilitation medicine. In the sports and fitness field, one of the uses of EMS is as a supplement to conventional muscle training, in order to increase the efficiency of muscle groups and adapt physical proportions to the desired aesthetic results. EMS application goes in two directions. On the one hand, a targeted strengthening of musculature can be produced (activating application) and on the other hand a relaxing, resting effect can also be achieved (relaxing application).
Active application includes the following:
- Muscle training to improve endurance performance and/or
- Muscle training to support the strengthening of certain muscles or muscle groups in order to achieve desired changes to body proportions.
Relaxing application includes the following:
- Muscle relaxation in order to loosen up muscular tension
- Improving muscular fatigue symptoms
- Accelerating muscle regeneration after high muscular performance (e.g. after a marathon).
Through integrated massage technology, Digital EMS/TENS also offers the possibility of reducing muscular tension and combating fatigue symptoms using a programme based on real massage in terms of sensation and effect.
Using the positioning suggestions and programme charts in this manual, you can determine the machine setting fast and easily for the respective application (depending on the region of the body affected) in order to ensure the desired effect.
Through the two separately adjustable channels, the Digital EMS/TENS has the advantage of adapting the intensity of the pulses independently of each other to two parts of the body to be treated, for example in order to cover both sides of the body or ensure even stimulation of larger areas of tissue. The individual intensity setting of each channel also allows you to treat two different parts of the body at the same time, whereby it is possible to save time compared with individual sequential treatment.
1.2 Scope of supply
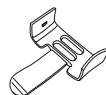
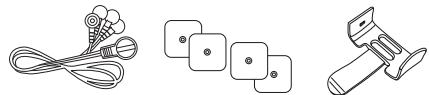
- 1x Digital EMS/TENS machine (incl. belt clip)
- 1x connecting cable
- 4x adhesive electrodes (45 x 45 mm)
- 3x AAA batteries
- these instructions for use
Subsequent purchase articles
8x adhesive electrodes (45× 45mm) Art.no.661.22
4x adhesive electrodes (50 x 100 mm), Art. no. 661.21
2. Important Information
Use of the machine does not replace medical consultation and treatment. In the event of any type of pain or illness, you must therefore always first ask your doctor.
WARNING!
In order to prevent any damage to health, we would urgently advise against using the Digital EMS/TENS in the following cases:
- With any implanted electrical devices (such as pacemakers)
- If there are any metal implants
- When using an insulin pump
In case of high fever (e.g. >39^

- In case of known or acute cardiac arrhythmias and other disorders in stimulus formation and conduction of the heart
- If suffering from attacks (e.g. epilepsy)
If pregnant
In case of cancer - After operations where increased muscle contractions might impair the healing process
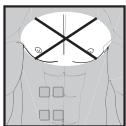
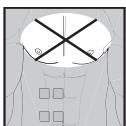
- Never use near the heart. Stimulation electrodes should never be placed anywhere on the front of the thorax (marked by ribs and breastbone), but above all not on the two large pectoral muscles. Here it can increase the risk of ventricular fibrillation and lead to cardiac arrest
- On the bony part of the cranium, near the mouth, throat or larynx
Near the throat / carotid artery
Near the genitals - On acutely or chronically diseased (injured or inflamed) skin (e.g. in the event of painful and painless inflammation, reddening, skin rashes (e.g. allergies), burns, bruises, swellings, open wounds and wounds in the process of healing, on operation scars in the process of healing)
- In environments with high humidity such as in the bathroom or when having a bath or shower
- Do not use after consuming alcohol
- When a high frequency surgical device is connected at the same time
Before using the machine, you should consult with the doctor in charge of your treatment in the event of the following:
- Acute diseases, especially if hypertension is suspected or actually exists, or blood-clotting disorders, tendency to thromboembolic diseases or in case of malignant new masses
- All skin diseases
- Chronic pain disorders which have not been clarified, regardless of the region of the body
Diabetes - All sensitivity disorders with reduced pain awareness (such as metabolic disturbances)
Medical treatments carried out simultaneously
- Complaints arising as a result of the stimulation treatment
- Constant skin irritation as a result of prolonged stimulation at the same electrode point.
IMPORTANT!
Use the Digital EMS/TENS solely:
- On humans
- For the purpose for which it was developed and in the manner specified in these instructions for use. Any improper use can be hazardous.
- For external application.
- With the original accessory parts which are supplied and can be re-ordered, otherwise the warranty becomes null and void.
PRECAUTIONARY MEASURES:
- Always remove the electrodes from the skin with a moderate pull in order to avoid injury in the event of highly sensitive skin.
- Keep the machine away from heat sources and never use it near ( 1m ) short-wave or microwave equipment (e.g. mobile phones), as this may lead to unpleasant current spikes.
- Do not expose the machine to direct sunlight or high temperatures.
- Protect the machine from dust, dirt and humidity. Never submerge the device in water or other liquids.
- The machine is suitable for private use.
- For reasons of hygiene, the electrodes should only be used on one person.
- If the machine is not functioning properly, or if you start feeling unwell or there is any pain, stop the application immediately.
- To remove or move the electrodes, first switch off the machine or the appropriate channel in order to avoid unwanted irritation.
- Never modify any electrodes (e.g. by cutting). This leads to a higher current density and can be dangerous (max. recommended output value for electrodes: 9mA/cm^2 , an effective current density over 2mA/cm^2 requires greater attention).
- Do not use when asleep, when driving a vehicle or at the same time as operating machinery.
-
Never use with any activities where an unforeseen reaction (e.g. increased muscle contraction despite low intensity) may be dangerous.
-
Make sure that no metallic objects such as belt buckles or necklaces can come in contact with the electrodes during stimulation. If you wear any jewellery or piercings (e.g. belly piercing) near the application site, you must remove these before using the machine as burning may otherwise occur at some points.
- Keep the device away from children to prevent any hazards.
- Do not confuse the electrode cables and contacts with your headphones or other devices, and do not connect the electrodes to other devices.
- Do not use this machine at the same time as other equipment which sends electrical pulses to your body.
- Do not use it near any highly flammable substances, gases or explosives.
- Never use accumulators, always use the same types of battery.
- In the initial minutes, carry out the application sitting or lying down in order to avoid any unnecessary risk of injury in the rare event of a vagal reaction (feeling of weakness). If you start feeling weak, switch the machine off immediately and put your legs up (approx. 5-10 minutes).
- It is not advisable to apply any enriching creams or ointments to the skin beforehand, as this greatly increases electrode wear or else unpleasant current spikes may occur here.
Damage:
- If the machine is damaged, do not use it if you are in any doubt but rather contact your dealer or the customer service address indicated.
- Check the device at regular intervals for signs of wear or damage. If you find any such signs or if the device was used improperly, you must bring it to the manufacturer or dealer before it is used again.
- Switch off the device immediately if it is defective or if is not working properly.
- Do not, under any circumstances, attempt to open or repair the machine yourself! Only have repairs carried out by the customer service department or an authorized dealer. If these instructions are not heeded, the warranty becomes null and void.
- The manufacturer assumes no liability for damage caused through improper or wrong use.
Information on ESD (Electrostatic Discharge)
Please note that jacks marked with the ESD warning label must not be touched.
ESD protective measures:
- Do not touch plugs/jacks marked with the ESD warning label with fingers!
- Do not touch plugs/jacks marked with the ESD warning label with handheld tools!
Further explanations on the ESD warning label, as well as possible training courses and their contents, are available on request from the customer service department.
3. Current parameters
Electrical stimulation machines operate with the following current settings, which will alter the stimulation effect depending on the setting.
3.1 Pulse shape
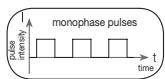
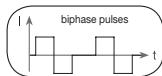
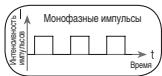
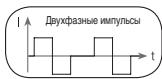
This describes the time function of the excitation current whereby monophase pulse trains are differentiated from biphase. With monophase pulse trains, the current flows in one direction. With biphase pulses, the excitation current alternates its direction.
In the Digital EMS/TENS unit, there are only biphase pulse trains, as they reduce the strain on the muscle, leading to less muscle fatigue as well as safer application.
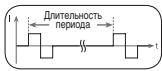
3.2 Pulse frequency
Frequency indicates the number of individual pulses per second, and is indicated in Hz (Hertz). It can be calculated by working out the inverse value of the periodic time. The respective frequency determines which types of muscle
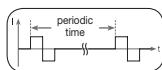
fibre preferably react. Slow-response fibres tend to react to lower pulse frequencies up to 15Hz , while fast-response fibres only respond to frequencies over approx. 35Hz .
With pulses of approx. 45 - 70Hz , there is permanent tension in the muscle combined with premature muscle fatigue. Higher pulse frequencies can therefore preferably be used for elasticity and maximum strength training.
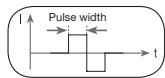
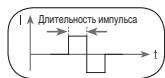
3.3 Pulse width
Pulse width is used to indicate the duration of an individual pulse in microseconds. Pulse width also determines the penetration depth of the current whereby in general, the following applies: a greater muscle mass requires a greater pulse width.
3.4 Pulse intensity
Setting the degree of intensity is individually dependent on the subjective feeling of each individual user and is determined by a number of parameters such as application
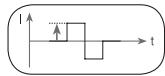
site, skin circulation, skin thickness as well as quality of electrode contact. The actual setting should be effective but should never produce any unpleasant sensations such as pain at the site of application. While a slight tingling sensation indicates sufficient stimulation energy, any setting which leads to pain must be avoided.
With prolonged application, readjustment may be necessary due to time adjustment processes at the site of application.
3.5 Cycle-controlled pulse parameter variation
In many cases it is necessary to cover the entirety of tissue structures at the site of application by using several pulse parameters. With the Digital EMS/ TENS unit, this is done by the existing programmes automatically making a cyclical pulse parameter change. This also prevents individual muscle groups at the site of application from getting tired.
With the Digital EMS/TENS unit there are useful presettings for current parameters. During the application, however, you do have the possibility of changing pulse intensity at any time and, with individual programmes, you can also alter pulse frequency beforehand in order to implement the application which is the most comfortable or promises the most success for you.
4. Unit description
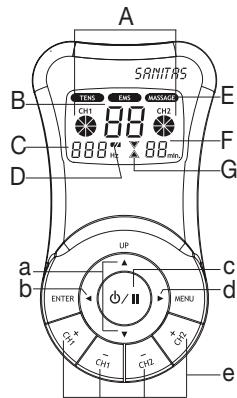
4.1 Description of components Display (main menu):
A Pulse intensity
B Programme/cycle numbers
C Frequency (Hz)
D Low battery
E TENS/EMS/MASSAGE submenus
F Timer function (residual time indicator)
G Operating status display
Keys:
a UP and DOWN selection keys
b ENTER key
c ON/OFF key
d MENU key
e CH1+, CH1-, CH2+, CH2- keys
Accessories:
- 1x connection cable (with 2 separately controllable channels, recognisable by their difference in colour)
- 4x adhesive electrodes (45 x 45 mm)
- 1x belt clip
4.2 Key functions
Every time a key is pressed, this is acknowledged by a signal tone in order to ensure that any unintentional pressing of a key is detected. This signal tone cannot be switched off.
ON/OFF
(1) Hit briefly to switch on the machine. If the key is held down for 10 seconds when switching on, the unit automatically switches off again.
(2) Press once to interrupt stimulation treatment = pause mode.
(3) Hold ON/OFF key down (approx. 3 seconds) to switch off the machine.
and
(1) Select between (A) treatment programme, (B) frequency and (C) treatment time.
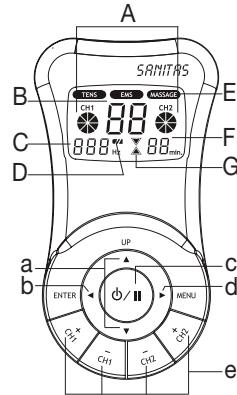

(2) The DOWN key is used to reduce pulse intensity for both channels during stimulation.
MENU
(1) Navigation between the submenus TENS, EMS and MASSAGE.
(2) Return to (A) programme selection window or (B) main menu.
ENTER
(1) Menu selection.
(2) To confirm a selection made with UP/ DOWN, apart from channel intensity.
CH1+, CH1-, CH2+, CH2-
Setting pulse intensity.
5. Start-up
- Remove the belt clip from the machine, if attached.
- Press on the battery cover at the back of the machine and push it to the side.
- Insert three AAA 1.5 V alkaline batteries. Make absolutely sure that you insert the batteries with the correct polarity as marked.
- Replace the battery cover carefully (Fig. 1).
- Attach the connecting cable to the electrodes (Fig. 2).
① Note: The electrodes have a clip fastener to ensure easy connection.
- Insert the connecting cable connector into the socket at the back of the machine (Fig. 3).
- Do not pull, twist or make any sharp kinks in the cables (Fig. 4).
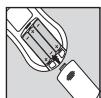
Fig. 1
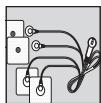
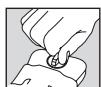
Fig. 2
Fig. 3
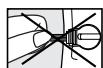
Fig. 4
6. Programme overview
6.1 Basic information
The Digital EMS/TENS unit has a total 50 programmes:
20 TENS programmes
20 EMS programmes
10 MASSAGE programmes
With all programmes, you can set the length of application and (for each of the two channels) pulse intensity separately.
Besides this, with TENS and EMS programmes 11-20, you can also change the pulse frequency of the individual cycles in order to adapt the stimulation effect to the structure of the site of application.
Cycles are the different sequences making up the programmes. They automatically run one after the other and increase the efficacy of stimulation on different types of muscle fibre and combat premature muscle fatigue.
You will find the standard stimulation parameter settings and information on placing the electrodes in the following programme charts for TENS, EMS and MASSAGE.
6.2 TENS programmes
| Prog. No. | Reasonable areas of application Indications | Possible electrode position | Cycle 1 | Cycle 2 | Cycle 3 | Cycle 4 | ||||||||||||
| Cycle 5 | Cycle 6 | Cycle 7 | Cycle 8 | |||||||||||||||
| Width (μs) | Fre-quen-cy (Hz) | On Time (sec.) | Off Time (sec.) | Width (μs) | Fre-quen-cy (Hz) | On Time (sec.) | Off Time (sec.) | Width (μs) | Fre-quen-cy (Hz) | On Time (sec.) | Off Time (sec.) | Width (μs) | Fre-quen-cy (Hz) | On Time (sec.) | Off Time (sec.) | |||
| 1 + 11 | Neck pain, tension headache | 01, 02, 13 | 250 | 4 | 30 | 0 | 250 | 4 | 30 | 0 | 250 | 5 | 30 | 0 | 250 | 5 | 30 | 0 |
| 250 | 6 | 20 | 0 | 250 | 6 | 20 | 0 | 250 | 8 | 30 | 0 | 250 | 8 | 30 | 0 | |||
| 2 + 12 | Back pain | 03, 04, 05, 06, 15, 23 | 250 | 6 | 30 | 0 | 250 | 6 | 30 | 0 | 250 | 8 | 20 | 0 | 250 | 8 | 20 | 0 |
| 250 | 10 | 20 | 0 | 250 | 10 | 20 | 0 | |||||||||||
| 3 + 13 | Shoulder pain | 07, 14 | 250 | 2 | 10 | 0 | 250 | 4 | 8 | 0 | 250 | 6 | 6 | 0 | ||||
| 4 + 14 | Pain as a result of rheumatoid arthritis | See note | 250 | 60 | 20 | 0 | 250 | 70 | 20 | 0 | 250 | 80 | 30 | 0 | 250 | 80 | 30 | 0 |
| 5 + 15 | Lumbar pain | 22 | 250 | 80 | 20 | 0 | 250 | 80 | 20 | 0 | 250 | 75 | 4 | 0 | 250 | 10 | 20 | 0 |
| 250 | 70 | 4 | 0 | 250 | 65 | 4 | 0 | |||||||||||
| 6 + 16 | Menstrual pain | 08 | 250 | 40 | 30 | 0 | 250 | 45 | 30 | 0 | 250 | 55 | 30 | 0 | 250 | 60 | 30 | 0 |
| 7 + 17 | Pain programme I | See note | 250 | 4 | 30 | 0 | 250 | 4 | 20 | 0 | 250 | 6 | 30 | 0 | 250 | 6 | 20 | 0 |
| 250 | 8 | 30 | 0 | 250 | 8 | 20 | 0 | 250 | 10 | 30 | 0 | 250 | 10 | 20 | 0 | |||
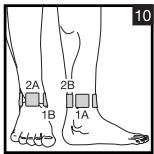
| 8 + 18 | Knee pain Ankle joint pain, capsular injuries | 09, 10 | 250 | 40 | 5 | 0 | 250 | 6 | 10 | 0 | 250 | 50 | 5 | 0 | ||||
| 9 + 19 (Burst) | Pain programme II | See note | 250 | 75 | 0,25 | 0,25 | 250 | 2 | 0,5 | 0 | ||||||||
| 10 + 20 (Burst) | Pain programme III | See note | 250 | 100 | 0,25 | 0,25 | ||||||||||||
On-Time (sec.) = Cycle switch-on time in seconds (contraction) - Off-Time (sec.) = Cycle switch-off time in seconds (relaxation)
Note: Electrode position is supposed to surround the painful area. With painful muscle groups, the electrodes are grouped round the muscle affected. In case of joint pain, the joint on the front/rear side of the joint and, if electrode distances permit, on the right and left sides of the joint, should be surrounded with electrodes.
Minimal electrode distance should not be less than 5cm and not exceed 15cm . See figure no. 9 an 10 for knee and ankle joint.
Burst programmes are suitable for all sites which should be treated with an alternating signal pattern (to ensure minimum habituation).
6.3 EMS programmes
| Prog. No. | Reasonable areas of application Indications | Possible electrode position | Cycle 1 | Cycle 2 | Cycle 3 | Cycle 4 | ||||||||||||
| Cycle 5 | Cycle 6 | Cycle 7 | Cycle 8 | |||||||||||||||
| Width (μs) | Fre-quen-cy (Hz) | On Time (sec.) | Off Time (sec.) | Width (μs) | Fre-quen-cy (Hz) | On Time (sec.) | Off Time (sec.) | Width (μs) | Fre-quen-cy (Hz) | On Time (sec.) | Off Time (sec.) | Width (μs) | Fre-quen-cy (Hz) | On Time (sec.) | Off Time (sec.) | |||
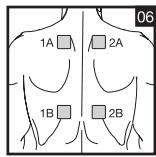
| 1 + 11 | Shoulder muscles | 07, 14 | 250 | 30 | 5 | 1 | 250 | 10 | 15 | 1 | 250 | 50 | 5 | 1 | ||||
| 2 + 12 | Middle and lower trapezius muscle, lattisimus dorsi muscle, neck muscles | 01, 02, 03, 04, 05, 12, 15 | 250 | 4 | 30 | 1 | 250 | 4 | 20 | 1 | 250 | 5 | 30 | 1 | 250 | 5 | 20 | 1 |
| 250 | 6 | 30 | 1 | 250 | 6 | 20 | 1 | |||||||||||
| 3 + 13 | Back musculature near spinal column, Prog. I | 03, 06, 22, 23 | 250 | 2 | 10 | 1 | 250 | 4 | 10 | 1 | 250 | 6 | 10 | 1 | ||||
| 4 + 14 | Front and back upper arm musculature (including biceps), front and back lower arm musculature | 16, 17, 18, 19 | 250 | 4 | 30 | 1 | 250 | 4 | 30 | 1 | 250 | 4 | 30 | 1 | 250 | 5 | 30 | 1 |
| 250 | 5 | 30 | 1 | |||||||||||||||
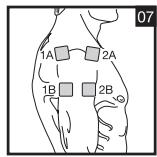
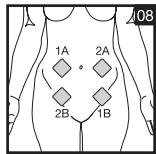
| 5 + 15 | Straight and transverse abdominal musculature | 11, 20, 21 | 250 | 6 | 15 | 1 | 250 | 8 | 15 | 1 | 250 | 10 | 15 | 1 | ||||
| 6 + 16 | Back musculature near spinal column, Prog. II | 03, 06, 22, 23 | 250 | 2 | 20 | 1 | 250 | 2 | 20 | 1 | 250 | 1 | 30 | 1 | 250 | 1 | 30 | 1 |
| 7 + 17 | Back musculature near spinal column, Prog. III | 03, 06, 22, 23 | 250 | 4 | 30 | 1 | 250 | 4 | 20 | 1 | 250 | 6 | 30 | 1 | 250 | 6 | 20 | 1 |
| 250 | 8 | 30 | 1 | 250 | 8 | 20 | 1 | |||||||||||
| 8 + 18 | Posterior musculature | 24 | 250 | 20 | 5 | 1 | 250 | 6 | 5 | 1 | 250 | 30 | 5 | 1 | ||||
| 9 + 19 | Front and back upper thigh musculature | 25, 26 | 250 | 20 | 5 | 1 | 250 | 6 | 8 | 1 | 250 | 25 | 5 | 1 | ||||
| 10 + 20 | Front and back lower thigh musculature | 27, 28 | 250 | 25 | 5 | 1 | 250 | 6 | 8 | 1 | 250 | 35 | 5 | 1 | ||||
On-Time (sec.) = Cycle switch-on time in seconds (contraction) - Off-Time (sec.) = Cycle switch-off time in seconds (relaxation)
6.4 MASSAGE PROGRAMMES
| Prog. no. | Massage form |
| 1 | Tap and grasp massage |
| 2 | Knead and grasp massage |
| 3 | Tap massage |
| 4 | Side of hand/pressing massage |
| 5 | Side of hand/pressing massage |
| 6 | Vibratory massage |
| 7 | Tap massage (switch between electrodes) |
| 8 | Massage jet (switch between electrodes) |
| 9 | Pressure massage jet (switch between electrodes) |
| 10 | Combination programme (switch between electrodes) |
Electrodes must be placed so that they surround the muscle segments in question. For optimal effect, electrode distance must not be greater than approx. 15 cm.
The electrodes should not be applied to the anterior wall of the thorax, i.e. never massage the left or right large pectoral muscle.
6.5 Information on placing the electrodes
For the desired success of any stimulation application, it is important that electrodes are placed sensibly.
We advise you to coordinate with your doctor regarding the best electrode positions for your intended field of application.
The electrode positions suggested inside the cover (Figs. 1-28) serve as a guide. The following applies when choosing electrode positions:
Electrode distance
The greater the electrode distance which is selected, the greater will be the volume of tissue that is stimulated. This applies to the area and the depth of the tissue volume. At the same time, however, the strength of tissue stimulation decreases as the electrode distance becomes greater, which means that, if a greater electrode distance is chosen, a greater volume is stimulated, but stimulation is weaker. To increase stimulation, pulse intensity must then be increased.
The following guideline holds when selecting electrode distances:
- most reasonable distance: approx. 5-15 cm
below 5cm it is mainly surface structures which are strongly stimulated - over 15cm , large-area and deep structures are stimulated very weakly
Electrode relationship to muscle fibre orientation
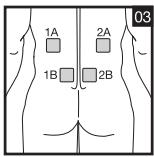
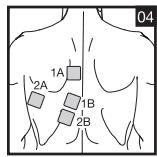
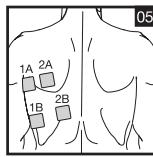
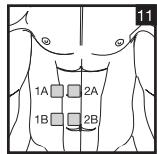
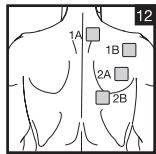
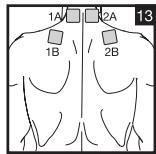
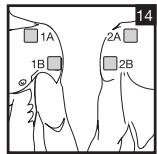
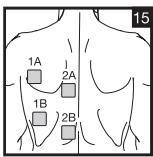
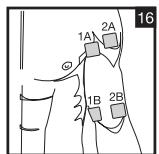
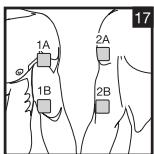
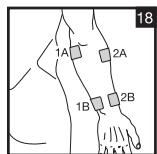
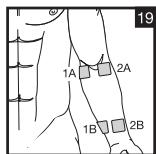
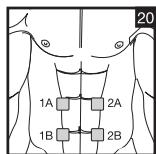
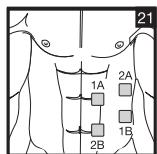
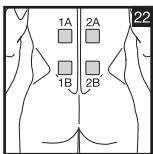
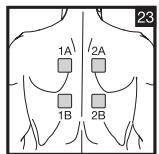
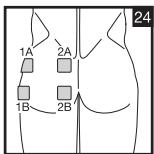
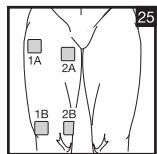
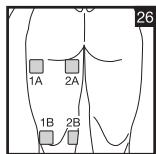
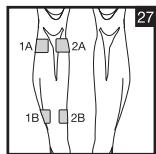
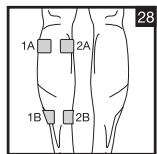
Choice of current flow direction must be adapted to the muscle fibre orientation according to the desired muscle layer. If surface muscles are to be reached, the electrodes must be placed parallel to the fibre orientation (p. 2, fig. 16; 1A-1B/2A-2B). If deep tissue layers are to be reached, the electrodes must be placed crosswise to the fibre orientation (p. 2, fig. 16; 1A-2A/1B-2B). The latter arrangement can, for example, be achieved via the cross electrode arrangement, e.g. p. 2, fig. 16; 1A-2B/2A-1B.
Note the colour-codes of the cables and the channels. The white cable belongs to channel CH1 and the grey cable to channel CH2.
① In the treatment of pain (TENS) using the Digital EMS/TENS machine with its 2 separately controllable channels and in each case 2 adhesive electrodes, it is advisable to either position the electrodes of one channel so that the pain spot lies between the electrodes or else you position one electrode directly on the pain spot and the other at least 2 - 3cm away.
The electrodes of the second channel can be used to treat other pain spots simultaneously or else, however, together with the electrodes of the first channel, to surround the pain area (opposite). A cross arrangement is again advisable here.
① Massage function tip: always use all 4 electrodes to ensure optimal treatment.
① In order to extend the durability of the electrodes, use them on clean skin which is as free as possible from hair and grease. If necessary, clean the skin with water before application and remove the hair.
① If an electrode becomes detached during the application, the pulse intensity of both channels goes to the lowest setting. Press the ON/OFF key to enter pause mode, reposition the electrode and continue application by pressing the ON/OFF key again and setting the required pulse intensity.
7. Application
7.1 Advice on application
- If the machine is not used within 3 minutes, it switches off automatically (automatic switch-off function). When it is switched on again, the LCD main menu screen appears, with the last used submenu flashing.
- If an admissible key is pressed, there is one short beep. If an inadmissible key is pressed, there are two short beeps.
7.2 Procedure for TENS, EMS and MASSAGE programmes 01-10 (quick start)
- From the programme charts, select a programme that is suitable for your purpose.
- Place the electrodes in the area selected and connect these to the machine. The corresponding positioning suggestions may help you here.
- Press the ON/OFF key in order to switch on the machine.
- Press MENU and navigate through the sub-menus (TENS/EMS/MASSAGE) and confirm your selection with ENTER (Fig. 1, example of TENS display).
- Using the UP/DOWN keys, select the programme you want and confirm with ENTER (Fig. 2, example of display for No. 1 TENS programme).
- Using the UP/DOWN keys, select the total treatment time and confirm with ENTER (Fig. 3, example of 30-minute treatment duration). The machine is in wait status (Fig. 4).
- Press ON/OFF to start the stimulation treatment. The operation status display starts to change (Fig. 5).
- Select the pulse intensity which is the most comfortable for you by pressing the key CH 1+/CH 2+. The pulse intensity display adapts accordingly.
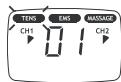
Fig. 1
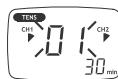
Fig. 2
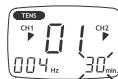
Fig. 3
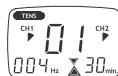
Fig. 4
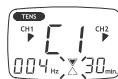
Fig. 5
7.3 Procedure for TENS/EMS programmes 11 to 20 (individual programmes)
Programmes 11 to 20 are preset programmes which you can also individualise. Here you can set pulse frequency.
- From the programme charts, select a programme that is suitable for your purpose.
- Place the electrodes in the area selected and connect these to the machine. The corresponding positioning suggestions may help you here.
- Press the ON/OFF key in order to switch on the machine.
- Press MENU and navigate through the sub-menus (TENS/EMS/MASSAGE) and confirm your selection with ENTER (Fig. 1, example of TENS display).
- Using the UP/DOWN keys, select the programme you want and confirm with ENTER (Fig. 2, example of display for No. 11 TENS programme).
- Using the UP/DOWN keys, select the frequency you want for Cycle 1 (Hz) and confirm with ENTER (Fig. 3). Repeat this process for all subsequent cycles.
- To terminate frequency setting, set the frequency (Hz) after the cycle last required "--0" and press ENTER. All frequency settings of subsequent cycles are then automatically set at "0" and thus not taken into account.
Tip: Hold down the ENTER key for 2 seconds in order to skip frequency settings and access 'treatment time setting'. In the event that you need all 8 cycles, you can also press ENTER for 2 seconds to terminate selection of frequency settings.
- Using the UP/DOWN keys, select the desired treatment time and confirm with ENTER (Fig. 4, example of 30-minute treatment duration).
- The machine is in wait status (Fig. 5).
- Press ON/OFF to start the stimulation treatment. The operation status display starts to flash (Fig. 6).
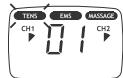
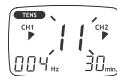
Fig. 1
Fig. 2
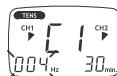
Fig. 3
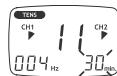
Fig. 4
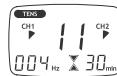
Fig. 5
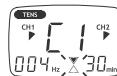
Fig. 6
- Select the pulse intensity which is the most comfortable for you by pressing the key CH 1+/CH 2+.
The pulse intensity display adapts accordingly.
① Note: Your individualised programme settings are stored and automatically retrieved when you select it next.
7.4 Changes to the settings
Changing intensity (during application)
- CH1+/- and CH2+/-: Changing the intensity for each channel.
- DOWN key : the intensity of both channels is reduced.
Interrupting stimulation
Press the ON/OFF button.
If you press it again, the application is resumed.
Switching off a complete channel
Press the CH- key until the channel reaches the lowest intensity, then hold the key depressed until the channel no longer appears in the display. Hold down the corresponding key CH + to reactivate the channel.
Changing application (completely or single parameters)
- ON/OFF: to interrupt stimulation
- MENU: back to program selection window or main menu
- Set required parameters. Confirm with ENTER. Press ON/OFF to continue application.
7.5 Doctor's Function
Doctor's Function is a specific setting to allow you to call up your specific personal programme even more easily.
Your individual programme setting is immediately retrieved in wait status when you switch on and is activated by simply pressing the ON/OFF key
Settings for this individual programme may, for example, be on the advice of your doctor.
With the Doctor's Function, only pulse intensity can be changed during stimulation treatment. All other parameters and programmes of the Digital EMS/TENS are blocked in this case and cannot be modified or called up.
Setting the Doctor's Function:
-
Select your programme and appropriate settings as described under 7.2 or 7.3.
-
Before you activate the programme by pressing the ON/OFF key, hold ON/OFF and CH 2+ keys down simultaneously for approximately 5 seconds. Storage in Doctor's Function is confirmed by a long signal tone.
Cancelling Doctor's Function:
To clear the device again and access other programmes, hold down the two keys ON/OFF and CH 2+ once again for approximately 5 seconds (not possible during stimulation). Cancelling of the Doctor's Function is confirmed by a long signal tone.
8. Cleaning and storage
Adhesive electrodes:
- In order to ensure that the electrodes adhere for as long as possible, they should be cleaned carefully with a damp, lint-free cloth.
After use, stick the electrodes onto the backing film.
Cleaning the unit:
- Remove the batteries from the device every time you clean.
- Clean the unit after use with a soft, slightly moistened cloth. In case of more extreme soiling you can also moisten the cloth with mild soapy water.
- Ensure that no water penetrates into the machine. If this should ever happen, only use the machine again once it is completely dry.
- Do not use any chemical cleaners or abrasive agents for cleaning.
Storage:
- Remove the batteries from the unit if you are not going to use it for a longer period. Leaking batteries can damage the unit.
- Do not make any sharp kinks in the connecting leads or electrodes.
- Detach the connecting cable from the electrodes.
- After use, stick the electrodes onto the backing film.
- Store the machine in a cool, well-ventilated place.
- Never place any heavy objects on the machine.
9. Disposal
Used, fully discharged batteries must be disposed of in a specially labeled collection container, at toxic waste collection points or through an electrical retailer. You are under legal obligation to dispose of batteries correctly.
Note: You will find these markings on batteries containing harmful substances: Pb = battery containing lead, Cd = battery containing cadmium, Hg = battery containing mercury.

Please dispose of the device in accordance with the directive 2002/96/ EC - WEEE (Waste Electrical and Electronic Equipment). If you have any queries, please refer to the local authorities responsible for waste disposal.

10. Problems and solutions
The machine does not switch on when the ON/OFF button is pressed. What should I do?
(1) Make sure that the batteries have been inserted correctly and have contact.
(2) Change the batteries if necessary.
(3) Contact customer service.
The electrodes are detaching themselves from the body. What should I do?
(1) Clean the adhesive surface of the electrodes with a damp, lint-free cloth. Then let them dry in the air and attach them again. Should the electrodes still not adhere firmly, they must be replaced.
(2) Before each application, clean the skin, avoiding using any skin cream or oils before treatment. Shaving can increase adhesion of the electrodes.
The machine is giving out abnormal signal tones during treatment. What should I do?
(1) Look at the display. Is any channel flashing? Interrupt the programme by pressing the ON/OFF button. Make sure that the connecting leads are properly connected to the electrodes. Make sure that there is a firm contact between the electrodes and the treatment area.
(2) Make sure that the plug of the connecting lead is firmly connected to the machine.
(3) If the signal tones do not stop and the channel is flashing, change the connecting cable.
(4) The display shows a flashing battery signal. Renew the batteries.
There is no noticeable stimulation. What should I do?
(1) If a warning signal sounds, go through the steps described above.
(2) Press the ON/OFF key to start the programme again.
(3) Check that the electrodes are positioned properly and make sure that the adhesive electrodes are not overlapping.
(4) Increase pulse intensity in stages.
(5) The batteries are almost empty. Replace these.
You are aware that the electrodes feel uncomfortable. What should I do?
(1) The electrodes are badly positioned. Check positioning and if necessary reposition the electrodes.
(2) The electrodes are worn. Due to the fact that current distribution can no longer be guaranteed evenly over the entire surface, these may lead to skin irritation. You must therefore replace these.
The skin in the treatment area becomes red. What should I do?
Stop treatment immediately and wait until the skin has returned to normal. If any redness beneath the electrode soon disappears, this is not dangerous and is due to the increased circulation which has been stimulated locally. If, however, the skin irritation remains and there is possibly itching or inflammation, please consult your doctor before further use. It may possibly be caused by an allergy to the adhesive surface.
The belt clip is not secure. What should I do?
If the clip is fastened to the belt and only then connected to the machine, there is not optimal hold. You should therefore take the machine in your hand. Position the belt clip on the back of the machine. You will notice the correct position of the clip when you hear it click into position. Now secure the machine with belt clip on the belt again.
11. Technical details
Name and model:
SEM 40
Initial curve shape:
biphasesquare-wave pulse
Pulse duration:
40-250 μs
Pulse frequency:
1-120 Hz
Output voltage:
max. 90 Vpp (at 500 Ohm)
Output current:
max. 180 mApp (at 500 Ohm)
Power supply:
3x AAA batteries
Treatment time:
adjustable from 5 to 90 minutes
Intensity:
adjustable from 0 to 15
Operating conditions: 10^ - 40^ (50°F-104°F) with a relative humidity of 30-85%
Storage conditions: -10°C-50°C (14°F-122°F) with a relative humidity of 10-95%
Dimensions: 130 × 68 × 29 mm (incl. belt clip)
Weight: 105 g (without batteries), 140 g (incl. belt clip and batteries)
Explanation of symbols: Application part type BF Caution! Read the instructions for Use.
Note: If the machine is not used according to these specifications, perfect functioning is not guaranteed.
We reserve the right to make any technical alterations that are necessary in order to improve and develop the product further.
This unit is in line with European Standards EN60601-1, EN60601-1-2 and EN60601-2-10 and is subject to particular precautions with regard to electromagnetic compatibility (EMC). Please note that portable and mobile HF communication systems may interfere with this unit. For more details, please contact customer service at the address indicated.
The machine meets the requirements of the European Medical Products Directive 93/42/EC and the German Medical Products Act. In accordance with the Operators' Ordinance on Medical Products, regular measurement precision controls must be carried out if the machine is used for commercial or economic purposes. Even in the case of private use, we recommend checking measurement precision at two-yearly intervals at the manufacturers.
FRANÇAIS
Sommaire
8x electrodes auto-adhesives (45 x 45 mm), ref. n° 661.22
20 programmes TENS
20 programmes EMS
10 programmes MASSAGE
7.5 Doctor's Function
IeCTBnE 3NeKTPOCTMUNLAuIN, KAc IpaBnIO, CTAHOBnTC BnIDbIM TOnbKO NocpeyIaRHO NOBTOpHOrO INPImeHEnr. 3NeKTPOCTMUNLAuaN He 3aMeHReT peYIaRHyTOpeHIOBV KyMbIu, HO B 3NaHTeJIbHO CTeNEHn DOnoJIHReT ee DeIcTBnE.
TENS TONHOM TENS - YpeckoKHOJ 3JeKTOpOCTMnyIeMe HEPBbIX OKOHauHHI - NOHMAMOT DeIcTBUOeue Yepe3 KOKY 3NeKtPrUeCKoe BO36yXdHeNIE HEPBOB. TENS DOnyueH KaCteuchte KINHueCKn DOka3AHNO, 3ΦΦeKTNBHO, He MEKnkAmeHTO3HO, npi PAnBbHOM PImMeHNHe NHE MIOeTO No6OHyBx 3ΦΦeKToE MeTOnaNo IeueHnIO B0ne, Bbl3bIbEMbX OnpedEnHbIMn PInuHNNAM, -PnI 3OTM B T. u nI pOcToI camOpTepanH. BoJeTyOnHooee N 60JeNoDaBJIraOooee DeIcTBVe
DOCTNRAE TCR, KPOME BCERO IPOQERO, NYTEM NODABLENH NEPEDAQUI BOJIN IO HEPBAIM (PNI 3TOM, PNPJDE BCERO, BNAOJAPR BAICOKOACTOTbHM IMNPNbCAM) IN POCTA BbIeJIENH YAOTERHOHO 3NIDOPHNA, KOPTOB YMEHBsaET YCBCTBNTeHOCtB K 60JIN BSAOJAPR CBOEMY DeIcTBnIO HA CEHTPAJBNO HEPBNO CNUCTeM. MeToD hauHyo NOITBepKdENH I DONYUeH K MEINIHNHCKOMY pIMMEHEHIO.
Kakda Kaptna 3aboeBaan, nO3BoJHOaA nC0nIb3oBaTb TENS, dOJIxHa 6blb oBroBOpena C leauM Bpaom. OH daCT Bam TaXke yKa3aHnNo cAmOTepaHn C npImeHHeNEM TENS.
TENS Klnnueckn nCtBtAn iOnyueh IaI cneyuOxns ObnaTei npImeHnA:
- 60JI N B CINHe, OCO6eHNO XaIOnbI B OblaCTn IONCHNCHOrO IN SeiHOrO OT.deIIOB P03BOHOHnKA
- 60JI B C cytBaBax (HanpIMep, KOJIeHNbIX, Ta3ObeIpeHNbIX, IJIeYeBbIX)
HEBpaanm
TOLOBHbIe 60nn - 60nnpmMeHCTpyaunx y jekuHH
60NIIOcNE TpaBM ONOpHO-DBnIaTeNbHOrO annapaTa - 60nl npi HapuweHnX KpOoOpaueHn
XPOHHeCKHe 60nBb3bBaemble pa3nHbIMn pnuHaMn.
3Jektpocmmya Mblu (EMS) ABnETc 11pOKo paCnpocPaeHHbIM n 6Oeepn3HaHbIM MeTOOM n yXe MHOrne T0dbI pPrMeHReTc B cOpTbHoi n peBunltaHOHIOH mEHNBE. B OAnstc cNoPTa n fHTHeCA EMS npmeHReTc KaK DOnOJIHeHNE K O6bHbIM MeTOdAM TpeHIpOBKn MbU, YTo6b I NOBbICNTb cyHKNUOHaJIhBe CNOcObHcTn MbluN n DoCTNb JKeJaEMbIX pONOpzI TeJa. EMS nCOnb3yeTcB n DBxu HaprabHeHnx. C ODoH CTOpOBy, MOKHO Bbl3BaTb CEHeHApBANHeHoe UkpeJIeHne MyCKyNAtpyi (akTNBpyIOoee npMeHEHne), a C dpyro-M oKxet DOctnATcbsc Paccla6bIaIOoee, BOCCTaHABINBAIOoee DeIcTBNe (paccla6bIaIOoee npMeHEHne).
KaTnBpyIOUeMyIpIMHeHNOOTHOCTCA:
- TpeHnPOBkA MblIz DJIY NOBbIeHnB BblHOcJIbOcTn N/NI
- TpeHnPoBkA MbIuZ IaIIOIepKKn YKpeJIeHn OIpTeJeHHbIX MbIuZ IIN IpyPiMbIuZ, UTObI DOCTUBy XeJaAeMbIX N3MeHEnB IN pONOpCuaX Tea.
KpaccnaablaioeMy npimehenHIO OTHOCTa:
- peIakcaIy MblIz dIy yCTpaHEnI paTxAKeHIn 3aIeMJIeHn MbIz
-
ynyuheHne npn ABIeHNX MbIeHuOy yCTaIOCTN
-
yckopene perehepaun MbIuPn oocne 6oIbwoMblueHNO Harpy3Kn (HaNPmep, oocne mapafohckoro 6era).
Kpome toro, mfpobov np6bop EMS/TENS 6laqoapra BcTpoehno TexhonoMMAccaxa daet BO3MOXHOCTb c NOMOsbIO np6blnkeHHo NO BOCPnATNIO n DeiCTBNO KpealbHomy Maccaxy pOgrpammby MeHbwaTb pactxJHnI 3aueMJIeHHnMbIuN 6bOpTbC rABNeHHAMy yctanoCTn.
Ha ochobahm pekomehdaa mno 0n3uohnpobahm n TaBnI nporpamM, npnbedeHHbX B daHNO IHCTpyKun, Bbl moKeTe b6ICTPO n IpocTo ONpeDenTb NaCtpoKy npnbopa dna COOTBeCTByIOe IpnMeHENr (B 3abncmoCTn OT cactn TeNa) n dla COOTBeCTByIOe DeICTBna.
Блардяпьургелов рогунчypевмьkananam,цфрбов пибор EMS/TENS obecneuBaet Bo3MOxHcObtpeylnpOBK INHTeCNBHOCTNIMpylbcoB He3aBnCmIO Dpyr O TdpYra Ha Dbe YacTn TeJa, HapPImep, YTObI OXBaTnTb Teno C obexxCtropoH nIN paBHomepo CTMUnpOBaT bOJIbIme yucTkn TkaHei.
Kpome TORO, INHINBUNyAunbHaerpyIINPOBka INHTECNBHOCTN KaKDO RKAHala daaet Bam BO3MOXHOCTb ONDBOHEMENHO pIMMEHHe NpIbOpa B DByx pa3JIuHbIX qactx Tena, 6bnrOapar Yemy DoCTnraeTcra 3KOHOMN BpeMeHn NO cpabHeHIO C nocJeDobatbHbIM pIMMEHHeM.
1.2 06bem nocTabKn
- 1цфровь пибор EMS/TENS(BKЛЮЧАЗацELКУДЯ ремнA)
-1coeHNHTeHbHkab - 4camokklehouxxra3neKtpo4a(45x45MM)
- 36aTapeiKu TnIa AAA
JaHHa HNCTpyKUINI NO pIPMEHeHIO
DOnOHnHTeBHO NOKyNaembIe YactN
8camokkJeIoUxixc3JeKeKtpoDob(45x45MM),apt.N661.22
4camokneuixcnaektpoia (50x100MM),apt.N661.21
2.ВaxHbIe yKa3aHnI
PpimmeHne pnp6opa He 3aMeHHET Bpaue6hIx KOHCyIbTaun I neeHnA.
Po3tomy npn IIO6bIX TINAX 6OJIe INIIN 6OJIe3HeBcerda npedbapntelho
npokOHcyIbTnpyIteCb C BPaQOM!
BHIMAHHE!
Bo n36exaHne Bpea 3doPoBbHO HacToTbeHo He peKoMeHyetc npImeHtB cnfoBOI np6Op EMS/TENS B cIeDyUxN CnyaHx:
-При IMПлаHTИРованьх ЗЛЕКТрОпиБорax(наррIMeP,СТИМУЛТOP рNTMa cepdua)
- PnHaNUHmMeTaNlNueCKNX IMnJaNaHTaTOB
-Дялodeи,Исплььтуоших Инсулиноьtie haCoobci
-При ВьICOKОТ TemпepаType (нанример,свьие 39°C)
- ПИЗИЗВЕСТНБИ XIЛОСТРБИХ HAPUSEHЯХ PHTMa CERДА经pyrnx HAPUSEHЯx BO36byJxDEHЯ经 INPObEDEHЯ IMPyIbCoB VCEpDce
- pni npinaKax (Hapnpimep, 3nInneCm)
BOBpem86epemehHOCTN
- ppi paKOBbIX 3a60neBaHnIrx
PONCE ONEpaCm, PnI KOTOpbIX ycINeHHe COKpaSeHHe Meblu MoKeT MeaAtb PPOUecCy Bb3DopOBLeHnA
3aPpeaaetcnpmmeHne pnpbopa B6n3n cepda. CTmyIpyuOHe 3JeKTPoDbl 3aPpeaaetc yctahablnBaTb B KaKnx-Ni60 ToKk NappeHne Yactn rpydno H KJIeTKn (orpaHNeHHp6paMn I pydnoH)B OOC6eHHocTHn Ha oboxN 6bIbXHrpydHbIXMbIbXaz.3deCb OH MOKET NOBbUaTb OAnCHOCTb MEPaHaHJ XeJyDuOcOB cepda N BbIbTaBocAHOBky cepda
- Ha KocTAX Yepena, B OBJLACTN pTa, TIOITKN IINI ROPTaH
B OBJACTI IeN/COHbIX apTePNI
B ObnaCTn NIOOBbIX OpraHOB
- PnO octPbIX INI XPOHueckX 3a60eBaHnx KoxN (NOBpeKHeHIN INI BOCaJIeHIN), (HAnpIMep, PnO 60e3HHeBIX INI Be63oBe3HHeHbIX BOCaJIeHIN, NOKpaCEHINx, KOHXoH CbIN (HaNPIMep, aJIePrIn), OXorax, UdaPax, OTeKaX, Ha OTKpbITbIX INI 3aXHBauOx pxAHx, HApamax Iocne Opeaun, HaxoDaIuxxC B npOcece 3aXNBHeHH)
-При ВсICOKОВ ВlaJXHOCTN B03dUxa,наprIMeP,В BaHHbIX KOMHaTAX ИИN Prn prneme BaHHbI INI dUsha.
He nolb30BaTbCn pOcne yNoTpe6NeHn aIkoROn
- Pnp OJHOBpeMeHOM npICoEINHeHIM K BbICOKOaCTOTHOMy XmpyrInueckOMy annapaty

Ipeed npimeneHnem npnbopa npokohcybtpnytecbJeauaum Bpaqom npi:
OCTpbix 3a60eneBaHnIX, B OOC6EHocTn Pnpi NIOo3peHHN ININ HAInuH apTePnaIbHOI TnepToHHN, HapUSeHHx CBeptbBaHHN KPOBn, CKIOHooCTN K TpOM6o3M6oHN, a TAKXe PnI 3I0kaeeCTBeHHbIX HOBOO6pa3OBaHHX
JIIO6bIX KOXHbIX 3a6OJIeBaHHIaX
HEBbIaHcEHbIX XPOHnueCKNX 60JIe3HeHHbIX COCTOARHX, HE3aBICIMo OT YaCTN TEJa
- Dna6eTe
- liobix Hapyuhenx yBCTBnteHbOCTn C NOHNXeHHo 60JIeBOI yBCTBNTeHbHO (Haipimep, pIn Hapyuhenx oMeHa BceCTB)
- ODHOBpEmHNO IPOBOIDMbIX MEdIuHcknX JueeHnX
- BO3HnKaHOUxN PnI CTmUyIaIuIN XaIIO6ax
- HeNCHe3aIOxN pa3dpaXeHnIX KoxN B CBA3N C dIINTeJIbHOI CTIMyJLcIN C paCIOJIOXeHmE 3NeKtPOJOB B OJHOM I TOM JEMCTe
BHIMAHINE!
IcnoIb3yIe zIuIpBoO npI6Op EMS/TENS nckIouHTeIbHo:
-Дилodei
B cJIeJX, dJIa KOTOpbIX OH 6BJI pa3pAbOtaH, n TOLJI bKO CNOCo6OM, ONICAHbIM B DAHNHO INCHETpyKUIN IO pImMeHHeHIO. IIO6OE HnpeBaINbHOE NcNOJIb3OBAHne MOKET 6BJT OANChBIM
-ДагНаухного РимMuHeHnA
C BXOJAMM B O6bem NIOCTABKIN IDOJOLHNTeBHO KUYIeHHbIMN OPINHAJIbHBIMN PIPINAJIeXKHOCTAMN, B IPOTNBHOM CJIyae TepaOT CBOHO CINLY PIPITRAHNA NO PpeoCTabHeHne rapaHTNI
MEPbI PEPDOCTOPOXHOCTN:
BceIa ChImaTe 3neKToDblc KOKn, He CnIIuKOM CInbHO TAnH 3a HIX, YTObbl B peKnx Cnyaax Oueh yBCTBnteJIbHO KOKn PpeDTbpaTtB ee NOBpexDeHn.
- He npin6nkaite npin6op K nctouhknam TeIa N He nCIOJIb3yIte erO B6n3N (~1 M) KOPOTKo- INMKNPOBONHObIX npin6obpOB (HapnPIMep, MO6INbHBIX TeJeFOHOB), T. K. 3TO MOKET npINBOIDNTK HENPNAITbIM CKaHcAM TOKA.
- He noADBperaIte npmbop DeiCTBIO npAMybIX COJIHeHbIX lyuei IIN BbICOKHX TemnepaTyp.
3aunuaTe npnbop ot nbI, rpa3n n BnaI. Hn B koem cnyae he norpykaTe npnbop B oOy uIN dpYrne KJdkocTn.
-ПиборпохдглперсогинговИспогьзовима.
Peynpobka ypOBHn INTEHCNBHOCTn 3aBNCIT OT INIMBNUyAIBHORO cy6BeKTHBHO OoUyEHN KaxJDO TOnJIbHO NOIb3OBATeTn ONpeJeNtC8oBbHM YcNlOM BeINuH, KaK, HApnPmep,
Obnactb npimHeHn, KpOBo0baPeHne B KOKe, TOniMa HKOx, a TaKke KaeeBTO KOHTaKaTc 3JeNkToPdAmn. Ha npaktnke NaCTpoKa DoJnxHa 6bTb 3ΦeKtmbHoi, Ho H N B KOem Cnyae He DoJnxHa BblBaTaB He npriATbIX OuyuHm, Hapmep, Boone B
obnaTn pnpMeHHeN. B TO BPm, kak JelKm 3yd yka3bIaet Ha doctaOnHyo 3heprnO CTMyJauzim, 3anpeaaetc npmeHrtb HactpoKIn, KOtOpBe bbl3bIaOt 60JIb. Pn dInTeBHom nCpOJIb3OBaHm MoKET nOTpe6ObaTb cpeRyIpOBKa B CBA3n C BPemHHbIMn IpOeCCAMn aJaNTaTcM K ObnaTn npmeHHeN.
3.5 LKmHoe HmHeHne npaMeTPOB mnyIbCOB
Bo MHORIX cnyaXr Tpe6yeTcR NyTeM npIMHeHn HeckOblkHX npaMeTpoB MMnYbCOB OXBATITb BCE COBOKNHOCTb CTpyKtpy TKAHN B o7laactn npIMHeHn. B uPPOBOM npIbope EMS/TENS 3TO ocUeCTBnEeTc 6bAoRaTOMy, YTO npEJaRaemble npOrpAmMbY ABOTMaTHueCKN BblONHJOT zKlNUeCeKo N3MeHne npaMeTPOB MMnYbCOB. TEM cAmbm Takxse PpeoTbpaaueTcYctALoCTb OTdJIbHbX rpyPiMbIu C obNaCTn npIMHeHn.
B uippoBOM npio6ope EMS/TENS nmeIOCT paHOnHaJIbIe IpeDBApNTeHbIe hAcTpoKn npaMeTPOB TOka. Ho BBy moKeTe B JIO6oB MOMENT BO BPemr npImeHeHnI3MeHnTB INTEcHmBHOCTb IMNyIbCOB, a, KpOme TOrO, BOTJeHbIX npOrpaMMax BBy moKeTe npEBApNTeHbNO 3MeHNt bactOTy IMNpyIbCOB, YTO6bl npOBectn 60lee npiaTHoe iIN cyJnauee 60nbui yCnex npImeHeHne.
OtncaHne np6opa
4.1 0603haeHne KOMHOHeTOB
Дисплей (гльавhoe Meню):
A INHTEHCNBHOCTb IMNpyIbCOB
B Homepa nporpaMM/ukKIOB
C Yactota (T)
D Hn3Km yPoBeHb 3apra da 6aTaapeek
E TOnMeHToTENS/EMS/MASSAGE
FФунклгайтмера (Индikаць оctabшeroя Врemeи)
G INHINKaiznpekima pa60tbl
KhoNk:
a KhoNkBb60pa UP(BBepx)uDOWN(BH3)
b Khonka ENTER
C Khonka BKNBbIKN
d Khonka MEHIO
e Khonka CH1+, CH1-, CH2+, CH2-
PpinaJdxKHOCTn:
1 coeMHInTeHbN Ka6Bn (c 2 pa3dJIbHO peRyIINpyEmbIMn KaHaIaMn, BnDHO np a3HbIM cBETAM)
- 4 caMOKneIOUxCnA
3JIeKtPoJa (45 x 45 MM)
13auneJaIpeMHa
4.2ФункцнКонOK
Kaxdoe haxatne KhoNknoTBePckDaetc3yKBOBIM CnHaiom, YTObI o6paNTb BHMaHHe NaCnyaHoe Haxatne KHONoK. 3TO T3ykoBOn CnHan He MoXeT 6bITb BbIKIOUeyH.
BKN/BbIKN
(1) KopoTko HaxaTbДЯ BkIIOUeHn PpIbOpa. EcJI N KHOIIKApI pR bKIOUeHn OCTaETc HaxaToI 10 cekyHd, pNbOp aBTOMaTHueCKn OTKlIOuAeTc.
(2)Перьване CTIMулиш OДнOKpaTHыm habaem =pexim nay3bl
(3) Bbiklnochene npi60pa dInTeIbHbIM HaXaTHeM (OK. 3 cekyHd)
#
(1) Bb6op (A) nporpaMMbl, (B) yacToTb n (C) dInTeJIbHOCTn BO3dEiCTBn
(2) KhoNkoDNOW▼ BO BpEMa CTmMyIaIuM yMeHbIaETCa INTeHCnBHOCTb NmIyIbCoB dIЯ O6Onx KaHaJIOB.
MEHIO
(1) Habiruaia Mekdy noDmeHIO TENS, EMS n MASSAGE
(2)Bo3BpaT B (A) OKHO BbIbOpa nporpamM nII B (B) rIaBHOe MeH0
ENTER
KhoNka DOWN V: INHTeHcNBHOCTb 6OoNX KaHaNoB yMeHbIaETCA
IpepbIbAHne CTmMyJIaUN
HaxaTb KhoNkY BKJ/BblKJI.
HaximMatb KhoNky CH- do Tex nop, noka KaHaJ He DoCTnHET HaimeHbSei
INTeHcNtBHOCTn, 3aTeM YdepXBaTb KhoNky HkaToI Do Tex nop, noka OH BoIbHe 6byet Nok3bIbTaCn Ha DnCnnee.
Ecnbl Bby UdepXbaTe HaxaToI COOTBeTCTByOuSyo KhoNky CH+, To KaHaJ ChOba AKTNbPyETcA.
7.5 Doctor's Function
Doctor's Function -3to CnseuaIbHaN HAcTpoiKa, c NOMOJIbKOToPoB BBy eJe pOneU nCpeHApBaIeHHeM MoXeTe BBy3BaTb A6cONIOHO nepcoHaJbHyo npOrpaMMy. BaAa INdInDyIaHNaH HAcTpoiKa npOrpAMM BBy3bBAeTCR c43y Je Prn BKNIOueHHn B coCToHme OxNDAHm I AKTHINpyTCnPocTbIM HaxaTMEM KhoNk BNJI/BbIKL. HaCtpoika 3ToN INdINDbIaHbHO npOrpAMMb MoXeT BByIOINHrTaCB, HapImep, no cobety BaWero Brapa.
PnakTbNupOBaHNo Doctor's Function Bo BpemCTmMyIaMIM MoXHO h3MeHnTB TOnbKO HHTeCNBHOCT mNpyLcob. Bce npametpbI nnporpaMbI uDpOBOrO np6oBa EMS/TENS B 3tOM Cnyae 3aboknpoBaHb I He MOrY 6bIT h3MeHeHb I Bbl3BaHbI.
Hacrpoika Doctor's Function:
- BbIbepnTe BaUy npOrpAmMy n COOTBETCTBYIOJIne HAcTpoKn, KaK OINcAHO B n. 7.2 n 7.3.
- Празд,Чь AkTиВироваы Рограмунхашипем кнОПКВКЛ,ODНOBРЕмноУдахивайтей Хаатын KMONKВКЛИСCH2+В teueHne 5 cekynd.
CoxpaHHeB Doctor's Function noTBePckJaTeCnДIInTeJIbHbIM 3ByKOBbIM CmHaIOM.
Ydalenne Doctor's Function:
Pn6Op He BkIIOaetc npn Haxatm KhoKb BKJI/BblKJ. YTo DeNaTb?
(1) Y6eɪntbca B TOM,чTo 6aTapeɪKn IIpaBɪnIbHo BIOXeHbI N I MɪEHT KOHTaKT.
(2)Прии Нeo6хODIMOCTN,Заментббатарк.
(3) CBa3bca co cnyk60y TexHnueckoro 06ecneueHna.
3JektpoDbI OTBaIIBaIOTc TeJa. 4To DeNaTb?
(1) KneKyIO NOBEPXHOCTb 3NEKTPOIOB ONUCTNtB BnAIXHO, He BOIOKHNCIO TPRIKO. 3aTeM DaTb BbICOXHYb Ha BO3DyXE YCTaHOBNrTOBTOPHO.EcIN 3NEKTPoDb BCE paBHO He DEpKaTcR, INx HEo6xoIMo 3AMeHNb.
(2)Пелед Кождьим Истпьтбовим Рочиь Кожу, He ПOLTБОВТСВЕДБАМAMIM Маламн Дли Ухда за Кожени. Брита может улунштф ркcaцию ЗпektpoюB.
Bo BpemnIb3OBAHn np6op nOaet anHomJIbHbIe 3ByKOBbIe CnHaJIbI. YTo dena?
HnkaKoIyBCTbTeJIbHOITcIMyIaIuNHe npOnCxOJNT.HTo DeNaTb?
(1) Ecnn 3buynt npdeynpejdxaoiun cnHn, BblonHtbn OnilcaHhbe Bblwe onepaunm.
(2)Диновторного заусякnapограмьнхаы BKЛ/BblKЛ.
- DEUTSCH
- Inhaltsverzeichnis
- Doctor's Function
- Getting to know your machine
- What is Digital EMS/TENS and what can it do?
- Scope of supply
- Subsequent purchase articles
- Important Information
- WARNING!
- Before using the machine, you should consult with the doctor in charge of your treatment in the event of the following:
- IMPORTANT!
- Use the Digital EMS/TENS solely:
- PRECAUTIONARY MEASURES:
- Damage:
- Information on ESD (Electrostatic Discharge)
- Current parameters
- Pulse shape
- Pulse frequency
- Pulse width
- Pulse intensity
- Cycle-controlled pulse parameter variation
- Unit description
- Description of components Display (main menu):
- Keys:
- Accessories:
- Key functions
- ON/OFF
- and
- MENU
- ENTER
- Start-up
- Programme overview
- Basic information
- MASSAGE PROGRAMMES
- Information on placing the electrodes
- Electrode distance
- Electrode relationship to muscle fibre orientation
- Application
- Advice on application
- Procedure for TENS, EMS and MASSAGE programmes 01-10 (quick start)
- Procedure for TENS/EMS programmes 11 to 20 (individual programmes)
- Changes to the settings
- Changing intensity (during application)
- Interrupting stimulation
- Switching off a complete channel
- Changing application (completely or single parameters)
- Setting the Doctor's Function:
- Cancelling Doctor's Function:
- Cleaning and storage
- Adhesive electrodes:
- Cleaning the unit:
- Storage:
- Disposal
- Problems and solutions
- The machine does not switch on when the ON/OFF button is pressed. What should I do?
- The electrodes are detaching themselves from the body. What should I do?
- The machine is giving out abnormal signal tones during treatment. What should I do?
- There is no noticeable stimulation. What should I do?
- You are aware that the electrodes feel uncomfortable. What should I do?
- The skin in the treatment area becomes red. What should I do?
- The belt clip is not secure. What should I do?
- Technical details
- FRANÇAIS
- Sommaire
- 06bem nocTabKn
- 2.ВaxHbIe yKa3aHnI
- BHIMAHHE!
- Bo n36exaHne Bpea 3doPoBbHO HacToTbeHo He peKoMeHyetc npImeHtB cnfoBOI np6Op EMS/TENS B cIeDyUxN CnyaHx:
- Ipeed npimeneHnem npnbopa npokohcybtpnytecbJeauaum Bpaqom npi:
- BHIMAHINE!
- IcnoIb3yIe zIuIpBoO npI6Op EMS/TENS nckIouHTeIbHo:
- MEPbI PEPDOCTOPOXHOCTN:
- LKmHoe HmHeHne npaMeTPOB mnyIbCOB
- OtncaHne np6opa
- 0603haeHne KOMHOHeTOB
- Дисплей (гльавhoe Meню):
- KhoNk:
- PpinaJdxKHOCTn:
- 4.2ФункцнКонOK
- BKN/BbIKN
- #
- MEHIO
Brand : SANITAS
Model : DIGITAL EMS TENS
Category : EMS and TENS devices