
IBU3114V - Frying Pan Cylinda - Free user manual and instructions
Find the device manual for free IBU3114V Cylinda in PDF.
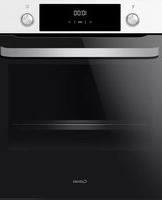


| Type of product | Frying pan |
| Brand | Cylinda |
| Model | IBU3114V |
| Diameter | 28 cm |
| Height | 5 cm |
| Handle length | 20 cm |
| Weight | 1.2 kg |
| Materials | Aluminum body with non-stick ceramic coating |
| Handle material | Heat-resistant plastic |
| Induction compatible | Yes, magnetic induction base |
| Heat source compatibility | Gas, electric, ceramic, induction |
| Oven safe | Up to 180 °C (without lid) |
| Non-stick coating | PFOA-free ceramic coating |
| Dishwasher safe | No, hand wash recommended |
| Suitable utensils | Wood or silicone, avoid metal |
| Maintenance | Clean with soft sponge and warm water |
| Safety features | Cool-touch handle, stable flat base |
| Spare parts | No user-serviceable parts; contact support |
| Repairability | Designed for professional repair |
| Warranty | Standard manufacturer warranty |
Frequently Asked Questions - IBU3114V Cylinda
User questions about IBU3114V Cylinda
0 question about this device. Answer the ones you know or ask your own.
Ask a new question about this device
Download the instructions for your Frying Pan in PDF format for free! Find your manual IBU3114V - Cylinda and take your electronic device back in hand. On this page are published all the documents necessary for the use of your device. IBU3114V by Cylinda.
USER MANUAL IBU3114V Cylinda
IBU3114RF
IBU3114V
Viktigt!
The packaging materials 100% recyclable and is marked with the recycle symbol ✉ The various parts of the packaging must therefore be disposed of responsibility and in full compliance with local authority regulations governing waste disposal.
SCRAPPING OF HOUSEHOLD APPLIANCES
When scrapping the appliance, make it unusable by cutting off the power cable and removing the doors and shelves (if present) so that children cannot easily climb inside and become trapped.
This appliance is manufactured with recyclable or reusable materials.
Dispose of it in accordance with local waste disposal regulations.
For further information on the treatment, recovery and recycling of household electrical appliances, contact your competent local authority, the collection service for household waste or the store where you purchase the appliance.
This appliance is marked in compliance with European Directive 2012/19/EU, Waste Electrical and Electronic Equipment (WEEE).
By ensuring this product is disposed of correctly, you will help prevent potential negative consequences for the environment and human health, which could otherwise be caused by inappropriate waste handling of th is product.

The symbol 📄 on the product or on the accompanying documentation indicates that it should not be treated as domestic waste but must be taken to an appropriate collection center for the recycling of electrical and electronic equipment.
ENERGY SAVING TIPS
Only preheat the oven if specified in the cooking table or your recipe. Use dark lacquered or enamelled baking moduls as they absorb heat far better. Standard cycle (PYRO): which is suitable for cleaning a very dirty oven. Energy-saving cyde (PYRO EXPRESS/ECO) - only in some models -: which consumes approximately 25% less energy than the standard cycle.
Select it at regular intervals (after cooking meat on 2 or 3 consecutive occasions).
DECLARATION OF CONFORMITY
This appliance has been designed, constructed and distributed in compliance with the requirements of European Directives:
LVD 2014/35/EU, EMC 2014/30/EU and RoHS 2011/65/EU.
This appliance, which is intended to come into contact with foodstuffs, complies with European Regulation CE n. 1935/2004.
This appliance meets the Eco Design requirements of European Regulations n. 65/2014, and n. 66/2014 in conformity to the European standard EN 60350-1.

Material Chemicals

REACH Regulation (EU) 1907/2006
RoHS Directive 2011/65/EU


Energy

CE mark (LVD, EMC, RED, MD, etc.)
General Product Safety Directive (GPSD)
Directive 2001/95/EC
EcoDesign Directive 2009/125/EC + ErP:
Energy Labelling Regulation (EU) 2017/1369

Waste
Management
Waste Framework Directive (SCIP) 2008/98/EC
Packaging Waste Directive 94/62/EC
Waste from Electrical and Electronic Equipment
(WEEE) Directive 2012/19/EU
Installation
Montering av ugnen
Nätanslutning
OBS!
Live L: BN - brun
Neutral N: BU - blå

Digitalt ur
Observera!

Ångrengöring Steam Clean

Låsa upp barnlåset.

Read the entire manual carefully before using the appliance for the first time. You will learn how to use the appliance it and look after it properly from the start.
Table of contents
page
Safety advice....27
Safeguarding the environment....29
Declaration of conformity....30
Installation....31
Before using the appliance for the first time 33
Electronic programmer....33
The oven and its functions....37
Cleaning the oven door....45
Technical data....48
NOTE
Electrical connection must be made by a properly certified, qualified installer.
The appliance is intended for household use only. Incorrect use carries the risk of injury.
GUIDELINES CONCERNING THE SAFETY OF USE
Warning: The appliance and its accessible parts become hot during use. Care should be taken to avoid touching heating elements. Children less than 8 years of age shall be kept away unless continuously supervised.
This appliance can be used by children aged from 8 years and above and persons with reduced physical, sensory or mental capabilities or lack of experience and knowledge if they have been given supervision or instruction concerning use of the appliance in a safe way and understand the hazards involved. Children shall not play with the appliance. Cleaning and user maintenance shall not be made by children without supervision.
Note. Electrical connection must be made by a properly certified, qualified installer.
The appliance is intended for household use only. Incorrect use carries the risk of injury.
The oven is very hot while in use and for some time after it has been switched off.
When the oven is in use, some parts will become hot.
Warning: Do not use harsh abrasive cleaners or sharp metal scrapers to clean the oven door glass since they can scratch the surface, which may result in shattering of the glass.
Warning: Ensure that the appliance is switched off before replacing the lamp to avoid the possibility of electric shock.
GUIDELINES CONCERNING THE SAFETY OF USE
Caution: The cooking process has to be supervised. A short term cooking process has to be supervised continuously.
Danger of burns! Hot steam may escape when you open the oven door. Be careful when you open the oven door during or after cooking. Do NOT lean over the door when you open it. Please note that depending on the temperature the steam can be invisible.
You should not use steam cleaning devices to clean the appliance.
The appliance must not be installed behind a decorative door in order to avoid overheating.
The appliance has been designed only for cooking. Any other use (for example for heating) does not comply with its operating profile and may cause danger.
Use only original temperature probe supplied with the appliance.
DISPOSAL OF PACKAGING MATERIALS
The packaging materials 100% recyclable and is marked with the recycle symbol. The various parts of the packaging must therefore be disposed of responsibility and in full compliance with local authority regulations governing waste disposal.
SCRAPPING OF HOUSEHOLD APPLIANCES
When scrapping the appliance, make it unusable by cutting off the power cable and removing the doors and shelves (if present) so that children cannot easily climb inside and become trapped.
This appliance is manufactured with recyclable or reusable materials.
Dispose of it in accordance with local waste disposal regulations.
For further information on the treatment, recovery and recycling of household electrical appliances, contact your competent local authority, the collection service for household waste or the store where you purchase the appliance.
This appliance is marked in compliance with European Directive 2012/19/EU, Waste Electrical and Electronic Equipment (WEEE).
By ensuring this product is disposed of correctly, you will help prevent potential negative consequences for the environment and human health, which could otherwise be caused by inappropriate waste handling of th is product.

The symbol 📄 on the product or on the accompanying documentation indicates that it should not be treated as domestic waste but must be taken to an appropriate collection center for the recycling of electrical and electronic equipment.
ENERGY SAVING TIPS
Only preheat the oven if specified in the cooking table or your recipe. Use dark lacquered or enamelled baking moduls as they absorb heat far better. Standard cycle (PYRO): which is suitable for cleaning a very dirty oven. Energy-saving cyde (PYRO EXPRESS/ECO) - only in some models -: which consumes approximately 25% less energy than the standard cycle.
Select it at regular intervals (after cooking meat on 2 or 3 consecutive occasions).
DECLARATION OF CONFORMITY
This appliance has been designed, constructed and distributed in compliance with the requirements of European Directives:
LVD 2014/35/EU, EMC 2014/30/EU and RoHS 2011/65/EU.
This appliance, which is intended to come into contact with foodstuffs, complies with European Regulation CE n. 1935/2004.
This appliance meets the Eco Design requirements of European Regulations n. 65/2014, and n. 66/2014 in conformity to the European standard EN 60350-1.

Material Chemicals
REACH Regulation (EU) 1907/2006
RoHS Directive 2011/65/EU


Energy

CE mark (LVD, EMC, RED, MD, etc.)
General Product Safety Directive (GPSD)
Directive 2001/95/EC
EcoDesign Directive 2009/125/EC + ErP:
Energy Labelling Regulation (EU) 2017/1369

Waste Management
Waste Framework Directive (SCIP) 2008/98/EC
Packaging Waste Directive 94/62/EC
Waste from Electrical and Electronic Equipment
(WEEE) Directive 2012/19/EU
Installation
Installing the oven
- The kitchen area should be dry and aired and equipped with efficient ventilation. When installing the oven, easy access to all control elements should be ensured.
- Coating or veneer used on fitted furniture must be applied with a heat-resistant adhesive (100°C). This prevents surface deformation or detachment of the coating.
- Hoods should be installed according to the manufacturer's instructions.
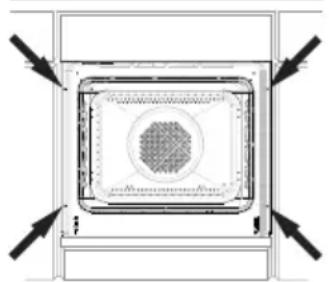
- Make an opening with the dimensions given in the diagram for the oven to be fitted.
- Make sure the mains plug is disconnected and then connect the oven to the mains supply.
- Insert the oven completely into the opening without allowing the four screws in the places shown in the diagram to fall out.
Electrical connection
Warning. All electrical work should be carried out by a suitably qualified and authorised electrician. No alterations or wilful changes in the electricity supply should be carried out.
The oven is manufactured to work with a one-phase alternating current (230V 1N\~50Hz) and is equipped with a 3 x 1,5 mm 4 connection lead. The electricity supply for the oven must have a safety switch which enables the power to be cut off in case of emergency. The distance between the working contacts of the safety switch must be at least 3 mm.
Before connecting the oven to the power supply it is important to read the information on the data plate and the connection diagram.
Connection diagram
Caution! In the event of any connection the safety wire must be connected to the ⏚PE terminal.
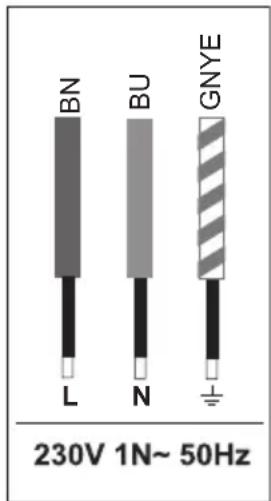
Live L: BN - brown
Neutral N: BU - blue
Earth PE: GNYE -green/yellow
Power circuit should be protected with a 16A fuse.
Recommended type of connection lead:
H05VV-F, 3 x 1,5mm².
Important. If the fixed power supply cable is damaged, it should be replaced at the manufacturer or at an authorized servicing outlet, or by a qualified person to avoid danger.
Built-in dimensions

Before using the appliance
Clean the appliance using a damp cloth, possibly with some soap or mild washing-up liquid. Rinse and dry thoroughly. After cleaning, heat the oven with top and bottom heater to 250° C for approx. 30 minutes. The smell produced by heating the oven is harmless but still you should ventilate.
Do not clean with: steel wool, abrasive scouring powder or anything else that can scratch.
You cannot use pots with plastic handles in the oven.
Push-pull knobs
The cooker is equipped with a push-pull knobs. In order to select a function do the following:
• Gently press and release a knob which will pop out.
- Turn the knob to the desired function.


Electronic programmer
Caution!
The time "0.00" will start flashing in the display field upon connection to the power supply.
The programmer should be set with the current time. (See Electronic programmer). If the current time is not set operation of the oven is impossible.

MENU - select the mode of operation
- sensor Plus
< - sensor Minus- appliance on indicator
- Kitchen Timer
- Duration
- End Time
Setting the time
When the appliance is plugged into the electrical mains supply, or when power is restored after power outage, the digital display will show flashing 0.00:
- Touch and hold MENU (or simultaneously touch < and >) until you will see on the display and the dot below the symbol is flashing.
- Touch < or > within 7 seconds to set the current time.
To store the new time setting, wait approximately 7 seconds after time has been set. The dot below the symbol will stop flashing.
You can adjust the time later. To do this touch < and >, simultaneously and adjust the current time while the dot below the symbol is flashing.
Note:
The oven can be turned on when you see the symbol on the display.
Kitchen Timer
You can active the Kitchen Timer at any time, regardless of the status of other functions. The Kitchen Timer can be set from 1 minute up to 23 hours and 59 minutes.
To set the Kitchen Timer:
- Touch MENU, then the display will show blinking Ⓐ
- Use the < and > sensors to set the Kitchen Timer. The display will show the set time and Kitchen Timer symbol ⚠. Once the set time elapses, alarm sounds and the 🔊icon flashes.
- Touch and hold the < / > or MENU to mute the alarm. The â will be off and the display will show the current time after approximately 7 seconds.
Note:
If no button is touched, alarm will turn off automatically after approximately 7 minutes.
Timed operation
To set the appliance to switch off after a specific duration:
- Set the function selector knob and the temperature selector knob to your preferred settings.
- Touch MENU repeatedly until the display shows dur (duration) briefly and the symbol will be flashing.
- Set the desired duration from 1 minute to 10 hours using the < / > sensors.
The set duration will be memorised after about 7 seconds. The display will show the current time and the [→] symbol.
Once the duration time has elapsed the oven will turn off automatically. You will hear an alarm and the land symbols will be flashing.
- Set the oven function selector knob and the temperature selector knob in off position.
- Touch and hold < / > or MENU to mute the alarm. The and ⇔ will be off and the display will show the current time after approximately 7 seconds.
Delayed timed operation
In order to set the appliance to switch off at a specific time after a set Duration has elapsed, set the Duration and the End Time:
- Touch MENU repeatedly until
the display shows dur (duration) briefly and the symbol will be flashing,
- Set the desired duration from 1 minute to 10 hours using the < / > sensors.
- Touch MENU repeatedly until the display shows End briefly and the symbol will be flashing.
- Set the End Time using the < / > , sensors, a maximum of 23 hours and 59 minutes ahead.
- Set the function selector knob and the temperature selector knob to preferred settings. The H and functions are now active. The appliance will switch on at End Time minus Duration (i.e. if the set Duration is 1 hour and the set End Time is 14:00, the appliance will automatically switch on at 13:00).
Once the Duration time has elapsed the oven will turn off automatically. You will hear an alarm and the land will be flashing.
- Set the oven function selector knob and the temperature selector knob in off position.
- Touch and hold < / > or MENU to mute the alarm. The and ⇔ will be off and the display will show the current time after approximately 7 seconds.
Cancel settings
Timer and automatic function settings may be cancelled at any time. Cancel automatic function settings:
- Simultaneously touch and hold the < / > sensors.
Cancel timer settings:
- Touch the MENU sensor to select the Kitchen Timer.
- Simultaneously touch the < /> sensors.
Change the beep tone
You can change the beep tones as follows:
- Simultaneously touch and hold the < / > sensors.
- Touch MENU repeatedly to select the ton (tone). The display will be flashing ton I.
- Touch < / > to select the preferred tone:
Use the > to select the setting 1 to 3
Use the < to select the setting 3 to 1.
Adjust display brightness
You can adjust display brightness 1 to 9, where 1 is the darkest and 9 is the brightest. The brightness setting applies to an inactive control panel, i.e. when no controls are touched for 7 seconds.
You can adjust display brightness as follows:
- Simultaneously touch and hold the < / > sensors.
- Touch MENU repeatedly to select the bri (brightness) setting
— the settings can be accessed in sequence ton (tone) and bri (brightness).
- Touch < / > to select the preferred brightness:
Use the > to select the setting 1 to 9
Use the < to select the setting 9 to 1.
Night Mode
The display is dimmed during the night hours 22:00 — 06:00.
Temperature Probe
Adjustment and display range: 30°C bis 99°C, Resolution: 1 Grad, Default set value: 80°C.
Temperature probe is recognized automatically when temperature at meat probe is above 0° C.
Important!
The temperature probe socket is protected with a cap.
Remove the protective cap from the socket to be able to plug in the temperature probe.
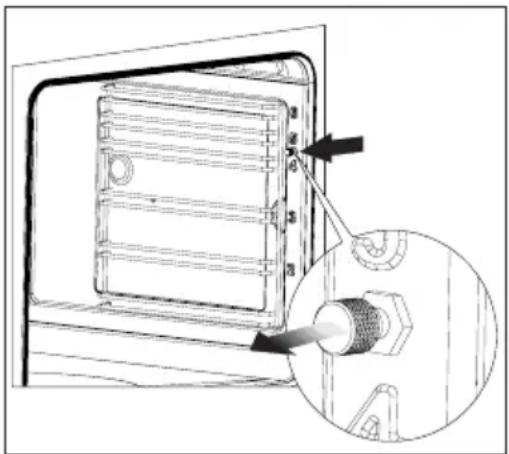
If meat probe is plugged in, the two digits on the left side show the actual temperature at the meat probe and the two digits at the right side show the set point value.
If the probe temperature is lower than the minimum setting temperature of 30° C, the display reads "30". If the probe temperature is higher than the maximum setting temperature of 99° C, the display reads the maximum setting temperature.
With plugging in the connector of the meat probe, the program is started and the nominal temperature is set to 80° C. The value of the set temperature can be changed as long as the temperatures are displayed, but not when timer is still in start up mode.
The meat probe alarm can be reset by pressing any key.
An active meat probe program or a pending alarm can be reset by disconnecting the meat probe and pressing any key.
The use of temperature probe is recommended when cooking large portions of meat (at least 1 kg).
The use of temperature probe is not recommended when cooking poultry and meat with bones.
When not in use, disconnect the temperature probe from its socket and remove from oven chamber.
Important!
Use only original temperature probe supplied with the appliance.
Recommended probe temperature settings
| TYPE OF MEAT TEMPERATURE[°C] | |
| PORKFilletRoast | 85 - 9080 - 85 |
| BEEFRoast beef or filletRareMediumWell done | 90 - 9550 - 5565 - 7075 - 80 |
| VEAL 85 - 90 | |
| LAMB 85 - 90 | |
| VENISON 80 - 85 | |
| FISHe.g. salmon trout,cod | 80 - 85 |
The oven and its functions
The symbols on the oven function knob have the following meaning:

ECO
ECO Heating
This is an optimised heating function designed to save energy when preparing food. At this knob position, the oven lighting is off.

Interior lighting
When the knob is turned to this position, the interior oven lighting is lit.

Fan and bottom heating switched on
This knob setting activates both the fan and the bottom heating element. The oven is then heated from the bottom. Suitable e.g. for pizza and pies.
Important! If the temperature knob is set to zero, the cooling setting is used.

Top heater, bottom heater and fan are on.
This knob setting is most suitable for baking cakes. Convection baking (recommended for baking).

Fan and ring heater on
When this function is activated, the fan on the rear wall of the oven starts.
This provides constant and even air circulation inside the oven.
This heating method has the following benefits:
• The oven heats up faster and there is no need to preheat it
- Two levels can be used at the same time
- Meat dishes lose less fat and juices during heating, which improves the flavour
• The oven does not get as dirty
You must use the temperature settings together with the fan function.
Important! If the fan function is switched on when the temperature knob is set to zero, only the fan is activated. This setting can be used to cool dishes or the oven.

Top and bottom heating switched on.
Highest temperature 250° C. If the knob is set to this position, the oven heats up normally.

Bottom heating on
Highest temperature 200°C.

Grill on
This setting activates the grill.

Intensive grill (grill plus top heat)
The food is grilled and heated from above at the same time. In this way, the temperature is higher at the top of the oven, making the roasted food darker in colour. A practical setting for grilling thick items

Fan and intensive grill on
The grill plus top heat and fan run at the same time. This reduces the grill time and improves the flavour.

Defrosting
Only fan is on and all heaters are off.
Rapid Preheating
Ring heater and grill on. Use to preheat the oven.
Temperature knob
The oven temperature is controlled by the temperature knob on the control panel, indicated by the symbol ° C. The oven stops heating up when you turn the knob to zero.
Always follow the advice given in the recipe for the food you are baking/cooking.
Light indicators
Two light indicators indicate that the oven has been activated – a yellow and a red indicator. When the yellow light indicator lights up, it means the oven operates. When the red light indicator goes out, it means the oven has reached the set temperature. If a recipe for a dish recommends that the dish is placed in a heated oven, do not put it in the oven until the red light indicator has gone out. During baking, the red light indicator will light up and go out intermittently (maintaining the temperature in the oven). The yellow light indicator can also light up when the knob is in the "Oven lighting" position.
Baking
Wait until the oven reaches the right temperature (light indicator turns off) before placing the baking in the oven.
Right baking time
Follow the instructions in the recipe. Be extra careful the first few times you use your new appliance to bake, the appliance may heat somewhat faster than your previous appliance.
Cooking
Follow the advice in the recipe. If it is a dish you have made many times before you should be extra careful the first few times you make it in your new appliance.
Grilling
Follow the advice in the recipe. Place the food on the grill and slide the grill rack into the top position in the oven. Push the roasting pan into the position below to collect any dripping fat.
Do not put aluminium foil on the bottom or walls of the oven.
The heat does not radiate properly, so there is a risk of damaging the enamel in the oven.
Baking
● Tables 1 and 1A are recommended for baking.
- The baking parameters are given for 3 different types of heat: conventional heating (top and bottom heating element), fan
Function, top heating element + fan.
Roasting meat
● Table 2 is recommended for roasting meat.
The roasting parameters are given for conventional heating and for fan.
● The recommended parameters for meat, fish and toast are compiled in table 3.
● The recommended parameters for roasting with fan are compiled in table 4.
TABLE 1: Pastries
| Pastries | Top and bottom heating element | Fan assisted heating | Top/bottom heating element | Baking time [min.] | |||
| Oven setting | Temperature [°C] | Oven setting | Temperature [°C] | Oven setting | Temperature [°C] | ||
| Baking in a baking pan | |||||||
| Sponge cake | 2 | 170-180 | 2 | 150-170 | 2 | 150-170 | 60-80 |
| Sponge cake | 2 | 160-180 | 2 | 150-170 | 2 | 150-170 | 65-80 |
| Flan case | 2-3 | 170-180 | 2-3 | 160-170 | 2-3 | 160-170 | 20-30 |
| Soft sponge | 2 | 170-180 | 30-40 | ||||
| Shortcrust pastry flat with fruit | 2-3 | 160-180 | 2-3 | 160-180 | 60-70 | ||
| Cheesecake (on shortcrust pastry base) | 2 | 140-150 | 2 | 140-160 | 60-90 | ||
| Yeast cake | 2 | 160-180 | 2 | 150-170 | 2 | 150-170 | 40-60 |
| Bread (e.g. granary) | 2 | 210-220 | 2 | 180-200 | 2 | 180-200 | 50-60 |
| Baking on baking trays | |||||||
| Shortcrust pastry flat with fruit | 3 | 170-180 | 3 | 160-170 | 3 | 160-170 | 35-60 |
| Fruitcake (yeast or baking powder) | 3 | 160-170 | 3 | 160-170 | 30-50 | ||
| Hundreds and thousands cake | 3 | 160-170 | 3 | 150-170 | 3 | 150-160 | 30-40 |
| Jelly roll | 2 | 180-200 | 10-15 | ||||
| Pizza (thin base) | 3 | 220-240 | 3 | 200-220 | 10-15 | ||
| Pizza (thick base) | 2 | 190-210 | 3 | 180-200 | 30-50 | ||
| Small pastries/cakes | |||||||
| Small pastries/cakes | 3 | 170-180 | 3 | 150-160 | 3 | 150-160 | 10-25 |
| 2 | -plates | -- | 1+3 | 140-150 | -- | -- | 25-35 |
| Puff pastry | 3 | 180-190 | 3 | 170-190 | 3 | 170-180 | 18-25 |
| Meringue | 3 | 90-110 | 2 | 90-110 | 80-90 | ||
| Profiteroles | 2 | 170-190 | 2 | 170-190 | 35-45 | ||
Buns
75 g yeast
150 g margarine
500 ml milk (whole milk)
1/2 teaspoon salt
135 g sugar
Cardamom
900 g flour
Crumble the yeast and mix it with some of the milk. Melt the margarine and pour in the rest of the milk. Mix all the ingredients until you have a smooth dough.
Let the dough rise for 15 min in the bowl. Shape it into small balls and put them in moulds. Let them rise for 30–40 min on the tray. Glaze with beaten egg and sprinkle with granulated sugar.
Bake at 160-180°C top and bottom heating elements for 30-40 min, or 150-170°C fan for 30-40 min.
Muffins
approx. 20 pcs.
1 juicy sponge cake or 1 rich sponge cake with grated lemon rind 60–90 g raisins or currants
Oven temperature:
top and bottom heating elements 180-190°C
or fan 160-170°C
Baking time 10-20 min
Switch on the oven. Make the cake mixture according to one of the suggestions, adding grated lemon rind in both cases. Mix in raisins of currants.
Put muffin cases/paper cases on a tray.
Put the mixture in the cases, e.g. using a spoon.
Bake in the centre of the oven for 10-20 min.
Swiss roll
3 eggs
135 g sugar
120 g flour
1 teaspoon baking po- wder
1 tablespoon water
Filling:
280 g stewed fruit or jam or 1 portion of chocolate butter icing
Baking time 10-15 min
Makes 20-24 slices. Oven temperature, top and bottom heating elements 180-200°C
Easy to mix, quick to cook and roll up. Can be filled with e.g. slightly sweetened stewed apple, raspberry jam or chocolate butter icing. Switch on the oven in good time. Cover a tray with greaseproof paper or baking paper. Beat the egg and the sugar. Mix the flour and backing powder and stir it in carefully, together with the water. Spread out the dough on the paper in an even layer. Bake in the centre of the oven, 10-15 min with the top and bottom heating elements at 180-200°C. Sprinkle some sugar on the cake and tip it onto a piece of greaseproof paper. Brush with some cold water and remove the paper the cake was baked on. Spread on a thin layer of stewed fruit or jam and roll up. Or let the cake cool under a damp piece of greaseproof paper, spread with chocolate butter icing and roll it up.
TIPS: Cut the Swiss roll into approx. 3 cm slices, top with whipped cream and fruit or berries and serve for dessert.
TABLE 1A: Pastries
| Pastries | Top and bottom heating element | Fan assisted heating | Baking time min. | ||
| Oven setting | Temperature [°C] | Oven setting | Temperature [°C] | ||
| Buns | 3 | 160-180 | 3 | 150-170 | 30-40 |
| Muffins | 3 | 180-190 | 3 | 160-170 | 10-20 |
| Jelly roll | 3 | 180-200 | - | - | 10-15 |
TABLE 2: Roasting meat
| Meat dish | Oven setting from below | Temperature °C | Roasting time* min. | ||
| Fan assisted heating | Conventional oven | Fan assisted heating | Conventional oven | ||
| Beef | approx. 1 cm: 12-15 | ||||
| Roast beef or fillet | 3 | 250 | |||
| preheated oven | 3 | 250 | 15-25 | ||
| pink (medium) | 3 | 210-230 | 25-30 | ||
| preheated oven well done | 3 | ||||
| Roast | 2 | 2 | 160-180 | 200-220 | 120-140 |
| Pork | |||||
| Roast | 2 | 2 | 160-180 | 200-210 | 90-140 |
| Ham | 2 | 2 | 160-180 | 200-210 | 60-90 |
| Fillet | 3 | 210-230 | 25-30 | ||
| Veal | 2 | 2 | 160-170 | 200-210 | 90-120 |
| Lamb | 2 | 2 | 160-180 | 200-220 | 100-120 |
| Venison | 2 | 2 | 175-180 | 200-220 | 100-120 |
| Poultry | |||||
| Chicken | 2 | 2 | 170-180 | 220-250 | 50-80 |
| Goose (approx. 2 kg) | 2 | 2 | 160-180 | 190-200 | 150-180 |
| Fish | 2 | 2 | 175-180 | 210-220 | 40-55 |
*Recommendations in table 2 apply to a 1 kg meat portion.
Roasting large cuts of meat is preferable, but the cooking time for each additional 1kg is 30–40 min extra. Turn the cut of meat halfway through the cooking time.
Important: only use ovenproof dishes.
TABLE 3: Grill
| Dish | Oven setting from the bottom | Temperature [°C] | Cooking time [min.] | |
| One side The | other side | |||
| Pork chop | 4 | 250 | 8-10 | 6-8 |
| Minced pork | 3 | 250 | 10-12 | 6-8 |
| Kebab | 4 | 250 | 7-8 | 6-7 |
| Sausages | 4 | 250 | 8-10 | 6-8 |
| Roast beef (approx. 1kg) | 3 | 250 | 12-15 | 10-12 |
| Veal chop | 4 | 250 | 8-10 | 6-8 |
| Roast veal | 4 | 250 | 6-8 | 5-6 |
| Lamb chop | 4 | 250 | 8-10 | 6-8 |
| Half chicken (approx. 500 g) | 3 | 250 | 25-30 | 20-25 |
| Fillet of fish | 4 | 250 | 6-7 | 5-6 |
| Trout (approx. 200 – 250g) | 3 | 250 | 5-8 | 5-7 |
| Toast | 4 | 250 | 2-3 | 2-3 |
TABLE 4: Fan + grill
| Dish | Weight[kg] | Oven settingfrom below | Temperature[°C] | Roasting time[min.] |
| Roast pork | 1.0 | 2 | 170-190 | 80-100 |
| 1.5 | 2 | 170-190 | 100-120 | |
| 2.0 | 2 | 170-190 | 120-140 | |
| Lamb | 2.0 | 2 | 170-190 | 90-110 |
| Roast beef | 1.0 | 2 | 200-220 | 30-40 |
| Chicken | 1.0 | 2 | 180-200 | 50-60 |
| Duck | 2.0 | 1-2 | 170-190 | 85-90 |
| Goose | 3.0 | 1 | 140-160 | 110-130 |
| Turkey | 2.0 | 2 | 180-200 | 110-130 |
| 3.0 | 1-2 | 160-180 | 150-180 |
During roasting, baste the meat with gravy or warm salty water several times.
TABLE 5: Recommended setting for ECO Heater
| Dish Oven function Temperature | [°C] | Oven setting from the bottom | Cooking time [min.] | |
| Spong cake |  | 180 - 200 2 - 3 | 50 - 70 | |
| Cakes |  | 180 - 200 2 50 | - 70 | |
| Fish | [HZST] | 190 - 210 2 - 3 | 45 - 60 | |
| Beef |  | 200 - 220 2 90 | - 120 | |
| Pork |  | 200 - 220 2 90 | - 160 | |
| Chicken |  | 180 - 200 2 80 | - 100 | |
ECO Heater is an optimised heating function designed to save energy when preparing food. You cannot reduce the cooking time by setting a higher temperature; preheating the oven is not recommended. Do not change the temperature setting and do not open the oven door during cooking.
Cleaning the oven door
Correct and regular oven cleaning and maintenance prolongs its service life.
Regular maintenance
The user must ensure the following: - Keep the oven and its surroundings clean.
Important! Make sure the oven is turned off and all knobs are turned to "0". Cleaning must not start until the oven is cold.
Replacing the lamp in the oven
Turn off at the main switch or remove the fuses as the power supply to the oven must be cut off before the lamp is replaced. Remove the broken bulb and replace it with a new (G9, 25 W oven bulb). Pull the halogen bulb out using a cloth or paper.
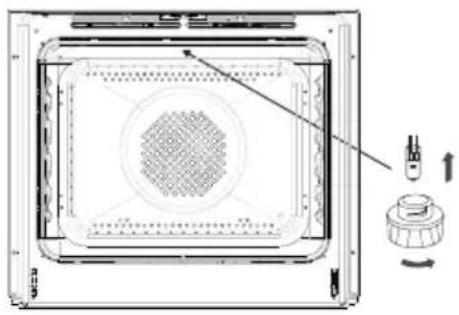
Note: Do not touch the halogen bulb directly with your fingers!
Oven fittings
The oven is equipped with removable side rails. To remove them for cleaning, pull the handle at the front and then pull out the rail and remove it from the rear fixture. After cleaning the rails, put them in the openings in the oven and push down the fixture.


Steam cleaning Steam Clean
Place a bowl containing 0.25 litres water at the bottom of the oven and close the oven door. Set the oven to 50°C and turn the function knob to "bottom heating" ☐ Heat the oven for approx. 30 min. Then open the oven door, dry the oven using a cloth or sponge and then clean the oven using warm water with washing-up liquid.
Door removal
In order to obtain easier access to the oven chamber for cleaning, it is possible to remove the door. To do this, tilt the safety catch part of the hinge upwards (fig. A). Close the door lightly, lift and pull it out towards you. In order to fit the door back on to the cooker, do the inverse. When fitting, ensure that the notch of the hinge is correctly placed on the protrusion of the hinge holder. After the door is fitted to the oven, the safety catch should be carefully lowered down again. If the safety catch is not set it may cause damage to the hinge when closing the door.

Remove the inner panel
- Carefully remove the door slat (fig. B, C)
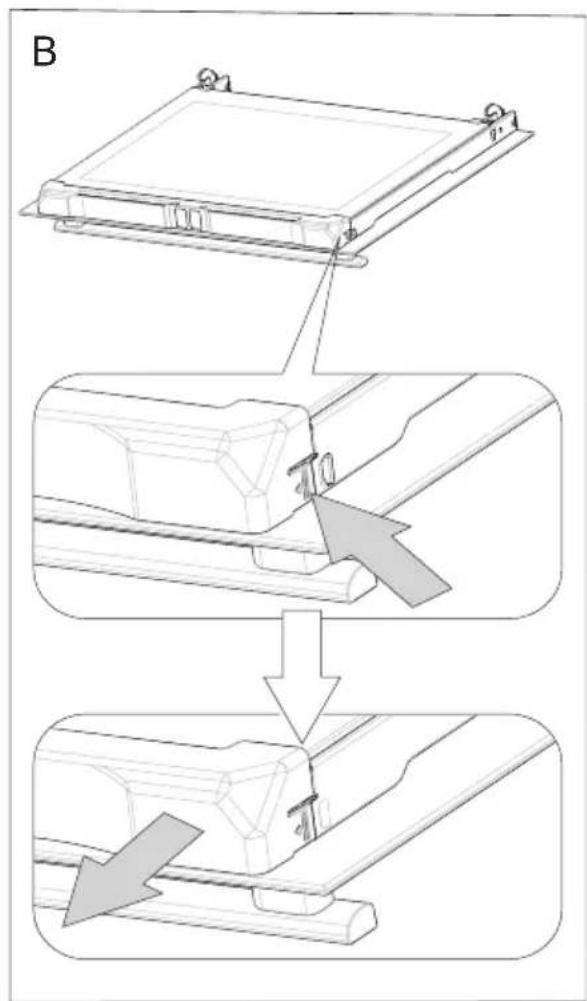

- You can then remove the glass panel (Fig. D). After cleaning, repeat the procedure in the reverse order.
Important! Do not force the upper slat in on both sides of the door at the same time. In order to correctly fit the top door slat, first put the left end of the slat on the door and then press the right end in until you hear a "click". Then press the left end in until you hear a "click".

Child safety lock
Oven door features a child safety lock device that prevents children from opening of the door. The appliance is supplied by the manufacturer with the door safety lock device engaged.


Release the child safety lock.

The lock is released and you can open the door.

The child safety lock is re-engaged once you close the door.
Technical data
Dimensions
Width 595 mm
Height 595 mm
Depth 570 mm
Equipment
2 baking trays
1 roasting pan
1 grill rack
Power
Top heater 900 W
Bottom heater 1100 W
Ring heater 2100 W
Grill 1500 W
Total 3600 W
Service
Vi har service i hela Sverige / Nationwide service in Sweden
Besök www.cylinda.se / Visit www.cylinda.se
Ring 0771-25 25 00 (endast lokaltaxa) / Call 0771-25 25 00
Uppge / Declare
Maskintyp / Model code
Serienummer / Serial number
Inköpsdatum / Purchase date
Problembeskrivning / Problem description
- VIKTIGT
- SCRAPPING OF HOUSEHOLD APPLIANCES
- ENERGY SAVING TIPS
- DECLARATION OF CONFORMITY
- INSTALLATION
- MONTERING AV UGNEN
- NÄTANSLUTNING
- OBS
- DIGITALT UR
- OBSERVERA
- ÅNGRENGÖRING STEAM CLEAN
- TABLE OF CONTENTS
- NOTE
- GUIDELINES CONCERNING THE SAFETY OF USE
- DISPOSAL OF PACKAGING MATERIALS
- INSTALLING THE OVEN
- ELECTRICAL CONNECTION
- CONNECTION DIAGRAM
- BEFORE USING THE APPLIANCE
- PUSH-PULL KNOBS
- ELECTRONIC PROGRAMMER
- CAUTION
- SETTING THE TIME
- KITCHEN TIMER
- TIMED OPERATION
- DELAYED TIMED OPERATION
- CANCEL SETTINGS
- CHANGE THE BEEP TONE
- ADJUST DISPLAY BRIGHTNESS
- NIGHT MODE
- TEMPERATURE PROBE
- IMPORTANT
- THE OVEN AND ITS FUNCTIONS
- ECO HEATING
- INTERIOR LIGHTING
- FAN AND BOTTOM HEATING SWITCHED ON
- TOP HEATER, BOTTOM HEATER AND FAN ARE ON
- FAN AND RING HEATER ON
- TOP AND BOTTOM HEATING SWITCHED ON
- BOTTOM HEATING ON
- GRILL ON
- INTENSIVE GRILL (GRILL PLUS TOP HEAT)
- FAN AND INTENSIVE GRILL ON
- DEFROSTING
- RAPID PREHEATING
- TEMPERATURE KNOB
- LIGHT INDICATORS
- BAKING
- RIGHT BAKING TIME
- COOKING
- GRILLING
- DO NOT PUT ALUMINIUM FOIL ON THE BOTTOM OR WALLS OF THE OVEN
- ROASTING MEAT
- BUNS
- MUFFINS
- SWISS ROLL
- CLEANING THE OVEN DOOR
- REGULAR MAINTENANCE
- REPLACING THE LAMP IN THE OVEN
- OVEN FITTINGS
- STEAM CLEANING STEAM CLEAN
- DOOR REMOVAL
- REMOVE THE INNER PANEL
- CHILD SAFETY LOCK
- TECHNICAL DATA
- DIMENSIONS
- EQUIPMENT
- POWER
- SERVICE
- UPPGE / DECLARE
Brand : Cylinda
Model : IBU3114V
Category : Frying Pan