
SIB7162KVRF - Frying Pan Cylinda - Free user manual and instructions
Find the device manual for free SIB7162KVRF Cylinda in PDF.
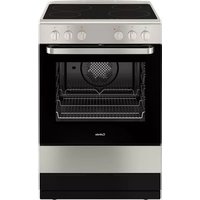


| Type of product | Frying Pan |
| Brand | Cylinda |
| Model | SIB7162KVRF |
| Material | Aluminium |
| Coating | Non-stick, PFOA-free |
| Diameter | 28 cm |
| Height | 5 cm |
| Handle | Heat-resistant, ergonomic |
| Weight | 1.2 kg |
| Compatible hob types | Gas, electric, ceramic, induction |
| Oven safe | Yes, up to 200°C |
| Dishwasher safe | No, hand wash recommended |
| Cleaning | Hand wash with soft sponge |
| Safety features | Cool-touch handle, stable base |
| Heat distribution | Even heat distribution |
| Spare parts availability | Replacement handles available |
| Reparability | Handle and fasteners replaceable |
| Warranty | 2 years manufacturer warranty |
Frequently Asked Questions - SIB7162KVRF Cylinda
User questions about SIB7162KVRF Cylinda
0 question about this device. Answer the ones you know or ask your own.
Ask a new question about this device
Download the instructions for your Frying Pan in PDF format for free! Find your manual SIB7162KVRF - Cylinda and take your electronic device back in hand. On this page are published all the documents necessary for the use of your device. SIB7162KVRF by Cylinda.
USER MANUAL SIB7162KVRF Cylinda
SIB 7162 KV RF
SIB 7162 KV
Viktigt!
Indicator visar R.

Indicator visar 5
Låsa upp barnlåset.
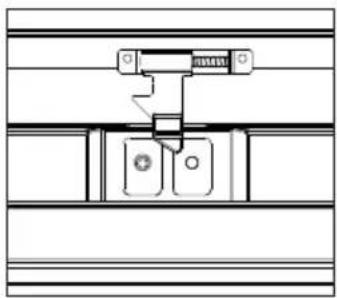
A=104 mm; B=147 mm

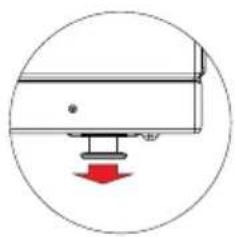


Höjd utan sockel
Read the entire manual carefully before using the appliance for the first time. You will learn how to use the appliance it and look after it properly from the start.
Read the entire manual carefully before using the appliance for the first time. You will learn how to use the appliance it and look after it properly from the start!
Table of contents
page
Safety advice....30
Before using the appliance for the first time ....32
Facts about ceramic hobs ....33
The oven and its functions....40
Cleaning the oven door....48
Technical data....51
Mounting the anti-tip device....52
Height of the appliance....53
NOTE
Electrical connection must be made by a properly certified, qualified installer.
The appliance is intended for household use only. Incorrect use carries the risk of injury.
Disposing of used products

When the product is no longer required, it must not be disposed of as normal waste, but should be handed over to an organisation that recycles electrical and electronic products. There is a symbol on the product, user instructions or packaging that shows that the product should be recycled when it is no longer required.
Materials used to manufacture the product can be recycled as indicated. Recycling the materials used to make the product that you no longer require helps to protect the environment.
Contact your local authority to find out where the recycling organisations are in your area.
GUIDELINES CONCERNING THE SAFETY OF USE
Warning: The appliance and its accessible parts become hot during use. Care should be taken to avoid touching heating elements. Children less than 8 years of age shall be kept away unless continuously supervised.
This appliance can be used by children aged from 8 years and above and persons with reduced physical, sensory or mental capabilities or lack of experience and knowledge if they have been given supervision or instruction concerning use of the appliance in a safe way and understand the hazards involved. Children shall not play with the appliance. Cleaning and user maintenance shall not be made by children without supervision.
Warning: Unattended cooking on a hob with fat or oil can be dangerous and may result in fire.
NEVER try to extinguish a fire with water, but switch off the appliance and then cover flame e.g. with a lid or a fire blanket.
Warning: Danger of fire: do not store items on the cooking surfaces.
Warning: If the surface is cracked, switch off the appliance to avoid the possibility of electric shock.
Note. Electrical connection must be made by a properly certified, qualified installer.
The appliance is intended for household use only. Incorrect use carries the risk of injury.
GUIDELINES CONCERNING THE SAFETY OF USE
The oven is very hot while in use and for some time after it has been switched off.
When the oven is in use, some parts will become hot.
Metallic objects, such as knives, forks, spoons and lids should not be placed on the hob surface since they can get hot.
After use, switch off the hob element by its control and do not rely on the pan detector.
Warning: Do not use harsh abrasive cleaners or sharp metal scrapers to clean the oven door glass since they can scratch the surface, which may result in shattering of the glass.
Warning: Ensure that the appliance is switched off before replacing the lamp to avoid the possibility of electric shock.
Caution: The cooking process has to be supervised. A short term cooking process has to be supervised continuously.
Warning: Use only hob guards designed by manufacturer of the cooking appliance or indicated by the manufacturer of the appliance in the instructions for use as suitable or hob guards incorporated in the appliance. The use of inappropriate guards can cause accidents.
You should not use steam cleaning devices to clean the appliance.
Installation
Fit the anti-tip device (page 52)
The anti-tip device prevents the appliance from tipping over. For example, a child should not be able to climb on the oven door and tip the appliance over. If there are young children in the house, a hob guard should also be fitted.
NOTE Remember that the anti-tip device is disabled when you pull the appliance forwards, e.g. for cleaning. Supervise children carefully to avoid accidents.
NOTE Subject to technical alterations.
See the instructions on page 52 for how to fit the anti-tip device.
The appliance must be level.
This is important for frying results as well as baking. Pull out the plate storage drawer to access the screws in the four adjustable feet. Use a spirit level or frying pan filled with water to check.
Further adjustment may be required after some time as the flooring may settle.
Before using the appliance
Clean the appliance using a damp cloth, possibly with some soap or mild washing-up liquid. Rinse and dry thoroughly. After cleaning, heat the oven with top and bottom heater to 250° C for approx. 30 minutes. The smell produced by heating the oven is harmless but still you should ventilate.
Use energy wisely
Use pans that are the right size for the cooking zones. It is better to use a slightly larger pan than a pan that does not cover the cooking zone.
Put the lids on saucepans and pots to save energy. It is also recommended that you switch off the cooking zone slightly in advance and let the dish continue to cook using the residual heat.
Facts about ceramic hobs
Induction cooking zones
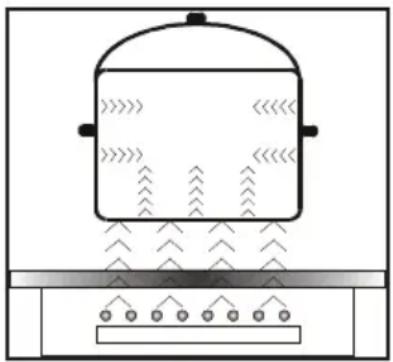
A power generator supplies the coil installed in the heating panel. An induction coil is located under each cooking zone. When a cooking zone is switched on, this coil creates a magnetic field which impacts directly on the base of the pan and heats it up. The cooking zone itself is heated up indirectly by the heat given off by the pan. The surface of the hob remains cold.
Induction cooking zones only work when a ferromagnetic pan is placed on it.
Induction heating features two main advantages:
- as the pan is the sole source of heat, the heat use is optimised,
- no heating inertia occurs, as cooking starts automatically the moment the pan is placed on the surface of the heating panel, and ends when the pan is removed.
Protection equipment:
The protections activate rarely if the panel is installed and operated correctly.
Fan: the appliance has a cooling fan to help extend the life of the electronics. When the heating panel is being used intensively, this will come on and you will hear a whirring sound. The fan may continue to run after the appliance has been switched off.
Transistor: the temperature of the electronics is measured constantly by a probe. The system disconnects the cooking zones which are near the overheated components automatically should the probe trigger such a signal.
Pot detection: the pan detector is a key element of the panel, which determines whether the heating can start and when to stop it. Small objects which may occur within the cooking zones, e.g. teaspoon, knife, or a ring, will be disregarded and the system will not activate.
Detecting pan on the cooking zone
Each induction cooking zone is equipped with pan detector. It activates and interrupts heating automatically when a pan is placed / replaced from the zone. This saves energy.
● Heating temperature is displayed if a suitable pan is used.
- Induction cooking suitable pans are those with flat, magnetic base. See table for detailed information.
Heating power digit will blink in the display if there is no pan in place on a cooking zone, or the pan is unsuitable. The cooking zone will not activate. The cooking zone will switch off automatically if no suitable pan is placed on the cooking zone within 1 minute.
It is not recommended to switch off cooking zones under normal conditions by taking the pan off it. Use the respective knobs to switch off cooking zones.
Note:
Please note that all the settings will be cancelled if there is a power cut. Exercise care when the power is restored. The residual heat indicator ('H') will appear in the display as long as the cooking zones are hot.
Switch off the cooking zones after you have finished using the heating panel.
Do not rely on the indications of the pan detector.
Selection of cooking pots to be used in the induction zone
The smallest and the largest diameters are indicated in the table below and they depend on the pot quality.
| Induction heating zone Diameter of the pot bottom used for induction co-oking | ||
| Diameter (mm) Minimum (mm) Optimum (mm) | ||
| 210 120 210 | ||
| 160 110 160 | ||
When using pots smaller than minimum diameters, the induction heating zone may fail to operate.
Bottom of the cookware has to be flat for optimal temperature control by the induction module.
Deep embossed logo or concave bottom of the cookware can interfere with the temperature control by the induction module and lead to overheating of the cookware.
Do not use damaged cookware with base deformed due to excessive heat.
| Cookware marking |  Check if there is a sign on the label in-forming that the pot is suitable for use on inductive plates Check if there is a sign on the label in-forming that the pot is suitable for use on inductive plates |
| Use magnetic pots (from enamelled sheet metal, fer-rite stainless steel, cast iron), check them by trying to attach magnet to the pot bottom (has to cling) | |
| Stainless steel | Does not detect the pot presence |
| Except for pots from ferromagnetic steel. | |
| Aluminium | Does not detect the pot presence. |
| Cast iron | High efficiency |
| Attention: the pots can scratch the plate. | |
| Enamelled steel | High efficiency |
| Recommended pots with flat, thick and even bottom. | |
| Glass | Does not detect the pot presence |
| Porcelain | Does not detect the pot presence |
| Pots with copper bottom | Does not detect the pot presence |
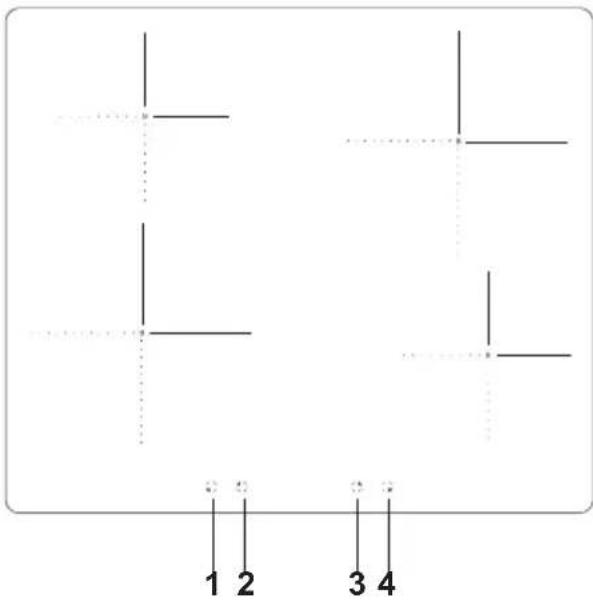

1234
The cooking zones have variable heating power. The heating power can be adjusted by turning the dial left or right.
| Heating power | Use |
| 0 Switched off Use of residual heat. | |
| 1-2 Heating up hot meals.Slow cooking of smaller portions | |
| 3 Slow cooking on low power | |
| 4-5 Long preparation of larger portions and frying larger portions | |
| 6 Frying, roasting | |
| 7-8 Frying | |
| 9 Starting to prepare dishes, frying | |
| A Automatic parboiling function | |
| P Booster function (extra boost energy for quicker cooking). | |
Zones:
[1] Front left 2000 W / 3000 W* 210mm diameter
[2] Back left 1200 W / 1400 W* 160mm diameter
[3] Back right 2000 W / 3000 W* 210mm diameter
[4] Front right 1200 W / 1400 W* 160mm diameter
*Booster-funktion
Switching on the induction hob
- Switch on the cooking zone using the dial on the control panel.
- The symbols by the knobs indicate which dial operates each cooking zone.
- The desired heating power can be set immediately (1-9).
- The set heating power is also shown on the hob's display.
The child lock function
You can disable any of the cooking zones by activating the child lock function. This protects your children.
Activating the child lock function.
- The child lock function can be activated when all knobs are set to "0" position.
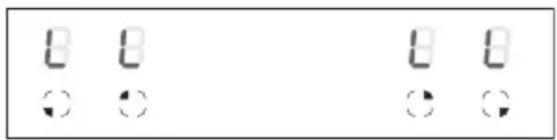
- Simultaneously turn both knobs [1] and [4] to the left and hold for 3 seconds. All the indicators show the "L" symbol. The child lock function has been activated.
Turning any of the hob's knob causes all the indicators to show the "L".
Deactivate child lock.
- Simultaneously turn both control knobs [1] and [4] to the right to position "P" and hold both knobs at this position for 1 second and then turn both knobs back to "0". The child lock "L" symbol will disappear from displays and child lock will deactivate.
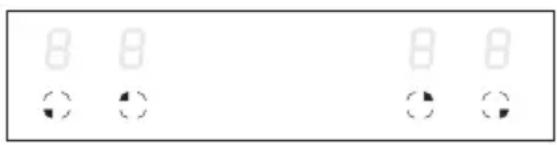
The residual heat indicator H
The hob is also equipped with a residual heat indicator “H” Even if a cooking zone is not directly heated, it takes in heat from the base of a pot or pan. As long as the “H” symbol is lit, any residual heat can be used for heating a pot or pan or melting fat. When the indication goes out, you can touch the cooking zone, bearing in mind that it still does not have the ambient temperature.
Important!
When there is no power, the residual heat indicator does not light up.
Automatic function
All four cooking zones are fitted with a special function which allows each of them to start on full heating power regardless of the power currently set. After a certain time the heating power returns to that which is set (from 1 to 8) To use this function, choose the level which is to be used to heat the dish, or to which the power is to return.
The auto function is useful when:
- dishes are cold at the start of cooking and need intensive heating, so that they can then be cooked on low power so that they do not need to be constantly watched (e.g. beef ragout).
The auto function is not useful when:
- baking or steaming a dish which needs to be stirred, mixed or have water added;
- you are boiling pasta or dumplings in a large amount of water;
- you are preparing dishes which require long cooking in a pressure cooker.
Activating the auto function:
- Set the dial to „A“, then turn it back to the required power. The indicator will alternate between showing the „A“ symbol and the chosen power level. After the increased power cooking (e.g. 5) is finished, the cooking zone returns to the power level shown on the display

- shown on the display

On indicator 5
- If the knob is in the "0" position immediately after selecting the auto parboiling function (i.e. no cooking power level has been set), the auto parboiling function switches off after three seconds.
- Removing a pan from a cooking zone and replacing it on the same cooking zone within ten minutes does not cancel the set auto par-boiling function.
The cooking zone is switched on at full power for a time depending on the heat setting selected, and is then switched back to the heat setting set.
| Cooking heat level | Time automatic function is active (seconds) |
| 1 | 48 |
| 2 | 72 |
| 3 136 | |
| 4 208 | |
| 5 264 | |
| 6 432 | |
| 7 120 | |
| 8 192 | |
| 9 | - |
The Booster Function increases the nominal power of the ∅ 160 mm cooking zone from 2000 W to 3000 W, and ∅ 200 mm cooking zone from 1200 W to 1400 W.
To activate the Booster function, turn the knob to the "P" position and hold it for 3 seconds. The letter "P" will be shown on cooking zone display.
To deactivate the Booster function turn the knob to another position or lift the pot from the cooking zone.
For the ∅210 mm cooking zone, operation of the Booster function is limited to 10 minutes. Once the Booster function is automatically deactivated, the cooking zone continues to operate at its nominal power.
The Booster function can be re-activated, provided the appliance electronic circuits and induction coils are not overheated.
When the pot is lifted from the cooking zone when the Booster function is in operation, it remains active and the countdown continues.
When the appliance electronic circuits or induction coils overheat when the Booster function is in operation, it is automatically deactivated. The cooking zone continues to operate at its nominal power.
Two cooking zones arranged vertically form a pair.
If activating Booster function causes the overall power limit of a pair to be exceeded, the heat setting of the other cooking zone in a pair will be automatically reduced.
Limiting the operating time
In order to increase efficiency, the induction hob is fitted with a operating time limiter for each of the cooking zones. The maximum operating time is set according to the last heating power level selected. If you do not change the heating power level for a long time (see table) then the associated cooking zone is automatically switched off and the residual heat indicator is activated. However, we you switch on and operate individual cooking zones at any time in accordance with the operating instructions.
| Cooking heat level | Maximum operating time (min) |
| 1 480 | |
| 2 480 | |
| 3 300 | |
| 4 300 | |
| 5 300 | |
| 6 | 90 |
| 7 | 90 |
| 8 | 90 |
| 9 | 90 |
| P | 10 |
The oven and its functions
The symbols on the oven function knob have the following meaning:

ECO Heating
This is an optimised heating function designed to save energy when preparing food. At this knob position, the oven lighting is off.

Interior lighting
When the knob is turned to this position, the interior oven lighting is lit.

Fan and bottom heating switched on
This knob setting activates both the fan and the bottom heating element. The oven is then heated from the bottom. Suitable e.g. for pizza and pies.
Important! If the temperature knob is set to zero, the cooling setting is used.

Top heater, bottom heater and fan are on.
This knob setting is most suitable for baking cakes. Convection baking (recommended for baking).

Fan and ring heater on
When this function is activated, the fan on the rear wall of the oven starts.
This provides constant and even air circulation inside the oven.
This heating method has the following benefits:
• The oven heats up faster and there is no need to preheat it
- Two levels can be used at the same time
- Meat dishes lose less fat and juices during heating, which improves the flavour
• The oven does not get as dirty
You must use the temperature settings together with the fan function.
Important! If the fan function is switched on when the temperature knob is set to zero, only the fan is activated. This setting can be used to cool dishes or the oven.
Top and bottom heating switched on.
Highest temperature 250° C. If the knob is set to this position, the oven heats up normally.

Bottom heating on
Highest temperature 200°C.

Grill on
This setting activates the grill.

Intensive grill (grill plus top heat)
The food is grilled and heated from above at the same time. In this way, the temperature is higher at the top of the oven, making the roasted food darker in colour. A practical setting for grilling thick items

Fan and intensive grill on
The grill plus top heat and fan run at the same time. This reduces the grill time and improves the flavour.

Defrosting
Only fan is on and all heaters are off.

Rapid Preheating
Top heater, roaster and fan on. Use to preheat the oven.
Temperature knob
The oven temperature is controlled by the temperature knob on the control panel, indicated by the symbol ° C. The oven stops heating up when you turn the knob to zero.
Always follow the advice given in the recipe for the food you are baking/cooking.
Light indicators
Two light indicators indicate that the oven has been activated – a yellow and a red indicator. When the yellow light indicator lights up, it means the oven operates. When the red light indicator goes out, it means the oven has reached the set temperature. If a recipe for a dish recommends that the dish is placed in a heated oven, do not put it in the oven until the red light indicator has gone out. During baking, the red light indicator will light up and go out intermittently (maintaining the temperature in the oven). The yellow light indicator can also light up when the knob is in the "Oven lighting" position.
Baking
Wait until the oven reaches the right temperature (light indicator turns off) before placing the baking in the oven.
Right baking time
Follow the instructions in the recipe. Be extra careful the first few times you use your new appliance to bake, the appliance may heat somewhat faster than your previous appliance.
Cooking
Follow the advice in the recipe. If it is a dish you have made many times before you should be extra careful the first few times you make it in your new appliance.
Grilling
Follow the advice in the recipe. Place the food on the grill and slide the grill rack into the top position in the oven. Push the roasting pan into the position below to collect any dripping fat.
Do not put aluminium foil on the bottom or walls of the oven.
The heat does not radiate properly, so there is a risk of damaging the enamel in the oven.
Storage drawer for accessories
You can store the roasting pan, baking trays, grill rack and other accessories in the drawer. There is a safety device that stops the drawer being pulled out too far accidentally.
If you want to pull out the drawer completely, e.g. to clean, pull it out until you reach the safety device and then lift up the front and pull it out completely.
You put the drawer back in the reverse order. Make sure it is in the right tracks on the sides.
Baking
● Tables 1 and 1A are recommended for baking.
- The baking parameters are given for 3 different types of heat: conventional heating (top and bottom heating element), fan
Function, top heating element + fan.
Roasting meat
● Table 2 is recommended for roasting meat.
The roasting parameters are given for conventional heating and for fan.
● The recommended parameters for meat, fish and toast are compiled in table 3.
● The recommended parameters for roasting with fan are compiled in table 4.
TABLE 1: Pastries
| Pastries | Top and bottom heating element | Fan assisted heating | Top/bottom heating element | Baking time [min.] | |||
| Oven setting | Temperature [°C] | Oven setting | Temperature [°C] | Oven setting | Temperature [°C] | ||
| Baking in a baking pan | |||||||
| Sponge cake | 2 | 170-180 | 2 | 150-170 | 2 | 150-170 | 60-80 |
| Sponge cake | 2 | 160-180 | 2 | 150-170 | 2 | 150-170 | 65-80 |
| Flan case | 2-3 | 170-180 | 2-3 | 160-170 | 2-3 | 160-170 | 20-30 |
| Soft sponge | 2 | 170-180 | 30-40 | ||||
| Shortcrust pastry flat with fruit | 2-3 | 160-180 | 2-3 | 160-180 | 60-70 | ||
| Cheesecake (on shortcrust pastry base) | 2 | 140-150 | 2 | 140-160 | 60-90 | ||
| Yeast cake | 2 | 160-180 | 2 | 150-170 | 2 | 150-170 | 40-60 |
| Bread (e.g. granary) | 2 | 210-220 | 2 | 180-200 | 2 | 180-200 | 50-60 |
| Baking on baking trays | |||||||
| Shortcrust pastry flat with fruit | 3 | 170-180 | 3 | 160-170 | 3 | 160-170 | 35-60 |
| Fruitcake (yeast or baking powder) | 3 | 160-170 | 3 | 160-170 | 30-50 | ||
| Hundreds and thousands cake | 3 | 160-170 | 3 | 150-170 | 3 | 150-160 | 30-40 |
| Jelly roll | 2 | 180-200 | 10-15 | ||||
| Pizza (thin base) | 3 | 220-240 | 3 | 200-220 | 10-15 | ||
| Pizza (thick base) | 2 | 190-210 | 3 | 180-200 | 30-50 | ||
| Small pastries/cakes | |||||||
| Small pastries/cakes | 3 | 170-180 | 3 | 150-160 | 3 | 150-160 | 10-25 |
| 2 | -plates | -- | 1+3 | 140-150 | -- | -- | 25-35 |
| Puff pastry | 3 | 180-190 | 3 | 170-190 | 3 | 170-180 | 18-25 |
| Meringue | 3 | 90-110 | 2 | 90-110 | 80-90 | ||
| Profiteroles | 2 | 170-190 | 2 | 170-190 | 35-45 | ||
Buns
75 g yeast
150 g margarine
500 ml milk (whole milk)
1/2 teaspoon salt
135 g sugar
Cardamom
900 g flour
Crumble the yeast and mix it with some of the milk. Melt the margarine and pour in the rest of the milk. Mix all the ingredients until you have a smooth dough.
Let the dough rise for 15 min in the bowl. Shape it into small balls and put them in moulds. Let them rise for 30–40 min on the tray. Glaze with beaten egg and sprinkle with granulated sugar.
Bake at 160-180°C top and bottom heating elements for 30-40 min, or 150-170°C fan for 30-40 min.
Muffins
approx. 20 pcs.
1 juicy sponge cake or 1 rich sponge cake with grated lemon rind 60–90 g raisins or currants
Oven temperature:
top and bottom heating elements 180-190°C
or fan 160-170°C
Baking time 10-20 min
Switch on the oven. Make the cake mixture according to one of the suggestions, adding grated lemon rind in both cases. Mix in raisins of currants.
Put muffin cases/paper cases on a tray.
Put the mixture in the cases, e.g. using a spoon.
Bake in the centre of the oven for 10-20 min.
Swiss roll
3 eggs
135 g sugar
120 g flour
1 teaspoon baking po- wder
1 tablespoon water
Filling:
280 g stewed fruit or jam or 1 portion of chocolate butter icing
Baking time 10-15 min
Makes 20-24 slices. Oven temperature, top and bottom heating elements 180-200°C
Easy to mix, quick to cook and roll up. Can be filled with e.g. slightly sweetened stewed apple, raspberry jam or chocolate butter icing. Switch on the oven in good time. Cover a tray with greaseproof paper or baking paper. Beat the egg and the sugar. Mix the flour and backing powder and stir it in carefully, together with the water. Spread out the dough on the paper in an even layer. Bake in the centre of the oven, 10-15 min with the top and bottom heating elements at 180-200°C. Sprinkle some sugar on the cake and tip it onto a piece of greaseproof paper. Brush with some cold water and remove the paper the cake was baked on. Spread on a thin layer of stewed fruit or jam and roll up. Or let the cake cool under a damp piece of greaseproof paper, spread with chocolate butter icing and roll it up.
TIPS: Cut the Swiss roll into approx. 3 cm slices, top with whipped cream and fruit or berries and serve for dessert.
TABLE 1A: Pastries
| Pastries | Top and bottom heating element | Fan assisted heating | Baking time min. | ||
| Oven setting | Temperature [°C] | Oven setting | Temperature [°C] | ||
| Buns | 3 | 160-180 | 3 | 150-170 | 30-40 |
| Muffins | 3 | 180-190 | 3 | 160-170 | 10-20 |
| Jelly roll | 3 | 180-200 | - | - | 10-15 |
TABLE 2: Roasting meat
| Meat dish | Oven setting from below | Temperature °C | Roasting time* min. | ||
| Fan assisted heating | Conventional oven | Fan assisted heating | Conventional oven | ||
| Beef | approx. 1 cm: 12-15 | ||||
| Roast beef or fillet | 3 | 250 | |||
| preheated oven | 3 | 250 | 15-25 | ||
| pink (medium) | 3 | 250 | |||
| preheated oven well done | 3 | 210-230 | 25-30 | ||
| Roast | 2 | 2 | 160-180 | 200-220 | 120-140 |
| Pork | |||||
| Roast | 2 | 2 | 160-180 | 200-210 | 90-140 |
| Ham | 2 | 2 | 160-180 | 200-210 | 60-90 |
| Fillet | 3 | 210-230 | 25-30 | ||
| Veal | 2 | 2 | 160-170 | 200-210 | 90-120 |
| Lamb | 2 | 2 | 160-180 | 200-220 | 100-120 |
| Venison | 2 | 2 | 175-180 | 200-220 | 100-120 |
| Poultry | |||||
| Chicken | 2 | 2 | 170-180 | 220-250 | 50-80 |
| Goose (approx. 2 kg) | 2 | 2 | 160-180 | 190-200 | 150-180 |
| Fish | 2 | 2 | 175-180 | 210-220 | 40-55 |
*Recommendations in table 2 apply to a 1 kg meat portion.
Roasting large cuts of meat is preferable, but the cooking time for each additional 1kg is 30–40 min extra. Turn the cut of meat halfway through the cooking time.
Important: only use ovenproof dishes.
TABLE 3: Grill
| Dish | Oven setting from the bottom | Temperature [°C] | Cooking time [min.] | |
| One side The | other side | |||
| Pork chop | 4 | 250 | 8-10 | 6-8 |
| Minced pork | 3 | 250 | 10-12 | 6-8 |
| Kebab | 4 | 250 | 7-8 | 6-7 |
| Sausages | 4 | 250 | 8-10 | 6-8 |
| Roast beef (approx. 1kg) | 3 | 250 | 12-15 | 10-12 |
| Veal chop | 4 | 250 | 8-10 | 6-8 |
| Roast veal | 4 | 250 | 6-8 | 5-6 |
| Lamb chop | 4 | 250 | 8-10 | 6-8 |
| Half chicken (approx. 500 g) | 3 | 250 | 25-30 | 20-25 |
| Fillet of fish | 4 | 250 | 6-7 | 5-6 |
| Trout (approx. 200 – 250g) | 3 | 250 | 5-8 | 5-7 |
| Toast | 4 | 250 | 2-3 | 2-3 |
TABLE 4: Fan + grill
| Dish | Weight [kg] | Oven setting from below | Temperature [°C] | Roasting time [min.] |
| Roast pork | 1.0 | 2 | 170-190 | 80-100 |
| 1.5 | 2 | 170-190 | 100-120 | |
| 2.0 | 2 | 170-190 | 120-140 | |
| Lamb | 2.0 | 2 | 170-190 | 90-110 |
| Roast beef | 1.0 | 2 | 200-220 | 30-40 |
| Chicken | 1.0 | 2 | 180-200 | 50-60 |
| Duck | 2.0 | 1-2 | 170-190 | 85-90 |
| Goose | 3.0 | 1 | 140-160 | 110-130 |
| Turkey | 2.0 | 2 | 180-200 | 110-130 |
| 3.0 | 1-2 | 160-180 | 150-180 |
During roasting, baste the meat with gravy or warm salty water several times.
TABLE 5: Recommended setting for ECO Heater
| Dish Oven function Temperature | [°C] | Oven setting from the bottom | Cooking time [min.] | |
| Spong cake |  | 180 - 200 2 - 3 | 50 - 70 | |
| Cakes |  | 180 - 200 2 50 | - 70 | |
| Fish |  | 190 - 210 2 - 3 | 45 - 60 | |
| Beef | [7XAB] | 200 - 220 2 90 | - 120 | |
| Pork | [7HBA] | 200 - 220 2 90 | - 160 | |
| Chicken |  | 180 - 200 2 80 | - 100 | |
ECO Heater is an optimised heating function designed to save energy when preparing food. You cannot reduce the cooking time by setting a higher temperature; preheating the oven is not recommended. Do not change the temperature setting and do not open the oven door during cooking.
Cleaning the oven door
Correct and regular oven cleaning and maintenance prolongs its service life.
Regular maintenance
The user must ensure the following: - Keep the oven and its surroundings clean.
Important! Make sure the oven is turned off and all knobs are turned to "0". Cleaning must not start until the oven is cold.
Replacing the lamp in the oven
Turn off at the main switch or remove the fuses as the power supply to the oven must be cut off before the lamp is replaced. Remove the broken bulb and replace it with a new (G9, 25 W oven bulb). Pull the halogen bulb out using a cloth or paper.

Note: Do not touch the halogen bulb directly with your fingers!
Oven fittings
The oven is equipped with removable side rails. To remove them for cleaning, pull the handle at the front and then pull out the rail and remove it from the rear fixture. After cleaning the rails, put them in the openings in the oven and push down the fixture.


Steam cleaning Steam Clean
Place a bowl containing 0.25 litres water at the bottom of the oven and close the oven door. Set the oven to 50°C and turn the function knob to "bottom heating" ☐ Heat the oven for approx. 30 min. Then open the oven door, dry the oven using a cloth or sponge and then clean the oven using warm water with washing-up liquid.
Remove the oven door
To access the interior of the oven for cleaning, you can remove the oven door. To do this, open the door and pull up the safety device found in the hinge (Fig. A). Then push the door slightly, lift it up and pull it out. To fit the door of the oven, do this in the reverse order. When replacing the door, make sure the cut-out part of the hinge is placed correctly on the hinge's grip. After replacing the door, you must pull down the safety device. If you do not pull it down, the hinges may be damaged when you try to close the door.
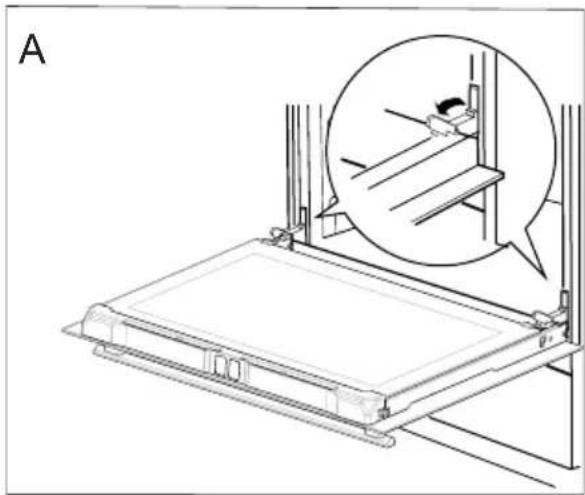
Pulling up safety devices for the hinge
Remove the inner panel
- Carefully remove the door slat (fig. B, C)
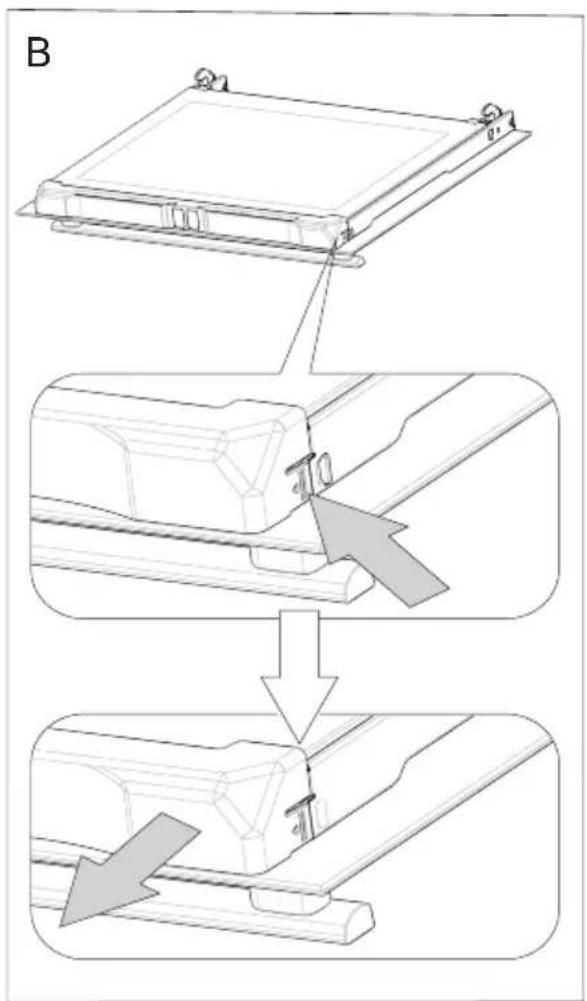

- You can then remove the glass panel (Fig. D). After cleaning, repeat the procedure in the reverse order.
Important! Do not force the upper slat in on both sides of the door at the same time. In order to correctly fit the top door slat, first put the left end of the slat on the door and then press the right end in until you hear a "click". Then press the left end in until you hear a "click".

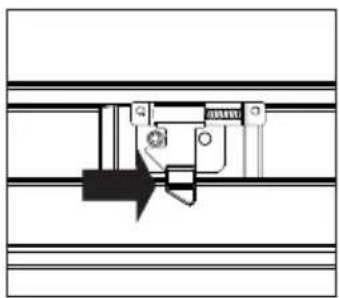
Child safety lock
Oven door features a child safety lock device that prevents children from opening of the door. The appliance is supplied by the manufacturer with the door safety lock device engaged.

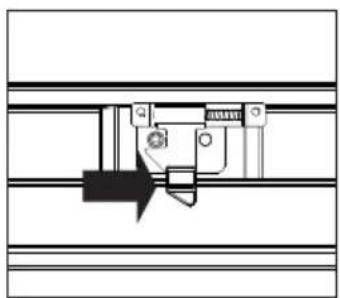
Release the child safety lock.

The lock is released and you can open the door.

The child safety lock is re-engaged once you close the door.
Care of enamel hob and plates
Protect the hob against discolouring by wiping it after each use. Avoid abrasive detergents. Use ordinary washing-up liquid or soap. If you want to polish it, use window cleaner.
Technical data
Dimensions
Width 595 mm
Height 900 mm
Depth 600 mm
Equipment
2 baking trays
1 roasting pan
1 grill rack
1 anti-tip device
Power
Hob 7400 W
Oven 3600 W
Grill 1500 W
Total 11000 W
If the appliance does not work:
For connection to the mains, see the data plate on the reverse of the appliance.
To contact Cylinda Service, see box.
(To find the model no. pull out the appliance and read the rating plate on the side of the appliance).
Warning! Do not perform any repairs by yourself. Electrical equipment must always be repaired by an authorised electrician.
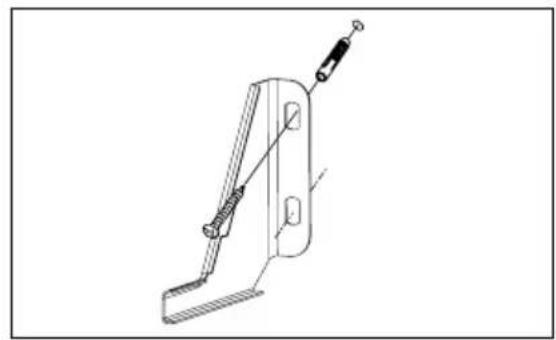
Mounting the anti-tip device
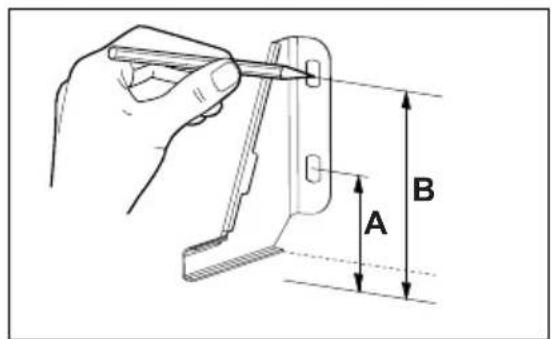
A=104 mm; B=147 mm
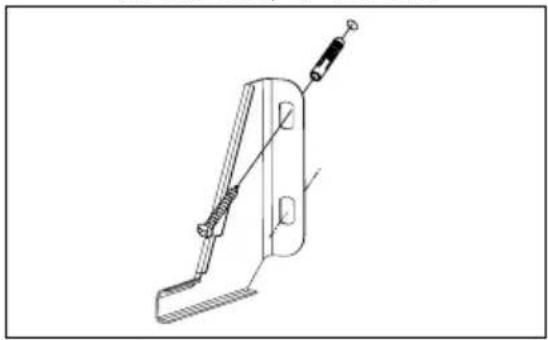

If the tiles etc. only cover the top part of the rear wall, the anti-tip device must be distanced by the equivalent thickness.
Height of the appliance
Standard height of free standing cooker with adjustable socle is 90cm. You can adjust height to 92,5 with the feet in highest position.

Adjust the cooker from 90 to 92,5 cm
*Some models: Use the front screws for back wheel adjustment. Important: Do not add pressure on the backwheels during this operation.
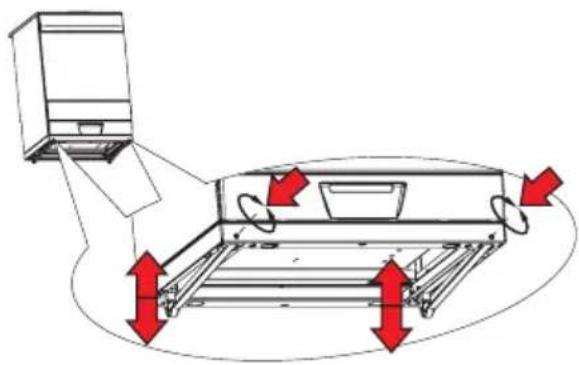
- Tilt the cooker backwards, unscrew the adjustment front legs to set the correct height.

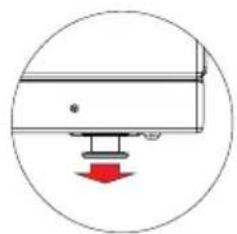
- Tilt the cooker forward. The cooker is heavy, rear rollers can not be overloaded. Ask someone for help.
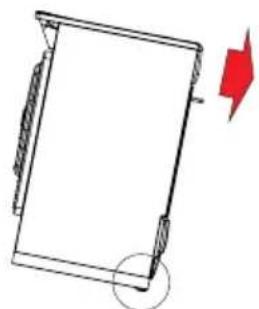

- Unscrew the adjusting screw located at the front of adjustable socle. When unscrewing the rollers will slide down on the back of the appliance.
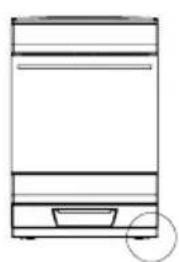

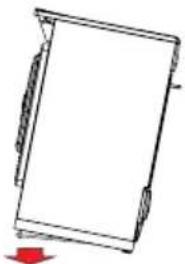
- Place the appliance and check the correct height of the cooker.
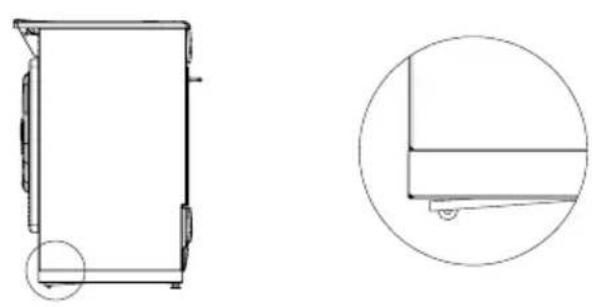
Height without socle
Adjust the cooker from 85 to 86,5 cm: remove the socle, and add 4 new feet. You can adjust height to 86,5 with the feet in top position. Recommend 2 persons.
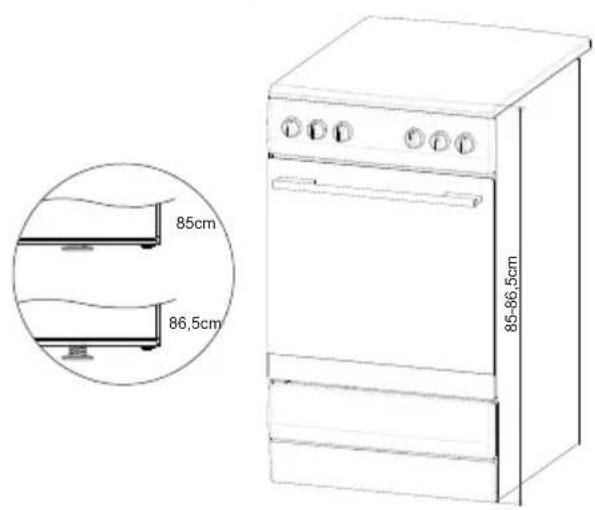
Adjust the cooker from 85 to 86,5 cm
- First dismount the socle; place appliance on the side, using the screwdriver, remove 6 screws marked on below drawing.

Feet mounted in the socle are too high- 45,5mm, You need to use the shorter feets that are in the accessories bag.
- Mount new feet on the four holes in the base of cooker, regulate the height to 86.5cm.
Service
Vi har service i hela Sverige / Nationwide service in Sweden
Besök www.cylinda.se / Visit www.cylinda.se
Ring 0771-25 25 00 (endast lokaltaxa) / Call 0771-25 25 00
Uppge / Declare
Maskintyp / Model code
Serienummer / Serial number
Inköpsdatum / Purchase date
Problembeskrivning / Problem description
- VIKTIGT
- HÖJD UTAN SOCKEL
- TABLE OF CONTENTS
- NOTE
- DISPOSING OF USED PRODUCTS
- GUIDELINES CONCERNING THE SAFETY OF USE
- INSTALLATION
- FIT THE ANTI-TIP DEVICE (PAGE 52)
- NOTE SUBJECT TO TECHNICAL ALTERATIONS
- THE APPLIANCE MUST BE LEVEL
- BEFORE USING THE APPLIANCE
- USE ENERGY WISELY
- FACTS ABOUT CERAMIC HOBS
- INDUCTION COOKING ZONES
- PROTECTION EQUIPMENT
- DETECTING PAN ON THE COOKING ZONE
- SELECTION OF COOKING POTS TO BE USED IN THE INDUCTION ZONE
- ZONES
- SWITCHING ON THE INDUCTION HOB
- THE CHILD LOCK FUNCTION
- THE RESIDUAL HEAT INDICATOR H
- IMPORTANT
- AUTOMATIC FUNCTION
- LIMITING THE OPERATING TIME
- THE OVEN AND ITS FUNCTIONS
- ECO HEATING
- INTERIOR LIGHTING
- FAN AND BOTTOM HEATING SWITCHED ON
- TOP HEATER, BOTTOM HEATER AND FAN ARE ON
- FAN AND RING HEATER ON
- TOP AND BOTTOM HEATING SWITCHED ON
- BOTTOM HEATING ON
- GRILL ON
- INTENSIVE GRILL (GRILL PLUS TOP HEAT)
- FAN AND INTENSIVE GRILL ON
- DEFROSTING
- RAPID PREHEATING
- TEMPERATURE KNOB
- LIGHT INDICATORS
- BAKING
- RIGHT BAKING TIME
- COOKING
- GRILLING
- DO NOT PUT ALUMINIUM FOIL ON THE BOTTOM OR WALLS OF THE OVEN
- STORAGE DRAWER FOR ACCESSORIES
- ROASTING MEAT
- BUNS
- MUFFINS
- SWISS ROLL
- CLEANING THE OVEN DOOR
- REGULAR MAINTENANCE
- REPLACING THE LAMP IN THE OVEN
- OVEN FITTINGS
- STEAM CLEANING STEAM CLEAN
- REMOVE THE OVEN DOOR
- REMOVE THE INNER PANEL
- CHILD SAFETY LOCK
- CARE OF ENAMEL HOB AND PLATES
- TECHNICAL DATA
- DIMENSIONS
- EQUIPMENT
- POWER
- IF THE APPLIANCE DOES NOT WORK
- MOUNTING THE ANTI-TIP DEVICE
- HEIGHT OF THE APPLIANCE
- ADJUST THE COOKER FROM 90 TO 92,5 CM
- HEIGHT WITHOUT SOCLE
- ADJUST THE COOKER FROM 85 TO 86,5 CM
- SERVICE
- UPPGE / DECLARE
Brand : Cylinda
Model : SIB7162KVRF
Category : Frying Pan