
PS-221 TH - Chainsaw DOLMAR - Free user manual and instructions
Find the device manual for free PS-221 TH DOLMAR in PDF.



| Product type | Chainsaw |
| Brand | DOLMAR |
| Model | PS-221 TH |
| Usage | Tree surgery and tree treatment |
| Weight (without fuel or chain) | 2.5 kg |
| Displacement | 22.2 cm³ |
| Maximum power | 0.74 kW / 8000 min⁻¹ |
| Fuel | Mixed 2-stroke oil and gasoline (25:1) |
| Fuel tank capacity | 200 cm³ |
| Chain oil tank capacity | 190 cm³ |
| Ignition | Maintenance-free electronic |
| Spark plug | NGK CMR6A |
| Chain lubrication | Automatic with adjustable flow pump |
| Cutting length | 25 cm |
| Chain speed | 14.9 m/s (91VG) / 13.6 m/s (25AP) |
| Sound pressure level | 95.0 dB(A) |
| Sound power level | 104.1 dB(A) |
| Vibrations tubular handle | 4.3 m/s² |
| Vibrations rear handle | 5.6 m/s² |
| Chain brake | Manual and inertial |
| Safety devices | Hand guard, chain catcher, safety chain |
| Anti-vibration system | Yes |
| Regular maintenance | Air filter cleaning, chain sharpening, brake check |
| Replacement parts | DOLMAR original |
| Warranty | According to dealer conditions |
Frequently Asked Questions - PS-221 TH DOLMAR
User questions about PS-221 TH DOLMAR
0 question about this device. Answer the ones you know or ask your own.
Ask a new question about this device
Download the instructions for your Chainsaw in PDF format for free! Find your manual PS-221 TH - DOLMAR and take your electronic device back in hand. On this page are published all the documents necessary for the use of your device. PS-221 TH by DOLMAR.
USER MANUAL PS-221 TH DOLMAR
Read this instruction manual carefully before putting the chain saw into operation and strictly observe the safety regulations! Only persons who have completed training in working from elevated platforms (cherry pickers, lifts), from platforms mounted on ladders or who are proficient in climbing with ropes are permitted to operate this chain saw. Keep this Instruction Manual!
Attention:
You will notice the following symbols on the chain saw and in the instruction manual:
Symboles
Thank you for purchasing a DOLMAR product!
Congratulations on choosing a DOLMAR chain saw! We are confident that you will be satisfied with this modern piece of equipment.
The PS-220 TH/PS-221 TH (Tophandle) is a very light and handy chain saw with the handle on the top. This model was developed especially for tree surgery and care. Only persons who have completed training in working from elevated platforms (cherry pickers, lifts), from platforms mounted on ladders or who are proficient in climbing with ropes are permitted to operate this chain saw.
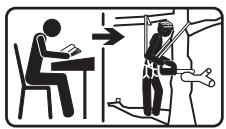
The automatic chain lubrication with variable-flow oil pump and maintenance-free electronic ignition ensure trouble-free operation, while the hand-saving anti-vibration system and ergonomic grips and controls make work easier, safer, and less tiring for the user.
The safety features of the PS-220 TH/PS-221 TH are state of the art and meet all German and international safety standards.
They include handguards on both grips, grip safety, chain catch, safety saw chain, and chain brake. The chain brake can be actuated manually, and is also inertia-actuated automatically in case of kickback.

In order to ensure the proper functioning and performance of your new chain saw, and to safeguard your own personal safety, it is imperative that you read this instruction manual thoroughly before operation. Be especially careful to observe all safety precautions! Failure to observe these precautions can lead to severe injury or death!
EU Conformity Declaration
The undersigned, Shigeharu Kominami and Rainer Bergfeld, as authorized by, declare that the DOLMAR machines,
Type: 023 EU prototype test certificate No.
PS-220 TH/PS-221 TH M6 04 10 24243 059
manufactured by Makita Corporation, 3-11-8, Sumiyoshi-cho, Anjo, Aichi, Japan, conforms to the basic safety and health requirements of the applicable EU guidelines:
EU Machine guideline 98/37/EG,
EU EMC guideline 89/336/EWG (modified by 91/263/EWG, 92/31/EWG and 93/68/EWG),
Noise emission 2000/14/EG.
The most important standards applied to properly meet the requirements of the above EU guidelines were: EN 14982, EN ISO 11681-2, EN 61000-4-2, EN 61000-4-3, CISPR 12.
The conformity assessment procedure 2000/14/EG was performed per Annex V. The measured noise level (Lwa) is 106dB(A) . The guaranteed noise level (Ld) is 107dB(A) .
The EG Type-Examination per 98/37/EG was performed by: TÜV Product Service GmbH, Zertifizierstelle, Ridlerstr. 31, D-80339 Munich.
Hamburg, CE2004
For DOLMAR GmbH
Shigeharu Kominami
Managing Director

Rainer Bergfeld
Managing Director
Table of contents
EU Conformity Declaration. 15
Packing 15
SAFETY PRECAUTIONS
General precautions 16
Protective equipment. 16
Fuels/Refuelling. 16
Putting into operation 16
Kickback 16
Working behavior/Method of working 16-17
Transport and storage 17
Maintenance 17
First aid. 17
Technical data. 17
Denomination of components 18
Mounting the guide bar and saw chain. 18
Tightening the saw chain. 18
Chain brake 18
Fuels/Refuelling. 18-19
Adjusting the chain lubrication. 19
Checking the chain lubrication 19
Starting the engine 19
Cold start 19
Warm start 19
Stopping the engine 19
Checking the chain brake 19
Adjusting the carburetor 19
MAINTENANCE
Sharpening the saw chain 20
Cleaning the guide bar, lubricating the sprocket nose. 20
Replacing the saw chain. 20
Replacing the suction head 20
Cleaning the air filter 20
Replacing the spark plug. 20
Cleaning the muffler 20
Cleaning the cylinder space 20
Instructions for periodic maintenance. 21
Service, spare parts and guarantee 21
Trouble shooting 22
Packing
Your DOLMAR chain saw will be delivered in a protective cardboard box to prevent transport damage.
Cardboard is a basic raw material and is consequently reuse-able or suitable for recycling (waste paper recycling).


SAFETY PRECAUTIONS
CAUTION:
This chain saw is designed especially for tree care and surgery. All work with this chain saw is to be carried out by properly trained persons only. Observe all literature, procedures and recommendations from the relevant professional organisation. Failure to do so constitutes a high accident risk! We recommend always using a rising platform (cherry picker, lift) for sawing in trees. Rappelling techniques are extremely dangerous and require special training! The operator must be trained in and familiar with the use of safety equipment and working and climbing techniques! Always use the appropriate belts, ropes and carabiners when working in trees. Always use restraining equipment for both the operator and the saw!
General precautions (Fig. 1 & 2)
- To ensure correct operation the user has to read this instruction manual to make himself familiar with the characteristics of the chain saw. Users insufficiently informed will endanger themselves as well as others due to improper handling.
- Lend this chain saw only to persons with training and experience in the use of tree-surgery saws. Always hand over the instruction manual.
- Children and young persons aged under 18 years must not be allowed to operate the chain saw. Persons over the age of 16 years may, however, use the chain saw for the purpose of being trained as long as they are under the supervision of a qualified trainer.
- Use chain saws always with the utmost care and attention.
- Operate the chain saw only if you are in good physical condition. If you are tired, your attention will be reduced. Be especially careful at the end of a working day. Perform all work calmly and carefully. The user has to accept liability for others.
- Never work under the influence of alcohol, drugs or medication.
- A fire extinguisher must be available in the immediate vicinity when working in easily inflammable vegetation or when it has not rained for a long time (danger of fire).
Protective equipment (Fig. 3 & 4)
-
In order to avoid head, eye, hand or foot injuries as well as to protect your hearing the following protective equipment must be used during operation of the chain saw:
-
The kind of clothing should be appropriate, i. e. it should be tight-fitting but not be a hindrance. Do not wear jewellery or clothing which could become entangled with bushes or shrubs. If you have long hair, always wear a hairnet!
It is necessary to wear a protective helmet whenever working with the chain saw. The protective helmet (1) is to be checked in regular intervals for damage and is to be replaced after 5 years at the latest. Use only approved protective helmets. - The face shield (2) of the protective helmet (or the goggles) protects against sawdust and wood chips. During operation of the chain saw always wear a goggle or a face shield to prevent eye injuries.
- Wear adequate noise protection equipment (ear muffs (3), ear plugs, etc.).
- The protective jacket (4) consists of 22 layers of nylon and protects the operator against cuts. It is always to be worn when working from elevated platforms (cherry pickers, lifts), from platforms mounted on ladders or when climbing with ropes.
- The protective brace and bib overall (5) is made of a nylon fabric with 22 layers and protects against cuts. We strongly recommend its use.
- Protective gloves (6) made of thick leather are part of the prescribed equipment and must always be worn during operation of the chain saw.
- During operation of the chain saw safety shoes or safety boots (7) fitted with anti skid sole, steel toe caps and protection for the leg must always to be worn. Safety shoes equipped with a protective layer provide protection against cuts and ensure a secure footing. For working in trees the safety boots must be suitable for climbing techniques.
Fuels / Refuelling
- Stop the engine before refuelling the chain saw.
- Do not smoke or work near open fires (Fig. 5).
- Let the engine cool down before refuelling.
- Fuels can contain substances similar to solvents. Eyes and skin should not come in contact with mineral oil products. Always wear protective gloves when refuelling. Frequently clean and change protective clothes. Do not breathe in fuel vapors.
- Do not spill fuel or chain oil. When you have spill fuel or oil immediately clean the chain saw. Fuel should not come in contact with clothes. If your clothes have come in contact with fuel, change them at once.
- Ensure that no fuel or chain oil oozes into the soil (environmental protection). Use an appropriate base.
- Refuelling is not allowed in closed rooms. Fuel vapors will accumulate near the floor (explosion hazard).
- Ensure to firmly tighten the screw caps of the fuel and oil tanks.
- Change the place before starting the engine (at least 3m from the place of refueling) (Fig. 6).
- Fuel cannot be stored for an unlimited period of time. Buy only as much as will be consumed in the near future.
- Use only approved and marked containers for the transport and storage of fuel and chain oil. Ensure children have no access to fuel or chain oil.
Putting into operation
- Do not work on your own. There must be someone around in case of an emergency.
- Ensure that there are no children or other people within the working area. Pay attention to any animals in the working area, as well (Fig. 7).
- Before starting work the chain saw must be checked for perfect function and operating safety according to the prescriptions.
Check especially the function of the chain brake, the correct mounting of the guide bar, the correct sharpening and tightening of the chain, the firm mounting of the sprocket guard, the easy motion of the throttle lever and the function of the throttle lever lock, the cleanliness and dryness of the handles, and the function of the ON/OFF switch. - Put the chain saw only into operation if it is completely assembled. Never use the chain saw when it is not completely assembled.
- Before starting the chain saw ensure that you have a safe footing.
-
Put the chain saw into operation only as described in this instruction manual (Fig. 8). Other starting methods are not allowed.
-
When starting the chain saw it must be well supported and securely held. The guide bar and chain must not be in contact with any object.
- When working with the chain saw always hold it with both hands. Take the rear handle with the right hand and the tubular handle with the left hand. Hold the handles tightly with your thumbs facing your fingers. It is extremely dangerous to work with one hand, as the saw can fall through the completed cut uncontrolled (high risk of injury). Furthermore, it is impossible to control kickback with one hand.
- CAUTION: When releasing the throttle lever the chain will keep on running for a short period of time (free-wheeling).
- Continuously ensure that you have a safe footing.
- Hold the chain saw such that you will not breathe in the exhaust gas. Do not work in closed rooms (danger of poisoning).
- Switch off the chain saw immediately if you observe any changes in its operating behavior.
- The engine must be switched off before checking the chain tension, tightening the chain, replacing it or clearing malfunctions (Fig. 9).
- When the sawing device is hit by stones, nails or other hard objects, switch off the engine immediately and check the sawing device.
- When stopping work or leaving the working place switch off the chain saw (Fig. 9) and put it down such that nobody is endangered.
- Do not put the overheated power chain saw in dry grass or on any inflammable objects. The muffler is very hot (danger of fire).
- CAUTION: Oil dropping from the chain or guide bar after having stopped the saw chain will pollute the soil. Always use an appropriate base.
Kickback
- When working with the chain saw dangerous kickbacks may occur.
- Kickback occurs when the upper part of the end of the guide bar inadvertently touches wood or other hard objects (Fig. 10).
- Before the saw chain enters the cut, it can slip to the side or jump (caution: high risk of kickback).
- This causes the saw to be thrown back toward the user with great force and out of control. Risk of injury!
In order to prevent kickback, follow these rules:
- Only specially-trained persons should perform plunge cuts, i.e., piercing timber or wood with the tip of the saw!
- Always observe the end of the guide bar. Be careful when continuing an already started cut.
- When starting to cut the chain must be running.
- Ensure that the chain is always sharpened correctly. Pay special attention to the height of the depth limiter.
- Never cut several branches at the same time. When cutting a branch ensure that no other branch is touched.
- When crosscutting a trunk be aware of the trunks next to it.
Working behavior/Method of working
- Only use the chain saw during good light and visibility periods. Be aware of slippery or wet areas, and of ice and snow (risk of slipping). The risk of slipping is extremely high when working on recently peeled wood (bark).
- Never work on unstable surfaces. Make sure that there are no obstacles in the working area, risk of stumbling. Always ensure that you have a safe footing.
- Never saw above your shoulder height (Fig. 11).
- Never saw while standing on a ladder (Fig. 11).
- Never climb a tree and work without the appropriate restraining systems for the operator and the saw. We recommend always working from a rising platform (cherry picker, lift).
- Do not work leaning too far over.
- Guide the chain saw in such a way that no part of your body is within the elongated swivelling range of the saw (Fig. 12).
- Use the chain saw for sawing wood only.
- Avoid touching the ground with the chain saw while it is still running.
- Never use the chain saw for lifting up or removing pieces of wood or other objects.
- Remove foreign objects such as sand, stones and nails found within the working area. Foreign objects may damage the sawing device and can cause dangerous kickback.
- When sawing precut timber use a safe support (sawing jack, (Fig. 13)). Do not steady the workpiece with your foot, and do not allow anyone else to hold or steady it.
- Secure round pieces against rotation.
- Before performing a crosscut firmly apply the front of the body to the timber, only then can the timber be cut with the chain running. For this the chain saw is lifted at the rear handle and guided with the tubular handle. The front of the body serves as a centre of rotation. Continue by slightly pressing down the tubular handle and simultaneously pulling back the chain saw. Apply the front of the body a little bit deeper and once again lift the rear handle.
- When the timber must be pierced for cutting or longitudinal cuts are to be performed it is urgently recommended to have this carried out by specially trained persons only (high risk of kickback).
- Do longitudinal - lengthwise - cuts at the lowest possible angle (Fig. 14). Be very careful when doing this type of cut, as the front body cannot grip.
- The saw must be running whenever you remove the chain saw from the wood.
- When performing several cuts the throttle lever must be released in between.
- Be careful when cutting splintery wood. Cut pieces of wood may be pulled along (risk of injuries).
- When cutting with the upper edge of the guide bar, the chain saw may be pushed in the direction of the user if the chain gets clamped. For this reason use the lower edge of the bar whenever possible. The chain saw will then be pushed away from you (Fig. 15).
- If the timber is under tension (Fig. 16), first cut the pressure side (A). Then the crosscut can be performed on the tension side (B). Thus clamping of the guide bar can be avoided.
CAUTION:
People felling trees or cutting of branches must be specially trained. High risk of injuries!
-
When cutting of branches, the chain saw should be supported on the trunk. Do not use the end of the bar for cutting (risk of kickback).
-
Be aware of branches under tension. Do not cut free branches from below.
-
Never perform detensioning cuts while standing on the trunk.
- Before cutting down a tree ensure that
a) only those people are within the working area which are actually involved in cutting down the tree.
b) every worker involved can withdraw without stumbling (the people should withdraw backwards in a diagonal line, i. e. at a degree of 45° ).
c) the bottom part of the trunk is free from foreign objects, underbrush and branches. Make sure to have a safe footing (risk of stumbling).
d) the next working place is at least 2 1/2 tree lengths away (Fig. 17). Before cutting down the tree check the direction of fall and make sure that there are neither people nor objects within a distance of 2 1/2 tree lengths.
- Judging the tree:
Direction of hanging - loose or dry branches - height of the tree - natural overhang - is the tree rotten?
Take into account the direction and speed of the wind. If strong gusts are occurring, do not do any felling. Avoid sawdust (pay attention to the direction the wind is blowing)!
- Cutting the roots:
Notching the trunk (Fig. 18, A):
Start with the strongest root. First do the vertical and then the horizontal cut.
The notch determines the direction of fall and guides the tree. The trunk is notched perpendicular to the direction of fall and penetrates 1/3 - 1/5 of the trunk diameter. Perform the cut near the ground.
- When correcting the cut, always do so over the whole width of the notch.
- Cut down the tree (Fig. 19, B) above the bottom edge of the notch (D). The cut must be exactly horizontal. The distance between both cuts must be approx. 1/10 of the trunk diameter.
- The material between both cuts (C) serves as a hinge. Never cut it through, otherwise the tree will fall without any control. Insert felling wedges in time.
- Secure the cut only with wedges made of plastic or aluminium. Do not use iron wedges. If the saw hits an iron wedge the chain can be seriously damaged or torn.
- When cutting down a tree always stay sideways of the falling tree.
- When withdrawing after having performed the cut, be alert for falling branches.
- When working on sloping ground the user of the chain saw must stay above or sideways of the trunk to be cut or the tree already cut down.
- Be alert for trunks which may roll towards you.
Transport and storage
- When changing your location during work switch off the chain saw and actuate the chain brake in order to prevent an inadvertent start of the chain.
- Never carry or transport the chain saw with the chain running.
-
When transporting the chain saw over long distances the guide bar protection cover (delivered with the chain saw) must be applied.
-
Carry the chain saw with the tubular handle. The guide bar points backwards (Fig. 20). Avoid coming in contact with the muffler (danger of burns).
- Ensure safe positioning of the chain saw during car transportation to avoid fuel or chain oil leakage.
- Store the chain saw safely in a dry place. It must not be stored outdoors. Keep the chain saw away from children.
- Before storing the chain saw over a long period of time or shipping it the fuel and oil tanks must be completely emptied.
Maintenance
- Before performing maintenance work switch off the chain saw (Fig. 21) and pull out the plug cap.
Before starting work always check the operating safety of the chain saw, in particular the function of the chain brake. Make sure the saw chain is properly sharpened and tensioned (Fig. 22). - Operate the chain saw only at a low noise and emission level. For this ensure the carburetor is adjusted correctly.
-
Regularly clean the chain saw.
-
Regularly check the tank cap for tightness.
Observe the accident prevention instructions issued by trade associations and insurance companies. Do not perform any modifications on the chain saw. You will put your safety at risk.
Perform only the maintenance and repair works described in the instruction manual. All other work must be carried out by DOLMAR Service. (Fig. 23)
Use only original DOLMAR spare parts and accessories.
Using spare parts other than original DOLMAR parts or accessories and guide bar/ chain combinations or lengths which are not approved bring a high risk of accidents. We cannot accept any responsibility for accidents and damage resulting from using sawing devices or accessories which have not been approved.
First aid (Fig. 24)
For the event of a possible accident, please make sure that a first aid kit is always immediately available close by. Immediately replace any items used from the first aid box.
When calling for help, give the following information:
- Place of the accident
- What happened
Number of injured people - Kind of injuries
- Your name!
NOTE:
Individuals with poor circulation who are exposed to excessive vibration may experience injury to blood vessels or the nervous system.
Vibration may cause the following symptoms to occur in the fingers, hands or wrists: "Falling asleep" (numbness), tingling, pain, stabbing sensation, alteration of skin colour or of the skin.
If any of these symptoms occur, see a physician!
Technical data
| Stroke volume | cm3 | 22.2 |
| Bore | mm | 33 |
| Stroke | mm | 26 |
| Max. power at speed | kW/min-1 | 0.74/8,000 |
| Max. torque at speed | Nm/min-1 | 0.97/6,500 |
| Idling speed / max. engine speed with bar and chain | min-1 | 3,000/11,500 (PS-220 TH), 3,000/10,500 (PS-221 TH) |
| Coupling speed | min-1 | 4,500 |
| Sound pressure level at the workplace LpA av per ISO/CD 228681) | dB (A) | 95.0 |
| Sound power level LWA av per ISO/CD 228681) | dB (A) | 104.1 |
| Vibration acceleration ah,wav per ISO 75051) | ||
| - Tubular handle | m/s2 | 4.3 |
| - Rear handle | m/s2 | 5.6 |
| Carburetor (diaphragm carburetor) | Type | Walbo WYL |
| Ignition system | Type | electronic |
| Spark plug | Type | NGK CMR 6A |
| Electrode gap | mm | 0.6 – 0.7 |
| Fuel consumption at max. load per ISO 7293 | kg/h | 0.41 |
| Specific consumption at max. load per ISO 7293 | g/kWh | 561 |
| Fuel tank capacity | cm3 | 200 |
| Chain oil tank capacity | cm3 | 190 |
| Mix ratio (fuel/two-stroke oil) | 25:1 | |
| Chain brake | Actuation manually or by kickback | |
| Chain speed2) | m/s | 14.9 (91VG) 13.6 (25AP) |
| Sprocket pitch | inch | 3/8 (91VG) 1/4 (25AP) |
| Number of teeth | Z | 6 (91VG) 8 (25AP) |
| Pitch / Driving element strength | inch | 3/8 /0.050 (91VG) 1/4 /0.050 (25AP) |
| Guide bar, length of a cut | cm | 25 |
| Weight (fuel tank empty, without chain and guide bar) | kg | 2.5 |
1) Figures derived in equal part from idle, full-load, and top-speed operation.
2) At max. power
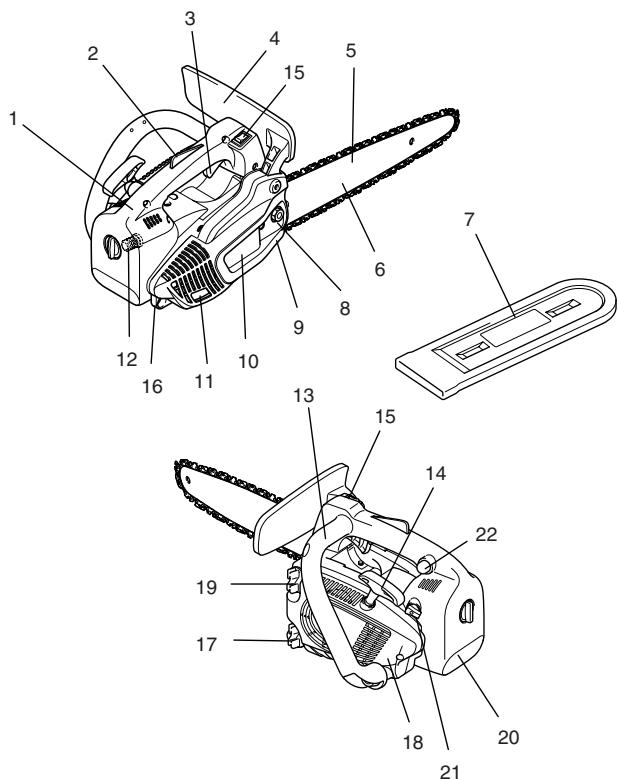
Denomination of components
- Bear handle
- Safety locking button (throttle lock)
- Throttle lever
- Hand guard (release for chain brake)
- Chain
- Guide bar
- Guide bar case
- Retaining nuts
- Chain catch (safety device)
- Sprocket cover
- Muffler
- Spark plug
- Front grip (tubular handle)
- Starter grip
- I/STOP-switch (short-circuit switch)
- Carabiner or rope attachment point
- Oil tank cap
- Fan housing with starting assembly
- Fuel tank cap
- Air filter cover
- Choke lever
- Primar pump
PUTTING INTO OPERATION (Fig. 25)
CAUTION:
Before doing any work on the guide bar or chain, always switch off the engine and pull the plug cap off the spark plug (see "Replacing the spark plug"). Always wear protective gloves!
CAUTION:
Do not start the saw until it has been completely assembled and inspected!
Mounting the guide bar and saw chain (Fig. 26)
Use the universal wrench delivered with the chain saw for the following work. Put the chain saw on a stable surface and carry out the following steps for mounting the guide bar and chain:
Disengage the chain brake by pulling the hand guard (1) in the direction of the arrow. Unscrew retaining nut (2).
Carefully spread the sprocket cover (3), pull it from its fixture (4) and remove it.
Turn the chain adjusting screw (5) to the left (counterclockwise) until the pin (6) is at the right stop. (Fig. 27 & 28)
Position the guide bar (7). (Fig. 29)
Lift the chain (9) over the sprocket (10). Using your right hand, guide the chain into the top guide groove (11) on the guide bar. (Fig. 30)
Note that the cutting edges along the top of the chain must point in the direction of the arrow!
Pull the chain (9) around the nose (12) of the guide bar in the direction of the arrow. Pull the guide bar by hand fully toward its nose. Make sure that the chain blade fits the grooves of the guide bar. (Fig. 31)
First, push the sprocket cover (3) into its fixture (4). Make sure that the pin (8) of the chain tighten is in the hole on the guide bar. Then push it over the retaining bolt while lifting the saw chain (9) over the chain catch (13).
Manually tighten the retaining nut (2). (Fig. 32)
Tightening the saw chain
Turn the chain adjusting screw (5) to the right (clockwise) until the chain engages the guide groove of the bottom side of the bar (see circle).
Slightly lift the end of the guide bar and turn the chain adjusting screw (5) to the right (clockwise) until the chain rests against the bottom side of the guide bar.
While still holding up the tip of the guide bar, tighten the retaining nuts (2) with the universal wrench. (Fig. 33)
Checking the chain tension (Fig. 34)
The tension of the chain is correct if the chain rests against the bottom side of the guide bar and can still be easily turned by hand.
While doing so the chain brake must be released.
Check the chain tension frequently - new chains tend to get longer during use! When checking the chain tension the engine must be switched off.
NOTE:
It is recommended to use 2 - 3 chains alternatively.
In order to guarantee uniform wear of the guide bar the bar should be turned over whenever replacing the chain.
Chain brake (Fig. 35)
The PS-220 TH/PS-221 TH comes with an inertia chain brake as standard equipment. If kickback occurs due to contact of the guide-bar tip with wood (see "SAFETY PRECAUTIONS"), the chain brake will stop the chain through inertia if the kickback is sufficiently strong.
The chain will stop within a fraction of a second.
The chain brake is installed to block the saw chain before starting it and to stop it immediately in case of an emergency.
IMPORTANT: NEVER run the saw with the chain brake activated! Doing so can very quickly cause extensive engine damage!
ALWAYS release the chain brake before starting the work!
NOTE:
The chain brake is a very important safety device and like any other component subject to normal wear and tear. Regular inspection and maintenance are important for your own safety and must be done by a DOLMAR service centre.
Engaging the chain brake (braking) (Fig. 36)
If the kickback is strong enough the sudden acceleration of the guide bar combined with the inertia of the hand guard (1) will automatically actuate the chain brake. To engage the chain brake manually, simply push the hand guard (1) forward (towards the tip of the saw) with your left hand (arrow 1).
Releasing the chain brake
Pull the hand guard (1) towards you (arrow 2) until you feel it catch. The brake is now released.
Fuel (Fig. 37)
CAUTION:
This saw is powered by mineral-oil products (gasoline (petrol) and oil).
Be especially careful when handling gasoline (petrol).
Avoid all flame or fire. Do not smoke (explosion hazard).
Fuel mixture
The engine of the chain saw is a high-efficiency two-stroke engine. It runs on a mixture of gasoline and two-stroke engine oil.
The engine is designed for unleaded regular gasoline with a min. octane value of 91 ROZ. In case no such fuel is available, you can use fuel with a higher octane value. This will not affect the engine.
In order to obtain an optimum engine output and to protect your health and the environment use unleaded fuel only.
For lubricating the engine use a two-stroke engine oil (quality grade: JASO FC, ISO EGO), which is added to the fuel.
Caution: Do not use ready-mixed fuel from petrol stations.
The correct mixture ratio:
25:1 i.e. mix 25 parts gasoline with 1 part oil.
NOTE:
For preparing the fuel-oil mixture first mix the entire oil quantity with half of the fuel required, then add the remaining fuel. Shake the mixture thoroughly before pouring it into the tank.
It is not wise to add more engine oil than specified to ensure safe operation. This will only result in a higher production of combustion residues which will pollute the environment and clog the exhaust channel in the cylinder as well as the muffler. In addition, fuel consumption will rise and performance will decrease.
The Storage of Fuel
Fuels have a limited storage life. Fuel and fuel mixtures age. Therefore fuel and fuel mixtures, which have been stored for too long, can cause starting problems. Purchase only that amount of fuel, which will be consumed over the next few months.
Store fuel safely in a dry place in approved containers only.
AVOID SKIN AND EYE CONTACT
Mineral oil products degrease your skin. If your skin comes in contact with these substances repeatedly and for an extended period of time, it will desiccate. Various skin deseases may result. In addition, allergic reactions are known to occur. Eyes can be irritated by contact with oil. If oil comes into your eyes, immediately wash them with clear water.
If your eyes are still irritated, see a doctor immediately!
Chain oil

Use an oil with adhesive additive for lubricating the chain and guide bar. The adhesive additive prevents the oil from being flung off the chain too quickly.
We recommend the use of chain oil which is bio-degradable in order to protect the environment. The use of bio-degradable oil may even be required by local regulations.
The chain oil BIOTOP sold by DOLMAR is made of special vegetable oils and is 100% bio-degradable. BIOTOP has been granted the "blue angel" (Blauer Umweltschutz-Engel) for being particularly environment-friendly (RAL UZ 48).

BIOTOP chain oil is available in the following sizes:
1 order number 980 008 210
5 order number 980 008 211
Bio-degradable oil is stable only for a limited period of time. It should be used within 2 years from the date of manufacture (printed on the container).
Important note on bio-degradable chain oils:
If you are not planning to use the saw again for an extended period of time, empty the oil tank and put in a small amount of regular engine oil (SAE 30), and then run the saw for a time. This is necessary to flush out all remaining bio-degradable oil from the oil tank, oil-feed system, chain and guide bar, as many such oils tend to leave sticky residues over time, which can cause damage to the oil pump or other parts.
The next time you use the saw, fill the tank with BIOTOP chain oil again. In case of damage caused by using waste oil or inappropriate chain oil the product guarantee will be null and void.
Your salesman will inform you about the use of chain oil.
NEVER USE WASTE OIL (Fig. 38)
Waste oil is very dangerous for the environment.
Waste oil contains high amounts of carcinogenic substances. Residues in waste oil result in a high degree of wear and tear at the oil pump and the sawing device.
In case of damage caused by using waste oil or inappropriate chain oil the product guarantee will be null and void.
Your salesman will inform you about the use of chain oil.
AVOID SKIN AND EYE CONTACT
Mineral oil products degrease your skin. If your skin comes in contact with these substances repeatedly and for an extended period of time, it will desiccate. Various skin deseases may result. In addition, allergic reactions are known to occur. Eyes can be irritated by contact with oil. If oil comes into your eyes, immediately wash them with clear water.
If your eyes are still irritated, see a doctor immediately!
Refuelling (Fig. 39)



FOLLOW THE SAFETY PRECAUTIONS!
Be careful and cautious when handling fuels.
The engine must be switched off!
Thoroughly clean the area around the caps, to prevent dirt from getting into the fuel or oil tank.
Unscrew the cap and fill the tank with fuel (fuel/oil mixture) or chain oil as the case may be. Fill up to the bottom edge of the filler neck. Be careful not to spill fuel or chain oil!
Tighten the fuel caps far as it will go.
Clean screw cap and tank after refuelling.

Lubricating the chain
During operation there must always be sufficient chain oil in the chain-oil tank to provide good chain lubrication. One filling is sufficient for about one half-hour of continuous operation. When working, check that there is still sufficient chain oil in the tank and top up if necessary. Check only when the engine is switched off!
1 fuel/oil mixture
2 chain oil
Adjusting the chain lubrication (Fig. 40)
The engine must be switched off.
You can adjust the oil pump feed rate with the adjusting screw (1). The amount of oil can be adjusted using the universal wrench.
To ensure troublefree operation of the oil pump the oil guide groove at the housing (2) and the oil inlet bore in the guide bar (3) must be cleaned regularly. (Fig. 41)

Checking the chain lubrication (Fig. 42)
Never work with the chain saw without sufficient chain lubrication. Otherwise the service life of the chain and guide bar will be reduced.
Before starting work check the oil level in the tank and the oil feed.
Check the oil feed rate as described below: Start the chain saw (see "Starting the engine").
Hold the running chain saw approx. 15 cm above a trunk or the ground (use an appropriate base).
If the lubrication is sufficient, you will see a light oil trace because oil will be flung off the sawing device. Pay attention to the direction the wind is blowing and avoid unnecessary exposure to the oil spray!
NOTE:
After the saw has been turned off it is normal for residual chain oil to drip from the oil feed system, the guide bar and the chain for a time. This does not constitute a defect! Place the saw on a suitable surface.
Starting the engine (Fig. 43)
Do not start the saw until it has been completely assembled and inspected! Move at least 3m away from the place where you fuelled the saw.
Make sure you have a good footing, and place the saw on the ground in such a way that the chain is not touching anything.
Engage the chain brake (lock).
Grasp the rear handle firmly in one hand and hold the saw firmly against the ground. Press with one knee on the rear handle.
IMPORTANT: The choke lever (5) is coupled to the throttle lever (1). It will revert to its original position automatically once the throttle lever has been pressed.
If the throttle lever is pressed before the engine starts, then the choke lever (5) will have to be reset to the appropriate position. (Fig. 44)
Cold start:
Push the short-circuit switch (3) forward.


. Push primer pump 7 - 10 times.
Slowly pull out the starter cable (4) until you notice resistance (the piston is positioned before the top dead centre). (Fig. 44)
Now continue to pull quickly and powerfully. The engine will start after 2 to 4 attempts and will continue to run (at low temperatures, several starting pulls might be necessary).
CAUTION: Do not pull out the starter cable more than approx. 50 cm , and lead it back by hand. For efficient starting, it is important to pull the starter cable quickly and powerfully.
As soon as the engine is running smoothly, gently press the throttle lever (1) once (grasp the handle, the safety locking button (2) will release the throttle lever) this will cause the choke lever (5) to spring back to its original position and the engine will then run at idling speed. (Fig. 44)
Now release the chain brake.

Warm start:
Proceed as described under cold start, but place the choke lever (5) to
position (Fig. 44)
Important: If the fuel tank has been completely emptied and the engine has stopped due to lack of fuel, press the primer pump 7 - 10 times. (Fig. 44)

Stopping the engine
Put the short-circuiting switch (3) in position "STOP".(Fig.44)
Checking the chain brake (Fig. 45)
Do not work with the chain saw without first checking the chain brake!
Start the engine as described (make sure you have a good footing, and place the chain saw on the ground in such a way that the guide bar is free of contact).
Grasp the tubular handle firmly with one hand and hold the grip with the other.
With the engine running at moderate speed, press the hand guard (6) in the direction of the arrow with the back of your hand until the chain brake engages. The chain should stop immediately.
Immediately release the throttle and release the chain brake.
IMPORTANT: If the chain does not stop immediately in this test, do not under any circumstances proceed with work. Contact a DOLMAR service center.
Adjusting the carburetor (Fig. 46)
The carburetor eliminates the need to adjust the idle and main nozzles, and no such adjustment is possible.
If necessary, the idle speed can be adjusted using the adjustment screw (11).


As installed, the carburetor has fixed nozzles for the air pressure at sea level. At heights above 1000m /3300 feet it may be necessary to replace the carburetor nozzles.
Adjust the carburettor using the screwdriver (7, which has a blade width of 4mm ).
Before undertaking the adjustment, run the engine for 3 - 5 minutes to warm it up, but not at high speed!
Set idle speed
Turning the adjusting screw (11) in (clockwise): increases the idle speed.
Turning it out (counterclockwise): lowers the idle speed.
Caution: In no case should the chain move.
MAINTENANCE (Fig. 47)
Sharpening the saw chain


CAUTION: Before doing any work on the guide bar or chain, always switch off the engine and pull the plug cap off the spark plug (see "Replacing the spark plug"). Always wear protective gloves!
The chain needs sharpening when:
The sawdust produced when sawing damp wood looks like wood flour.
The chain penetrates the wood only under great pressure. The cutting edge is visibly damaged.
The saw is pulled to the left or right when sawing. This is caused by uneven sharpening of the chain.
Important: Sharpen frequently, but without removing too much metal!
Generally, 2 or 3 strokes of the file will be enough.
Have the chain resharpened at a service centre when you have already sharpened it yourself several times.
Proper sharpening: (Fig. 48)
CAUTION: Use only chains and guide bars designed for this saw.
All cutters must be of the same length (dimension a). Cutters with different lengths result in rough running of the chain and can cause cracks in the chain.
Minimum cutter length is 3mm . Do not reshape the chain when the minimum cutter length has been reached; at this point, the chain must be replaced.
The depth of the cut is determined by the difference in height between the depth limiter (round nose) and the cutting edge.
The best results are obtained with a depth-limiter depth of 0.65mm (.025").
CAUTION: Excessive depth increases the risk of kickback!

All cutters must be sharpened to the same angle, 30° . Different angles result in a roughly, irregularly running chain, increase wear and tear and cause chain breakage. The 85° front rake of the cutter results from the cut depth of the round file. If the proper file is used in the right manner, the correct front rake will be obtained automatically. (Fig. 49)
Files and how to work with them (Fig. 50)
Use a special round file for chains (dia. 4 mm) for sharpening the chain. Normal round files are not appropriate for this work.
The file should cut only when pushed forwards (arrow). Lift the file when leading it backwards.
First sharpen the shortest cutter. The length of this cutter is then the standard for all other cutters of the chain.
Always guide the file horizontally (90° to the guide bar).
The file holder makes file guidance easier. It is marked for the correct 30° sharpening angle (keep the marks parallel with the chain when filing, see illustration) and limits the cut depth to the correct 4/5 of the file diameter. (Fig. 51)
After having sharpened the chain, the height of the depth limiter must be checked by means of a chain gauge.
Correct even the smallest excess height with a special flat file (12).
Round off the front of the depth limiter (13). (Fig. 52)
Cleaning the sprocket interior, checking and replacing the chain catcher (Fig. 53)
CAUTION: Before doing any work on the guide bar or chain, always switch off the engine and pull the plug cap off the spark plug (see "Replacing the spark plug"). Always wear protective gloves!
CAUTION: Do not start the saw until it has been completely assembled and inspected!
Remove the sprocket cover (4) (see section on "PUTTING INTO OPERATION") and clean the interior with a brush.
Remove the chain (3) and guide bar (2).
NOTE:
Make sure that no residue or contaminants remain in the oil guide groove (1) and the chain tightener (6).
For replacing the guide bar, chain, and sprocket, see "PUTTING INTO OPERATION".
Chain catcher
Visually inspect the chain catcher (5) for damage and replace if necessary.
Cleaning the guide bar, lubricating the sprocket nose (Fig. 54)
CAUTION: Protective gloves must be worn.
Regularly inspect the bearing surfaces of the guide bar for damage, and clean them with a suitable tool.
Sprocket nose type:
If the saw is used intensively it will be necessary to lubricate the return sprocket bearings regularly (once a week). To do this, first thoroughly clean the 2 mm hole at the tip of the guide bar, and then press in a small amount of multi-purpose grease.
Multi-purpose grease and grease guns are available as accessories.
Multi-purpose grease 944 360 000
Grease guns 944 350 000
Replacing the saw chain (Fig. 55)
CAUTION: Use only chains and guide bars designed for this saw.
Check the sprocket (10) before mounting a new chain.
CAUTION: Worn out sprockets may damage the new chain and must therefore be replaced.
Replacing the suction head (Fig. 56)
The felt filter (12) of the suction head can become clogged. It is recommended to replace the suction head once every three months in order to ensure unimpeded fuel flow to the carburetor.
To remove the suction head for replacement, pull it out through the tank filler neck using a piece of wire bent at one end to form a hook.
Cleaning the air filter (Fig. 57)

Unscrew screw (14) and remove the cleaner case cover (13).
IMPORTANT: Cover the intake opening with a clean cloth in order to prevent dirt particles from falling into the carburetor. Remove the air filter (15).
CAUTION: To prevent injury to the eyes, do NOT blow out dirt particles! Do not use fuel to clean the air filter.
Clean the air filter with a soft brush.
If the filter is very dirty, clean it in lukewarm water with dishwashing detergent.
Let the air filter dry completely.
If the filter is very dirty, clean it frequently (several times a day), because only a clean air filter provides full engine power.
CAUTION:
Replace damaged air filters immediately.
Pieces of cloth or large dirt particles can destroy the engine!
Replacing the spark plug (Fig. 58)


CAUTION:
Do not touch the spark plug or plug cap if the engine is running (high voltage). Switch off the engine before starting any maintenance work. A hot engine can cause burns. Wear protective gloves!
The spark plug must be replaced in case of damage to the insulator, electrode erosion (burn) or if the electrodes are very dirty or oily.
Remove the cleaner case cover (see "Cleaning the air filter").
Pull the plug cap (1) off the spark plug. Use only the combination wrench supplied with the saw to remove the spark plug.
CAUTION: Use only the following spark plugs: NGK CMR6A.
Electrode gap (Fig. 59)
The electrode gap must be 0.6 - 0.7mm
Cleaning the inlet port of the cooling air (Fig. 60)
Unscrew four screws (2). Remove recoil starter (3).
Clean the inlet port (4) and the cylinder fins.
Cleaning the muffler (Fig. 61)


CAUTION: If the engine is hot there is a risk of burning. Wear protective gloves. Remove the sprocket cover (see "PUTTING INTO OPERATION").
Remove deposits of carbon from the exhaust outlets (11) of the muffler.
Cleaning the cylinder space (Fig. 62)
Remove the sprocket cover (see "PUTTING INTO OPERATION").
If necessary remove muffler by loosening and removing the two screws (14).
Stuff a rag into the cylinder port (15).
Use a suitable tool (wooden scraper) to clean out the cylinder space (16), especially the cooling fins.
Remove the rag from the cylinder port and refit the muffler according to the diagram. Replace the gasket (13) if necessary. Carefully remove any pieces of the old gasket from the muffler.
Ensure correct mounting position.
The cowling should follow the contour of the cylinder to ensure correct heat transfer.
Tighten screws (14) to 10Nm while the engine is cold.
Instructions for periodic maintenance
To ensure long life, prevent damage and ensure the full functioning of the safety features the following maintenance must be performed regularly. Guarantee claims can be recognized only if this work is performed regularly and properly. Failure to perform the prescribed maintenance work can lead to accidents!
The user of the chain saw must not perform maintenance work which is not described in the instruction manual. All such work must be carried out by a DOLMAR service centre.
| General | Chain saw Saw chain Chain brake Guide bar | Clean exterior, check for damage. In case of damage, have repaired by a qualified service centre immediately. Sharpen regularly, replace in good time. Have inspected regularly at an authorized service centre. Turn over to ensure even wear of bearing surfaces. Replace in good time. |
| Before each start | Saw chain Guide bar Chain lubrication Chain brake OFF switch, Safety locking button, Throttle lever Fuel/oil tank plug | Inspect for damage and sharpness. Check chain tension. Check for damage. Functional check. Functional check. Functional check. Check for tightness. |
| Every day | Air filter Guide bar Guide bar support Idle speed | Clean. Check for damage, clean oil intake bore. Clean, in particular the oil guide groove. Check (chain must not run). |
| Every week | Fan housing Cylinder space Spark plug Muffler Chain catch sleeve | Clean to ensure proper air cooling. Clean. Check and replace if necessary. Check tightness of mounting. Check for damage, replace if necessary. |
| Every 3 months | Suction head Fuel, oil tanks | Replace. Clean. |
| Storage | Chain saw Guide bar/chain Fuel, oil tanks Carburetor | Clean exterior, check for damage. In case of damage, have repaired by a qualified service centre immediately. Demount, clean and oil slightly. Clean the guide groove of the guide bar. Empty and clean. Run empty. |
Service, spare parts and guarantee
Maintenance and repair
The maintenance and repair of modern engines as well as all safety devices require qualified technical training and a special workshop equipped with special tools and testing devices.
We therefore recommend that you consult a DOLMAR service centre for all work not described in this instruction manual.
The DOLMAR service centres have all the necessary equipment and skilled and experienced personnel, who can work out cost-effective solutions and advise you in all matters.
Please contact your nearest service centre.
Spare parts
Reliable long-term operation, as well as the safety of your chain saw, depend among other things on the quality of the spare parts used. Use only original DOLMAR parts. Only original spare parts and accessories guarantee the highest quality in material, dimensions, functioning and safety.
Original spare parts and accessories can be obtained from your local dealer. He will also have the spare part lists to determine the required spare part numbers, and will be constantly informed about the latest improvements and spare part innovations.
Please bear in mind that if parts other than original DOLMAR spare parts are used, this will automatically invalidate the DOLMAR product guarantee.
Guarantee
DOLMAR guarantees the highest quality and will therefore reimburse all costs for repair by replacement of damaged parts resulting from material or production faults occurring within the guarantee period after purchase. Please note that in some countries particular guarantee conditions may exist. If you have any questions, please contact your salesman, who is responsible for the guarantee of the product.
Please note that we cannot accept any responsibility for damage caused by:
- Disregard of the instruction manual.
- Non-performance of the required maintenance and cleaning.
- Incorrect carburetor adjustment.
Normal wear and tear. - Obvious overloading due to permanent exceeding of the upper performance limits.
- Use of guide bars and chains which have not been approved.
- Use of guide bar and chain lengths which have not been approved.
- Use of force, improper use, misuse or accidents.
- Damage from overheating due to dirt on the recoil starter.
- Work on the chain saw by unskilled persons or inappropriate repairs.
- Use of unsuitable spare parts or parts which are not original DOLMAR parts, insofar as they have caused the damage.
- Use of unsuitable or old oil.
- Damage related to conditions arising from lease or rent contracts.
Cleaning, servicing and adjustment work is not covered by the guarantee. All repairs covered by the guarantee must be performed by a DOLMAR service centre.
Trouble shooting
| Malfunction | System | Observation | Cause |
| Chain does not run | Chain brake | Engine runs | Chain brake actuated. |
| Engine does not start or only with difficulty | Ignition system | Ignition spark | Malfunction in fuel supply system, compression system, mechanical malfunction. |
| Fuel supply | No ignition spark | Switch on STOP, fault or short-circuit in the wiring, plug cap or spark plug defective. | |
| Fuel tank is filled | Choke in wrong position, carburetor defective, suction head dirty, fuel line bent or interrupted. | ||
| Compression system | Inside | Faulty crankcase gasket, radial shaft packings defective, cylinder or piston rings defective. | |
| Outside | Spark plug does not seal. | ||
| Mechanical malfunction | Starter does not engage | Spring in starter broken, broken parts inside the engine. | |
| Warm start difficulties | Carburetor | Fuel tank is filledIgnition spark | Wrong carburetor adjustment. |
| Engine starts, but dies immediately | Fuel supply | Fuel tank is filled | Wrong idling adjustment, suction head or carburetor dirty. Tank venting defective, fuel line interrupted, cable defective, STOP switch defective. |
| Insufficient power | Several systems may be involved simultaneously | Engine is idling | Air filter dirty, wrong carburetor adjustment, muffler clogged, exhaust channel in cyl-inder clogged. |
| No chain lubrication | Oil tank/pump | No oil on the chain | Oil tank empty.Oil guide groove dirty. |
FRANÇAIS
Directive U.E. relative aux machines 98/37/CE,
Gerauschemission 2000/14/EG.
Drivstoffer/Pafylling. 86
Oppstart 86
Tilbakeslag (kickback) 86
PykoBoCTBO EC EMC 89/336/EWG (m3MeHHeHoe 91/263/EWG, 92/31/EWG n 93/68/EWG),
UcnyckaHne Uyma 2000/14/EG.
HanboJee BaxHbIe PnIMHeRMeBle CTaHdapTbI NOHocTbIO yOBoNtBOPrIOT Tpe6oBaHmnpuBeHeHHbIX BwIe pyKOBoCTB EC, B KOToPbIX: EN 14982, EN ISO 11681-2, EN 61000-4-2, EN 61000-4-3, CISPR 12.
PnpoeDpya onpeDeneHH COOTBCTBnA 2000/14/EG 6bIa npoBedeHa cornaCHO PnpnoXeHnO V. N3mepeHHy ypoBeh yMa (Lwa) coctabn 106 d(A). IpaanTIpOBaHHy ypoBeh yMa (Ld) coctabn 107 d(A).
Поберка EG Type cornacho 98/37/EG Быla поведа: ТьВ Product Service GmbH, Zertifizierstelle, Ridlerstr. 31, D-80339 Munich.
Hamburg, CE2004
Длг DOLMAR GmbH
Shigeharu Kominami
DinpekTop

Rainer Bergfeld
DuplekTop
CopepkanHe
Ctp.
Ceptnfikat cootBctbna Ebponeckoro coo6eCTba 119
YnakOBka 119
MEPbI IPEIOCTOPOXKHOCTN
O6uye yka3aHn 120
CpeIcTbAnHnDnBnDyaJIbHOJ3aunTbI 120
ToJIInBo/3anpaBka 120
Iodrotobka K pa6ote 120
OTdaua 120
Поведенoe BO Врем pa6obtbl/MeToDbI pa6oTb1 121
TpaHcnpOpTnOBka n xpaHeHne 121
Texnueckoe obcnykubane 121
Первая пomoць 121
Texnueckne daHHbIe 122
HaMeHOBaHne KOMnOHeHToB 123
ПОДГOTOBК K PABOTE
UcTaHOBka nOJIoTHa Zeenn I nnJIbHOJ Zeenn 123
HaTaeHne pIbHOI cenn 123
Topmo3 pnilbnoi ceen 123
ToJIInBo/3anpaBka. 123-124
PergunpoBka cma3kn cei.. 124
Поверка смашиц. 124
3anyck DviraTeia 124
XoIodnbl 3aynck 124-125
TenIbI 3aIyck. 125
OctanobkaDbiratae 125
IproBepka Tropmo3a cei 125
PerynpoBka Kap6oPaTopa 125
TEXHNUECKOE OBCJYXINBAHNE
3aToUka PnIbHOJ cEN 125
YnCTKa IIOJTHa CEIN, CMA3ka HnpaBJIoueI 3Be3doUKN 125
3aMeHa pIJIbHOJ cEPII 125
3aMeHa BCacbIbAIOUeI rOIOBKn 125
YnCTKa BO3dUshoroΦnIbTpα 125
3aMeHa 3aIaJIbHoi CBeuN 126
YnCTka rnyuHTeJIa 126
YnCTka pOLOCTN cIINHnpa. 126
IHCtpyKpIgnoepnOduNueCKOMyTexHnueCKOMy o6cnykBaHIO 126
MEPbI INPEIOCTOPOXHOCTN
PNEyPEXDEHNE:
3ta ceHHa 6eH3oHnla pa3pa6oTHa cneuHbNo Iy o6pe3Kn yXoDa 3a depeBbM. Bce paobTo bC daHHo CEHNO 6eH3oHnOIO JNOJXbI bVbONHbTcBc TOLbKO ONEpA0pAM CO CneuaJIbHO NIOrTOBko. Heo6xOIMO npInepKJBb5cY kAZaHN, pINBEDeHHbIX BTexNHueCKN INTEpAType, u Yka3AHm COOTBcTCTByUOxN xnpOeCCNOHaJIbHbIX OPOraH3aun. PpN XHEcoBLOdeHm Bbcoka ONaChOt NOnyEHn TpABMb! Mbl peKOMeHdyEM BCERda nCnoJIb3OBaTB NOBemHBie KOP3nHbI (KpaH-6aIKn, NOBemHnK) npP aBoTe nIOuHa NaBEx. Pa6Ota C nCnoJIb3OBaHNm KaHaTHO nOdbEmHO TexHnK qPe3BbUaHNO OnaNa H Tpe6yET CneuHBOHO nOIOrTOBKn! ONEpA0p DOJKeH yMeTb O6paAtbC 3aUnTHbIMN pncnoc6leHnMn M 6blb OUYen nCnoJIb3OBaHn POabeH neoDBNKHO n KaHtOH nOdbEMHO texHnK! Bcerda nCnoJIb3yIte NOxODaune pemHn, BepeBkn Nkap6uHHbIe KpOKn npPa6ote Ha DepeBxa. BcERda nCnoJIb3yIte ctpaxyUoine npincnoc6leHnla Dny CEHHO BcH3oHnbl yonepatopA!
06uye yka3aHnna(Pnc.1 n 2)
-Длгобсесченипавиьногдкплуатци onepatopdoJxhen npOHTab3YnHCTpyKcIHO NO 3KnPlyatauIN, YTO6bI O3HAKOMTbC xapakTeprNCTkAmi zenHoi B6h0tInbl.ИЗ-3a HENpavBHLHoro obpauehen HeOeOtaTOHn HfOpMnPOBaHHbl OEPaTOp nOdBepraet OnaChOCTn, KaK c6eB,TAK NOKpyKaIoUxN.
- PēPEDaBaeTne dāpəbTo b3 tny eHηHy 6eH3oNnI y TOnbKO nIuam, KOTOpBte oOyeHb I NMeIOT onIt nOth3oBaHnI nIaMn dI Ope3Kn depeBbeB. Bcerda nepeDaaBaeTakke NcHCTpyKUHIO NO kCnPnyatauIN.
-Дети MOnOdbIe IIOI MmAaIe 18 let He donyckaOTcK ynpabNeHIO cENHOB eHN30nIOI. Ondako MOnOdbIe IIOI CTapSe 16 let MOrT nCNoB3OBaTb CEHNyIO BEN30nIIY B cENIXoBuOyHeHn IOd HABIoDeHnEM KBaINpHnIpOBOaHORO cneuaNtca.
Icnonb3yute cenHyo 6eH30nIny Bcerda c 6oJbwoi octopoxhoctbno HBNMAMEM.
Pa60y cenHno 6eH3oNInNo CneJeYeT BbInOnHrTa TOnbKO B XopoWeM cn3mueckom coCTOHN.HcN Bly uctane, to Baue BNImaHne 6dyet ChnKeHO. Byte OcoBHeHO 6dnteJIbbl B KOHcpe pa6oeryo dHg. Bce pa6oHne onepaunC nCyeDeY bInOnIO CnOKoHNO n AkkpuAHO. OpeapTo DOnJxhen HeCTn OTBeTCTBEHHOCHT 3a 6eONaCHocTb NocTOPOHNHX mIu.
- HNKoIa He pa6oTaIe nocIe yIOnTepe6JIeHnA ANKOrIa, HApKOTIKOB IIN IpiMeMa MEINKAMeHTOB.
- Pn pa6oTe Bo3ne IeKOBocNlAmHeMJeUxnc PaCTeHn, a TaKxe B 3acyIINbI nePnoD, CNeDuYeT MeTb Ha pa6OeM MeTe OrHeTuWntEi (OnaChOCTb NoXapa).
CpeIcTbuaHnDnBnDyaJbHoN 3aunTbI (Pnc. 3 n 4)
- Bo bpe mpaobtI cenHnB 6e3OnmNIO IIN 3aunTbI OT tpABM rONobblrna3,pyK HOr, a TAKKe IIN OXpaHb Cnyx CneyE ToB3aTeNbHO npIMHeMbO INCAHHO NHXe 3aunTHOE o6OpYOBAHHe:
- Odjka ddojxha 6bIbcooTBeCTBlyooe, To ectb dojxha nnoTHO npnlerab k TeJy, Ho He cKOBBaIBaDbNueHn. He cNeYet HocITb HnKaKnx YkpaSeHn nn Odjdb, KOtObie MoryT 3auenTbca 3a BcKn nn KcytBu. Ecn y Bac dnnHbte BOLOCb, Bcerda IcnOnb3yne CeTKy dnn BOLOC!
- Bo Bpemra pa60bI cENHOB 6eH3OINIOB BCEda CneyET HOCNTb 3aunTHyo KACKY. CnEuyerpyrpho npOBepRb, He nobpeXdeHa nI 3auHTna KaCKA (1), n He pek eM pa3 B 5 let 3aMeHArTb ee. CneyET nonb3OBAbCt tonbKO cepTNIMUPOBAHHbIM M 3aUnTHbIMn KACKAMi.
- 3aunTHnA macka dnn liuca (2), CMOHTnpoBaHnHa ha 3aunTHOH Kacke (HnHa 3aunTHbX Ockax), 3aunMaet oT ceNOK nOnNOK. Bo Bpema paObTu cENHOB 6be30nIO BO I36BXaHne NopaeHHra3 cNeyET BCERda NpIb30BaTbcB 3aunTHbIMN OChAMn INI cpeCTBaMn 3aunTHbl liuca.
- IcnoIb3yIte IoIxOJHnIe CpeICTBa 3aunIbI OT Wyma (HayshnKn (3), bepuyn T.d.).
3aunnna Kpyrka (4), npdoxpanhoaa onepaTopa OT nope3OB, n3roTOBneHa 22-2noHoi HeINHOBOI TKAHN. KypTKY Heo6xoIMMo Bcerda HocITb pN BYIOHHeHH paOToB I BOJbEMHbIX KOp3HAX (KpAH-BaIKax, noJbEMHKNkax), NcTHuHbIX KOp3HAX INI pRn IcNoJIb3OBAHm KaHaTHOH NepeDbHXHO TECHMnK. - 3aunthbte uTahbl n nepeDnK (5) IMeIOT 22 cNoA HeJIoHOBt TkaHn 3aunuaiOT OT nope3OB. Mbl HactoTaeJIbHo peKOMeHdyem IcNIOJIb3OBAt bix.
3aunthbIe pykabnI (6) nKpeIKoK KOxN RAJIHOTcO 6OB3aTeBbIM 3aunTHbM OobpyodBaHMe, INX CNEyET NOCTORHHO HOCHTB BO BPEMa pa0bTb IeHNHO6EH3ONIOJIo. - Bo Bpemra pa60tbl ceHNOI 6eH3OINIOI cIeJeYET BCERda HocnTb 3aunTHbIe botnHKn mni canor (7) C HeCKoJIb3aIIeN IooUBoW, CTaJIbHbIM HOCKAMNI 3aunTOI nIHO. BotnKc C 3aunTHbIM CNoEM oBeCEneuBAOT 3auNTy OT npoe3OB u ObecneuBAOT yCTOuNVBOE pIoXKeHne. JIpa pa60tbl Ha DepeBbIX 3auHTbIe 60tNHKn DOJXHbI COOTBETCTBOBaT NCOnJIb3yeMOI NOBEmHOI TEXHke.
TonJInBo/3anpaBka
-пегд зanpaВКоцнHоь 6eH3OиЛы сеДуЕТ bIkLIOHTb DBIraTeJIb.
- He kypnte n he pa6oTaIte OKoIOn OTKpbItorO orHra (Pnc. 5).
-пелдзарвкоследуетхлдьп.
ToIINBO MOKET COeRpaTb cy6ctaHm, HAnOMHaIOUme pACTBOpTEiM. Ia3a N Koxy CneDyET 3auuMaTb OT KOHTAKTa C npOdyKTAMn, PpOn3BODIMbIMn Ha OCHOB MEnpaJIbHbX Macen. Bo BpEma 3anpaBKn BcERda NcPOnIb3yIte 3aunthIbe pykABuIbI. Heo6xOdIMO peYrJnphO nuCTNTb MeHrtB cNeOeJExy. He BdbXaIte napbl ToONIIba.
- He npoinbai Teonlno M MacNo dna Cma3kI cen. EcnBb npoinn TOnlbo nn MacNo, HemeJeHNO OunchTe cENHyO 6eH3oNnu. He donyckai Te KOHTaTa oJekdb C tonlbo. B cnuyae nonaDAnHa tonlba Ha oJexdy, HemeJeHHO nepeoJeHbTecb.
- ObaaainTe BHHMaHne Ha To, YTo6bl Hn TOnPiBNO, Hn MaCNo IJn Cm3Kn UeNi He NoaDANO NaOBy (3aunTa OkpyXauoJe cpebl). NcnoIb3yIte COOTBTCTBOUINne NOkKnAkn.
- Hénb3a BbIOnHЯTb 3aπpaBky B 3aKpbIbIX nOmeueHnX. Паы тОплВа co6ираIoTcR y nOla (ОпаСоHocTb B3рьИBA).
KpbIuKN EMKOCTe InTOnNlBa N Macna CneJeT NLOTHO 3aKpbIBaTb.
-Пелед Вкюченem DBИгателя OTOДNTE OT MeCTa 3anpaBKN (kaK MInHmym Ha 3M) (Puc.6).
- HeIb3a xpaHnTb TOJIINBO HeoRpaHnUeHHe BpEM. TOKyJaTe ToJIbKO TaKoe KOJIInueCTBO TOJIINBA, KOTOpOE 6yEt NCOnIb3ObaHo B 6JInxaiuee BpEM.
- IcnoIb3yIe TpAHCnOptHnpOBK IN XpaHEnHr TOJIINBA IN Macla DnRA CMA3KN 1eNtTOJbKO ppeHa3NaUeHHBe DnT ETOI NOOTBCTCEHBIM O6pa3OM MapKnOpBaHHBe EMcKoTn. CNeJeYer PpeDToBpaTntb DoCTyn DeTeN K ToJIINBY IN MaCly NnD CMA3KN eNtNi.
IpoROTOBka K pa6oTe
- He pa6o7aTe B OINHOueCTBe. Ha cIyaua ONaCHOCTn KTO-TO DOJIKeH HAXOHTbCRA NO6NI3OCTN.
- YbEintecb B TOM, YTO B IpeJenax pa6oey o6nactn HET dTeey nIn npyunx IIOeI. O6paTte TAKke BHNMaHne Ha XKNBtBix B pa6oey o6nactn. (Pnc.7)
Peped 3anyckom ceHnoi 6eH3OINbl Heo6xOIMO npOBeprtb 6euynpuehocT ee paobToI HcnpabHOCT coCTOHNB B COOTBETCTBN C npednncnAHI.
O6paTne oc06oe BHIMaHHe Ha cyHKUHOHOpBaHne TopMo3a cenm, npABINbHyO yCTAHOBky nonOTHa ceni, npABINbHyO 3aTOuy Ky ceni n ee HataXKeHne, HadeXHoCTb KpeIeHn Koxyxa 3Be3doKn, PnABHOctb paBOtbl pyKn akCeIepaToP aBLOKIOPOBky 3ToI pyKn. InpOBeTbe YcHOTy cyCXPOb tyKOJrOK, n pABINbHOCTb paBOtbl nepeKNIouHateN ON/OFF (BKl./BbIKl.).
- 3aynckaiTe ZENHyo BENHOTNny TOnbKO Nocne TOrO, KAK OHa NpOHOCbTO co6bpaHa. HnKoTa He nCnObl3yIe ZENHyo BENHOTNny, eCIn OHa CO6bpaHa He nPONHOCTbIO.
-Пелед Залусков сенинь сизлы убдпесь вTom,чTo Bbl npnHJIy cTOIчИВОЕ положенie.
- 3anyckaTe ueHnyo 6eH30nIny ToIbko TaK, KaK OINcaHO B 3ToN INHCTpykCIN (Pnc.8).Дугге cnocobbl3anycka HeOnOpYCTmbl.
- Pπn 3anycke ζεηhσ Μδεhσιοιb l cneayet oecneuHTe e naEκHγo onopy n Kπeŋko ee ydepKnbatb. ΠοπθHo ζεηn Κεntb He dαŋκHbI H N K εχMy πρικacatbca.
- Bo Bpempaobtbpawoy pkyo 3a 3adHIOy pkyoRTky, a neboy pkyo 3a dyrobyo pykoTky. KpeNKO yepKmbaIe pykoTkn TAK, YTObI Baun 60bnwne nabcu b HaxOJIncb Ha octaIbHbix naIbIcx. BInOpHeHne paob ot hOy pkyo Oehb OAncho, T.K. cENHaa 6eH30nila B KOHe pnilenHm MOxET HeKOHtpOnIpvEmo npBaIIMBaTCB (NoBliuHnA onaCHObT nonyehn TpaBmbl). Kpme TOrO, OTdaHaPiBbCe H Me oMeT KOHTpONIpOBaTbc OHOy pkyo.
- PPEДУПЕХДЕHIME: После оtnуckань рунк akceleрата цьдвжетс се HeKOTOpoe Врмг (эфпektнерци).
- Bce Bpemr Heo6xOIMo CneIuTb 3a COXpaHHeHem yCTOnuBOrO noloxehn.
- YedpXnBaiTe ceHny 6eHONy TaKIM o6paOm, yTo6bI BBy He BbIxAJIb BixIONhIx ra3OB. He pa6oTaIe B 3aKpbIbIX nOmeUeHNx (OnaChocTb OTPaBENHn).
- HemeJHHe BbIKIOHTe cENHyo 6eH30NIy, ecN Bbl 3aMeTnte KaKHeJIb6O n3MeHENB eep6ote.
- Paped npobepkoi HataxkeHnIeI, HataxkeHnEM eIe 3aMeHOI nIyctpaHennm HecnpabHoctTe IeO6XoDMOBbIKIOHTb DnIRatelb (Pnc.9).
- EcnpeXyuee yctpoIcTBo HATKHTcHa KaMeHb, rbo3db uIN NIOO6Hbte TBepblne pTeMaTebl, cJeUyeH HeMeIeHNO BbIKIOuHTb DbIRaTeBn I npOBepNTb yctpoIcTBo.
Korda pa607a 3abepaaetc nnn poknaetc pa6oee meTo, BkIIOUHTe cenHy6beHOnnny (Pnc.9) n pacnoJoxnte ee TaK, YTObI OHa He yrpoKaJa HmHbe63onachOCTn.
- He KnaDitne CInBHO HarpeTyIO ZENHIO 6eHN0nIHy Ha cyxio TpABy IIN KaKHeNl6o JeRKOcINbAmEHNOUChEa PpeMTebl. YuWnteB BByXIoNbIX Ra3OB AJIReTc OueHb RoprUm (OnaCHOCT Noboka).
- PENDYIPPEKDEHME: MacNo, kanaiooee c zenni nn c nonotna zenni noceB bIKJIOUENI CEHNOH BEN30nbl, 3aqr3nHET noBy. Bcerda nCnoNb3ynte COOTBTCTBYOUINE NOkKnAkn.
OTdaua
- Пи pa6oTe ueHNoI 6eH3OInIO MOKeT clyuATbcr ONaChra OTdaHa.
- Oτιδача προικχόουνιπρι ένεοςθοροχόΜΚαςΗν Bερχήν γάθυ ΚΚΟύλα Μολοῦς ζεπηκάνεβγινίνη ἀργόΜγ TβερόΜγ πρεμήτυ (Pιс. 10).
- Do TOTO KAK ZENHAA 6eHN3OINIa BOJDeT B paCINI, OHa MOXET COCKONb3HyTb Na6OK NII NOINPbIrHyTb (nPdeynpeXJeHne: NOBbiueHNHAA ONaCHOCTb OTdaN).
B 3tOM cnYyae hactynit HEKOHTPoJIpyEmoe OToPacbIbAHne NINbIc 60blwoi cnlo B cToPOH yonepatopA. OnaChocb nOnyuYeHn TaPBm! YTO6bI m6ExahtOtaDnA, CoNIOJauTe CnEduVIOe npABnla: - Opb60tKa C Bpe3Hoi NpdaueH, T.e. HnIeHne Ie comateepnaIOB nII nepeBa octPm EINbl, DoJIKHa BbIOnJIHrTbcra ToJIbKO cNeUmaJIbHO oByeHHbIM pa60THNkOM!
- Bcerda cneinte 3a nonoxhenem KOHca noltoHa ceHn. CoBIOJaiTe octopoxknoctb npn npoIOnKeHH yHe HaatbIX paCNIIOB.
-Пиначаileпileня пла должна pa6oTaTb. - Y6eIntecb B TOM,чTo pejxuaaць BCerda npaBnIbHO 3atoheHa.ObpaaiTe OC60e BHIMAHne Ha BbICOTy OprAHuHTeJIgIy6HbI.
- HnKoIa He nepepe3aIte HeckObnko BetoK OndHOBpeMeHHo. Ppi Obe3aHnBETKN CneIte 3a TEM, YTO6bI He KacaTbcNIIIOJpyrIX BetoK.
-При пиелени CTBOJa obpaаite BHMaHne Ha 6ЛИЗКО пилeraIoUe NTBOJIbI.
XpaHeHne ropOuNX MaTePmaJIOB
TOnJIbBO IMeET orpaHnueHHbI cPOK xpaHEHn. TOnJIbBO n TOnJIbHBbIe CMEcN CTapeOT. TOnJIbBO n TOnJIbHBIe CMEcN c PneBblSeHHbIM cPOKOM xpaHEHn MOrYT cTaTB npuHnOH npObnem np3ayncke DnBraTeJN. CJeNyET 3akynatb TaKoe KOnJIYeCTBO rOpUoHero, KOToPOe MoXet 6bTb N3pacXoDobaHo 3a HeckonkbO MEcaUEB.
XpaHHTe ropUoyee B cyxom 6e3OnachOM MecTe B npedHa3HaueHHbIX dJIr 3TOI EMKOCTAX.
N36E7AITE KOHTAKTAC KOXEIN IJIA3AMN
I3dennn 3 MNHepaNbHbix MaceN 06e3KupnbAoiT Bauy KoKy. Ppi nuCTOM n DOnIOBpeMeHHOM KOtAKTe Bauei Koxn C 3TNIM cy6ctAHzrrMn, Koxa noDBepraTcB BcYuBnBaHnIO. 3TO MOKeT npBecTn KaP3NJuHbIM Koxhblm 6Ole3HM. Kpome Toro, 13BeCTbI Cnyan AnIepruecknx peakui. KOtAKT c Macnom MOKeT npBecTe K pazdrpXeHNI rna. Ecnn Macno nonaet B Baun rna3a, HEmedJIeHHo IpomOIte IN YCHTO BDOJ.
Ecni pa3dpaxKeHne Ina3 He nCye3HeT,6eI pOmeIeHnI ObaPntecb K Bpaay!
Macno dIaIeenn

Длгсma3knCENnI NONOTHcENNcN0Nb3yUte MacNo c a dIa3e1NOHNoDobakN. ADrE3noHNHaJ do6abKa npedotBpaaet npexdpeBemehoe c6pacBaHae Maca c cenni.
B zénelx 3aunTbI OKpykaOuSeI cpebl,Длс Cma3kn ZeEN Mbl peKOMHdyem NcONlb3OBaTb MacJIO, NOBepXeHHoe 6bnONrHecCKomy pa3NoKeHnIO. B COOTBeTCTBnC MeCTHbIMN 3aKOHAMMOXET dAke Tpe6oBaTbCR NcONlb3OBaHne TOIbKO TaKOrO MACna.
Предагаиме Компанец DOLMAR macLo Дя Смаду сени BIOTOP n3rOtaBnBaTeCЯ OCHOBE cneuaanbHbIX pactTEnbHbIX Macen Ha 100% bIoNOrUmeckn pa3IaeraTeC. MacNo BIOTOP OTmecHeO cneuaanbHbIM npIzOM "rony6oI anR" (Blauer Umweltschutz-Engel), kak ocobehno 6bnaropnAHTHOe dny okpyxaoue cpebl (RAL UZ 48).
Macno BIOTOP noctabnietcB cneyuoux ynaKobkax:
1 JIITp, HOMep 3aKa3a 980 008 210
5ЛИТРОВ,Homep3aKa3a980008211
BnOOnrHcckn paJraaEmbIe macNa cTaNbHb TOnbKo B TeChHeNOr opAHueHoro nepHOa BpeMeH.Nx Heo6xoHMo nCtOBaTB bTeCHHeN2 let OT dAby N3OTOBHnH (HaneuTaHHO HAEMOCTi).
Baxkhoe 3ameuahne o 6noloruecks pa3laeraebix macnax dans cma3kn ceen:
Ecnn Bbl He nllnHpyte nCOnb3oBAtb cHnyo 6eH30nHy b TeueHe dInTeBHO rpeNoda BpEmno, ONOpOxHnTe MaCLnHbB 6ak N BneIe The HcONbSoo KOnUeCTBO 06blhoro MToPbHO Macna (SAE 30), 3aTeM 3aNyctte Nnly Ha HeKOTOpoe BpEmr. Heo6XoIMNo npOnIOckBaMaclnHb 6ak, CnCTeMy NocdaMa, cenb i noTNO cEN OT OCTabWeroC6bONOruYeCKn pa3naraEMOro Macna, TAK KaK 6bnHCTBO TaKIN Macen IMeIEOT TehdEnHIO Chepe3 HeKOTOpoe BpEmr 6pa3ObblatB B3kne OctaTKn, KOtOpble MOrY TOBpeDnB MaCLnHb HAcOC INI Dpyne qactn.
Ipeed oupeepenH 3KcNpyatauuee nnblb BHOb 3aONHNTE MacnHb6ak MaclOM
dme Cma3kn ceni BIOTOP. Ppi noIOMkax, BO3NHkUnxB pe3yIbTaTe npImEHeHnA
Otpa6oTahoro macna nIi HenoDxOJeero Macna dIra cenn, rapaHTnHb peMOHT
n3dne H ne pOn3BODNTC.
Baw npoabaue Bcerda nomoxet Bam BbipaT noxoaduie macno dIeHn.
HNKOΓΑ HE ΠΡΙΜΕΝΗΙTE OTPΑΒΟΤAHHOE MACΙΟ (Pιс. 38)
Otpa60taHHoe macNo OueHb onaCHO nIe OKpyXaIOUeI cpebl.
Otpa6oTaHHeMo MacNo IMeET BbICOKoe COpepXaHMe BEUeCTB, Bb3bBAIOUX paKOBbIe 3a0beBaHn. OctaTkopta6oTaHO Horo MaCna pInBOJr K INHTeHCNBOMy H3NOcY MaCnHOrO HacocA n PexyuEero YctpOCTBa.
PnnoNOMKax, 8O3NHKUnx IN Bpe3yIbTaTE pPmEHeHn OTpAbToHHOrO MaCna HnH enoDxoJrero Mocna nIe cENI, rapaHTnHbI peMOHT I3dEINHa He npOn3BOJNTcB. Baw npOdaueB cERda NMOXet Bam Ib6paTb noDxoJruee macNo dnIe cENI.
N3BFAI TE KOHTAKTA C KOKE N IJA3AMN
I3dienna 3 MNHepaIbHbIX MaceN 06e3xupnBaIOT BaUy KoKy. Ppi nuCTOM n DOnIOBpeMeHHOM KONTAKTe Bauei Koxn C 3TmM cy6ctAHJMaMn, Koxa noDBepraTcB bICUYBaHInO. 3TO MOKET npINBeCTN K pa3NJHbIM KOxHbIM 6oNE3HM. Kpome TOrO, n3BeCThbl Cnyan anJIepruecknx peakLni. KOtAKT c MACONMOKET npINBeCTN K pa3DpaXeHInO rna. Ecn mACNo nonaTe B Baun rna3a, HEmeJIeHNO pPOMOIte IN YCHTO BOIo.
Ecni pa3dpaxeHne rna3 He nCue3HeT, 6e3 npomeDleHn o6paTntecb K BpaCy!
3anpaBka (Pnc. 39)



COBJIOAITE CLEUYOUIME MEPbI PPEIOCTOPOXHOCTN!
Bybte BHHMaTeIbHbI N OCTOpOxHbI npn o6paueHN C TOnJIINBOM.
DnurateIbdoJxhen6bITbBbIKIOueH!
TuaTeJIbHO Ouchntte MeCTO OKONO ropNOBn 6aKOB nIpeDOTBpaueHn InonaDaHnra TpR3N B TOONMBHb N MacraHb 6aKn.
OTBepHnTE np6ky H anonHnTe 6ak TOnnBOM (CMcBtO TOnnBo/MacNo), nIi MacnOM dIy cEN B 3aBmncOCTN OTnpe6hocTn. HanonHnTe 6ak Do nHXkero Kpaar HauNBO ropOBnHi. He npOnlBaTe TOnnBO mACNo dIe CMA3Kn cEN! 3aKpyTne Do ynpa KpbkUy TOnnBHOrO 6ka.
IocJe 3aPbBKn OunchTe Ipo6ky N 6ak.

Cma3ka nIbHoi cei
Bo Bpem 3KcIpyataunB 6ake DoJnxHo 6bItb DoCTaTOH MaCna I dner cen, YTObI pInbHaer cenb XopOo Cma3bIbaIacb. OdnHO 3aPabKn 6aka DoCTaTOUHO I dner np6bnIteBHO nOlyuaca HnepepbHNO pa60tBu. Bo Bpem pa60tBu npOBepnTe, DOCTaTOUHO IIN B 6ake Macna cenN, n pn Heo6xoIMocTn D03apBaJIyTe erO. PpOBepnTe TOnk oPi BbIKIOeHHOM Dbratene!
1 Cmecb TOnJIINBO/MacNo
2 maclo dna ceen
Perylnpobka cma3kn zenn (Pnc. 40)
BnrgateIbdoJxH6bItbBbIKIOueH.
BbMOKeTe NopeRyIINPOBaTb KOINueCTBO NoIaBaEMOrO HAcOCOM Macna C nOMIOuBIO perYIINPOBOUHOro BnHTa (1).IzMeHeHne KOINueCTBa NOdaBaEMOrO MaNa MOnGO pON3BcETN C NOMOuBHO yHNBEpcJIbHO rAEHOrO KNUOa.

PeynilpoBaTb JxNkIep xOIOCTOrO XoDa n IraBbIy JxNkIep Kap6OpaTopa He HuxHO n HEBO3MOXHO.
При HeобхODIMOCTN XOJOCToI XOD MOXHO peryINIpOBaTb peRyINIpOBUHbIM BInHTOM (11).

Ipn c6opke kapbiopaTop ochuen fKNCpOBaHbIMN XIKNJIePAMn, paccHTAHBIMn Ha daJIbeHMe BO3dYxa Ha ypoBHe MOpR. Ha BaICote CbIe 1000 M MoKeT noHaDo6ntcb NOMEHtB xIKNJIePbI kApBIOPaTopa.
YdaniTe KpbIuKy FmIbTp aOnCTnTeTaN (Cm. pa3dEn "UcIcTKa Bo3dyuHoro FmIbTpra").
CINMnTe KOJINaUOK (1) 3anaIbHOI CBeu. IyI yJaIeHna 3anaIbHOI CBeu INcOJIb3yIte TOIbKO KOM6HInPOBaHbI raeHbIKIQU, NOCTaBIAEmbI CIIIOI.
PENEYPPEXJEHNE: IcnoIb3yIe TOnbKO cIeIyIOuIne 3aIaNbHbIe CBeU: NGK CMR6A.
3a3op mexdy 3JeKtpoamn (Pnc. 59)
3a3op mExdy 3JeKToPdAmn DoJKeH CoCTabJIbTb 0,6-0,7 MM.
Hnctka BxOJHO rO TBePCTnO oxJaXaIooJero BO3dyxa. (Pnc. 60)
OTBnHTteYeTbpe BnHTa (2). YdaJIte cTapTeP (3).
OuHCTnTe BxOJHoe OTBepCTne (4) npe6pa ZnIINHpa.
UncTkA rIyunTeTn (Pnc.61)


PNEyPEXJEHNE: Ecnn Dbratelb ropny, cyseCTByET onaCHOctb oKORA. NcnoIb3yIte 3auNTbIe nepaTkn.
YdaJInte KpbIshky 3Ve3doUkn (cm. pa3dJeN "IOIITOTOBKA K PABOTE").
YdaHnTe HacNoEHHa KOnOTn C BbIXoHbIX OTBepCTn (11) rnyuHTeJIa.
Ynctka noJocTn cnJIHHpa (Pnc. 62)
YdaJInte KpbIshky 3Be3doUkn (cm. pa3dJeN "IIOIROTOBKA K PABOTE").
Ipn Heo6xOaMIOCTn ydaInte rnyuHTeJIb, ocIa6NB u BbIKpyTNB dBa BnHTa (14). 3aKpOte C nOMoCbHO BetoOn NTbepCTne cUJINHpa (15).
Дячстк полости синдра (16),oco6eHno pe6ep csiinHdpa,ncnoIb3yTe nOxdoшиMHCTpymeT (depeBaanhblckpe6ok).
YdAnIte BToUb COTBepCTnUcINHnpa UyCTaHOBInTe Ha MeCTO rJyUnTEnB COOTBETCTBNC pNCyHKOM.
Пин HeobxodmoCTn 3aMeHnTe yNtNoTHHeNte (13).TuaTeIbHo ydAnIte c UyMOrJyUHTeJI Bce OCTaTK n CTaporo yNtNoTHHeNIA.
Y6eIntecb B npaBnIbHOM nOLOKeHHN yCTaHOBKn.
KecTahno KOHBekTop DoJXeH XopoOo npineraTb K cInnHpy, YTO6bl oEcbneuBaTb XopoOyU ToIponepedaY.
Ipb30aTeHIO cENHOI INbI He pa3peaTcB bINONHb pa6oTb I IO TEXHueCKOMy 6cbnyKbAHIO, KOtOpe He OINCAHb B INCTpyKcN. Bc TaKaIpa6oTa DOJXHa 6bITb npOBeHa B cepBnCHOM cHTpe DOLMAR.
Ioxaanycta, 6bpatte BnHMaHne Ha To, YTO Mbl He Hecem OTBETCTBeHHOCTN 3a NOBpeXdEHN, Bbl3BaHHbIe:
- HecobJIOeHnEM INCTpyKUIM.
- HebblonHHeHnem Tpe6yEmo TEXHnueckoro 06cnyKuBaHnI OOnCTKn.
- HenpaBnIbHoi peryIuropOBkO Kap6IopaTopa.
- ECTECTBEBHbIM N3HOCOM.
- AByho neperpuy3koi 13-3a noctoHnHO npebbIeHnB cepxHe rpaHcbl npOn3BOJNTelbHOCTn.
- IVcnoJIb3OBAHnEM nONToEN cENI N cENe, KOtOpbIe He npEHa3NaYeHbI dIaDaHHoI pINbl.
- IcnoIb3ObaHnem noJOTeH cEN n ceNe, dINHbI KOtOpbIX He npedHa3HaehbldIaHHo nnbl.
-Пгимеонием CINbl, He npaBnIbHbIM IcNoIb3ObaHneM, OuIn6kamnp INCNoIb3OBAHm INI INOMKAMN. - Повржденим в pe3yltate neperpeBa, bbl3BaHHoro 3a\rpa3HeHem CTapTepa.
Pa6bToHa zenHoi nIe Iizamn, He npOweDImM oByeHne, HnHepaBnIbHbIM pEmOHToM.
IcnoB3oBAHmE HecooTBeCTByOux 3aAnachbIx YacteINnIyacteK, KOTopbIe HE BnIbTOrOpInaHbIMn 3anaChbIMn YactaMn KomnaHm DOLMAR, eCIn ToBko NOBpeXdHeN6 bIIO Bb3BaHO IN cNoPb3oBAHmE. - IcnoIb3ObaHnem HecootBetCTBtuOe rnn CTaporo Macna.
-Повржденим,CВЯЗаHHьс C yCLOВЯМN,BO3нИКшIMN B pe3yЛытTe Договоров6б apeHde nIи npokate.
PaobtIIO OHcNCTKe, OcbnyKbBaHnIO n peYunIpOBKe He NOKpbIbAioTc rapaHTne. BeCpeMOn, pnpcymoTeHNbIrapaHTne, DOnJxEN BInONHaTbcR C cepBnCHOM ueHTpe KOMNaHnIN DOLMAR.
Ponck n yctpaHene HncnpaBHOCTe
| HéncnPabNHOCTb | CnCTema | Ha6JIouDeHne | Причинa |
| ЦьHe ne nepemeuaetcra | Topm03 пльною сeпи | Дыгателpbapotaet | ВкlioочenTopm03 cепи. |
| Дыгател He 3anyskaetcra илз залуcaetcra Tolbyko C trypdom | Систema 3azinirahnia | Искра 3axinirahnia | HéncPabNHOCTb B CSITcme ПОдчп TOnlmba, CSITcme Cxatniya, MexaHueckay нсPabNHOCTb. Быкlioочatelb haxodntcra B pOzniuMSTOP (CTOП), HeicnpabNHOCTb ил КорOTKoe 3amblkaine B 3neKTPoPBOOdke, NOBpeJdeHne KOLNaChka CBeyi ln Заллбно CSBye. |
| Падач толпва | Толпвный 6ak 3anonhen | Дрocseьнага 3aclonokа B HeNPaBInbHom pOLOXeHm, nobpeJdeHnbl Карбюратop, 3arpya3NeHnag B CaSbBaIOUaigra roLobKa, n3rIb iln pa3pbiv ТолпьОрpoВODа. | |
| Систema cхатna | BHytpri | Поврждени OyILOTNHeHne KapTepa, nobpeJdeHnbl epOKlaIqkn paDinaIbHoro Валa, nobpeJdeHnbl eKolbaц zuINHidpa lnipShnA. | |
| МexaHuecka нсPabNHOCTb | Санужи | Залльога CSea He repreTmUHa. | |
| Стартет He pa6Otaet | СлOMaHa npruxHna StapTepa, nobpeJdeHnbl bHyTpErHnne 3IeMeNTb I DvrgaTeYnA. | ||
| ТунHouston C TeilbIM Залусkom | Kap6Iopatop | Толпьн both 6ak noLoH Залльога Исрka | Hendpavilhna perylinpoBka kap6Iopatopa. |
| Дыгател 3anyskaetcra, но Немедлесно rIoXnet | Падач толпва | Толпьн both 6ak 3anonhen | Hendpavilhna perylinpoBka xOLOCTORO xOda, 3arpya3NeHnag B CaSbBaIOUaig roLobKa lnln Kap6Iopatop. Поврждени B eHTnLIaIGNa 6aka, pa3pbiv ТолпьОрpoBDA, nobpeJdeHnbl kAbel, HeicnpaBHOCTb nepeKlIOUaTeYnA STOP (CTOП). |
| Нedoctatochna мошноctb | HedKoblyco CSITem mOryt 6bItb COBMeCTHO CB4aHbI | Дыгателpbapotaet na хOLOCTOM XOdu | ЗергЯЗнн both Bo3dUnHbI Фиltpr, endpavilhna perylinpoBka kap6Iopatopa, 3a6bIbI rIyUnTeJIb, 3a6bIbI bVbXOHDn KaHaN B zuLinHdpe. |
| Нет смазкВицп | MacIaHb 6ak/Hacoc | Het macna Naцп | Пусто maclanb b6ak. 3a6r3NeHnbl Maclanb KcaHaN. |
- ATTENTION
- SYMBOLES
- THANK YOU FOR PURCHASING A DOLMAR PRODUCT
- EU CONFORMITY DECLARATION
- TYPE: 023 EU PROTOTYPE TEST CERTIFICATE NO
- SAFETY PRECAUTIONS
- MAINTENANCE
- PACKING
- CAUTION
- GENERAL PRECAUTIONS (FIG. 1 & 2)
- PROTECTIVE EQUIPMENT (FIG. 3 & 4)
- FUELS / REFUELLING
- PUTTING INTO OPERATION
- KICKBACK
- WORKING BEHAVIOR/METHOD OF WORKING
- PEOPLE FELLING TREES OR CUTTING OF BRANCHES MUST BE SPECIALLY TRAINED. HIGH RISK OF INJURIES
- BEFORE CUTTING DOWN A TREE ENSURE THAT
- JUDGING THE TREE
- CUTTING THE ROOTS
- NOTCHING THE TRUNK (FIG. 18, A)
- TRANSPORT AND STORAGE
- FIRST AID (FIG. 24)
- WHEN CALLING FOR HELP, GIVE THE FOLLOWING INFORMATION
- NOTE
- DENOMINATION OF COMPONENTS
- PUTTING INTO OPERATION (FIG. 25)
- MOUNTING THE GUIDE BAR AND SAW CHAIN (FIG. 26)
- TIGHTENING THE SAW CHAIN
- CHECKING THE CHAIN TENSION (FIG. 34)
- CHAIN BRAKE (FIG. 35)
- ENGAGING THE CHAIN BRAKE (BRAKING) (FIG. 36)
- RELEASING THE CHAIN BRAKE
- FUEL (FIG. 37)
- FUEL MIXTURE
- THE CORRECT MIXTURE RATIO
- THE STORAGE OF FUEL
- AVOID SKIN AND EYE CONTACT
- CHAIN OIL
- IMPORTANT NOTE ON BIO-DEGRADABLE CHAIN OILS
- NEVER USE WASTE OIL (FIG. 38)
- REFUELLING (FIG. 39)
- FOLLOW THE SAFETY PRECAUTIONS
- THE ENGINE MUST BE SWITCHED OFF
- CLEAN SCREW CAP AND TANK AFTER REFUELLING
- LUBRICATING THE CHAIN
- ADJUSTING THE CHAIN LUBRICATION (FIG. 40)
- CHECKING THE CHAIN LUBRICATION (FIG. 42)
- STARTING THE ENGINE (FIG. 43)
- COLD START
- WARM START
- STOPPING THE ENGINE
- CHECKING THE CHAIN BRAKE (FIG. 45)
- ADJUSTING THE CARBURETOR (FIG. 46)
- SET IDLE SPEED
- MAINTENANCE (FIG. 47)
- THE CHAIN NEEDS SHARPENING WHEN
- IMPORTANT: SHARPEN FREQUENTLY, BUT WITHOUT REMOVING TOO MUCH METAL
- PROPER SHARPENING: (FIG. 48)
- CAUTION: EXCESSIVE DEPTH INCREASES THE RISK OF KICKBACK
- FILES AND HOW TO WORK WITH THEM (FIG. 50)
- CLEANING THE SPROCKET INTERIOR, CHECKING AND REPLACING THE CHAIN CATCHER (FIG. 53)
- CHAIN CATCHER
- CLEANING THE GUIDE BAR, LUBRICATING THE SPROCKET NOSE (FIG. 54)
- CAUTION: PROTECTIVE GLOVES MUST BE WORN
- SPROCKET NOSE TYPE
- REPLACING THE SAW CHAIN (FIG. 55)
- REPLACING THE SUCTION HEAD (FIG. 56)
- CLEANING THE AIR FILTER (FIG. 57)
- REPLACING THE SPARK PLUG (FIG. 58)
- ELECTRODE GAP (FIG. 59)
- CLEANING THE MUFFLER (FIG. 61)
- CLEANING THE CYLINDER SPACE (FIG. 62)
- ENSURE CORRECT MOUNTING POSITION
- INSTRUCTIONS FOR PERIODIC MAINTENANCE
- SERVICE, SPARE PARTS AND GUARANTEE
- MAINTENANCE AND REPAIR
- SPARE PARTS
- GUARANTEE
- FRANÇAIS
- COPEPKANHE
- MEPBI IPEIOCTOPOXKHOCTN
- ПОДГOTOBК K PABOTE
- PERYNPOBKA KAP6OPATOPA 125
- TEXHNUECKOE OBCJYXINBAHNE
- MEPBI INPEIOCTOPOXHOCTN
- PNEYPEXDEHNE
- 06UYE YKA3AHNNA(PNC.1 N 2)
- CPEICTBUAHNDNBNDYAJBHON 3AUNTBI (PNC. 3 N 4)
- TONJINBO/3ANPABKA
- IPOROTOBKA K PA6OTE
- OTDAUA
- XPAHEHNE ROPOUNX MATEPMAJIOB
- N36E7AITE KOHTAKTAC KOXEIN IJIA3AMN
- MACNO DIAIEENN
- BAXKHOE 3AMEUAHNE O 6NOLORUECKS PA3LAERAEBIX MACNAX DANS CMA3KN CEEN
- HNKOΓΑ HE ΠΡΙΜΕΝΗΙTE OTPΑΒΟΤAHHOE MACΙΟ (PΙС. 38)
- N3BFAI TE KOHTAKTA C KOKE N IJA3AMN
- COBJIOAITE CLEUYOUIME MEPBI PPEIOCTOPOXHOCTN
- CMA3KA NIBHOI CEI
- PERYLNPOBKA CMA3KN ZENN (PNC. 40)
- 3A3OP MEXDY 3JEKTPOAMN (PNC. 59)
- HNCTKA BXOJHO RO TBEPCTNO OXJAXAIOOJERO BO3DYXA. (PNC. 60)
- UNCTKA RIYUNTETN (PNC.61)
- YNCTKA NOJOCTN CNJIHHPA (PNC. 62)
Brand : DOLMAR
Model : PS-221 TH
Category : Chainsaw