Bolero Coolsilver 4d Bi 526 Elite D - Refrigerator CECOTEC - Free user manual and instructions
Find the device manual for free Bolero Coolsilver 4d Bi 526 Elite D CECOTEC in PDF.


| Product Type | Refrigerator with bottom freezer |
| Brand | Cecotec |
| Model | Bolero Coolsilver 4d Bi 526 Elite D |
| Total Capacity | 526 liters |
| Height | 190 cm |
| Width | 70 cm |
| Depth | 60 cm |
| Net Weight | 80 kg |
| Power Supply | 220-240 V, 50 Hz |
| Annual Consumption | Approximately 350 kWh/year |
| Energy Class | D (according to new label) |
| Climate Class | N-ST |
| Cooling Technology | No Frost (4D ventilated cold) |
| Number of Doors | 4 (French doors) |
| Shelves | Adjustable glass |
| Lighting | Interior LED |
| Temperature Control | Touch electronic |
| Water Dispenser | No |
| Ice Maker | No |
| Noise Level | 38 dB |
| Defrosting | Automatic (No Frost) |
| Refrigerant Type | R600a |
Frequently Asked Questions - Bolero Coolsilver 4d Bi 526 Elite D CECOTEC
User questions about Bolero Coolsilver 4d Bi 526 Elite D CECOTEC
0 question about this device. Answer the ones you know or ask your own.
Ask a new question about this device
Download the instructions for your Refrigerator in PDF format for free! Find your manual Bolero Coolsilver 4d Bi 526 Elite D - CECOTEC and take your electronic device back in hand. On this page are published all the documents necessary for the use of your device. Bolero Coolsilver 4d Bi 526 Elite D by CECOTEC.
USER MANUAL Bolero Coolsilver 4d Bi 526 Elite D CECOTEC
Safety instructions 11
-
Parts and components 98
-
Before use 98
-
Installation 99
-
Operation 104
-
Cleaning and maintenance 108
-
Troubleshooting 109
-
Recycling of electrical and electronic equipment 110
-
Copyright 111
-
Simplified EU Declaration of Conformity 111
SOMMAIRE
EN · The coding in this manual is generic and applies to all code variants of the appliance.
Read the following instructions carefully before using the appliance. Keep this instruction manual for future reference or new users.
- It is important to make sure all users are familiar with the appliance's operation and safety features to prevent faults and unnecessary accidents.
- Make sure that the mains voltage in your house matches the voltage stated on the rating label of the appliance.
- This appliance can be used by children aged 8 and above and persons with reduced physical, sensory, or mental capabilities or lack of experience and knowledge, as long as they have been given supervision or instruction concerning the use of the appliance in a safe way and understand the hazards involved. Children must not play with the appliance. Cleaning and maintenance should not be carried out by children without supervision.
- To avoid the risk of suffocation, keep the packaging material away from children.
- WARNING: if the interior light is damaged, contact the official Cecotec Technical Support Service. Do not try to repair it yourself.
- WARNING: when positioning the appliance, make sure the power cord does not get trapped or damaged. A crushed or damaged plug may heat up and cause a fire.
- Make sure the appliance plug is accessible after installation.
- Do not place food directly against the air outlet on the interior of the appliance.
- Keep the ventilation openings clear from obstructions.
- Do not place carbonated or soft drinks in the freezer compartment, as this creates pressure in the can, which could explode and damage the appliance.
- WARNING: do not use mechanical devices or other means to speed up the defrosting process other than those recommended by Cecotec.
- WARNING: do not damage the cooling circuit.
- If the cord is damaged, it must be replaced by the manufacturer, the supplier, or qualified personnel to avoid hazards.
- WARNING: do not use electrical appliances inside the refrigerator.
- It is recommended to regularly check the power cord for any signs of damage. Do not use the appliance if the cord is damaged.
- To avoid injuries or death caused by electric shock, do not use the appliance with your hands wet or over a wet surface.
- Do not use the appliance with an extension cable or a multi-socket adaptor. Make sure the appliance is plugged in directly to a power supply.
- When positioning the appliance, make sure there is enough free space at the rear, as it is the main heat outlet. This will allow for adequate ventilation.
- Do not place hot food or drinks in the refrigerator, allow them to cool down to room temperature beforehand.
- Do not place any other appliance on the refrigerator and do not wet it.
- Do not store explosive substances such as aerosols or flammable propellants in this appliance.
- This appliance is intended for domestic use only and is not suitable for use in commercial establishments such as bars, restaurants, farms, hotels, motels, and offices.
- WARNING: to avoid any risk due to the instability of the refrigerator, you must install it according to the instructions.
-
This appliance has a built-in earthed plug. Make sure the power supply in your house is properly earthed.
-
Wait 5 minutes after a power failure before turning the appliance back on. Otherwise, the compressor may get damaged.
- This appliance is not intended to be operated by means of an external timer or separate remote-control system.
- Always handle the appliance carefully to avoid damaging it.
- Frozen food can cause frostbites if consumed right after removing it from the freezer compartment.
- Do not remove or touch items in the freezer compartment with your hands wet, as it could cause skin abrasions or frost/freeze burns.
- Never use the base, drawers, or door as support.
- Do not overload the door shelves or place too much food on the drawers to prevent items from falling off and damaging the appliance.
- WARNING: do not attach multi-socket adaptors or multiple power supplies to the rear part of the appliance.
- To avoid food contamination, please follow the instructions below:
A. Opening the door for a long period of time may cause a significant increase in temperature in the appliance compartments.
B. Regularly clean the surfaces that come into contact with food and with the accessible draining systems.
C. If your refrigerator features a dispenser, clean the water tank if it has not been used for 48 hours.
D. Store raw meat and fish in proper containers in the freezer, so they do not come into contact with or leak on other food.
E. The two-star compartments are suitable for storing pre-frozen food, storing or making ice cream, and making ice cubes.
F. Compartments with one, two, or three stars are not suitable for freezing fresh food.
- Before carrying out any maintenance and cleaning task, turn off the appliance and unplug it.
- It is advisable to wait for at least four hours before connecting the appliance to allow oil to flow through the compressor.
- Air must flow around the appliance. Lack of air leads to overheating. To achieve good ventilation, follow the installation instructions.
- Whenever possible, the rear part of the appliance should not be too close to the wall to prevent it from touching or reaching the hot parts (the compressor and the condenser). To avoid risk of fire, follow the installation instructions.
- Make sure that the plug is accessible after installation of the appliance.
- All electrical work required to maintain this appliance must be carried out by a qualified electrician.
- Use the appliance only for the purposes described in this manual. Improper or incorrect use may pose a hazard to both the appliance and the user.
Temperature range
The appliance temperature range information can be found on its marking. Indicates the optimum room temperature for proper operation of the appliance.
| Climate class | Optimal room temperature |
| SN | From +10 °C to +32 °C |
| N | From +16 °C to +32 °C |
| ST | From +16 °C to +38 °C |
| T | From +16°C to +43°C |
Notes:
- Taking into account the limiting values of the room temperature range for the climates for which the appliance is designed and that internal temperatures may be affected by factors such as the location of the appliance, room temperature and frequency of door opening, it may be necessary to modify the setting of any temperature control device according to these factors.
- If the appliance is operated in an environment other than the specified climate type (i.e. beyond the rated room temperature range), it may not be able to maintain the desired compartment temperatures.
Refrigerant
- Isobutane refrigerant (R600a), contained within the refrigeration circuit of the appliance, is a natural gas with a high level of environmental compatibility; however, it is flammable. Make sure that no components of the refrigeration circuit have been damaged during the transport and installation of the appliance.
- WARNING: the refrigerant and the insulator gas are flammable. When disposing of the appliance, only dispose of it at an authorised waste-disposal facility. Do not expose it to flames.
-
WARNING: the appliance contains refrigerant and gases in the insulation. The appliance and gases must be disposed of professionally, as they may cause injuries to eyes or ignition. Make sure the refrigeration-circuit pipe is not damaged before disposing of it correctly.
-
This symbol means: warning, risk of fire/flammable materials.
- If the refrigeration circuit is damaged:
A. Avoid open flames and sources of ignition.
B. Fully ventilate the room where the appliance is located.
INSTRUCTIONS DE SÉCURITÉ
A. Refrigerator compartment
- Refrigerator compartment door shelf
- Refrigerator compartment shelves
- Freshness Flex HUB drawer
- Humidity Flex HUB drawer
B. Freezer compartment
- Freezer compartment drawer
- CryoFreeze ^® drawer
C. Power switch.
Note:
The graphics in this manual are schematic representations and may not exactly match the product.
To maximise the refrigerator's energy efficiency, place all shelves and drawers in their original position, as shown in figure 1.
Press the single button switch on the bottom of the refrigerator to turn it on.
2. BEFORE USE
- This appliance comes in a packaging designed to protect it during transport. Remove the appliance from its box. You can keep the original box and other packaging materials in a safe place to prevent damage to the appliance if you need to transport it in the future. If you wish to dispose of the original packaging, make sure all items are recycled properly.
- Check that all parts and components are included and in good condition. If any of them are missing or damaged, please contact Cecotec's Official Technical Support Service immediately.
Box content:
- Refrigerator
- CryoFreeze PAD
- Instruction manual
- Do not remove the product's serial number in order to keep proper traceability if technical assistance is required.
3. INSTALLATION
Precautions before Installation
- Installation position:
- Do not place the product in direct sunlight or near electrical appliances that generate heat, such as stoves, ovens or dishwashers. The product should be installed so that the plug is easily accessible. Insert the plug into a dedicated socket to avoid accidental power failure. Do not use multiple adapters, as they may fall out due to the weight of several cables.
- Installation of the power supply:
- Check the product nameplate for power supply requirements. The appliance must be properly earthed.
List of accessories required for installation
Fig. 2
- Lower air inlet/outlet cover.
- Power cable.
- Upper decorative cover.
- Lower decorative cover without hole.
- Lower decorative cover with hole.
- Box fixing frame.
- Cover of the box fixing frame.
- Cabinet fixing plate.
- Flat head screw with transverse slot.
- Screw cap.
Note: The lower exhaust hood is located in the upper foam, while the rest of the installation parts are located in the attached bags.
Basic Dimensions
Fig. 3
| Refrigerator Dimensions | Width | 962 mm |
| Depth | 572 mm | |
| Height | 1996 mm | |
| Cabinet Hole Size | Width | 964 mm |
| Depth | ≥580 mm | |
| Height | 2000 mm |
Appliance ventilation:
Recommended free spaces: Top: 4 mm, Left side: 4 mm, Right side: 4 mm, Back: 8 mm, Bottom: 0 mm.
ENGLISH
Before installation
Fig. 4 and 5
| Refrigerator door plate thickness A (mm) | Spacing X (mm) | Width of reference door plate B (mm) | |
| Full Overlap Mode 1 | Full Overlap Mode 2 | ||
| 16 - 20 | 4 | 496 | 494 |
| 21 - 22 | 6 | 494 | 492 |
The design clearance should be 4 mm when the thickness of the outer door plate is 20 mm. The width of the cabinet door plate is 496 mm in full overlap mode 1, or 494 mm in full overlap mode 2.
Overlapping modes:
- Full Overlap Mode 1 (Fig. 4)
- Full Overlap Mode 2 (Fig. 5)
Fig. 4 and 5 key:
A = Thickness of the refrigerator door plate
B = Cabinet door plate width
X = Space
Cabinet requirements:
- The left and right cabinet doors should have the same dimensions, with a width of B
- The door plate and the cabinet must be completely overlapped.
- The height of the skirt line should be between 80-120 mm.
- The hole for the power cable and water pipe can be drilled on one side or on both sides depending on the actual conditions.
- The power plug must be located in the adjacent cabinet.
Installation tools
The following installation tools are required for the installation of the refrigerator and should be used only by professional installers:
- Allen key (M3).
- Electric gun.
- Measuring tape.
- Hexagon wrench.
- Toolbox.
- Limit guide piece.
Cabinet inspection
-
Check if the dimensions of the cabinets and the door plate comply with the requirements (see dimension figure).
-
Check the power cable (see dimension figure).
- Check if the power plug has a normal power supply. The plug should be placed outside the refrigerator cabinet and close to the cabinet opening to ensure easy plugging/unplugging.
- Check if the floor is level.
Ensure that the above requirements are met before proceeding to the next step of the installation.
Unpacking of the refrigerator
- Remove the box from the product package and remove the top foam.
- Remove the protective foam on the sides of the product and inside the product.
- Lift the product together with others to remove the foam pad under the product.
- Open the product door and remove items such as installation accessories.
Refrigerator and cabinet installation instructions
Warning:
The product must be installed and fixed according to specifications to avoid hazards due to instability.
Refrigerator and cabinet attachment
- Open the product door and insert the 4 guide pieces into the two holes of the upper and lower hinges (the guide pieces are not placed on the internal hinges of the product). Then, close the door. Fig. 6.
- Insert the power cord into the bottom socket behind the product and connect it to the reserved socket through the hole in the cabinet.
- Push the product into the cabinet while pulling the power cord to avoid knots and collisions.
- Stop pushing when the limit guide pieces on the left/right bottom hinges are aligned with the cabinet surface. Fig. 7
- Turn the nuts on the adjusting pin with a hex wrench to raise or lower the front of the product. The adjustment is complete when the upper and lower limit guide pieces are aligned with the cabinet surface. Fig. 8
- Open the product door, remove the limit guide piece of a hinge and install the box fixing frame with two self-tapping screws. Replace the limit guide parts of the other hinges one by one. Fig. 9
- Install the cover of the box fixing frame after fixing it. Fig. 10
Fig. 6 key:
- Limit guide piece
Fig. 7 key:
- Limit guide piece
ENGLISH
Fig. 8 key:
- Adjusting pin nut
- Hex nut wrench
Fig. 9 key:
- Box fixing frame
Fig. 10 key:
- Enclosure fixing frame cover
Cabinet door and refrigerator door installation
- Install the door handle on the cabinet door.
- Measure the distance from the mounting plate to the top of the cabinet with a tape measure.
- Install the two cabinet doors on the product, loosen and remove the hex flange nut. Remove the upper fixing plate from the refrigerator door. Fig. 11
- Place the upper fixing plate on the cabinet door until the distance between the fixing plate and the upper edge of the cabinet door reaches the previously measured distance. Secure the top mounting plate and cabinet door with self-tapping flat head screws. Fig. 12
- Place the cabinet mounting plate in the corresponding slot of the tooling plate and secure it with self-tapping flat head screws.
- After mounting the two cabinet doors, hang the two doors on the refrigerator door. Fig. 13
- The two lower cabinet doors can be installed and fixed in the same way as the upper doors.
- Install the cabinet mounting plates on the lower cabinet doors and hang two cabinet doors on the product. Fig. 14
Fig. 11 key:
- Hexagonal nut with flange
- Top mounting plate
Fig. 12 key:
- Top mounting plate
- Cabinet body
- Cabinet mounting plate
- Tool plate
Fig. 13 key:
- Fixing plates for the cabinet
Fig. 14 key:
- Hexagonal nut with flange
Cabinet door adjustment
- Vertical Adjustment: Turn the refrigerator adjustment bolts with an Allen wrench to move the cabinet door up or down.
- Horizontal adjustment: Turn the side screws on the refrigerator door with an Allen wrench to move the cabinet to the left or right.
- Front/Rear Adjustment: Adjust the cabinet door to the proper position and then fasten the hex head screws:
- Adjustment at the Top of the Cabinet Door: Move the top of the cabinet door to adjust the front/rear based on the gap between the top mounting plate and the refrigerator.
- Adjustment in the middle part of the cabinet door: Move the cabinet door forward/backward until it reaches a suitable position, then tighten the hex head screw on the side sides of the refrigerator door.
- Adjustment at the Bottom of the Cabinet Door: Make the adjustment based on the space between the lower clamping plate and the screws in the clamping plate.
Cabinet door and refrigerator door installation
- Tighten the hex flange nuts on the upper fixing plate. Fig. 14
- Tighten the side screws and hex head screws on the refrigerator door. Fig. 15
- Slightly loosen the hex head screws on the bottom fixing plate and the refrigerator door, adjust the cabinet door to the proper position and then tighten the hex head screws. Fig. 16
Fig. 15 key:
- Hexagonal head fixing screw
- Clamping screw
- Allen key
Fig. 16 key:
- Lower fixing plate
- Self-tapping flat head screw
Refrigerator accessory installation
- Insert the upper/lower decoration hood into the corresponding edge clip of the product. Fig. 17
- Insert the lower air inlet hood into the bottom of the product. Ensure it is not blocked. Fig. 18
- Install the screw cap in the side notch of the refrigerator door. Fig. 19
Fig. 17 key:
- Decorative top cover
- Lower decorative cover
ENGLISH
Fig. 18 key:
- Lower air inlet/outlet hood
- Press the power switch on the bottom of the refrigerator to turn it on.
Fig. 19 key:
- Lateral notch
- Screw cover
4. OPERATION
Control panel
Fig. 20
- Temperature setting button (-)
- Temperature setting button (+)
- Temperature setting button (-)
- Temperature setting button (+)
- Ultra Freezing button
- Fast Freezing button
- Freezer compartment zone button
- Refrigerator compartment zone button
- Freshness Flex HUB zone button
- Fast Cooling button
- Locking button
The temperature range for the refrigerator compartment is from 2^ C to 8^ C. For the freezer compartment, the range is -15^ C to -23^ C. The Freshness Flex HUB zone allows for -4^ C, 0^ C and 4^ C temperature settings. When the refrigerator is turned on, the default temperatures are: refrigerator compartment at -5^ C, freezer compartment at -18^ C and Freshness Flex HUB zone at 0^ C.
Ultra Freezing Mode
The Ultra Freezing button activates this mode. When this mode is activated, the icon lights up. The freezer compartment temperature will continuously decrease. It is deactivated after 2 hours, when the freezer compartment sensor temperature is below -35^ , or when this button is pressed again.
Fast Freezing mode
The Fast Freezing button activates the Fast Freezing mode. When this mode is activated, the icon lights up. The freezer compartment temperature will continuously decrease. It is deactivated after 24 hours, when the freezer compartment sensor temperature is below -28°C, or when the button is pressed again.
Freezer compartment zone button
Allows you to set the freezer compartment temperature. The indicator lights up.
Temperature setting button (-)
Decreases the set temperature by 1^ C each time it is pressed, until the minimum temperature is reached.
Temperature setting button (+)
Increases the set temperature by 1^ C each time it is pressed, until the maximum temperature is reached.
Refrigerator compartment zone button
Allows you to set the refrigerator compartment temperature. The indicator lights up.
Freshness Flex HUB zone button
Allows you to adjust the temperature of the Freshness Flex HUB zone. The indicator lights up.
Fast Cooling mode
The Fast Cooling button activates the Fast Cooling mode. The indicator lights up. The set temperature is 2^ C. It is deactivated after 150 minutes or by pressing the button again.
Lock button
Lock or unlock the screen by pressing and holding the button for 3 seconds. The off icon indicates that the screen is unlocked.
Display indicator
It turns on when the door is opened and turns off if no buttons are pressed for 30 seconds. It turns on again when any button is pressed or when the door is closed and opened.
Display mode
When the display is unlocked and the Ultra Freezing button and Fast Cooling button are pressed simultaneously for 5 seconds, the display will beep, and the set temperature will be OF. To exit, repeat the process.
In display mode, the refrigeration compartment stops cooling, but the LED lights remain on.
Open door alarm
If the refrigerator door remains open for more than 1 minute, three consecutive alarms will sound. If it remains open, it will beep every 30 seconds. When closing the door, the alarm stops.
Use of the buttons
To use the buttons, the screen must be unlocked. The only exception is to cancel the alarm
ENGLISH
sound, which can be done even if the screen is locked. If you try to use other buttons with the screen locked, the buzzer will sound, and the icons will flash.
Tips for efficient refrigerator storage and use"
Food storage
- Store frozen foods inside the freezer compartment, not on the bottle rack.
- Allow hot foods to cool to room temperature before placing them in the refrigerator to reduce energy consumption.
- Write the freezing date on the packaging bag according to the food's shelf life to prevent exceeding the storage time.
- Divide food into appropriate portions and wrap them separately to facilitate freezing and prevent sticking.
- Use odourless, airtight, waterproof and contamination-free packaging materials to prevent food from absorbing odors and maintain food quality.
- Do not place too many fresh food items in the freezer compartment at once, preferably not exceeding the refrigerator's freezing capacity.
- Thawed foods should not be refrozen unless cooked.
- Do not place glass bottles or containers in the freezer compartment or in the refrigerator's air duct outlet, as they may explode.
- Food should not block the air outlet to avoid circulation problems.
Additional advice
- Temperature settings that are too high or too low can reduce the shelf life of your food, leading to more waste.
- Set the refrigerator temperature to +5^ and arrange the food to optimize temperature conditions and ensure optimal storage.
- Follow these tips to store food in the best conditions and avoid waste:
- Upper door shelves: Cheese and butter spread.
- Middle door shelves: Jams, jars, small bottles, tubes and eggs.
- Lower door shelves: Beverage cartons and bottles. Place filled containers near the hinge to reduce stress on the door.
- Glass Shelf and Vegetable Drawer: Fresh meat, game, poultry, bacon, sausages and raw fish. The recommended storage time for meat is no more than 24 hours.
Important:
Food items must not come into direct contact with the refrigerator's internal surfaces. Items should be wrapped individually in aluminium foil, cling film or airtight plastic containers.
Freezing and storing food in the freezer compartment
Using the freezer compartment:
- For storing deep-frozen food.
- make ice cubes.
- freeze food.
Note: Ensure the freezer compartment door is properly closed.
Buying frozen food
- The packaging must not be damaged.
- Consume food before the expiry date.
- If possible, transport deep-frozen foods in an insulated bag and place them quickly in the freezer compartment.
Frozen food storage
For best results, foods should be “flash frozen”. If not cooled quickly enough, food can be damaged by ice, destroying its structure. A constant storage temperature of -18 ^ is required to maintain the consistency, flavour and nutritional value of the food.
Freezing food has a positive effect on its shelf life and helps to avoid food waste.
- Temperature settings: Set the freezer compartment temperature to -18^ and arrange the food to optimize temperature conditions and ensure optimal storage: place the food to be frozen in the freezer drawers or on the glass and door shelves.
- Food suitable for freezing: Cakes and pastries, fish and seafood, meat, game, poultry, vegetables, fruits, herbs, shelled eggs, dairy products such as cheese and butter, ready-to-eat meals and leftovers including soups, stews, cooked meat and fish, potato dishes, soufflés and desserts.
- Food items not suitable for freezing: vegetables that are usually eaten raw, such as lettuce or radishes, shelled eggs, grapes, apples, pears and peaches, hard-boiled eggs, yoghurt, sour milk, sour cream and mayonnaise.
Recommended storage times for frozen food items
These times vary according to food type. Frozen foods can be preserved from 1 to 12 months (minimum at -18^ ).
- 1 month: Bacon, stews, milk.
- 2 months: Bread, ice cream, sausages, cakes, prepared seafood, fatty fish.
- 3 months: Lean fish, seafood, pizza, buns and muffins.
- 4 months: Ham, pastries, biscuits, veal and lamb chops, poultry pieces.
- 6 months: Butter, vegetables (blanched), whole eggs and yolks, cooked crab, minced meat (raw), pork (raw).
- 12 months: Fruit (dried or in syrup), egg whites, beef (raw), whole chicken, lamb (raw), fruit pies.
ENGLISH
5. CLEANING AND MAINTENANCE
Cleaning of the refrigerator
- Before cleaning, always switch off the power supply and disconnect the plug.
- During cleaning, ensure no water enters the power switch, control panel, door lamp or upper control panel.
- Remove dirt from the refrigerator's exterior using a mild cleaner, then wipe with a soft, clean cloth and allow the appliance to dry naturally.
- When cleaning the door sealing strip, always use clean water, wipe dry with a cloth and allow to dry naturally. Use a soft cloth dampened with warm water or neutral cleaner to clean the refrigerator body, except for the door sealing strip.
- Never rinse the refrigerator directly with water, as this will affect the electrical insulation properties, among others.
- Do not clean the refrigerator with metal cleaners, wire brushes, harsh abrasive cleaners, strong alkaline detergents, or flammable or toxic cleaning fluids.
- After cleaning, plug in the refrigerator plug and make sure it is securely connected.
Defrosting
This product has an automatic defrosting function, so no manual operation is required.
During vacations:
If you go on vacation, it is advisable to leave the refrigerator running and store food that can be kept for a short time. If you wish to turn off the refrigerator, remove all food, disconnect the power plug, clean the inside of the refrigerator thoroughly, and open the door to prevent unpleasant odours.
In case of power failure:
- Generally, a short-term power outage does not drastically affect the temperature of the refrigerator. However, if the outage is prolonged, reduce the frequency of opening the refrigerator and avoid introducing fresh food so as not to accelerate the temperature rise.
- If you are aware of an upcoming power cut, you can activate the Fast Freezing function in advance to maintain the refrigerator temperature at its lowest setting.
Switch-off
Generally, it is not recommended to turn off the refrigerator or disconnect the power switch, as this may affect the life of the appliance.
Energy saving tips
- Ensure the appliance is kept away from heat sources and direct sunlight.
- Before storing hot food, allow it to cool to room temperature and then place it in the refrigerator.
-
Close the door promptly, reduce opening frequency and shorten opening times.
-
When thawing frozen foods, place them in the refrigerator compartment to aid in cooling.
- Ensure the temperature sensor is not covered or blocked by food items and maintain appropriate spacing between foods.
6. TROUBLESHOOTING
Normal phenomena
| Button failure | Check if the refrigerator is in lockout mode on the control panel. In this mode, the buttons do not work. |
| Low voltage, the compressor fails to run | It is recommended to purchase a pressurizer of more than 1000W to protect the refrigerator in areas with low voltage. |
| Extended start-up time | If the ambient temperature is very high, the unit may take longer to start up. |
| Hot internal side panels | The internal side panels of the refrigerator may feel warm to the touch after the appliance has been operating for a while. This is completely normal and does not indicate a problem with the refrigerator. |
| Condensation droplets | When outside air enters the cold inner surface of the refrigerator, condensation droplets may appear.If humidity is high at the installation site or during rainy season, condensation droplets may form on the refrigerator's exterior. This is a natural phenomenon in humid climates. Wipe off the water drops with a dry cloth. |
| Noise | When operating the refrigerator for the first time, it will run at high speed for rapid cooling, and the sound may appear louder. When the internal temperature drops below a certain level, the noise will decrease.When starting or terminating compressor operation, expansion/contraction of various parts, operation of control devices or temperature changes inside the refrigerator may generate sounds. These sounds are normal. |
| Hot compressor | During operation, the temperature of the compressor may exceed 80 °C. Do not touch it, as this may cause serious injury. |
| Extended compressor operation | If the ambient temperature is too high or too much fresh food is put into the refrigerator, it may take longer to cool down to the set temperature. |
ENGLISH
Troubleshooting
Before contacting the Cecotec's Official Technical Support Service, please review this list. This list includes common problems that are not the result of manufacturing or material defects in this device.
| Problem | Possible cause | Solution |
| No display on the control panel | The appliance plug is not properly connected. | Check if the device is turned on. |
| Alarm sound | The door is slightly open or has not been closed for more than 1 minute. | Close the door completely. |
| Compressor does not work | The power supply is not connected properly. | Check if the power supply is properly connected. |
| Compressor runs too long | The refrigerator has been disconnected for a period of time. | It takes a few hours for the refrigerator to cool completely. |
| Too much fresh or hot food has been introduced. | Hot food will cause the refrigerator to run longer until the desired temperature is reached. | |
| The doors are opened too frequently or for too long. | Hot air entering the refrigerator makes the compressor run longer. Open the door less frequently. | |
| Vibration noise | The ground is uneven or weak. | Ensure the floor is level and solid and can properly support the refrigerator. |
| Objects placed on top of the refrigerator are vibrating. | Remove the objects. Do not place objects on top of the refrigerator. | |
| The refrigerator is touching the wall or cabinets. | Move the refrigerator so it does not touch the wall or cabinets. |
7. RECYCLING OF ELECTRICAL AND ELECTRONIC EQUIPMENT

This symbol indicates that, according to the applicable regulations, the product and/or battery must be disposed of separately from household waste. When this product reaches the end of its shelf life, you should dispose of the batteries/accumulators and take them to a collection point designated by the local authorities.
For detailed information on how to properly dispose of electrical and electronic equipment and/or the corresponding batteries, consumers should contact their local authorities.
Compliance with the above guidelines will help protecting the environment.
8. COPYRIGHT
The intellectual property rights over the texts in this manual belong to CECOTEC INNOVACIONES, S.L. All rights reserved. The content of this publication may not, either in part or in its entirety, be reproduced, stored in a retrieval system, transmitted or distributed by any means (electronic, mechanical, photocopying, recording or similar) without prior authorisation from CECOTEC INNOVACIONES, S.L.
9. SIMPLIFIED EU DECLARATION OF CONFORMITY
CE Cecotec Innovaciones hereby declares that this appliance complies with the essential requirements and other relevant provisions of the regulations applicable in the European Union. This appliance has been designed, manufactured and tested in compliance with required safety and quality standards. The full text of the EU Declaration of Conformity can be found on the following website: https://cecotec.es/es/information/declaration-of-conformity
FRANÇAIS
1. PIÈCES ET COMPOSANTS
Img. 1
6. PROBLEEMOPLOSSING
B. Compartment congelador
- Calaix del compartiment congelador
- Calaix CryoFreeze
https://cecotec.es/es/information/declaration-of-conformity
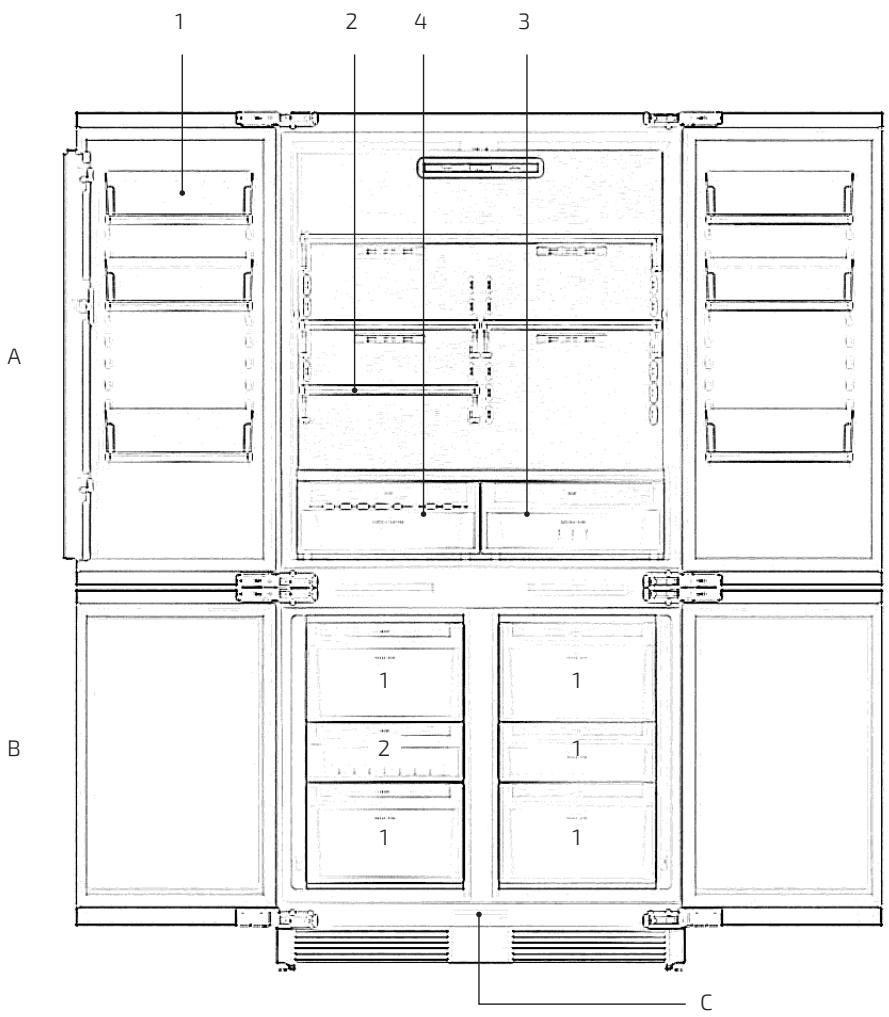
Fig./Img./Abb./Afb./Rys.1

Fig./Img./Abb./Afb./Rys. 2
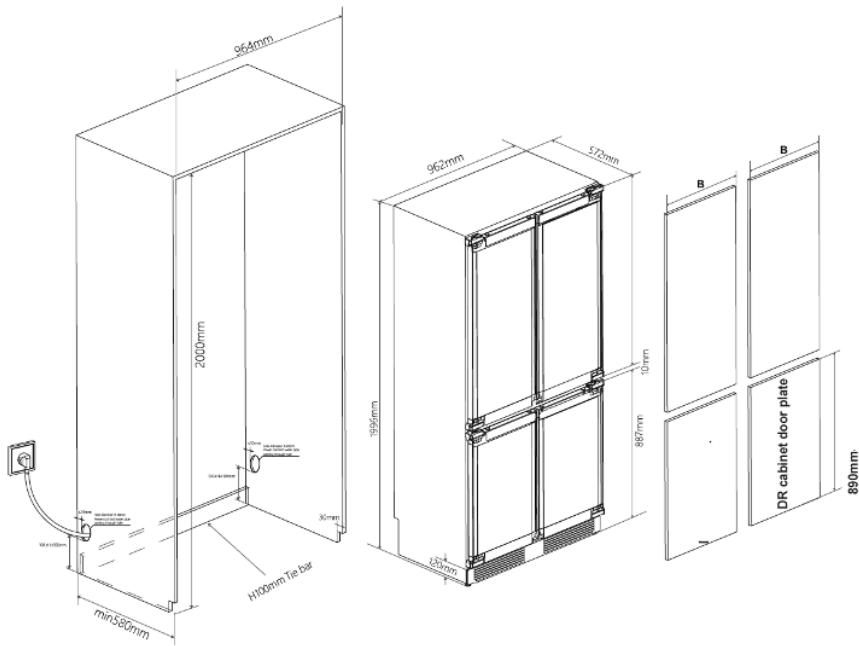
Fig./Img./Abb./Afb./Rys. 3

Fig./Img./Abb./Afb./Rys. 4
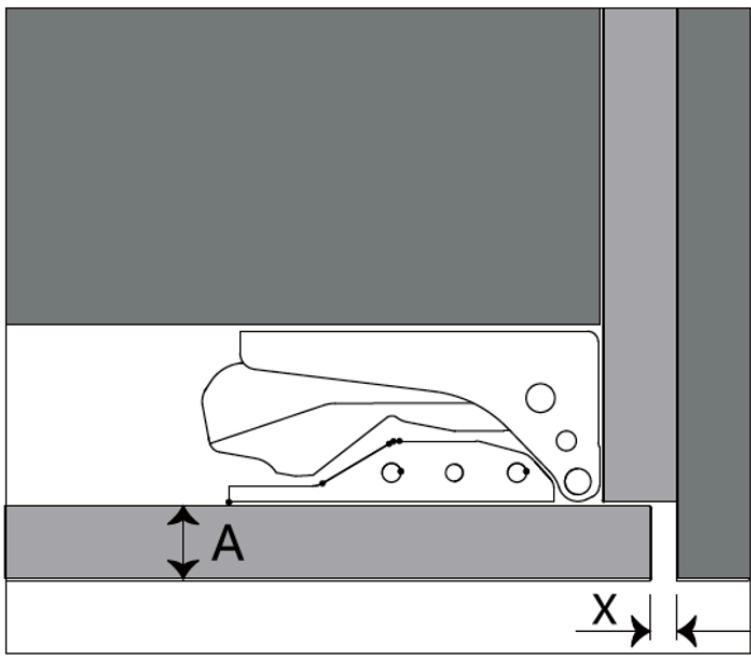
Fig./Img./Abb./Afb./Rys. 5

Fig./Img./Abb./Afb./Rys. 6
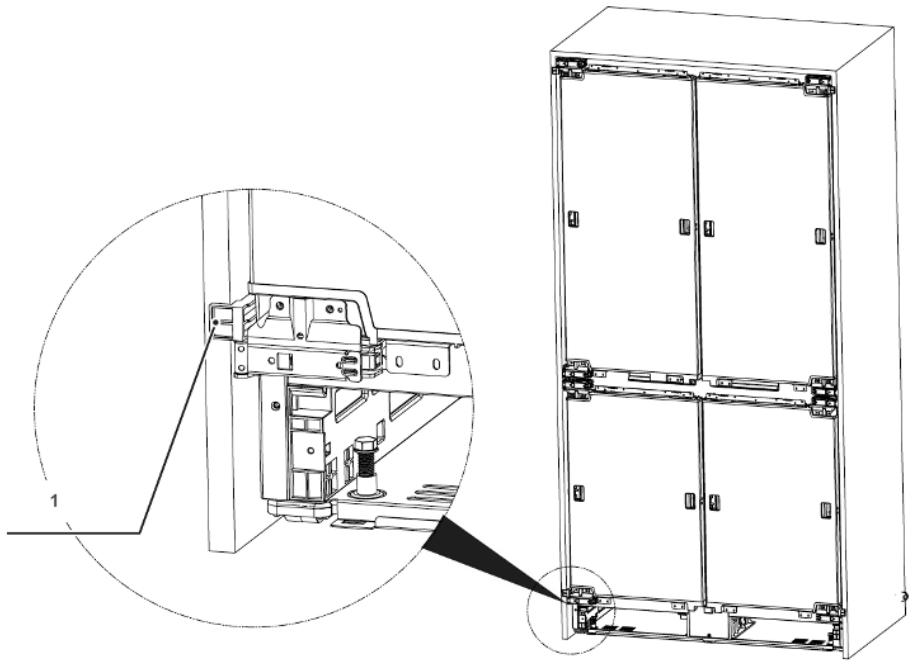
Fig./Img./Abb./Afb./Rys. 7

Fig./Img./Abb./Afb./Rys. 8

Fig./Img./Abb./Afb./Rys. 9

Fig./Img./Abb./Afb./Rys. 10

Fig./Img./Abb./Afb./ Rys. 11
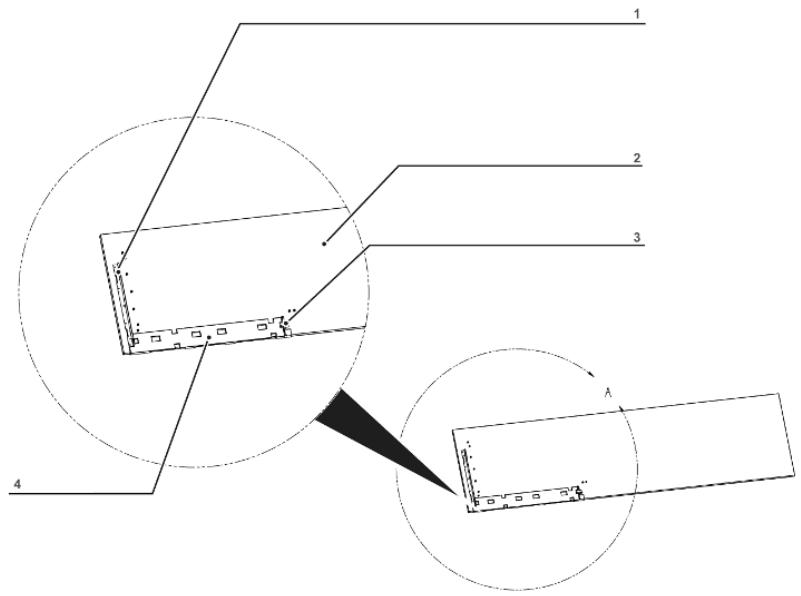
Fig./Img./Abb./Afb./Rys. 12

Fig./Img./Abb./Afb./Rys. 13

Fig./Img./Abb./Afb./Rys. 14
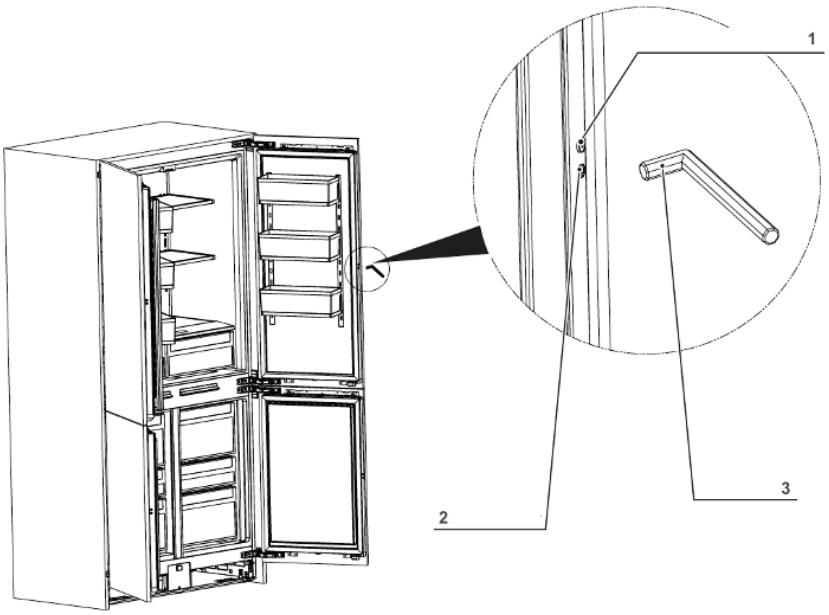
Fig./Img./Abb./Afb./ Rys. 15

Fig./Img./Abb./Afb./Rys. 16

Fig./Img./Abb./Afb./Rys. 17

Fig./Img./Abb./Afb./Rys. 18

Fig./Img./Abb./Afb./ Rys. 19

Fig./Img./Abb./Afb./Rys. 20
www.cecotec.es


- SOMMAIRE
- Temperature range
- Notes:
- Refrigerant
- INSTRUCTIONS DE SÉCURITÉ
- Note:
- BEFORE USE
- Box content:
- INSTALLATION
- - Installation position:
- - Installation of the power supply:
- Fig. 2
- Basic Dimensions
- ENGLISH
- Before installation
- Cabinet requirements:
- Installation tools
- Cabinet inspection
- Unpacking of the refrigerator
- Refrigerator and cabinet installation instructions
- Refrigerator and cabinet attachment
- Fig. 8 key:
- Fig. 9 key:
- Fig. 10 key:
- Cabinet door and refrigerator door installation
- Fig. 11 key:
- Fig. 12 key:
- Fig. 13 key:
- Fig. 14 key:
- Cabinet door adjustment
- Fig. 15 key:
- Fig. 16 key:
- Refrigerator accessory installation
- Fig. 17 key:
- Fig. 18 key:
- Fig. 19 key:
- OPERATION
- Control panel
- Fig. 20
- Ultra Freezing Mode
- Fast Freezing mode
- Freezer compartment zone button
- Temperature setting button (-)
- Temperature setting button (+)
- Refrigerator compartment zone button
- Freshness Flex HUB zone button
- Fast Cooling mode
- Lock button
- Display indicator
- Display mode
- Open door alarm
- Use of the buttons
- Tips for efficient refrigerator storage and use"
- Food storage
- Additional advice
- Freezing and storing food in the freezer compartment
- Buying frozen food
- Frozen food storage
- Recommended storage times for frozen food items
- CLEANING AND MAINTENANCE
- Cleaning of the refrigerator
- Defrosting
- During vacations:
- In case of power failure:
- Switch-off
- Energy saving tips
- TROUBLESHOOTING
- Troubleshooting
- RECYCLING OF ELECTRICAL AND ELECTRONIC EQUIPMENT
- COPYRIGHT
- SIMPLIFIED EU DECLARATION OF CONFORMITY
- FRANÇAIS
- PIÈCES ET COMPOSANTS
- Img. 1
- PROBLEEMOPLOSSING
Brand : CECOTEC
Model : Bolero Coolsilver 4d Bi 526 Elite D
Category : Refrigerator