
B1 - Guitar effects pedalboard ZOOM - Free user manual and instructions
Find the device manual for free B1 ZOOM in PDF.
| Product type | Effects pedal for bass guitar |
| Model | B1 |
| Brand | ZOOM |
| Dimensions (L x D x H) | 136 mm x 155 mm x 52 mm |
| Weight (without batteries) | 350 g |
| Power supply | 9 V DC, 300 mA (center negative) AC adapter or 4 AA alkaline batteries (LR6) |
| Battery life | Approximately 12 hours with alkaline batteries |
| Number of patches | 80 (40 user + 40 preset) |
| Simultaneous effects modules | Up to 8 |
| Effect types | 46 (compressor, wah, overdrive, EQ, chorus, delay, reverb, etc.) |
| Built-in tuner | Auto-chromatic, adjustable 435–445 Hz |
| Rhythm function | 40 patterns, adjustable tempo 40–250 BPM |
| Input | Standard mono jack (Input) |
| Output | Stereo jack (Output/Phone), doubles as line/headphone output |
| Expression pedal | Not built-in (Control In connector for FP01/FP02) |
| Footswitch | Control In connector for FS01 (bank change, tap tempo) |
| Maintenance and cleaning | Soft, dry cloth; do not use solvents |
| Safety | Use only the AD-0006 adapter; avoid moisture, dust, and shocks |
| Repairability / Spare parts | Contact an authorized ZOOM service center; do not open the housing |
| General information | Original manual in English and French available; patch presets possible; factory reset (All Initialize) |
Frequently Asked Questions - B1 ZOOM
User questions about B1 ZOOM
0 question about this device. Answer the ones you know or ask your own.
Ask a new question about this device
Download the instructions for your Guitar effects pedalboard in PDF format for free! Find your manual B1 - ZOOM and take your electronic device back in hand. On this page are published all the documents necessary for the use of your device. B1 by ZOOM.
USER MANUAL B1 ZOOM
Thank you for selecting the ZOOM B1/B1X (hereafter simply called the "B1/B1X"). Please take the time to read this manual carefully to get the most out of this product and to ensure optimum performance and reliability.
Keep this manual at hand for future reference.
Contents
SAFETY PRECAUTIONS / Usage
Precautions 2
Terms Used in This Manual. 3
Controls and Functions /
Connections 4
Selecting a Patch 6
Using the Tuner 8
Using the Rhythm Function 10
Editing a Patch 12
Storing/Copying Patches 14
Changing the Way Patches Are
Called Up 16
Using a Foot Switch or Pedal ....16
Using the foot switch (FS01)
(B1 only) 16
Using the expression pedal .... 17
Effect Types and Parameters ....18
Linking Effects 18
Explanation of symbols 18
PATCH LEVEL 19
COMP/LIMIT module 19
EFX (Effects) module 19
DRIVE module 20
EQ module 21
ZNR/AMP (ZNR/Amp Simulator)
module 21
MODULATION/DELAY
module 22
REVERB/DELAY module 24
B1/B1X Preset Pattern 25
Restoring Factory Defaults 25
Special Features of B1X 26
[PEDAL ASSIGN] key
operation 26
Adjusting the expression
pedal 26
Specifications 27
Troubleshooting 27
SAFETY PRECAUTIONS / Usage Precautions
SAFETY PRECAUTIONS
In this manual, symbols are used to highlight warnings and cautions for you to read so that accidents can be prevented. The meanings of these symbols are as follows:

This symbol indicates explanations about extremely dangerous matters. If users ignore this symbol and handle the device the wrong way, serious injury or death could result.

This symbol indicates explanations about dangerous matters. If users ignore this symbol and handle the device the wrong way, bodily injury and damage to the equipment could result.
Please observe the following safety tips and precautions to ensure hazard-free use of the B1/B1X.

Power requirements
Since power consumption of this unit is fairly high, we recommend the use of an AC adapter whenever possible. When powering the unit from batteries, use only alkaline types.
[AC adapter operation]
- Be sure to use only an AC adapter which supplies 9 V DC, 300mA and is equipped with a "center minus" plug (Zoom AD-0006). The use of an adapter other than the specified type may damage the unit and pose a safety hazard.
- Connect the AC adapter only to an AC outlet that supplies the rated voltage required by the adapter.
- When disconnecting the AC adapter from the AC outlet, always grasp the adapter itself and do not pull at the cable.
- During lightning or when not using the unit for an extended period, disconnect the AC adapter from the AC outlet.
[Battery operation]
- Use four conventional IEC R6 (size AA) batteries (alkaline).
- The B1/B1X cannot be used for recharging.
- Pay close attention to the labelling of the battery to make sure you choose the correct type.
- When not using the unit for an extended period, remove the batteries from the unit.
- If battery leakage has occurred, wipe the battery compartment and the battery terminals carefully to remove all remnants of battery fluid.
- While using the unit, the battery compartment cover should be closed.
![ZOOM B1 - [Battery operation] - 1](/content/2025/01/152189/images/d997fc2a401ecbe8f94bb60f0a2466be64354d3e6ed38313b800c59f957dd0c5.jpg)
Environment
To prevent the risk of fire, electric shock or malfunction, avoid using your B1/B1X in environments where it will be exposed to:
- Extreme temperatures
-
Heat sources such as radiators or stoves
High humidity or moisture -
Excessive dust or sand
- Excessive vibration or shock

Handling
- Never place objects filled with liquids, such as vases, on the B1/B1X since this can cause electric shock.
- Do not place naked flame sources, such as lighted candles, on the B1/B1X since this can cause fire.
- The B1/B1X is a precision instrument. Do not exert undue pressure on the keys and other controls. Also take care not to drop the unit, and do not subject it to shock or excessive pressure.
- Take care that no foreign objects (coins or pins etc.) or liquids can enter the unit.

Connecting cables and input and output jacks
You should always turn off the power to the B1/B1X and all other equipment before connecting or disconnecting any cables. Also make sure to disconnect all connection cables and the power cord before moving the B1/B1X.

Alterations
Never open the case of the B1/B1X or attempt to modify the product in any way since this can result in damage to the unit.

Volume
Do not use the B1/B1X at a loud volume for a long time since this can cause hearing impairment.
Usage Precautions
Electrical interference
For safety considerations, the B1/B1X has been designed to provide maximum protection against the emission of electromagnetic radiation from inside the device, and protection from external interference. However, equipment that is very susceptible to interference or that emits powerful electromagnetic waves should not be placed near the B1/B1X, as the possibility of interference cannot be ruled out entirely.
With any type of digital control device, the B1/B1X included, electromagnetic interference can cause malfunctioning and can corrupt or destroy data. Care should be taken to minimize the risk of damage.
Cleaning
Use a soft, dry cloth to clean the B1/B1X. If necessary, slightly moisten the cloth. Do not use abrasive cleanser, wax, or solvents (such as paint thinner or cleaning alcohol), since these may dull the finish or damage the surface.
Please keep this manual in a convenient place for future reference.
Terms Used in This Manual
This section explains some important terms that are used throughout the B1/B1X documentation.
IN COMP/LIMIT EFX DRIVE EQ ZNR AMP MODULATION/DELAY REVERB/DELAY OUT
■ Effect module
As shown in the illustration above, the B1/B1X can be thought of as a combination of several single effects. Each such effect is referred to as an effect module. In addition to modules such as DRIVE and MODULATION/DELAY, the B1/B1X also provides a module for noise reduction and amp simulation (ZNR/AMP). Parameters such as effect intensity can be adjusted for each module individually, and modules can be switched on and off.
■ Effect type
Some effect modules have several different effects which are referred to as effect types. For example, the MODULATION/DELAY module comprises chorus, flanger, and other effect types. Only one of these can be selected at a time.
■ Effect parameter
All effect modules have various parameters that can be adjusted. These are called effect parameters. When thinking of an effect module as a compact effect, the parameters change the tone and effect intensity similar to the knobs on the device.
Patch
In the B1/B1X, effect module combinations are stored and called up in units referred to as patches. A patch comprises information about the on/off status of each effect module, about the effect type
used in each module, and about effect parameter settings. The internal memory of the B1/B1X can store up to 80 patches.
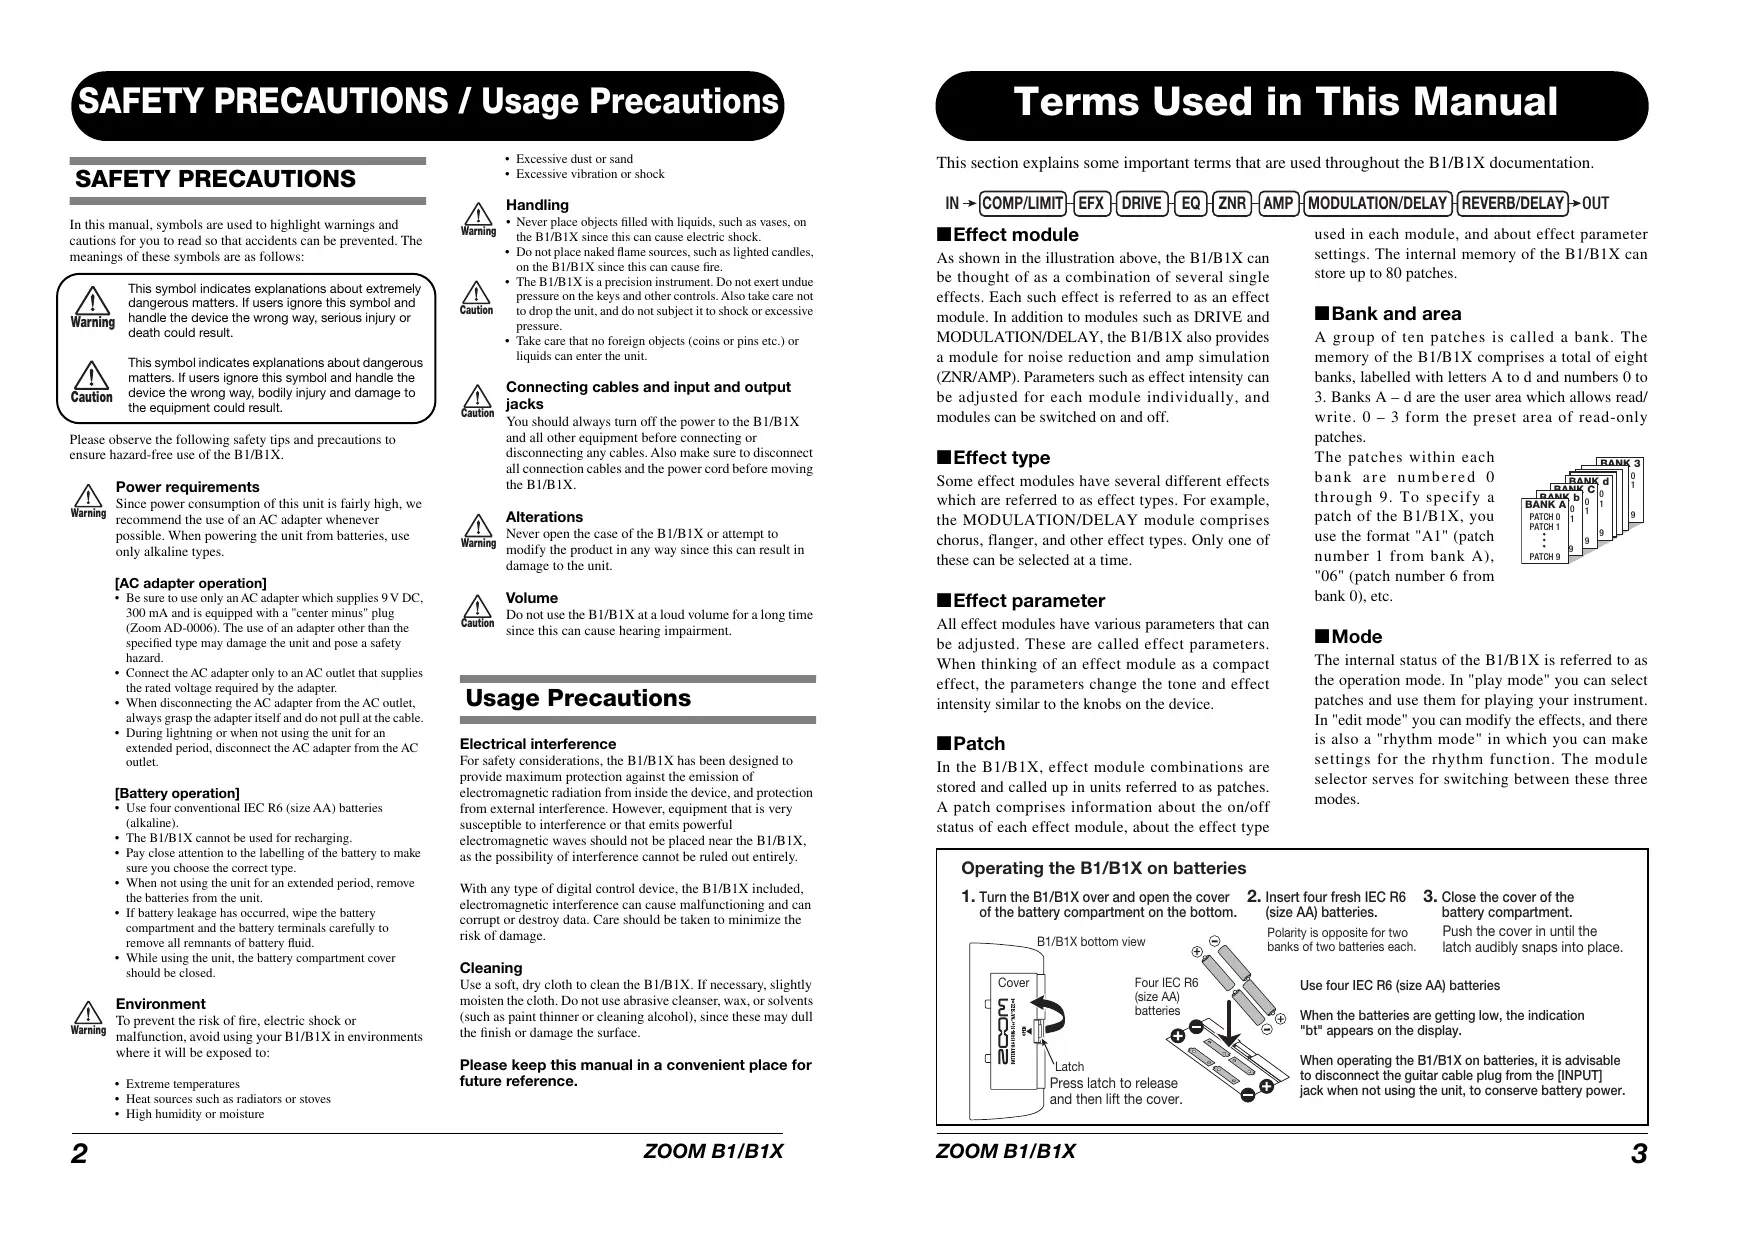
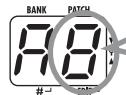
■ Bank and area
A group of ten patches is called a bank. The memory of the B1/B1X comprises a total of eight banks, labelled with letters A to d and numbers 0 to 3. Banks A - d are the user area which allows read/write. 0 - 3 form the preset area of read-only patches.
The patches within each bank are numbered 0 through 9. To specify a patch of the B1/B1X, you use the format "A1" (patch number 1 from bank A), "06" (patch number 6 from bank 0), etc.
Mode
The internal status of the B1/B1X is referred to as the operation mode. In "play mode" you can select patches and use them for playing your instrument. In "edit mode" you can modify the effects, and there is also a "rhythm mode" in which you can make settings for the rhythm function. The module selector serves for switching between these three modes.
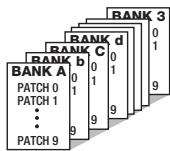
Operating the B1/B1X on batteries
-
Turn the B1/B1X over and open the cover of the battery compartment on the bottom.
-
Insert four fresh IEC R6 (size AA) batteries.
Polarity is opposite for two banks of two batteries each.
- Close the cover of the battery compartment.
Push the cover in until the latch audibly snaps into place.
Use four IEC R6 (size AA) batteries
When the batteries are getting low, the indication "bt" appears on the display.
When operating the B1/B1X on batteries, it is advisable to disconnect the guitar cable plug from the [INPUT] jack when not using the unit, to conserve battery power.
Controls and Functions / Connections
This section describes the names and functions of all parts of the B1 and B1X. Functions that are special to the B1X are explained on page 26. Please also refer to that section.
Module selector
Switches between play mode, edit mode, and rhythm mode. In edit mode, the knob selects the module for operation.
RHYTHM [▶/■] key
In play mode and rhythm mode, this key serves to start and stop the rhythm pattern. In edit mode, the key serves to select the module to control with the pedal.
Display
Shows patch numbers, setting values, and other information for operating the B1/B1X.
Top Panel (B1X)
[VALUE] knob
This knob allows changing the level of effect parameters or of the overall patch.
Expression pedal (B1X only)
Can be used as a volume pedal or as a real-time controller for effect parameters. (For details, see page 26.)
[STORE] key
Serves for storing edited patches in memory.
[PEDAL ASSIGN] key (B1X only)
Serves to select the module to assign to the built-in expression pedal.
[BANK UP·TAP] key
In play mode, the key switches to the next higher bank. In other modes, the key lets you manually specify the rhythm pattern tempo and other parameters related to timing and cycle.
[▼]/[▲] foot switches
These switches are used for selecting patches, controlling the tuner, and other functions.
![ZOOM B1 - [▼]/[▲] foot switches - 1](/content/2025/01/152189/images/375ee894a7932c1918cf5ff0bbeef5765d2fad6d3412471ca2da909d59b68b50.jpg)
When operating the B1/B1X on batteries, it is advisable to disconnect the bass cable plug from the [INPUT] jack when not using the unit, to conserve battery power.
[INPUT] jack
Serves for connecting the bass When operating the B1/B1X on batteries, inserting the bass cable plug into this jack will turn the unit on.
![ZOOM B1 - [INPUT] jack - 1](/content/2025/01/152189/images/a03e445a2978495aa4e558aecc54a664d8b141919ee115ccc3f509df76778448.jpg)
Rear Panel (B1)
AC adapter
Differences between B1X and B1
B1X special features that differ from B1:
- Equipped with expression pedal as standard feature ( p. 26)
- [PEDAL ASSIGN] key on top panel allows selection of module to be controlled with expression pedal ( p. 26)
- No [CONTROL IN] jack on rear panel; optional foot switch (FS01) or expression pedal (FP01/FP02) cannot be used.
[OUTPUT/PHONES] jack
This stereo phone jack serves for connection of the bass amplifier or a pair of stereo headphones. It is also possible to use a Y cable and send the output to a stereo system, to produce sweeping stereo effects.
![ZOOM B1 - [OUTPUT/PHONES] jack - 1](/content/2025/01/152189/images/b434b460752593dad3c80d7ac89e1b1fbce539e4b7c4774c87f5e585c7b51a94.jpg)
Bass amplifiers
Headphones
FS01
![ZOOM B1 - [OUTPUT/PHONES] jack - 2](/content/2025/01/152189/images/ccbe5e94a42dda30d940caa57a3049005f7489997bf7beccbc878aa0f9e944c4.jpg)
FP01/FP02
[DC IN] jack
An AC adapter (ZOOM AD-0006) with a rated output of 9 volts DC, 300mA (center minus plug) can be plugged into this jack.
[CONTROL IN] jack (B1 only)
Serves for connection of the optional foot switch (FS01) or expression pedal (FP01/FP02).
Selecting a Patch
To try out the various effects of the B1/B1X, we recommend that you simply play your instrument while switching patches.
1 Turn power on
- When using the B1/B1X on batteries, plug a shielded cable with mono phone plug into the [INPUT] jack on the rear panel of the B1/B1X.
- When using the B1/B1X with the AC adapter, plug the adapter into the outlet and plug the cable from the adapter into the [DC IN] jack on the B1/B1X.
- Turn the bass amplifier on and adjust the volume to a suitable position.
Set the B1/B1X to play mode
- If the Module selector is set to a position other than "PLAY", set it to "PLAY".
The currently selected bank and patch number are shown on the display.

HINT
Immediately after turning the B1/B1X on, the unit will be in play mode, even if the Module selector is set to a position other than "PLAY".
Adjust the master level
- To adjust the master level in play mode, you can use the [VALUE] knob.
When you turn the [VALUE] knob, the master level setting is shown for a time on the display.

The master level setting range is 0 - 98,1.0 It will be reset to 80 when the unit is turned off and then on again.
NOTE
When using headphones, this knob adjusts the listening volume.
3 Select a patch
- To switch the patch, press one of the [] / [] foot switches.
Pressing the [] foot switch calls up the next lower patch, and pressing the [] foot switch calls up the next higher patch.
Repeatedly pressing one foot switch cycles through patches in the order A0 - A9 ... d0 - d9 00 - 09 ... 30 - 39 A0 , or the reverse order.
4 Directly selecting a bank
- To select the banks A - d, 0 - 3 directly, use the [BANK UP•TAP] key.
Each push of the key switches to the next higher bank.
NOTE With the B1, using the foot switch (FS01) to switch banks is also possible ( p. 16).
Using the Tuner
The B1/B1X incorporates an auto-chromatic tuner. To use the tuner function, the built-in effects must be bypassed (temporarily turned off) or muted (original sound and effect sound turned off).
Switch to bypass or mute
- Setting the B1/B1X to the bypass state
In play mode or rhythm mode ( p. 10),
press both [ ] / [ ] foot switches together briefly and release.
- Setting the B1/B1X to the mute state
In play mode or rhythm mode ( p.10)
press both [ ] / [ ] foot switches
together and hold for at least 1 second.
NOTE The bypass or mute condition cannot be activated when the unit is in idle mode.
Patch change at bypass/mute
When you press both [ ] / [ ] foot switches together while playing your instrument, the sound may change momentarily just before the bypass/mute condition is activated. This is because the B1/B1X switches to the next higher or lower patch when one of the foot switches is pressed slightly earlier. (When you cancel the bypass/mute condition, the original patch number will be active again.)
This behavior is not a defect. It is due to the very high speed at which the B1/B1X responds to patch switching. To prevent the sound change caused by the above condition, do not produce sound with your instrument until the bypass/mute condition is fully established.
2 Tune your instrument
- Play the open string to tune, and adjust the pitch.
The left side of the display shows the note which is closest to the current pitch.
A = D = G =
A^# = D^# = . G^# = _
B = B E = E
C F
C^# = · . F
Adjusting the reference pitch of the tuner
If required, you can fine-adjust the reference pitch of the B1/B1X tuner.
- Turn the [VALUE] knob.
When you turn the [VALUE] knob in the bypass/mute condition, the current reference pitch is shown for a time on the display. The default setting is 40 (center A = 440 Hz).
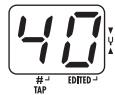
- While the reference pitch is shown, turn the [VALUE] knob to adjust the value in the range from 35 - 45 (center A = 435 to 445 Hz).
Shortly after you release the [VALUE] knob, the display indication will revert to the previous condition.
NOTE When you turn the B1/B1X off and on again, the reference pitch setting will be reset to 40 (center A = 440 Hz).
4 Return to play mode
- Press one of the [] / [] foot switches.
The right side of the display shows a symbol that indicates by how much the tuning is off.
Pitch is high Pitch is correct Pitch is low
Tune the other strings in the same way.


Indication turns faster the more the pitch is off
Using the Rhythm Function
The B1/B1X has a built-in rhythm function that plays realistic drum sounds in various patterns. The rhythm function is available in play mode and in rhythm mode. This section describes how to use the function in rhythm mode.
1 Select rhythm mode
- Set the Module selector to the "RHYTHM" position.
The number of the currently selected rhythm pattern (01 - 40) appears on the display.
You cannot switch patches or adjust the master level.
HINT
- The rhythm function can also be used in play mode.
- In play mode, you cannot switch the rhythm pattern or adjust the rhythm volume and tempo.
2
Start the rhythm function
- To start the rhythm function, press the RHYTHM [▶/■] key.
NOTE
While the rhythm is playing, the REVERB/DELAY module effect is disabled.
3
Select a rhythm pattern
The B1/B1X has 40 built-in rhythm patterns. For more information on pattern contents, see page 25.
- To switch rhythm patterns, press one of the [] / [] foot switches in rhythm mode.
HINT
When you press both [] / [] foot switches in rhythm mode, the B1/B1X switches to the bypass/mute condition ( p. 8). The rhythm function can also be used in this condition.

Adjust the rhythm volume
- To adjust the rhythm volume, turn the [VALUE] knob.
When you turn the [VALUE] knob, the current setting (0 - 30) is shown for a time on the display.

Adjust the tempo
The rhythm pattern tempo can be adjusted in the range of 40 - 250 BPM (beats per minute).
- To continuously change the rhythm tempo, hit the [BANK UP·TAP] key once and then turn the [VALUE] knob while the tempo value is being shown on the display.
- To manually specify the tempo, hit the [BANK UP•TAP] key at least twice in the desired interval.
The B1/B1X automatically detects the interval in which the key is pressed the second and subsequent times, and sets the tempo accordingly (tap tempo function).
While the above steps are carried out, the current tempo value (40 - 250) is shown for a time on the display. For values in the range from 100 to 199, a dot is shown in the bottom right corner (after the second digit). For values of 200 and above, dots are shown after the first and second digits.
Tempo = 120 BPM
Tempo =240 BPM
HINT
With the B1, using the foot switch (FS01) to manually adjust the tempo is also possible ( p. 16). The B1X does not support use of a foot switch.

Stop the rhythm
- To stop the rhythm, press the RHYTHM [▶/■] key.
The B1/B1X returns to the previous condition.
Editing a Patch
The patches of the B1/B1X can be freely edited by changing the effect parameter settings. Try editing the currently selected patch to create your own sound.
1 Select the effect module/ parameter
- Turn the Module selector to select the effect module and parameter to edit. The available settings are listed below.
The EQ module has three parameters, and the DRIVE, MODULATION/DELAY, and REVERB/DELAY modules have two parameters each. The Module selector lets you directly access each of these.
Type = Effect type Prm = Parameter
(1) Patch level (Prm)
(2) COMP/LIMIT module (Type&Prm)
(3) EFX module (Type&Prm)
(4) DRIVE module (Type)
(5) DRIVE module (Prm1)
(6) DRIVE module (Prm2)
(7)-(9) EQ module (Prm)
(10) ZNR/AMP module (Type&Prm)
(11) MODULATION/DELAY module (Type&Prm1)
(12) MODULATION/DELAY module (Prm2)
(13) REVERB/DELAY module (Type&Prm1)
(14) REVERB/DELAY module (Prm2)
- Type&Prm or Type&Prm1
Item where the effect type (left side of display) and parameter setting value (right side of display) are adjusted simultaneously.
Effect type
Parameter setting value
- Type
Item where the effect type only is selected.
Effect type
- Prm, Prm1, or Prm2
Item where the parameter setting value only is adjusted.
Parameter setting value
Change the setting
- Use the [VALUE] knob to change the effect type and parameter as shown on the display.
When the effect type and/or parameter setting has been changed, a dot (. ) appears in the bottom right of the display. This indicates that a setting has been changed.
Dot indicates that setting has been changed
NOTE
When you have selected a parameter that can be set with the tap function ( p. 18), you can use the [BANK UP·TAP] key to specify a time interval or rate by repeatedly hitting the key.
3
To switch an effect module on and off
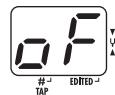
- To switch the currently selected effect module between on and off, press one of the []/[] foot switches.
The indication "oF" appears on the display. When you press one of the switches once more, the indication returns to the previous condition.
4 Terminate the edit mode
- To terminate the edit mode and return to the play mode, set the Module selector to the "PLAY" position.
NOTE When you return to play mode and have made any change to the patch, the dot (. ) will be shown in the bottom right of the display. If you select another patch in this condition, the changes you have made in edit mode will be lost unless you store the patch first. To retain the changes, store the patch as described on page 14.
Storing/Copying Patches
An edited patch can be stored in a bank of the user area (A - d). It is also possible to store an existing patch in another location to create a copy.
In play mode or edit mode, press the [STORE] key.
- The bank and patch number are shown on the display as a flashing indication.
![ZOOM B1 - In play mode or edit mode, press the [STORE] key. - 1](/content/2025/01/152189/images/dd1618efc3bc65e59556adf714e21594030156692376ba7d7c959c67095be832.jpg)
NOTE
Patches of banks in the preset area (0 - 3) are read-only. No patches can be stored or copied into these locations. If you press the [STORE] key while a patch from the preset area is selected, the patch "A0" (bank A, patch number 0) will be selected automatically as default store/copy target.
2
Select the store/copy target bank
- To select the store/copy target bank, use the [BANK UP·TAP] key.
NOTE
- Only a bank of the user area (A - d) can be selected as store/copy target bank.
- During the store/copy process, the foot switch (FS01) cannot be used to change banks.
To cancel the store process
- To cancel the store process, operate the [VALUE] knob before pressing the [STORE] key again in step 4.
4
Press the [STORE] key once more
- When the store/copy process is completed, the B1/B1X returns to the previous mode, with the target patch being selected.
![ZOOM B1 - Press the [STORE] key once more - 1](/content/2025/01/152189/images/f9ebd55b71831d48b7c4d676f3221cc3c0869277d8a7042b03dd4f02d8dfe8c9.jpg)
3
Specify the store/copy target patch number
- To specify the store/copy target patch number, use the [] / [] foot switches.
Changing the Way Patches Are Called Up
In normal operation, changing a patch in play mode of the B1/B1X will be active immediately. This means that the sound changes straight away when you make the selection.
In some cases, such as when the new patch is at a memory location not adjacent to the current one, this method may not be ideal, because the sound will change in various ways as you switch through the patches. In such a case, you may want to change the patch selection method to "pre-select". In this mode, you first select the patch to use next, and then perform an additional step to activate the patch.
To change B1/B1X operation to pre-select, perform the following steps.
1. Turn power to the B1/B1X on while holding down the [▲] foot switch.
The indication "PrE-SElEc" scrolls on the display during startup.
2. In play mode, use the [] / [] foot switches to specify the patch to use next.
You can use the [BANK UP·TAP] key or a foot switch (FS01) connected to the [CONTROL IN] jack to switch only the bank (The B1X does not support use of a foot switch.)
The new bank or patch number specified by the above step flashes on the display. The sound does not change yet.
3. When you have specified the patch to use, press both [ ] / [ ] foot switches together.
The patch change is accepted, the display changes from flashing to permanently lit, and the sound changes.
![ZOOM B1 - When you have specified the patch to use, press both [ ] / [ ] foot switches together. - 1](/content/2025/01/152189/images/bedae82a9a2f7148c8c3b94d1eb6e184fdde731fde436d0f658d501759ca529e.jpg)
4. To return the B1/B1X to the normal patch selection method, simply turn power off and then on again.
The patch selection method is automatically reset to conventional operation.
Using a Foot Switch or Pedal
The B1 is equipped with a [CONTROL IN] jack that allows connection of an optional foot switch or expression pedal.
This section explains how to use this capability.
Using the foot switch (FS01) (B1 only)
Simply connect the optional foot switch (FS01) to the [CONTROL IN] jack of the B1 and turn the unit on. This allows you to switch banks and specify the tempo for rhythm patterns with the foot switch.
Depending on the currently selected mode, the foot switch operates as follows.
Play mode
Pressing the foot switch selects the next higher bank.
Rhythm mode
When you press the foot switch two times or
more, the B1 detects the interval and automatically adjusts the tempo accordingly (tap tempo function).
Edit mode
The foot switch has no effect.
Using the expression pedal
With the B1, an expression pedal (FP01/FP02) can be connected to the [CONTROL IN] jack and used as a volume pedal or for adjusting a certain parameter of an effect type in real time.
With the B1X, the built-in expression pedal can be used in the same way. The function of the expression pedal can be selected and stored individually for each patch.
- To use an expression pedal with the B1, plug the FP01 or FP02 into the [CONTROL IN] jack and turn on the power.
- Select the patch in which to use the expression pedal.
- Set the Module selector to a position other than "PLAY" or "RHYTHM".
The B1/B1X goes into edit mode.
- While holding down the [RHYTHM] key, use the [VALUE] knob to select the module to control with the expression pedal. Available settings are shown below.
| Display | Control target |
| ∅F | Disabled |
| ∅P | Volume |
| ∅P | COMP/LIMIT module |
| ∅P | EFX module |
| ∅P | DRIVE module |
| Display | Control target |
| PP | MODULATION/DELAY module |
| FR | REVERB/DELAY module |
HINT
- In the section "Effect Types and Parameters" (page 19 - 24), a pedal symbol indicates which effect type/parameter is controlled by the pedal.
- When a module has been selected as control target, but the effect type currently selected for that module does not have a pedal symbol, the expression pedal has no effect.
5. Store the patch as required.
The expression pedal setting is stored for that patch.
6. Select this patch in play mode, and operate the expression pedal.
The respective parameter changes when you operate the pedal (pushing the pedal down has the same effect as increasing the value of the parameter).
In the bypass condition, the expression pedal always functions as volume pedal, regardless of the setting made in step 4.
HINT
- The expression pedal operates also in edit mode.
- With the B1X, you can also use the [PEDAL ASSIGN] key on the top panel instead of the [RHYTHM] key and [VALUE] knob to select the module to be controlled by the pedal. For details, see page 26.
Effect Types and Parameters
Linking Effects
The patches of the B1/B1X consist of eight serially linked effect modules, as shown in the
illustration below. You can use all effect modules together or selectively set certain modules to on or off.
- Manufacturer names and product names mentioned in this listing are trademarks or registered trademarks of their respective owners. The names are used only to illustrate sonic characteristics and do not indicate any affiliation with ZOOM CORPORATION.
For some effect modules, you can select an effect type from several possible choices. For example, the MODULATION/DELAY module comprises Chorus, Flanger, and other effect types. The REVERB/DELAYmodule comprises Hall, Room, and other effect types from which you can choose one.
Explanation of symbols
- Module selector

The Module selector symbol shows the position of the knob at which this module/parameter is called up.
- Expression pedal

A pedal icon in the listing indicates a parameter that can be controlled with the built-in or an external expression pedal.
When this item is selected, the parameter in the module can then be controlled in real time with a connected expression pedal.
- Tap

A [TAP] icon in the listing indicates a parameter that can be set with the [BANK UP·TAP] key.
When the respective module/effect type is selected in edit mode and the [BANK UP·TAP] key is pressed repeatedly, the parameter (such as modulation rate or delay time) will be set according to the interval in which the key is pressed.
■PATCH LEVEL
| PATCH LEVEL (Prm) | |
| Determines the overall volume level of the patch. | |
| Sets the patch level in the range from 2 - 98, 1.0. A setting of 80 corresponds to unity gain (input level and output level are equal). |
COMP/LIMIT module
| This module comprises the effects that control the level dynamics such as compressor and limiter. | |
| COMP/LIMIT (Type&Prm) | |
| Selects the COMP/LIMIT module effect type and adjusts the effect intensity. | |
| Compressor | |
| This is a compressor which keeps the level within a certain range by attenuating high-level signals and boosting low-level signals. Higher setting values result in higher effect sensitivity. | |
| Limiter | |
| This is a limiter that suppresses signal peaks above a certain reference level. The right-digit value adjusts the limiter reference level. |
EFX (Effects) module
| This module comprises modulation effects such as tremolo and phaser. | |
| EFX (Type&Prm) | |
| Selects the EFX module effect type and adjusts the effect intensity. | |
| Auto Wah | |
| This effect varies wah in accordance with the input signal intensity. Higher setting values result in higher effect sensitivity. | |
| Resonance Filter | |
| This effect varies the frequency band of the resonance filter according to the input signal intensity. Higher setting values result in higher effect sensitivity. | |
| Octave | |
| This effect adds a one-octave lower component to the original sound. Higher setting values increase the level of the effect sound (one-octave lower sound). | |
| Tremolo | |
| This effect periodically varies the volume. Higher setting values result in faster modulation rate. | |
| Phaser | |
| This effect produces sound with a pulsating character. Higher setting values result in faster modulation rate. | |
| Ring Mod (Ring Modulator) | |
| This effect produces a metallic ringing sound. Higher setting values result in higher modulation frequency. | |
| Defret | Defret |
| This effect makes the sound of a fretted bass resemble that of a fretless bass. Higher setting values result in higher effect sensitivity. | |
| Slow Attack | Slow Attack |
| This effect reduces the attack rate of each individual note, producing a violin playing style sound. Higher setting values result in slower attack times. | |
| Pedal Vox | Pedal Vox |
| This effect simulates the half-open sound of a vintage Vox wah pedal. Higher setting values result in higher emphasized frequency. | |
■DRIVE module
This module includes 13 types of amp/stomp box modeling effects and a bass synthesizer. For this module, DRIVE (effect type), GAIN (parameter 1), and MIX (parameter 2) can be adjusted separately.
| DRIVE (Type) | |||
| Selects the effect type for the DRIVE module. | |||
| AMPEG | 56 | SUPER BASS | |
| Effect modeled on the sound of the ultimate rock bass amp, the Ampeg SVT. | Simulation of the Marshall Super Bass head amp that has made rock history. | ||
| SWR | 40 | ACOUSTIC | |
| Simulation of the SWR SM-900, famous for its hi-fi sound. | Effect modeled on the sound of the Acoustic 360 with its tight midrange. | ||
| BASSMAN | 40 | HARTKE | |
| Effect modeled on the sound of the Fender Bassman 100. | Simulation of the Hartke HA3500 famous for its aluminum cone. | ||
| TRACE ELLIOT | 40 | TUBE PRE | |
| Effect modeled on the sound of the Trace Elliot AH-500. | ZOOM original tube preamplifier sound. | ||
| SANSAMP | 45 | TS9 | |
| Simulation of the Sansamp Bass Driver DI, highly popular among bass players. | Simulation of the Tube Screamer used by many guitarists as a booster. | ||
| ODB-3 | 45 | MXR BASS DI | |
| Simulates the ODB-3 overdrive bass machine from Boss. | Simulates the MXR Bass D.I.+ distortion channel. | ||
| FUZZFACE | 45 | MONO SYN | |
| Simulation of the Fuzz Face that made rock history with its zany look and smashing sound. | This is a monophonic bass synthesizer (for single-note playing) that detects the pitch of the input signal. | ||
| GAIN (Prm1) | |
| Sets the DRIVE module parameter 1. The parameter type depends on the currently selected effect type. | |
| When distortion effect type is selected | |
| Gain | |
| Adjusts the gain (distortion depth). |
| When MONO SYN effect type is selected | |
| 51→55 | Variation |
| Allows selection of the oscillator waveform type and tone variation. Available settings are "s" (sawtooth), "p" (square), and "m" (PWM = pulse width modulation). | |
| GAIN DRIVE FREQUENCY | MIX (Prm2) |
| Sets the DRIVE module parameter 2. This parameter is the same for all effect types. | |
| Q→10 | Mix |
| Sets the mixing balance between the signal before the DRIVE module and the signal after passing the module. Higher setting values result in more drive sound. | |
- Manufacturer names and product names mentioned in this listing are trademarks or registered trademarks of their respective owners. The names are used only to illustrate sonic characteristics and do not indicate any affiliation with ZOOM CORPORATION.
EQ module
This is a 3-band equalizer. For this module, the three items EQ LO, EQ MID, and EQ HI can be adjusted separately.
| EQ LO (Prm) | EQ MID (Prm) | EQ HI (Prm) | ||
| Adjusts the LO band of the EQ module. | Adjusts the MID band of the EQ module. | Adjusts the HI band of the EQ module. | ||
| Lo | Mid | Hi | ||
| Adjusts the low range (70Hz) boost/ cut. | Adjusts the midrange (450 Hz) boost/cut. | Adjusts the high range (3 kHz) boost/ cut. | ||
■ZNR/AMP (ZNR/Amp Simulator) module
| This module combines two elements. ZNR is a noise reduction circuit developed by ZOOM which removes noise during play pauses without affecting sound quality. The amp simulator recreates the sound of speaker cabinets. | |
| ZNR/AMP (Type&Prm) | |
| Selects ZNR sensitivity and amp simulator type at the same time. | |
| ZNR (ZOOM Noise Reduction) | |
| This is the noise reduction function only. Higher setting values result in stronger effect. Set the value as high as possible without causing the sound to be cut off unnaturally. | |
| AMP&ZNR (Amp Simulator & ZNR) | |
| Combination of ZNR with bass amp cabinet simulator. The right-digit value controls ZNR sensitivity. |
■MODULATION/DELAY module
| This module comprises modulation and delay effects such as chorus, flanger, delay, etc. For this module, the two items MODULATION/DELAY (effect type & parameter 1) and RATE/TIME (parameter 2) can be set separately. | |||
| MODULATION/DELAY(Type&Prm1) | MODULATION/DELAY(Type&Prm1) | RATE/TIME (Prm2) | |
| Selects the MODULATION/DELAY module effect type and controls parameter 1 at the same time. | Sets the value of parameter 2 for the MODULATION/DELAY module. | ||
| Chorus | ←→50 | Rate | |
| This effect mixes a variable pitch-shifted component to the original signal, resulting in full-bodied resonating sound. Higher right-digit setting values result in higher effect sound level. | Adjusts the modulation rate. | ||
| Ensemble | ←→50 | ||
| This is a chorus ensemble with three-dimensional movement. Higher right-digit setting values result in higher effect sound level. | |||
| Flanger | ←→50 | Rate | |
| This effect produces a resonating and strongly undulating sound. Higher right-digit setting values emphasize the characteristics of the effect. | Adjusts the modulation rate. | ||
| Step | |||
| Special effect that changes the sound in a staircase pattern. Higher right-digit setting values emphasize the characteristics of the effect. | |||
| Mono Pitch | ←→-1 | Shift | |
| This is a monophonic pitch shifter (for single-note playing) with reduced flutter. Higher right-digit setting values increase the level of the effect sound. | ←→-1 | Sets the pitch shift amount in semitones. "dt" results in a detune effect. | |
| ←→-12 | |||
| ←→-12 | |||
| HPS (Harmonized Pitch Shifter) | ←,Co | Key | |
| This is an intelligent pitch shifter that automatically shifts the pitch of the original sound along a major scale, based on a preset key. Higher right-digit setting values increase the level of the effect sound. | ←,Co,d | ± | |
| ←,Co,E | ± | ||
| ←,Co,F | F,Co | G,Co | |
| ←,Co,R | R,Co | R,Co | |
| ←,Co,B | B,Co | B,Co | |
| Vibrato | RateTAP | |||
| This is an automatic vibrato effect. Higher right-digit setting values result in deeper vibrato. | Adjusts the modulation rate. | |||
| Pitch Bend | Pedal Position | |||
| This effect allows using the expression pedal to change the pitch in real time. Right-digit setting values select the pitch change type caused by the expression pedal (see Table 1). | Sets the initial value for the pitch shift amount (the value that is active when the pedal is at rest). The original sound/effect sound level balance also changes according to the parameter 1 setting (see Table 1). | |||
| [Table1] | ||||
| Type&Prm1 | Prm2=0 | Prm2=1.0 | Type&Prm1 | Prm2=0 |
| Pedal fully raised (minimum) | Pedal fully depressed (maximum) | Pedal fully raised (minimum) | ||
| b1 | 0 cent | +1 octave | b6 | -1 octave + original sound |
| b2 | 0 cent | +2 octaves | b7 | -700 cent + original sound |
| b3 | 0 cent | -100 cent | b8 | Doubling |
| b4 | 0 cent | -2 octaves | b9 | -∞(0Hz) + original sound |
| b5 | 0 cent | -∞ | ||
| Detune | Fine | |||
| By adding a slightly pitch-shifted harmonic component to the input signal, this effect produces a sound reminiscent of a 12-string guitar. Higher setting values increase the level of the effect sound. | Allows fine-tuning of pitch shift in 1/100 semitone units. | |||
| Delay | TimeTAP | |||
| This is a long delay with a maximum setting of 5000 ms. Higher right-digit setting values increase the level of the effect sound and the feedback amount. | Sets the delay time. In the 10 - 1000 millisecond range, the adjustment is performed in 10-ms steps (1 - 99,1.0). Above 1 second, the adjustment is performed in 100-ms steps (1.1 - 5.0). | |||
| Tape Echo | ||||
| This effect simulates a tape echo with a long delay time of up to 5000 ms. The right-digit setting values determine the level of the effect sound and the feedback amount. | ||||
REVERB/DELAY module
| This module contains effects that simulate various reverb sounds. For this module, the two items REVERB/DELAY and DECAY/TIME can be adjusted separately. | |||
| REVERB/Delay TYPE&Prm1) | Selects the REVERB/DELAY module effect type and controls parameter 1 at the same time. | REVERB/Delay TYPE&Prm1) | DECAY/TIME (Prm2) |
| Controls the value of parameter 2. | |||
| Delay | This is a delay with a maximum setting of 3000 ms. Higher right-digit setting values increase the level of the effect sound and the feedback amount. | Time | Time |
| Sets the delay time. In the 10 - 1000 millisecond range, the adjustment is performed in 10-ms steps (1 - 99,1.0). Above 1 second, the adjustment is performed in 100-ms steps (1.1 - 3.0). | |||
| Tape Echo | This effect simulates a tape echo with a long delay time of up to 3000 ms. The right-digit setting values determine the level of the effect sound and the feedback amount. | ||
| Analog Delay | This effect simulates an analog delay with a long delay time of up to 3000 ms. The right-digit setting values determine the level of the effect sound and the feedback amount. | ||
| Ping Pong Delay | This is a ping-pong type delay where the delay sound alternates between left and right. The right-digit setting values determine the level of the effect sound and the feedback amount. | ||
| Hall | This reverb effect simulates the acoustics of a concert hall. Higher right-digit setting values increase the level of the effect sound. | Decay | Adjusts the decay duration. |
| Room | This reverb effect simulates the acoustics of a room. Higher right-digit setting values increase the level of the effect sound. | ||
| Spring | This effect simulates a spring-type reverb. Higher right-digit setting values increase the level of the effect sound. | ||
B1/B1X Preset Pattern
| # | Pattern Name | TimSig | # | Pattern Name | TimSig | # | Pattern Name | TimSig |
| 1 | 8beat 1 | 4/4 | 15 | FUNK 1 | 4/4 | 29 | 5per4 2 | 5/4 |
| 2 | 8beat 2 | 4/4 | 16 | FUNK 2 | 4/4 | 30 | LATIN | 4/4 |
| 3 | 8beat 3 | 4/4 | 17 | HIPHOP | 4/4 | 31 | BALLAD 1 | 4/4 |
| 4 | 8shuffle | 4/4 | 18 | R'nR | 4/4 | 32 | BALLAD 2 | 3/4 |
| 5 | 16beat 1 | 4/4 | 19 | POP 1 | 4/4 | 33 | BLUES 1 | 4/4 |
| 6 | 16beat 2 | 4/4 | 20 | POP 2 | 4/4 | 34 | BLUES 2 | 3/4 |
| 7 | 16shuffle | 4/4 | 21 | POP 3 | 4/4 | 35 | JAZZ 1 | 4/4 |
| 8 | ROCK | 4/4 | 22 | DANCE 1 | 4/4 | 36 | JAZZ 2 | 3/4 |
| 9 | HARD | 4/4 | 23 | DANCE 2 | 4/4 | 37 | METRO 3 | 3/4 |
| 10 | METAL 1 | 4/4 | 24 | DANCE 3 | 4/4 | 38 | METRO 4 | 4/4 |
| 11 | METAL 2 | 4/4 | 25 | DANCE 4 | 4/4 | 39 | METRO 5 | 5/4 |
| 12 | THRASH | 4/4 | 26 | 3per4 | 3/4 | 40 | METRO | |
| 13 | PUNK | 4/4 | 27 | 6per8 | 3/4 | |||
| 14 | DnB | 4/4 | 28 | 5per4 1 | 5/4 |
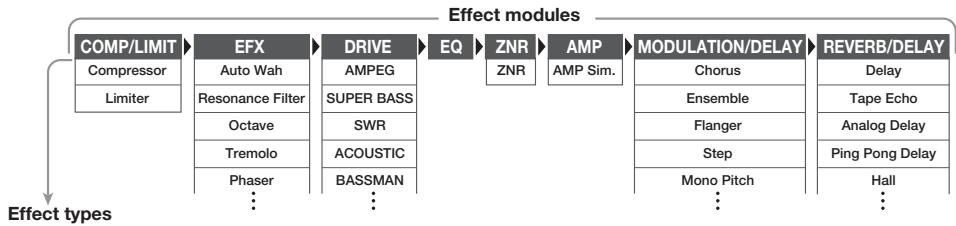
Restoring Factory Defaults
In the factory default condition, the patches of the user area (A0 - d9) of the B1/B1X contain the same settings as the patches of the preset area (00 - 39). Even after overwriting the user patches, their original content can be restored in a single operation ("All Initialize" function).
- Turn the B1/B1X on while holding down the [STORE] key.
The indication "AL" appears on the display.
All patch settings are returned to the factory default condition, and the unit switches to play mode. To cancel All Initialize, press the RHYTHM [▶/■] key instead of the [STORE] key.
NOTE
When you carry out All Initialize, any newly created patches that were stored in the user area will be deleted (overwritten). Perform this operation with care to prevent losing any patches that you want to keep.
Special Features of B1X
This section explains features and operating steps that are unique to the B1X.
[PEDAL ASSIGN] key operation
The top panel of the B1X has a [PEDAL ASSIGN] key. Besides the method described on page 17, the module to be controlled by the pedal can be selected with this key.
- In play mode or edit mode, press the [PEDAL ASSIGN] key to select the control target module.
The module currently selected as control target is indicated by the row of LEDs above the [PEDAL ASSIGN] key.
All out Off
VOLUME Volume
COMP COMP/LIMIT module
OWAH/EFX EFX module
DRIVE · · · · · · · DRIVE module
MODULATION · · MODULATION/DELAY module
REVERB · · · · · REVERB/DELAY module
![ZOOM B1 - [PEDAL ASSIGN] key operation - 1](/content/2025/01/152189/images/65ca0789ec6bb7ddfd68da7c8bd7d5b732fcc26446c8046b0a16e233d943ad08.jpg)
- Store the patch as required.
- In play mode, select the patch and operate the expression pedal.
The respective parameter changes in real time.
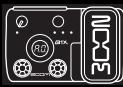
4. To toggle the module assigned to the pedal between on and off, briefly push the pedal fully down.
When the module is off, the respective LED above the [PEDAL ASSIGN] key flashes. This function can also be used in edit mode.
Adjusting the expression pedal
The expression pedal of the B1X can be readjusted as necessary. If the effect change seems insufficient when pushing the pedal down, or if the volume or tone changes excessively even when the pedal is only lightly pushed, adjust the pedal as follows.
- Hold down the [PEDAL ASSIGN] key while turning power to the B1X on.
The indication "dn" appears on the display. - Fully raise the expression pedal and press the [STORE] key.
The indication "UP" appears on the display. - Push the expression pedal fully down and release it.
Push strongly, so that pedal touches here

When foot is lifted, pedal returns slightly
- Press the [STORE] key once more.
The adjustment is complete, and the unit returns to the play mode. If the indication "Er" is shown, repeat the procedure from step 2.
Specifications
Effect types
Effect modules
Patch memory
46
max. 8 simultaneous modules
User area: 10 patches x 4 banks = 40
Preset area: 10 patches x 4 banks = 40
Total 80 patches
96 kHz
24 bit, 128 times oversampling
24 bit, 128 times oversampling
32 bit
20Hz - 40kHz + 1.0dB -4.0 dB (10-kilohm load)
Display
Input
Rated input level
Input impedance
Output
Maximum output level
2-digit 7-segment LED
Standard mono phone jack
-20 dBm
470 kilohms
Standard stereo phone jack (doubles as line/headphone jack)
Line +3dBm
(output load impedance of 10 kilohms or more)
Phones 20mW + 20mW (into 32-ohm load)
Control input
Power requirements
AC adapter
Batteries
For FP02/FP01 or FS01 (B1 only)
9 V DC, 300mA (center minus plug) (ZOOM AD-0006)
B1/B1X Four IEC R6 (size AA) batteries, approx. 12 hours continuous operation (alkaline batteries)
B1 350g (without batteries)
B1X 600g (without batteries)
Expression pedal FP01/FP02 or Foot switch FS01 (B1 only)
Troubleshooting
No power
Refer to "Turn power on" on page 6.
- RREVERB/DELAY module effect does not operate
While a rhythm pattern is playing, the REVERB/DELAY module effect is not available. Stop the rhythm pattern first ( p 11).
- Patches cannot be switched
Has the method for calling up patches been changed to "pre-select" ( p.16) ? Turn
power off and then on again to reset the unit to normal operation.
High level of noise
Is ZOOM AC adapter being used? Be sure to use only an adapter for 9V DC, 300mA with center minus plug (ZOOM AD-0006).
Battery life is short
Are manganese batteries being used? Continuous operation time is 12 hours with alkaline batteries.
The FCC regulation warning (for U.S.A.)
This equipment has been tested and found to comply with the limits for a Class B digital device, pursuant to Part 15 of the FCC Rules. These limits are designed to provide reasonable protection against harmful interference in a residential installation. This equipment generates, uses, and can radiate radio frequency energy and, if not installed and used in accordance with the instructions, may cause harmful interference to radio communications. However, there is no guarantee that interference will not occur in a particular installation. If this equipment does cause harmful interference to radio or television reception, which can be determined by turning the equipment off and on, the user is encouraged to try to correct the interference by one or more of the following measures:
- Reorient or relocate the receiving antenna.
- Increase the separation between the equipment and receiver.
- Connect the equipment into an outlet on a circuit different from that to which the receiver is connected.
- Consult the dealer or an experienced radio/TV technician for help.
Disposal of Old Electrical & Electronic Equipment (Applicable in European countries with separate collection systems)
This symbol on the product or on its packaging indicates that this product shall not be treated as household waste. Instead it shall be handed over to the applicable collection point for the recycling of electrical and electronic equipment. By ensuring this product is disposed of correctly, you will help prevent potential negative consequences for the environment and human health, which could otherwise be caused by inappropriate waste handling of this product. The recycling of materials will help to conserve natural resources. For more detailed information about recycling of this product, please contact your local city office, your household waste disposal service or the shop where you purchased the product.

ZOOM CORPORATION
ITOHPIA Iwamotocho 2chome Bldg. 2F, 2-11-2, Iwamoto-cho,
Chiyoda-ku, Tokyo 101-0032, Japan
Web Site: http://wwwzoomom.co.jp
BASS EFFECTS PEDAL B1/B1X Patch List
| No. | Patch name | Description | Main effect | Pedal setting | |
| DEMO | A0 | Rock Out | Versatile sound that fits almost any playing style. Modeled on the Fender Bassman 100 that is the realization of every bassist's dream. | BASSMAN | VOLUME |
| A1 | Groovy Ass Funk | Auto Wah lets you get into that seventies disco groove. Play funky bass lines in the style of the dance band Chic. | Auto Wah | AUTO WAH SENSE | |
| A2 | Punktrash | This patch gives you bass sound with just the right edge for punk. Sling your bass low and bolster your band's sound with driving phrases as in "I Wanna Be Sedated" by The Ramones. | TS9 | VOLUME | |
| A3 | Tapper's Delight | Old-style overdrive sound with many uses. Sometimes even a conservative bass player will want to let loose with some dramatically distorted solos. That's when this patch comes in handy. | ODB-3 | VOLUME | |
| A4 | Blow your speaker!! | Mighty octaver sound that will make your speakers wail. You can control the octave mixing ratio with the pedal. | Octave | OCTAVE MIX | |
| A5 | ENSEMBLE | This patch produces a wide, transparent bass sound using the Ensemble effect. Try it with moody solos and arpeggio phrases. | Ensemble | ENSEMBLE MIX | |
| A6 | Fretless Maximus | This simulation is great for playing a jazzy walking bass. Turn your instrument into a fretless bass at the flick of a switch. | Defret | VOLUME | |
| A7 | Syn Fifths | Synth bass sound mainly based on MONO SYN, with Resonance Filter and Mono Pitch thrown in for good measure. Choose it to play lead bass or to get that intense synthesizer sound. | MONO SYN | RESONANCE FILTER SENSE | |
| A8 | SLOW | Slow Attack sound which gives a bow playing effect. The pedal lets you freely adjust the rise time. | Slow Attack | SLOW ATTACK TIME | |
| A9 | Bass + Guitar | This Mono Pitch effect simulates unison playing of electric guitar and bass. Create great unison phrases even without a guitarist. | Mono Pitch | MONO PITCH MIX | |
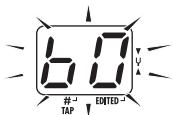
| MODEL | b0 | Big Bassman | Simulates the Fender Bassman 100 made famous by Paul McCartney. Use a Rickenbacker or violin bass and enjoy that special Beatles sound. | BASSMAN | VOLUME |
| b1 | SansAmp | Simulation of the Sansamp Bass Driver DI, highly popular among bass players. The tight and polished sound is ideal for recording. | SANSAMP | VOLUME | |
| b2 | Buzz Drive | Simulates the Fuzz Face famous for its unique look. The aggressive buzz sound will give your bass play that extra bite. | FUZZFACE | PITCH BEND PEDAL POSITION | |
| b3 | HARTKE | Simulation of Hartke HA3500 head amp combined with aluminum-cone cabinet 4.5XL. Note the characteristically transparent and responsive sound of aluminum. | HARTKE | VOLUME | |
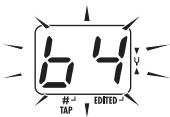
| b4 | SVT Saturation | This patch is modeled on the all-tube Ampeg SVT, known as the ultimate rock bass amp. The gutsy sound of tube saturation creates a solid bottom end. | AMPEG | VOLUME | |
| b5 | Dirty Job | Simulation of the MXR Bass D.I.+ distortion channel, great for playing dirty solos. By moving the pedal, you can control the Delay mix. | MXR BASS DI | DELAY MIX | |
| b6 | TUBE | Simulates a high-class tube preamp such as used in recording studios. The fat and creamy sound suits every genre. | TUBE PRE | VOLUME | |
| b7 | Drivin' Over | Simulation of the Boss Overdrive ODB-3 for bass guitar. Combination with the Phaser effect results in a brisk and pleasing drive sound. | ODB-3 | PHASER RATE | |
| b8 | True Grit | Simulates the combination of the Acoustic 360 head amp and 301 cabinet. Subdued high range and firm midrange produce an appealing vintage style tone. | ACOUSTIC | VOLUME | |
| b9 | SWR | Simulates the SWR sound as produced by the SM-900 head amp together with the Goliath cabinet. Rich low end and sharp highs are great for slap playing. | SWR | VOLUME | |
| ARTIST | C0 | Jaco | The bass sound of Jaco Pastorius with strong chorus. Place your finger on the rear pickup of a Jazz Bass and try out those cool phrases from "Three Views Of A Secret." | Chorus | ROOM MIX |
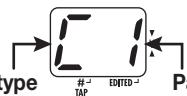
| C1 | Tribute | This patch is inspired by the legendary Motown bass player James Jamerson. Every fan of sixties Motown sound will be thrilled. | AMPEG | VOLUME | |
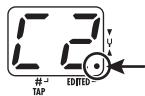
| C2 | Chili Wah | Rock sound with Auto Wah as used by Flea of the Red Hot Chili Peppers. Try some flashy slap play and turn up the volume. | Auto Wah | AUTO WAH SENSE | |
| C3 | Victor Wooten | Simulates the sound of that ultimate bass virtuoso, Victor Wooten, as heard on his first album "Show of hands." Select this and explore the boundaries of the bass universe. | Room | ROOM MIX | |
| C4 | Billy Sheehan | The distorted bass sound used for solos by Mr.Big bassist Billy Sheehan is programmed into this patch. When not using the patch for a solo, you can adjust the mixing balance between original sound and distortion with the pedal. | ODB-3 | DRIVE BALANCE | |
| C5 | Stanley Clarke | Sound in the style of Stanley Clarke who plays electric and acoustic bass with equal finesse. Brush up on your jazz sense. | TUBE PRE | VOLUME | |
| C6 | Will Lee | Simulates the sound of one of New York's top session bass players, Will Lee. The fat tone has a strong fusion character. Combination with Detune produces an expansive sound with moderate amounts of modulation. | Detune | DETUNE MIX | |
| C7 | Tony Levin | Famous for his work with King Crimson, Tony Levin played the kind of tricky inventive phrases that are the hallmark of progressive rock. This patch produces just the right tone for this kind of play. | Defret | VOLUME | |
| C8 | Geezer | Simulates the sound of bassist Geezer Butler as heard on seminal Black Sabbath hits such as "Electric Funeral" and "N.I.B." | Room | DRIVE BALANCE | |
| C9 | Mr. Bruce | Rediscover the sound created by Cream bassist Jack Bruce on "Badge" and "Sunshine of Your Love." | SUPER BASS | VOLUME | |
| VARIATION | d0 | Big Bottom Rez | Great patch for playing those pumping Reggae phrases. The tone is also suitable for groovy bass lines using the Resonance Filter. | Auto Wah | VOLUME |
| d1 | Attack from Mars! | Mysterious, space-like sound using the Step effect. Startle your audience with this effective patch to create a special moment. | Step | STEP RATE | |
| d2 | HEAVY COMP | Clean sound with strong compression. Provides a sharply etched attack but keeps the volume even when playing slap phrases. | Compressor | VOLUME | |
| d3 | Happy disaster | HPS (Harmonized Pitch Shifter) sound. G major scale harmonies bring the bass clearly to the foreground. The pedal serves to adjust the HPS mix. | HPS | HPS MIX | |
| d4 | HornSolo | Unique sound imitating a muted trumpet. Great to grab the listener's attention. Controlling the volume with the pedal further enhances the realism. | Resonance Filter | VOLUME | |
| d5 | Aguabass | Combination of Auto Wah and Delay. Adjust the Delay mix with the pedal and change the ambient feeling while playing. This adds a twist to slap and finger playing. | Delay | DELAY MIX | |
| d6 | Vibe | Vibrato creates a beautiful tone that is well matched to phrases with long held notes. | Vibrato | VOLUME | |
| d7 | Phased | Synth bass sound defined by a slight Phaser component. Suitable for lead bass and obtaining intense synth sound during a live performance. | MONO SYN | PHASER RATE | |
| d8 | Dark Octave | Octave sound that can be used for lead solo. Lets you create an earth-shaking bass sound that will hold its own even against a down-tuned guitar. | Octave | OCTAVE MIX | |
| d9 | Dreamscape | Combination of Flanger and Delay results in a dreamy sound that tends to linger on. An excellent choice for melodious solo phrases and intros. | Flanger | DELAY MIX |
- The preset area of banks 0 - 3 contains the same patches as A - d.
- The ZNR value may need to be adjusted depending on the bass guitar and amplifier.
Manufacturer names and product names mentioned in this patch list are trademarks or registered trademarks of their respective owners and do not indicate any affiliation with ZOOM CORPORATION. All product and artist names are intended only to illustrate sonic characteristics that were used as reference in the development of this product.
- Contents
- SAFETY PRECAUTIONS / Usage Precautions
- SAFETY PRECAUTIONS
- Power requirements
- [AC adapter operation]
- [Battery operation]
- Environment
- Handling
- Connecting cables and input and output jacks
- Alterations
- Volume
- Usage Precautions
- Electrical interference
- Cleaning
- Terms Used in This Manual
- IN → COMP/LIMIT → EFX → DRIVE → EQ → ZNR → AMP → MODULATION/DELAY → REVERB/DELAY → OUT
- ■ Effect module
- ■ Effect type
- ■ Effect parameter
- Patch
- ■ Bank and area
- Mode
- Operating the B1/B1X on batteries
- Controls and Functions / Connections
- Module selector
- RHYTHM [▶/■] key
- Display
- [VALUE] knob
- Expression pedal (B1X only)
- [STORE] key
- [PEDAL ASSIGN] key (B1X only)
- [BANK UP·TAP] key
- [▼]/[▲] foot switches
- [INPUT] jack
- Differences between B1X and B1
- [OUTPUT/PHONES] jack
- [DC IN] jack
- [CONTROL IN] jack (B1 only)
- Selecting a Patch
- Turn power on
- Set the B1/B1X to play mode
- Adjust the master level
- Select a patch
- Directly selecting a bank
- Using the Tuner
- Switch to bypass or mute
- Patch change at bypass/mute
- Tune your instrument
- Adjusting the reference pitch of the tuner
- Return to play mode
- Using the Rhythm Function
- Select rhythm mode
- HINT
- 2
- Start the rhythm function
- NOTE
- 3
- Select a rhythm pattern
- Adjust the rhythm volume
- Adjust the tempo
- Stop the rhythm
- Editing a Patch
- Select the effect module/ parameter
- Change the setting
- To switch an effect module on and off
- Terminate the edit mode
- Storing/Copying Patches
- In play mode or edit mode, press the [STORE] key.
- Select the store/copy target bank
- To cancel the store process
- 4
- Press the [STORE] key once more
- Specify the store/copy target patch number
- Changing the Way Patches Are Called Up
- Turn power to the B1/B1X on while holding down the [▲] foot switch.
- In play mode, use the [] / [] foot switches to specify the patch to use next.
- When you have specified the patch to use, press both [ ] / [ ] foot switches together.
- To return the B1/B1X to the normal patch selection method, simply turn power off and then on again.
- Using a Foot Switch or Pedal
- Using the foot switch (FS01) (B1 only)
- Play mode
- Rhythm mode
- Edit mode
- Using the expression pedal
- Store the patch as required.
- Select this patch in play mode, and operate the expression pedal.
- Effect Types and Parameters
- Linking Effects
- Explanation of symbols
- - Module selector
- - Expression pedal
- - Tap
- ■DRIVE module
- EQ module
- ■ZNR/AMP (ZNR/Amp Simulator) module
- Restoring Factory Defaults
- Special Features of B1X
- [PEDAL ASSIGN] key operation
- Adjusting the expression pedal
- Specifications
- Troubleshooting
- The FCC regulation warning (for U.S.A.)
- Disposal of Old Electrical & Electronic Equipment (Applicable in European countries with separate collection systems)
- ZOOM CORPORATION
- BASS EFFECTS PEDAL B1/B1X Patch List
Brand : ZOOM
Model : B1
Category : Guitar effects pedalboard