PEBH 780 - Drill PARKSIDE - Free user manual and instructions
Find the device manual for free PEBH 780 PARKSIDE in PDF.

User questions about PEBH 780 PARKSIDE
0 question about this device. Answer the ones you know or ask your own.
Ask a new question about this device
Download the instructions for your Drill in PDF format for free! Find your manual PEBH 780 - PARKSIDE and take your electronic device back in hand. On this page are published all the documents necessary for the use of your device. PEBH 780 by PARKSIDE.
USER MANUAL PEBH 780 PARKSIDE
Operating and safety instructions
PERCEUSE
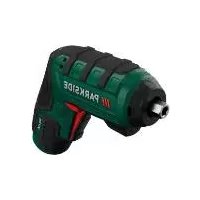
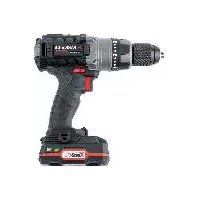
PEBH 780 rotary percussion drill for chiselling, hammering, drilling and screwing
Dear Customer,
We are delighted that you have decided to purchase our high quality PEBH 780 rotary percussion drill. Please make sure you familiarise yourself fully with the way the equipment works before you use it for the first time and that you understand how to handle electrical power tools correctly. Please read the operating instructions below and the accompanying safety advice carefully. Use the equipment only as described and for the indicated purposes. By doing this you will be able to work in complete safety and produce better results. We hope you enjoy using your drill.
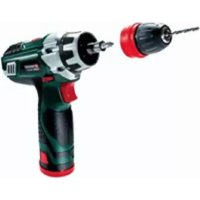
FEATURES OF THE PEBH 780
① Chuck
② Locking/unlocking cap
③ Depth stop
④ Function selector
(5) Ventilation slots
(6) ON/OFF trigger
⑦ Speed control wheel
⑧ Forward/reverse selector
Trigger lock button
10 Auxiliary side handle
TECHNICAL INFORMATION
Nominal power:
Nominal voltage:
No load speed:
Blows per minute max.:
Max. hole diameter:
780W
230V 50Hz
n00-1.100/min
0-5.800/min
24 mm in concrete
13 mm in steel
30 mm in wood
Protection class:
Gewicht:

3.3 kg
Sound pressure level:
Sound power level:
Vibration:
Lp = 99.6 dB(A)
LW = 112.6 ~dB(A)
8.5m/s²

Wear ear defenders!
IMPORTANT SAFETY ADVICE
To be read in conjunction with the advice in the accompanying booklet on safety before using for the first time.
To avoid causing damage and danger to life, before starting work check the surface you are about to drill (e.g. by using a metal detector/loca tor) for electrical cables, gas and water pipes.
On safety grounds, always use two hands when using the drill and keep a proper footing and balance. Make sure you always use the auxiliary side handle (10) whilst operating the drill.
Look after your health: Wear ear defenders - also wear safety glasses and a breathing /dust mask.
Always keep the power cable well out of the working area and fed to the rear of the machine.
The drill is not to be operated by persons under 16 years old.
AREA OF USE
The PEBH 780 rotary percussion drill can be used successfully for light chiselling work. The drill can also be used for rotary percussion drilling in brick, concrete, and natural stone as well as for breaking off plaster or rendering. The area of use of the drill also includes drilling holes in wood, plastic and metal, and its use as a screwdriver.
OPERATION
Take note of the mains voltage. The voltage must agree with that shown on the identification plate (equipment shown as 230V can also be used with 220V ).
SWITCHING ON AND OFF
Whilst operating the drill you can select between instantaneous and continuous operation. For short periods of operation choose the instantaneous mode and for longer periods of operation choose the continuous mode. This is how to operate the drill at your chosen setting:
INSTANTANEOUS OPERATION ON: Press ON/OFF ⑥ trigger
INSTANTANEOUS OPERATION OFF: Release ON/OFF ⑥ trigger
CONTINUOUS OPERATION ON: Press ON/OFF ⑥ trigger and lock in position with the trigger lock button ⑨
CONTINUOUS OPERATION ON: Press ON/OFF ⑥ trigger once more and release.
INSERTING / REMOVING TOOLS
INSERTING TOOL
Before inserting the tool, lightly grease the chuck and clean if necessary. To insert pull the locking/unlocking cap ② backwards and insert the tool. You should be able to hear clearly the tool engaging if it has been inserted correctly. Releasing the locking/unlocking cap ② locks the mechanism. Check by pulling the tool that it is correctly locked. The device is designed so that tool has a certain amount of radial and axial play. The centring takes place automatically once the motor is started.
REMOVING TOOL
To remove the tool, pull the locking/unlocking cap ② backwards again and remove the tool.
ADDITIONAL CHUCK FOR STRAIGHT SHANK DRILL BITS
INSTALLING ADDITIONAL CHUCK FOR STRAIGHT SHANK DRILL BITS
To install the additional chuck for straight shank drill bits (see Fig. ⑪), pull the locking/unlocking cap ② backwards and insert the additional chuck. You should be able to hear clearly the additional chuck engaging if it has been inserted correctly. Releasing the locking/unlocking cap ② locks the mechanism. Check by pulling the tool that it has correctly locked.
REMOVING ADDITIONAL CHUCK FOR STRAIGHT SHANK DRILL BITS
To remove the additional chuck, pull the locking/unlocking cap ② backwards again and remove the additional chuck.
SELECT FUNCTION
WARNING! Only use / set the function selector ④ after the motor has reached a standstill.
You can set the function selector ④ to the symbol appropriate to the area of use. There are three function settings as follows:
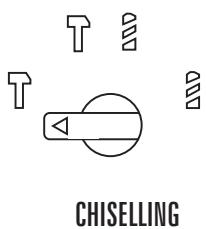
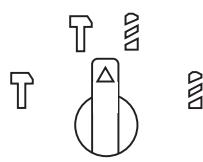
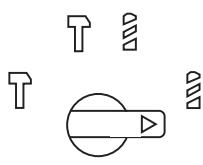
ROTARY PERCUSSION DRILLING DRILLING / SCREWING
SELECT DIRECTION OF ROTATION
WARNING! Only use / set the forward / reverse selector (8) after the motor has reached a standstill.
Note: The maximum speed for heavy work is only available in forward mode. The drill always works at a lower speed in reverse mode.
PRESELECT SPEED
WARNING! Only use / set the speed control wheel ⑦ after the motor has reached a standstill.
You can use the speed control wheel ⑦ to preselect the operating speed to the exact value appropriate to your work. It is infinitely variable. This means you can easily and conveniently drill into e.g. smooth surfaces such as tiles etc. In addition, it allows you to avoid the drill bit slip ping and breaking material out around the hole whilst drilling.
Note: If you select a low speed, this means the ON / OFF trigger (6) will only press in a limited amount (as a result of the reduced speed pre selected). If you need the maximum power for your work, use the highest preselected speed (turn speed control wheel (▼)).
LOW (-) SPEED: HOHE (+) DREHZAHL:
turn the speed control wheel ⑦ up () turn the speed control wheel ⑦ down ()
USING THE AUXILIARY HANDLE
Warning! On safety grounds, make sure you always use the auxiliary side handle ⑩ whilst operating the PEBH rotary percussion drill. You can alter the position of the auxiliary side handle ⑩ by loosening the wingnut and swivelling the handle. The handle can be engaged in various positions. Tighten the wingnut again.
Recommendation: Set the handle in the horizontal position (at 90^ to the drill body). This will provide you with a safe position and one in which you can operate the drill without becoming tired.
SAFETYCLUTCH
For your safety, the PEBH 780 rotary percussion drill is fitted with a safety clutch. This has the effect that when the drilling tool becomes trapped the drive is automatically interrupted. This means you can work more safely. However, you should always seek to keep a proper footing and balance, hold the drill with two hands and always use the auxiliary side handle ⑩ .
DEPTH STOP
Use the depth stop ③ to set the drilling depth to produce a hole of the exact depth required.
Simply loosen the wingnut and set the depth stop ③ using the scale, before tightening the wingnut again.
MAINTENANCE OF YOUR ROTARY PERCUSSION DRILL
Before doing any work on the drill, always pull out the plug.
- Clean the drill regularly. For the best results do this straight after the work has been completed.
- Do not allow liquids to get inside the drill. Use a soft cloth for cleaning the housing. Do not use petrol, solvents or cleaners that might attack the plastic.
- Air vents ⑤ must always be clear and clean.
Further practical tips for power tools can be found in the accompanying booklet on safety advice.
We reserve the right to make technical modifications in the course of further development.
STATEMENT OF CONFORMITY
We. Kompernaß Handelsgesellschaft mbH, Burgstr. 21, D-44867 Bochum, Germany, hereby declare
that this product conforms with the following EC regulations:
EC machine guideline:
EC low voltage regulations:
Electromagnetic compatibility:
Applicable harmonised standards:
(89/392 EEG), (91/368 EEG), (93/44 EEG), (93/68 EEG)
(73/23/EEG), (93/68 EEG)
(89/336 EEG), (92/31 EEG), (93/68 EEG)
EN 50144-1:1998, EN 50144-2-6:1996, EN 55014-1:1993 +A1 +A2
EN 61000-3-2:1995 + A1 + A2, EN 61000-3-3:1995, EN 55014-2:1997
Manufacturer:
Model type:
Description:
Bochum, 01.04.2002
PARKSIDE
PEBH780
ROTARY PERCUSSION DRILL

Hans Kompenaß
- Managing Director -
PARKSIDE
PERCEUSE PEBH 780
Ciseler, marteler, percer et visser
DOMAIN D'APPLICATION
Kamyopia npooTaiaic; II
Bapoc: 3,3 kg
Pntote to diakotm ENTOE/EKTO ⑥
Aptote eLaeBepo to diakotm ENTOE/EKTO ⑥
Pntote to diakotm ENTOE/EKTO ⑥ ka
otaBepoonote tov me To koupi aaoaiaionc ⑨
Pntote kai apote eLaeBepo to diakotn
ENTOZ/EKTOE ⑥.
TOnOeTHsH /AΦAIPEsH E3APTHMATΩN
TONOETHsE3APTHMATΩN
Piv tv tonohtonan mavete eapwca ka kabapote tv kepaan diatpnnc. TpaBnTe npoc ta nioa to kaluma aopalaion / anaopalaionc 2kai tonoetme to eApma. H wotn tonoetmoyivea at vnttnptne to xapakntiptoiko yxaykwatoc. Aynovtac eueeepo to kaluma aopalaion / anaaopalaionc 2n tonohtom ooknpweetai. EeyEeTm owotn tonoetnonpawctao tEAptnma npoc ta EEw. Aoyw tsns quongoumtao c to eapntma napouaieia aktivwnt kn aovikn anoklion. To kevtpapiqa tou npayatonoieitai autouata me ta evepytonoioun tou kivtnpa.
AΦAIPE∑H EEAPTHMATΩN
TnV aapieoTou EapntmuoTpaBnEeEionTo KaLmua aopalion / anopalion 2 npoc ta niaw kai apapeoTe to eaptnma.
IPOENIIAORH APIOMOY ΣTPOΦΩN

Ppoooh! H xonpaonoin /puoTou puouotkoTpoiaokou eiloync stpov 7 eipertetai movov otav to epyalioiv aevpyoioevo.