
CK3100 LCD - Bluetooth hands-free kit PARROT - Free user manual and instructions
Find the device manual for free CK3100 LCD PARROT in PDF.
User questions about CK3100 LCD PARROT
0 question about this device. Answer the ones you know or ask your own.
Ask a new question about this device
Download the instructions for your Bluetooth hands-free kit in PDF format for free! Find your manual CK3100 LCD - PARROT and take your electronic device back in hand. On this page are published all the documents necessary for the use of your device. CK3100 LCD by PARROT.
USER MANUAL CK3100 LCD PARROT
Steering wheel mounted control Parrot MULTICOMM
For Parrot Bluetooth®
CK3000 EVOLUTION
CK3100 LCD
hands-free car kits
User Guide

Parrot

Bluetooth
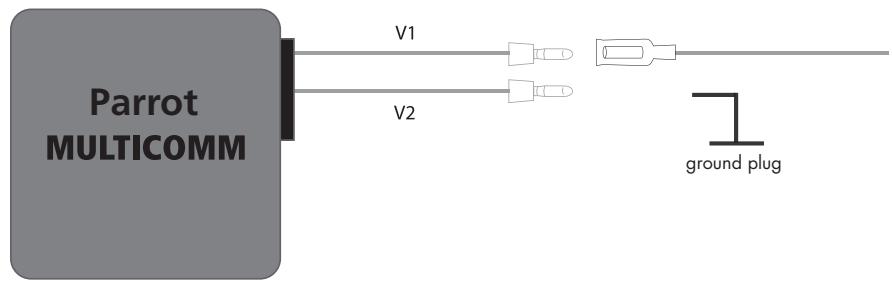
Parrot MULTICOMM
- English. 3
- Français. 21
- Espanol 39
Italiano 57 - Deutsch 75

CONTENTS
Introduction 5
Kit contents 5
Fitting 5
Vehicle specific fitting procedure 8
First time use 17
Features 17
Checking the wiring 19
Hotline 20
Notes 20
INTRODUCTION
The Bluetooth® wireless technology enables voice and data to be sent via a short-distance radiolink. It allows several electronic devices to communicate with each other, particularly phones and hands-free kits.
Parrot draws on its long years of experience in the Bluetooth technology and signal processing to offer you innovative hands-free kits.
Thank you for purchasing this steering wheel control interface designed for the Parrot CK3100 LCD or Parrot CK3000 EVOLUTION hands-free kits.
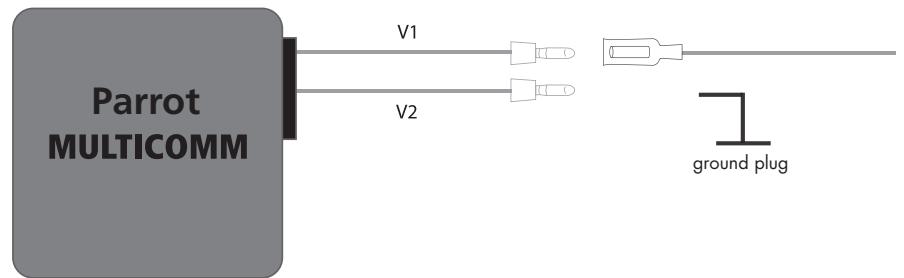
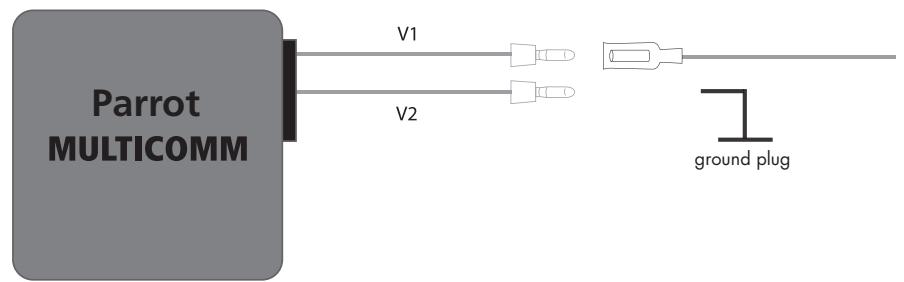
The Parrot MULTICOMM interface enables you to connect your vehicle's steering wheel controls SWC to your Parrot hands-free kit. With this interface, you will be able to make phone calls via the steering wheel controls while keeping your hands on the wheel.
KIT CONTENTS
-
Installation cables
-
Power supply cable for the interface
- Parrot CK3000 EVOLUTION control keypad adapter (Parrot CK3000 EVOLUTION version only)
- Parrot CK3100 LCD screen adapter (Parrot CK3100 LCD version only)
-
Bullet terminal female
-
Instruction for use
FITTING
This fitting guide only describes the procedure for fitting the Parrot MULTICOMM steering wheel control interface. Do not hesitate to refer to the directions for use supplied with your hands-free kit for further information on the fitting procedure. We would advise our customers to have the interface fitted by a professional.
Note : In the rest of this guide, the abbreviation «SWC» will be used to replace the term «steering wheel controls».
Fitting the Steering Wheel Control (SWC) Interface:
Supply:
The power supply for the Parrot MULTICOMM interface is taken from the power cable of the Parrot hands-free kit.
Depending on the model of your Hands free car kit, the red and yellow wire from the interface power cable shall be connected to:
- The orange wire from the interface power cable, if you have a Parrot CK3000 EVOLUTION.
-
The red wire from the interface power cable, if you have a Parrot CK3100 LCD.
-
The black wire is for ground
- The yellow wire corresponds to the Parrot mute output
On some vehicles, the 12V power wires may be reversed, in which case you must reverse the red and orange wires of the hands-free kit's power supply. This can easily be done by reversing the two fuse holders on the kit's power cable.
Ensure that the orange wire is used for the ignition +12V. Otherwise, you might run down the vehicle's battery. In this case, you must therefore connect the orange power wire to the fuse box or another ignition power source.
Mute:
Once the call is in progress, the Mute function will mute the car radio and your audio system amplify voice your communication through car speakers.
The yellow wire of the Parrot MULTICOMM interface should be connected to the yellow Mute wire of the Parrot hands-free kit and to the Mute input of your car stereo (if your car stereo features a mute input).
If the car stereo features a mute input, connect the yellow wire of the kit's cable to the car stereo's mute input. Check the position of your car stereo's mute input before connecting the yellow wire. If necessary, test the three possible inputs and then select the one corresponding to the mute input.
- Car stereo with ISO connectors:
Remove the audio and power ISO connectors from your car stereo and plug the male ISO connectors of the hands-free kit into the car stereo. Connect the vehicle's audio and power ISO connectors to the female ISO connectors of your hands-free kit.
- Car stereo without ISO connectors:
If your car stereo does not feature ISO connectors, an ISO adapter cable can be used to simplify the installation of your hands-free kit and your steering wheel control interface. The ISO adapter can then be used to connect your hands-free kit by adapting to your vehicle's specific connections.
You will find a list of adapter cables on our website at www.parrot.com for simplifying the installation procedure.
- Protocol communication
The protocol communication of your SWC is managed via a wire which have a variable electric voltage. This wire allows you to enjoy the features of your Hands Free car kit by using the command buttons of your SWC. It is important to follow the instructions on the "VEHICLE SPECIFIC FITTING PROCEDURE" in order to comply with the wiring communication protocol.
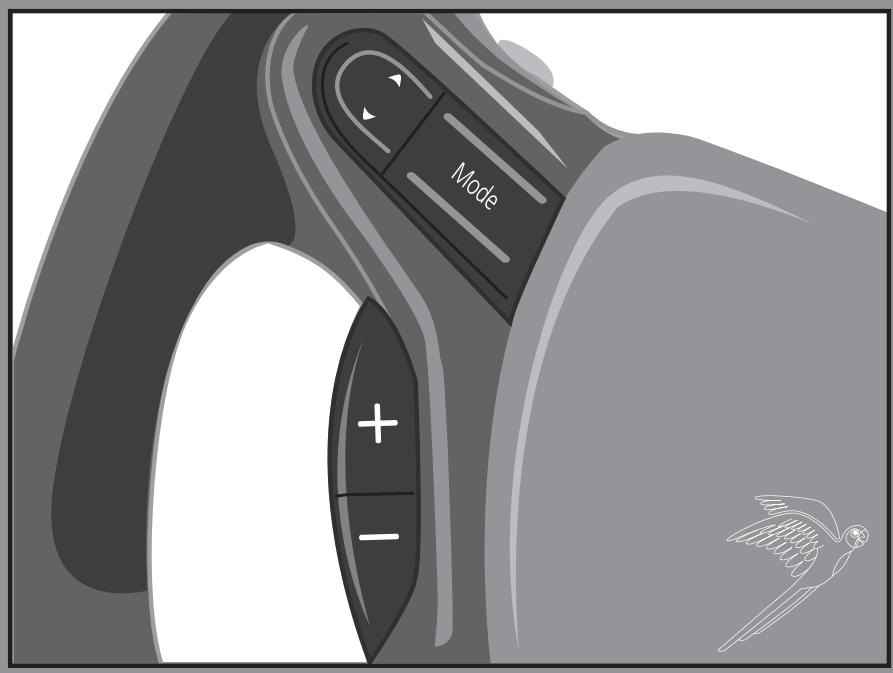
Parrot CK3000 EVOLUTION
① Connect the power cable of the Parrot MULTICOMM interface to the 14-way connector of the SWC unit.
② Join the connector of the kit's control keypad to the connector on the interface's power cable.
③ Connect the Parrot MULTICOMM interface's power cable of the hands-free kit.
A: connect the orange wire from the car kit power cable to the yellow/red power cable of the interface.
4 Connect the yellow mute wire
of the Parrot MULTICOMM interface:
- To the Parrot yellow mute wire
- And to the car stereo's mute input if applicable
⑤ Refer to the chapter entitled «Vehicle
Specific Fitting Procedure》 to correctly connect the communication protocol.
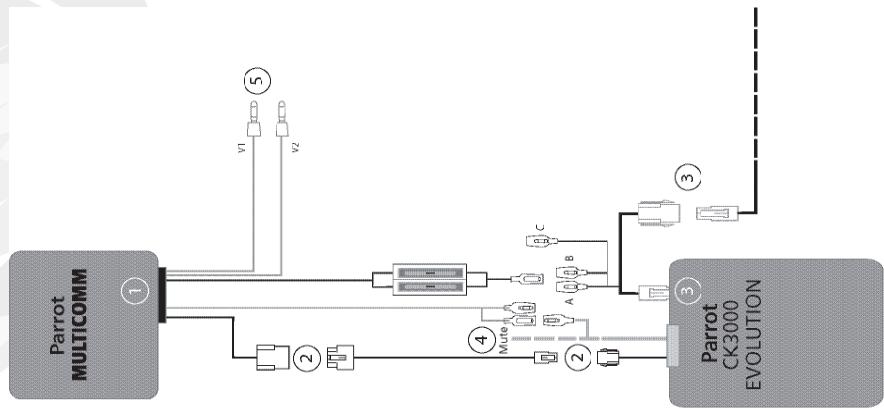
① Connect the power cable of the Parrot MULTICOMM interface to the 14-way connector of the SWC unit.
② Join the connector of the kit's control keypad to the connector on the interface's power cable.
③ Connect the Parrot MULTICOMM interface's power cable of the hands-free kit. B: Connect the red wire from the car kit power cable to the yellow/red power wire of the interface, power cable.
4 Connect the yellow mute wire of the Parrot MULTICOMM interface: -To the Parrot yellow mute wire -And to the car stereo's mute input if applicable
Refer to the chapter entitled «VehicleSpecific Fitting Procedure» to correctly connect the communication protocol.
VEHICLE SPECIFIC FITTING PROCEDURE
Important:
The wires corresponding to the protocol communication must be connected correctly to your car stereo's information. It is important to follow the wiring diagram for your vehicle.
We would strongly advise our customers to have the interface fitted by a professional.
Our www. parrot. com website contains a complete, up-to-date-base of wiring diagrams for all Parrot products, specifically covering every brand and model.
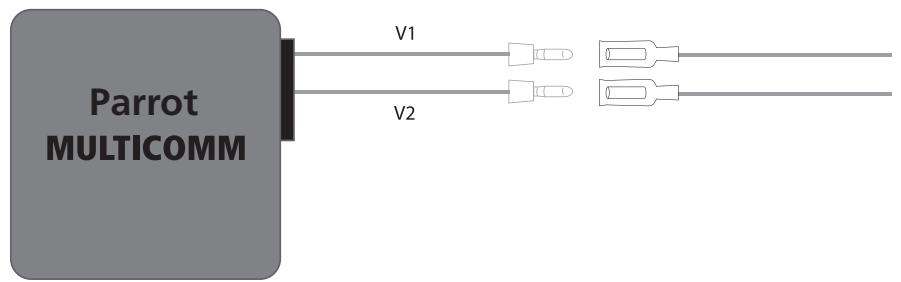
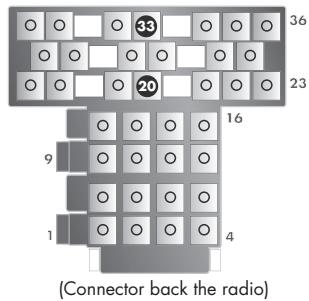
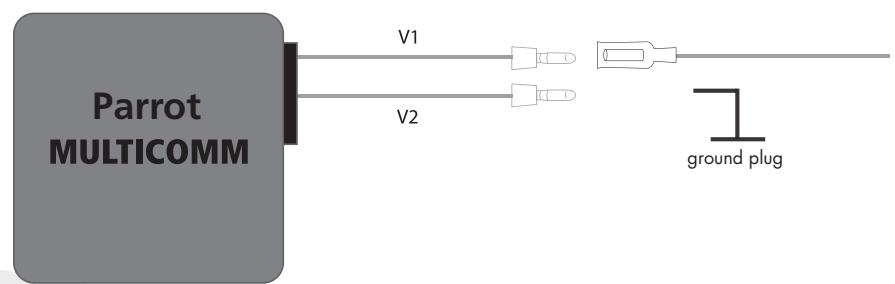
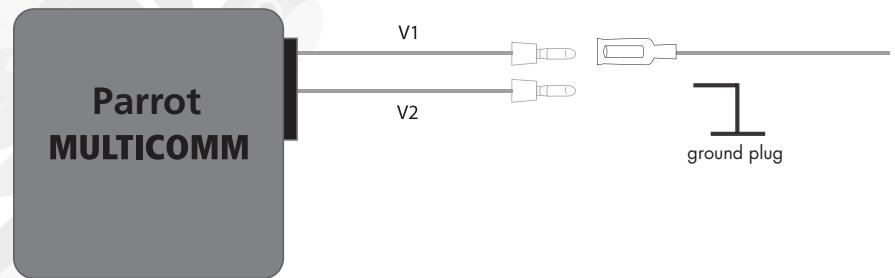
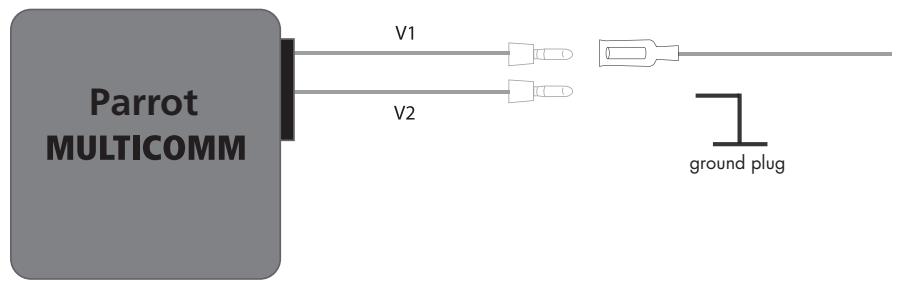
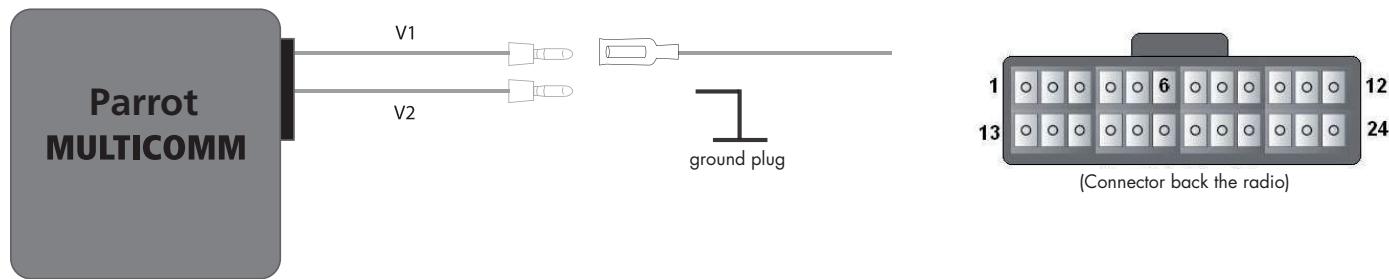
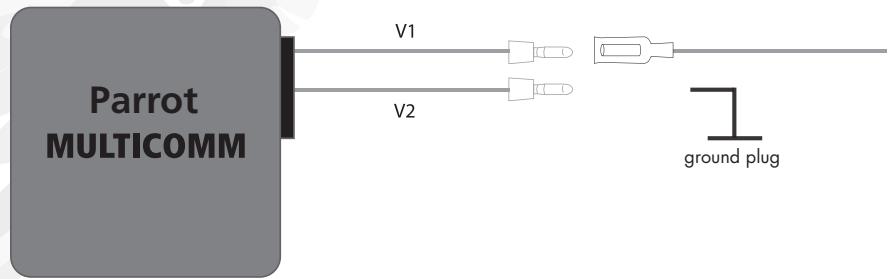
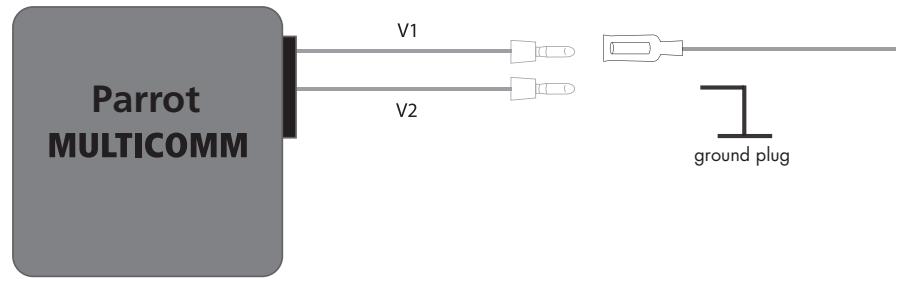
Note : Bullet terminal female are supplied with the Parrot MULTICOMM interface to simplify the installation of the dedicated communication protocol wires.
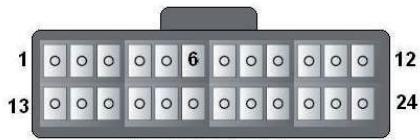
ALFA ROMEO
A- ALFA 147 - 156 (>2004) protocol communication configuration.
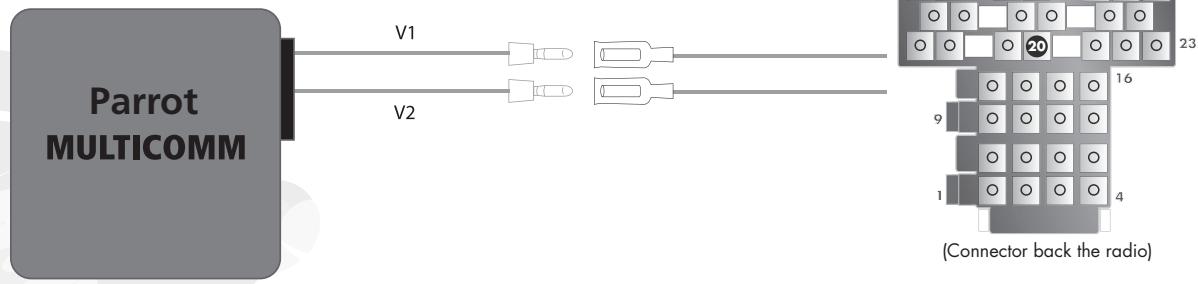
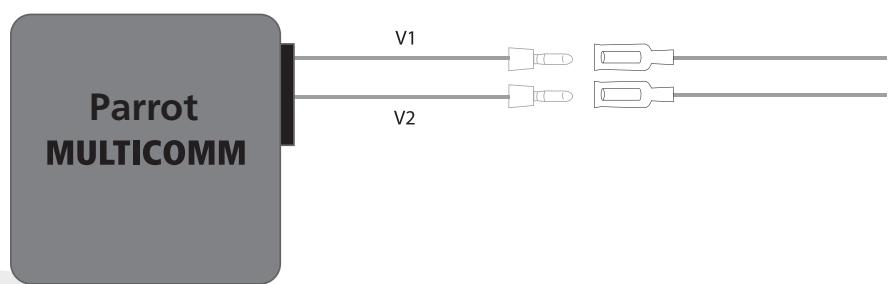
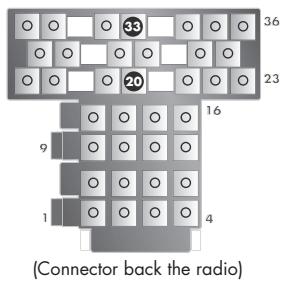
- Connect the purple wire corresponding to V1 resistive information to pin33
- Connect the white wire corresponding to V2 resistive information to pin 20
FIAT FITTING
A. Multipla (>2006), Ducato(>2006) & Panda (> 2005) protocol communication configuration
- Connect the purple wire corresponding to V1 resistive information to pin33.
- Connect the white wire corresponding to V2 resistive information to pin 20.
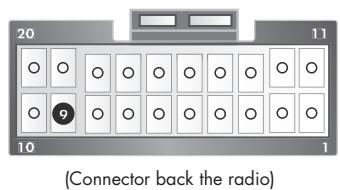
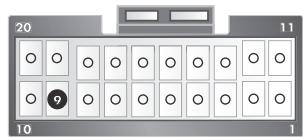
B- FIAT 16 protocol communication configuration

- Connect the purple wire corresponding to V1 resistive information to pin 9.
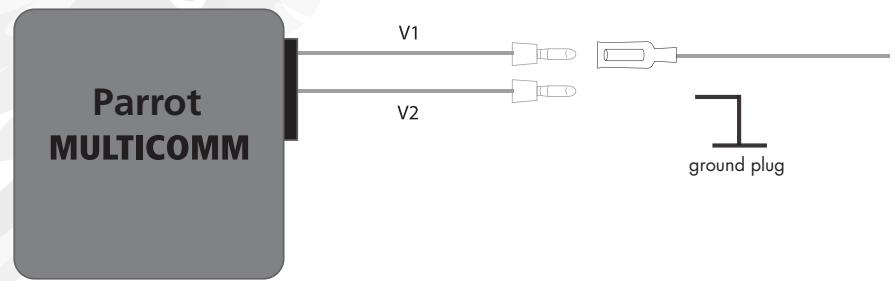
- Connect the white wire corresponding to V2 to the ground plug.
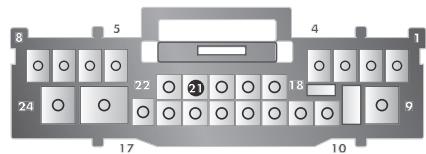
A-FORD Fiesta & FORD Focus (< 2005) protocol communication configuration.

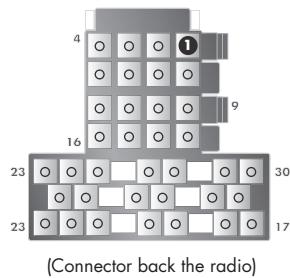
- Connect the purple wire corresponding to V1 resistive information to pin 19
- Connect the white wire corresponding to V2 to the ground plug.
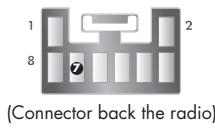
B-FORD Focus (>2005) /FORD Fiesta (>2005) /FORD GALAXY (>2005) /FORD C-Max/FORD S-Max protocol communication configuration.
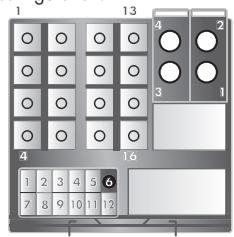
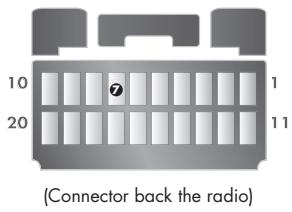
(Connector back the radio)
- Connect the purple wire corresponding to V1 resistive information to pin 6
- Connect the white wire corresponding to V2 to the ground plug.
HONDA
A-HONDA Civic (>2006) protocol communication configuration
- Connect the purple wire corresponding to V1 resistive information to pin 14
- Connect the white wire corresponding to V2 to the ground plug
(Connector back the radio)
HYUNDAI
A-Hyundai SANTA FE protocol communication configuration
- Connect the purple wire corresponding to V1 resistive information to pin 6
- Connect the white wire corresponding to V2 to the ground plug
JAGUAR
A-Jaguar X-Type and Jaguar S-Type (< 2004) protocol communication configuration

(Connector back the radio)
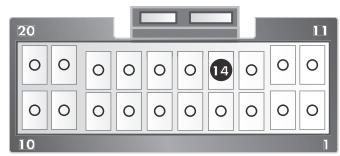
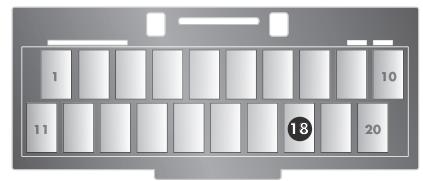
- Connect the purple wire corresponding to V1 resistive information to pin 18
- Connect the white wire corresponding to V2 to the ground plug.
KIA
A-KIA SORENTO (>2006) protocol communication configuration
(Connector back the radio)
- Connect the purple wire corresponding to V1 resistive information to pin 6
- Connect the white wire corresponding to V2 to the ground plug.
MAZDA
There are two possibilities:
A1-Mazda (>2006) protocol communication configuration.
(Connector back the radio)
- Connect the purple wire corresponding to V1 resistive information to pin 21.
- Connect the white wire corresponding to V2 to the ground plug.
OR
A2-Mazda (>2006) protocol communication configuration.

(Connector under the steering wheel)
- Connect the purple wire corresponding to V1 resistive information to pin 3
- Connect the white wire corresponding to V2 to the ground plug.
A- Nissan MICRA protocol communication configuration
- Connect the purple wire corresponding to V1 resistive information to pin33
- Connect the white wire corresponding to V2 resistive information to pin 20
OPEL
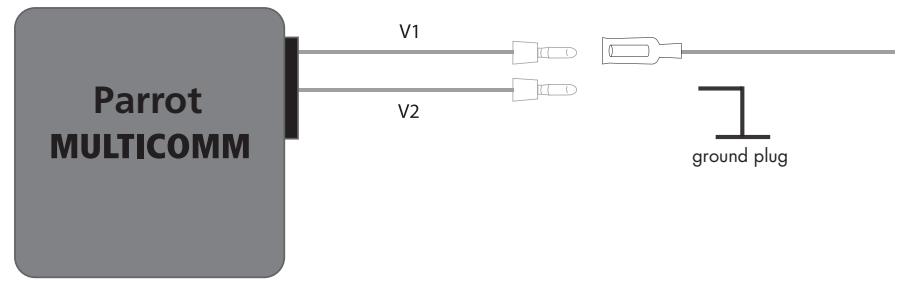
A-ALL Opel cars [1999-2003] protocol communication configuration.
- Connect the purple wire corresponding to V1 resistive information to pin 1.
- Connect the white wire corresponding to V2 to the ground plug.
SUZUKI
A-Suzuki Grand VITARA & Suzuki SX4 protocol communication configuration
- Connect the purple wire corresponding to V1 resistive information to pin 9
- Connect the white wire corresponding to V2 to the ground plug.
(Connector back the radio)
TOYOTA FITTING
A- Toyota Yaris (<2005) & Toyota RAV 4 protocol communication configuration
- Connect the purple wire corresponding to V1 resistive information to pin 7
- Connect the white wire corresponding to V2 to the ground plug.
B- Toyota Avensis, Toyota Corolla & Toyota Yaris (>2006) protocol communication configuration
- Connect the purple wire corresponding to V1 resistive information to pin 7
- Connect the white wire corresponding to V2 to the ground plug.
FIRST TIME USE
The first time that you switch on your hands-free kit, you must pair your mobile phone with the kit. This phase involves configuring the Bluetooth connection between your phone and the hands-free kit.
Note: you can skip the following phase if your phone is already paired with your handsfree kit.
Pairing your phone with your hands-free kit:
- Ensure that the Bluetooth feature on your phone is enabled
- Search for Bluetooth peripherals on your phone (refer to your phone's user guide or visit the Support heading on our website at www.parrot.com)
- Select your hands-free kit
- Enter «1234» on your phone when prompted
- Both devices connect automatically
Note : refer to the «Support» heading on our website at www.parrot.com for further information.
FEATURES
Depending on the steering wheel controls in your vehicle, the Parrot MULTICOMM interface will enable you to take full advantage of the features available on your hands-free kit:
Receive a call
End a call
- Redial function
- Call volume adjustment
- Contacts phoned using the kit's voice recognition feature
- Discreet mode
- Exit discreet mode
Volume adjustment during calls
Language setting (Only for Parrot CK3000 EVOLUTION)
- Menu navigation (Only for Parrot CK3000 EVOLUTION)
After the installation just follow the procedure below.
Parrot MULTICOMM is a self-learning unit able to manage analog steering wheel command protocols.
Some vehicles come with specific «Answer / Hang up» buttons for using a phone from the steering wheel.
The hands-free kit can also be used via the volume adjustment buttons.
Depending on your vehicle's steering wheel controls, there are several possibilities for using a hands-free kit with the steering wheel controls:
- Mode 1: the steering wheel does not feature any phone button, but only volume adjustment controls («Volume (+)» and «Volume (-)» buttons)
Mode 2: the steering wheel features a single «Phone» button
Mode 3: the steering wheel features an «Answer» button and a «Hang up» button
Mode 1: If there are VOLUME BUTTONS (no phone buttons)
1- Supply the power by turning on the ignition; the Parrot MULTICOMM LED will blink once.
2- Press the steering wheel command buttons following this sequence: « VOLUME - », « VOLUME + », « SEEK DOWN », « SEEK UP ». Each press will be confirmed by a blinking of the Parrot MULTICOMM LED. At the end of this simple sequence the Parrot MULTICOMM LED will switch ON.
3-Now switch off and on the ignition; the Parrot MULTICOMM LED must be ON. The procedure is finished and Parrot MULTICOMM has learnt the new protocol.
Note: To reset the unit, with the ignition on, keep the Parrot MULTICOMM button pressed until the LED blinks.
Available functions with the volume adjustment buttons :
- Answer an incoming call:
End a call: - Refuse an incoming call:
- Start the voice recognition feature:
- Redial the last number:
Press the «Volume (+)» button.
Press the «Volume (-)» button.
Press the «Volume (-)» button.
Press the «Volume (+)» button, then quickly press the «Volume (-)» button.
Quickly press the «Volume + button, followed by a long press of the «Volume · button until the number is dialled.
Quickly press the «Volume (+)» button.
During the call, quickly press the Volume (+) button followed by Volume (-) .
During the call, press the «Volume (+)» button and then on the «Volume (-)» button.
Repeat this procedure until you reach the required volume.
- Lower the volume:
During the call, press the «Volume(-)» button and then on the «Volume(+)» button. Repeat this procedure until you reach the required volume.
Only for Parrot CK3000 EVOLUTION:
- Reset the hands-free kit:
Repeat the following sequence five times: press the «Volume (-)» button and then the «Volume (+)» button.
- Enter the menu:
Press the following sequence twice: « SEEK DOWN » button then the « SEEK DOWN » button. The SEEK buttons are used to search for radio stations.
- Go forward through the menu:
Press the «Volume (+)» button then the «Volume (-)» button, leaving less than one second between each press.
-
Go backwards through the menu: Press the «Volume » button then the «Volume (+) » button, leaving less than one second between each press.
-
Select a menu option:
Quickly press the «Volume (+)» button.
- Cancel a menu option:
Quickly press the «Volume . » button.
Mode 2 : If there is ONE PHONE button
1- Supply the power by turning on the ignition; the Parrot MULTICOMM LED will blink once.
2- Press the steering wheel command buttons following this sequence: « VOLUME - », « VOLUME + », « SEEK DOWN » Each press will be confirmed by a blinking of the Parrot MULTICOMM LED.
3- Now press and keep pressed « SEEK UP » button till the Parrot MULTICOMM LED switch OFF.
4- Now press the steering wheel command PHONE button; the Parrot MULTICOMM LED will light ON. The procedure is finished and Parrot MULTICOMM has learnt the new protocol.
5-Now switch off and on the ignition; the Parrot MULTICOMM LED must be ON. The procedure is finished and Parrot MULTICOMM has learnt the new protocol.
Note: To reset the unit, with the ignition on, keep the Parrot MULTICOMM button pressed until the LED blinks.
Parrot functions used with a single phone button
- Answer an incoming call:
End a call: - Refuse an incoming call:
- Start the voice recognition feature:
- Redial the last number:
- Discreet mode:
- Exit discreet mode:
- Increase the volume:
- Lower the volume:
Press the «Phone» button.
Long press of the «Phone» button.
Long press of the «Phone» button.
Short press of the «Phone» button.
Long press of the «Phone» button.
Press the «Phone» button.
Press the «Phone» button.
During the call, press the «Volume (+)» button.
During the call, press the «Volume (-)» button.
Only for Parrot CK3000 EVOLUTION
- Reset the hands-free kit:
Repeat the following sequence five times: press the «Volume (-)» button and then the «Volume (+)» button.
- Enter the menu:
Press the following sequence twice: « SEEK UP » button then the « SEEK DOWN » button. The SEEK buttons are used to search for radio stations.
- Go forward through the menu: Press the «Volume (+)» button.
-
Go backwards through the menu: Press the «Volume()» button.
-
Select a menu option:
Quickly press the «Phone» button. - Cancel a function:
Long press of the «Phone» button.
Mode 3: If there are TWO PHONE BUTTONS
1- Supply the power by turning on the ignition; the Parrot MULTICOMM LED will blink once.
2- Press the steering wheel command buttons following this sequence: « VOLUME - », « VOLUME + », « SEEK DOWN » Each press will be confirmed by a blinking of the Parrot MULTICOMM LED.
3- Now press and keep pressed « SEEK UP » button till the Parrot MULTICOMM LED switch OFF
4- Now press and keep pressed the steering wheel command "HANG UP" phone button; till the Parrot MULTICOMM LED switch OFF.
5- Now press the steering wheel command "PICK UP" PHONE button; the Parrot MULTICOMM LED will light ON.
6- Now switch off and on the ignition: the Parrot MULTICOMM LED must be ON. The procedure is finished and Parrot MULTICOMM has learnt the new protocol.
Note: To reset the unit, with the ignition on, keep the Parrot MULTICOMM button pressed until the LED blinks
Available functions used with two phone buttons
- Answer an incoming call:
Press the «Answer» button.
End a call:
Press the «Hang up» button. - Refuse a call:
Press the «Hang up» button. - Start the voice recognition feature:
Quick press of the «Answer» button. - Redial the last number:
Long press of the «Answer» button. - Discreet mode :
Quick press of the «Answer» button. - Exit Discreet mode :
Quick press of the «Answer» button. - Increase the volume:
During the call, press the «Volume (+)» button. - Lower the volume:
During the call, press the «Volume (-)» button.
Only for Parrot CK3000 EVOLUTION
- Reset the hands-free kit:
Repeat the following sequence five times: press the «Volume (-)» button and then the «Volume (+)» button
- Enter the menu :
Press the following sequence twice: « SEEK UP » button then the « SEEK DOWN » button. The SEEK buttons are used to search for radio stations.
- Go forward through the menu: Press the «Volume (+)» button.
- Go backwards through the menu: Press the «Volume(-)» button.
- Select a menu option: Quickly press the «Answer» button.
- Cancel a function: Quickly press the «Hang up» button.
CHECKING THE WIRING
Once your Parrot MULTICOMM interface has been correctly fitted, the interface's LED should light up RED, in which case the interface is ready for use. If the LED does not light up, check the power wires of your Parrot MULTICOMM interface
In case of Parrot CK3000 EVOLUTION
- The red and yellow wire should correspond to the Ignition +12V .
In case of Parrot CK3100 LCD
- The red and yellow wire should correspond to the Permanent +12V
- The yellow wire of the Parrot MULTICOMM interface should be connected to the yellow mute wire of the Parrot hands-free kit and to the Mute input on your car stereo (if your car stereo features a mute input).
Note: It is also important to check the wiring of your hands-free kit. In this case, refer to the user guide supplied with your kit.
The initialisation procedure must be correctly performed. If you want to perform it again, please press the «reset» button using a stylus.

HOTLINE
Our hotline is at your disposal to provide you with any assistance required. You can contact the hotline by email or telephone. Open from Monday to Friday between 9 am and 6 pm (GMT+1).
Italy: [+39] 02 86 39 14 63
Spain: [+34] 902 404 202
UK: [+44] (0)870 112 5872
Germany: 0900 172 77 68
USA: [+1] (877) 9 PARROT (toll-free)
Europe: [+33] (0)1 48 03 60 69 (languages spoken: English, French, Spanish and German).
Visit our website at www.parrot.com to download the latest software version.
NOTES
SOMMAIRE
Europa: [+33] 148036069 (languages spoken: English, French, Spanish and German).
The manufacturer Parrot S.A. and its affiliates should not be held liable towards end users or third parties to prejudice caused by misuse of the product, nor for usage that would be in violation of local traffic regulations and laws.
DISCLAIMER
The information in this document is subject to change without notice and does not represent a commitment on the part of vendor. No warranty or representation, either expressed or implied, is made with respect of quality, accuracy or fitness for any particular purpose of this document. The associated with it at any time without obligation to notify any person or organisation of such changes. In no event will the manufacturer to liable for direct, indirect, special, incidental or consequential damages arising out of the use or inability to use this product or documentation, even if advised of the possibility of such damages.
This document contains material protected by copyright. All right are reserved. No part of this manual may be reproduced or transmitted in any form, by any means or for any purpose without express written consent.
Product names appearing in this document are mentioned for identification purposes only. All trademarks, product names appearing in this document are registered property of their respective owners.
DECLARATION OF CONFORMITY

We, Parrot S.A. 174 quai de Jemmapes, 75010 Paris, France, declare under our sole responsibility that our product, the car radio Parrot MULTICOMM, to which this declaration relates is in conformity with appropriate standards 2004/104/CE and Low Voltage directive 73/23/EEC.
BLUETOOTH®
The Bluetooth word mark and logos are owned by the Bluetooth SIG, Inc. and any use of such marks by Parrot S.A. is under license. Other trademarks and trade names are those of their respective owners.
PARROT S.A.
« All Rights reserved. The Parrot Trademarks appearing on this User Guide are the sole and exclusive property of Parrot S.A. All the others Trademarks are the property of their respective owners and are used under licence by Parrot S.A.».


Parrot
Parrot S.A. - 174, quai de Jemmapes - 75010 Paris - France
Fax +33 148030666/Phone+33148036060
www.parrot.com
ENG
ESP FRA DEU
ITA
C E


PI030441AA