
KH 1520 - Fan LERVIA - Free user manual and instructions
Find the device manual for free KH 1520 LERVIA in PDF.
User questions about KH 1520 LERVIA
0 question about this device. Answer the ones you know or ask your own.
Ask a new question about this device
Download the instructions for your Fan in PDF format for free! Find your manual KH 1520 - LERVIA and take your electronic device back in hand. On this page are published all the documents necessary for the use of your device. KH 1520 by LERVIA.
USER MANUAL KH 1520 LERVIA
Operating instructions
PL WENTYLATOR STOJACY
Instrukcja obstugi
HU TORONYVENTILLÁTOR
Hasznalati utasitas
STEBRNIVENTILATOR
Navodila za uporabo
CZ SLOPOVY VENTILATOR
Návod k obsluze
SK STLPOVY VENTILATOR
Návod na obsluhu
HR VENTILATOR-STUP
Upute za upotrebu
DE SAULEN-VENTILATOR
Bedienungsanleitung
TOWER FAN
2
Read the operating instructions carefully before using the appliance for the first time and preserve this booklet for later reference. Pass the manual on to whomsoever might acquire the appliance at a later date.
PL WENTYLATOR STOJACY 6
This appliance is designed to circulate air in indoor rooms in domestic households. This appliance is not intended for commercial or industrial applications.
Safety information
Risk of electric shock!
- Arrange for defective power plugs and/or cables to be replaced at once by qualified technicians or our Customer Service Department.
- Never take hold of the appliance if you have wet hands or if you are standing on a wet floor.
- In the event of operating malfunctions and before cleaning the appliance, remove the power plug from the wall socket.
Risk of personal injury!
- This appliance is not intended for use by individuals (including children) with restricted physical, physiological or intellectual abilities or deficiencies in experience and/or knowledge unless they are supervised by a person responsible for their safety or receive from this person instruction in how the appliance is to be used.
- Children should be supervised to ensure that they do not play with the appliance.
- Place the power cable such that no one can trip on or stumble over it.
-
Never insert your fingers or other objects through the ventilation slots.
-
Do not use extension cables. The appliance plug must be easily accessible in the event of an emergency.
- Under no circumstances should the tower ventilator be used in the vicinity of water, for example in a bath, shower, washbasin or in humid cellar rooms. The proximity of moisture presents a risk, even when the appliance is switched off.
- Do not operate the appliance if it has fallen or is damaged. Arrange for the appliance to be checked and, if necessary, repaired by qualified technicians.
Attention! Appliance damage!
- Do not subject the appliance to moisture or rain. Use the appliance Only in dry rooms, Never in the bathroom or similar.
- Do not fold or crush the power cable.
- Do not leave the appliance unattended at any time when it is in use.
- Never cover or block the ventilation slots.
- Do not place clothing items or other objects on the appliance.
- Connect this appliance only to a correctly installed and earthed wall power socket providing electrical energy at the level detailed on the rating plate.
- To disconnect, always pull the plug itself out of the power socket, do not pull on the power cable.
- Do not place water-filled receptacles, e.g. flower vases, on the appliance.

Under no circumstances may the appliance be submersed in fluids or fluids be allowed to permeate the housing. Do not expose the appliance to humidity and do not use it outdoors. There is the risk of electrocution. Should fluids nonetheless gain access into the appliance housing, immediately remove the plug from the wall socket and arrange for the appliance to be repaired by qualified specialists.
Items supplied
Ventilator KH1520
Plinth (2 pieces)
Nut (assembled on screw-thread)
Operating instructions
Check the items supplied for completeness directly after unpacking. Remove all packaging material.
Technical data
Mains voltage: 220 - 240 V\~, 50 Hz
Power consumption: 45 W
Protection class: II/回
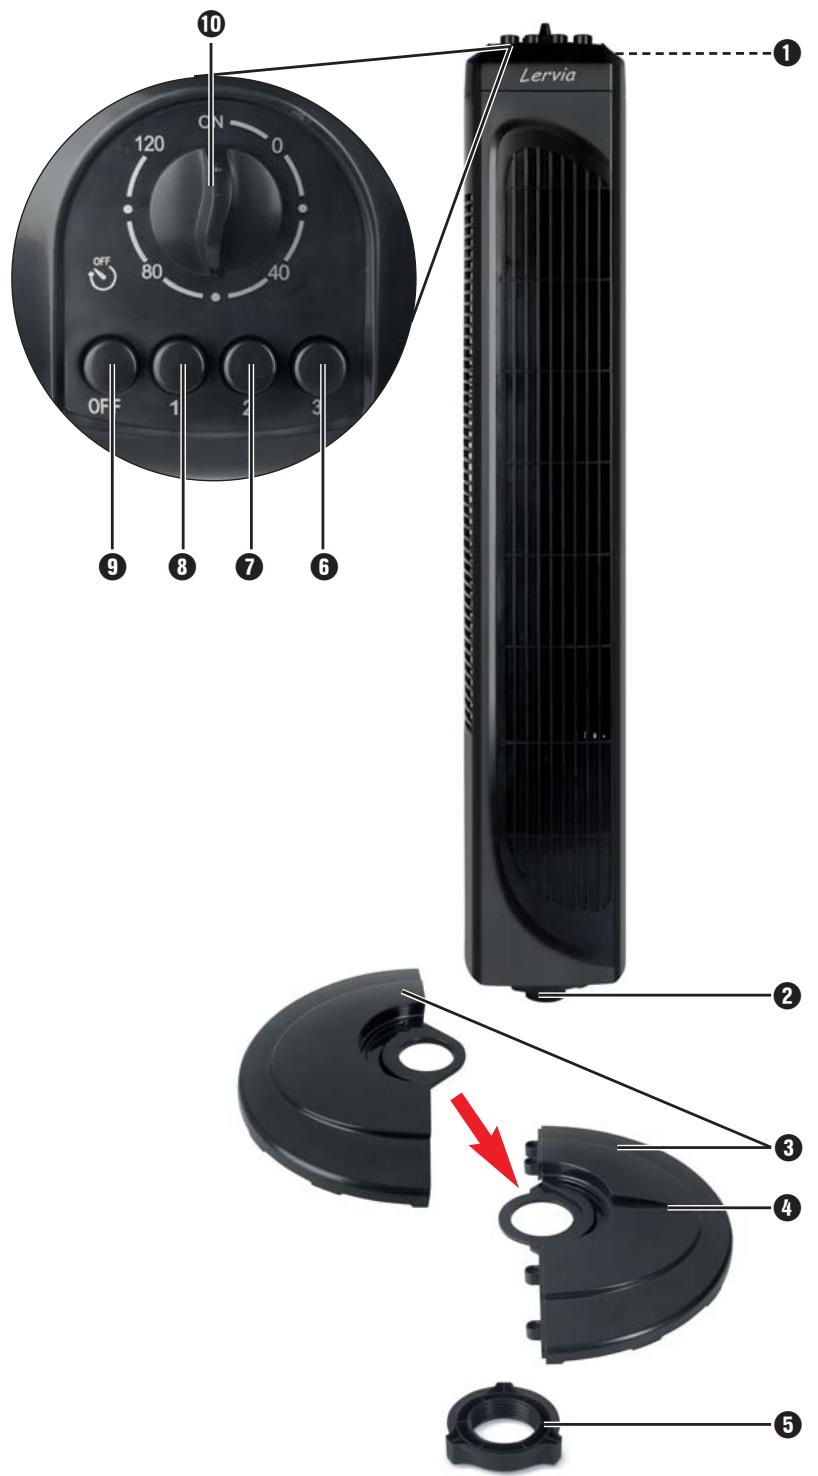
Appliance description
1 Switch for oscillation
Screw-thread
3 Plinth
Recess for power cable
5 Connection nut
Switch 3 (high speed)
7 Switch 2 (medium speed)
Switch 1 (slow speed)
Switch"OFF"
10 Rotary switch (Timer function)
Before taking into use
- Unscrew the connection nut 5 from the screwthread 2 on the ventilator tower.
- Combine the two parts of the plinth 3 together so that they form a circular plate and the pins protrude into the recesses.
- Insert the screw-thread 2 of the ventilator tower through the hole in the plinth 3. Ensure that the power cable lies in the recess 4 of the plinth 3.
- Rescrew the connection nut 5 handtight onto the screw-thread 2, such that the ventilator tower and the plint 3 are securely connected.
- Stand the ventilator upright.
- Connect the plug with a wall power socket.
Operation
- Position the rotary switch 10 at "ON".
- Select the desired speed level by using the switches:
1 8 = slow speed
2 ① = medium speed
3 ⑥ = high speed
- To switch the ventilator off for a short period, press the button "OFF" ⑨. To completely switch the ventilator off, press the button "OFF" ⑨ and position the rotary switch ⑩ at "0".
Oscillation (Turn function)
- Should you wish to activate the oscillation (turn function), press the button "Oscillation" ①.
To deactivate the turn function, press the button "Oscillation" ① once more.
Timer-Function
You can programme the ventilator to run for a specific time (up to 120 minutes). It switches itself off on expiry of the time period.
- Place the rotary switch 10 at the required operating time.
- Select the required speed level.
On expiry of the selected time period, the ventilator switches itself off.
Cleaning and Care
Risk of personal injury!
Before cleaning, ALWAYS remove the plug from the wall power socket. There is a risk of receiving an electric shock!
Wipe the appliance with a damp cloth. For stubborn soiling use a mild detergent on the cloth.

Never submerge any parts of the appliance in water or other liquids! This can create the risk of a life-threatening electrical shock if residual liquid comes into contact with powered components.
Disposal

Do not dispose of the appliance in your normal domestic waste. This product is subject to the provisions of European Directive 2002/96/EC.
Dispose of the appliance through an approved disposal centre or at your community waste facility. Observe the currently applicable regulations. In case of doubt, please contact your waste disposal centre.

Dispose of the packaging materials in an environmentally responsible manner.
Warranty and Service
The warranty for this appliance is for 3 years from the date of purchase. This appliance has been manufactured with care and meticulously examined before delivery. Please retain your receipt as proof of purchase. In the case of a warranty claim, please make contact by telephone with our service department. Only in this way can a post-free despatch for your goods be assured.
The warranty covers only claims for material and manufacturing defects, not for parts subject to wear and tear or for damage to fragile components, e.g. buttons or batteries. The appliance is intended for domestic use only, not for commercial purposes.
If this product has been subjected to improper or inappropriate handling, abuse, or modifications not carried out by one of our authorised sales and service outlets, the warranty will be considered void. Your statutory rights are not restricted in any way by this warranty.
GB DES Ltd
Units 14-15
Bilston Industrial Estate
Oxford Street
Bilston
WV14 ZEG
Tel.: 0870/787-6177
Fax: 0870/787-6168
e-mail: support.uk@kompernass.com
IE Kompernass Service Ireland
Tel: 1850 930 412 (0,082 EUR/Min.)
Standard call rates apply. Mobile operators may vary.
e-mail: support.ie@kompernass.com
Importer
KOMPERNASS GMBH
BURGSTRASSE 21
44867 BOCHUM, GERMANY
www.kompernass.com
47623 Kevelaer, Germany
Tel.: +49 (0) 1805008107