VARIATIONS DE SILHOUETTE - Sportswear THERMOR - Free user manual and instructions
Find the device manual for free VARIATIONS DE SILHOUETTE THERMOR in PDF.
User questions about VARIATIONS DE SILHOUETTE THERMOR
0 question about this device. Answer the ones you know or ask your own.
Ask a new question about this device
Download the instructions for your Sportswear in PDF format for free! Find your manual VARIATIONS DE SILHOUETTE - THERMOR and take your electronic device back in hand. On this page are published all the documents necessary for the use of your device. VARIATIONS DE SILHOUETTE by THERMOR.
USER MANUAL VARIATIONS DE SILHOUETTE THERMOR
Electronic convector : Hight, Standard, Low, Plinth Documentation for installation and use
RC
电暖器:标准型、高型、低型、踢脚型
安装使用说明书

①


(4)
CONDITIONS DE GARANTIE
DOCUMENT A CONSERVER PAR L'UTILISATEUR
INSTALLATIE VAN HET APPARAAT
ATLANTIC POLSKA SP Z 00
UL. Plochocnska 115
03-044 WARSZAWA
Tél.: (022) 81173 31
Fax:(022)6145700
PIECZEC INSTALATORA
PpupoepemnBbAamu npubop npouen MnoaohneHbue u npoepeKd npe oceeneHnae 30 eaoomnE. Blaoradapm Bac 3a nokynk annapaT a okazahnoe harnobepne. MHaedeemc, mO OH onnpaeod ece eausho oxduan.
HekoTopbIe peKoMeHdaZnI :
PpeKJe Yem NaHaTaB yCTaHOBky npi6oBa BHMaTeJbHo npOuHTaTe pykoBOdCTBO.
Ipeed npo3BveHnem oepaui no obcykBaHIO np6bopa OTKIOHTe 3JeKTPoNTaHne.
CoxpaHnTe pykoBODCTBO daKe nocJe yctaHObKn npi6opa.
XapaKTePncTnKn annapata (yka3aHHbIe Ha ZpMpMeHOM LITKe annapata):
KAT. B uJN C: Annapat COOTBETCTBYET HOpME NF 3neKtpnueckme xapaKTepnCTmN B COOTBETCTBnN CO 3HaueHnMn ykaaHHo Kateropnn.
IP24 :Annapat 3aunueHOT nonaDnHn BObl.
ot 2do 24 yacob, yctaHOBNTe KypCop 1 Ha IBa DeJIeHnI
6oJIe 24 YacOB uIN IeTOM, yCTaHOBnTB KOHBeKToP B NOIOKeHne
- EcniB KOMHaTe yCTaHOBJIeHO HeCKoIbKO KOHBeKTOpOB, OCTaBtE INx pa60TaTb OJHOBpeMeHHO; 3TO o6ecneHT noDepKahHe NOCTOHHOTempeAtpyb 6e3 dONOHITeNbHbIX 3atpat 3NeKTo3Heprn.
PNEyPEXHn

He donyckaTe deTei haxmAtb Ha nepeHIOI naHeI np6opa.
3anpeetaetcnoJIHocbIoo nIu qactNHy 3aKpbBaTb peWetkn np6opa (nepeHnE nIIN HxHnE) BO n36eKaHne neperpeBa.
He pa3pewaIte Detam nOmeaTaB pa3nUHbIe npedMeTbI uN 6ymary B np6op. Bce onepauun no o6cnyKuBaHHIO np6opa dOnxHbI npon3BOiNTbCra TOIbKO KBAINΦnIupoBaHHbIM TexHueckM nepcoHaONOM.

TEXHINCHECKOE OBCJNYXUBAHNE
IITTO rTOO tO6bI coXpAHnIb pa6Oohye xapaKTePncTkn KOHBeKTopa Heo6xOIMo pnpMeHPO dBa pa3a B roD OUYIaTB HIXHHe n BepXHne peSeTkn pnp6opar OT bIIn pnPi NmOUsu IeTkn IIIN PbIEcoca.
HeoXoIMo TAKKke KaKdIe PAnbT bT Bb3bBaTb KBaINΦuCIPOBaHHO MaCTepa dIra npOBepKn BHyTpEHnIX 3JemeHTOB np6opora.
B cnlyae cnilho 3aqrpa3HeHno aTmocsepebI ha noBepxHOCTn peSeETKn pnp6opa MOKet nOABNTcR pr3b. 3To raBneHne npCMCXODIT NO pnpUHNE Upe3MePHo 3aqrpa3HeHOrO BO3dyXa B NOMEUeHNIX. B TAKOM cnlyae peKOMeHpyETcN pNOBeprtBuHne N OmeUeHN (BeHTnJIuaIIO, NoctynIeHne BO3dyXa I.T.I.) N CHTOTy BO3dyXa. TaKe 3aqr3HeHne He nOKpBaOTCra rapAHNTn pnp6opa.O6uINbKa pn6opa MoKet sbTb OChuEHa BnAekHO TprkKn. Hn B Kcem cnlyae He nCnOJIb3OBAt b abpa3NBbIe npOkyTbl.
Pn6op He rpeet:
Y6eIITcB TOM, YTO BbIKIOUaTeJIy UCTAHOBKN HAXOJrTcBO BKIIIOUeHOM IOIOXeHIM, a TAKKc YEo ORpaHnHTeJIb MoUHOCTN (ecNI NMeETc) He OTKIOUHIN Pnp6Op. PpOBepbTe TEMpePaTyPO3dYxa.
Some recommendations :
Please read the documentation before starting to install the panel heater.
Disconnect power before working on the panel heater.
Conserve the documentation, even after installation of the panel heater.
Equipment specification : (indicated on the label of the device):
IP24 : Equipped protected from water splashes.
Class II : Double insulation.
INSTALLATION OF THE PANEL HEATER
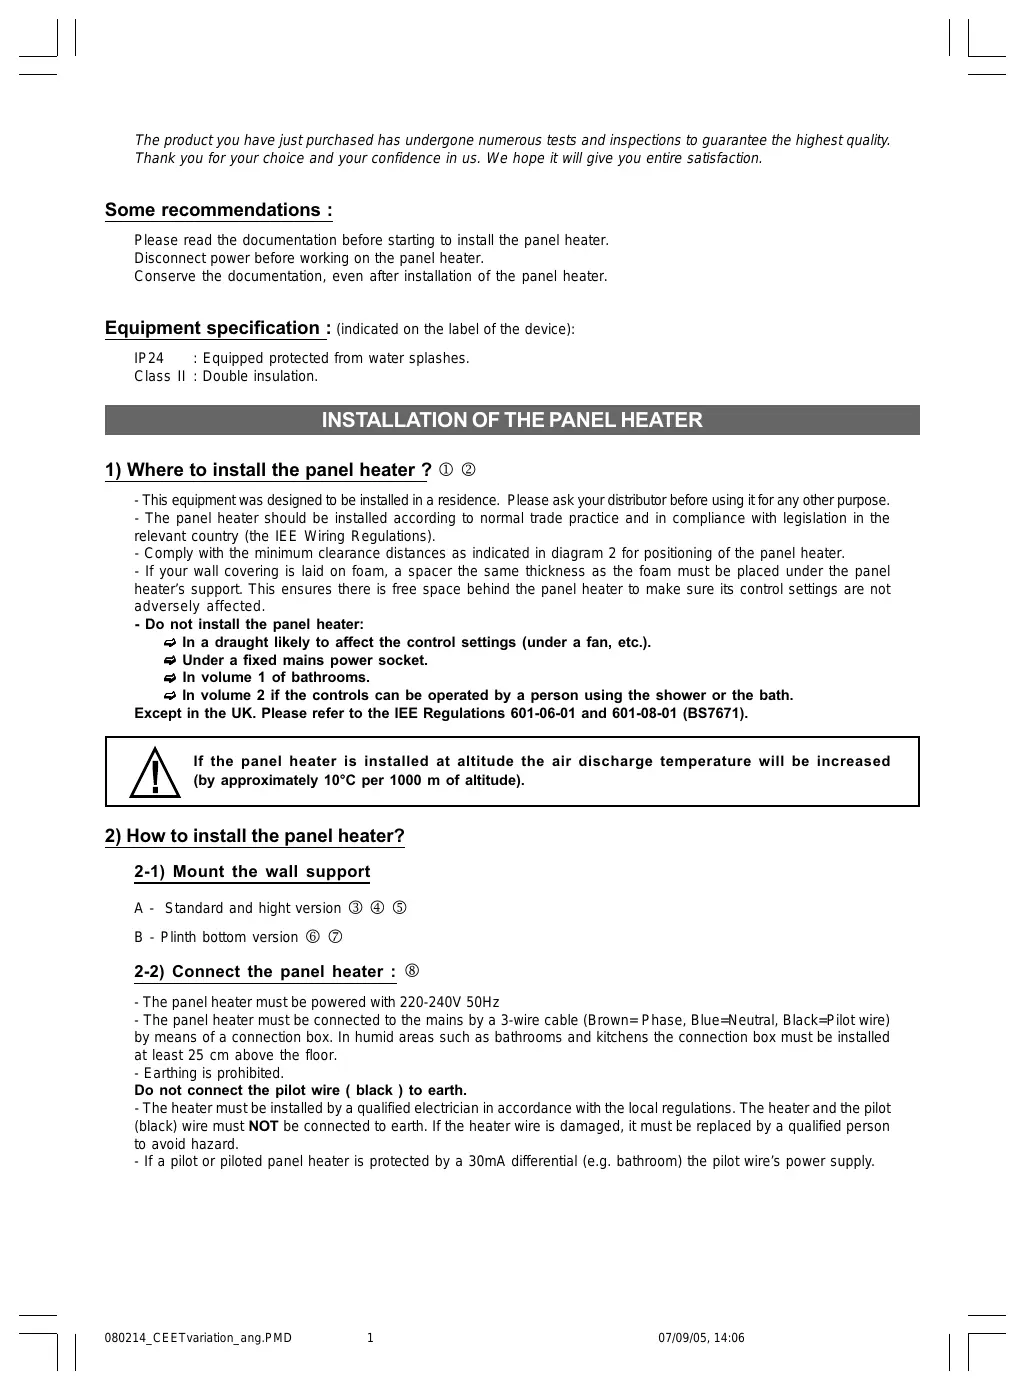
1) Where to install the panel heater? ① ②
- This equipment was designed to be installed in a residence. Please ask your distributor before using it for any other purpose.
- The panel heater should be installed according to normal trade practice and in compliance with legislation in the relevant country (the IEE Wiring Regulations).
- Comply with the minimum clearance distances as indicated in diagram 2 for positioning of the panel heater.
- If your wall covering is laid on foam, a spacer the same thickness as the foam must be placed under the panel heater's support. This ensures there is free space behind the panel heater to make sure its control settings are not adversely affected.
- Do not install the panel heater:
In a draught likely to affect the control settings (under a fan, etc.).
Under a fixed mains power socket.
In volume 1 of bathrooms.
In volume 2 if the controls can be operated by a person using the shower or the bath.
Except in the UK. Please refer to the IEE Regulations 601-06-01 and 601-08-01 (BS7671).

If the panel heater is installed at altitude the air discharge temperature will be increased (by approximately 10^ per 1000m of altitude).
2) How to install the panel heater?
2-1) Mount the wall support
A - Standard and hight version ③ ④ ⑤
B - Plinth bottom version ⑥ ⑦
2-2) Connect the panel heater: ⑧
- The panel heater must be powered with 220-240V 50Hz
- The panel heater must be connected to the mains by a 3-wire cable (Brown= Phase, Blue=Neutral, Black=Pilot wire) by means of a connection box. In humid areas such as bathrooms and kitchens the connection box must be installed at least 25~cm above the floor.
- Earthing is prohibited.
Do not connect the pilot wire ( black ) to earth.
- The heater must be installed by a qualified electrician in accordance with the local regulations. The heater and the pilot (black) wire must NOT be connected to earth. If the heater wire is damaged, it must be replaced by a qualified person to avoid hazard.
- If a pilot or piloted panel heater is protected by a 30mA differential (e.g. bathroom) the pilot wire's power supply.
Table of commands the panel heater can receive on its pilot wire. To be measured between the pilot wire and the neutral.
| Commands Received | No current | Alternation no current (4'57") phase 230V (3") | Alternation no current (4'53") phase 230V (7") | Complete alternation 230V | Negative half-alternation-115V | Positive half-alternation +115V |
| Oscilloscope Rêf/Neutral | — | 5' 3" | 5' 7" | — | — | — |
| Mode obtained | Comfort | Comfort-1°C | Comfort-2°C | Eco | Anti-freeze | Power Cut Stop |
USING THE PANEL HEATER
1) Description of the control unit : ⑨
Mode switch knob.
ECO temperature set value adjustment knob.
COMFORT temperature set value adjustment knob.
V1 Heating light.
V2 ECO mode light.
V3 COMFORT light.
2) Fixing the comfort temperature

The comfort temperature that you would like while the room is occupied.
a) Set the cursor ① to , the heating light V3 comes on.
b) Set the control knob 3 to 5, the heating light V1 comes on, if the room temperature is below the required temperature.
c) Wait a few hours until the temperature stabilizes.
d) If the setting is satisfactory (if necessary use a thermometer to check), mark the position.
If the setting is not satisfactory, adjust it and start again from point c.
3) Fixing the Eco temperature : (
This is the required temperature during periods when the room is unoccupied.
It is recommended that this mode should be used if the room is unoccupied for more than 2 hours.
a) Set the cursor switch knob to , the heating light V2 comes on.
b) Adjust the control knob between 3 and 4, the heating light V1 comes on, if the ambient temperature is lower than the instruction of desired Eco temperature.
c) Wait a few hours until the temperature stabilizes.
d) If the setting is satisfactory (if necessary use a thermometer to check), mark the position.
If the setting is not satisfactory, adjust it and start again from point c.
4) Frost-Free mode:
This mode is used to keep the temperature at approximately 7^ in the room when you are absent from the house for a prolonged period (i.e. more than 24 hours).
a) Set the cursor 1 to .
5) The heating indicator : V1
This light indicates periods during which the element is heating. It flashes when the temperature is stable, and it goes off if the temperature is too high.
6) Switching off the device :
To set the device to the Off position, move the cursor to
7) Locking the controls: ⑩
It is possible to lock or limit the range of use of thumb-wheels 2 and 3 and lock selector switch cursor 1 to prevent the inadvertent manipulation of the device (by children, etc).
a) Detach the device from its wall bracket.
b) On the back of the thermostat box, detach pins P from their supports.
c) Choose position B to lock the thumb-wheels or position L to limit the range of use of the thumb-wheels.
Choose one of the positions M to lock the person in the desired mode.
This device has a thermostat capable of receiving orders through its pilot wire. It recognizes the following commands:
- CONFORT (comfort) : Temperature set using the thumb-wheel ③
- CONFORT -1 (comfort -1) : Temperature set using the thumb-wheel ⑧ -1°C
- CONFORT -2 (comfort -2) : Temperature set using the thumb-wheel ⑧ -2°C
- ECO : Temperature set using the thumb-wheel 2
- HORS GEL (frost-free) : Room temperature maintained at approximately 7^
- ARRET (Off) : Immediate stoppage of the device (used for load-shedding).
To activate the programming mode set cursor 1 to ①.
In this way, by connecting the pilot wire to a timer, you can program your Comfort and Economy temperature periods. It is possible to connect several devices to one timer and, in this way, make energy savings.
NB: When there is no command given over the pilot wire, the device heats in the Comfort mode. HG and load-shedding commands override the Economy and Comfort modes. On changing from the Comfort mode to the Economy mode, the changeover time is approximately 12 seconds.
RECOMMANDATIONS FOR USE
- There is no point in setting the unit to its maximum, the room temperature will not rise any faster.
- Switch the unit off by putting cursor ① to Ⓞ.
- Remember to lower the temperature if you go out for several hours.
If go out for : less than 2 hours, do not touch the controls.
from 2 hours to 24 hours, set the cursor 0 to .
for more than 2 hours or during the summer, put the unit in Frost Free mode (s).
If you have several units in the room, let them all operate at the same time, this will give a more uniform temperature without increasing electricity consumption.
WARNING

This appliance is not intended for use by young children or infirm persons without supervision. Young children should be supervised to ensure that they do not play with the appliance, lean against the front or insert objects or paper in it.
Do not totally or partially block the grilles on the front or inside of the appliance, as this may cause overheating.
If the supply cord is damaged, it must be replaced by a service agent or similarly qualified person in order to avoid a hazard (applies to units fitted with a supply cord and plug).
Units fitted with a three core supply cord (brown, blue & black), must be directly connected to fixed wiring by a licensed electrician.
All work on the interior of the appliance must be carried out by a licensed electrician.

MAINTENANCE
To maintain performances of your unit, you should clean the upper and lower grilles of the unit about twice a year using a vacuum cleaner or a brush.
Have a professional check the inside of the unit every five years.
Dirt may collect on the grille of the unit if the atmosphere is polluted. This phenomenon is due to the poor quality of the ambient air. In this case, it is recommended to check that the room is well ventilated (ventilation, air inlet, etc.), and that the air is clean. The unit will not be replaced under the guarantee because of this type of dirt.
The unit casing should be cleaned with a damp cloth, never use abrasive products.
The unit does not heat :
Check that the programmer is in COMFORT mode.
Make sure that the installation circuit breakers are switched on, or that the load shedder (if you have one) has not switched off the unit power supply. Check the air temperature in the room.
The unit does not carry out programming orders :
Make sure that the programming unit is being correctly used (refer to its user's manual) or that the K7 Program is properly inserted in its housing and that it is operating normally (batteries?).
The unit is permanently heating :
Make sure that it is not in a draft and that the temperature setting has not been changed.
This unit with electronic control is equipped with a microprocessor that can be disturbed by some severe mains voltage disturbances (outside EC standards defining the disturbance protection level).
If there are any problems (thermostat blocked, etc.) switch off the unit power supply (fuse, circuit breaker, etc.) for about 10 minutes to allow the unit to start again.
Have your energy distributor check your power supply if the phenomenon occurs frequently.
WARRANTY CONDITIONS
KEEP THIS DOCUMENT IN A SAFE PLACE
(This certificate should only be produced if you are making a complaint, attached with the invoice of the purchase)
- This guarantee is applicable for 2 years from the date of original purchase and shall be valid for no more than 30 months from the date of manufacture.
- Your Atlantic distributor will exchange parts shown to be defective in manufacture. The replacement parts will be free of charge but Atlantic does not accept responsibility for freight or labor charges or losses in transit.
- This guarantee excludes damage by neglect, shipping or accident and any damage due to incorrect installation, use for purposes other than those intended or failure to observe the instructions given..
UNIT TYPE*:
SERIAL NUMBER*:
CUSTOMER'S NAME AND ADRESS*:
*This information is shown on the plate which can be seen on the left-side or behind the front grille of the unit.
THERMOR Service