DISNEY CLOCK RADIO MD 2774 - Alarm clock radio MEDION - Free user manual and instructions
Find the device manual for free DISNEY CLOCK RADIO MD 2774 MEDION in PDF.

| Product type | Clock radio |
| Brand | MEDION |
| Model | DISNEY CLOCK RADIO MD 2774 |
| Mains power supply | 230 V ~ 50 Hz |
| Backup batteries | 2 x 1.5 V R03/LR03 (AAA) |
| Wavebands | FM 87.5 – 108 MHz / MW 522 – 1620 kHz |
| Time display | 12 or 24 hours selectable |
| Brightness levels | 2 adjustable levels |
| Alarms | Radio or Disney melodies (5 to choose from) |
| Alarm snooze (SNOOZE) | Yes, 10 minutes |
| Auto off (SLEEP) | Yes, from 10 to 90 minutes in 10-minute increments |
| Station memory | 10 stations per waveband |
| Automatic station search | Yes |
| FM antenna | Wire antenna (to unwind) |
| MW antenna | Built-in ferrite |
| Dimensions (approx.) | 15 x 8 x 10 cm (estimated) |
| Weight (approx.) | 500 g (estimated) |
| Care and cleaning | Unplug and clean with a soft, damp cloth. Do not use detergents. |
| Safety instructions | Do not open or repair yourself. Keep batteries out of reach of children. Observe battery polarity. |
Frequently Asked Questions - DISNEY CLOCK RADIO MD 2774 MEDION
User questions about DISNEY CLOCK RADIO MD 2774 MEDION
0 question about this device. Answer the ones you know or ask your own.
Ask a new question about this device
Download the instructions for your Alarm clock radio in PDF format for free! Find your manual DISNEY CLOCK RADIO MD 2774 - MEDION and take your electronic device back in hand. On this page are published all the documents necessary for the use of your device. DISNEY CLOCK RADIO MD 2774 by MEDION.
USER MANUAL DISNEY CLOCK RADIO MD 2774 MEDION
Radiofrequency UKW 87,5-108 MHZ
Radiofrequency Mittelwelle 522 - 1620 kHz
- Display
- Volume Control
- Tuning Up/Minute Button
- Display Low/High Button
- Radio On/Off Button
- Alarm On/Off Button
- Display (12/24hr) Switch
- AM/FM Band Button
- Radio Preset Up Button
-
Battery Compartment (Bottom of Unit)
-
Snooze Button
- Clock Set/Alarm Set Button
- Tuning Down/Hour Button
- Sleep Button
- Radio Preset Set/Disney Alarm Type Button
- Alarm Type Button
- FM Antenna Wire (Bottom of Unit)
DISPLAY
A. Snooze
B. Time
C. Alarm On
D. Radio (Alarm)
E. Music (Alarm)
F. Preset
G. Sleep
H. AM/FM
I. Clock and Timer
J. Preset Number
K. MHz/kHz
L. AM/PM
SAFETY PRECAUTIONS
About this manual

Please observe the following safety instructions carefully before putting the unit into operation. Take note of the warnings on the unit and in this manual.
Always keep the instruction manual near at hand. If you sell or pass on the product, make sure to include this manual together with the unit.
Do not let young children use electrical devices unattended.
Swallowing batteries may be fatal. Therefore always keep batteries inaccessible to young children. If a battery has been swallowed, consult a doctor immediately.
Keep the plastic packaging out of reach for young children to avoid danger of suffocation!
Make sure that the unit is not exposed to
- humidity or moisture;
- direct sunlight or other direct heat (e. g. from radiators or other stereo equipment);
- constant vibration;
- strong dust or places without ventilation.
Do not repair the unit yourself.

Under no circumstances attempt to open or repair the unit yourself. There is danger of electric shock!
Refer all servicing to our Service Center or to another qualified workshop.
Battery disposal

Empty alkaline and NiCd batteries do not belong in the household refuse. The batteries must be disposed of at a designated disposal/recycle point.
INSTALLATION
Connect the AC cord it to a conveniently located AC outlet 230V 50Hz only. The Clock Display will illuminate and "0:00" or "12:00" will blink in the display.
NOTE: If the AC cord is disconnected or if there is a power failure, this electronic clock is designed to continue operating internally (without showing the time on the Clock Display) with two (2) 1,5V batteries size "AAA", R03/LR03 (not included).
To install the batteries:
- Remove the battery compartment door by inserting a small screwdriver, paper clip or similar item into the tab while gently pushing to remove.
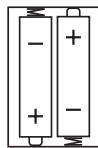
- Insert two (2) R03/LR03 batteries into the battery compartment. Be sure to observe the polarity markings.
- Close the battery compartment door.
BATTERY PRECAUTIONS
- Do not mix different types of batteries (e.g. Alkaline and Carbon-zinc) or old batteries with fresh ones.
- If the device is not to be used for a long period of time, remove the batteries. They may leak.
OPERATION
DISPLAY LOW/HIGH
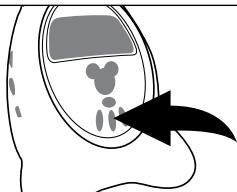
This unit has two levels of brightness for the display. Repeatedly press the Display Low/High button until the desired brightness appears in the display.
OPERATION (CONTINUED)
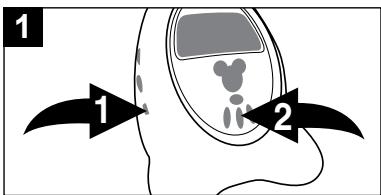
TO LISTEN TO THE RADIO
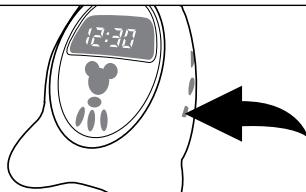
Press the Radio On/Off button ① to turn the unit on; the AM or FM indicator will light. Press the AM/FM Band button ② to select AM or FM.
Tune a station by pressing the Tuning Up/Minute ① or Tuning Down/Hour ② button. Press and hold either button and the unit will scan and stop on the next strong station.
Adjust the volume using the Volume control 0.
Press the Radio On/Off button to turn the unit off.
ANTENNAS
FM: Extend the FM antenna wire (located in the battery compartment) for best reception.
AM: Turn the unit for better AM reception.
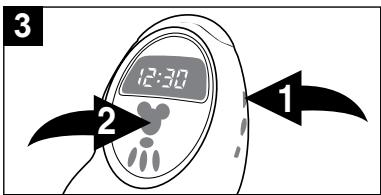
SETTING RADIO PRESETS (10 FOR EACH BAND)
Tune a station as described above, then press the Radio Preset Set/Disney Alarm Type button 1 once; the Preset Number will blink. Press the Radio Preset Up button 2 to select a radio preset number, then press the Radio Preset Set/Disney Alarm Type button 1 again to confirm and the radio preset will be set.
OPERATION (CONTINUED)
TO RECALL RADIO PRESETS
12/24 HOUR SWITCH
To recall a Radio Preset, press the Radio Preset Up button repeatedly until the desired Radio Preset appears in the display.
To set this unit for the 12 hour clock format, slide this switch to the 12HR position. To set the clock for the 24 hour format, slide it to the 24HR position.
NOTE: Once a radio frequency is selected, the display will revert to the time display after 10 seconds.
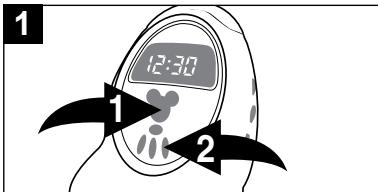
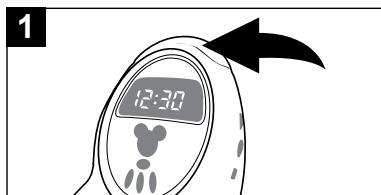
TO SET OR RESET THE TIME

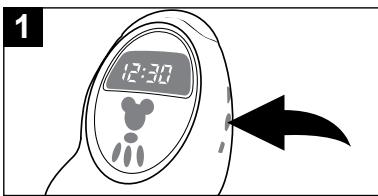
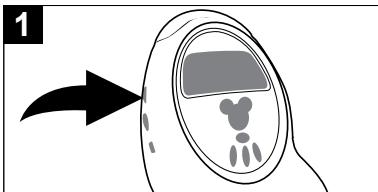
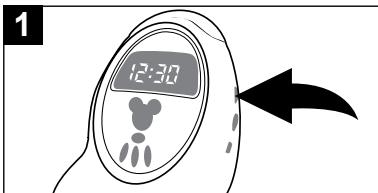
1
With the radio off, press the Clock Set/Alarm Set button once to set the time; the Time indicator will light and the display will blink.

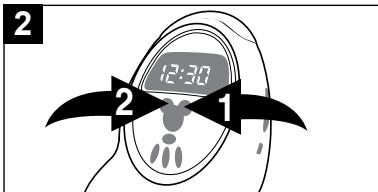
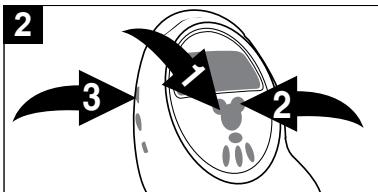
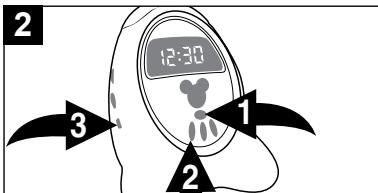
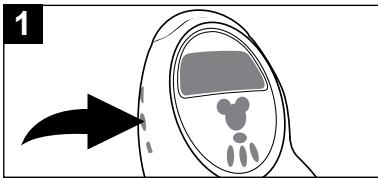
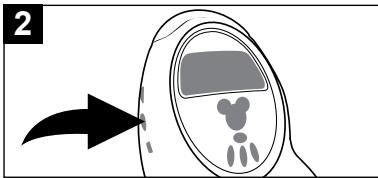
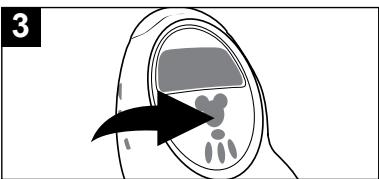
2
Press the Tuning Down/Hour button 1 to set the hour and the Tuning Up/Minute button 2 to set the minute. In the 12 hour mode, make sure the appropriate AM indicator is lit for morning hours and the PM indicator for afternoon hours. Wait 10 seconds, or press the Clock Set/Alarm Set button 3 twice and the time will be set.
OPERATION (CONTINUED)
TO SET OR RESET THE ALARM TIME
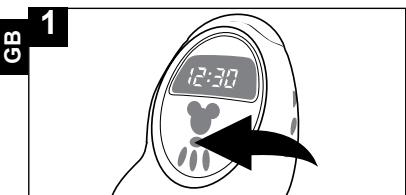
With the radio off, press the Clock Set/Alarm Set button twice to set the alarm time; the Alarm On indicator and the display will blink.
Press the Tuning Down/Hour button 1 to set the alarm hour and the Tuning Up/Minute button 2 to set the alarm minute. Make sure the appropriate AM/PM indicator is lit if using the 12 hour mode (see above). Wait 10 seconds, or press the Clock Set/Alarm Set button 3 again and the time will be set.
TO SET THE ALARM TO WAKE TO RADIO
Set the alarm time as previously instructed. Select a radio station as described above and make sure the Volume control is set as desired.
NOTE: To avoid having the volume set too low, this unit will automatically set the volume to a preset level as needed.
Press the Alarm On/Off button 1. The alarm clock symbol will light. If the musical note lights, press the alarm type button 2 repeatedly, until the radio symbol lights up. Confirm the selection with 3.
To shut off the alarm, see below.
OPERATION (CONTINUED)
TO SET THE ALARM TO WAKE TO DISNEY SOUND
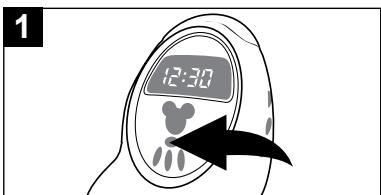
Set the alarm time as previously instructed. Press the Alarm On/Off button and the Alarm On and Radio (Alarm) indicators will light.
NOTE: To avoid having the volume set too low that it cannot be heard when the alarm sounds, this unit will automatically set the volume to a preset level as needed.

Press the Alarm Type button ① repeatedly to cycle through the five Disney alarm choices. Press the Radio Preset Set/Disney Alarm Type button ② to confirm. The musical note indicator is lit.
At the preset time, the selected tone will play.
To shut off the alarm, see below.
TO SHUT THE ALARM OFF
To shut the alarm off, press the Alarm On/Off button once. Press the Alarm On/Off button again to set the alarm for the next day.
SNOOZE
The alarm can be temporarily turned off by pressing the Snooze button; the alarm will turn back on automatically 10 minutes later. The Snooze indicator will light.
OPERATION (CONTINUED)
TO ACTIVATE THE SLEEP FUNCTION
Tune the desired radio station as described above. Press the Sleep button; the Sleep indicator will light and will appear on the clock display.
To adjust the sleep time between 90 and 10 minutes in 10 minute intervals, repeatedly press the Sleep button.
To cancel Sleep, press the Radio On/Off button.
CLEANING
Always disconnect the AC power plug before cleaning the unit.
To clean the unit, only use a moistened, soft cloth. Do not apply chemical solvents or cleaning agents, as they may damage the surface and/or labelling of the unit.
SPECIFICATIONS
Mains input: 230V 50Hz
Batteries: 2 x 1.5 V, R03 or LR03 (recommended)
Radio frequency FM 87.5 - 108 MHZ
Radio frequency AM 522 - 1620 kHz
Subject to technical modifications!
COMMANDES
L'APPAREIL
MISE EN PLACE DES PILES:
Hent lagret station: Stationsvalgtast (9).
INDSTILLING AF UR/VEKKEUR:
Slukevt.forradioen(5).