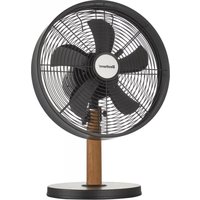
FT-30MJ3 - Fan BESTHERM - Free user manual and instructions
Find the device manual for free FT-30MJ3 BESTHERM in PDF.


| Product type | Pedestal fan |
| Brand | Bestherm |
| Model | FT-30MJ3 |
| Blade diameter | 30 cm |
| Number of speeds | 3 |
| Oscillation | Yes, automatic (70°) |
| Timer | Yes, up to 8 hours |
| Remote control | Yes, included |
| Power | 50 W |
| Voltage | 220-240 V, 50 Hz |
| Material | ABS plastic and steel |
| Weight | 4.5 kg |
| Dimensions (H × W × D) | 130 × 45 × 45 cm |
| Maintenance | Clean with a damp cloth, do not use abrasive products |
| Safety | Protective grille, automatic shut-off if tipped over |
| Spare parts available | Blade, grille, motor, base |
| Repairability | Repairability index: 8.2/10 (estimate) |
| Warranty | 2 years |
Frequently Asked Questions - FT-30MJ3 BESTHERM
User questions about FT-30MJ3 BESTHERM
0 question about this device. Answer the ones you know or ask your own.
Ask a new question about this device
Download the instructions for your Fan in PDF format for free! Find your manual FT-30MJ3 - BESTHERM and take your electronic device back in hand. On this page are published all the documents necessary for the use of your device. FT-30MJ3 by BESTHERM.
USER MANUAL FT-30MJ3 BESTHERM
MANUEL D'INSTRUCTIONS
STRUCTURE DU PRODUIT

ASSEMBLAGE DU PRODUIT
FONCTIONNEMENT
Original version
BEFORE OPERATING THIS PRODUCT, READ, UNDERSTAND, AND FOLLOW THESE INSTRUCTION
EN_V1_20221230
READ AND SAVE THESE SAFETY INSTRUCTIONS BEFORE USING THIS APPLIANCE
IMPORTANT SAFETY INSTRUCTIONS
⚠ WARNING: When using electrical appliances, basic safety precautions should always be followed to reduce the risk of fire, electrical shock and personal injury.
- Do not use this product in the immediate vicinity of water, such as bathtubs, washbowls, swimming pools etc. where the likelihood of immersion or splashing could occur.
- Do not place the fan or any parts near an open flame, cooking or other heating appliance.
- Do not operate the fan with a damaged cord or plug, or if the product malfunctions, or is dropped or damaged in any manner.
- This appliance can be used by children aged from 8 years and above and persons with reduced physical, sensory or mental capabilities or lack of experience and knowledge if they have been given supervision or instruction concerning use of the appliance in a safe way and understand the hazards involved.
- Children shall not play with the appliance. Cleaning and user maintenance shall not be made by children without supervision.
- If the supply cord is damaged, it must be replaced by the manufacturer, its service agent or similarly qualified persons in order to avoid a hazard.
- Do not cover the grill, or operate in close proximity to curtains, etc. Ensure adequate ventilation around the unit.
- Place the fan on a dry level surface to avoid overturning.
- Use this fan only as described in this manual. Other use not recommended may cause fire, electric shock or injury to persons. This will also void your warranty.
- Always operate the product from a power source of the same voltage, frequency and rating as indicated on the rating label.
- This product is intended for indoor, household use ONLY. Do not use outdoors or for commercial or industrial purposes.
- Do not operate the fan with the cord coiled up, fully unwind before use.
- Do not operate the fan in the presence of explosive and/or flammable fumes.
- To protect against electric shock: do not immerse unit, plug or cord in water or spray with liquids; do not place the fan on
windowsills or other places where it may be exposed to dripping or splashing of water; do not place vases or similar objects filled with liquids near the fan.
-
To reduce the risk of fire or electric shock, do not use this fan with any solid-state speed control device.
-
Turn the fan off and unplug the fan from the outlet when not in use, when moving the fan from one location to another and before disassembling or cleaning. Fully assemble the fan before switching on again.
-
To disconnect the fan, first turn the unit off, grip the plug and pull it from the wall outlet. Never pull the plug by the cord.
-
Avoid contact with moving fan parts. Do not insert any body parts (e.g. finger) or objects through the grill when the fan is operating.
-
The use of attachments not recommended by the manufacturer may be hazardous.
-
Do not operate if the fan housing is damaged.
-
A loose fit between the AC outlet (receptacle) and plug may cause overheating and a distortion of the plug. Contact a qualified technician to replace loose or worn outlet.
-
If the fan is not working properly, contact a qualified technician for examination and repair. Never attempt to dismantle the fan yourself.
-
Never install or store the unit where it could be subject to:
a. Heat sources like radiators, heat registers, stoves or other products that produce heat
b. Direct sunlight
c. Mechanical vibration or shock
d. Excessive dust
e. Lack of ventilation, such as a cabinet or bookcase
f. Uneven surfaces
-
Do not leave the fan running unattended.
-
Do not hang or mount fan on a wall or ceiling.
-
The fan must be fully and properly assembled before use.
-
After assembly, do not remove the guards during use or cleaning
-
Never remove the fan guards for cleaning or maintenance.
-
This appliance is for indoor use only. Any other use (professional) is excluded.
PRODUCT STRUCTURE

- Oscillation Knob
- On/Off/Speed Dial (0/I/II/III)
- Tilt Adjustment Screw
- Neck Fixing Bolt
- Locating Screw
- Neck Fixing Knob
- Top of Pipe
- Pipe
- Base
- Base Locking Screw
- Carry Handle
PRODUCT ASSEMBLY
Remove all small parts from the box.
Base Assembly
- Remove the Neck Fixing Bolt and Knob from the top of the Pipe.
- Loosen and remove the Base Locking Screw from the bottom of the Pipe.

- Fit the Pipe into the recess in the top side of the Base; and while holding it, turn it over to access the bottom side.
- Align the Base Locking Screw against the hole as shown. Tighten
the Base Locking Screw to finish attaching the Base to the fan body.
- Now turn it right way up and place on a flat stable surface

Fan Head Assembly
Neck Fixing Bolt and Knob--to fix the Motor unit to the Pipe
Locating Screw-- to limit the angle of tilt
Tilt Adjustment Screw--to adjust the tilt
- Remove the Tilt Adjustment Screw from the neck of the Motor Unit; place the neck over the Pipe with Locating Screw aligning with the slot on the side of the Pipe.
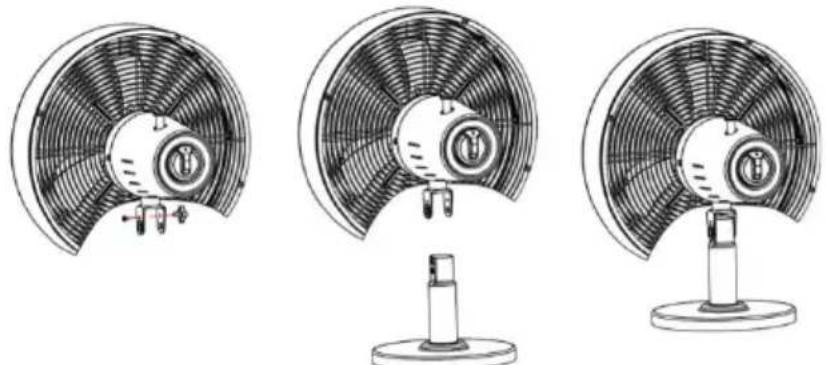
- Run the Neck Fixing Bolt through the neck of the Motor Unit and the Pipe.
Tighten the Locating Screw.

- Fix the Neck Fixing Knob to the Neck Fixing Bolt.

- Screw in the Tilt Adjustment Screw to the neck of the Motor Unit. Now you can adjust the tilt of the Motor Unit and secure it in position by tightening the Tilt Adjustment Screw.

OPERATION
Warning: Make sure that the fan is fully assembled and that the grills are in place and locked before switching on.
- Place your fan on a level and dry surface, keeping in mind the safety precautions outlined.
- Plug the fan into a suitable mains socket (see Technical Specifications for details).
Speed Adjustment: Turn the On/Off/ Speed Dial to the desired setting. There are 4 settings - 0 (Off), I (Low speed), II (Medium speed) and III (High speed).
Oscillation function: Push the Oscillation Knob down to start oscillation. Pull it up to stop oscillation.
Tilt Adjustment: To adjust the air flow, the tilt angle can be adjusted. To do this, loosen the Tilt Adjustment Screw and adjust the fan head to the desired angle. Tighten the Tilt Adjustment Screw to fix the position.
Caution: The fan should be switched off when making this adjustment.
TECHNICAL DATA
| Model No: | FT-30MJ3 |
| Voltage/Frequency: | 220-240V~ 50Hz |
| Rated power: 35W | |
 | Compliance with all requirements of applicable CE directives |
 | Electrical products should not be disposed of with household waste.Please recycle at collection points provided for this purpose.Contact local authorities or your dealer for recycling advice. |
 | The Triman logo indicates that the product or packaging must not be disposed of with household waste but must be sorted or taken to a collection point (containers in shops, rubbish dumps, etc.) to be recycled.For more information: www.quefairedemesdechets.fr |
| Information requirements for Fan | |||
| Model identifier: | FT-30MJ3 | ||
| Description | Symbol | Value | Unit |
| Maximum fan flow rate | F | 20.4 | m3 /min |
| Fan power input P 32.7 W | |||
| Service Value | SV | 0.6 | (m3 /min)/W |
| Standby power consumption | PSB | N/A | W |
| Seasonal electricity consumption | Q | 11.2 | kWh/a |
| Fan sound power level L | WA | 56 | dB(A) |
| Maximum air velocity | c | 2.0 | meters/sec |
| Measurement standard for service value | EN 50564: 2011IEC 60879:2019EN 60704-2-7:1998 |
| Contacts details for obtaining more information | HOM’Y SASGREEN PARK - Bat A, 61 rue de la cimaise, 59650Villeneuve d'Ascq, FRANCE |
CLEANING AND MAINTENANCE
Caution:
- Always switch off and unplug the fan before performing any cleaning.
-
Do not use harsh detergents, chemical cleaners or solvents as they may damage the surface finish of the components.
-
Use a vacuum cleaner with a brush attachment to clean the Grills.
- Use a soft duster or a cloth rag to dust off all the surfaces.
Caution: Ensure that water doesn't get into the Motor Unit.
STORAGE AND DISPOSAL
If you do not plan to use the fan for extended periods of time, it is recommended that it is cleaned and stored (preferably in its original packaging) in a cool, dry place.
Please check with your local council for alternative disposal methods before disposing of electrical products with household waste. If electrical appliances are disposed of in landfills or dumps, it is possible that hazardous substances may leak into the groundwater and get into the food chain, damaging your health and well-being.


Imported by: HOM'Y SAS
GREEN PARK - Bat A, 61 rue de la cimaise, 59650 Villeneuve
d'Ascq, FRANCE
Fabriqué en Chine
www.bestherm.eu
- MANUEL D'INSTRUCTIONS
- STRUCTURE DU PRODUIT
- ASSEMBLAGE DU PRODUIT
- FONCTIONNEMENT
- READ AND SAVE THESE SAFETY INSTRUCTIONS BEFORE USING THIS APPLIANCE
- IMPORTANT SAFETY INSTRUCTIONS
- PRODUCT STRUCTURE
- PRODUCT ASSEMBLY
- BASE ASSEMBLY
- FAN HEAD ASSEMBLY
- OPERATION
- CLEANING AND MAINTENANCE
- CAUTION
- STORAGE AND DISPOSAL
Brand : BESTHERM
Model : FT-30MJ3
Category : Fan