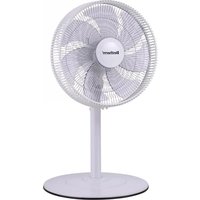
RSK-1 - Fan BESTHERM - Free user manual and instructions
Find the device manual for free RSK-1 BESTHERM in PDF.


| Product type | Pedestal fan |
| Brand | Bestherm |
| Model | RSK-1 |
| Category | Fan |
| Dimensions (H x W x D) | 130 x 40 x 40 cm |
| Net weight | 3.5 kg |
| Power supply | 220-240 V ~ 50 Hz |
| Rated power | 45 W |
| Number of speeds | 3 speeds |
| Oscillation | Yes, horizontal (90°) |
| Timer | Not available |
| Main functions | Adjustable ventilation, oscillation, manual tilt |
| Protective grille | Removable for cleaning |
| Maintenance | Clean with a soft, damp cloth; do not immerse |
| Safety | Protective grille, automatic shutdown in case of tipping |
| Spare parts | Blade, front/rear grille, motor (available after-sales) |
| Repairability | Repairability index: 8/10 (estimate) |
| Usage | Indoor only |
| Noise level | 45 dB (max) |
| Color | White |
| Warranty | 2 years |
Frequently Asked Questions - RSK-1 BESTHERM
User questions about RSK-1 BESTHERM
0 question about this device. Answer the ones you know or ask your own.
Ask a new question about this device
Download the instructions for your Fan in PDF format for free! Find your manual RSK-1 - BESTHERM and take your electronic device back in hand. On this page are published all the documents necessary for the use of your device. RSK-1 by BESTHERM.
USER MANUAL RSK-1 BESTHERM
MANUEL D'INSTRUCTIONS
VENTILATEUR FIXE 35CM RSK-1

STRUCTURE DU PRODUIT
PRÉPARATION
ASSEMBLAGE DU PRODUIT
voulu.
Original version
BEFORE OPERATING THIS PRODUCT, READ, UNDERSTAND, AND FOLLOW THESE INSTRUCTIONS.
EN_V1_20221224
GENERAL SAFETY INSTRUCTIONS
Read and follow all the instructions in this “Use and Care” manual even if you feel you are familiar with the products, and find a place to keep it handy for future reference.
READ AND SAVE THESE INSTRUCTIONS FOR FUTURE REFERENCE
IMPORTANT SAFEGUARDS
PLEASE READ ALL INSTRUCTIONS CAREFULLY BEFORE USING THE PRODUCT.
When using the electrical appliance, the following basic safety precautions should always be followed.
WARNING: to reduce the risk of fire, electric shock or injury to persons or property:
- Always operate the product from a power source of the same voltage, frequency and rating as indicated on the product identification plate.
- Do not use this fan with any solid state speed control device to reduce the risk of electric shock.
- Do not leave the fan running unattended.
- Do not operate the product if it is dropped, damaged or showing signs of product malfunction. Do not operate the product with a damaged plug or cord. Return the complete product to the place of purchase for inspection, refund or replacement.
- If it is not working properly, contact a qualified electrician or service center for examination and repair, never try to dismantle it by yourself.
-
Do not immerse, expose the product or expose the flexible cord to rain, moisture or any other liquid.
-
This product should not be used in the immediate vicinity of water, such as bathtubs, washbowls, swimming pools etc. where the likelihood of immersion or splashing could occur.
-
Never install the unit where it could be subject to:
-
Heat sources such as radiators, heat registers, stoves or other products that produce heat
- Direct sunlight
- Mechanical vibration or shock
- Excessive dust
- Lack of ventilation, such as a cabinet or bookcase
-
Uneven surface
-
Switch off and unplug from outlet when the product is not in use, before assembling or disassembling parts and before cleaning. Fully assemble the fan before switching on.
-
Avoid contact with moving parts. Do not insert any body parts (e.g. finger) or objects through the grill when the fan is operating.
-
Do not cover the grid, or operate in close proximity to curtains, etc.
- This product is intended for normal domestic/household use only.
- Always disconnect the fan when moving it from one location to another.
- The use of attachments or accessories not recommended or sold by the product distributor may cause personal or property hazards or injuries.
- Be sure fan is on a stable surface when operating to avoid overturning.
- Do not immerse in water.
-
If the supply cord is damaged, it must be replaced by the manufacturer, its service agent or similarly qualified persons in order to avoid a hazard.
-
This appliance can be used by children aged from 8 years and above and persons with reduced physical, sensory or mental capabilities or lack of experience and knowledge if they have been given supervision or instruction concerning use of the appliance in a safe way and understand the hazards involved.
- Children shall not play with the appliance.
- Cleaning and user maintenance shall not be made by children without supervision.
- Warning ! Never use without the guards in place. After assembly, do not remove the guards during use or cleaning.
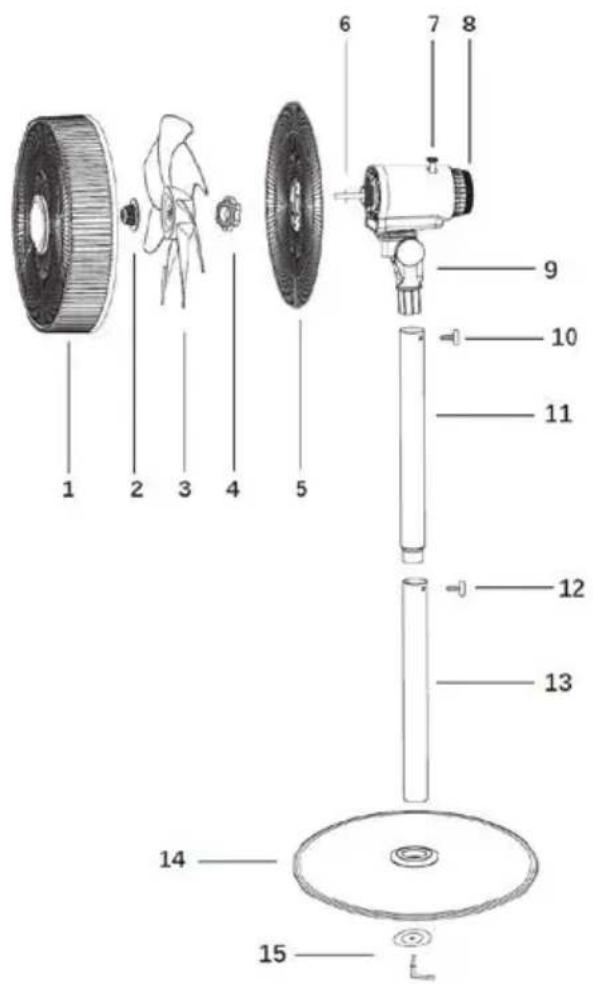
PRODUCT STRUCTURE
- Front grid
- Blade cap
- Fan Blade
- Rear grille locker (Plastic mounting nut)
- Rear grid
- Motor shaft
- oscillation knob
- Rotated Switch
- Connector
- Fix knob A
- Upper tube
- Fix knob B
- Lower tube
- Round base
- Washer & L type screw
GETTING STARTED
Unpack the fan from the gift box.
Retain the carton and packing for future use. If you have to dispose of the carton and packing, please do so responsibly.
PRODUCT ASSEMBLY
- First, loosen and remove the L type base screw and washer(15) from the lower tube(13). Then secure the lower tube(13) on the round base(14) by the L type base screw and washer(15).
- Slide the upper tube(11) over the lower Tube(13) and tighten the Fix knob B(12). Make sure the Fix knob B(12) is tightly secured.
- Slide the Connector(9) of the Fan head down over the Upper Tube(11) and tighten the Fix knob A(10). Make sure the Fix knob A(10) is tightly secured.
- Position the Rear Grid(5) against the front of the motor housing, ensuring that the locating pegs on the motor housing are engaged correctly in the narrow holes on the Rear Grid(5).
- Replace and tighten the Plastic Mounting Nut(4). DO NOT OVER TIGHTEN!
Loosen nut of blade by turning it clockwise to ☐ and tighten it by turning it anti-clockwise to ☑.
Loosen nut of rear guard by turning it anti-clockwise to ☐, and tighten it by turning it clockwise to ☐.
- Push the Fan Blade(3) onto the Motor Shaft(6), locating the slot on the back of the Fan Blade(3) on to the drive pin that passes through the Motor Shaft(6).
- Tighten the Blade Cap(2) by turning it anticlockwise.
- Position the Front Grid(1) against the Rear Grid(5) so that the slot in the rims can fit the Rear Grid(5). Lock the clip on the front Grid(1), and fix the safety screw.
OPERATION
CAUTION:
- Select a suitable location for the fan. Always choose a safe location in accordance to the safety recommendations outlined.
- When placing a fan on a table or shelf, always ensure that the power cord does not hang where it can accidentally be pulled and that the unit cannot accidentally fall.
- Do not hang or mount the fan on a wall or ceiling.
- Remove the cable tie and unravel the cord set before operation.
- To blow air in one direction and stop oscillation, allow the Desk Fan to move into the desired position and pull the oscillating knob(7) up. To return to a normal oscillating function, press the oscillating knob(7) down.
1. On / Off and Speed Control
The ON/OFF and Speed is controlled by the rotated Switch(8).
0-The Fan is switched Off, 1-at the lowest speed, 2-at the middle speed, 3-at the highest speed

2. Angle Adjustment
Switch off the fan. Adjust the fan to the desired angle by hand.
3. Oscillation control
The fan can be set to oscillate by pushing Oscillating Knob downwards. To stop the oscillating feature, pull-up the Oscillation Knob(7).
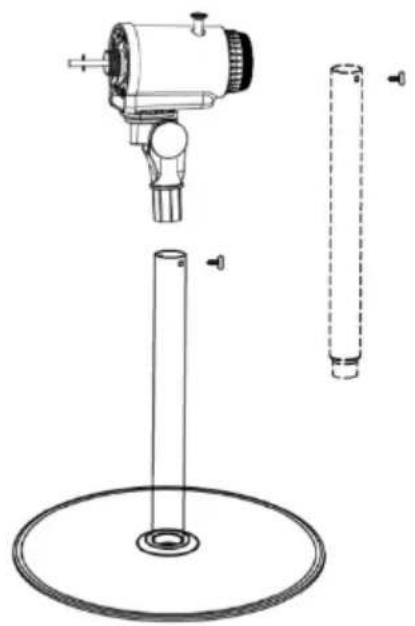
4. 2 in 1 function
The fan can be transformed from stand fan to table fan by removing the upper tube(11). Then Slide the Switch Box down over the Lower
Tube(13) and tighten the Fix knob (10/12). Make sure the Fix knob (10/12) is tightly secured.
TECHNICAL DATA
| Model No: | RSK-1 |
| Voltage/Frequency: | 220-240V~, 50Hz |
| Rated power: | 50W |
 | Compliance with all requirements of applicable CE directives |
 | Electrical products should not be disposed of with household waste.Please recycle at collection points provided for this purpose.Contact local authorities or your dealer for recycling advice. |
 | The Triman logo indicates that the product or packaging must not be disposed of with household waste but must be sorted or taken to a collection point (containers in shops, rubbish dumps, etc.) to be recycled.For more information: www.quefairedemesdechets.fr |
| Information requirements for Fan | |||
| Decription | Symbol | Value | Unit |
| Maximum fan flow rate | F | 55.02 | m3 /min |
| Fan power input | P | 48.5 | W |
| Service Value | SV | 1.13 | (m3 /min)/W |
| Standby power consumption | PSB | 0.00 | W |
| Seasonal electricity consumption | Q | 15.520 | kWh/a |
| Fan sound power level | LWA | 60.8 | dB(A) |
| Maximum air velocity | c | 2.98 | meters/sec |
| Measurement standard for service value | EN IEC 60879:2019 | ||
| Contacts details for obtaining more information | HOM'Y SASGREEN PARK - Bat A, 61 rue de la cimaise, 59650 Villeneuve d'Ascq, FRANCE | ||
CLEANING AND MAINTENANCE
- Caution! The device must be turned off and unplugged before every cleaning.
- Once the fan is assembled, it is forbidden to disassemble the grids (guard) when cleaning.
-
Keep the air vents at the rear of the main body free from dust or fluff—use a vacuum cleaner to remove these when necessary. Do not probe any opening to remove fluff.
-
Fan component parts should be cleaned using mild soap and a damp cloth or sponge. Do not allow any water or other liquid to enter the motor housing.
• Thoroughly remove soap film with clean water.
CAUTION: Do not use harsh detergents, chemical cleaners or solvents as they may damage the surface finish of the fan components.


Imported by: HOM'Y SAS
- MANUEL D'INSTRUCTIONS
- VENTILATEUR FIXE 35CM RSK-1
- STRUCTURE DU PRODUIT
- PRÉPARATION
- ASSEMBLAGE DU PRODUIT
- GENERAL SAFETY INSTRUCTIONS
- IMPORTANT SAFEGUARDS
- PRODUCT STRUCTURE
- GETTING STARTED
- PRODUCT ASSEMBLY
- OPERATION
- CAUTION
- ON / OFF AND SPEED CONTROL
- ANGLE ADJUSTMENT
- OSCILLATION CONTROL
- 2 IN 1 FUNCTION
- CLEANING AND MAINTENANCE
Brand : BESTHERM
Model : RSK-1
Category : Fan