
SOUND ON SOUND - Audio recorder KORG - Free user manual and instructions
Find the device manual for free SOUND ON SOUND KORG in PDF.
| Product Type | Portable multitrack audio recorder |
| Brand | KORG |
| Model | SOUND ON SOUND |
| Dimensions (W x H x D) | 69 mm x 135 mm x 35 mm |
| Weight | 140 g (without memory card or batteries) |
| Power | 2 AA batteries (LR6 alkaline or NiMH) or optional DC 4.5 V AC adapter |
| Recording format | WAV (44.1 kHz, 16-bit, BWF compatible) |
| Maximum recording time | 6 hours per song, approximately 100 minutes per GB |
| Maximum number of songs | 200 |
| Main functions | Recording, playback, overdub (Sound-On-Sound), built-in effects (100 types), rhythm box (50 patterns), chromatic tuner, A/B loop, undo/redo, Sound Stretch (25-150%) |
| Inputs | GUITAR IN (6.35 mm jack), LINE (3.5 mm stereo mini-jack), MIC (3.5 mm stereo mini-jack with Plug-In-Power), built-in microphone |
| Outputs | Headphones (3.5 mm stereo mini-jack), internal speaker |
| Storage medium | microSD card (512 MB to 2 GB) or microSDHC (4 to 16 GB) |
| Display | LCD with touch cursor and adjustable backlight |
| Maintenance and cleaning | Clean with a clean, dry cloth. Do not use benzene, thinner, or flammable products. |
| Safety | Do not expose to rain, moisture, magnetic fields, or strong vibrations. Use only the recommended AC adapter. Avoid liquid or metal object intrusion. |
| Spare parts and repairability | Contact your Korg dealer or after-sales service. Optional AC adapter, user-replaceable batteries. |
| General information | Compliant with CE and NMB-003 Class B standards. Operating temperature: 0°C to +40°C (without condensation). Supplied with test alkaline batteries and user manual. |
Frequently Asked Questions - SOUND ON SOUND KORG
User questions about SOUND ON SOUND KORG
0 question about this device. Answer the ones you know or ask your own.
Ask a new question about this device
Download the instructions for your Audio recorder in PDF format for free! Find your manual SOUND ON SOUND - KORG and take your electronic device back in hand. On this page are published all the documents necessary for the use of your device. SOUND ON SOUND by KORG.
USER MANUAL SOUND ON SOUND KORG
Using the unit in the following locations can result in a malfunction.
- In direct sunlight
- Locations of extreme temperature or humidity
- Excessively dusty or dirty locations
- Locations of excessive vibration
- Close to magnetic fields
Power supply
Please connect the designated AC adapter to an AC outlet of the correct voltage. Do not connect it to an AC outlet of voltage other than that for which your unit is intended.
Interference with other electrical devices
Radios and televisions placed nearby may experience reception interference. Operate this unit at a suitable distance from radios and televisions.
Handling
To avoid breakage, do not apply excessive force to the switches or controls.
Care
If the exterior becomes dirty, wipe it with a clean, dry cloth. Do not use liquid cleaners such as benzene or thinner, or cleaning compounds or flammable polishes.
Keep this manual
After reading this manual, please keep it for later reference.
Keeping foreign matter out of your equipment
Never set any container with liquid in it near this equipment. If liquid gets into the equipment, it could cause a breakdown, fire, or electrical shock.
Be careful not to let metal objects get into the equipment. If something does slip into the equipment, unplug the AC adapter from the wall outlet. Then contact your nearest Korg dealer or the store where the equipment was purchased.
- All product names and company names are the trademarks or registered trademarks of their respective owners.
This device complies with Part 15 of the FCC Rules. Operation is subject to the following two conditions: (1) This device may not cause harmful interference, and (2) this device must accept any interference received, including interference that may cause undesired operation. Complies with Canadian ICES-003 Class B.
Incorrect operation or malfunction may cause the contents of memory to be lost, so we recommend that you save important data on a CD or other media. Please be aware that Korg will accept no responsibility for any damages which may result from loss of data.
Notice regarding disposal (EU only)


When this "crossed-out wheeled bin" symbol is displayed on the product, owner's manual, battery, or battery package, it signifies that when you wish to dispose of this product, manual, package or battery you must do so in an approved manner. Do not discard this product, manual, package or battery along with ordinary household waste. Disposing in the correct manner will prevent harm to human health and potential damage to the environment. Since the correct method of disposal will depend on the applicable laws and regulations in your locality, please contact your local administrative body for details. If the battery contains heavy metals in excess of the regulated amount, a chemical
symbol is displayed below the "crossed-out wheeled bin" symbol on the battery or battery package.
THE FCC REGULATION WARNING (for USA)
This equipment has been tested and found to comply with the limits for a Class B digital device, pursuant to Part 15 of the FCC Rules. These limits are designed to provide reasonable protection against harmful interference in a residential installation. This equipment generates, uses, and can radiate radio frequency energy and, if not installed and used in accordance with the instructions, may cause harmful interference to radio communications. However, there is no guarantee that interference will not occur in a particular installation. If this equipment does cause harmful interference to radio or television reception, which can be determined by turning the equipment off and on, the user is encouraged to try to correct the interference by one or more of the following measures:
Reorient or relocate the receiving antenna.
- Increase the separation between the equipment and receiver.
- Connect the equipment into an outlet on a circuit different from that to which the receiver is connected.
- Consult the dealer or an experienced radio/TV technician for help.
Unauthorized changes or modification to this system can void the user's authority to operate this equipment.
COPYRIGHT WARNING
This professional device is intended only for use with works for which you yourself own the copyright, for which you have received permission from the copyright holder to publicly perform, record, broadcast, sell, and duplicate, or in connection with activities which constitute "fair use" under copyright law. If you are not the copyright holder, have not received permission from the copyright holder, or have not engaged in fair use of the works, you may be violating copyright law, and may be liable for damages and penalties. If you are unsure about your rights to a work, please consult a copyright attorney.
KORG TAKES NO RESPONSIBILITY FOR ANY INFRINGEMENT COMMITTED THROUGH USE OF KORG PRODUCTS.
IMPORTANT NOTICE TO CONSUMERS
This product has been manufactured according to strict specifications and voltage requirements that are applicable in the country in which it is intended that this product should be used. If you have purchased this product via the internet, through mail order, and/or via a telephone sale, you must verify that this product is intended to be used in the country in which you reside.
WARNING: Use of this product in any country other than that for which it is intended could be dangerous and could invalidate the manufacturer's or distributor's warranty.
Please also retain your receipt as proof of purchase otherwise your product may be disqualified from the manufacturer's or distributor's warranty.
Table of Contents
Introduction 5
Before Using the SOUND on SOUND 6
Inserting or Replacing Batteries 6
Inserting or Removing a Memory Card 7
Supported memory cards 7
Turning the Power On or Off 8
Setting the Current Date and Time 8
Part Name and Function 9
Connectors. 9
Control Panel 10
LCD Layout 12
Using the SOUND on SOUND. 14
Recording and Playback. 14
Selecting an input source 14
Recording a new song. 15
Playback 16
Overdubbing (Sound-On-Sound). 17
Useful Functions for Playback and Recording. 19
Adjusting the playback speed (Sound Stretch function) 19
Setting the playback or recording start point 19
Loop playback/recording 19
Canceling recording (Undo/Redo) 21
Other Functions 22
Using the effects 22
Using the rhythm machine. 23
Using the tuner 24
Menu Mode. 25
Basic Operation in Menu Mode 25
List of Categories, Pages, and Parameters. 25
Categories, Pages, and Parameters 29
INPUT 29
REC 30
TIME. 32
RHYTHM 34
FX. 35
TUNER. 37
DATA 37
MISC 43
Appendix. 47
SOUND on SOUND Data Structure 47
Messages. 50
Execution messages 50
Error messages 50
Troubleshooting 52
Effect Type. 54
Rhythm Type 55
Specifications 56
Main sections 56
Main standards. 57
Introduction
Thank you for choosing the Korg SOUND on SOUND UNLIMITED TRACK REORDER. This device allows you to easily record professional sounding audio without the hassle of a large recording rig. The SOUND on SOUND is great for songwriters sketching out ideas, guitar players, recording band rehearsals or concerts.
The SOUND on SOUND enables you to record performances through a built-in microphone. It also features direct recording from a guitar connected to the dedicated guitar input jack, line recording from an external audio device, and recording through an external microphone connected to the microphone jack. The recorder supports the WAV (44.1 kHz, 16-bit) audio format. The SOUND on SOUND also allows you to overdub by recording and mixing input signals while playing back the file. This function is very useful when you want to use the unit as a simple multi-track recorder.
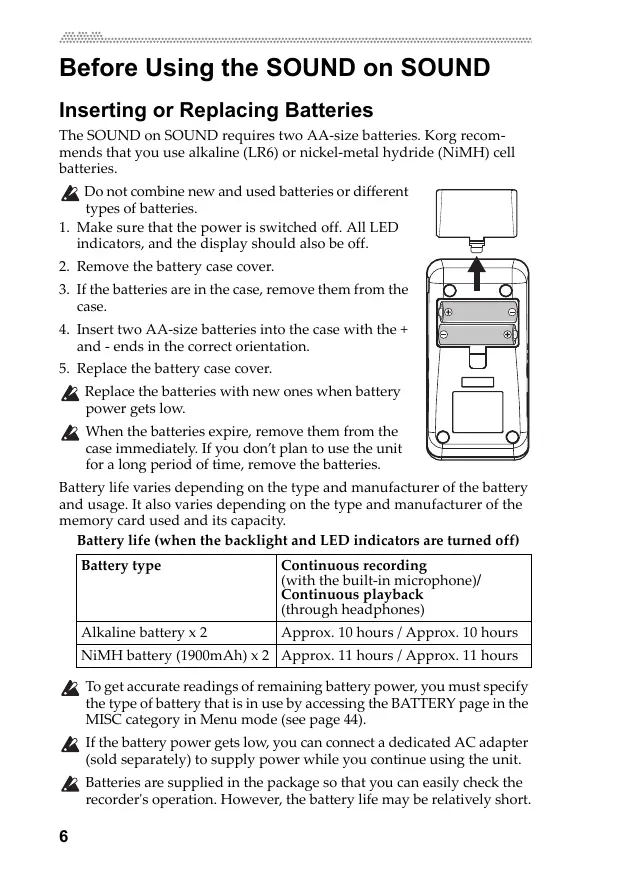
Before Using the SOUND on SOUND
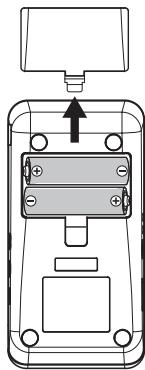
Inserting or Replacing Batteries
The SOUND on SOUND requires two AA-size batteries. Korg recommends that you use alkaline (LR6) or nickel-metal hydride (NiMH) cell batteries.
Do not combine new and used batteries or different types of batteries.
- Make sure that the power is switched off. All LED indicators, and the display should also be off.
- Remove the battery case cover.
- If the batteries are in the case, remove them from the case.
- Insert two AA-size batteries into the case with the + and - ends in the correct orientation.
- Replace the battery case cover.
Replace the batteries with new ones when battery power gets low.
When the batteries expire, remove them from the case immediately. If you don't plan to use the unit for a long period of time, remove the batteries.
Battery life varies depending on the type and manufacturer of the battery and usage. It also varies depending on the type and manufacturer of the memory card used and its capacity.
Battery life (when the backlight and LED indicators are turned off)
| Battery type | Continuous recording (with the built-in microphone)/ Continuous playback (through headphones) |
| Alkaline battery x 2 | Approx. 10 hours / Approx. 10 hours |
| NiMH battery (1900mAh) x 2 | Approx. 11 hours / Approx. 11 hours |
To get accurate readings of remaining battery power, you must specify the type of battery that is in use by accessing the BATTERY page in the MISC category in Menu mode (see page 44).
If the battery power gets low, you can connect a dedicated AC adapter (sold separately) to supply power while you continue using the unit.
Batteries are supplied in the package so that you can easily check the recorder's operation. However, the battery life may be relatively short.
Inserting or Removing a Memory Card
- Make sure that the power is switched off. All LED indicators, and the display should also be off.
- Insert the memory card until it clicks (see page 9).
- To remove the memory card, push the card in gently using the tip of your finger until the card clicks, then release your finger.
- After the memory card is ejected, remove it from the slot.
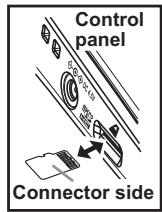
For more information on handling memory cards, please refer to the instruction manual that came with the card.
4 Be sure to push the memory card into the slot securely in the correct orientation with the correct side facing up. Do not push in a memory card forcefully. Insert the card into the slot gently.
Do not install or remove a memory card while the power to the unit is on. Otherwise, data in the unit or on the memory card may be lost, or the memory card may become unusable.
Supported memory cards
The SOUND on SOUND supports microSD cards and microSDHC cards.
Formatting a memory card
If you used a memory card with your computer, cell phone, digital camera or other device, you cannot use it as is with the SOUND on SOUND. You must properly format such a card before you can use it with the recorder. For more information, Please refer to the "FORMAT" section on page 37.
About available recording time
Approx. 100 minutes per 1GB Approx. 10MB required per recording minute
Available recording time values listed above are estimates. The maximum recording time will be shorter as the number of songs in the card increases.
Maximum recording time listed above is based on the first continuous recording for a new song. For overdubbing, maximum recording time is the total sum of all recording durations.
Maximum recording time per song is six (6) hours.
Turning the Power On or Off

Before connecting the unit to another device, be sure to turn down the volume of the unit as well as the other device, and turn the unit off to prevent malfunction or damage to the speakers.
- To turn on the power to the unit, press and hold down the power button until the display turns on.
- To turn off the power to the unit, first make sure that playback or recording is stopped, then press and hold down the power button until the unit displays the PWR OFF dialog.
- Press the button to turn the power off. If you decide NOT to turn the power off, press the button.
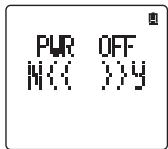

Be sure to follow the steps described above to turn off the power to the unit.
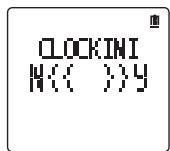
Setting the Current Date and Time
Before you start recording, set the internal clock. The date and time set here will be used to timestamp recorded songs.
- When you turn on the power to the unit for the first time, the unit will display "CLOCKINI."
- Press the button.
- The year field will flash. Press the + or - button to set the year.
Only the last two digits of the year are displayed. The first two digits are fixed to "20XX."
- After setting the year, press the button.
- The month field will flash. Press the + or - button to set the month.
- Press the button to move through the setting items, and use the + and - buttons to set the day, hour, minute, and second values.
- Press the button to confirm the date and time settings.
If you want to cancel the settings, press the Stop button.
To set the date and time later, access the DATE page in the MISC category in Menu mode (see page 43).
Note If you remove the batteries or if the batteries in the unit have been exhausted for a while (about three days) after you set the date and time, the internal clock will be reset to the default setting.
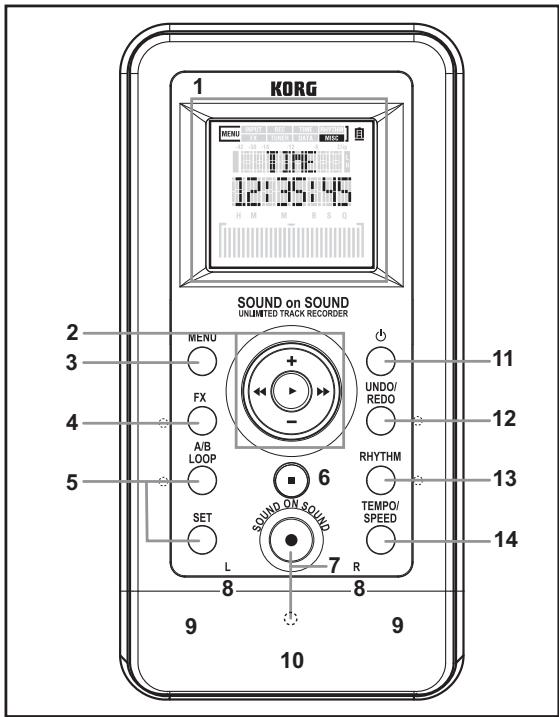
Part Name and Function
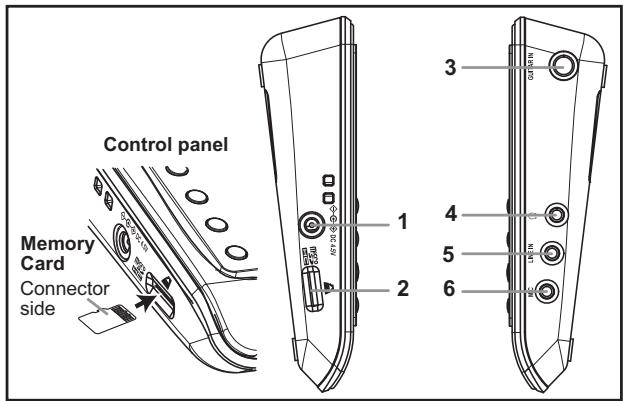
Connectors
- AC adapter jack
Be sure to use the AC adapter that is dedicated to the SOUND on SOUND.
- Memory card slot
Please refer to "Inserting or Removing a Memory Card" on page 7.
- GUITAR IN jack (standard phone jack)
You can connect a guitar or bass guitar directly to this high-impedance input jack.
- Headphone jack (stereo mini jack)
Use this output jack to connect stereo headphones or an external audio device (such as an amplifier). When this jack is used, the internal speaker will be muted.
Connect this analog audio input jack to the audio analog output connector on an external audio device.
Connect an external microphone here.
You can also use a small condenser-type microphone that supports Plug-In-Power (see "P-IN-PWR" on page 30).
Control Panel
1. LCD display
Indicates various settings. When a rectangular frame is displayed in the lower area, you can input or change parameter values by touching and sliding over this area with your finger (see page 12).
2. Controller buttons
The , , , + and - buttons are used to control recording and playback and adjust various settings in Menu mode.
3. MENU button
Press this button to enter Menu mode to access various settings (see page 25). Pressing the Stop button while holding down the MENU button will cause the unit to enter Hold mode, in which all button operations will be disabled. To cancel Hold mode, press the Stop button again while holding down the MENU button.
4. FX button and indicator
Press this button briefly to turn the effects on (the LED will light up) or off (the LED will turn off). Press and hold down the button to access the effect setting page (see page 22).
5. A/B LOOP button and indicator, A/B SET button
These buttons enable you to set up loop playback and recording (see page 19).
6. Stop button
Press this button to stop recording or playback, or cancel the setting.
7. Record (SOUND ON SOUND) button and indicator
Press the Record button to place the unit in Record Ready mode. The Record indicator will flash. Press the Record button again to start recording while the unit is in Record Ready mode. The Record indicator will light up steadily.
8. Clip indicators L & R
These indicators will flash red during clipping.
9. Internal stereo microphone
10. Speaker
The built-in speaker will be muted if the headphone jack is connected. The speaker will also be muted to avoid feedback while you are recording via the built-in or external microphone, setting the input level, using the tuner, or when the unit is in Record Ready mode.
11. Power button (see page 8)
12. UNDO button and indicator (see page 21)
13. RHYTHM button and indicator
Press this button briefly to turn the rhythm machine on (the LED will light up) or off (the LED will turn off). Press and hold down the button to access the rhythm machine settings page (see page 23).
14. TEMPO/SPEED button
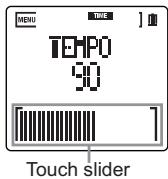
Press this button briefly to display the tempo. You can also set up tap tempo. Press and hold down the button to display the tempo setting page (see page 23).
LCD Layout
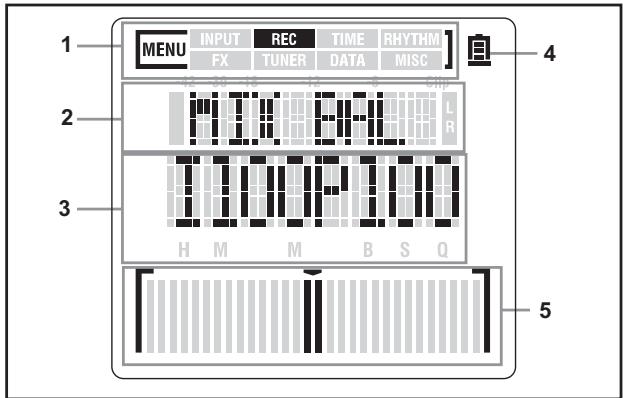
1. Menu mode indicators
These indicators show the categories in Menu mode.
To navigate through different categories, press and hold down the MENU button and press the 四 + or - button. To navigate through different pages in each category, press the 四 button.
Press the + or - button to set the parameter values.
| INPUT | Input settings, such as the input level, tone, Plug-In-Power, etc. (see page 29). |
| REC | Recording settings, such as the recording starts, Undo function, etc. (see page 30). |
| TIME | Time-related settings, such as the Time mode setting, tempo, etc. (see page 32). |
| RHYTHM | Rhythm-related settings, such as selection of various rhythm and drum kit options, etc. (see page 34). |
| FX | Effect settings, such as effect selection and effect parameter settings, etc. (see page 35). |
| TUNER | Tuner settings. (see page 24). |
| DATA | Data management, such as deleting songs, formatting, etc. (see page 37). |
| MISC | Other functions, such as the LCD backlight, LED indicators, etc. (see page 43). |
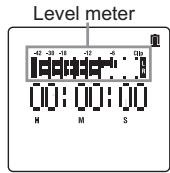
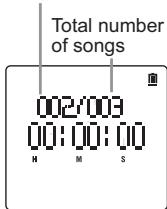
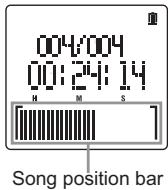
2. Song number, level meter, page title
| While stopped | Indicates the song number |
| During playback | Indicates the playback level meter |
| During recording or in Record Ready mode | Indicates the input level meter |
| In Menu mode | Indicates a page title in the category |
3. Counter, parameter
| During record- ing or playback | Indicates the current playback position | |
| HMS | Indicates the current position in hour, min- ute, second | |
| MBQ | Indicates the current position in measure, beat, quarter-beat | |
| In Menu mode | Indicates the parameter option or value in the page | |
4. Battery indicator
The battery indicator shows the amount of battery power.
High 1 > 2 Low
If is flashing, the batteries are almost exhausted. Replace them immediately.
The battery indicator does not appear while you are using an optional AC adapter.
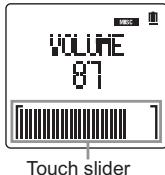
5. Song position bar, tuning meter, touch slider
| During playback | Song position bar Indicates the current playback position. You can change the playback position by using this bar as a touch slider. |
| During tuner operation | Tuning meter Indicates the current tuning status. If your instrument is tuned correctly, the bar graph will reach and stop at the center. |
| Effect Select page | Touch slider Enables you to adjust the parameter value by touching the slider. |
| Rhythm Select page | Touch slider Enables you to select a rhythm variation by touching the slider. |
| Other parameters | Touch slider If a frame is displayed around the bar, you can touch inside the frame to change parameter values. |
Using the SOUND on SOUND
Recording and Playback
Before you start recording, you can add the following features, if desired.
- Applying the unit's effects to the input sound (see page 22).
- Using the built-in rhythm machine (see page 23).
- Recording in MBQ (in measures) Time mode (see page 32).
Selecting an input source
This section explains how to record an electric guitar that is connected to the GUITAR IN jack.
- Connect your electric guitar to the GUITAR IN jack.
Do not connect anything to the LINE or MIC jack.
About input source detection
The SOUND on SOUND automatically scans to determine whether or not the GUITAR IN, LINE and MIC jacks are connected. If the unit detects a connected jack, it will automatically assign the jack as the input source. Therefore, do not connect anything to jacks other than the one you want to use for audio input. If multiple jacks are connected to external devices, the unit will select a jack according to the following input priority list. If no jacks are connected, the unit will automatically select the built-in microphone as the input source.
| Connected devices | Input source automatically selected |
| Guitar, line device, microphone | GUITAR IN jack |
| Guitar, microphone | GUITAR IN jack |
| Line device, microphone | LINE jack |
| Microphone | MIC jack |
| None | Built-in microphone |

Before you use a Plug-In-Power microphone, you must set the corresponding parameters (see page 30).
- Press the Record button to enter Record Ready mode. The Record LED indicator will flash.
- Press the + or - button to adjust the input level. You can also use the touch slider displayed on the LCD to adjust the level.
The recording level is appropriate if the level meter stays around " -6" and the Clip LED indicators do not light up when loud audio is input.
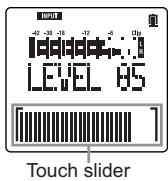
Please note that you cannot adjust the input level if the LVL CTRL (level control) parameter has been set to AUTO (see "LVL CTRL" on page 29).
- Press the Stop button to cancel Record Ready mode. The Record LED indicator will turn off.
Recording a new song
Data recorded on the SOUND on SOUND is called a "song."
Before you start recording a song, you must create a new song file to record with.
-
Follow one of the three methods described below to create a new song file.
-
If you have not recorded any songs after formatting a memory card, or if you have deleted all songs (see page 37) and the song title "NEW/001" appears on the LCD, press the Record button.
-
If there are only a small number of recorded songs (for example, if the song indicator "002/003" appears on the LCD), you can press the button to select the empty song file (in this case, "NEW"), then press the Record button.
-
If numerous songs exist (for example, if the song indicator "002/025" is displayed on the LCD) and if you want to start recording immediately, press and hold down the Stop button and press the Record button.
If the Record LED indicator flashes quickly (about twice per second) after you press the Record button, the unit is in Record Ready mode for a new song. If the Record LED indicator flashes slowly (about once per second) after you press the Record button, you must select a new song file (see "Over dubbing (Sound-On-Sound)" on page 17). Create and select a new song file.
- To start recording, while the unit is in Record Ready mode (and the Record LED indicator is flashing), press the Record button again to start recording. The Record LED indicator will light up steadily.
You can also start recording at the moment the audio starts (see "AT START" on page 30).
- To pause recording, press the Stop button. The Record LED indicator will flash.
- To resume recording, press the Record button (the Record LED indicator will light up). Alternatively, to finish recording, press the Stop button again (the Record LED indicator will turn off).
Currently-selected song number
Playback
- Locate the top of the song.
Press the button briefly to locate the top of the song that was just recorded. If you select a different song by pressing the or button, the top of that song will automatically be located.
- Play back the recorded song.
Press the button to play back the recorded song. - To pause playback, press the button.
- To resume playback, press the button again.
- To stop playback and locate the top of the song, press the Stop button.
To adjust the playback volume level, press the + or - button. You can also use the touch slider displayed on the LCD to adjust the level.
Moving the song playback position
To move the song playback position, follow one of the methods below. Please note that these methods are available only while the unit is displaying the playback screen.
| Fast forward | Press and hold down the ➔ button to fast forward through the song. |
| Fast reverse | Press and hold down the ⇑ button to fast rewind through the song. |
| Locating the top of the song | Press the ⇌ button briefly to locate the top of the song. Press the ⇌ button briefly at the top of the song to locate the top of the previous song. |
| Locating the top of the next song | Press the ➔ button briefly to locate the top of the next song. |
| Locating a position within the current song | While holding down the Stop button, press the ⇑ or ➔ button to locate the top of the song, Point A, Point B, or the end of the song (whichever the closest to the current point). |
| Locating a point specified by HMS Time mode (Hour: Minute: Second) | 1. While playback is stopped, press and hold down the Stop button and press the ➔ button. 2. The counter will flash. You can specify a time position using the + and - buttons. 3. Press the ⇌ or ➔ button to select the hour, minute, or second field. 4. After you specify the time, press the ➔ button to finish the setting. |
| Locating a point specified by MBQ Time mode (Measure: Beat: Clock) | 1. While playback is stopped, press and hold down the Stop button and press the ➔ button. 2. The counter will flash and you can specify an MBQ position using the + and - buttons. 3. Press the ⇑ or ➔ button to select the measure, beat or quarter-beat field. 4. After you specify the position, press the ➔ button to finish the setting. |
| Sliding fast forward/reverse | Touch and slide over the song position bar on the bottom of the LCD to move the playback position coarsely. |
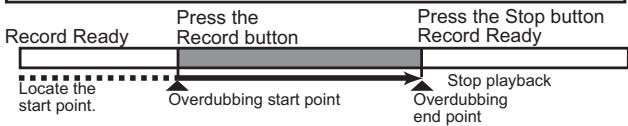
Over dubbing (Sound-On-Sound)
The SOUND on SOUND enables you to easily overdub on a song that has already been recorded. During overdubbing, two types of files are created: original material files that contain individual recordings, and a 2-mix file that combines the playback sound and additional recordings. The SOUND on SOUND recognizes the original material files and 2-mix file all together as one song file (see "FINALIZE" on page 39).
You can easily burn an audio CD from these overdubbed songs by copying them from the recorder to your computer, and using the KORG AUDIO UTILITY software, which you can download from the Korg web site.
You can also create a WAV file for each original material file plus 2-mix file by finalizing the overdubbed song. You can edit these WAV files using waveform editing software on your computer, or load them into a DAW (see "FINALIZE" on page 39).
About the space required for overdubbing on a memory card
During overdubbing, the SOUND on SOUND stores each original recording material file that was recorded (see page 47).
If you plan to overdub frequently, you should use a high capacity memory card. For example, if you make a three-minute recording, and then overdub three minutes three times, the space on a memory card required by these recordings would be approximately 30MB (first recording), 30MB (first overdubbing), 30MB (second overdubbing), and 30MB (third overdubbing), totaling approximately 120MB.
Overdubbing procedure
- Press the or button to select the song you want to overdub.
- If you want to start overdubbing in the middle of the song, locate the over-dub start point (see "Moving the song playback position" on page 16).
- Press the Record button to enter Record Ready mode. The Record LED indicator will flash slowly (about once per second).
-
Press the + or - button to adjust the input level, if necessary. You can also use the touch slider displayed on the LCD to adjust the level.
-
Press the or button to adjust the balance between the playback volume and input level, if necessary (see "MIX BAL" on page 32).
- Press the Record button again. The unit will start playback and recording at the same time. The Record LED indicator will light up steadily.
- Input sound mixed with the playback sound is recorded on the memory card.
You can also trigger recording at the moment the audio starts (see "AT START" on page 30).
If you want to start overdubbing at a certain point in the song while listening to the playback, press the button during Record Ready mode to start playback. Then press the Record button at the point you want to start recording.
- To pause overdubbing, press the Stop button. The Record LED indicator will flash.
Note If you press the Record or button instead of the Stop button, the unit will enter Record Ready mode, and playback will continue.
- To resume overdubbing, press the Record button (the Record LED indicator will light up). Alternatively, to finish overdubbing, press the Stop button again (the Record LED indicator will turn off).

If you overdub beyond the end point of the first recording, the end point of the song will be extended to the end of the overdubbed section.
Now the first layer of overdubbing is complete. To overdub more, repeat Steps 2 through 9.
Over dubbing while playing back only a targeted portion of a song
Over dubbing while playing back from the top to the end of a song
Useful Functions for Playback and Recording
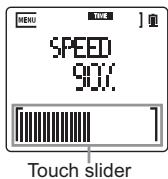
Adjusting the playback speed (Sound Stretch function)
The Sound Stretch function is very useful when you want to learn a fast guitar phrase by playing back the phrase slowly, or when you wish to record a complicated phrase by playing your guitar slowly.
Using this function, you can change the playback speed in the range of 25% to 150% without changing the pitch.
To change the playback speed, access the "SPEED" parameter in Menu mode (see page 33).
During overdubbing, you can only make the speed slower (25% - 99%) .
Setting the playback or recording start point
Auto Start
You can specify the input level where recording will automatically start after you press the Record button. To set the Auto Start input level, access the "AT START" parameter in Menu mode (see page 30).
Count In
You can specify the time to start playback for overdubbing. To set the start time, access the "COUNT IN" parameter in Menu mode (see page 31).
The parameters for this function vary depending on the Time mode setting for the counter (see "MODE" on page 32).
This function is effective only when recording starts while the unit is stopped and the Auto Start function is turned off (see "AT START" on page 30).
Loop playback/recording
Using the A/B Loop function enables you to play back or record a part between Points A and B repeatedly.

Repeat playback (A/B loop playback)
- Locate the loop start point (Point A), then press the A/B SET button. Point A is marked and the loop LED indicator will flash.
If the counter is displayed in MBQ Time mode, the unit will automatically mark Point A at the top of the measure before the measure where you specified the start point.
- Locate the loop end point (Point B), then press the A/B SET button. Point B is marked and the loop LED indicator will light up steadily.
If the counter is displayed in MBQ Time mode, the unit will automatically mark Point B at the top of the measure after the measure where you specified the end point.
To cancel the setting, press the A/B SET button again. The loop LED indicator will turn off and Points A and B are erased. You can also set Points A and B by pressing and holding down the A/B SET button to access the "A POINT" and "B POINT" parameter pages respectively (see page 33).
- Press the A/B LOOP button to turn on the A/B Loop function. The loop LED indicator will light up.
- When the playback position reaches Point B, it automatically returns to Point A to repeat A/B playback.
- Press the A/B LOOP button again to turn the A/B Loop function off. The loop LED indicator will turn off.
If you specify Point B at a time position before Point A, the time value of Point A and Point B will be swapped.
The interval between Points A and B should be two seconds or longer. You cannot set Point B within two seconds of Point A.
Repeat recording (A/B loop recording)
During loop playback, you can record by pressing the Record button.
- Refer to the "Repeat playback (A/B loop playback)" section to start loop playback.
- Press the Record button to enter Record Ready mode. The Record LED indicator will flash slowly.
- Press the Record button again to enter Record mode. At this point, nothing is recorded yet. Recording will start after the playback position returns to Point A from Point B. The Record LED indicator will continue flashing slowly until the playback position reaches Point B, then it will light up steadily when the playback position returns to Point A.
- When the recording position reaches Point B, the unit enters Record. Ready mode and starts A/B loop playback. The Record LED indicator will flash.
If you want to repeat overdubbing, press the Record button again to repeat loop recording.
If the duration between Points A and B is shorter than eight (8) seconds, the unit pauses playback when recording is complete. And then, the unit automatically starts loop playback of the recorded audio.
Canceling recording (Undo/Redo)
If you are not satisfied with your recorded performance, you can use the Undo function to cancel the recording.
To cancel the Undo operation, use the Redo function.
The Undo/Redo operation procedure varies depending on the Undo Time setting (see "UNDOTIME" on page 31). The factory default setting for the number of times for the Undo operation is one (1).
When the Undo Time setting is one (1) (1TIME):
- Press the UNDO button after recording.
- The unit discards the latest recording and reverts to the status obtained before recording.
The Undo LED indicator will light up.
If you start recording under these circumstances, Redo data will be lost and the Undo LED will turn off.
- To cancel the Undo operation (to revert to the status before you executed the Undo command), press the UNDO button again while the Undo LED indicator is illuminated. (This is called a "Redo" operation.)
When the Undo Time is set to a multiple number (10TIMES or INFINITY):
- After recording, press and hold down the UNDO button, and press the button.
- You can revert to an earlier stage (layer) of recording with each press of the button. The Undo LED indicator will light up.
At this time, the number of Undo layers will be displayed on the LCD as long as you press and hold down the UNDO button.
If you start recording under these circumstances, Redo data will be lost and the Undo LED will turn off.
- After the Undo LED indicator lights up, press and hold down the UNDO button, and press the button to redo later stages (layers).
You can undo and redo up to the number of times you specified for the Undo Time setting.
Other Functions
Using the effects
The SOUND on SOUND features 100 high-quality built-in effects, including amp models developed by "BEMs," Korg's proprietary modeling technology. These effects can be applied to both input audio and recorded songs (see "FX" on page 35).
The effects sound may be distorted or noisy, depending on the type or input level of the connected musical instruments, or the type of effects.
What is REIMS?
REMS (Resonant structure and Electronic circuit Modeling System) is KORG's proprietary sound modeling technology which precisely reproduces the complex character and nature of both acoustic and electric instruments as well as electronic circuits in real world environments. REMS emulates a wide variety of sound generation characteristics including instrument bodies, speakers & cabinets, acoustic fields, microphones, vacuum tubes, transistors, etc.
Turning the effects on or off
- Press the FX button to turn the effects on. The Effect LED indicator will light up.
- Press the FX button again to turn the effects off. The Effect LED indicator will turn off.
Selecting an effect and setting the effect parameters
- Press and hold down the FX button to display the Effect Select page (TYPE).
- Press the + or - button to select an effect.
- You can change the parameter value displayed on the FX EDIT 1 page by using the touch slider.

The parameter type varies depending on the effect.
- Press the button to access the FX EDIT 1 or FX EDIT 2 page. A parameter for the selected effect will be displayed.
- Press the + or - button (or touch slider) to modify the parameter value. (On the FX EDIT 1 page, this step is the same operation as described in Step 3 above.)
FXEDIT1
- If necessary, press the button to move to the effect insertion point (see "POSITION" on page 35) to modify the setting.
You can store these parameter settings for each song, and enable or disable them by pressing the FX button.
Using the rhythm machine
The SOUND on SOUND features a built-in rhythm machine that offers 50 rhythm types. You can use the rhythm machine as a timing guide while you are recording your performance. Alternatively, you can play a creative rhythm section by using the touch slider near the bottom of the LCD.
Turning the rhythm machine on or off
- Press the RHYTHM button to turn the rhythm machine on. The Rhythm LED indicator will light up.
- Press the RHYTHM button again to turn the rhythm machine off. The Rhythm LED indicator will turn off.
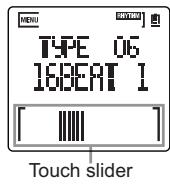
Selecting a rhythm type and setting the rhythm machine parameters
- Press and hold down the RHYTHM button to display the Rhythm Select page (TYPE).
- Press the + or - button to select a rhythm type.
- You can modify the current rhythm variation by using the touch slider. Slide your finger to the left on the touch slider to make the rhythm variation simpler. Slide your finger to the right to make the variation more complex.
- You can press the or button to display the Swing Setting page (see "SWING" on page 34) or the Recording Setting page (see "REC" on page 34) to make more detailed settings, if desired.
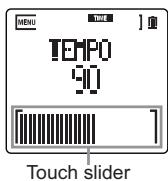
Setting the tempo of the rhythm machine
- Press and hold down the TEMPO button to display the Tempo Setting page (TEMPO).
- Press the + or - button (or use the touch slider) to modify the tempo of the rhythm machine. To use the TEMPO button as the Tap Tempo button, tap the button at the tempo that you want to use.
The tempo specified here will be applied to the entire song.
Using the tuner
The SOUND on SOUND features a built-in tuner. You can accurately tune your musical instrument connected to the INPUT jack while viewing the tuning meter displayed on the LCD.
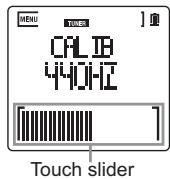
Tuning procedure
- Press the MENU button to enter Menu mode.
- Press and hold down the MENU button, and press the button until the TUNER category indicator appears.
- If you want to calibrate the tuner (modify the standard pitch), press the button until the Calibration page (CALIB) appears, then press the + or - button to modify the value. (The default setting is 440Hz .)
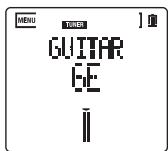
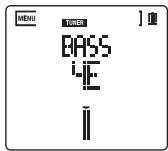
- Press the or button to access the page for the musical instrument that you wish to tune. Select the GUITAR page to tune a guitar, the BASS page to tune a bass guitar, and the CHROM page for other instruments.
- Play a single note on your musical instrument. The unit displays the name of note that is closest to the pitch the unit recognizes. If you are tuning a guitar or bass guitar, press the + or - button to select the string number indicator that matches the string you are tuning.
- Play a single note and tune the instrument so that an arrow and bars appear in the center of the meter. If the pitch is low, the bars appear on the left side. If the pitch is high, the bars appear on the right side.
To stop the tuner operation, press the MENU button to exit Menu mode. Alternatively, press and hold down the MENU button, and press the or button to display a page in a different category.

Menu Mode
Press the MENU button to enter Menu mode. In this mode, you can select a category, parameter, set the parameters, and execute functions.
Basic Operation in Menu Mode
| Selecting a category | While holding down the MENU button, press the \( \langle \downarrow \downarrow \uparrow \uparrow \uparrow \uparrow \uparrow \) or - button. |
| Selecting a parameter | Press the \( \langle \downarrow \downarrow \uparrow \uparrow \uparrow \) button. |
| Setting a value | Press the + or - button. If a frame is displayed around the bar graph near the bottom of the LCD, you can set a value by sliding your finger to the left or right on the bar (touch slider). |
List of Categories, Pages, and Parameters
- Underscored values in the Parameter/Setting range column represent the default setting.
- Column M indicates the location where data is stored: Location "B" refers to the global (common) location in the unit; Location "S" indicates a song.
- Column PR indicates whether or not the corresponding parameter can be modified or viewed:
"P" means you can modify and view the parameter only during playback or in Record Ready mode. "p" means you can view the parameter only during playback or in Record Ready mode.
"R" means you can modify and view the parameter during recording.
"r" means you can view the parameter only during recording.
| Category | ||||
| Page | Parameter/Setting range | M | Description | PR |
| INPUT | ||||
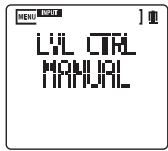
| LVL CTRL | MANUAL, AUTO | B | Controls the input level. | PR |
| LEVEL | 0-60-100 | B | Adjusts the input level. | PR |
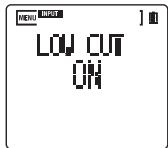
| LOW CUT | OFF, ON | B | Turns the low range cut on and off. | PR |
| TONE | LOW10-OFF-HI10 | B | Adjusts the input tone. | PR |
| N-GATE | OFF, ON | B | Turns the Noise Gate function on and off. | PR |
| MIC GAIN | LOW, MID, HIGH | B | Adjusts microphone sensi-tivity | PR |
| P-IN-PWR | OFF ON | B | Turns Plug-in-Power on and off. | PR |
| REC | ||||
| AT-START | OFF, INPUT L, INPUT H, 200ms | B | Determines how record-ing starts. | P |
| COUNT IN | HMS:OFF 1-10SEC MBQ:OFF 1MEAS, 2MEAS | B | Sets the playback start time during overdubbing. | P |
| UNDOTIME | 1TIME, 10TIMES, INFINITY | B | Specifies the number of times available for the Undo function. | P |
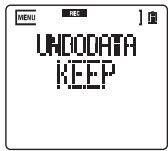
| UNDODATA | DELETE, KEEP | B | Determines whether the files deleted from the Undo history will be erased or kept. | P |
| MIX BAL | I100P000-I100P100-I100P100 | B | Adjusts the mix balance between the input and playback level. | PR |
| TIME | ||||
| MODE | HMS, MBQ | S | Sets song's Time mode. | PR |
| TEMPO | 30-120-240 | S | Sets song's tempo. | pr |
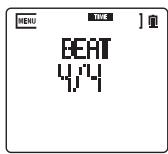
| BEAT | 4/4, 3/4, 6/8 | S | Sets song's time signature. | pr |
| SPEED | 25%-ORIGINAL -150% | Sets song's playback speed. | P | |
| A POINT | --- | S | Sets Point A of an A/B loop. | pr |
| B POINT | --- | S | Sets Point B of an A/B loop. | pr |
| RHYTHM | ||||
| TYPE | 01-50 | S | Specifies the rhythm machine type. | PR |
| SWING | 00-25, PRESET | S | Adjusts the swing of the rhythm machine. | PR |
| REC | OFF ON | S | Turns rhythm machine recording on and off. | P |
| FX | ||||
| TYPE | 01-100 | S | Selects the effect type. | PR |
| FX EDIT 1 | Variable depend-ing on the effect type | S | Sets the value of effect parameter 1. | PR |
| FX EDIT 2 | Variable depend-ing on the effect type | S | Sets the value of effect parameter 2. | PR |
| POSITION | INPUT, REC DRY, PLAY TRK, MASTER, RHYTHM | S | Sets the effect insertion position. Specifies the source audio where the effect is applied. | P |
| TUNER | ||||
| CHROM | Chromatic tuner | |||
| GUITAR | Guitar tuner | |||
| BASS | Bass tuner | |||
| CALIB | 435-440-445 | B | Calibration (standard pitch) | |
| DATA | ||||
| DELETE | ---, CURRENT, ALL | Specifies songs to delete. | ||
| FORMAT | ---, EXECUTE | Formats a memory card. | ||
| CARDINFO | U_, F_ | Displays the amount of available space on the memory card. | pr | |
| IMPORT | ---, EXECUTE | Begins the import operation. | ||
| FINALIZE | ---, MATERIAL, 2MIX, BOTH | Begins the finalize operation. | ||
| CARDTEST | ---, EXECUTE | Begins the memory card test. | ||
| UPDATE | ---, EXECUTE | Update the system. | ||
| MISC | ||||
| VOLUME | 0-60-100 | B | Adjusts the playback volume level. | PR |
| DATE | --- | B | Sets the date. | PR |
| TIME | --- | B | Sets the time. | |
| B-LIGHT | OFF, ON, 10SEC, 20SEC, 30SEC | B | Sets the LCD backlight. | PR |
| LED | OFF, ON, B-LIGHT | B | Turns the LED on and off. | PR |
| BATTERY | ALKALINE, NI-MH | B | Specifies the battery type. | PR |
| PEAKHOLD | 0SEC, 2SEC INFINITY | B | Specifies the peak hold time for the level meter. | PR |
| A-PW-OFF | OFF, 3MIN, 5MIN, 10MIN, 30MIN | B | Specifies the time duration until the unit automatically turns off when the unit is idle. | |
| T-CALIB | ---, EXECUTE | B | Calibrates the touch slider located near the bottom of the LCD. | |
| F-RESET | ---, EXECUTE | Initializes the recorder to factory settings. | ||
Categories, Pages, and Parameters
INPUT
In this category, you can make various settings for the audio input section.
LVL CTRL
MANUAL:
This option enables you to set the input level manually.
AUTO:
The input level is set automatically.
Low input levels are raised and high input levels are lowered so that the entire sound level will be more consistent. Also, if an input signal level is excessive, the Limiter function will be activated to compress the signal to an appropriate input lev
LEVEL
Use this parameter to adjust the input level when the LVL CTRL parameter is set to MANUAL.
You can also use the + and - buttons to adjust the level in Record Ready mode.
Set the input level to as high as possible while listening to the sound so that the Clip indicator doesn't light up (60 = 0dB)
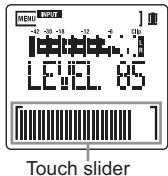
You cannot set the LEVEL parameter if the LVL CTRL parameter is set to AUTO.
LOW CUT
If the recorder picks up faint noises, such as a breath that hits the microphone directly, or outdoor wind or breeze, set this parameter to ON to cut the low frequency range to minimize the noise.
TONE
This parameter enables you to adjust the tone of the input sound.
LOW 1-10:
Higher values will enhance the low range.
OFF: The tone will not be adjusted.
HIGH 1-10:
Higher values will enhance the high range.
N·GATE
Set this parameter to ON to activate the noise gate and cut low level signals.

This option is available only when the LVL CTRL parameter is set to AUTO.
MIC GAIN
LOW: Select this option when you record loud sounds (such as band performances).
MID: This option sets the gain to a level between LOW and HIGH.
HIGH: Select this option when you record low level audio (such as conference meetings).

You can set the MIC GAIN parameter when you record through the built-in microphone or an external microphone connected to the MIC jack. However, this parameter is unavailable when you are recording via the LINE or GUITAR IN jack.

P-IN-PWR
Activating P-IN-PWR supplies power to the MIC jack. If this parameter is set to ON, be sure to connect a condenser-type microphone that supports Plug-In-Power. If you connect another type of microphone (such as a dynamic microphone or a microphone with a built-in battery), the microphone may be damaged.

REC
In this category, you can adjust various settings for recording.
AT START
You can specify a time interval between pressing the Record button and the start of recording. You can also set the recorder so that it will start recording when a specified level of signal is input.
OFF:
Recording starts immediately when you press the Record button.
INPUT L:
Recording automatically starts when the input level exceeds about - 18dB after you press the Record button. Input audio of one second in duration prior to the recording start point will also be recorded.
INPUT H:
Recording automatically starts when the input level exceeds about -6dB after you press the Record button. Input audio of one second in duration prior to the recording start point will also be recorded.
200ms:
Recording starts about 200ms after you press the Record button. Select this option if you want to prevent the noise generated by pressing the Record button (if any) from being recorded.
COUNT IN
The parameter options vary depending on the MODE parameter page setting in the TIME category (see page 32). This parameter setting is effective only when the AT START parameter is set to OFF and when recording starts while the unit is stopped.
When MODE is set to HMS:
OFF: Recording and playback start at the same time.
1-10SEC:
Playback starts prior to the start of recording by a specified time.
When MODE is set to MBQ:
OFF: Recording and playback start at the same time.
1MEAS:
Playback starts from one measure before the current time position.
2MEAS:
Playback starts from two measures before the current time position.
UNDOTIME
If the number of Undo times is high, more space will be required on the memory card (see "Canceling recording (Undo/Redo)" on page 21).
1TIME, 10TIMES:
You can undo or redo once or ten times.
INFINITY:
You can undo or redo as many times as space on the memory card allows.

UNDODATA
DELETE:
Select this option to erase the files deleted from the Undo history.
KEEP:
Select this option to save the files deleted from the Undo history. You can choose to store data on the card that cannot be accessed by this unit, such as data deleted because you made a new recording after undoing the latest recording.
MIX BAL
The mix balance set by this parameter will be used during overdubbing.
I100P000:
You will only hear the input sound, and not the playback sound.
I100P100:
The input and playback levels are equally balanced.
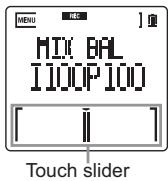
I000P100:
You will only hear the playback sound, and not the input sound.

The mix balance setting will not be reflected in the first recording session of a new song. Only a reduction of the input level, and not a reduction of the playback level, will be reflected in an overdubbed recording.
TIME
In this category, you can adjust settings for the counter indicator, loop positions, etc.
MODE
This parameter enables you to select the units of the counter.
HMS:
The counter is displayed in hour, minute, and second units.

MBQ:
The counter is displayed in measure, beat, and quarter-beat units. Select this option to manage songs in measures.
TEMPO
The counter in MBQ Time mode and the rhythm machine will use the tempo specified by this parameter (see "Setting the tempo of the rhythm machine" on page 23).
BEAT
This parameter sets the song's time signature.
SPEED
You can adjust the playback speed without changing the pitch (Sound Stretch function).
25%: The unit plays a song at quarter speed.
ORIGINAL:
The unit plays a song at its original speed.
150%: The unit plays a song at 1.5x speed.
If you select any option other than ORIGINAL, playback sound quality will decrease. If you want to listen to the sound at its original level of quality, set this parameter to ORIGINAL.
During overdubbing, you can only make the speed slower (25%-99%).
If you select any option other than ORIGINAL, and then overdub, the recorder will calculate and regenerate the playback data after recording is complete. Therefore, it may take more time until normal operation becomes available.
Point A
Point B
These parameters enable you to set loop Points A and B (see "Loop playback/recording" on page 19).
- Press the button while the A POINT or B POINT page is displayed.
The parameter setting will flash, indicating it is available for editing. - Press the button to move the cursor through each field.
- Press the + or - button to adjust the value.
- Press the button to confirm the setting. If you want to cancel the settings instead, press the Stop button.
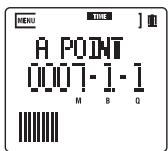
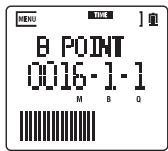
If you specify Point B earlier than Point A, the time value of Points A and B will be swapped.
The interval between Points A and B should be two seconds or longer. You cannot set Point B within two seconds of Point A.
RHYTHM
In this category, you can set various parameters for the built-in rhythm machine.
TYPE
Use the + or - button to select the type.
You can modify the current rhythm variation by using the touch slider. Slide your finger to the left on the touch slider to make the rhythm variation simpler. Slide your finger to the right to make the variation more complex.
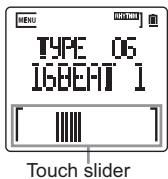
SWING
If you specify a value for this parameter, the timing of even steps of the rhythm will be slightly offset. In this way, you can reproduce a wide range of rhythms, from a simple but powerfully precise 16-beat to a hip groove with a slightly offset shuffle. The swing value is in the range of 0 to 25(%) . The voicing timing of even steps will be offset.
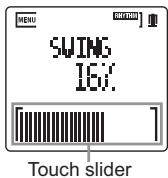
0-25:
The rhythm machine plays a perfect 16-beat with "0," and a shuffle with "16."
PRESET:
The rhythm machine uses the preset value for each rhythm type.
REC
OFF:
Only the input sound is recorded. The rhythm machine sound is not recorded.
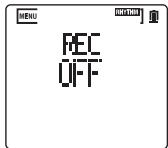
ON:
Only the rhythm machine sound is recorded. The input sound is not recorded.
When this parameter is set to "ON," only the rhythm machine will be recorded. Sound input via the internal microphone or a connected device will not be recorded.
When this parameter is set to "ON," you can adjust the volume level of the rhythm machine using the input level adjustment for
the MIX BAL parameter. When this parameter is set to "OFF," you can adjust the volume level of the rhythm machine using the playback level adjustment for the MIX BAL parameter.
FX
In this category, you can set various parameters for the built-in effects.
TYPE
This parameter enables you to select the effect type. This parameter page also enables you to modify the FX EDIT 1 parameter setting by using the touch slider (see "Selecting an effect and setting the effect parameters" on page 22).

FXEDIT1
FXEDIT2
These parameter pages enable you to set the parameter for an effect program selected via the TYPE parameter (see "Selecting an effect and setting the effect parameters" on page 22). The parameter type on these pages varies depending on the selected effect.
Some of the effect programs are applied only when you touch the touch slider.
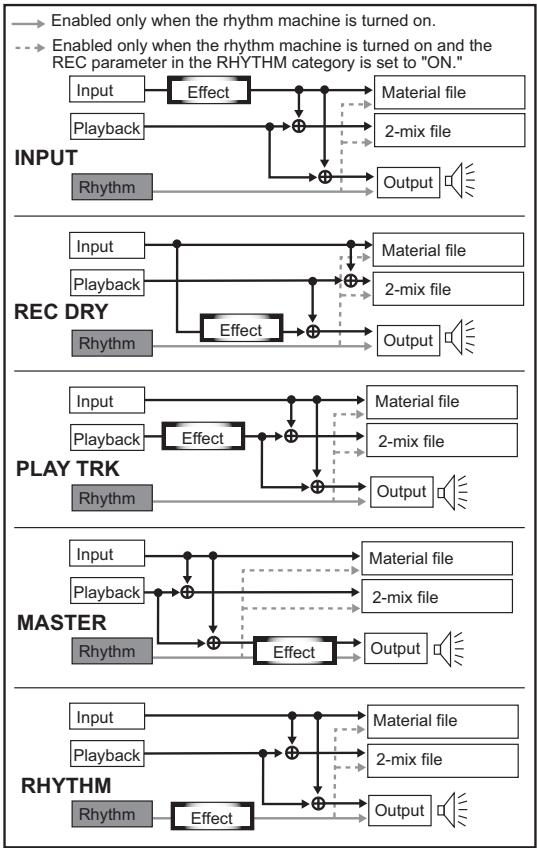
POSITION
This parameter specifies the effect insertion point.
INPUT:
The effect is applied to the input signal and the effect sound is output. The effect sound is also recorded in the recording file.

REC DRY:
The effect is applied to the input signal and the effect sound is output. The dry sound (sound with no effect) is recorded in the recording file.
PLAY TRK:
The effect is applied to the playback sound. Playback sound with the effect is recorded in the recording file.
MASTER:
The effect is applied to the master sound (that is a mix of the input and playback sounds). The dry sound (sound with no effect) is recorded in the recording track.
RHYTHM:
The effect is applied to the rhythm sound. If the REC parameter in the RHYTHM category is set to "ON," the rhythm sound with effect will be recorded to the recording track.

This option is available only when the rhythm machine is turned on.
TUNER
For information about this category, see "Using the tuner" on page 24.
DATA
In this category, you can delete or finalize data, format a memory card, etc.
DELETE
- Access the DELETE page, select "CURRENT" (currently-selected song) or "ALL" (all songs in the memory card), then press the button.
- A confirmation message will appear. Press the button to begin the delete operation. Alternatively, press the button to cancel the operation.
- The unit will display "COMPLETE" when deletion is complete.
A new song is always positioned following all existing songs, even if an existing song has been deleted.
FORMAT
You must format a memory card by using the format function in the recorder before you can use the card for the first time.
- Access the FORMAT page, select "EXECUTE," and then press the button.
- A confirmation message will appear. Press the button to begin the format operation.
Alternatively, press the button to cancel the operation.
- The unit displays "COMPLETE" when formatting is complete.
Memory cards formatted by other devices may not operate correctly on the recorder.
4 Formatting a memory card will erase the all of the data in the card. Be sure to keep backup files of important data on a computer or other external device.
CARDINFO
This page indicates the used space or free space in the card expressed by recording time (in minutes).
U
The amount of used space is indicated in minutes.
F:
The amount of free space is indicated in minutes.
IMPORT
The SOUND on SOUND can import files in the following formats. If you want to import certain WAV or AIFF files later, you can store them in the EXTRAUDIO folder on a memory card that was formatted on the recorder.
File format: WAV file, AIFF file
File's bit resolution: 16-bit, 24-bit
Sampling frequency: 44.1kHz 48kHz 88.2kHz 96kHz
Number of characters in file name:
Up to the first eight (8) characters will be displayed.
Importing a file
- Access the IMPORT page, select "EXECUTE," and then press the button.
- The unit displays the name of a WAV/AIFF file stored in the EXTRAUDIO folder.
- Press the + or - button to select the file you wish to import, then press the button.
- A confirmation message will appear. Press the button to begin the import operation.
-
The selected WAV/AIFF file is loaded as a song. The import operation may take some time, depending on the file format.
-
The bar graph on the bottom of the LCD indicates the progress of the import process. If you want to cancel the import, press the Stop button while the progress bar is displayed.

- The unit will display "COMPLETE" when the import is complete.
The SOUND on SOUND recognizes the imported WAV/AIFF file as a new song.
FINALIZE
The SOUND on SOUND stores overdub files as well as individual original recording material files that were recorded during overdubbing.
Overdub files and original recording material files store only their discrete, separate recordings (not mix data). The internal clock management data enables you to play back the individual parts from the corresponding recorded time positions.
Internal data structure before finalizing
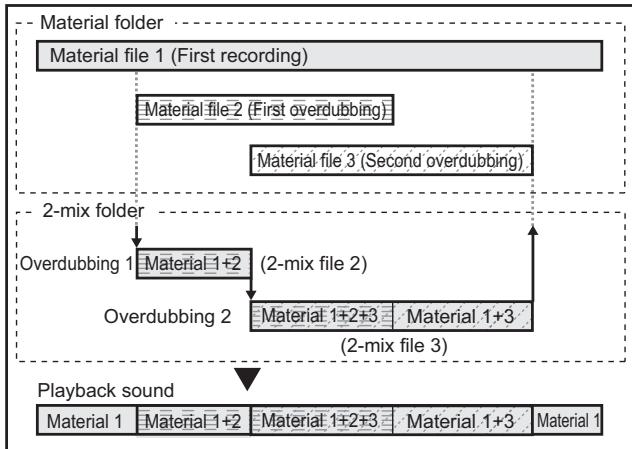
One advantage of this internal data structure is that it does not require too much space on the memory card. On the other hand, a disadvantage is that the timeline may not align very well when you export the data to an external DAW and perform complicated editing.
Finalizing the data on the SOUND on SOUND will add a silent part at the top of each individual material file. This silence fills a gap from the top of the file to the recording start point so that the timeline of all materials will align accurately with each other. In this way, for example, a mix file will become a complete stereo file from which you can burn a CD.
You can also specify whether you wish to finalize only the material files (1) or only 2-mix files (2) as a finalizing option.
Internal data structure after finalizing
Finalized folder
Material file 1
Silence data Material file-2
Silence data
Material file 3
Mix file
Material 1
Material1+2
Material 1± 2± 3
Material 1+3
Material
*2
If you overdubbed a part at a modified playback speed, the material file for this part will automatically be converted by the finalize operation to a new file that uses the original speed.
The SOUND on SOUND creates a WAV file in BWF (Broadcast Wave File) format that contains time information. If you use a DAW that supports the BWF format, the timeline of these files will be aligned with each other without performing the finalizing process.
About the space required for finalizing on a memory card
The SOUND on SOUND stores all original recording material files and 2-mix files even after the finalizing process is complete (see page 47). If you plan to perform the finalize operation, you should use a memory card with high capacity. For example, if you finalize a file of approximately 120MB (see page 17), a file of up to approximately 120 MB will be created, thus using a total of approximately 240MB of the memory card space.
Finalizing procedure
- Access the FINALIZE page, then use the + or - button to select one of the following options:
MATERIAL: Finalizes only material files.
2MIX: Finalizes only 2-mix files.
BOTH: Finalizes both material files and 2-mix files.
- Press the button.
- A confirmation message will appear. Press the button to execute the finalize operation.
- The finalizing process for the current song starts. This process may take more time, depending on the file size.
- The bar graph near the bottom of the LCD screen indicates the progress of the finalizing process. If you want to cancel the process, press the Stop button while the progress bar is displayed.
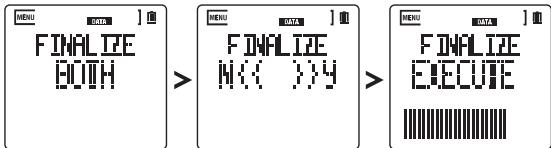
- The unit will display "COMPLETE" when the finalizing operation is complete.
Even after the finalize operation, the original data is still kept in the memory card (see "SOUND on SOUND Data Structure" on page 47).
The finalized data is stored in the Finalize folder for the song (see "SOUND on SOUND Data Structure" on page 47). If the song already contains a Finalize folder, the folder and its content will be completely overwritten.
CARDTEST
This function tests a memory card by automatically reading and writing data to the card to determine whether the card is compatible with the recorder. The recorder will decide that a card is not compatible if the writing speed of the card is slower than the speed required for recording. Executing this test enables you to discover the recording conditions required for the card. In this way, you can use the card more efficiently.
The results of this test do NOT absolutely guarantee the operation of a card. Even if the recorder determines that your card can be used for recording based on the test results, the card may still
cause an error (such as "CARDBUSY") depending on recording conditions or the application environment.
- Access the CARDTEST page, select "EXECUTE," and then press the button.
- A confirmation message will appear. Press the button to begin the memory card test operation.
- The memory card test will begin. This process may take more time, depending on the card type.
- The bar near the bottom of the LCD indicates the progress of the test. If you want to cancel the test, press the Stop button while the progress bar is displayed.
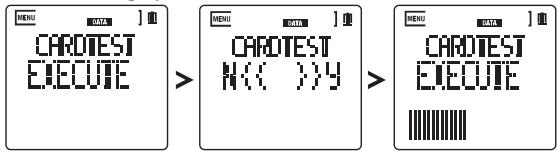
- The unit will display "COMPLETE" when the test is complete. The test results are classified into three categories:
ALL OK: You can use all recording-related functions with this card.
1TRK OK: You can make a normal recording, but no overdubbing.
UNUSABLE:
You cannot record on the SOUND on SOUND with this card.
UPDATE
This function updates the recorder's operating system. You can download the latest system file to your computer from the Korg web site (http://www.korg.com). For more information on downloading the system file, please check the Korg web site.
To prevent the power from being cut off during the update operation, be sure to use new batteries with sufficient charge or use an optional AC adapter. If any accident, such as a power outage occurs during the update, the unit may be unable to function correctly. In this case, contact the Korg dealer from whom you purchased the unit.
- Save the downloaded system file in the SOS_DATA folder in the memory card.
-
Access the UPDATE page, select "EXECUTE," and then press the button.
-
A confirmation message will appear. Press the button to begin the update operation.
- The bar graph near the bottom of the LCD will show the progress of the update.
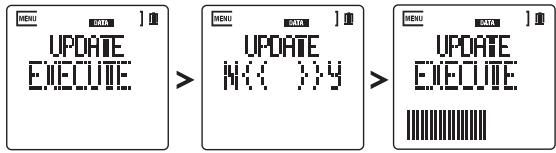
- The unit will display "COMPLETE" when the update is complete.
- Press any button on the control panel. The unit displays the PWR OFF dialog.
- Press the button to turn off the power to the unit.
- Press the Power button again. The recorder turns on. The system has been updated.
MISC
In this category, you can set the indicator duration, calibration, and other miscellaneous parameters.
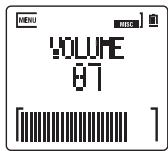
VOLUME
This parameter enables you to adjust the monitoring volume level during recording. This parameter page is also displayed when you press the + or - button during playback (see page 16) and can be navigated in the same way.
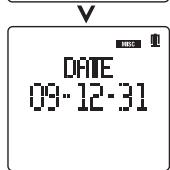
DATE
This parameter enables you to set the year, month, and date.
The date set here will be used as a timestamp for the recorded songs (see page 8).
- Press the button to display the flashing year field.
- Press the or button to select the year, month, or date field, and press the + or - button to change the number.
- Press the button to confirm the setting. The flashing number will light up steadily. If you want to cancel the settings instead, press the Stop button.
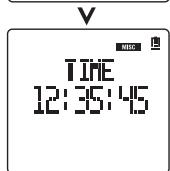
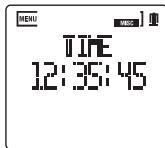
TIME
This parameter enables you to set the time. The time set here will be used as a timestamp for the recorded songs (see page 8).
- Press the button to display the flashing hour field.
- Press the or button to select the hour, minute, or second field, and press the + or - button to change the number.
- Press the button to confirm the setting. The flashing number will light up steadily. If you want to cancel the settings instead, press the Stop button.
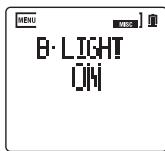
B·LIGHT
This parameter enables you to specify the LCD backlight duration.
OFF: The backlight is always off.
ON: The backlight is always on.
10 sec, 20 sec, 30 sec: If the recorder is left unused for the specified number of seconds, the backlight will turn off.
LED
This parameter enables you to set the LED indicator duration.
OFF: The LED indicators are always off.
ON: The LED indicators are always on.
B-LIGHT: The LED indicator duration is set to the same value as the backlight duration specified by the B-LIGHT parameter.

BATTERY
Specify the type of battery used on the recorder so that the recorder will be able to display an accurate amount of remaining battery power.
ALKALINE:
Select this option when alkaline batteries are used.
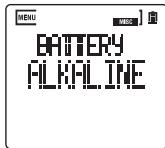
NI-MH:
Select this option when nickel-metal hydride batteries are used.
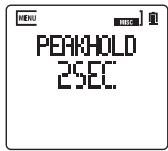
PEAKHOLD
This parameter enables you to set the recording peak hold time of the level meter.
0 sec: No peak hold value is displayed.
2 sec:
Peak hold value is displayed for two seconds.
INFINITY:
Peak hold value is displayed all the time.
A·PW·OFF
The unit turns itself off automatically if it is left unused for a duration specified by this parameter. The power does not turn off automatically during recording or playback.
OFF:
The power does not turn off automatically (the function is disabled).
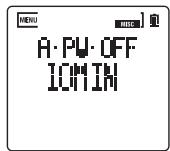
3MIN, 5MIN, 10MIN, 30MIN:
The unit will be turned off automatically if it is left idle for the specified duration.
T- CALIB
This function calibrates the touch slider in the bottom area of the LCD by correcting the discrepancy between the indication on the display and the actual touched point on the slider. This function can be useful if the touch slider responds to your touch incorrectly (for example, if touching a point on the bar moves the song playback position to an unexpected point in the song).
- Access the T-CALIB page, select "EXECUTE," and then press the button.
- A confirmation message will appear. Press the button to begin the calibrate operation.
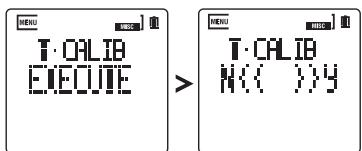
-
The recorder will display "TOUCH L." Touch the left end of the touch sensitive area.
-
If the recorder recognizes your touch correctly, it will display "TOUCH R." Touch the right end of the touch sensitive area.
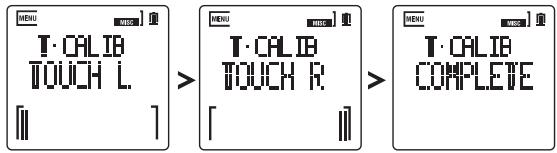
- If the recorder recognizes your touch correctly, it will display "COMPLETE."
F-RESET
This function initializes the recorder to factory default settings. This process will NOT erase song data in the memory card.
- Access the F-RESET page, select "EXECUTE," and then press the Record button.
- A confirmation message will appear. Press the button to execute the factory reset operation.
- The unit will display "COMPLETE" when the reset operation is complete.
Appendix
SOUND on SOUND Data Structure
The following diagram illustrates a typical data structure of memory cards formatted and recorded by the SOUND on SOUND.
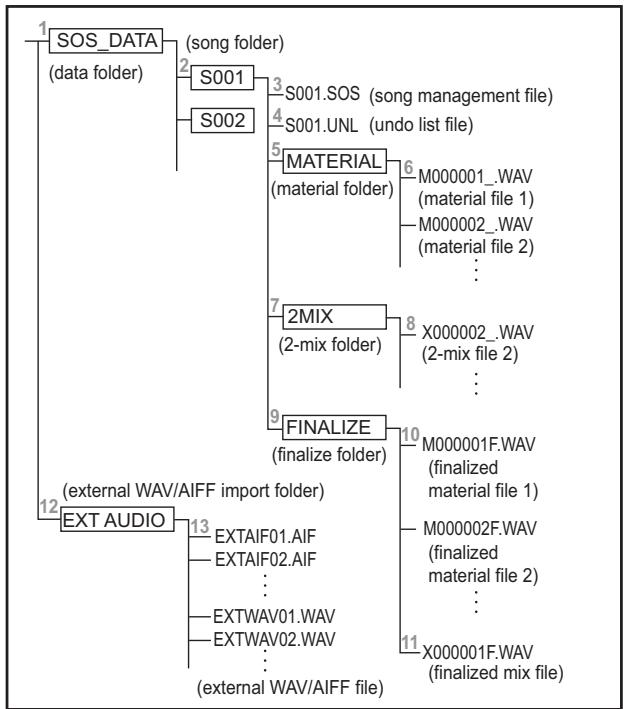
Folder and file structure
1. SOS_DATA (data folder)
This folder stores the SOUND on SOUND system data and recording data. You can create as many song folders as free space on the memory card allows.
2. S001 (song folder)
This folder is created for each new song recorded by the unit. Song folders are numbered sequentially starting with S001. Three digits following the letter "S" indicate the song number. Therefore, if you rename the folder on a computer, do not modify the first four digits. Append a desired name after the four digits. If you back up a song to a computer, be sure to copy the entire song folder.

When you load the song folder from a computer to the recorder, make sure that the song folder name has a unique number.
3. S001.SOS (song management file)
This file stores the time management data for material files, 2-mix files, and setting data for the built-in rhythm machine and effects. Only one file with the .SOS extension can be included in a song folder.
4. S001.UNL (undo list file)
This is a management file for the Undo function. It contains management data to carry out the Undo and Redo operations.
5. MATERIAL (material folder)
This folder stores material files recorded during overdubbing.
6. M000001_.WAV (material file)
This file stores the first recording, and material files (input sound) recorded prior to the 2-mix stage.
7. 2MIX (2-mix folder)
This folder stores 2-mix files (playback sound + input sound) recorded during overdubbing.

The first recording will not be used to create a 2-mix file.
8. M000002_.WAV (2-mix file)
This file stores 2-mix data recorded during overdubbing.
9. FINALIZE (finalize folder)
This folder stores the finalized material and mix files.

This folder will not be created before the finalize operation is executed.
10. M000001F.WAV (finalized material file)
This file contains "zero" data that fills a gap from the top of the file to the playback start point. Therefore, the timeline of these files on the DAW tracks will be aligned each other perfectly.
11. X000001F.WAV (finalized mix file)
This file features 44.1kHz / 16 -bit. You can copy this file directly to a computer and easily create an audio CD.
12. EXTRAUDIO (external WAV/AIFF import folder)
This folder is used to import external audio files (in WAV/AIFF format). You can import WAV/AIFF files stored in this folder into a song on the SOUND on SOUND.
13. External WAV/AIFF file
This is an external file to be imported into a song on the SOUND on SOUND. You can import files in the following formats:
File format: WAV file, AIFF file
File's bit resolution: 16-bit, 24-bit
Sampling frequency: 44.1kHz 48kHz 88.2kHz 96kHz
Number of characters in file name:
Up to the first eight (8) characters will be displayed.
Messages
Execution messages
CANCELED
The operation has been canceled.
COMPLETE
The operation is complete and correct.
Error messages
A/B SWAP
Since point A was set behind point B in an A/B loop, the position of points A and B have been swapped.
CANNOT
This operation cannot be executed.
CARDBUSY
The access speed of the memory card is too slow to record or play back. Use a memory card that is compatible with the recorder.
If songs are written and/or deleted numerous times, the song data in the memory card may scatter across the card and the processing performance may deteriorate. In such a case, back up important songs to your computer, then format the memory card again.
CARD ERR
An error occurred during access to the memory card. Connect the memory card to your computer and execute the Check Drive function. If this error message is displayed again, format the memory card.
CARDFULL
The memory card does not have sufficient free space. Erase unnecessary songs.
FSYS ERR
An error occurred when the the memory card was accessed. If this problem persists after you restart the recorder, consult the Korg dealer from whom you purchased the unit.
ILLEGAL
Data is not supported by the SOUND on SOUND.
MEM.ErrR
An internal processing error has occurred. If this problem persists after you restart the recorder, consult the Korg dealer from whom you purchased the unit.
NO CARD
No memory card is inserted.
SONGFULL
No new song can be created. The recorder can create no more than 200 songs.
SUM ERR
The system update operation failed. Try again from the beginning. If this message is displayed again, contact the Korg dealer from whom you purchased the unit.
UNFORMAT
The memory card has not been formatted.
!REC.REC
The recorder is recording now, and is unable to execute the command. Stop recording.
!REC.RUN
The recorder is playing now, and is unable to execute the command. Stop playback.
Other messages
This message is displayed when the recorder fails or malfunctions. Contact the Korg dealer from whom you purchased the unit.
Troubleshooting
The unit does not power on.
- Make sure the batteries are inserted with the polarities (+, -) in the correct orientation.
- The batteries may be exhausted.
- Make sure that the AC adapter is connected correctly.
The unit turns off unexpectedly.
- The Auto Power Off parameter is set to one of the minute options (see page 45).
The LCD display is dark.
- The backlight may have been set to turn off (see page 44).
The LED indicators do not light up or flash.
- The LED parameter is set to OFF. Consequently, the LED indicators will not light up or flash (see page 44).
The recorder is not responsive to button operation.
- Hold mode may have been turned on (see page 10).
The recorder responds to the touch slider operation incorrectly.
- Calibrates the touch slider (see page 45). If the problem persists, consult the Korg dealer from whom you purchased the unit.
No sound is heard.
- Make sure that all connected devices are turned on.
- Make sure that the amplifier or headphones are connected correctly.
The volume level on the device that's connected to the GUITAR IN or MIC jack seems too low.
- Are you using a cable with impedance?
Use a cable with no impedance.
No playback sound is heard.
- The volume level is set to "0."
No sound is emitted from the internal speaker.
- Sound from the internal speaker is muted when headphones are connected to the recorder or when the internal microphone input is enabled.
Input sound or recorded sound is not what you expect.
-
Effects may have been applied (see page 22).
-
Make sure that the input level (LEVEL parameter) is adjusted correctly (see page 29).
- The tone of the input sound may have been adjusted (TONE parameter) (see page 29).
No input sound is heard.
- Make sure the input level is set correctly (see page 29).
- Is the recorder in Record Ready mode or Record mode?
- Make sure that all devices are connected correctly (see page 14).
- If you are using a Plug-In-Power compatible microphone, set the P-IN-PWER parameter to ON (see page 30).
- Make sure that the volume level of the connected external device is set correctly.
- The REC parameter in the RHYTHM category may have been set to ON (see page 34).
- Make sure that the MIX BAL parameter is set properly (see page 32).
- The VOLUME parameter may have been set to "0" (see page 43).
Cannot record.
- Make sure that the input level is set correctly (see page 29).
- Have you inserted a memory card?
- The memory card may not have sufficient free space (see page 38).
- The REC parameter in the RHYTHM category may have been set to ON (see page 34).
- Make sure that the MIX BAL parameter is set properly (see page 32).
Recorded sound is interrupted.
- The recorder was exposed to an impact during recording.
- The batteries may have been exhausted during recording.
The unit does not start properly.
- The contents of the memory card may be incorrect.
- The unit was unable to recognize the memory card. In this case, turn on the power to the recorder while pressing and holding down the Record button and the MENU button simultaneously to force the unit to format the installed memory card. If the unit still does not start correctly after you format the memory card, the memory card or the recorder may be damaged. Try using another memory card and restarting the unit. If the problem persists, consult the Korg dealer from whom you purchased the unit.
4 Formatting a memory card will erase all data on the card.
Effect Type
| GTR: Effects suitable for recording a guitar or bass guitar | ||||||
| 01 | CLN TONE | 10 | AC15 | 19 | AC LEAD | 28 FX PITCH |
| 02 | CRUNCH | 11 | '80S AXE | 20 | THROAT | 29 STROBO |
| 03 | HUGELEAD | 12 | HARDLEAD | 21 | CLNPITCH | 30 AC30 |
| 04 | FLANDED | 13 | TOUCHWAH | 22 | UK '70S | 31 USHIGAIN |
| 05 | BLK 2X12 | 14 | AC PHASE | 23 | UK '80S | 32 BROKEN |
| 06 | UK BLUES | 15 | PWRBLUES | 24 | RINGMOD | 33 LIMITERB |
| 07 | UK MODERN | 16 | TALKDLY | 25 | CLN VIBE | 34 COMPEQ B |
| 08 | DISPITCH | 17 | TAPECHO | 26 | BUTIQ OD | 35 CHORUS B |
| 09 | OCT VERB | 18 | TWD 4X10 | 27 | USMODERN | 36 OD BASS |
| MIC: Effects suitable for recording a vocal or acoustic guitar through the microphone | ||||||
| 37 | HALLVERB | 44 | AG LOCUT | 51 | SHORTDLY | 58 DECIMATE |
| 38 | ROOMVERB | 45 | HIFI EQ | 52 | CHORUS | 59 RING DLY |
| 39 | CHRSVERB | 46 | RAYDEEOH | 53 | FLANGER | 60 ALIEN |
| 40 | DLYVERB | 47 | PINGPONG | 54 | UNIVIBE | 61 SPRINGFX |
| 41 | TUBE PRE | 48 | BPMDELAY | 55 | VO SLICE | |
| 42 | CH STRIP | 49 | FILTRDLY | 56 | LILVOICE | |
| 43 | TOUCH EQ | 50 | PANDELAY | 57 | TUBEDIST | |
| MST: Effects suitable for recorded songs, built-in rhythm patterns or line inputs | ||||||
| 62 | HALL | 70 | LIMITER | 78 | LPFDELAY | 86 PHASER |
| 63 | S HALL | 71 | AMPBOX | 79 | HPFDELAY | 87 AUTOPAN |
| 64 | DRYPLATE | 72 | LPF24 | 80 | BPFDELAY | 88 BPMSLICE |
| 65 | B ROOM | 73 | HPF12 | 81 | CHORSDLY | 89 CRusher |
| 66 | EQ FLAT | 74 | BPF | 82 | PHASEDLY | 90 RING BOX |
| 67 | TUBE EQ | 75 | LFOFILTR | 83 | DIFFUSER | 91 TALKMOD |
| 68 | TUBECOMP | 76 | BPM ECHO | 84 | LFOJET | 92 LFO WAH |
| 69 | MSTRCOMP | 77 | TAPDELAY | 85 | TOUCHJET | 93 PITCHSHIFT |
| TCH: Effects applicable through the touch slider | ||||||
| 94 | TOUCHLPF | 96 | HPFLOOP | 98 | REVERSE | 100 TCHGRAIN |
| 95 | TOUCHHPF | 97 | HPFLOOP | 99 | TIMEBEND | |
Rhythm Type
| 01 | 8BEAT 1 | 14 | ROCK 4 | 27 | POP 4 | 40 | LATIN 4 |
| 02 | 8BEAT 2 | 15 | ROCK 5 | 28 | POP 5 | 41 | HIPHOP 1 |
| 03 | 8BEAT 3 | 16 | ROCK 6 | 29 | GROOVE 1 | 42 | HIPHOP 2 |
| 04 | 8BEAT 4 | 17 | ROCK 7 | 30 | GROOVE 2 | 43 | DIGIROCK |
| 05 | 8BEAT 5 | 18 | ROCK 8 | 31 | GROOVE 3 | 44 | HOUSE |
| 06 | 16BEAT 1 | 19 | HARDROCK | 32 | GROOVE 4 | 45 | TECHNO |
| 07 | 16BEAT 2 | 20 | METAL | 33 | JAZZ 1 | 46 | ELEKTRO |
| 08 | 16BEAT 3 | 21 | ROCNROLL | 34 | JAZZ 2 | 47 | METRO 1 |
| 09 | 16BEAT 4 | 22 | COUNTRY | 35 | JAZZ6/8 | 48 | METRO 2 |
| 10 | 16BEAT 5 | 23 | BLUES | 36 | WALTZ3/4 | 49 | METRO 3 |
| 11 | ROCK 1 | 24 | POP 1 | 37 | LATIN 1 | 50 | METRO 4 |
| 12 | ROCK 2 | 25 | POP 2 | 38 | LATIN 2 | ||
| 13 | ROCK 3 | 26 | POP 3 | 39 | LATIN 3 |
Specifications
Operation environment:
0-+40 degrees Celsius (32-104 degrees Fahrenheit) (no condensation allowed)
Main sections
Recording format: PCM audio format WAV format (extension:.wav), BWF compliant, 44.1kHz@ 16-bit
Available recording time: Depending on the memory card Approx. 100 minutes per 1GB, * First recording to a new song Maximum continuous recording time: 6 hours
Total number of songs: Up to 200 songs
Maximum number of Overdubs: Depends on memory card space.
Undo/Redo: Depends on memory card space.
Tempo: 30-240
Total number of rhythm: 50
Counter: Hour/Min/Sec, Mase/Beat/Quater Beat
Categories: GTR (guitar), MIC (microphone), MST (master), TCH (touch slider)
Total number of effects: 100
Temperament: 12 tone equal temperament
Tuning mode: Chromatic, Guitar, Bass
Supported Memory card: microSD card (512MB-2GB) microSDHC card (4GB-16GB) *2GB or more is recommended.
Display: LCD with touch sensitive panel and backlight
Power supply: "AA/LR6" alkaline battery x2 or AA nickel-metal hydride battery x2 Optional AC adapter (DC4.5V G)
Dimensions: 69mm W × 135mm H × 35mm D) 2.72'' W × 5.31'' H × 1.38'' D
Weight: 140g /4.94 oz. (not including a memory card and batteries)
Accessories: Owner's Manual (this book), alkaline batteries x 2 (for checking recorder operation)
Main standards
GUITAR IN: Connector 6.3mm phone jack (unbalanced) Input impedance 470 kohms Nominal level -6[dBv]
LINE: Connector 3.5mm stereo mini jack Input impedance 14 kohms Nominal level -6[dBv]
MIC: Connector 3.5mm stereo mini jack (switchable to Plug-In-Power) Input impedance 15 kohms
Nominal level MIC GAIN: LOW -22[dBv] MIC GAIN: MID -30[dBv] MIC GAIN: HIGH -38[dBv]
Headphones: Connector 3.5mm stereo mini jack Maximum level 25mW× 25mW@ 16 ohms
Impedance 8 ohms
Maximum output 0.8W
20Hz - 20kHz + / - 1dB
- Korg reserves the right to change the specifications without notice.