
I40M-HD - Arranger keyboard KORG - Free user manual and instructions
Find the device manual for free I40M-HD KORG in PDF.
| Product type | Arranger keyboard |
| Brand | KORG |
| Model | I40M-HD |
| Built-in hard disk | Yes (HDK-i40M kit installed by authorized center) |
| Hard disk partitioning | Multiple partitions (letters C to Z and numbers 1 to 9) |
| Maximum number of files per partition | 224 |
| Song display | Alphabetical order |
| Song selection | By progressive number (000-999) or via wheel |
| Operational modes with disk | Disk/Global, Song Play, Song Edit |
| Additional disk functions | File copy (CPY), partition format (FMT) |
| Operating system update | Via floppy disk, download from www.korg.it |
| Automatic hard disk shutdown | Yes, when inactive |
| Compatibility | iS35 (becomes iS35-HD) and i40M (becomes i40M-HD) |
| Safety | Dangerous voltages inside – installation by authorized center only |
| Spare parts | Kit HDK-iS35 (code FDD0003002) and HDK-i40M (code FDD0003001) |
| Repairability | Service reserved for Korg Authorized Service Centers |
| Number of pages in the manual | 53 pages |
Frequently Asked Questions - I40M-HD KORG
User questions about I40M-HD KORG
0 question about this device. Answer the ones you know or ask your own.
Ask a new question about this device
Download the instructions for your Arranger keyboard in PDF format for free! Find your manual I40M-HD - KORG and take your electronic device back in hand. On this page are published all the documents necessary for the use of your device. I40M-HD by KORG.
USER MANUAL I40M-HD KORG
Warning: The "HDK-iS35" (code FDD0003002) or "HDK-i40M" (code FDD0003001) kit must be installed by an Authorized Korg Service Centre. The instruments contain live parts that may cause serious personal injuries. Do not install the kit on your own. Korg declines any responsibility in case of damages to persons or properties caused by the opening of the instrument by unauthorized personnel.
iS35 and i40M Owner's Manual
The Korg iS35-HD or i40M-HD is an iS35 or i40M provided with hard disk. If you have an iS35, you can convert it into an iS35-HD with the "HDK-iS35" kit. If you have an i40M, you can convert it into an i40M-HD with the "HDK-i40M" kit. Installation must be carried out by an Authorized Korg Service Centre.
The iS35-HD or i40M-HD is basically an iS35 or i40M. Refer to the iS35 or i40M Owner's Manual for information on how to use the instrument. This manual describes the functions related to the hard disk in the Disk/Global, Song Play and Song Edit operating modes.
Hard disk structure
The iS35-HD or i40M-HD hard disk is divided into partitions. A partition is a disk unit that is separate from the other ones. Each partition must be considered as an high-capacity disk capable of containing the same data as a disk (midfiles, styles, arrangements, programs, etc.).
Just like in an MS-DOS® computer, partitions are identified by a letter or number from C and Z, and from 1 to 9. The number of partitions is set by Korg when producing the hard disk.
Each partition can contain up to 224 files.
Hard disk automatic stop
The hard disk automatically stops when not used. It starts again and gets ready in a few seconds when you perform an operation on it.
Displaying the songs in alphabetical order
In the previous releases of the operating system, songs were displayed in the order in which they were saved on the disk. The iS35-HD or i40M-HD operating system displays the songs in alphabetical order, making it easier to search a song on the hard disk.
Selecting the songs with the numerical keypad
In this release of the operating version, you can select the songs by entering the progressive number that was automatically assigned when saving them. The progressive number is displayed on Page 1 in the Song Play mode. See "Selecting the songs with the progressive number" on page 5.
New Disk functions
The "Copy" (see "Copying a file" on page 9) and "Format HD" (see " Formatting the hard disk" on page 11) functions have been introduced to make file management on the hard disk easier.
Upgrading the operating system
The iS35-HD and i40M-HD operating system can be upgraded by loading the new system from disk. The new operating system can be downloaded from www.korg.it.
Disclaimer
Korg is not responsible for loss of data arising from the incorrect use of the hard disk or hardware malfunctioning.
© 1999 Korg Italy. All rights reserved.
2
Using the hard disk
Selecting the disk unit
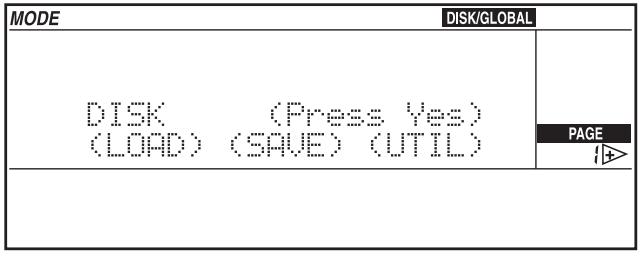
In Disk/Global mode
1 Press DISK/GLOBAL to enter the Disk/Global mode. The selected disk unit is shown on the top left:
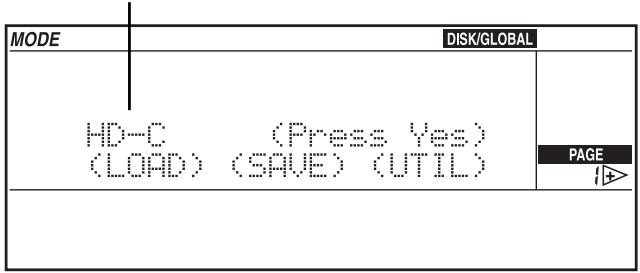
Selected disk unit
| Display | Disk unit |
| DISK | disk |
| HD-C ... HD-Z, HD-1 ... HD-9 | hard disk partition |
2 Hold the DISK/GLOBAL or TRK SELECT button pressed and use the TEMPO/ VALUE buttons (or the DIAL) to select the desired disk unit. Hold the TEMPO/VALUE button pressed to scroll the disk units on the display.
In the example above the C partition of the hard disk has been selected (this partition is automatically selected when turning on the instrument).
3 Release the DISK/GLOBAL or TRK SELECT button. Now you can use all loading (LOAD) or saving (SAVE) functions, as well as the utility functions (UTILITY), such as formatting (FORMAT) and file deleting (DELETE).
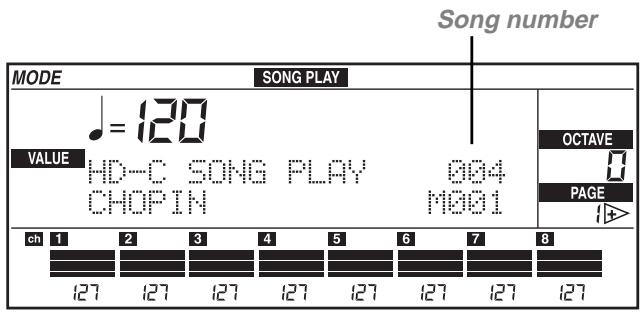
In Song Play mode
1 Press SONG PLAY to enter the Song Play mode. The selected disk unit is shown on top left.
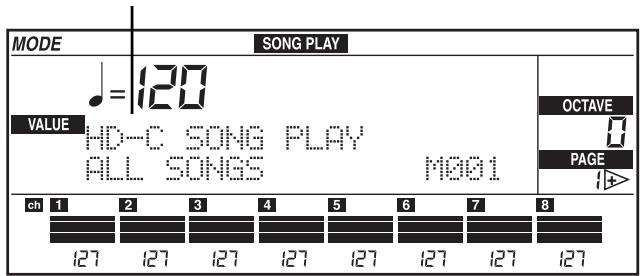
Selected disk unit
2 Hold the SONG PLAY or TRK SELECT button pressed and use the TEMPO/VALUE buttons (or the DIAL) to select the desired disk unit. Hold the TEMPO/VALUE button pressed to scroll the disk units on the display.
3 Release the SONG PLAY or TRK SELECT button.
4 Select the song with the buttons in the TEMPO/VALUE section (or the DIAL). Songs are displayed in alphabetical order. The progressive number assigned to the song is shown on top left (see "Selecting the songs with the progressive number" on page 5).
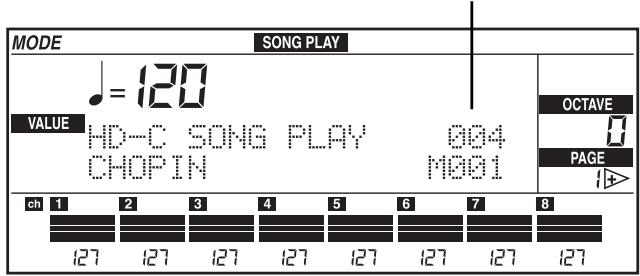
Song number
In Song Edit mode
1 Press SONG EDIT to enter the Song Edit mode. The selected disk unit is shown on top left.
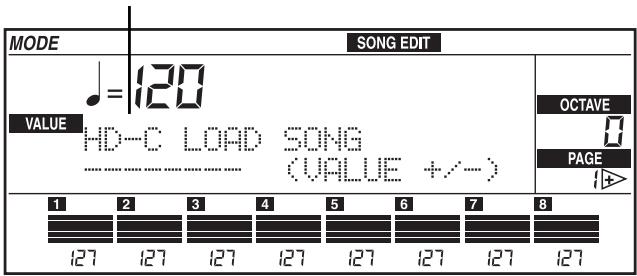
Selected disk unit
2 Hold the SONG EDIT or TRK SELECT button pressed and use the TEMPO/VALUE buttons (or the DIAL) to select the desired disk unit. Hold the TEMPO/VALUE button pressed to scroll the disk units on the display.
3 Release the SONG EDIT or TRK SELECT button.
4 Select the song with the buttons in the TEMPO/VALUE section (or the DIAL). Songs are displayed in alphabetical order.
Selecting the songs with the progressive number
In the Song Play mode you can select a song by entering the progressive number (from 000 to 999) that is automatically assigned to the song when saving it on disk (disk or hard disk). If, for instance, you save the song MICHELLE first and then MYWAY, RAGTIME, and CHOPIN the following numbers will be assigned to the songs:
- MICHELLE
- MYWAY
- RAGTIME
- CHOPIN
When you delete a song, its progressive number will become free. If you save a new song, the new song will be saved in the free location. If, for instance, you delete the song RAGTIME and save PRELUDE the order of the songs will be as follows:
- MICHELLE
- MYWAY
- PRELUDE
- CHOPIN
Note: Numbers cannot be manually assigned to the songs. The number is always assigned automatically when saving the song on disk.
The number of the selected song is shown on the display on Page 1 in the Song Play mode:
Entering the number in the iS35-HD
When you are on Page 1 in the Song Play mode, the ARRANGEMENT section can be converted into a numerical keypad used to select the songs. Since the number assigned to the song is always a three-digit number, it may be necessary to enter one or two zeros before the number (i.e. "9" becomes "009").
Use the buttons in the ARRANGEMENT section to enter the number. For instance, to select song number 95, press 0 (A or B), 9 (USER), and 5 in a sequence. To select song number 9 press 0 (A or B), 0 (A or B), and 9 (USER) in a sequence.
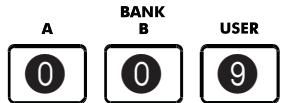
ARRANGEMENT

| Button | Number |
| BANK A, B | 0 |
| BANK USER | 9 |
| NUMBER [1-8] | 1-8 |
Entering the number in the i40M-HD
When you are on Page 1 in the Song Play mode, the PROGRAM/ARRANG section can be converted into a numerical keypad used to select the songs. Since the number assigned to the song is always a three-digit number, it may be necessary to enter one or two zeros before the number (i.e. "9" becomes "009"). To enter the number, press the PROGRAM/ARRANG button to light up the ARRANG LED and use the buttons in the PROGRAM/ARRANG section:
PROGRAM/ARRANGEMENT
PROGRAM O

ARRANG.

A

B

USER


F(USER/DRUM)

NUMBER


| Button | Number |
| BANK A, B, C | 0 |
| BANK D, E, F | 9 |
| NUMBER [1-8] | 1-8 |
1 Press the PROGRAM/ARRANG button to light up the ARRANG LED.
2 Enter the song number. For instance, to select song number 95, press 0 (A, B or C), 9 (D, E or F), and 5 in a sequence. To select song number 9, press 0 (A, B or C), 0 (A, B or C), and 9 (D, E or F) in a sequence.
3
Other functions
Copying a file
The COPY FILE function (CPY) allows for copying files from a disk to a hard disk partition, or from a hard disk partition to another partition. All the file types recognized by the instruments (arrangements, styles, backing sequences, programs, midi-files) can be copied.
Note: Files cannot be copied within the same disk unit (i.e. from partition HD-C to partition HD-C).
1 Press DISK/GLOBAL to enter the Disk/Global mode.

2 Move the cursor to UTIL (UTILITY) and press ENTER/YES. The Utility page will appear on the display.

3 Move the cursor to CPY (COPY) and press ENTER/YES.
Origin unit
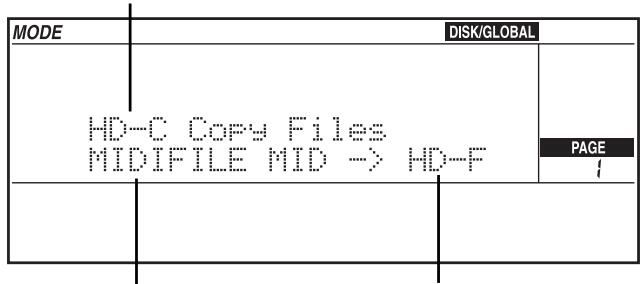
File to be copied
Destination unit
4 Hold the DISK/GLOBAL or TRK SELECT button pressed and use the TEMPO/ VALUE buttons (or the DIAL) to select the disk unit (partition or disk drive) that contains the files to be copied. The name of the origin disk unit is shown on top left.
5 Move the cursor to the name of the disk unit to which the files must be copied in the second line of the display and select the destination unit with the TEMPO/VALUE buttons (or the DIAL). Now you can copy the files in any of the three procedures indicated below:
A - Copying a single file
This function allows you to copy a single file from the origin to the destination unit.
1 Move the cursor to the name of the file to be copied.
2 Select the file with the TEMPO/VALUE buttons (or the dial).
3 Press ENTER/YES to start copying.
Note: The "FILENAME.MID" exists" message will appear (where FILENAME is the name of the file being copied) if the destination unit contains a file under the same name. Press ENTER/YES to confirm copying or EXIT/NO to cancel. The first free progressive number will be assigned to the file.
B - Copying all the midfiles (songs,.MID files)
This function allows you to copy all the midifiles contained in the disk or hard disk partition.
1 Move the cursor to the name of the files to be copied.
2 Hold the [UP / + ] button pressed to go to the end of the song list. The last item but one on the list is the "MIDI Files" option. Select this option.
3 Press ENTER/YES to start copying.
Note: When copying all the midfiles, the files in the origin disk unit will be merged with the files in the destination disk unit. If the origin disk unit contains files that
already exist in the destination unit, the existing files will be deleted and replaced with the files from the origin disk unit. For instance, if the "MICHELLE.MID" file exists both in the origin and destination unit, the file in the destination unit will be deleted and replaced with the file from the origin unit.
The copy function identifies the free progressive numbers and assigns them to the new files. The progressive numbers that are still free will be assigned to the remaining files. For this reason, the progressive number assigned to the songs in the destination unit may be different from the number they have in the origin unit.
See "Selecting the songs with the progressive number" on page 5.
C - Copying all the files
This function allows you to copy all the files (arrangements, styles, backing sequences, programs, midfiles) contained in the disk or hard disk partition.
1 Move the cursor to the name of the file to be copied.
2 Hold the [UP / + ] button pressed to go to the end of the song list. The last item on the list is the "All Files" option. Select this option.
3 Press ENTER/YES to start copying.
Note: When copying all the files, the files in the origin disk unit will be merged with the files in the destination disk unit. If the origin disk unit contains files that already exist in the destination unit, the existing files will be deleted and replaced with the files from the origin disk unit.
As regards the midfiles (songs, .MID files), the copy function identifies the free progressive numbers and assigns them to the new files. The progressive numbers that are still free will be assigned to the remaining files. For this reason, the progressive number assigned to the songs in the destination unit may differ from the number they have in the origin disk unit.
Formatting the hard disk
The procedure used to format disks is described in the Owner's Manual. This section illustrates how to format the hard disk.
Each hard disk partition must be individually formatted once the "HDK-iS35" or "HDK-i40M" kit has been installed. Formatting will only delete the partition you have selected, not the entire hard disk.
1 Press DISK/GLOBAL to enter the Disk/Global mode.
2 Move the cursor to UTIL (UTILITY) and press ENTER/YES. The Utility page will appear.
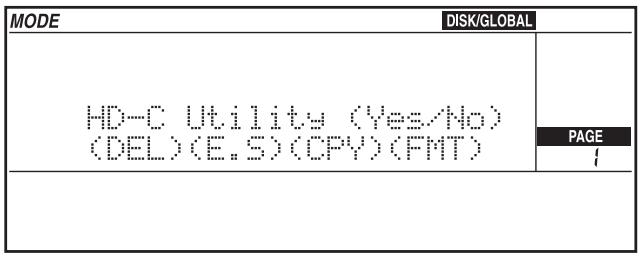
3 Move the cursor to FMT (FORMAT) and press ENTER/YES. The Format page will appear.
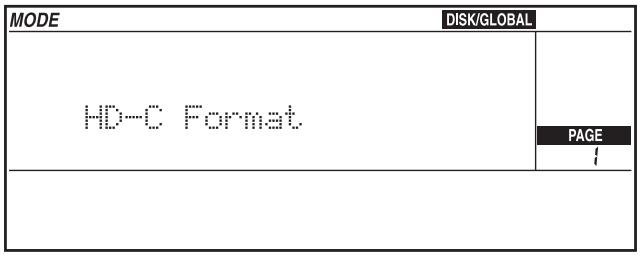
4 Select the desired hard disk partition as described in "Selecting the disk unit" on page 3.
5 Press ENTER/YES to start formatting. The "Already formatted. Continue?" or "Disk contains xx files. Continue?" message will appear if the partition has already been formatted or contains data.
Warning: All data contained in the partition will be deleted! Press EXIT/NO to cancel formatting.
6 Press ENTER/YES to confirm formatting.
KORG iS35-HD / i40M-HD Informations supplémentaires
CHAPTER
1
Introduction
Attention!
© 1999 Korg Italy. Tutti i diritti riservati
2
Uso dell'hard disk
- iS35 and i40M Owner's Manual
- Hard disk structure
- Hard disk automatic stop
- Displaying the songs in alphabetical order
- Selecting the songs with the numerical keypad
- New Disk functions
- Upgrading the operating system
- Disclaimer
- 2
- Using the hard disk
- Selecting the disk unit
- In Disk/Global mode
- In Song Play mode
- In Song Edit mode
- Selecting the songs with the progressive number
- Entering the number in the iS35-HD
- Entering the number in the i40M-HD
- PROGRAM/ARRANGEMENT
- NUMBER
- 3
- Other functions
- Copying a file
- A - Copying a single file
- B - Copying all the midfiles (songs,.MID files)
- C - Copying all the files
- Formatting the hard disk
- KORG iS35-HD / i40M-HD Informations supplémentaires
- Introduction
- Attention!
- Uso dell'hard disk
Brand : KORG
Model : I40M-HD
Category : Arranger keyboard