CJ210BB - Camera LEXIBOOK - Free user manual and instructions
Find the device manual for free CJ210BB LEXIBOOK in PDF.

| Product type | Film camera |
| Brand | LEXIBOOK |
| Model | CJ210BB |
| Film format | 35 mm film (24 x 36 mm) |
| Zoom | Manual, 35 mm and 50 mm |
| Flash | Built-in electronic flash |
| Power | 1 LR6 1.5 V alkaline battery (not included) |
| Dimensions (approx.) | 120 x 70 x 50 mm |
| Weight (approx.) | 200 g |
| Main material | Plastic |
| Viewfinder | Built-in optical viewfinder |
| Frame counter | Yes, manual |
| Rewind | Manual by knob |
| Film advance | Manual by knob |
| Maintenance | Soft cloth slightly damp, without detergent |
| Warranty | 2 years |
| Design | Europe |
| Manufacturing | China |
Frequently Asked Questions - CJ210BB LEXIBOOK
User questions about CJ210BB LEXIBOOK
0 question about this device. Answer the ones you know or ask your own.
Ask a new question about this device
Download the instructions for your Camera in PDF format for free! Find your manual CJ210BB - LEXIBOOK and take your electronic device back in hand. On this page are published all the documents necessary for the use of your device. CJ210BB by LEXIBOOK.
USER MANUAL CJ210BB LEXIBOOK
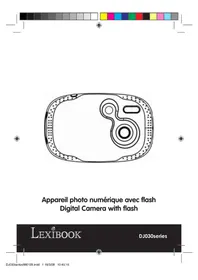
Zoom Camera APPAREIL PHOTO ZOOM CJ210Serie
INSTRUCTION MANUAL MODE D'EMPLOI

Français
English
Portugues
Espanol
Italiano
Deutsch
Nederlands
EaVikα
105(W)x150(H)mm
Français
INTRODUCTION
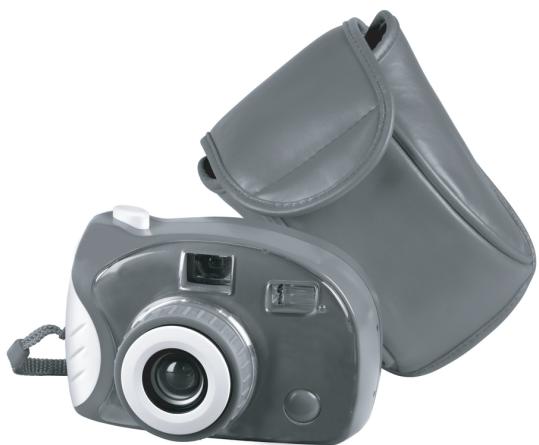
Your new camera with 35mm & 50mm zoom and integrated flash is ideal to introduce you to photography. It works with all films type 24× 36mm (Standard film 35mm ) and the winding and rewinding are manual. Even though this camera is very easy to use, read carefully the instructions below to use its functions like a pro!
DISCOVER YOUR CAMERA
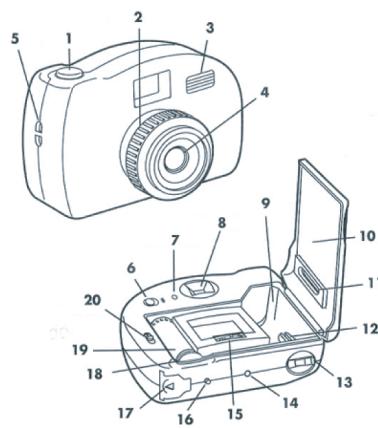
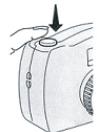
- SHUTTER RELEASE BUTTON
2.35 OR 50 MM MANUAL ZOOM - ELECTRONIC FLASH
- LENS
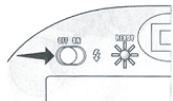
5.WRIST STRAP SLOT - FLASH SWITCH
- FLASH READY LIGHT
- VIEWFINDER
- FILM CHAMBER
- BACK DOOR
- FILM WINDOW
- FILM PLACEMENT AREA
- FILM REWIND CRANK
- PHOTO COUNTER
- FILM INSTALLATION ROLLER
- FILM REWIND BUTTON
- BATTERY COMPARTMENT
- FILM ADVANCE WHEEL
- FILM SPOOL NOTCHES
- BACK DOOR LATCH
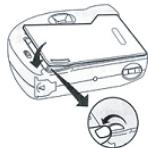
POWER SUPPLY
This camera works with 1 alkaline 1.5V 2.25 Ah batteries type AA (not included). This game must be powered using only the specified batteries.
-
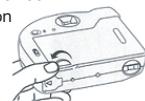
Open the battery compartment cover (17) located under the camera.
-
Install the 1 AA alkaline batteries observing carefully the polarity indicated at the bottom of the battery compartment.
- Close back the battery compartment.

Do not use rechargeable batteries. Non-rechargeable batteries are not to be recharged. Remove the storage batteries before recharging. Recharge storage batteries under adult supervision. Do not mix different types of battery and storage battery, or new and old batteries or storage batteries. Insert batteries and storage batteries according to the polarity. Remove used storage batteries from game. Do not short-circuit the battery or storage battery terminals. Keep batteries away from fire. If game remains unused for an extended period, remove batteries. Only batteries of the same or equivalent type as recommended are to be used.
WARNING: If the unit malfunctions or receives an electrostatic shock, switch the unit off and on again using the ON/OFF button. If this proves to be ineffective, remove the batteries and/or perform the Reset procedure.
LOADING THE FILM
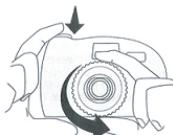
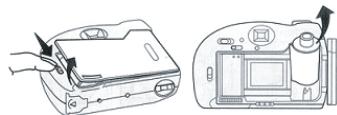
1- Push the back door latch down (20) to open the back door (10).
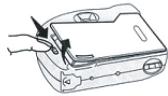
2- Insert a roll of 35mm film in the film chamber (9).
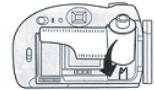
Slide the film strip on the film installation roller (15) and the film spool notches (19). Turn the film advance wheel (18) ensuring that the film is inserted correctly into the gears of the film spool notches (19).
3- Close the back cover (10).
4- Turn the film advance wheel (18) and press the shutter release button (1).
5- Repeat step 4 until the photo counter (14) indicates "1". You are now ready to take pictures.
TAKING PICTURES
Outside on bright sunny days, look through the viewfinder (8) and compose your picture. Best pictures are taken when the sun is over or behind you and not behind the subject.
USING THE FLASH
Indoors, at night or on cloudy days, you will need to use the flash. Slide the flash switch (6) to the 'ON' position and wait until the ready light (7) is lit. You are now ready to take a picture using the flash.
Warning: Never take a picture too close to a person or an animal as it may cause vision problems.
Note: Slide the flash switch (6) to the 'OFF' position when you are not using the flash to preserve battery life.
ZOOM FUNCTION
The zoom has a 35 to 50~mm range. Turn the zoom (2) slightly to the left to obtain a large angle. Turn the zoom towards the right to get a close up view. Press on the shutter release button (1) to take a picture.
Then, turn the film advance wheel (18) until it stops. You may now take your next picture.
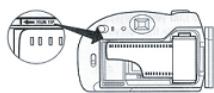
REWINDING AND UNLOADING THE FILM
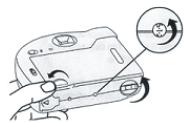
1- When the last picture has been taken or the film is finished, press the film rewind button (16).
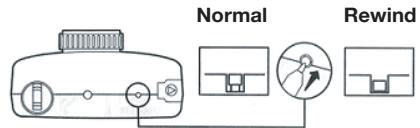
2- Keeping the film rewind button (16) pressed, flip out the handle of the film rewind crank (13) and turn it clockwise to rewind the film. Keep turning until no pressure is felt.

3- Push the back cover release button (20) to open the back door cover (10) and remove the film. Do not remove the film when you are exposed to direct sunlight.
PROBLEMS AND SOLUTIONS
| Problem | Solution |
| The trigger does not work. | The film is not advanced to the next picture or has not been loaded properly. |
| The film does not advance. | The film is already advanced and the picture has not been taken yet or you are at the end of the roll. |
| The photo counter of the rewind crank does not turn when advancing the film. | The film was not loaded properly. Reload the film. |
| The pictures are blurry. | The camera is not held firmly or the subject moved. |
| The pictures are too dark. | There is not enough light around the subject. Turn on the flash or use a ISO 400 or 800 film. |
| The pictures are foggy. | The lens is dirty. Clean them using a lens cleaner. |
| Partial pictures. | Hands, fingers or strap were in front of the lens when the picture was taken. |
| Subjects off centre or cut off. | Frame main subjects in the centre of the viewfinder. |
| Flash ready light off. | The flash is not turned on, the battery is low or was installed incorrectly. |
| The flash ready light turns on very slowly. | The battery is weak and should be replaced. |
| The flash does not work. | No film or battery. Battery installed incorrectly. The flash is not turned on or the battery is weak. |
| The pictures taken using the flash are too dark. | The subject is beyond the flash range or the picture was taken before the ready light was on. |
| The pictures taken using the flash are too bright. | The subject is too close. |
| The battery has a short life. | The flash is never turned off or another type of batteries than alkaline is used. |
CAMERA CARE
When the camera is not in use:
- Do not cause shocks or vibrations to the camera.
- Do not expose your camera to high temperatures.
- Store your camera into its case and in a dry location away from dust and chemicals.
WARRANTY
NOTE: Please keep this instruction manual, it contains important information.
This product is covered by our 2-year warranty.
For any claim under the warranty or after sale service, please contact your distributor and present a valid proof of purchase. Our warranty covers any manufacturing material and workmanship defect, with the exception of any deterioration arising from the non-observance of the instruction manual or from any careless action implemented on this item (such as dismantling, exposition to heat and humidity, etc.). It is recommended to keep the packaging for any further reference.
CARE INSTRUCTIONS
To clean the unit, use only a dry cloth; do not use any detergent product.
Do not expose the unit to direct sunlight or to any other source of heat.
Do not dismantle or drop.
Do not get wet.
It is recommended to keep the packaging for any further reference.
In a bid to keep improving our services, we could implement modification on the colours and the details of the product shown on the packaging.
Ref:CJ210Serie
Designed and developed in Europe - Made in China
Environmental Protection:
Unwanted electrical appliances can be recycled and should not be discarded along with regular household waste! Please actively support the conservation of resources and help protect the environment by returning this appliance to a collection centre (if available).

Portugués
INTRODUÇÃO
Designed in Europe - Made in China