
DIGITAL PHOTO FRAME - Digital photo frame LEXIBOOK - Free user manual and instructions
Find the device manual for free DIGITAL PHOTO FRAME LEXIBOOK in PDF.
| Product type | Digital photo frame |
| Brand | LEXIBOOK |
| Model | DF700 Series |
| Screen size | 6 inches (15.24 cm) |
| Resolution | 520 x 288 pixels |
| Brightness | 350 cd/m² |
| Contrast | 300:1 |
| Viewing angles | 60°/60°/50°/40° (CR≥10) |
| Response time | 30 ms |
| Display format | 16:9 |
| Supported image formats | JPEG |
| Maximum photo resolution | 5.0 megapixels |
| Storage | SD/MMC card |
| Power supply | AC 100-240V / DC 12V (power adapter included) |
| Power consumption | 6 W |
| Operating temperature | -20°C to 65°C |
| Storage temperature | -30°C to 75°C |
| Dimensions (W x H x D) | 231 x 160 x 36 mm |
| Weight | 0.4 kg |
| Functions | Auto slideshow, pause, play, settings (brightness, contrast, color, language) |
| Display modes | Pan Scan, Fit Height, Fit Width, Fill, AUTO FILL, Original |
| Image rotation | 90°, 180°, 270° |
| Slideshow interval | 5 s to 1 h (adjustable) |
| Safety | Do not expose to moisture, disconnect by unplugging |
| Maintenance | Clean with a dry, soft cloth |
Frequently Asked Questions - DIGITAL PHOTO FRAME LEXIBOOK
User questions about DIGITAL PHOTO FRAME LEXIBOOK
0 question about this device. Answer the ones you know or ask your own.
Ask a new question about this device
Download the instructions for your Digital photo frame in PDF format for free! Find your manual DIGITAL PHOTO FRAME - LEXIBOOK and take your electronic device back in hand. On this page are published all the documents necessary for the use of your device. DIGITAL PHOTO FRAME by LEXIBOOK.
USER MANUAL DIGITAL PHOTO FRAME LEXIBOOK
©2008 Marvel Characters, Inc.
©2008 Barbie, Inc. All rights Reserved.
©2008 LEXIBOOK®
91953 Courtaboeuf Cedex, France.
Service consommateurs: 0892 23 27 26 (0.34€ TTC/min)
http://www.lexibook.com

The graphic symbols on the back cover of the set mean the following:
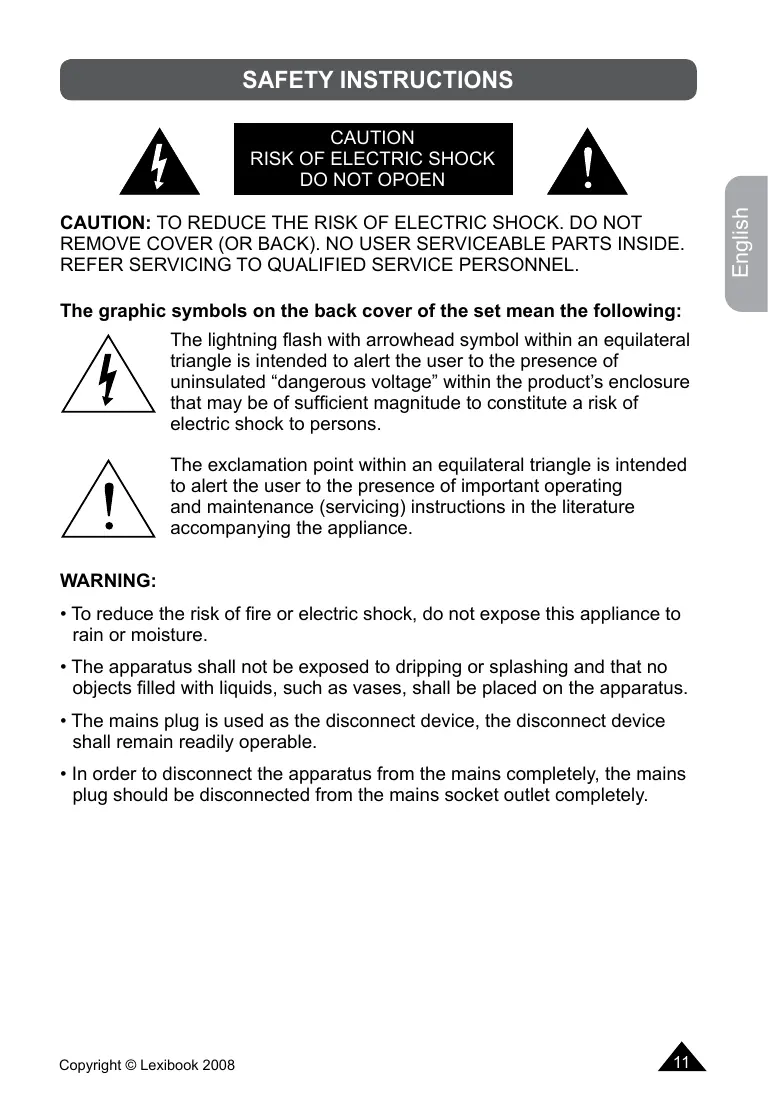
The lightning flash with arrowhead symbol within an equilateral triangle is intended to alert the user to the presence of uninsulated "dangerous voltage" within the product's enclosure that may be of sufficient magnitude to constitute a risk of electric shock to persons.

The exclamation point within an equilateral triangle is intended to alert the user to the presence of important operating and maintenance (servicing) instructions in the literature accompanying the appliance.
WARNING:
- To reduce the risk of fire or electric shock, do not expose this appliance to rain or moisture.
- The apparatus shall not be exposed to dripping or splashing and that no objects filled with liquids, such as vases, shall be placed on the apparatus.
- The mains plug is used as the disconnect device, the disconnect device shall remain readily operable.
- In order to disconnect the apparatus from the mains completely, the mains plug should be disconnected from the mains socket outlet completely.
IMPORTANT SAFETY INSTRUCTIONS
- Read these instructions.
- Keep these instructions.
- Heed all warnings.
- Follow all instructions.
- Do not use this unit near water.
- Clean only with a dry cloth.
- Do not block any ventilation openings. Install in accordance with manufacturer's instructions.
- Do not install near any heat sources such as radiators, heat registers, stoves or other apparatus (including amplifiers) that produce heat.
- Do not defeat the safety purpose of the polarized or grounding-type plug. A polarized plug has two blades with one wider than the other. A grounding-type plug has two blades and a third grounding prong. The wide blade or the third prong is provided for your safety. If the provided plug does not fit into your outlet, consult an electrician for replacement of the obsolete outlet.
- Protect the power cord from being walked on or pinched particularly at plugs, convenience receptacles, and the point where they exit from the unit.
- Only use attachments/ accessories specified by the manufacturer.
- Unplug this unit during lightning storms or when unused for long periods of time.
- Refer all servicing to qualified service personnel. Servicing is required when the unit has been damaged in any way, such as the following: the power-supply cord or plug has been damaged; liquid has been spilled or objects have fallen into the unit; and/or the unit has been exposed to rain or moisture, does not operate normally, has changed its performance or has been dropped.
- Do not overload wall outlet. Use only power source as indicated.
15.Use replacement parts as specified by the manufacturer. - The product may be mounted to a wall only if recommended by the manufacturer.
- Upon completion of any service or repairs to this product, ask the service technician to perform safety checks.
INSTALLATION
Unpacking the device
When unpacking, ensure that the following elements are included:
1 x digital photo frame
1 x AC/DC adapter
1 x frame support bracket
1 x instruction manual
WARNING: All packaging materials, such as tape, plastic sheets, wire ties and tags are not part of this photo frame and should be discarded.
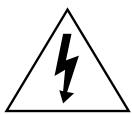
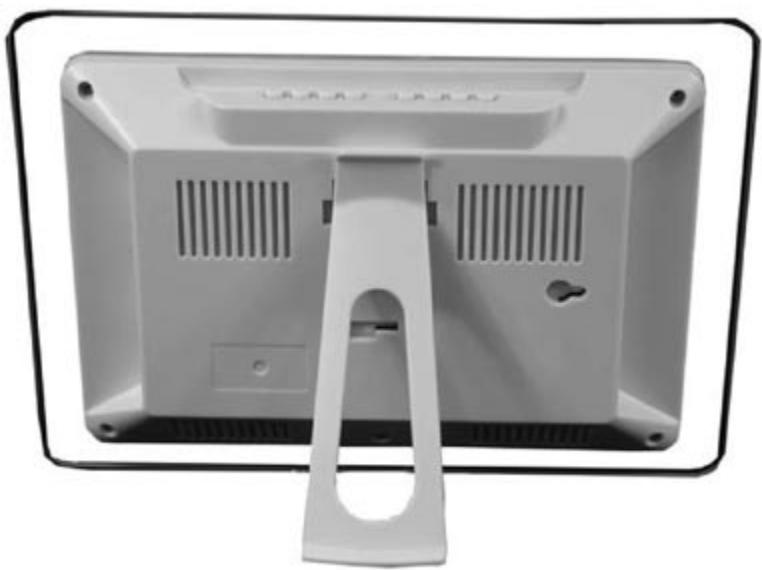
Support bracket installation
Fix the bracket into one of the two slots on the back of the photo frame.
There are three different kinds of view positions:
Landscape:
Portrait:

Wall mounted:
Wall mounting slots
SD/MMC card installation
To display your pictures, insert your SD/MMC card into the SD/MMC card slot located on the right side of the photo frame. Make sure to insert the card in the correct direction.
Power connection
Use the AC/DC adapter (AC100V-240V/DC12V) to connect the photo frame to a main socket (the DC input is located on the right side, at the back of the frame).
Note:
- Before using this product for the first time, please remove the static label from the LCD screen.
- Please switch off the unit before you make any connections.
- If the unit malfunctions or receives an electrostatic shock, turn the unit off and on again. If this proves to be ineffective, unplug the AC/DC adapter from the mains socket then plug it again.
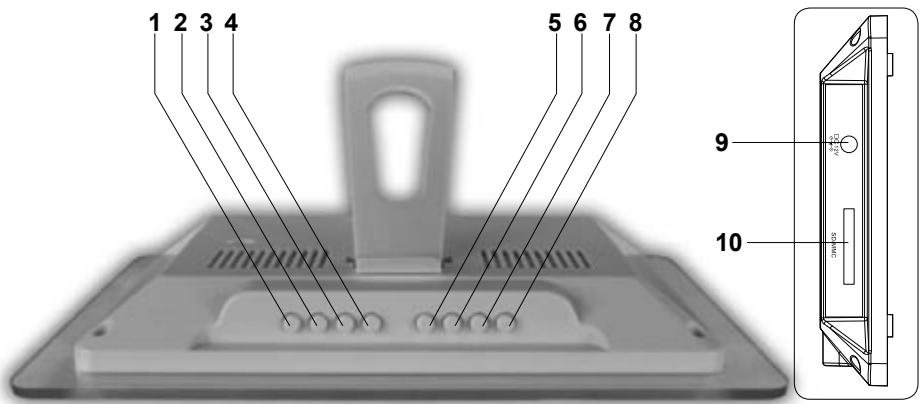
PRODUCT FEATURES
- PLAY/PAUSE button
- MENU button
- SKIPB 卡 button
- SKIPF button
-
INTERVAL button
-
MODE button
- ANGLE button
- POWER button
- DC IN (12V)
- SD/MMC card slot
This section explains how to use the digital photo frame. Read the following instructions to discover all its functions.
Getting started
- Before using this product for the first time, remove the static label from the LCD screen.
- Save pictures on a SD/MMC card and insert it into the SD/MMC card slot on the right side of the frame.
To Display your pictures
- Press the "POWER" button to switch on or switch off the photo frame.
- The photo frame will automatically launch a slideshow of the pictures stored on the SD/MMC card.
- Press the "PLAY/PAUSE" button once to pause the slideshow. Press the button again to resume playback.
- To display the previous picture, press and hold the SKIPB button for at least 2 seconds, then release it.
- To display the next picture, press and hold the SKIPF button for at least 2 seconds, then release it.
Warning: to ensure optimal performance of the digital photo frame, it is recommended to use pictures with a maximum size of 500KB. Larger picture size will slow down the loading times.
Picture settings
- Press the "MENU" button to enter the picture settings menu.
- To select "Brightness", "Contrast", "Colour" or "Language", press and hold the "MENU" button for at least 2 seconds, then release it (repeat the procedure to select the desired setting).
- Use the and buttons to increase or decrease the settings and to select the desired language.
- To save your settings and exit the menu, press the "MENU" button.
Slideshowhow delay interval settings
Press repeatedly the “INTERVAL” button to set the slideshow delay interval: 5s/15s/30s/45s/1m/15m/30m/45m/1h.
Display settings
During the slideshow, press repeatedly the "MODE" button to change the display mode of your pictures: "Pan Scan" (high resolution, full screen display), "Height fit" (picture is resized to fit the height of the screen), "Width fit" (picture is resized to fit the width of the screen), "Fill" (picture is resized for a full screen display), "AUTO FILL" (4 :3 display), "Original" (picture is displayed at its original size).
Angle settings
During the slideshow, press repeatedly the "ANGLE" button to set the display angle: 90^ , 180^ , 270^ or "No rotation".
TECHNICAL SPECIFICATIONS
| Display | 6" (15.24 cm) |
| Resolution | 520 x 288 |
| Luminosity | 350 cd/m2 |
| Contrast | 300 |
| View Angles | 60/60/50/40(CR≥10) |
| Response Time | 30ms |
| Screen size mode | 16 :9 |
| Slideshow delay interval | 5s/15s/30s/45s/1m/15m/30m/45m/1h |
| File format Type | JPEG |
| Photo size | 5.0 Mpixels |
| Power supply | AC100V-240V/DC12V |
| Power consumption | 6W |
| Temperature | Operating -20°C to 65°C Storage -30°C to 75°C |
| Dimensions | 231(L) x 160(W) x 36(H) mm |
| Weight | 0.4Kg |
MAINTENANCE
To prevent fire or shock hazard, disconnect your unit from the AC power source when cleaning. The finish on your unit may be cleaned with a dust cloth and cared for as other furniture. Use a soft, clean cloth moistened with plain, lukewarm water to clean the exterior of the unit. Use caution when cleaning and wiping the plastic parts. Mild soap and a damp cloth may be used on the front panel.
WARRANTY
NOTE: Please keep this instruction manual, it contains important information.
This product is covered by our 2-year warranty. For any claim under the warranty or after sale service, please contact your distributor and present a valid proof of purchase. Our warranty covers any manufacturing material and workmanship defect, with the exception of any deterioration arising from the non-observation of the instruction manual or from any careless action implemented on this item (such as dismantling, exposition to heat and humidity, etc.). It is recommended to keep the packaging for any further reference. In a bid to keep improving our services, we could implement modification on the colours and the details of the product shown on the packaging.
Reference: DF700 Series
©2008 Marvel Characters, Inc.
©2008 Barbie, Inc. All rights Reserved.
©2008 LEXIBOOK®
Designed en developed in Europe – Made in China
Lexibook UK Ltd,
Unit 10 Petersfield Industrial Estate,
Bedford Road, Petersfield,
Hampshire, GU32 3QA, United Kingdom.
Helpline: 0808 1003015
http://www.lexibook.com

Environmental Protection
Unwanted electrical appliances can be recycled and should not be discarded along with regular household waste! Please actively support the conservation of resources and help protect the environment by returning this appliance to a collection centre (if available).

PRECAUCION RIESGO DE DESCARGA ELECTRICA NO ABRIR

PRECAUCION: PARA REDUCIR EL RIESGO DE DESCARGA ELECTRICA, NO RETIRE LA CUBIERTA (O PIEZA TRASERA). NO HAY COMPONENTES EN EL INTERIOR SUSCEPTIBLES DE SER AJUSTADOS POR EL USUARIO. PARA REPARACIONES ACUDAA PERSONAL TECNICO CUALIFICADO.
©2008 Marvel Characters, Inc.
©2008 Barbie, Inc. All rights Reserved.
©2008 LEXIBOOK®
Lexibook Ibérica S.L.
©2008 Marvel Characters, Inc.
©2008 Barbie, Inc. All rights Reserved.
©2008 LEXIBOOK®
©2008 Marvel Characters, Inc.
©2008 Barbie, Inc. All rights Reserved.
©2008 LEXIBOOK®
©2008 Marvel Characters, Inc.
©2008 Barbie, Inc. All rights Reserved.
©2008 LEXIBOOK®
©2008 Marvel Characters, Inc.
©2008 Barbie, Inc. All rights Reserved.
©2008 LEXIBOOK®
- The graphic symbols on the back cover of the set mean the following:
- WARNING:
- IMPORTANT SAFETY INSTRUCTIONS
- INSTALLATION
- Unpacking the device
- Support bracket installation
- SD/MMC card installation
- Power connection
- Note:
- Getting started
- To Display your pictures
- Picture settings
- Slideshowhow delay interval settings
- Display settings
- Angle settings
- MAINTENANCE
- WARRANTY
- Environmental Protection
- PRECAUCION RIESGO DE DESCARGA ELECTRICA NO ABRIR
Brand : LEXIBOOK
Model : DIGITAL PHOTO FRAME
Category : Digital photo frame