
DKCO1HSM - Digital photo frame LEXIBOOK - Free user manual and instructions
Find the device manual for free DKCO1HSM LEXIBOOK in PDF.
| Product Type | Digital Photo Frame Keychain |
| Brand | LEXIBOOK |
| Model | DKCO1HSM |
| Screen | 1.1 inch OLED Color Screen |
| Supported Image Formats | JPEG, BMP, GIF |
| Memory Capacity | 60 photos |
| Power Supply | Rechargeable 3.7V Lithium Battery via USB |
| Connectivity | USB for PC connection and charging |
| Included Software | ImageViewer for photo management |
| Main Functions | Slideshow, brightness adjustment, date/time display, screen saver, photo editor |
| Adjustable Slideshow Duration | 0 to 31 seconds |
| Adjustable Screen Saver | 0 to 31 minutes |
| Date/Time Display | Synced with PC, adjustable OSD ON/OFF |
| Cleaning | Damp cloth; avoid solvents |
| Safety Instructions | Keep away from heat, moisture, strong sunlight |
| Compatible Operating System | Windows SE/ME/XP/Vista |
| Warranty | 2 years (excluding LCD screen) |
| Dimensions (approx.) | Approximately 5 x 4 x 1 cm (keychain size) |
| Weight (approx.) | Approximately 30 g |
| Repairability | Do not attempt to repair yourself; contact customer service |
| Spare Parts | Not specified; contact manufacturer |
| Origin | Designed in Europe, manufactured in China |
Frequently Asked Questions - DKCO1HSM LEXIBOOK
User questions about DKCO1HSM LEXIBOOK
0 question about this device. Answer the ones you know or ask your own.
Ask a new question about this device
Download the instructions for your Digital photo frame in PDF format for free! Find your manual DKCO1HSM - LEXIBOOK and take your electronic device back in hand. On this page are published all the documents necessary for the use of your device. DKCO1HSM by LEXIBOOK.
USER MANUAL DKCO1HSM LEXIBOOK
Congratulations on the purchase of your DKC01HSM_01 Digital Photo Frame keychain from LEXIBOOK®!
This convivial digital photo frame keychain offers numerous features and functions to allow you to enjoy your digital photos and keep them with you wherever you go.
This document is a brief guide which illustrates the main features and functions of DKC01HSM_01. We invite you to read this manual attentively as it will help and guide you with the usage of your new product.
UNPACKING YOUR DKC01HSM_01
Inside the package:
-1 DKC01HSM_01 digital photo frame keychain
- 1 USB cable
Please keep all packaging in a safe place for future reference. Please keep your sales (till) receipt - this is your guarantee
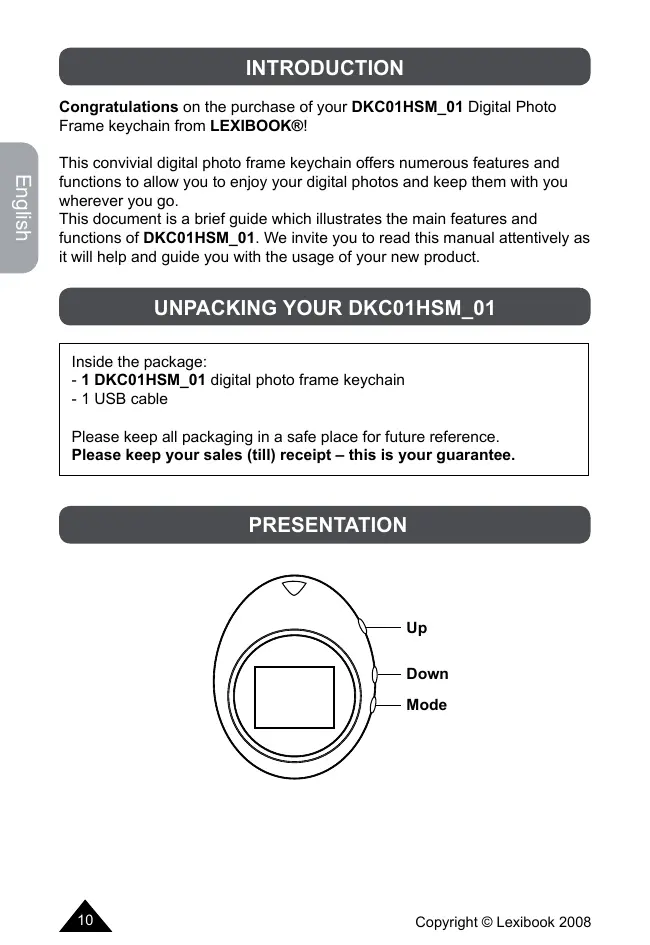
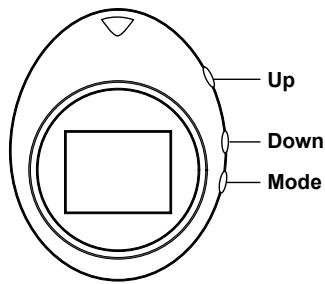
PRESENTATION
INSTALLATION
- Plug the USB cable into the computer and the digital photo frame. The computer will detect the new hardware automatically and theImageViewer window should pop up on its own. The screen on the unit will show "PC connecting."
- If this does not happen, unplug the USB cord from the computer and plug it in again. This will not affect the functioning of the unit even if the screen on the unit does not show "PC connecting."
- If you would like to go back into the program to edit your photos, please launch the imageview.exe file from your computer.
USING IMAGEVIEWER WHEN DKC01HSM_01 IS CONNECTED TO YOUR PC
1.ImageViewer will automatically display all the pictures which are already loaded into the frame.
2. You may select a photo in the digital photo frame by clicking the desired photo in the left box.
3. Once you click on a photo, you can move it up or down the list. This changes the order in which the photos are displayed when using the digital photo frame slideshow function.
4. You may also delete a photo by selecting it and clicking "Delete." This will permanently delete the photo from the list.
5. Click "Clear" to clear the entire contents of the digital photo frame.
6. The "Edit" button can be used to crop a photo.
a. In editing mode, place the cursor at the bottom right corner of the picture, then click and hold. Move the cursor inside the picture to resize the selection. Click and hold inside the selection area to move the selection.
b. Click "Auto Stretch" to fill up the entire screen with the photo and click "Smooth Edit" so that the photo appears clear in the photo frame.
- To add an image to the digital photo frame, click "Add Image as ..." Then select the directory where the image was saved and click "Open."
a. Once this is done, the image will appear in the left box.
b. At this point, the image can be manipulated like any others.
- Click the "Save" button to save all changes.
- Click "Set Logo Image" to select a start-up photo for the unit, just as you would select any other photo. It will show up every time when you turn the unit on. This picture is not displayed during the slideshow.
- Click "Exit" to leave the program
USING DKC01HSM_01 WHEN IT IS NOT CONNECTED TO YOUR PC
- Press and hold the "Mode" button for 2 seconds to turn on your digital photo frame.
- Press "Mode" again to display the Options Menu and press the "Up" and "Down" keys to scroll and navigate inside the menu. Press "Mode" again to confirm.
- Select "Time" to display the date and time. This time is synchronized with your PC clock. You cannot set the time from the unit itself.
- In the time sub-menu, press the "Up" and "Down" keys to set "OSD ON" or "OSD OFF" to show or hide the time and date on the screen of the unit in picture mode.
- Select "Slideshow" to change the time between photos from 0 to 31 seconds when using the slideshow function of the photo frame. Set it to "0" to disable the slideshow function.
- Select "Screen Save" to set the amount of time before the digital photo frame turns off automatically. Use the "Up" and "Down" keys to change the time from 0 to 31 minutes. Set it to "0" to disable the screen save function.
- Select "Brightness" to adjust the brightness.
- Press the "Mode" button again to return to picture mode.
CHARGING THE BATTERY
- Charge the unit by plugging the USB cable to your PC.
- The screen of the unit will display the battery symbol.
- When the unit is low in battery, the display will dim and blink before it finally turns off.
CLEANING AND CARE
- Don't clean any part of your DKC01HSM_01 with benzene, thinners or other solvent chemicals—this may cause permanent damage which is not covered by the guarantee. When necessary, clean it with a damp cloth.
- Keep your DKC01HSM_01 away from hot, humid conditions and strong sunlight.
- Every effort has been made to ensure high standards of reliability for your DKC01HSM_01. However, if something does go wrong, please do not try to repair it yourself – consult your supplier or the LEXIBOOK® help line
TECHNICAL SPECIFICATIONS
| Supported Formats | JPEG, BMP, GIF |
| Display | 1.1 inch OLED Colour Display |
| Storage Capacity | Stores 60 pictures |
| Power | 3.7 V Lithium battery + USB cable charger |
| Operation System | Win SE / ME / XP / Vista |
GUARANTEE
This product is covered by our two-year guarantee*.
For all matters relating to the guarantee or our after-sales service, please contact your retailer and have your receipt on hand. Our guarantee covers manufacturing or assembly defects with the exception of all damage resulting from a failure to respect the instructions, or any inappropriate handling of the article (such as taking it apart, exposing it to heat or humidity, etc).
- excluding the deterioration of the LCD screen.
Note: It is recommended that all packaging be kept for future reference.
Keep this instruction manual in a safe place as it contains important information.
Disclaimer: In our constant concern for improvement, the colours and details of the product may differ slightly from those shown on the packaging.
Reference:DKC01HSM_01
2-year warranty
©2008 LEXIBOOK®
Designed and developed in Europe - Made in China
Customer Service
LEXIBOOK UK Ltd
Unit 10 Petersfield Industrial Estate
Bedford Road, Petersfield
Hampshire, GU32 3QA,
United Kingdom
Helpline: 0808 100 3015
http://www.lexibook.com
CE
Environmental Protection
Unwanted electrical appliances can be recycled and should not be discarded along with regular household waste! Please actively support the conservation of resources and help protect the environment by returning this appliance to a collection centre (if available).


INDICE
INTRODUCCION. 16
DESEMBALAJE DEL DKC01HSM_01 16
PRESENTACION 16
INSTALACION 17
CÓMOTILIZAR ELIMAGEVIEWER CUANDOEL DKC01HSM_01 ESTÁ CONECTADO A SU PC. 17
CÓMÖ UTILIZAR EL DKC01HSM_01 CUANDO NO ESTÁ
CONECTADO A SU PC. 18
PARACARGAR LA BATERIA. 19
INSTRUCCIONES DE CUIDADO Y LIMPIEZA 19
ESPECIFICACIONES TECNICAS 19
GARANTIA 20
INTRODUICION
Lexibook Ibérica S.L.