USER MANUAL AM L2 LISTO
Raccordement electrolyte :
MasOS X 10.3 (Panther)
256 Mo RAM
USB 2.0
MTP XNJB
Acquisition analogue
Installling hard disk drive 5
Transfer of files from a computer 7
Transfer of files from an external peripheral 7
Detailed installation 9
The universe concept 11
Front of the MediaTec TNT 13
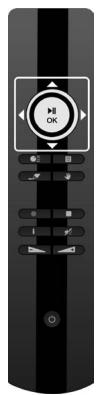
Remote control 14
The marker list 16
Hand menu 17
Tasks in navigators 17
Actions in players 19
3. TV Universe
MediaTec TNT changes the way you watch TV ! 20
TV player and TV navigator 20
Searching channels 21
Watching TV 22
External decoder set up 23
Timeshifting 24
Creating A Favourite Channels List 26
GettingProgramme Information 28
Recording Your Favourite Programmes 31
4. Music Universe
Creating a playlist 35
Adding a file to my playlist 35
Changing the order in which the tracks are played 35
Adding a song to a playlist 36
5. Video/photo universe
Looking at videos/photos 37
Restart watching a video 38
Watching my tv recordings 38
6. Parameters Universe
Choosing a tab 39
Tasks available in the different universes 40
Parental protection 41
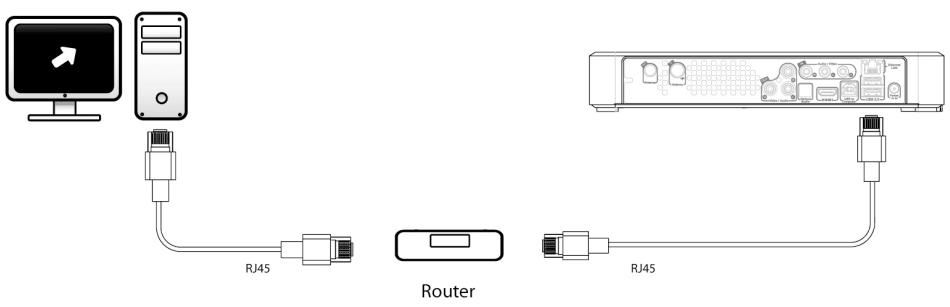
Connecting MediaTec TNT to a network 45
UPnP Connection 46
Update 47
7. Technical specifications
Important
Please read this manual carefully before using this product and keep it safe for further use.
Warning:
Any change or modification made to this equipment which has not been expressly authorised by the manufacturer, might deny the user the right to use this equipment.
In order to guarantee conformity with directive 89/336/EEC, only use correctly sheathed cables with this equipment.
Instructions for Use / Safety Recommendations
Positioning / Ventilation:
- Leave a space of at least 10cm around the product's air inlets in order to allow free circulation of air. Poor ventilation risks damaging the product.
Do not put your product on a soft surface where it might sink in (bed, sofa, carpet or any other similar surface).
In order to ensure the stability and correct functioning of your unit, please put it on a rigid and flat surface.
- Environments shut off to the flow of air such as cabinets and closed bookcases are not suitable unless they have appropriate ventilation installed.
So that each of your devices is suitably ventilated, do not stack them or place them too close to one another, otherwise the devices will mutually transmit heat.
Moisture:
Do not put your unit near any source of water such as a water container, bath, basin, tap, swimming pool, etc., in order to prevent electric shocks or damage to the product.
In the event that water is accidentally splashed onto the unit, unplug it and contact an approved dealer.
o Do not expose the unit to any conditions of extreme humidity.
Sunshine / Heat:
Do not put your product near any source of heat: direct sun, radiator, fireplace or any other similar source of heat. Do not put any source of heat on or near the unit (candle, ashtray, incense, etc.).
The unit has been designed to function in environments where the temperature is not extreme. Excessively high or low temperatures are to be avoided.
Connecting to the electricity supply:
- Put the unit near an easily accessible A/C electrical socket. The rear of the product should be clear in order to have easy access for connections.
The unit must only be powered by the external power supply provided. You must not under any circumstances try to operate the unit using another power supply.
- Using an external power supply other than the one supplied with the product might damage or cause the latter to malfunction.
To turn off the power supply, unplug the unit from the wall socket.
- Please connect the unit's cables and the power supply with care. Position the cables so they do not obstruct movement to avoid them being trodden on or tripped over.
o Please ensure that nothing is put on the cables.
。 Please make a regular visual check of the cables to make sure that they are in
good condition.
- During a storm, or when you are away or not using your unit for a long period of time, unplug the power supply, antenna and network cables. Taking this precaution, will prevent the unit from being damaged by lightning or surges.
The external power must necessarily be linked to earth.
General Recommendations:
o Do not insert any metallic object into the unit's openings.
Only a qualified technician is authorised to open the unit's housing.
To maintain the product, clean any dust which has settled on the air vents using a dry, clean cloth, having first unplugged the product.
- If the unit is not working normally, particularly if it is giving off a smell or making strange sounds, unplug it immediately and contact a dealer or approved repair centre.
The product label is located under the device.

- This appliance contains a lithium battery – for safety reasons, it is strictly forbidden to change this battery. Only a qualified, authorised technician should carry out this replacement operation.

Disposal of end-of-life products
This product has been designed with high-quality recyclable materials and components. The symbol of a crossed out dustbin on a product means that this latter meets the requirements of European directive 2002/96/EC. Enquire of local authorities about the system for collecting end-of-life electric and electronic products. Comply with legislation in force and do not throw your products away with household waste. Only suitable disposal of products can prevent contaminating the environment and harmful effects to health.
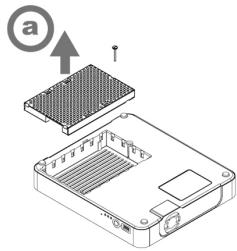
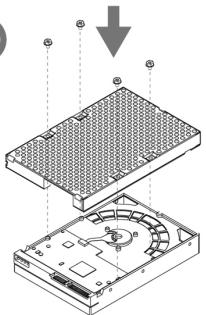
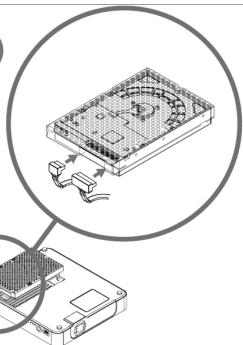
Installing hard disk drive
b
C
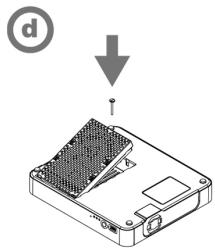
e
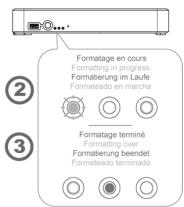
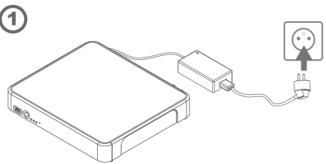
The first time you plug in the MediaTec TNT into an electrical socket, the hard disk will automatically format itself.
The first time you turn on the MediaTec TNT, you will be asked to answer a series of questions. There will be a series of screens until you reach the home page.
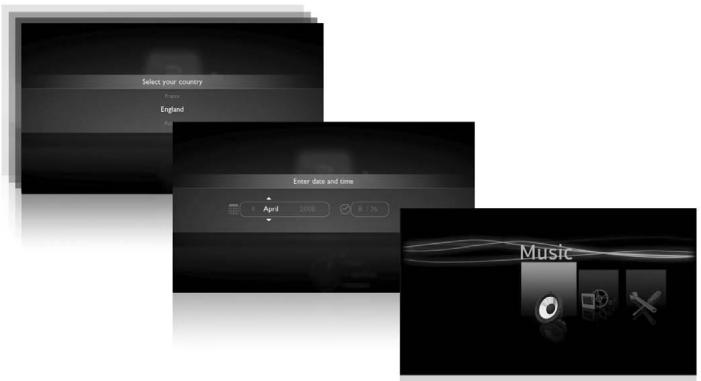
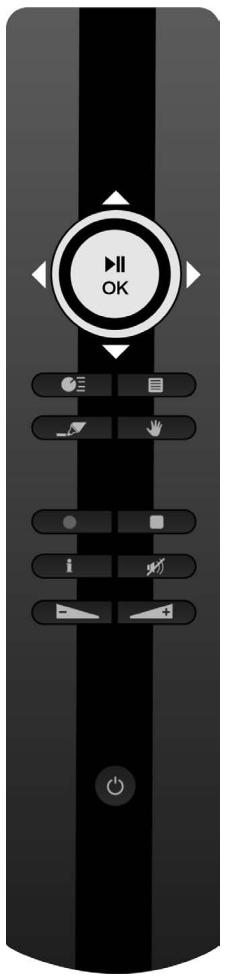
To move about the screens, use the remote control's wheel

To confirm a screen, press OK in the centre of the wheel


- If you do not use the MediaTec TNT for a period of time, a screen saver will start. To exit screen saver mode, press any button on the remote control.
- The following pictogram indicates that the MediaTec TNT is loading information.

Television set up
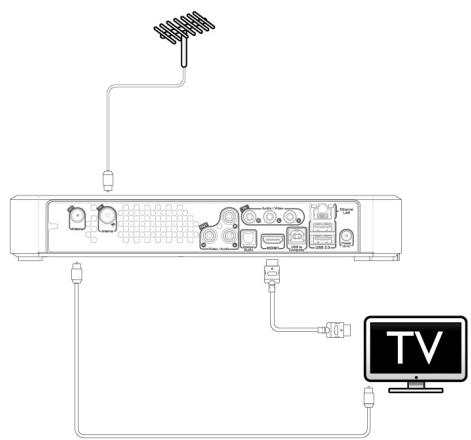
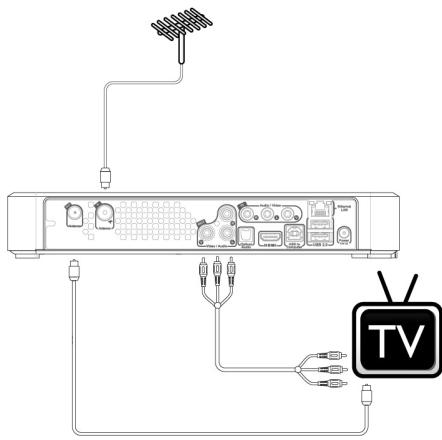
Set-up advice
If you have a flat LCD or plasma screen with an HDMI output, use this first. It enables you to have a High Definition quality picture.
To get the best quality picture possible, select the most suitable output resolution on the MediaTec TNT.
To change the output resolution on the MediaTec TNT, go to Parameters / Connection / HDMI YUV output resolution.
Do test out several output resolution settings as the picture quality can vary depending on the screen's performance.
If you have a cathode ray tube screen, use a "composite CVBS" cable [yellow]. The signal will be suited to your screen.
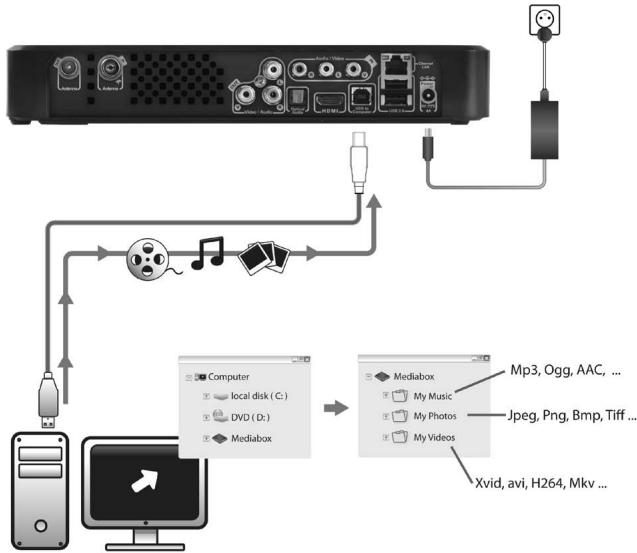
Transfer of files from a computer
Connect your MediaTec TNT to a computer with a USB cable.
Minimum Configuration:
PC
500 MHz Intel Pentium II
MasOS X 10.3 (Panther)
256 Mo RAM
USB 2.0
MTP XNJB
The MediaTec TNT is recognised as an external peripheral
Select your audio files (e.g. MP3, Ogg, AAC) on your PC and paste them in MediaTec TNT « My music » folder.
You can also select your video files [Xvid,avi,H264,Mkv] and paste them in « My video » folder and paste your photo files [jpeg,png,bmp] « My photos » files.
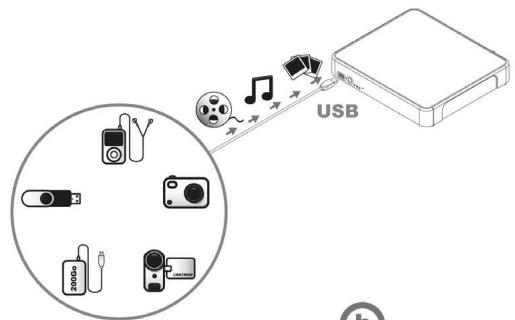
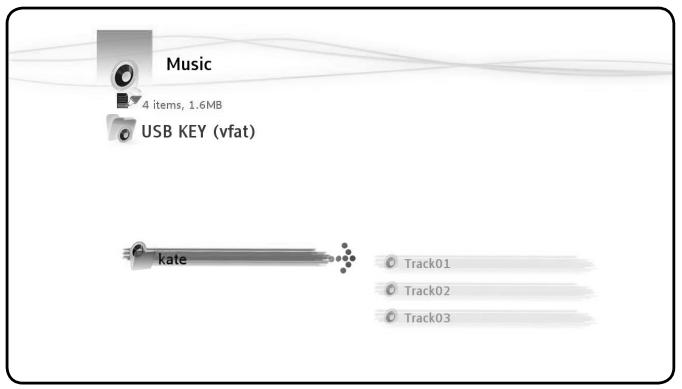
Transfer of files from an external peripheral
You can copy files from an external peripheral (external hard disk, digital camera, USB key, etc.) onto your MediaTec TNT via USB.
Connect the peripheral to the MediaTec TNT. The peripheral will appear in the interface (in the following example: USB key).
You can now select the files to be copied using the button. Be careful to select only a single type of file (audio or video or photo). When you have completed your
selection, go to the location where you would like to put the files. Press the button and select "Duplicate marked items". Your files are now available on your MediaTec TNT.
a
b

C


d

e


f
(1) - Connect your peripheral (for example a USB key) to the MediaTec TNT using the USB socket and/or a USB cable
(2) - Enter the Music Universe, then the USB key
(3) - Select the audio items to duplicate and go to the location where you would like to put the files
(4) - Select action «duplicate marked items in...» in the Hand Menu Files are now available in your MediaTec TNT.
Detailed installation
Router set up
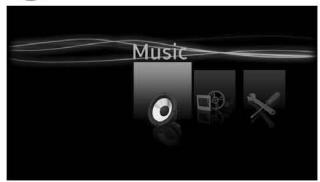
The universe concept
MediaTec TNT is made up of different Universes
Each Universe corresponds to a separate product with its own functions and media.
From the Homepage you can access all Universes:
TV Universe
Watch TV, organise recordings and consult the electronic programme guide.
» Go to page 20 for more details on this Universe

Music Universe
Listen to music and make playlists. This Universe brings together all the audio files.
» Go to page 34 for more details on this Universe

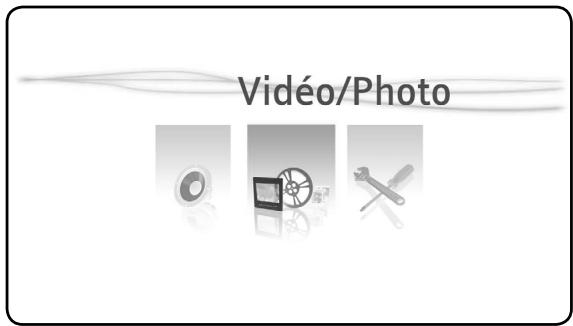
Video/photo Universe
Watch your TV programme recordings, create a photos slide show, watch your video camera recordings, etc. Access all image or video files in this Universe.
» Go to page 37 for more details on this Universe

Parameters Universe
You can modify all the MediaTec TNT settings in this Universe.
» Go to page 39 for more details on this Universe

- A Universe always includes a navigator and a player
The Navigator is used to select the media or the TV Channel
The player lets you watch/listen to the selected media
- Display the navigator while watching/listening by pressing

File Filtering
Each Universe filters your media files according to type and sorts them in the corresponding Universe.
In the « Music » Universe, only audio files are accessible.
When you copy files to MediaTec TNT, they must be sorted by media type otherwise they will not be accessible:
For example: You plug in a USB flash drive with a folder called « Kate » containing:
3 tracks of music
1 video
3 photos
To listen to the music content in « Kate »: go to the Music Universe.
To look at the video/photo content in « Kate »: go to the Video/Photo Universe.
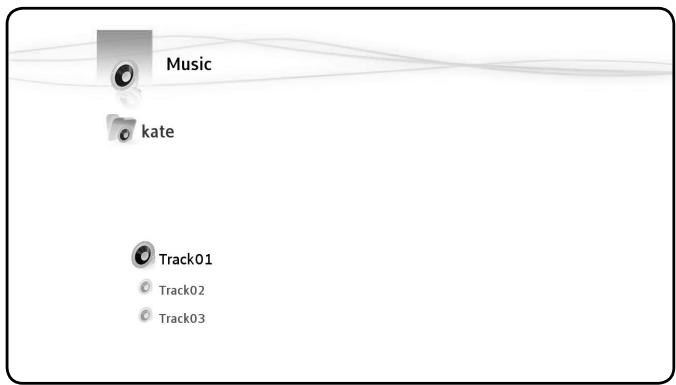
Only the music files on the USB flash disc are displayed
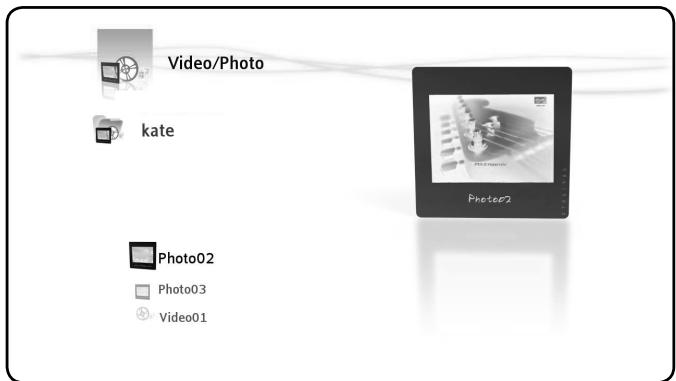
Only the photos and videos on the USB flash disc are displayed
Explanation of the indicator lights
| Communication with the computer in progress | ○ | ○ | ○ |
| Formatting/ Installation in progress | ○ | ○ | ○ |
| MediaTec TNT on standby or
MediaTec TNT is starting up | ○ | ○ | ○ |
| Pressing on a remote control button confirmed | ○ | ○ | ○ |
| Recording in progress | ○ | ○ | ○ |
| MediaTec TNT is on | ○ | ○ | ○ |
| Reset (held down) | ○ | ○ | ○ |
| Fast flashing |
| Disk error
(no disk, disk not detected, disk not formatted or disk damaged) | ○ | ○ | ○ |
| Slow flashing |
Reset Mode
During the reinitialisation of the MediaTec TNT, the blue indicator will be continuously lit whilst holding down the "reset" button, then will remain continuous during starting up.
If the "reset" button is held down for at least 5 seconds, the 3 indicator lights will flash rapidly and simultaneously.

- If you keep the "reset" button held down for 5 seconds more [being 10 seconds in total], the product will be totally reformatted.
- Blue light: lit when pressing RESET
- After 5 seconds of holding down RESET: the green, blue and red lights will flash.
- After 10 seconds. The green light will flash during the installation process.
Universe TV, Music, Video/photo


Home Page

In Player mode, displays the Navigator In Navigator mode, displays the Player if running

Displays available options / actions

Mute

Reduce/Increase Volume

On/ Off
TV Universe

| Player Mode | Navigator Mode |
| ▲ | Previous / Following Channel | Previous / Following Item |
| ←▶ | Return / Forward | Exit / Enter Selected File |
| ▶■ | Play / Pause | |
| ◎ | Fast Return / Forward | Previous/Following Item |
| ● | No action |
| ● | Program a recording / change recording time | Program a recording from the Program Guide |
| ■ | Stop Recording | No action |
| i | Display Information Box | Display details of selected Item |
Music Universe

| Player Mode | Navigator Mode |
| ▲ | Previous/Following track | Previous/Following item |
| ▲ | Display / Mask list of tracks being played | Exit/Enter selected item |
| ▲ | Play / Pause | Read selected item |
| Fast Return/Forward | Previous/Following item |
| No action | Add / Remove marked item to Marker List |
| No action |
| Stop Play and Return to Navigator | No action |
| i | No action | Display details of selected item |
Video/photo Universe

| Player Mode | Navigator Mode |
| ▲▼ | Previous/Following File | Previous/Following item |
| ▲▼ | Video:Skip Back/Forward | Exit/Enter selected item |
| ▲▼ | Play/Pause | Read selected item |
| ● | Fast Return / Forward | Previous/Following Item |
| ● | No action | Add/ Remove marked item to Marker List |
| ● | No action |
| ● | Stop Play and Return to Navigator | No action |
| i | Display Information Box | Display details of selected item |
This Button is Important as it is used to choose a file for a specific task.
。 How to copy only the best holiday photos from a USB key ?
How to tidy up my hard drive by deleting films already seen?
o How to choose several pieces of music to make a playlist ?
Any number of situations where you want to apply a common task to several files and folders at the same time.
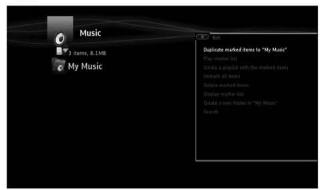
Once an item is « marked », the marker list indicator is displayed, showing:
he number of items (folder or files) which are « marked »
The total size of the items « marked »
When a folder is « marked », all its contents are marked as well.
In the following example, the user has « marked » the folder « Kate »: its contents have all been « marked ».

- The Marker List is a multiple file and folder selection tool
The contents of the list can be consulted and modified at any time
The full contents of the Marker List can be displayed by using
the button

- The Marker List is a multiple file and folder selection tool
- The contents of the list can be consulted and modified at any time
- The full contents of the Marker List can be displayed by using the button

- The « marker » list is not emptied when a task is completed.
Hand menu


Move, copy, rename or delete folders or files
Rotate a photo
Create a playlist, etc.
Whether you are in navigator or player mode, the displays the contextual task window relative to the Universe being used.
This window is available in the Navigators and Players of the TV, Music and Video/ photo Universes.

- In the TV Universe, the Hand Menu has different functions than in the other Universes.
Tasks in navigators
Tasks in navigators Music, Video/Photo
In the Navigators Music and Video/photo, use the button to display available actions on:
○ 1.he item selected: AUD-1A
The parent folder
The Marker List
The Universe: Music
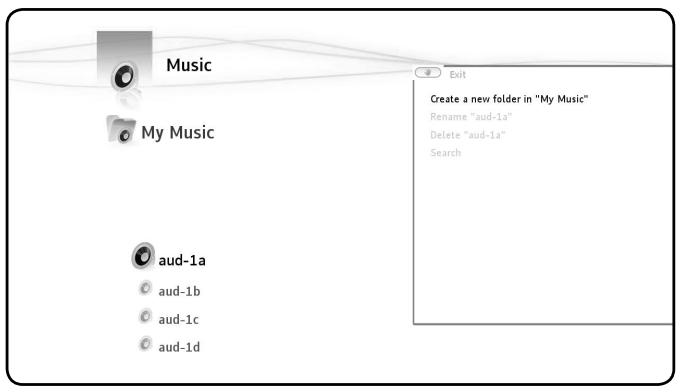
Available actions in the navigators Music and Video/photo
Duplicate marked items to ...
Play marker list
Create a playlist with marked items
Unmark all items1
Delete marked items2
Display marker list
Create a new folder in ...
o Rename
Delete
Search
Mask hidden items
Set to child mode

- [1] - This task does not delete the « marked » items, but simply unselects all those items « marked » in this Universe.
(2) - This task permanently deletes all « marked » files and folders.
Actions in the tv navigator
Programme grid
Create and organise favourites
O Rename a favourite
o · Delete a favourite or a channel from a favourite
Actions in players
Actions in music and video/photo players
When you listen to music, watch a slide show or video, the options available are found in the Hand Menu
The tasks available vary according to the type of file being played.
Actions during a Photo Slide Show
When the button is pressed, the slide show pauses.
The available options are:
Transitions
Left rotation
Right rotation
Actions when reading a file
The available options are:
Subtitles
Sound track
Select chapter
Change camera angle
Go to DVD menu
Go to video setup
Actions in the TV Player
Display EPG
○ Program a recording
Picture size
。 Subtitles : select available subtitles while programme is playing
Audio tracks : when several soundtracks are available, changes soundtrack while programme is playing
3. TV Universe
- Control what you are watching and go back in time
Organise the recording of your favourite TV series
o Record a programme and watch another one
Scroll through the programme guide
○ Create favourite channel lists for all the family
TV player and TV navigator

The TV Universe is organised in 2 parts: the Player and the Navigator. The LIST button switches from one to the other.
TV player

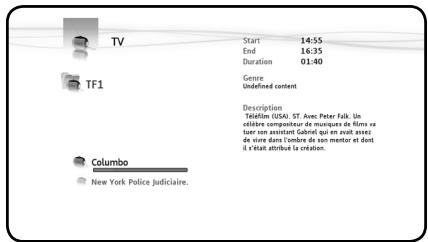
TV navigator
Use the TV Player to:
watch TV
record programmes
freeze live pictures
○ access the programme grid...
Use the TV Navigator to:
o display the list of available channels
○ obtain information on programmes present or future
o display programmes on other channels without zapping
Display the directory including:
the list of all scanned channels
the user list of favourite channels
the folder « My programmed recordings »
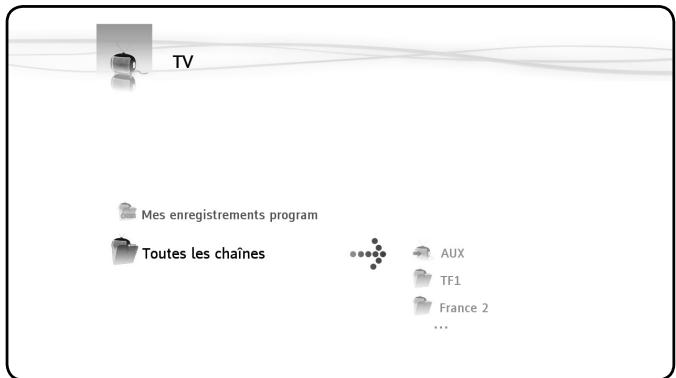
TV Navigator - All Channel List
Searching channels
The first time you access the TV Universe, the searching channels programme automatically begins.
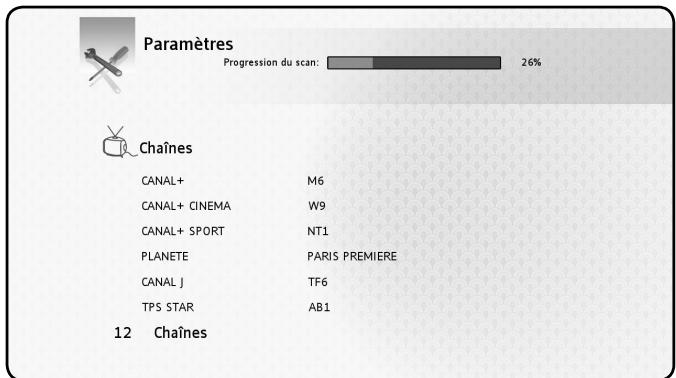
During the search, the number of channels found gradually increases. Search can last a few minutes
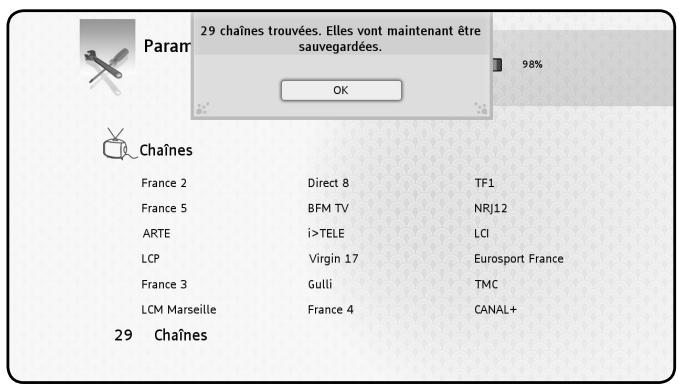
Once the search has ended, the save channels window appears.
Press the OK button to save the channels which have been found.
To make another channel scan, go to MediaTec TNT Parameters Universe.

If no channels are found, check that your aerial is plugged in.
Watching TV
Zap from channel to channel
○ Enter the TV Universe, the last channel to be watched is displayed
Use the buttons to zap from channel to channel
Direct access to my chosen channel
Open the TV Navigator

- Select the channel by navigating in the list of channels and press OK
External decoder set up
Your MediaTec TNT has audio and video plugs in order to simply connect your external decoder. This connection lets you enjoy your MediaTec TNT's functionalities with external sources (satellite decoder, DVB-T, VCR, etc.)

External decoder DVB-T
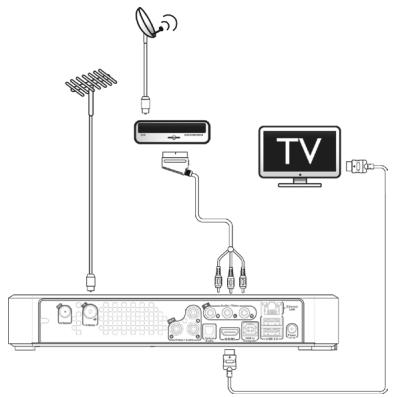
External decoder SATELLITE
Once the connection is set up, turn on the external decoder.
On the MediaTec TNT, set channel to « AUX"
The « AUX » channel displays the image and sound coming from the devices connected to audio/video plugs
« AUX » has the same behaviour as other channels. You can:
○ Add “AUX” to a favourite list
Schedule recordings
Time shift
On « AUX » you cannot access information on programmes
When you're watching « AUX », the progress bar only shows the memory content.
There is no EPG.

- Remember to switch on the external decoder before zapping to « AUX »
- For scheduled recordings, remember to let the external decoder on
- You can only record one programme at once.
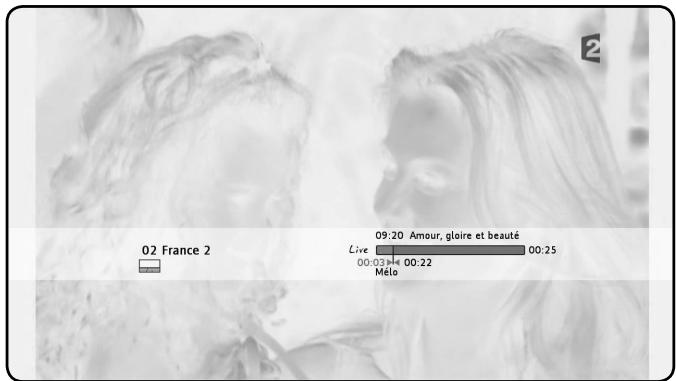
Timeshifting
« Time shifting » is a way of recording a TV programme for later viewing without being definitively stored.
The EPG and Time Shifting progress bars
- The two EPG and Tine Shifting progress bars are superimposed and allow you to control the TV.

(1) - EPG Progress Bar: Limits for the programme already shown and not yet shown
[2] - Time Shifting Bar: Indicates the situation for the programme being watched
(3)- Cursor screen: indique la situation de ce que vous regardez
The Time Shifting bar indicates that you can navigate in the programme from the time you zapped on the programme up to the live programme
Explanations:
The Time Shift bar fills up as soon as you zap on a channel and as soon as you start to watch TV the MediaTec TNT memorises what you are watching
○ Attention ! The memory is wiped clean as soon as you change channel
How to use this function ? You will not be limited by live broadcastsanymore
- Use the Pause button to freeze what you are watching, when you come back, press the Play button
Or let the TV continue and when you come back press « Fast Return » to see what you have missed

- This makes the info bar reappear. It will disappear automatically after a few seconds.

- If you change channel then come back to the same channel, you will have lost the Time Shift memory previously accumulated and it starts again!
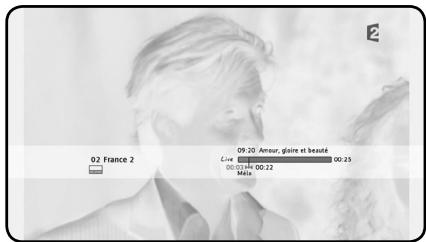
Understanding Pictograms

You are watching live TV

Fast return/forward during a programme

You are recording

Fast return/forward during a programme

Programme broadcast in High Definition

Programme broadcast in 16/9 format

Encoded Channel. A subscription is necessary

Several soundtrack languages are available.
Press the button to choose

Several subtitle languages are available.
Press the button to choose

The programme has Deaf and Hard of Hearing subtitles

Audiovision: soundtrack for the Blind and Partially Sighted

Subtitles adapted for the Deaf and Hard of Hearing
Each programme has been examined by the TV Channel so that if you respect the notification you will protect your children.

The soundtrack is in Home Cinema format
- All you need to know is in Info Zapping
- Watch the EPG and Time Shift progress bars particularly when watching a programme at a later time
- The pictograms indicate the options available via the menu
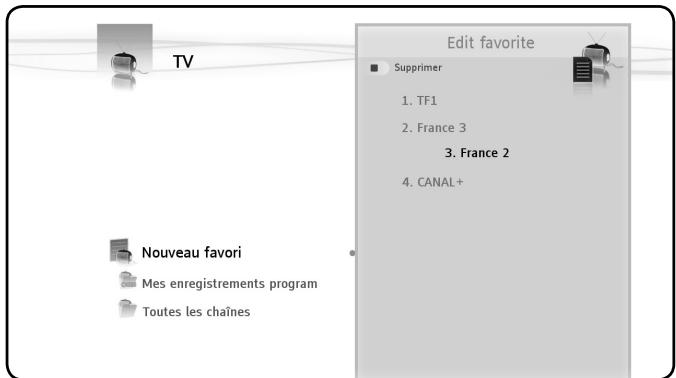
Creating A Favourite Channels List
Why create a favourite channels list ?
To organise the channels after a scan
To decide in which order the channels should appear
To group together channels by themes (sports, children, news, etc.)
To avoid channels not covered by the subscription
- Go to the list of all channels by pressing and select the ones to include in your list of favourite channels with the button
Press the button and select "Create a favourite channels with marked items"
- Confirm the command by pressing OK, then give the favourite a name
Modifying a list of favourite channels
Confirm the command "Edit this list," the edit window will appear to modify the order of channels in the list:
Press to shift the selected channel to the right in order to move it
- allows you to move the selected channel in the list
Finally, press to put the channel in the desired location in the list
delete channels from the list
- Select the channel to be deleted from this list and press

- When you delete a favourite channels list, the channels included in the list are not deleted. They are always available in the « full channel list »
The « full channel list » and its channels cannot be deleted
Adding a list of favourite channels
○ Select the channels you wish to add
o Go to the favourite to which you would like to add the channels
Press the button
○ Select "add marked items to..."
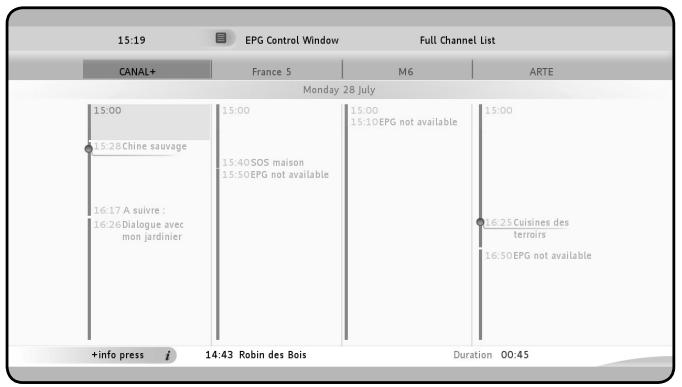
The electronic programme guide (EPG)
Use the Electronic Programme Guide (EPG) to:
o get all the information concerning present and future programmes
。 organise recordings 7 days in advance by simply pressing a button
EPG information is displayed in various forms depending on where you are:
In TV Player mode: the Info Zapping strip contains information on the programme being shown
In Navigator mode: when you select a channel the programme being shown and the next programme are displayed
In the programme grid, the next 7 days' TV programmes are displayed
When you zap on a channel, the Info Zapping strip is displayed for 5 seconds and gives the following information:
Programme Name
Programme Type
Start Time
。 Duration
Options available for the programme: multi lingual, subtitles, etc.
Age limit
While watching a programme press to display the TV Navigator, you can then:
o navigate in the lists of channels
- without zapping, access EPG information on present and next programmes
Display the programme grid for the next 7 days
Press the button and select the option: « Display EPG »

Navigating in the programme grid
to move the cell
Bottom strip = information on the selected programme
。 detailedprogrammeinformation
to select search criteria
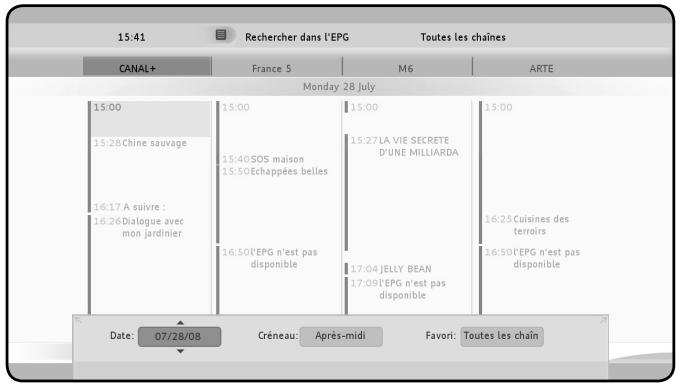

- i displays detailed information on the selected programme
- displays the programme grid control panel
- Starts recording the programme being watched or plan the recording of the selected programme
Exit Program Grid
Recording Your Favourite Programmes
Use MediaTec TNT to record TV programmes in 3 different ways:
Start instant recording
Plan a recording in Program Grid
Manually plan a recording

- You cannot make two recordings at the same time.
- A scheduled recording has priority over an instant recording.
The instant recording will be stopped as soon as the scheduled recording starts.
Instant recording
You are watching TV and you want to record the programme you are watching.
Press the button
The recording automatically starts from the screen cursor position
The default recording length is for 3h00
○ Modify the recording length by using the buttons after having pressed the
button again and then the buttons
In the following example the user wants to record a programme lasting 2h15
○ Choose to make a recording for 2h30
The red line symbolising the beginning of the recording shows that the whole programme will be recorded.
Recording in the Programme Grid
Recording in the programme grid enables recordings to be scheduled for the next 7 days.
Display the EPG grid; select the programme to be recorded and press the button.
In the grid, a pictogram shows you the recordings which have been planned.
Manual Recording
Very useful for recording repetitive programmes: a daily or weekly programme for example.
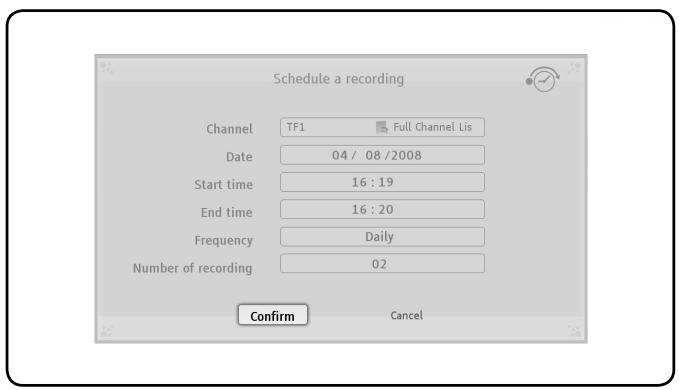
To manually record a programme open the task window by pressing the button and select: «Program a recording»

o Select the List with the TV channel and then the channel
Recording Date
Start and end times
Frequency: daily, weekly, monthly
Number of recordings : the programmed recording can be repeated several times
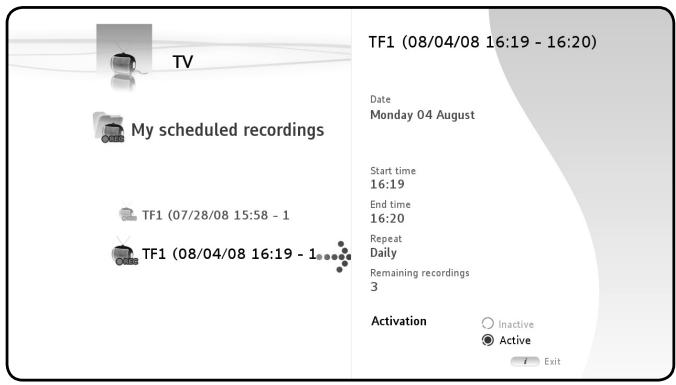

- If you have organised for a programmed recording to be repeated several times, you can deactivate the next automatic recording.
Go to the TV Universe Home Page and select the « My scheduled recordings » folder, press the button and select the « Deactivate » box
Where are your TV recordings stored ?
When a recording is finished it is stored in the Video/photo Universe
Press the button to go back to the Home Page and select the Universe. Enter the « My Recordings » folder
Where are my scheduled recordings stored?
All your scheduled recordings are displayed in the TV Universe, in the root folder called «my scheduled recordings». Enter this folder to modify, delete or deactivate a coming recording.
Transform your MediaTec TNT into a real jukebox !
"Forget using your computer to store music. Store it where you need it the most, in your living room!
With the Music Player listen to music files
With the Music Navigator :
o display the list of music available
consult playlists
consult different directories :
external peripherals
UPnP
My Music

Listening to music

Select the Universe

Confirm selection
Select the Source: Navigate in the existing folders or available sources.
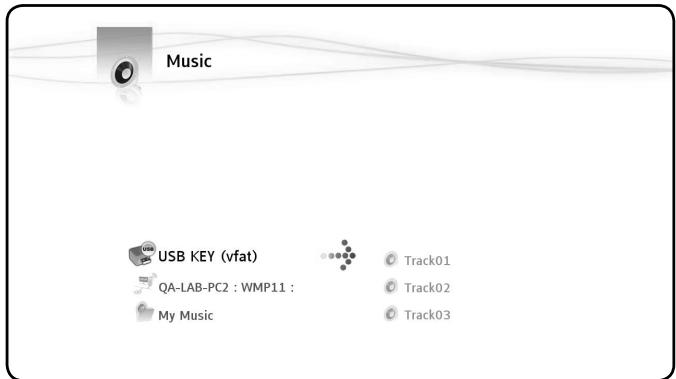
Select the folder: Click OK on the selected folder to start playing all the tracks in the folder.
Creating a playlist
Creating a Playlist allows you to make your own compilation for each situation.
- Select the tracks to be included in the Playlist -
Press the button. Select « Create a playlist with the marked items »
○ Give the Playlist a Name and confirm
Your Playlist is ready to go!

The files are added in the order in which they were selected.
Adding a file to my playlist
Example: you are listening to a piece of music and you want to include another track into the list you are using. Select the track to be included. Press the « OK » button.
A window is displayed giving you the choice between « Add to now playing or play this item »

- For fast navigation amongst the files, use the wheel

Changing the order in which the tracks are played
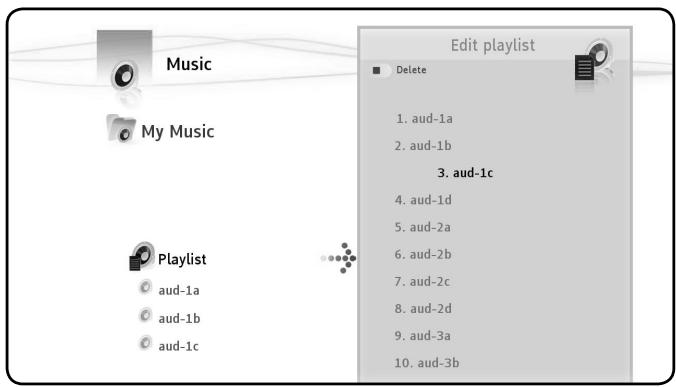
O
to Edit a Playlist
Position the cursor on the track to be moved
Press to remove the track from the list
to move the track to the desired position
to return the track to the list
return to Player
Adding a song to a playlist
To add a song to an existing playlist:
"mark" the songs to add
o Go to the playlist where you want to add songs
Press on the button and select "add marked items to the playlist"
5. Video/photo universe
Benefit from a High Definition picture, watch your recordings of TV programmes, show your family and friends your holiday photos, etc.
Use the Video/photo Player to look at your photos and watch your videos Use the Video/photo Navigator to:
- access the library of all your photos and videos, stored on the MediaTec TNT or on external peripherals
consult different directories :
external peripherals
。UPnP
My photos
My recordings
My videos
Looking at videos/photos
Select th Universe
Confirm Selection
Select the Source: Navigate in the existing folders or available sources
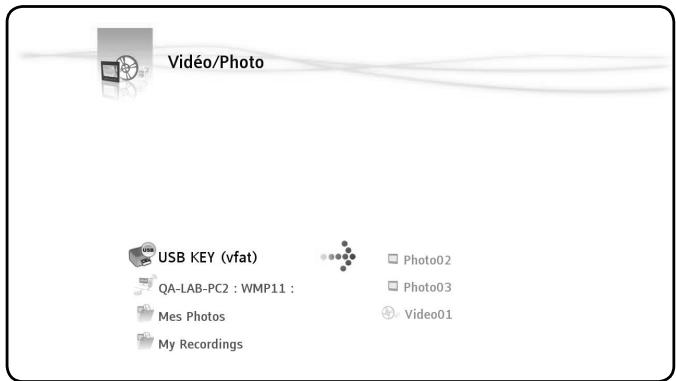
Select the folder: Click OK on the selected folder to start playing all the files in the folder.
Restart watching a video
When you press button while you are watching a video, if you press the OK button a window is displayed giving you the choice between « Resume playback or play »
Watching my tv recordings
Go to the Universe Home Page and select the « My Recordings » folder.
6. Parameters Universe
The Parameters Menu is made up of 3 zones:
2 task zones
1 play zone
Play zone
Use the Play Zone to see:
Today's date and time
The amount of Free Space on the Hard Disk
The type of Network Connection
The connection to the TV and TV resolution
Task zones
Use the Task Zones to select:
The Universe you want to be in
。 The Tasks available in the chosen Universe
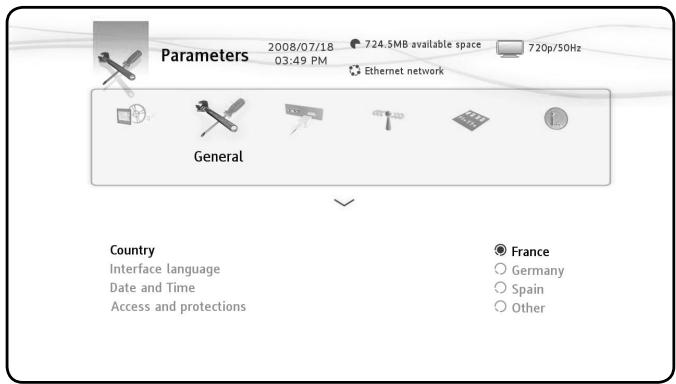
Choosing a tab
The different tabs in this Zone are:
。 TV : change the parameters of the TV Universe
。 Video/photo : change the parameters of the Video/photo Universe
- General: change the general parameters (choice of country, language interface, changing date and time, parental protection)
。 Connection : change the connection and resolution for the TV output
Network : network organisation (Ethernet or WiFi)
○ Advanced : manage hard disk space
- Version : see important information, the software version and the product series number
Tasks available in the different universes

The TV tab includes:
Time record margins
Fix the recording time just before and just after the programme so that you do not miss the beginning or the end
Channel search
Choice between scanning just the free channels or both the free and pay channels
External antenna
- If you have an internal antenna, when this function is activated your antenna is automatically boosted by the MediaTec TNT
Analog Acquisition
The Video/Photo tab includes:
Video parameters
Slideshow parameters
The Connection tab includes:
○ HDMI/YUV output resolution
Composite output
。HDMI sound
Automatic Framerate
SPDIF sound
O Aspect ratio
The Advanced tab includes:
Box reset
○ Use to delete: a scan, favourites, programmed recordings
o Default reinitialisation of all elements
Delete content
By Universe
Parental protection
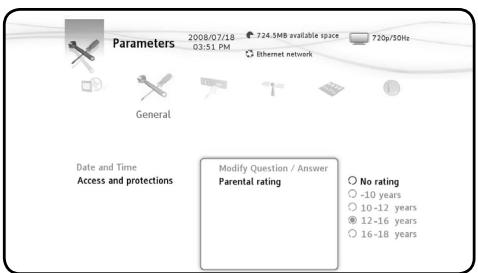
Use the «Children » mode to see only those files or TV programmes which are available in this mode.
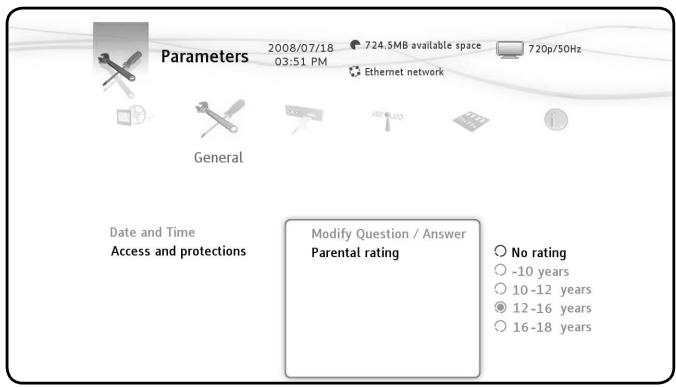
Parental Control can be activated when booting up for the first time or from theParameters Universe / General / Access and protections / Parental Control
When activating Parental Control you should:
o Indicate an age for restricting access to certain TV programmes and files.
The default age limit is 10 to 12 years and this can be modified in the Parameters Universe.
。 Enter a secret code to move from « Children » mode to « Parents » mode
Limit access to certain TV programmes
Example: TV Universe
You have activated the Parental Control and limited the age restriction from 12 to 16 years.

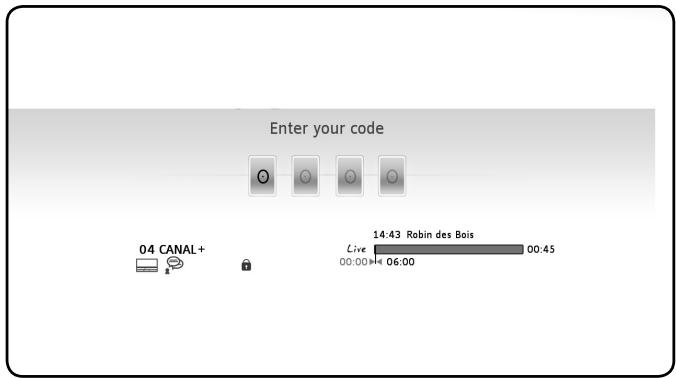
MediaTec TNT is now in « Children » mode and a programme not authorised for children under 16 is showing : MediaTec TNT restricts access to the programme.
A pop up is displayed. You can then use the secret activation code and pass to the « Parents » mode and watch the programme.
If, however, a programme not authorised for children under 12 years is being shown, MediaTec TNT will allow the child to watch the programme without asking for the activation code.
Mask files to stop access by children
Example: Music and Video/photo Universes
Parental Control is activated.
The age limit is fixed between 12 to 16 years.
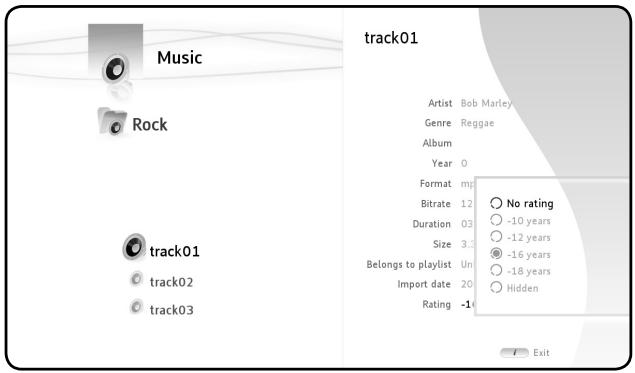
You have a file that you do not want your children to hear. The file must not appear on the screen in « Children » mode.
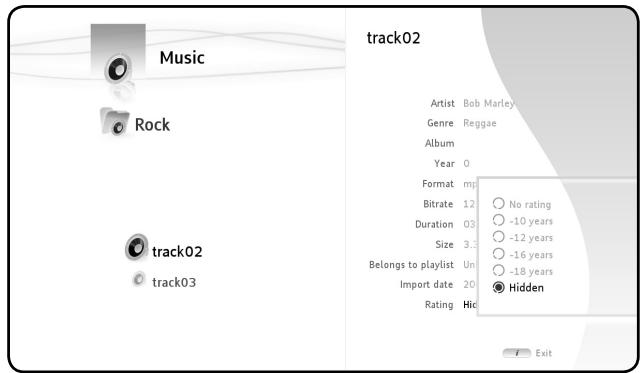
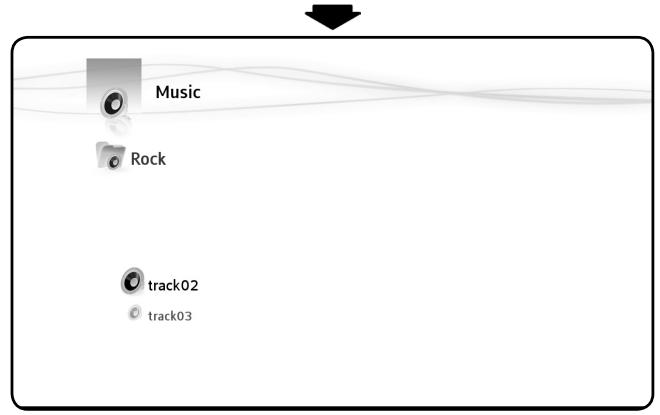
For example take the first track of the Rock file.
In « Parents » mode, select the file, press the button on the remote control, select « Rating » and enter the age limit in order to listen to the file, for example 16 years.
MediaTec TNT compares the age limit in parameters (fixed at 16 years) with the minimum age to listen to the file (which is also fixed at 16 years). The age you have indicated in parameters is superior or equal to the age restriction for the file, so this file will not appear in the « Children » mode.
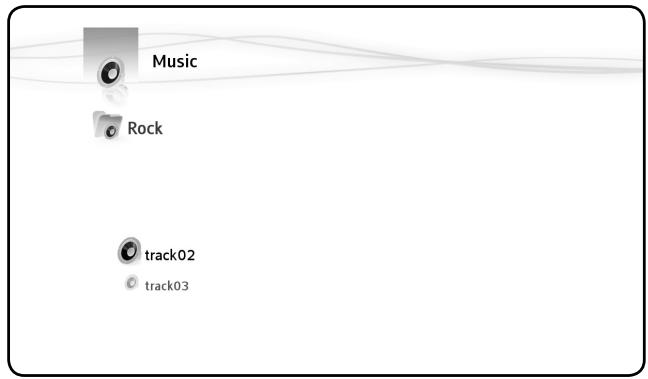
This is what is on the screen in « Children » mode:
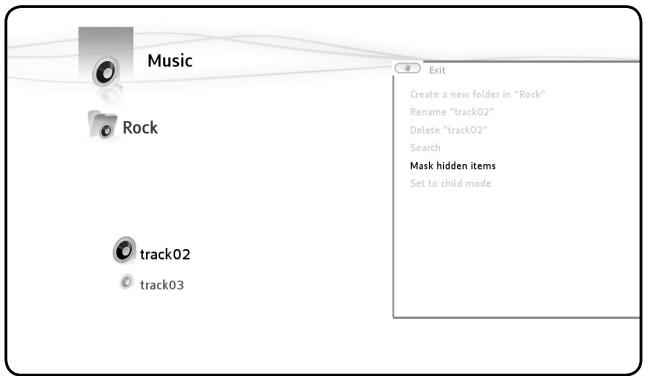
In « Parents » mode with the Parental Control activated, you have the possibility to mask certain files (music, photos and videos).
To do this use the 1 button to select the file as « Hidden ».
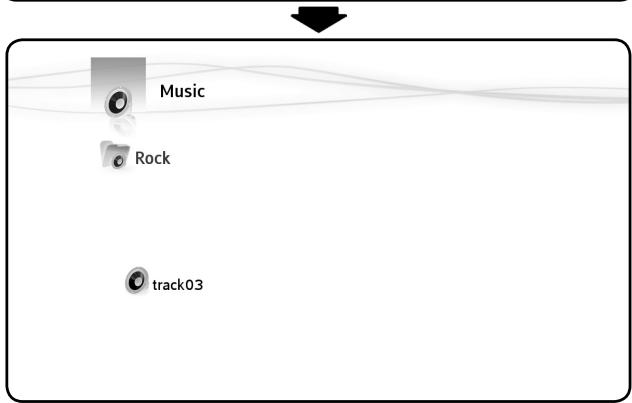
Press the button and select « Masked hidden items ». The files are masked, even in « Parents » mode.
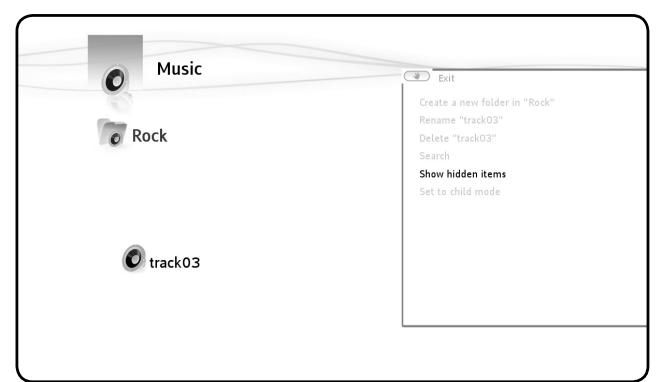
To display the files press the button and select « Show hidden Items ». The files are once more displayed in « Parents » mode.
In order to benefit from all of the advantages of MediaTec TNT, you can connect to a network.
Ethernet Connection
If you plugged the Ethernet cable in before turning your MediaTec TNT on, the Ethernet connection will be made automatically.
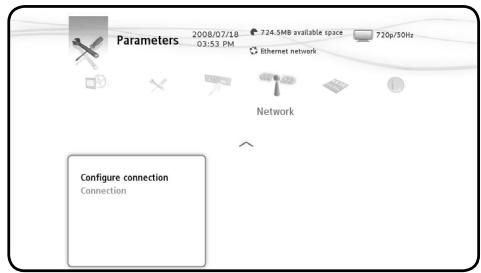
If you plug in the cable after having turned on your MEDIBOX, you will have to go to:
Parameters/Network/Configure connection (press OK),
Select "Ethernet"
For the next stage, if you are not an expert, choose "Automatic"
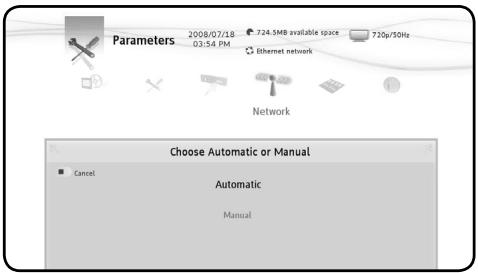

- Advanced users can set up the different fields concerning the Ethernet network manually, particularly the IP address (IP static).
UPnP Connection
UPnP is one of several ways of sharing media in MediaTec TNT.
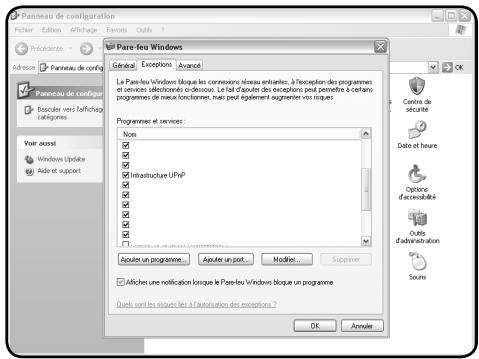
To use this method, activate UPnP on your PC.
In the Set up Window => Windows Firewall=> Exception Tab => select « Infrastructure UPnP »
To share media, several software programmes exist, such as Windows Media 11.
Set up Windows Media 11 as follows => Tools => Options => Tab Library.

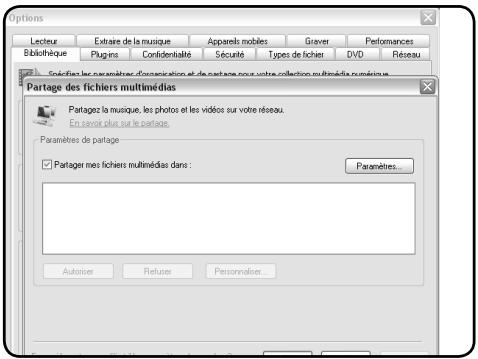
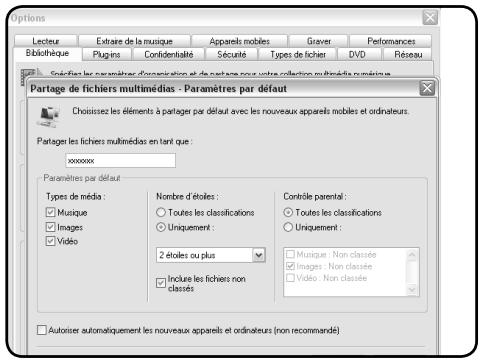
Choose the types of media to be shared.
Your shared folder using UPnP is activated and your media appear in the MediaTec TNT interface under the name indicated in Windows Media 11.
Update
Download the firmware update corresponding with your multimedia Hard Drive HD MediaTec on the website : www.boulanger.fr.
3UX.

Click on the « Assistance » tab at the bottom of the page.
ASSISTANCE ESSENTIEL B

You can also type directly the following address in the address bar: http://www.boulanger.fr/content/bfr/assistance/essentielb
Download update files for MediaTec TNT from the web site: xxxxx
Copy the file « update.wup » to an USB flash disk and plug it into the MediaTec TNT
MediaTec TNT will detect the update file (after approx. 1 minute) and will suggest that you begin the update.

- you cannot use the MediaTec TNT while it is detecting the update file.
Once the update has finished MediaTec TNT will automatically reboot.
When MediaTec TNT is ready, use the « OK » button to confirm and access your media.
7. Technical specifications
| Video | Format:AVI, MKV, MOV, MP4,MPEG PS,MPEG TS,MPEG-2TS/AVCHD,WAV,PCM,FLV,OGG/OGM,FLAC,ASF(with a later upgrade) |
| Codec:MPEG-1,MPEG-2,MPEG-4 ASP (DivX),MPEG-4 AVC(H.264),DivX 3.x,4,5 et 6,WMA,WMV9 et VC-1 (according to demux) |
| Max Resolution:for MPEG-1,MPEG-2 and MPEG-4 AVC:108Op@30fps for MPEG-4 ASP / DivX:960x576.no Qpel,no GMC. |
| Audio | Format:MPEG-1/2 audio,MP3,PCM,LPCM (only 16 bits per sample),AAC,AC-3,OGG Vorbis,FLAC,MPC |
| Down-mix:AAC,LPCM,AC-3 |
| Pass-through:AC-3,DTS |
| Photo | Format:JPEG,PNG,BMP,GIF |
| Subtitles | Format:SRT,DVB,DVD |
| Connectivity | Video:HDMI(1)Composite(2)(1 output and 1 input) |
| Audio:SPDIF |
| Network:LAN(10/100 Mbps)« Ethernet » |
| USB:3 host USB 2.0 ports1 target USB 2.0 port |
| Languages available | English,Spanish,French |
| Down-scaling | 108Op=>108Oi(3) |
| Video Interface | PAL(50Hz),NTSC(60 Hz) |
| Tuner numbers | 2(TNT) |
| Antenna Input(female) | Impedance:75Ω |
| Antenna Output(male) | Impedance:75Ω |
| Supported Files System | FAT16,FAT32,HFS+(read only),Ext2,Ext3,NTFS |
| Hard Disk | SATA 160 Go |
| Dimensions | 274 mm(L)*240mm(L)*46mm(h) |
| Weight | 1770 gr.with hard disk |
| Electric Power | 12 V DC - 4A max |
| Typ.Consumption | 25 W working |
| In ServiceTemperature | 45°C |
| Ventilator | 40*40*20 mm |
| Chip | ST7109 |
[1] HDMI output resolution: 1080i/60Hz, 1080i/50Hz, 720p/60Hz, 720p/50Hz
[2] Composite input / output resolution: 576p/50Hz, 480i/60Hz, 480p/60Hz
(3) Down-Scaling => Possibility to read a video in 108Op and 108Oi
Ver la television 22
MasOS X 10.3 (Panther)
256 Mo RAM
USB 2.0
MTP XNJB