
18310011 - Vacuum machine Gastronoma - Free user manual and instructions
Find the device manual for free 18310011 Gastronoma in PDF.


| Product Type | Sous-vide Vacuum Sealer |
| Brand | Gastronoma |
| Model | 18310011 |
| Dimensions (W x D x H) | 35 x 15 x 8 cm |
| Weight | 1.2 kg |
| Power Supply | 220-240 V, 50/60 Hz |
| Power Consumption | 110 W |
| Sealing Strip Width | 30 cm |
| Vacuum Pump Type | Single piston |
| Maximum Vacuum Pressure | -0.8 bar |
| Functions | Dry/Moist food mode, Pulse vacuum, Seal only, External hose for canisters |
| Material | Stainless steel & ABS plastic |
| Cleaning | Wipe with damp cloth. Drip tray removable for washing |
| Safety Features | Overheat protection, Automatic shut-off, Transparent lid for monitoring |
| Spare Parts Available | Sealing gaskets, vacuum hose, drip tray |
| Repairability Index | 7.5/10 (parts accessible, user-replaceable seals) |
| Accessories Included | 5 vacuum bags, 1 roll (20 cm x 3 m), external hose adapter |
| Warranty | 2 years |
Frequently Asked Questions - 18310011 Gastronoma
User questions about 18310011 Gastronoma
0 question about this device. Answer the ones you know or ask your own.
Ask a new question about this device
Download the instructions for your Vacuum machine in PDF format for free! Find your manual 18310011 - Gastronoma and take your electronic device back in hand. On this page are published all the documents necessary for the use of your device. 18310011 by Gastronoma.
USER MANUAL 18310011 Gastronoma

SOUS VIDE COOKING STEP BY STEP
1. Seasoning
To get the best out of your new sous vide cooker, please read this user guide carefully before using it for the first time. Take particular note of the safety precautions. We also recommend that you keep the instructions for future reference.
GENERAL SAFETY INSTRUCTIONS
- This appliance may only be used by children aged from 8 years and above and persons with reduced physical, sensory or mental capabilities or lack of experience and knowledge if they are supervised or have been given instructions concerning use of the appliance in a safe way and understand the hazards involved. Children must not play with the appliance. Cleaning and user maintenance must not be performed by children without supervision.
- Never leave unattended when in use. Keep an eye on any children in the vicinity of the appliance when it is in use. The appliance is not a toy.
- Incorrect use of this appliance may cause personal injury or damage the appliance.
- Use for the intended purpose only. The manufacturer is not responsible for any injury or damage resulting from incorrect use or handling (see also Warranty Terms).
- For domestic use only. Not for outdoor or commercial use.
- Remove all packaging and transport materials from the inside and outside of the appliance.
- Check that the appliance has no visible damage and that no parts are missing.
- Do not use with any cords other than that supplied.
- Check that it is not possible to pull or trip over the cord or any extension cord.
- The appliance must not be used together with a timer switch or a separate remote control system.
- Turn off the appliance and remove the plug from the socket when cleaning or when not in use.
- Avoid pulling the cord when removing the plug from the socket. Instead, hold the plug.
- Keep the cord and appliance away from heat sources, hot objects and naked flames.
- Ensure that the cord is fully extended.
- The cord must not be twisted or wound around the appliance.
- Check regularly that neither the cord nor plug is damaged and do not use the appliance if there is any damage, or if it has been dropped on the floor, dropped in water or damaged in any other way.
- If the appliance, cord or plug have been damaged, have the appliance inspected and if necessary repaired by an authorised repairer.
- Connect to 230 V, 50 Hz only. The warranty is not valid if the appliance is connected to incorrect voltage.
- Never try to repair the appliance yourself. Please contact the store where you bought the appliance for repairs under warranty.
- Unauthorised repairs or modifications will invalidate the warranty.
- Caution! Some parts of this appliance can become very hot and cause burns if touched. Particular attention should be paid where children and vulnerable people are present.
- Keep the appliance and its cord out of reach of children aged less than 8 years.
SPECIAL SAFETY INSTRUCTIONS
• Always place the appliance on a dry, level, firm and heat-resistant surface well away from any edges. - Always place the appliance at a safe distance from flammable objects such as curtains, tablecloths or similar. - The appliance must not be placed or stored near other sources of heat. - The surfaces become very hot during use. Do not touch the hot surfaces due to the danger of burns. - Do not move the appliance when in use. - Please note that the appliance will remain hot for a while after you switch it off. Always allow the appliance to cool down completely before storage. - Allow the lid to cool before cleaning with water. - Never use the appliance if the lid is damaged. - Only place vacuum-packed foods in the appliance. Do not try to cook unwrapped food!
Note! There is a temperature sensor installed in the bottom of the water bath.
Make sure not to damage it during use!
UK
BEFORE USE
- Remove all packaging and transport material from the appliance.
- Wash the lid and the inside of the water bath with hot water and a little washing-up liquid, and then dry the parts thoroughly.
ABOUT SOUS VIDE COOKING
Sous vide has long been a popular cooking method with professional chefs.
"Sous vide" is French for "under vacuum". It describes a cooking method in which food is placed in sealed vacuum bags and cooked in a water bath. The food is cooked at a constant low temperature over a long time to make it moist and flavoursome. As the vacuum bag is sealed, the food cooks in its own juices together with the marinades or spices you added. Vitamins, minerals and juices are retained and the flavour of the food is enhanced. This makes the food healthier, more tender and more flavourful. As meat cooked sous vide is more tender, it is possible to use cheaper cuts, such as neck fillet, shank and shoulder, which are often tastier than the more expensive cuts.
As sous vide cooking requires that foods be vacuum packed individually, several items can be cooked at the same time, as long as their cooking temperature is the same.
It is difficult to overcook food with sous vide, but the structure of the food can change slightly during cooking. The food can be prepared in plenty of time before serving, making sous vide perfect when you have guests.
Temperatures
The appliance has a temperature range of 40-90 °C in increments of 0.5 °C. The standard cooking temperature is 60 °C. Different temperatures are required for different foods and different degrees of doneness.
You can see sous vide temperatures and times in the table later on in these instructions.
Cooking time
The cooking time does not depend on the weight of the food, but its thickness. The standard cooking time is 2 hours. The time can be adjusted from 10 minutes to 72 hours. You can see sous vide temperatures and times in the table later on in these instructions.
Foods for sous vide cooking
Meat is particularly suited to sous vide cooking, as it makes it more tender, juicy and flavoursome, but vegetables and fish can also be cooked in this way.
We recommend sous vide cooking for the following foods:
- Beef, veal, lamb, pork and game • Chicken, turkey and duck
- Lean and oily fish, lobster tails and scallops
- Root vegetables such as potatoes, carrots, parsnips, beetroot and turnips
- Crisp vegetables such as peas, asparagus, corn, broccoli, cauliflower, aubergines, onions and squash
- Hard fruits such as apples and pears
- Soft fruits such as mango, plums, apricots, peaches, nectarines, papaya and strawberries
UK
SOUS VIDE COOKING STEP BY STEP
1. Seasoning
You can marinate the food or add spices, herbs, butter or oil before you seal the vacuum bag.
2. Vacuum sealing
The food must be vacuum sealed in a bag to remove air and moisture. This ensures the foods retain their natural flavour and nutritional content. Vacuum sealing also helps to open the pores of meat, poultry, fish and shellfish, so that the marinade and spices are absorbed better and the food is more flavoursome.
Oxygen and moisture in the ambient air reduces the flavour, nutritional content and structure of food, and it is therefore important to use a high-quality vacuum sealer to remove air and moisture before the bag is sealed to ensure the food is optimally vacuum packed.
3. Cooking
Once the water in the water bath has reached the required temperature, the vacuum bags containing the food should be placed gently in the water. Make sure the bags are completely under water, and that the water can circulate around the bags, so the food cooks evenly.
4. Browning
When foods are cooked sous vide, it may be necessary to brown meat in particular in a frying pan or grill in order to enhance its appearance and flavour. Remove the food from the bag and brown it quickly on a very hot frying pan or grill rack. This causes the fat and proteins to caramelise and enhances the flavour.
PREPARING FOODS
- Foods for sous vide cooking must be absolutely fresh.
- Check that meat, poultry, fish and shellfish have been stored correctly below 5 °C before cooking.
- Only use brand new and clean vacuum bags.
- Keep fresh and cooked foods apart.
- Wash your hands and work area thoroughly before handling food.
- The thickness of the food must be as described in the table of sous vide temperatures and times.
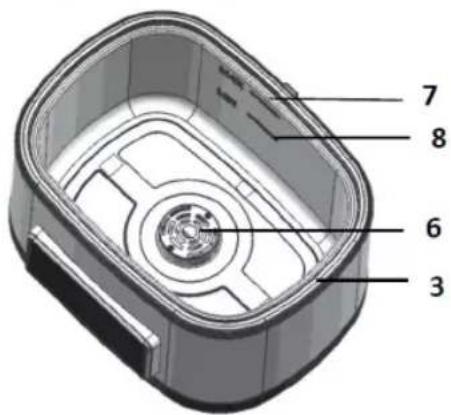
MAIN COMPONENTS
- Lid
- Handle
- Water bath
- Control panel
- Rack
- Filter cap
- Line for maximum water level
- Line for minimum water level
- Stirrer
Buttons and display:

(+) increases the cooking time or temperature.

(+) reduces the cooking time or temperature.

(TIME/TEMP) switches between cooking time and temperature.

(START/STOP) starts and stops the cooking process.

SET shows the preset cooking time and temperature.

LIVE switches between the remaining cooking time and the current temperature in the water bath.

HEAT shows the appliance's heating element is on.

FINISH shows that the cooking time has finished.

USE
- Place the appliance on a flat surface.
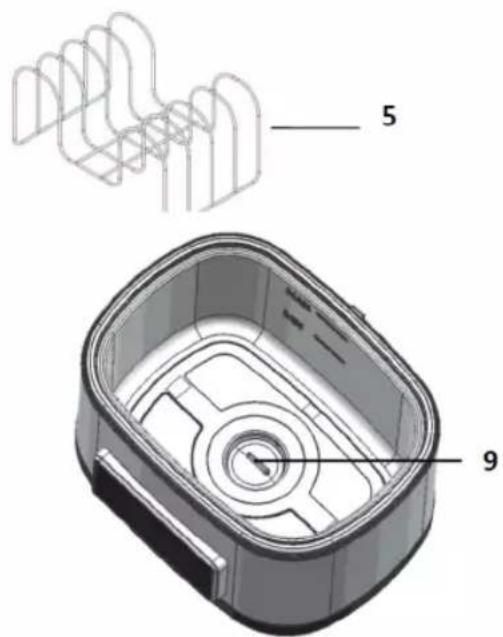
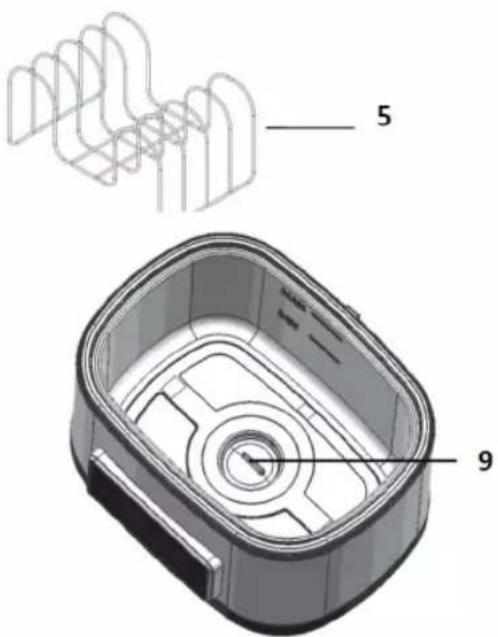
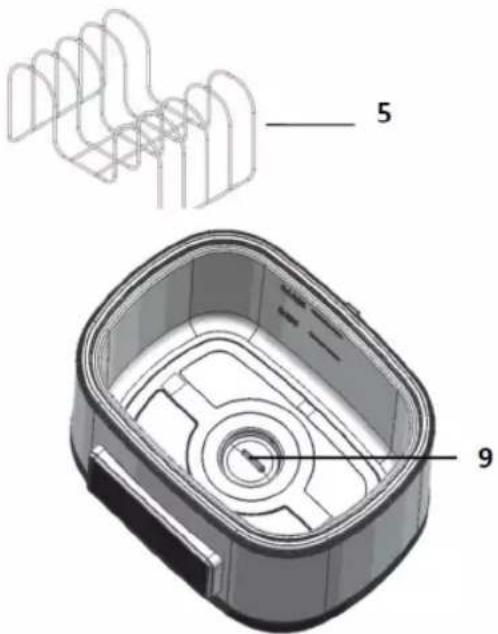
- Place the stirrer (9) on the spindle and place the filter cap (6) over the stirrer so that the bags of food cannot come into contact with the stirrer during cooking.
- Fill the water bath (3) with lukewarm or hot water. The water must not be hotter than the cooking temperature.
The water must be above the bottom line (8) in the water bath, and it must cover the foods you want to cook. Make sure not to overfill the water bath with water so that it exceeds the upper line (7) when the foods are placed in it!
- If necessary, insert the rack (5) in the water bath if you want to cook foods that are best placed on the rack.
- Place the lid (1) on the water bath (3).
- Plug it in. A beep is heard, and the light in the “START/STOP” button comes on. Press the “START/STOP” button, the display shows the standard cooking time and the standard cooking temperature.
- Press the TIME/TEMP button to select the cooking temperature and set the temperature using the (+/-) buttons. The set temperature is shown on the display under SET.
- You can switch between temperature display in Celsius or Fahrenheit by pressing the TIME/TEMP button for 3 seconds.
- Press the TIME/TEMP button to select the cooking time and set the time using the (+/-) buttons. The set time is shown on the display under SET.
- Press the START/STOP button to switch on the appliance. The stirrer begins to rotate, the HEAT symbol comes on and the heating element begins to heat the water. The current temperature in the water bath is shown on the display under LIVE.
- Once the set temperature has been reached, a beep is heard, and the FINISH symbol flashes.
Lift the lid off and carefully lay the vacuum-packed food in the water bath using tongs. The water must be able to circulate around the packs of food. Replace the lid.
- Press the START/STOP button to start the cooking process immediately, or the cooking process will start automatically after 3 minutes, if there is no operation on the buttons on the control panel, the FINISH symbol goes out. The current temperature in the water bath and the remaining cooking time are shown alternately on the display under LIVE.
- During the cooking time, you can change the cooking time and temperature by pressing the TIME/TEMP button and then making adjustments using the (+/-) buttons.
- You must not remove the lid during cooking unless absolutely necessary. The appliance cooks at a very low temperature, so it takes a long time to regain any heat loss. If condensation forms on the inside of the lid so that you cannot see into the water bath, you can tilt the lid gently away from you so that condensation runs down into the water bath.
- Once the cooking process has finished, a beep is heard, and the HEAT symbol goes out.
Note
Make sure the bags are completely sealed before cooking begins.
Make sure the bags are still completely sealed once cooking is finished.
If the food is to be consumed within a few hours, it can be kept in the water bath for a short time without ruining the structure. You can see the standing times in the table later on in these instructions.
If the food is to be stored in the fridge for later use, immediately place the bags in ice water to quickly reduce the temperature of the food.
CLEANING
When cleaning the appliance, you should pay attention to the following:
- Unplug the appliance and allow it to cool before cleaning it and putting it away.
- Pour the water out of the water bath. Wipe the water bath and lid with a tea towel.
- Do not immerse the appliance, cord or plug in water and make sure no water enters the appliance.
- Wipe the outside of the appliance with a well-wrung cloth and dry with a dry soft cloth.
UK
INFORMATION ON DISPOSAL AND RECYCLING OF THIS PRODUCT
Please note that this Adexi product is marked with this symbol:
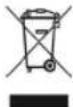
This means that this product must not be disposed of along with ordinary household waste, as electrical and electronic waste must be disposed of separately.
According to the WEEE directive, every member state must ensure correct collection, recovery, handling and recycling of electrical and electronic waste. Private households in the EU can take used equipment to special recycling stations free of charge. In certain member states, used appliances can be returned to the retailer where they were bought on the condition you buy new products. Contact your retailer, distributor or the municipal authorities for further information on what to do with electrical and electronic waste.
WARRANTY TERMS
The warranty does not apply:
- if the above instructions have not been followed
- if the appliance has been interfered with
- if the appliance has been mishandled, subjected to rough treatment, or has suffered any other form of damage
- if the appliance is faulty due to faults in the electricity supply.
Due to the constant development of our products in terms of function and design, we reserve the right to make changes to the product without prior warning.
FREQUENTLY ASKED QUESTIONS
If you have any questions regarding the use of the appliance and cannot find the answer in this user guide, please try our website at www.adexi.eu.
You can also see contact details on our website if you need to contact us for technical questions, repairs, accessories or spare parts.
IMPORTER
Adexi A/S
Lægårdsvej 9C
DK-8520 Lystrup
Denmark
www.adexi.dk
We cannot be held responsible for any printing errors
UK
TABLE OF COOKING TEMPERATURES AND TIMES
| Food item Thick- | ness* | Temp. (°C) | Time Standing time** |
| Beef, veal, lamb, game | |||
| Fillets, chops, ribeye, T-bone, sirloin, porterhouse (tender cuts) | 1-2 cm 49 | + 1 hour Up to 6 hours | |
| 2-5 cm 49 | + 2 hours Up to 8 hours | ||
| Flank, neck, thigh, shoulder, shank | 4-6 cm 49 | + 8 hours Up to 10 hours | |
| Pork | |||
| Pork breast 3-6 cm 82 10 hours | Up to 12 hours | ||
| Spareribs 2-3 cm 59 10 hours | Up to 12 hours | ||
| Cutlets 2-4 cm 56+ 4 hours Up to 6 hours | |||
| Pork loin 5-7 cm 56+ 10 hours | Up to 12 hours | ||
| Poultry | |||
| Chicken breast with bone | 3-5 cm 82 | 2 hours Up to 3 hours | |
| Boneless chicken breast | 3-5 cm 64 | 1 hour Up to 2 hours | |
| KyChicken thigh with bone | 3-5 cm | 82 | 1.5 hours Up to 3 hours |
| Boneless chicken thigh | 3-5 cm 64 | 1 hour Up to 2 hours | |
| Chicken drumstick | 5-7 cm 82 | 2 hours Up to 3 hours | |
| Duck breast | 3-5 cm 64 | 2 hours Up to 2 hours | |
| Fish | |||
| Lean and oily fish | 3-5 cm 47 | + 1 hour Up to 1 hour | |
| Shellfish | |||
| Prawns | 2-4 cm 60 | 1 hour Up to 1 hour | |
| Lobster tail | 4-6 cm 60 | 1 hour Up to 1 hour | |
| Scallops | 2-4 cm 60 | 1 hour Up to 1 hour | |
| Vegetables | |||
| Root vegetables | 1-5 cm 83 | + 1 hour Up to 2 hours | |
| Crisp vegetables | 1-5 cm 83 | + 1 hour Up to 2 hours |
* If the meat is thinner than specified, it will cook faster. ** The standing time is the longest time the food can remain in the water after cooking without the structure changing.
UK TABLE OF DONENESS AND TEMPERATURES
| Food item Doneness Temperature | (°C) | |
| Beef, veal, lamb, pork and game Rare 49 | ||
| Medium-rare 56 | ||
| Medium 60 | ||
| Medium-well done 65 | ||
| Well done | 71+ | |
| Poultry, boneless Well done | 64 | |
| Poultry, with bone Well done | 82 | |
| Fish Rare 47 | ||
| Medium-rare 56 | ||
| Medium 60 | ||
| Vegetables | General 83-87 |
DE
INTRODUCTION

DE
USE
RECYCLING THIS PRODUCT


- SOUS VIDE COOKING STEP BY STEP
- SEASONING
- GENERAL SAFETY INSTRUCTIONS
- SPECIAL SAFETY INSTRUCTIONS
- UK
- BEFORE USE
- ABOUT SOUS VIDE COOKING
- TEMPERATURES
- COOKING TIME
- FOODS FOR SOUS VIDE COOKING
- VACUUM SEALING
- COOKING
- BROWNING
- PREPARING FOODS
- MAIN COMPONENTS
- BUTTONS AND DISPLAY
- USE
- NOTE
- CLEANING
- INFORMATION ON DISPOSAL AND RECYCLING OF THIS PRODUCT
- WARRANTY TERMS
- FREQUENTLY ASKED QUESTIONS
- IMPORTER
- DE
- INTRODUCTION
- RECYCLING THIS PRODUCT
Brand : Gastronoma
Model : 18310011
Category : Vacuum machine