
SnapShot Cloud Pro 4G WA - Camera Dörr - Free user manual and instructions
Find the device manual for free SnapShot Cloud Pro 4G WA Dörr in PDF.


| Product Type | 4G Cellular Trail Camera |
| Brand | Dörr |
| Model | SnapShot Cloud Pro 4G WA |
| Dimensions (approx.) | 130 x 85 x 65 mm |
| Weight (approx.) | 320 g (without batteries) |
| Power Supply | 8 x AA batteries (not included) or external 6V DC adapter |
| Image Sensor | 5 MP CMOS (interpolated to 12 MP) |
| Lens | Wide angle, 120° field of view |
| Night Vision | Low-glow infrared LEDs, up to 20 m range |
| Trigger Speed | 0.5 seconds |
| Recovery Time | 5 seconds |
| Image Resolution | 12 MP (4032x3024) |
| Video Resolution | 1080p at 30 fps |
| Connectivity | 4G LTE cellular (SIM card required) |
| Cloud Service | Free cloud subscription for 1 month, then paid plans available |
| Storage | MicroSD card slot (up to 32 GB) |
| Detection Angle | 120° |
| PIR Sensitivity | Adjustable (low / medium / high) |
| Operation Modes | Photo / Video / Photo+Video |
| Time Lapse | Programmable interval (1 min - 24 h) |
| Operating Temperature | -20°C to +60°C |
| Water Resistance | IP65 (weatherproof) |
| Mounting | Strap or tripod mount (1/4 inch) |
| Cleaning and Maintenance | Clean lens with soft, dry cloth. Check battery contacts regularly. |
| Safety | Do not immerse in water. Use only recommended batteries. Keep away from children. |
| Spare Parts / Repairability | Battery tray and strap available from Dörr service. |
| General Information | Designed for outdoor wildlife monitoring, security, and remote surveillance. |
Frequently Asked Questions - SnapShot Cloud Pro 4G WA Dörr
User questions about SnapShot Cloud Pro 4G WA Dörr
0 question about this device. Answer the ones you know or ask your own.
Ask a new question about this device
Download the instructions for your Camera in PDF format for free! Find your manual SnapShot Cloud Pro 4G WA - Dörr and take your electronic device back in hand. On this page are published all the documents necessary for the use of your device. SnapShot Cloud Pro 4G WA by Dörr.
USER MANUAL SnapShot Cloud Pro 4G WA Dörr
SNAPSHOT CLOUD PRO 4G WA
14.4 ROHS KONFORMITÄT
| Video Settings | 34 |
| Video Size | 34 |
| Video Length | 34 |
| Flash Settings | 35 |
| PIR Motion Detector | 35 |
| Sensitivity | 35 |
| Timer | 35 |
| 07.1 During initial setup of the camera | 35 |
| 07.2 Standby Mode | 35 |
| Media | 36 |
| Favorites | 36 |
| Cameras | 37 |
| My Account | 38 |
| 08 | FURTHER FUNCTIONS | 39 |
| 08.1 Test Recordings | 39 |
| 08.2 Deleting/Re-registering a camera | 39 |
| 08.4 In the event of theft 39 | |
| 09 | MOUNTING / DIRECTING | 39 |
| 09.1 Mounting and directing the camera | 39 |
| 09.2 Notes for mounting the camera | 39 |
| 09.3.1 PIR Sensor | 39-40 |
| 09.3.2 Light conditions | 40 |
| 09.3.3 Weather protection | 40 |
| 10 | OPTIONAL ACCESSORIES | 40 |
| 10.1 Optional mounting accessories | 40 |
| 10.2 Optional anti-theft devices | 40 |
| 10.3 Alternative power supplies | 40 |
| 10.4 SIM Hero multi-network card | 41 |
| 11 | CLEANING AND STORAGE | 41 |
| 12 | SCOPE OF DELIVERY | 41 |
| 13 | TECHNICAL SPECIFICATIONS | 42 |
| 14 | DISPOSAL, CE MARKING, SIMPLIFIED EU DECLARATION OF CONFORMITY | 43 |
| 14.1 Disposal of battery/accumulator | 43 |
| 14.2 WEEE Information | 43 |
| 14.3 Disposal of the packaging | 43 |
| 14.4 Conformity with RoHS | 43 |
| 14.5 CE Mark | 43 |
| SIMPLIFIED EU DECLARATION OF CONFORMITY | 43 |
GB
THANK YOU very much for choosing a quality product by DÖRR.
Please read the instruction manual and the safety hints carefully before using the device for the first time.
Keep the operating instructions together with the device for reference. If other people use this device, provide them with these instructions. If you sell the unit, this manual forms an integral part of the device and must be supplied with it.
DÖRR is not liable for damage caused by improper use or failure to observe the operating and safety instructions.
In the event of damage caused by improper handling or by external influence, the guarantee or warranty claim becomes void. Any manipulation, structural modification of the product or opening of the housing by the user or an unauthorised third party shall be considered improper handling.
01 | ⚠️ SAFETY HINTS
This device is not a toy! To prevent accidents and suffocation keep the device, the accessories and the packing materials away from children and pets.
- ▲ People with physical or cognitive disabilities should use the camera with supervision.
• ▲ People with cardiac pacemakers, defibrillators or any other electrical implants should maintain a minimum distance of 30 cm, as the device generates magnetic fields.
- Your camera is fitted with a weatherproof housing according to protection class IP66 (dust and jet waterproof) so that the camera can be used outdoors. Nevertheless, protect the camera from extreme weather conditions and direct sunlight.
- Make sure to use only fresh Mignon AA LR6 1.5V Alkaline Manganese batteries or rechargeable NiMH or Lithium batteries of the same type and brand. Never combine Alkaline Manganese batteries with NiMH or Lithium batteries! When inserting the batteries please respect the correct polarity (+/-). Please remove batteries when device is not in use for a longer period.
- Only use SD/SDHC memory cards from 8GB to 32GB (SDXC 64GB to max. 128GB see chapter 06.3.1). Using a micro SD card in combination with an adapter may lead to malfunctions.
- Do not drop the camera onto a hard surface. Do not use the camera if it has been dropped. In this case a qualified electrician should inspect the camera before you use it again.
- Do not attempt to repair the devise by yourself. Risk of electrical shock! When service or repair is required, contact qualified service personnel.
- Do not open the camera housing (except the housing lid and the battery compartment) – the warranty will become void. The housing may only be opened by qualified DÖRR GmbH staff.
• LED bulbs can only be replaced by qualified DÖRR GmbH staff.
- Do not use the camera nearby devices that generate strong electromagnetic fields.
- Avoid touching the camera lens with your fingers.
- Protect the camera against extensive dirt. Never use aggressive cleansing agents or benzine to clean the camera. We recommend a soft, slightly damp microfiber cloth to clean the outer parts of the camera and the camera lens. Make sure to remove batteries before cleaning.
- Store the camera in a dust-free, dry and cool place when not in use.
- If the device is defective or without any further use, dispose of the device according to the Waste Electrical and Electronic Equipment Directive WEEE. For further information, please contact your local authorities.
02 | ⚠️ SAFETY HINTS FOR BATTERIES/ACCUMULATORS
Only use high-quality batteries or accumulators of popular brands. When inserting the batteries or accumulators, please respect the correct polarity (+/-). Do not insert batteries of different types and always replace all batteries at the same time. Never combine Alkaline Manganese batteries with NiMH or Lithium batteries! Do not combine used batteries with fresh batteries. Please remove batteries/accumulators when device is not in use for a long period of time. Do not throw the batteries/accumulators into fire, do not short-circuit and do not disassemble them! Never charge non-rechargeable batteries - risk of explosion! Remove empty batteries immediately from the device to avoid the leaking of battery acid. Remove leaking batteries from the device immediately. Clean the contacts before inserting fresh batteries. Risk of battery acid burn! In case of contact with battery acid, rinse the affected area immediately with water and contact a doctor. Batteries can be dangerous to life if swallowed. Keep batteries/accumulators away from small children and pets. Do not dispose of batteries in household waste (see also chapter "Disposal of Batteries/Accumulators").
03 | PRIVACY POLICY
In every country, legal data protection rules apply. As these rules may vary per country, please contact the appropriate authorities to learn about the latest privacy policy in your country. In any case kindly note:
- Do not observe public areas such as sidewalks, roads, parking lots etc.
- Never observe your staff.
- Respect the general right of privacy.
- Do not publish pictures showing individuals without having their permission. Do not publish pictures showing identifiable automobile license plates.
- Make aware of the observed areas with a sign and inform your neighbours and visitors if necessary.
04 | € MOBILE PHONE COSTS FOR PICTURE/VIDEO TRANSMISSION
Data exchange via mobile transmission always cause extra costs. These costs may vary depending on your provider and selected tariff and are not covered by the purchase of this camera. Please contact your mobile phone provider for tariff and costs.
05 | NOMENCLATURE
01 Antenna/antenna connection
02 PIR LED indicator
03 each 30 infrared LEDs
04 Light sensor
05 Camera lens
06 Motion detector (PIR sensor)
07 Tension lock
08 Eyelet for U-lock (lock optional)
09 Microphone
10 SIM card slot
11 SD card slot
12 QR Code (serial number)
13 TEST button
14 Button SD Format
15 Reset button
16 Slide control (ON/OFF)
17 LED status indicators
17a) Operating status
17b) Signal strength
17c) Battery status
17d) SD card status
17e) Network status
17f-g) DÖRR Cloud error indicators
18 Battery compartment
19 USB-C port
20 Connection external battery DC 12V
21 1/4 " thread mount
22 Eyelet for cable lock (lock optional)
23 Eyelets for mounting strap
24 Nano-SIM + Micro-SIM + Mini-SIM Adapter
25 USB-C data cable
26 Mounting strap
06 | COMMISSIONING
Remove the protective foil from the PIR sensor (06).
IMPORTANT
To avoid camera damages, make sure that camera is switched off (slide control 16 = OFF) for the following steps!

06.1 Mounting the antenna
Remove the yellow protective cap from the antenna connection (01) and screw on the supplied antenna.
06.2 Inserting the batteries
CAUTION
Make sure to use only fresh Mignon AA LR6 1.5V Alkaline Manganese batteries or rechargeable NiMH or Lithium batteries of the same type and brand. Never combine Alkaline Manganese batteries with NiMH or Lithium batteries! When inserting the batteries please respect the correct polarity (+/-). Please remove batteries when device is not in use for a longer period.
Open the camera releasing the lateral tension lock (07). Make sure that the slide control (16) is on position OFF. Insert 12 AA 1,5V batteries or rechargeable NiMH or Lithium batteries (not included) into the battery compartment (18). Respect correct polarity (+/-).
NOTICE
If you operate the camera with NiMH or Lithium batteries, please select NiMH or Lithium later in the APP/Web in the menu item „Battery type“ to ensure an accurate indication of the battery status.
For alternative power supplies, please read chapter 10.3.
06.3 Inserting a SD/SDHC/SDXC memory card
NOTICE
Only use SD/SDHC/SDXC memory cards from 8GB to max. 128GB. Using a micro SD card in combination with an adapter may lead to malfunctions. Make sure that the SD card is formatted and unlocked. To format the SDcard with the camera, please read chapter 06.3.2.

Insert the SD/SDHC/SDXC memory card (not included) with the label facing upwards into the SD card slot (11) until it snaps into place.
06.3.1 IMPORTANT SDXC Memory Cards 64 GB & 128 GB
Due to their standard formatting, SDXC memory cards with 64 GB and 128 GB must be formatted with the camera before use. How to format the SDXC card with the camera, please read following chapter 06.3.2.
06.3.2 Format SD/SDHC/SDXC card with the camera
-
Insert the SD/SDHC/SDXC memory card (not included) with the label facing upwards into the SD card slot (11) until it snaps into place.
-
Set the slide control (16) to the ON position. For example, use a pen to press the SD Format button (14) and hold it down for approx. 10 seconds until the LED 17d) starts flashing yellow:

- After 10 flashes and successful formatting, the LED 17d) lights up constantly green. When setting up for the first time, please switch the camera off again (slide control (16) to the OFF position).
06.4 Inserting a SIM card
In order to use the mobile transmission function, make sure to insert a SIM card (not included) into the SIM card slot (10). Please mind the symbol above the SIM card slot which shows how to insert the card correctly.
Nano-SIM, Micro-SIM cards and Mini-SIM cards can only be used with the adapters supplied (24).
IMPORTANT
- The PIN request has to be deactivated, you can do this directly in the shop where you bought the SIM card, or with help of a mobile phone.
- Make sure the SIM card is activated for the mobile data transmission and if necessary has sufficient credit.
- For the mobile data transmission, the camera needs the parameter data of the respective provider. For all supported SIM card providers, please refer to:
https://doerr.media/manuals/simCard_Provider.pdf
SIM card providers that are not on the list currently cannot be used.
NOTICE
We recommend using the simHERO multi-network card. See chapter 10.4.

06.5 Download the DöRR APP
To install the DÖRR APP, scan the corresponding QR code for Android or iOS inside the gift box with your smartphone or download the APP directly in the Play Store for Android or in the APP store for iOS.

06.6 Register and scan the QR code
Picture 1 Register with your email address and a password and tap to:
No account? Register now!
You will receive a confirmation email from DÖRR to the registered email address. Follow the link in this email for successful registration. Log in with the data used for registration.

Picture 2 Press the camera icon
Picture 3 Press at Add camera


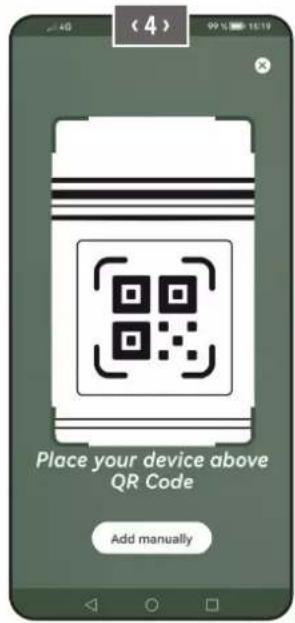
Picture 4 The QR code scanner function will start. Use your Smartphone to scan the QR code (12) in the camera
housing. Alternatively, you can enter the serial number manually. You will find the serial number inside of camera housing or on the gift box.
Switch the slide control (16) to position ON.

Picture 5 Please enter a name for the camera.

06.7 DÖRR SnapShot Cloud 4G/4G Pro website
You may also register and log in via our website with your PC/laptop:
https://www.doerr.cloud/
We recommend using Google Chrome Browser

NOTICE
The appearance/symbols in the app and on the website may vary. However, the settings and functions are identical and as described in the following chapters.
06.7 Switch on / Camera status check
After you have switched on the camera, the camera will now check all relevant functions. During this process, the operating status LED (17a) and all other LEDs flash green. As soon as the operating status LED (17a) lights up green continuously, the check is complete and your camera is ready for registration/use.
Unregistered camera:
Camera remains in registration mode for 5 minutes. After this, the camera switches to standby mode (see chapter 07.2) and the LEDs and PIR LED indicator (02) go out.
Already registered camera:
After approx. 1 minute, the camera switches to the defined working mode (LEDs and PIR LED indicator (02) go out).
You can return to the status view (LEDs light up) at any time by pressing the TEST button (13).
NOTICE
When setting up your camera for the first time, the LED status indicators (17f) and (17g) flash green until the camera has been successfully registered. Registration is complete as soon as you have clicked on Save settings in the app/web interface (see page 35).
Should a critical error occur during the check, the operating status LED (17a) will light up red constantly. For troubleshooting, as well as for information on the other LED status indicators (17b - 17e), please read the table below (chapter 06.7.1).
IMPORTANT
If the LED status indicators 📞(17f) and/or 📞(17g) light up or flash red, please contact our service department at +49 731 970 37 69 or by email at hello@doerr.gmbh.
| LED | LED status | Meaning | Troubleshooting |
| (02)Camerafront | flashes red | Camera is in setup mode.PIR sensor is not active. | Wait until the camera automatically switches to working mode. Alternatively, press and hold the TEST button (13) for 5 seconds. If the ca-mera is in working mode, the LED goes out. |
| ON(17a) | flashes slowly green Camera status is being checked. | ✓ | |
| lights constantly green Camera is ready for use. | ✓ | ||
| lights constantly red | Camera is not ready for use. | Check which other LED is red or flashing. | |
| flashes slowly yellow | Debug mode active. | Please contact DÖRR Service. | |
| (17b) | flashes slowly green | Connection establishment to the mobile network. | ✓ |
| lights constantly green | Connection to the mobile network esta-blished. | ✓ | |
| lights constantly yellow The signal strength is mediocre. | ✓ | ||
| flashes slowly yellow The signal strength is weak. | ✓ | ||
| lights constantly red Connection to the mobile network failed. | Make sure that:·the SIM card has credit.·the SIM card is inserted correctly.·the camera supports the network provider used (see chapter 6.4). | ||
| flashes slowly yellow No SIM card inserted. | Insert a SIM card. | ||
| flashes red and green alternately | Critical error! | Please contact DÖRR Service. | |
| (17c) | flashes slowly green | Camera connected to power supply. | ✓ |
| lights constantly green Battery capacity more than 60%. | ✓ | ||
| lights constantly yellow Battery capacity between 30-60%. | ✓ | ||
| lights constantly red | Battery capacity below 30%. | Insert fresh batteries as soon as possible. | |
| flashes quickly red | Battery capacity insufficient for opera-tion. | Insert fresh batteries. | |
| (17d) | lights constantly green | SD card inserted and ready for operation. | ✓ |
| lights constantly yellow | SD card inserted - card is full! | Delete files from the memory card and refor-mat the card (see chapter 6.3.2) | |
| lights constantly red | No SD card inserted or SD card locked or formatted incorrectly. | Please refer to chapter 6.3. | |
| flashes quickly green Data is being written to SD card. | ✓ | ||
| flashes quickly red for 5 sec., then returns to original status | Data cannot be written to SD card. | Please check the other SD card status. | |
| flashes slowly yellow Memory card is being formatted. | ✓ | ||
| (17e) | flashes slowly green | Network service is being initialized. | ✓ |
| lights constantly green Network quality is at least 4G. | ✓ | ||
| lights constantly yellow | Network quality is 2G to 3G. | ✓ | |
| lights constantly red No network service. | Make sure that:·the SIM card has credit.·the camera supports the network provider used (see chapter 6.4). | ||
| (17f) | lights constantly green Camera connected to | DÖRR Cloud. | |
| lights constantly red DÖRR Cloud service not available. Please contact DÖRR Service. | |||
| flashes slowly green Ready for registration process. | |||
| flashes slowly red DÖRR Cloud service not available. Please contact DÖRR Service. | |||
| flashes quickly green Communication with | DÖRR Cloud. | ||
| flashes red quickly for 5 sec., then returns to original status | Media upload failed. Please contact DÖRR Service. | ||
| (17g) | flashes slowly green Ready for registration process. | ||
| lights constantly green Camera connected to | DÖRR Cloud. | ||
| lights constantly red DÖRR Cloud service not available. Please contact DÖRR Service. | |||
| (All) | All LEDs flash green 2x and then go out Camera reset is being performed. | Camera must be reconnected to DÖRR Cloud.See instructions in the APP. | |
| All LEDs flash quickly green Firmware update is being performed. | |||
| All LEDs flash quickly red | Firmware update failed. | Check firmware, SD card inserted correctly, SD card formatted correctly? | |
DÖRR Service Department

+49 731 970 37 69

hello@doerr.gmbh
Default settings are marked with (*)
| Camera Settings | |
| Note: Changes made in settings will be executed by the camera after max. 24 hours. | |
| Camera | |
| Camera Mode | |
| Photo (*) | The camera takes photos according to your settings for image size and multi shot. |
| Video | The camera records videos according to your settings for video size and video length. |
| Photo and Video | The camera first takes a picture(s) and then a video according to your settings for picture size, multi shot, video size and video length. |
| Sending Mode | |
| Photo (*) Camera is sending photos. | |
| Video | Subscription required for video transmission. See My account. |
| Photo and Video | Subscription required for video transmission. See My account. |
| Preview In photo, photo and video modes, the quality of the picture is reduced. | |
| Security Mode | |
| Disabled (*) | This mode is aimed at users with special security requirements - all data transmission (image and video) is encrypted. Please note that using this mode results in a considerable increase in energy consumption. We recommend its use for professional users in the security sector and in combination with an external power source (see chapter 10.3) |
| Photo | |
| Video | |
| Photo and Video | |
| Battery Type | |
| Alkaline (*) | To ensure an accurate indication of the battery status, please select whether you have inserted alkaline, Ni-MH or lithium batteries in the camera. There are different battery types for lithium - if in doubt, select „Alkaline“. |
| Ni-MH | |
| Lithium | |
| Remote Control | |
| Realtime | Settings are applied immediately. IMPORTANT High battery consumption! |
| Every 30 minutes | Settings are applied at the latest in the selected time interval. If photos or videos are transmitted from the camera before the time interval expires, the new settings will be applied at this transmission time. |
| Every hour | NOTICEIf you have inadvertently made incorrect settings and the camera is not in real-time mode, you can correct the settings immediately by first making the desired settings in the app/web interface and then triggering an image manually via the motion detector, e.g. by waving your hand in front of the PIR sensor (06). |
| Every 2 hours | |
| Every 3 hours | |
| Every 4 hours | |
| Every 6 hours | |
| Every 12 hours | |
| Every 24 hours(*) | |
| Enable GPS | GPS is represented in radians on the timestamp (e.g. N48°18'44" E010°02'02") |
| SD card overwrite | If the SD card is full, the camera overwrites the oldest recordings recommended. |
| KameranameSnapShot Cloud 4G PRO | If the SD card is full, the camera stops recording until the card is changed or formatted.The camera name assigned can be changed here. |
| Time ZoneEurope/Berlin | Select the time zone of your region. |
| Photo SettingsImage size | |
| 24 MP (*) | Select the desired image resolution. |
| 16 MP | 24 MP (5664x4248) / 16 MP (4608x3456) / 12 MP (4032x3024) / 8MP (3264x2448) / 5 MP (2560x1920) |
| 12 MP | |
| 8 MP | |
| 5 MP | |
| Multishot | |
| 1 pic (*) | Select the number of images to be taken upon movement or triggering. |
| 2 pics | |
| 3 pics | |
| 4 pics | |
| 5 pics | |
| Delay | |
| Take X pictures within one second | If you have selected 2 to 5 pictures under „Multishot“, you can specify here whether the continuous pictures should be taken consecutively within 1 second or whether there should be a pause of 1 second or 2 seconds between the continuous pictures. |
| Interval between multishot pictures 1 sec. (*) | |
| Interval between multishot pictures 2 sec. | |
| Time Lapse(*) | The camera triggers according to the specific time set, independently from the PIR detector.Example with setting 01:00:00:The camera triggers every hour independently from motion recognition.Possible time interval: min. 05 seconds to max. 24 hours (Input 23:59:59) |
| Delay(*) | Set a pause for the PIR Sensor. This setting prevents the camera from taking too many images/videos.Example with setting 5 minutes:After triggering, the camera sets the PIR inactive for 5 minutes. After the time set the PIR sensor will be active again.Possible delay: min. 05 seconds to max. 24 hours (Input 23:59:59) |
| Flash SettingsMaximum number of images per dayOFF (*) 10 99 | Set the desired number of images per day.Once the set number is reached, the camera stops the function. |
| Video Settings | |
| Video Size | |
| FHD-1080P (*) | Select the desired video format. |
| HD-720P | Full HD 1080P (1920x1080) / HD 720P (1280x720) / WVGA (848x480) |
| WVGA | |
| Video Length | Select the desired video length. |
| 10(*)5 59 | min. 5 sec. - max. 59 sec. |
| Flash Settings | |
| Flash | |
| Max. Flash (*) | Select the desired flash range.Maximum approx. 20 meters / minimum approx. 8 meters |
| Min. Flash | |
| PIR Motion Detector | |
| Enable PIR | The Passive Infrared Sensor (PIR) triggers upon motion and temperature changes recognised within the detection range. |
| Sensitivity | Adjust the sensitivity of the motion detector.Level 1-5: Select when camera triggers too often upon environment influences, e.g. falling branches or strong sunlight.Level 6-9: The camera recognises even smallest motion and temperature changes.NOTICE If OFF is selected, the camera will not take any recordings! Switch the time lapse ON to get recordings! |
| Timer | |
| Timer 1(*) | Timer 1: Set a fixed working time frame in which the camera is active. Outside of this time, no recordings are made or movements are registered.Example with setting 2:00 – 5:00:Camera is only active between 2:00 and 5:00 a.m.If you select the OFF function in this menu item, the camera works 24 hours a day. You can set up to 2 working times per day. |
| Timer 2(*) | Timer 2: Set a second fixed working time frame in which the camera is active (see timer 1).If you select the OFF function in this menu item, the camera works 24 hours a day or according to your settings for timer 1. |
| Save Settings | Tap Save Settings to confirm your adjustments. |
07.1 ▶ NOTICE > during initial setup of the camera
After you have tapped on Save Settings, your registration is completed. After successful registration, the LED status indicators (17f) and (17g) stop flashing and light up green constantly. The camera will reboot within a few seconds. As soon as all LEDs light up green / yellow constantly, your camera is in working mode after approx. 60-70 seconds.
07.2 ▶ NOTICE > Standby Mode
If you do not complete the camera registration, the camera switches to standby mode after 5 minutes. To continue registration, either press the TEST button (13) or switch the camera off and on again using the slide control (16).
Please refer to chapter 06.8 to complete the registration.

Media


Here you will find an overview of the pictures and videos you have taken.
Click on the desired image or video for a larger view of the image or to play a video.
Hd_202330109900000XXX

Delete
Save
Here you can rename your picture/video or delete it individually.


Mark image or video as favorite.
Save the picture or video as a file in the smartphone gallery or on the hard disk of your PC/laptop (original quality).
Mark, delete and share individual, multiple or all images and videos.
Here you can filter by time period, media type, camera and user.

Favorites


Here you will find an overview of your pictures and videos marked as favorites.


Mark, delete and share individual, multiple or all favorites.
Here you can filter your favorites by time period, media type, camera and user.

Cameras
Here you will find an overview of all your registered cameras. For information and settings, tap on the relevant camera.
Camera

SnapShot 4G Pro 86026XXXXXXXX


This function is only available if you have selected „Real time“ under „Remote control“ in the camera settings.

Tap the camera icon to request a real-time image.

Tap on the video camera icon to request a real-time video (subscription required).

Tap on the symbol to open the following options:
Update Firmware
Only clickable if there is a new firmware available for your camera. Please note: Battery capacity must be more than 65%.
Format SD card
Turn off camera
The camera is switched off by command. The camera reports every 24 hours to check its status and switch back to working mode if necessary.
Report as stolen (please read chapter 08.3)
Delete camera (please read chapter 08.2)

Information
Firmware DSR1DRXX Displays the installed firmware version.
Battery 100% Displays the battery status.
Signal quality 4G Mobile network
Signal strength
Synchronized

Signal strength

successfully synchronized.

Settings
Camera settings
Sort number 1
Push
This takes you to the camera settings (see chapter 07).
▼ Sort your registered cameras.

Allow push notifications.

Share
Share camera pictures
Share images of the selected camera with friends and colleagues within the DÖRR APP (registration is necessary). Tap + and enter the email of your friend. Tap Invite Your friend receives an email invitation to register for our service. After successful registering, your friend is able to see the images of the shared camera. To end sharing the images, tap the email address and confirm Delete
Share images of the selected camera with friends and colleagues by email (no registration required). Tap + and enter the contact data. To end sharing the images, tap the email address and confirm Delete
SMTP Forwarding
Possibility to use manually defined SMTP servers to share data with other platforms such as "Revierwelt".

My Account
Here you can view and book your subscriptions for picture quality and video transmission.

NOTICE
Subscriptions can only be taken out in the respective iOS and Android app. Cancellations can only be made in the respective Appstore or Playstore.
In the web login under My account you can only see an overview of the currently active subscriptions.
User
| E-Mailmax.mustermann@max.de | Your e-mail address. |
| New password | If necessary, assign a new password. |
| Confirm password | Confirm new password. |
| Registered on01.01.20203 | Date of your registration. |
Save
| Webshop | Visit ourwebshopand find out more about our wide range ofhunting and outdoor products! | |
| Newsletter | Sign up for ournewsletterand benefit from a variety of attractive offers! | |
| Legal notice | About us & Contact | |
| Privacy policy | Privacy policy | |
| Logout |
08 | FURTHER FUNCTIONS
08.1 Test Recordings
Option 1: Request a real-time image as described on page 37 in the "Camera" section.
Option 2: To trigger a test recording manually on the camera, press the TEST button (13) once when the status display is active and the camera is ready for use (see chapter 06.8) to obtain media in the defined setting.
While the data is being written to the SD card, the SD card LED (17d) flashes green. While the test recording is being loaded into the DÖRR Cloud, the DÖRR Cloud LED (17f) flashes green.
To view your test recording, go to „Media“ in the DÖRR APP and tap on the corresponding camera.
08.2 Deleting/Re-registering a camera
In case you want to sell your camera, please follow these steps:
1. Delete the camera in the APP/web interface:

Cameras > tap on the camera to be deleted >
Camera
Tap on :
Delete camera
2. Reset camera to factory settings
To do this, press the RESET button (15) on the camera, e.g. with a pen, for approx. 10 seconds until all LEDs briefly light up green twice.
You or the new owner can now register the camera again in the DÖRR APP.
08.3 In the event of theft
If your camera is stolen, do NOT delete it from the APP, as this is the only way to ensure that the thief cannot register the camera. Contact our service via the „Report as stolen“ function and enter your contact details there.

Cameras > tap on the stolen camera >
Camera
Tap on :
Report as stolen
09 | MOUNTING / DIRECTING
09.1 Mounting and directing the camera
Pull the supplied mounting strap (26) through the eyelet (23) on the backside of the camera. Mount the camera to a tree, pole or any other suitable object. Do not fix the belt finally at this stage.
We recommend placing the camera at a height of 0.75 m to 1.00 m. The optimal distance to the subject is between 3 and 10 m. Larger distances are possible as well, but then the reliability of the motion sensor is no longer given. The camera lens (05) should now point to where the object is expected to show-up.
To verify your camera is hung up in a correct angle, we recommend taking a view test recorings (see chapter 08.1). The camera should be directed in a way that the object will appear in the centre of the picture. You may have to re-adjust the camera and take another test shot.
Once the camera position is correct, the mounting belt (26) can be tightened to hold the camera firmly.

NOTICE
Please also note chapter 10 with our extensive range of accessories for installation and anti-theft protection.
09.2 Notes for mounting the camera
09.2.1 PIR sensor
The PIR sensor triggers only under specific circumstances within a certain range. The capturing of objects strongly depends on temperature, vegetal cover, reflecting surfaces etc. Under perfect conditions the recognition range can be up to 20 m. Usually, you may expect a range of 15 m. It may take a few attempts to find a good
position for the camera. During photo test, be aware that animals are usually remarkably smaller than human beings. Animals might be below the PIR sensor detection range and not be captured.
09.2.2 Light conditions
Avoid direct backlight when mounting the camera. The lens should not point directly into the sun and camera should not be placed in shadow.
09.2.3 Weather protection
Although the camera is weatherproof and well-suited for outdoor use (dust and jet water protected according to IP66 protection class) we recommend mounting the camera in a secured place not facing the weather exposed side. Prevent the camera from driving rain and constant exposure to sunlight. After a long period of humidity caused by rain or fog, the camera should be placed in a dry area for a few days.
10 | OPTIONAL ACCESSORIES
10.1 Optional mounting accessories
Our optional accessories such as the patented DÖRR holding fixture in combination with the DÖRR universal adapter are designed for fast and easy mounting of the camera at a tree, wall or other objects. The camera clicks into the holding fixture and is firmly held in place. The camera can be removed easily for a quick change of place of action. The ball head ensure a flexible direction of the camera. The fixture is rotatable by 360° and swivels up to 30° in all directions:
DÖRR Holding Fixture Multi for SnapShot
10.2 Optional anti-theft devices
Pull a padlock (available as accessory) through the eyelet (08) to lock the camera housing:
DÖRR Combination Lock 3-digits small
Use our DÖRR cable lock (available as accessory) and pull it through the eyelet for cable lock (22) on the backside of the camera to secure it against theft:
DÖRR Universal Cable Lock 1,80 m
For a very high level of security, lock the camera in our weatherproof and rust-free DÖRR metal housing „Made in Germany“, which optimally protects your camera against theft, vandalism and extreme weather conditions:
DÖRR Metal Housing for SnapShot Cloud 4G/Pro 4G
10.3 Alternative power supplies
Use the DÖRR solar panel with internal Lithium Ion battery 1500 mAh for a sustainable and extended runtime. Optionally available in our DÖRR webshop:
DÖRR Solar Panel Li-1500 12V/6V
Alternatively, the camera can be operated with an external 12V battery in conjunction with our DÖRR battery cable. All optionally available in our DÖRR webshop:
Lead Battery 12V/12Ah
DÖRR Battery Cable 2m with flat plug
Both the solar panel and an external battery need to be plugged-in to the cameras DC 12V port (20). Any inserted batteries do not need to be removed when using external power supplies. The camera automatically reverts to the inserted batteries as soon as the external power supply is disconnected.
10.4 SIM Hero multi-network card
For optimum operation in all European countries, we recommend the SIM Hero multi-network card to benefit from the advantages of the special DÖRR tariffs and always the best local network:
simHERO M2M SIM card
for a great variety of surveillance camera accessories and get more information on our wide assortment of hunting and outdoor items!
11 | CLEANING AND STORAGE
Never use aggressive cleansing agents or benzine to clean the device. We recommend a soft, slightly damp microfiber cloth to clean the outer parts of the device. Remove batteries before cleaning! Store the device in a dust-free, dry and cool place. This device is not a toy - keep it out of reach of children. Keep away from pets.
12 | SCOPE OF DELIVERY

| Recording capability Photo / Video with audio / Photo+Video with audio | |
| Mobile picture transmission Yes | |
| Mobile video transmission Yes (subscription required) | |
| Combined picture and video recording Yes | |
| Number of LEDs / LED Type 60 Invisible Infrared LEDs, 940nm | |
| Flash range max. approx. 20 m | |
| Detection range motion sensor approx. 20m / 100° | |
| Picture angle approx. 100° | |
| Trigger speed PIR sensor approx. 0,4 - 0,7 sec. | |
| Image sensor 5MP Colour CMOS Sensor | |
| Aspect Ratio 4:3 | |
| Picture resolution stored 24 MP*/16 MP*/12 MP*/8 MP*/5 MP (*interpolated) | |
| Picture resolution sent | Thumbnail (1920x1440)/24 MP*/16 MP*/12 MP*/8 MP*/5 MP (*interpolated) |
| Digital picture format | JPEG |
| Video resolution stored + sent | Full HD 1080P / HD 720P / WVGA |
| Video length | 5 - 59 sec. |
| Digital video format | MP4 |
| Lens | F=2.0/100° |
| Multiple shots (pictures per release) | 1 - 5 photos |
| Delay PIR Sensor | 5 sec. - 24 hours |
| Sensitivity PIR sensor | 1 - 9 steps |
| Time frames per day | 2 |
| Time lapse function | Yes |
| Time stamp on image | Longitude and latitude, resolution, battery status, temperature (°F/°C), moon phase, date, time |
| Languages | DE, GB, FR, ES, IT, CZ, DK, FI, HU, NL, SE |
| Memory card | SD/SDHC 8GB up to max. 32GB; SDXC 64GB up to max. 128GB see instruction manual (memory card not included) |
| SIM card format | Standard SIM (Nano-SIM+Micro-SIM+Mini-SIM with adapter, SIM card not included) |
| Mobile radio module | LTE Cat1; EU; 4G/3G/2G |
| Frequency band | LTE-FDD: B1/B3/B7/B8/B20/B28, WCDMA: B1/B8, GSM/EDGE: B3/B8 |
| GPS | Yes |
| Power supply | 12x Mignon AA LR6 1.5V alkaline batteries or equivalent NiMH or Lithium batteries (not included) |
| Operating voltage | DC 12V / 2A |
| Power consumption approx. | while operation ∅ 107mA-300mA by day, 115mA-777mA by night / standby 0.084mA |
| Runtime in standby mode approx. | 8 month with 12x AA batteries |
| Socket for external battery | Yes |
| USB port | USB-C |
| Thread mount 1/4" | Yes |
| Ingress protection code | IP66 |
| Operating temperature approx. | -20°C to +55°C |
| Storage temperature approx. | -25°C to +60°C |
| Relative humidity approx. | 5% - 90% |
| Colour | camouflage/green |
| Dimensions approx. | 11,5 x 14,5 x 7,5 cm, height with antenna: 37 cm |
| Weight without batteries approx. | 394 g |
DÖRR GmbH reserves the right to make technical changes without notice.
14 | DISPOSAL, CE MARKING, SIMPLIFIED EU DECLARATION OF CONFORMITY

14.1 DISPOSAL OF BATTERY/ACCUMULATOR
Batteries and rechargeable batteries are marked with the symbol of a crossed-out waste bin. This symbol indicates that empty batteries or rechargeable batteries that can no longer be recharged must not be disposed of in household waste. Old batteries may contain harmful substances that can cause damage to health and the environment. As the end user, you are legally obliged to return used batteries (under German battery law, Section 11 Act Revising the Law of Waste-Related Product Responsibility for Batteries and Accumulators). You can return batteries free of charge after use at the point of sale or in your immediate vicinity (e.g. at municipal collection points or in shops). You can also return batteries to the seller by post.

14.2 WEEE INFORMATION
The WEEE (Waste Electrical and Electronic Equipment) Directive, which came into force as European law on 13 February 2003, led to comprehensive changes in the disposal of discarded electrical equipment. The primary purpose of this directive is to prevent e-waste while promoting reuse, recycling and other forms of reprocessing in order to reduce waste. The WEEE logo (dustbin) shown on the product and on the packaging indicates that the product must not be disposed of in normal household waste. You are responsible for delivering all discarded electrical and electronic equipment to appropriate collection points. Sorting waste for separate collection and sensible recycling of packaging waste helps to use natural resources more sparingly. Furthermore, e-waste recycling is a contribution to preserving our environment and thus also people's health. Further information on the disposal of electrical and electronic equipment, recycling and collection points can be obtained from local authorities, waste disposal companies, specialist retailers and the manufacturer of the device.

14.3 DISPOSAL OF THE PACKAGING
Dispose of the packaging by type. Give cardboard to the waste paper, foils to the collection of recyclables.

14.4 CONFORMITY WITH ROHS
This product complies with the European RoHS Directive on the restriction of the use of certain hazardous substances in electrical and electronic equipment and variations thereof.
CE 14.5 CE MARK
The imprinted CE mark complies with the applicable EU standards and indicates that the device meets the requirements of all EU directives applicable to this product.
SIMPLIFIED EU DECLARATION OF CONFORMITY
Hereby, DÖRR GmbH declares that the radio equipment type [204449] is in compliance with Directive 2014/53/EU. The full text of the EU declaration of conformity is available at the following internet address: https://www.doerr-outdoor.de/204449
DÖRR

DÖRR GmbH
Messerschmittstr. 1
D-89231 Neu-Ulm
Fon: +49 731 970 37 69
hello@doerr.gmbh
https://doerr-outdoor.de
SnapShot Cloud Pro 4G WA
Artikel Nr. 204449
Made in China
- SNAPSHOT CLOUD PRO 4G WA
- 14.4 ROHS KONFORMITÄT
- GB
- 01 | ⚠️ SAFETY HINTS
- 02 | ⚠️ SAFETY HINTS FOR BATTERIES/ACCUMULATORS
- 03 | PRIVACY POLICY
- 04 | € MOBILE PHONE COSTS FOR PICTURE/VIDEO TRANSMISSION
- 05 | NOMENCLATURE
- 06 | COMMISSIONING
- IMPORTANT
- 06.1 MOUNTING THE ANTENNA
- 06.2 INSERTING THE BATTERIES
- CAUTION
- NOTICE
- 06.3 INSERTING A SD/SDHC/SDXC MEMORY CARD
- 06.3.1 IMPORTANT SDXC MEMORY CARDS 64 GB & 128 GB
- 06.3.2 FORMAT SD/SDHC/SDXC CARD WITH THE CAMERA
- 06.4 INSERTING A SIM CARD
- 06.5 DOWNLOAD THE DÖRR APP
- 06.6 REGISTER AND SCAN THE QR CODE
- 06.7 DÖRR SNAPSHOT CLOUD 4G/4G PRO WEBSITE
- 06.7 SWITCH ON / CAMERA STATUS CHECK
- UNREGISTERED CAMERA
- ALREADY REGISTERED CAMERA
- 07.1 ▶ NOTICE > DURING INITIAL SETUP OF THE CAMERA
- 07.2 ▶ NOTICE > STANDBY MODE
- MEDIA
- DELETE
- SAVE
- FAVORITES
- CAMERAS
- CAMERA
- INFORMATION
- SETTINGS
- SHARE
- MY ACCOUNT
- 08 | FURTHER FUNCTIONS
- 08.1 TEST RECORDINGS
- 08.2 DELETING/RE-REGISTERING A CAMERA
- DELETE THE CAMERA IN THE APP/WEB INTERFACE
- RESET CAMERA TO FACTORY SETTINGS
- 08.3 IN THE EVENT OF THEFT
- 09 | MOUNTING / DIRECTING
- 09.1 MOUNTING AND DIRECTING THE CAMERA
- 09.2 NOTES FOR MOUNTING THE CAMERA
- 09.2.1 PIR SENSOR
- 09.2.2 LIGHT CONDITIONS
- 09.2.3 WEATHER PROTECTION
- 10 | OPTIONAL ACCESSORIES
- 10.1 OPTIONAL MOUNTING ACCESSORIES
- 10.2 OPTIONAL ANTI-THEFT DEVICES
- 10.3 ALTERNATIVE POWER SUPPLIES
- 10.4 SIM HERO MULTI-NETWORK CARD
- 11 | CLEANING AND STORAGE
- 12 | SCOPE OF DELIVERY
- 14 | DISPOSAL, CE MARKING, SIMPLIFIED EU DECLARATION OF CONFORMITY
- 14.1 DISPOSAL OF BATTERY/ACCUMULATOR
- 14.2 WEEE INFORMATION
- 14.3 DISPOSAL OF THE PACKAGING
- 14.4 CONFORMITY WITH ROHS
- CE 14.5 CE MARK
- SIMPLIFIED EU DECLARATION OF CONFORMITY
- DÖRR
Brand : Dörr
Model : SnapShot Cloud Pro 4G WA
Category : Camera