Richmond Deluxe 60DF - Cooker STOVES - Free user manual and instructions
Find the device manual for free Richmond Deluxe 60DF STOVES in PDF.
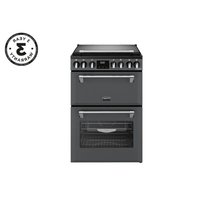


| Product Type | Dual Fuel Cooker |
| Brand | Stoves |
| Model | Richmond Deluxe 60DF |
| Width | 60 cm (approx.) |
| Height | 90 cm (approx.) |
| Depth | 60 cm (approx.) |
| Weight | Approximately 70 kg |
| Energy Source | Gas (hob) + Electric (oven) |
| Gas Type | Natural Gas (G20) / LPG convertible |
| Oven Capacity | Approximately 65 liters |
| Number of Burners | 5 gas burners |
| Main Functions | Baking, Grilling, Roasting, Slow Cooking |
| Oven Cleaning | Enamel interior, removable door for easy cleaning |
| Safety Features | Flame failure device on all burners, child lock on oven door |
| Control Type | Rotary knobs and electronic timer |
| Display | LED digital clock/timer |
| Oven Fan | Multifunction fan oven |
| Energy Efficiency Class | A+ (approx.) |
| Spare Parts Availability | Genuine Stoves parts available online |
| Repairability Index | High – standard components |
| Included Accessories | Baking tray, grill rack, oven shelves |
| Color | Stainless Steel / Black |
Frequently Asked Questions - Richmond Deluxe 60DF STOVES
User questions about Richmond Deluxe 60DF STOVES
0 question about this device. Answer the ones you know or ask your own.
Ask a new question about this device
Download the instructions for your Cooker in PDF format for free! Find your manual Richmond Deluxe 60DF - STOVES and take your electronic device back in hand. On this page are published all the documents necessary for the use of your device. Richmond Deluxe 60DF by STOVES.
USER MANUAL Richmond Deluxe 60DF STOVES
STOVES RICHMOND DELUXE 60CM DUAL FUEL (ALL MODELS)

Table Of Contents
USER GUIDE 1
INTRODUCTION .... 1
SAFETY & WARNING INFORMATION .... 3
GETTING TO KNOW YOUR PRODUCT 9
OVENS & GRILLS 12
USING THE HOB 13
USING THE GRIDDLE 16
USING THE GRILL 18
USING THE TOP OVEN 20
USING THE MAIN OVEN 22
USING OTHER ACCESSORIES 28
CLOCK/PROGRAMMER 30
CLEANING YOUR APPLIANCE 34
APPLIANCE MAINTENANCE 36
TECHNICAL DATA 38
ENERGY DATA TABLE 40
FRENCH: USER GUIDE 42
FRENCH: INTRODUCTION 42
SAFETY AND WARNING INFORMATION ...... 44
GETTING TO KNOW YOUR PRODUCT 51
OVENS AND GRILLS 54
USING THE COOKTOP 55
USING THE PLATE 58
USING THE GRILL 60
USING THE UPPER OVEN 62
USING THE MAIN OVEN 64
USING OTHER ACCESSORIES 72
CLOCK/TIMER 74
CLEANING YOUR APPLIANCE 78
APPLIANCE MAINTENANCE 80
SAFETY AND WARNING INFORMATION 89
GETTING TO KNOW YOUR PRODUCT 96
OVENS AND GRILLS 99
USING THE HOB 100
USING THE GRIDDLE 103
USING THE GRILL 105
USING THE TOP OVEN 107
USING THE MAIN OVEN 109
USING OTHER ACCESSORIES 117
DIGITAL TIMER 119
CLEANING YOUR APPLIANCE 123
APPLIANCE MAINTENANCE 125
TECHNICAL DATA 128
ENERGY DATA TABLE 130
DEUTSCH/GERMAN: USER MANUAL 132
GET TO KNOW YOUR PRODUCT 141
OVENS & GRILL 144
SVENSKA/SWEDISH: INTRODUCTION 268
SAFETY AND WARNING INFORMATION 270
This user guide book is designed to help you through each step of owning your new product.
Please read it carefully before you start using your appliance, as we have endeavored to answer as many questions as possible and provide you with as much support as we can.
General information, spares and service information is available from our website.
If you should find something missing from your product or have any questions that are not covered in this user guide, please contact us (see contact information inside the front cover).
For a more detailed explanation of how to use this product, please refer to www.stoves.co.uk for the full user manual.
COUNTRIES OF DESTINATION:
| GB- Great Britain | |
| IE - Ireland | |
| DE - Germany | √ |
| FR - France | √ |
| PL - Poland | √ |
| NL - Netherlands | √ |
| SE - Sweden | √ |
| NZ - New Zealand | |
| AU - Australia |
CONTACT INFORMATION:
Customer Care Helpline:
0344 815 3740
Alternatively, use the contact form on our website
www.stoves.co.uk
Details about warranty registration and spares & service information are also available on our website.
Calls are charged at the basic rate, please check with your telephone service provider for exact charges.
Your new appliance comes with our FREE 3 year guarantee (UK only), protecting you against electrical and mechanical breakdown.
To register your new appliance for its warranty (UK only) please visit our website www.stoves.co.uk. For full terms & conditions of the manufacturer's guarantee, please refer to the website above.
In addition, you may wish to purchase an extended warranty. Details of how to do this are also on our website www.stoves.co.uk.
Our policy is one of constant development and improvement, therefore we cannot guarantee the strict accuracy of all of our illustrations and specifications. Changes may have been made subsequent to publishing.
Glen Dimplex Home Appliances, Stoney Lane, Prescot, Merseyside, L35 2XW
All our electric products are labelled accordingly with the crossed out wheeled bin symbol. This indicates, for disposal purposes at end of life, that these products must be taken to a recognized collection points, such as local authority sites/local recycling centres.
This appliance Complies with European Community Directives (CE) for household and similar electrical appliances and Gas appliances where applicable.
This appliance conforms to European Directive regarding Eco design requirements for energy-related products. Our policy is one of constant development and improvement, therefore we cannot guarantee the strict accuracy of all of our illustrations and specifications - changes may have been made subsequent to publishing.
EUROPEAN DIRECTIVES
As a producer and a supplier of cooking appliances we are committed to the protection of the environment and are in the compliance with the WEEE directive.
DISPOSAL OF PACKAGING MATERIAL

The packaging materials used with this appliance can be recycled. Please dispose of the packaging materials in the appropriate container at your local waste disposal facilities.
SAFETY & WARNING INFORMATION

WARNING
This appliance can be used by children aged from 8 years and above and persons with reduced physical, sensory or mental capabilities or lack of experience and knowledge if they have been given supervision or instruction concerning use of the appliance in a safe way and understand the hazard involved. Children shall not play with the appliance. Cleaning and user maintenance shall not be made by children without supervision.

WARNING
The appliance and its accessible parts become hot during use. Care should be taken to avoid touching heating elements. Children less than 8 years of age shall be kept away unless continuously supervised.

WARNING
The oven must be switched off before removing the guard and that, after cleaning, the guard must be replaced in accordance with the instructions.

WARNING
A steam cleaner is not to be used on this appliance.

WARNING
If a lid is fitted to your appliance any spillage should be removed from the lid before opening and the hob surface should be allowed to cool before closing the lid.

WARNING
Ensure that the appliance is switched off before replacing the lamp to avoid the possibility of electric shock.

WARNING
Unattended cooking on a hob with fat or oil can be dangerous and may result in fire.

WARNING
Danger of fire: NEVER try to extinguish a fire with water, but switch off the appliance and then cover flame e.g. with a lid or a fire blanket.

WARNING
Use only hob guards designed by the manufacturer of this cooking appliance or indicated by the manufacturer of this appliance in the instructions for use as suitable or hob guards incorporated in the appliance. The use of inappropriate guards can cause accidents.

WARNING
Never place food, or dishes on the base of the main oven, the element is here and it will cause overheating.

WARNING
Do not place articles on or against the appliance.

WARNING
The appliance must never be disconnected from the mains supply during use, as this will seriously affect the safety and performance, particularly in relation to surface temperatures becoming hot and gas operated parts not working effectively. The cooling fan (if fitted) is designed to run on after the control knob has been switched off.

WARNING
Do not store or use flammable liquids or items in the vicinity of this appliance.

WARNING
Do not modify this appliance.

WARNING
Do not operate the appliance without the glass panels correctly fitted.

WARNING
This appliance must be earthed.

WARNING
GAS WARNING! - If you smell gas:
Do not try to light any appliance,
Do not touch any electrical switch.
Contact your local gas supplier immediately.

WARNING
This appliance shall be installed in accordance with the regulations in force and only used in a well ventilated space. Read the instructions before installing or using this appliance.

WARNING
Never use cooking vessels on the hob that overlap its edges.

WARNING
Prior to installation, ensure that the local distribution conditions (nature of the gas and gas pressure) and adjustment of the appliance are compatible.

WARNING
The adjustment conditions for this appliance are stated on the label (or data plate).

WARNING
This appliance is not connected to a combustion products evacuation device. It shall be installed and connected in accordance with current installation regulations. Particular attention shall be given to the relevant requirements regarding ventilation.
CAUTION INFORMATION

CAUTION
Make sure that you have removed all packaging and wrapping. Some of the items inside this appliance may have additional wrapping. It is advised that you turn the ovens and/or grill on for a short while. This will burn off any residues left from manufacturing. There may be a smell which accompanies this process - but this is nothing to worry about and is harmless. It is recommended that you wash the oven shelves, baking tray, grill pan and grill pan trivet before their first use in hot soapy water. This will remove the protective oil coating.

CAUTION
This appliance is for cooking purposes only. It must not be used for other purposes, for example room heating.

CAUTION
The use of gas cooking appliances results in the production of heat, moisture and products of combustion in the room in which it is installed. Ensure that the kitchen is well ventilated especially when the appliance is in use.

CAUTION
Prolonged intensive use of the appliance may require additional ventilation, for example the increasing of mechanical ventilation where present, additional ventilation to safely remove the products of combustion to outside (external) air whilst also providing room air changes with additional ventilation.

CAUTION
Connection should be made with a suitable flexible cable with a minimum temperature of 70°C. Ensure that you route all mains cables well clear of any adjacent heat source.

CAUTION
Accessible parts may be hot when the grill and/or the oven are in use. Young children shall be kept away.

CAUTION
We recommend that the appliance is connected by a competent person who is a member of a 'Competent Person Scheme' who will comply with the required regulations.

CAUTION
The space of air circulation, located underneath and at the back of the hob, improves its reliability by ensuring that it will cool down efficiently.

CAUTION
Our policy is one of constant development and improvement, therefore we cannot guarantee the strict accuracy of all our illustrations and specifications. Changes may have been made subsequent to publishing.

CAUTION
Consult a professional before installing additional ventilation.
GAS HOB: DO's & DON'Ts
DO
• Always ensure that pan bases are dry and flat before using them on the hob. • Always position pans over the centre of the heat zone, and turn the handles to a safe position so they cannot be knocked or grabbed. • Always use pans which are no smaller than 100mm (4"), or larger than 250mm (10"). Use a 230 mm (9") pan above the wok burner, if two or more other hotplate burners are in use at the same time.
• Always match the size of pan to the heat zone - do not use large pans on small zones or vice versa. • Always make sure that the burner caps, rings and pan supports are correctly placed. This will prevent pans becoming unstable while in use and ensure an uninterrupted gas flow.
DO NOT:
- Never use double pans, rim-based pans, old or misshapen pans, or any pan that is not stable on a flat surface.
- Never leave cooking fat or oil unattended.
- Never use commercial simmering aids or heat diffusers, as they create excessive heat and can damage the surface of the hob.
- Plastic cooking utensils can melt if they come into contact with a warm hob. Never leave them close to or on top of the hob.
- Never leave any heat zone alight without a pan covering it. This causes a fire hazard.
- Never leave an empty pan on a heating zone.
- Never leave anything lying on the hob.
- Never heat a sealed tin of food, as it might explode.
- Never use the hob surface for storage.

NOTE
Automatic cooking will normally produce condensation when cooling down and the food is still inside.
FIRE SAFETY ADVICE
- If you do have a fire in the kitchen, don't take any risks - get everyone out of your home and call the Fire Brigade.
- If a pan catches fire:
- Do not move it- it is likely to be extremely hot.
- Turn off the heat if it's safe to do so- but never lean over the pan to reach the controls. • If you have a fire blanket, put it out over the pan. If you have put the fire out, leave the pan to cool completely.
- Deep-fat frying presents more dangers in your kitchen.
- Never fill a chip pan (or other deep fat fryer) more than one-third full of oil.
- Do not use a fire extinguisher on a pan of oil- the force of the extinguisher can spread the fire and create a fireball.
- If you have an electrical fire in the kitchen:
- Pull the plug out, or switch off the power at the fuse box - this may be enough to stop the fire immediately
- Smother the fire with a fire blanket, or use a dry powder or carbon dioxide extinguisher
- Remember: never use water on an electrical or cooking oil fire.
OTHER SAFETY ADVICE
• DO
• Always take care removing food from the oven as the area around the cavity may be hot. • Always use oven gloves when handling any utensils that have been in the oven as they will be hot. • Always make sure that the oven shelves are resting in the correct position between two runners. - Always use the Minute Minder (if fitted) if you are leaving the oven unattended- this reduces the risk of food burning.
• DO NOT
- Never place items on the door while it is open.
- Never wrap foil around the oven shelves or allow foil to block the flue.
- Never drape tea towels near the oven while it is on; this will cause a fire hazard.
- Never pull heavy items, such as turkeys or large joints of meat, out from the oven shelf, as they may overbalance and fall.
- Never use this appliance to heat anything other than food items and do not use it for heating the room.
GETTING TO KNOW YOUR PRODUCT
Your appliance layout may differ depending on the model.
CONTROL PANEL![graph TD A["1"] --> B["2"] B --> C["3"] C --> D["4"] D --> E["5"] E --> F["1"] style A fill:#f9f,stroke:#333 style B fill:#ccf,stroke:#333 style C fill:#cfc,stroke:#333 style D fill:#fcc,stroke:#333 style E fill:#cff,stroke:#333 style F fill:#ffc,stroke:#333 subgraph "RICHMOND DELUXE" G["○"] --> H["…](/content/2026/06/1407661/images/b0a429746e166b0e459f847dbd189e7ed5bf88cfbcb77776f1f27ad7afdaaa12.jpg)
| 1 Cook | Zones |
| 2 Top | Oven/ Grill |
| 3 Multi-function oven | |
| 4 Clock/Programmer | |
| 5 Main | Oven temperature control |
HOB
| HOB FUNCTIONS | ||
| 1 | Small Right handfront | |
| 2 | Medium Right handrearLeft handrear | |
| 4 | Wok Left handfront | |
CAVITY OVERVIEW
![graph TD A["1"] --> B["2"] B --> C["3"]](/content/2026/06/1407661/images/4c5d5fe2fd89a9bd11930a38de46318582e0906987bf15fc5767164cb680360a.jpg)
| CAVITY OVERVIEW | |
| 1 FASCIA | |
| 2 GRILL/ TOP OVEN | |
| 3 MAIN OVEN |
TOP OVEN/GRILL DIAL

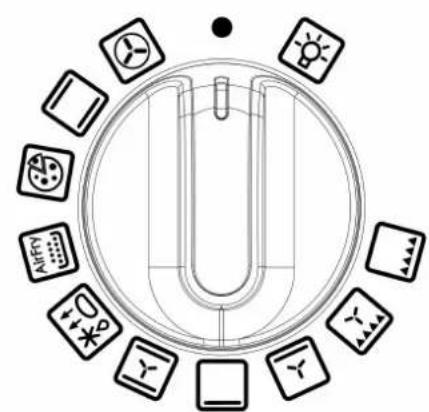
MAIN OVEN FUNCTION DIAL
MAIN OVEN TEMPERATURE CONTROL DIAL

Main Oven Functions
| Fanned Oven |  |
| Conventional Oven |  |
| Pizza Setting |  |
| Air Fryer |  |
| Defrost/Dough proving |  |
| Intensive Bake |  |
| Top Heat |  |
| Base Heat with Fan |  |
| Fanned Grill |  |
| Dual Grill |  |
| Auto Light |  |
OTHER FUNCTION LIST:
| KeepWarm70° | MAIN |  |
| SlowCook100° | MAIN |  |
TOP OVEN FUNCTIONS
| High Grill |  |
| Low Grill |  |
| Medium Grill |  |
OVENS & GRILLS
OVENS
When using the top oven or main oven, the white thermostat indicator light will come on until the selected temperature is reached.
When the top oven/grill or grill is switched on, the cooling fans come on to keep the fascia and control knobs cool during cooking/grilling. The cooling fans may operate when the main ovens are in use depending on the temperature setting. The fans may continue to operate for a period after the oven/grill has been switched off. During use the fan may cycle on and off, this is normal.

IMPORTANT
Never put items directly on top of the base of the oven, or cover the oven base with foil, as this may cause the element to overheat. Always position items on the shelf.

NOTE
The main oven will not operate if the programmer is set to Auto, see Clock/Programmer section for more information.
USING THE HOB
IGNITION PROCEDURES
Correct procedure for ignition of all gas burners on this appliance:
PRIOR TO IGNITION:
- Hotplate burner(s), position correctly sized, flat bottomed pan(s) directly onto the pan support above the selected burner(s).
WOK BURNER (IF FITTED)
- Position a flat bottomed wok or a correctly sized, flat bottomed pan directly onto the pan support above the wok burner. - Position the provided wok stand directly onto the pan support above the wok burner, then position a round bottomed wok directly onto the stand.
AUTOMATIC IGNITION (If Applicable)
- Push in and turn the selected gas burner control knob to the full flame symbol. Keep the control knob depressed. Sparking to the selected burner will commence automatically. Sparking will cease automatically once the flame is established. Continue to hold the control knob in for up to 15 seconds then release.
- If the burner fails to ignite within this time, release the control knob and wait 1 minute before attempting to re-ignite.
- In the event of a power failure, or the ignition not working, then a lighted match or taper can be used to ignite the burner.
- Use pans which are large enough to avoid overflows onto the hob surface.
- Wipe any spillage as soon as possible.
- Clean the hob top as regularly as possible, this will prevent any build up of grease which may be a fire hazard.
FITTING BURNER CAPS AND HEADS

When fitting the burner head, make sure that the notch lines up with the hole in the base.


NOTE
The burner heads can be taken apart for cleaning. Please make sure they are absolutely dry before replacing them.

Check that the burner head is level and the cap is fitted centrally on the burner head.
PAN PLACEMENT
Always make sure that your pans are placed centrally and do not allow the flame to extend over the base of the pan. Do not place pans directly onto the burners.
PAN SIZES REQUIRED
Always make sure that your pans are placed centrally and do not allow the flame to extend over the base of the pan. Do not place pans directly onto the burners.


WARNING
Do not allow cooking vessels to overlap cooking zones.
| Hob Cook Zones Minimum PanSizes (mm) | Maximum PanSizes (mm) | |
| Rapid & Wok 100 250 | ||
| All other cook zones | ||
USING THE GRIDDLE
THE GRIDDLE
Only use the griddle which has been approved for use on this appliance.
Do not use any other griddle, as this may be hazardous.
Please read these instructions thoroughly before using the griddle for the first time.
BEFORE USING THE GRIDDLE FOR THE FIRST TIME
- Wash the griddle thoroughly in hot soapy water.
- Apply a small coat of unsalted vegetable oil, on a dry cloth or paper towel onto the griddle surface.
- Heat the griddle on full power for 3 minutes. The griddle plate is now ready for use.

NOTE
The griddle is made of quality cast iron and has a non-stick cooking surface. Regular oiling will prolong its life and prevent rusting. If the griddle shows signs of rust, wash and re-oil.
USING THE GRIDDLE
IMPORTANT
The griddle should only be positioned front-to-back over the burners.

IMPORTANT
The griddle must not be used over the wok.
- Place the griddle carefully on the pan support over the burners, using the locating feet on the underside of the griddle. Take care to avoid damage to the surface of the pan supports.
- Before cooking, preheat the griddle for 3 minutes on full rate, which is indicated on the control knobs by a large flame symbol.
- After preheating, turn the control knobs to the small flame symbol. The griddle is now ready for cooking.

WARNING
Do not use metal implements, as they may damage the non-stick surface.

WARNING
Always allow the griddle to cool completely before moving or cleaning.

WARNING
Always ensure the griddle is firmly located on the 2 burner pan supports.
USING THE GRILL


WARNING
Never cover the grill pan or grill trivet with aluminium foil, or allow fat to build up in the grill pan, as this creates a fire hazard.

TIP
For best grilling results use shelf position 2 and a 6 minute pre-heat.
THE COOLING FAN
During use the fan may cycle on and off, this is normal.
When the grill is switched on, the cooking fan comes on to keep the fascia and control knobs cool during grilling. The fan may continue to operate for a period after the grill has been switched off.
USING THE GRILL

CAUTION
Accessible parts may be hot when the grill is used-young children should be kept away.

IMPORTANT
The grill door must be fully open when the grill is used.
- Open the grill door. Turn the control knob to the required setting. For best cooking results, we recommend that you preheat the dual grill for 3 minutes and the single grill for 5 minutes.
- Push the grill pan towards the back of the shelf to position it under the grill.
- To switch off return the control knob to the off position.
GRILL PAN AND TRIVET


WARNING
The door must be open when the grill is used for conventional grilling.
USING THE TOP OVEN


WARNING
When you are cooking keep children away from the vicinity of the oven.

CAUTION
The top element gets extremely hot when in use, so take extra care to avoid touching it.

NOTE
The top oven is a conventional oven and is not controlled by the programmer.
TO TURN ON THE TOP OVEN
- Turn the temperature control knob until the required temperature is selected. The white thermostat indicator will come on until the selected temperature is reached, and then go off. It will turn on and off periodically as the thermostat operates to maintain the selected temperature.
- To switch off, return the top oven control knob to the off position.
Important: Never put items directly on the base of the oven, or cover the oven base with foil, as this may cause the element to overheat. Always position items on the shelf.
COOLING FAN
During use the fan may cycle on and off, this is normal.
When the top oven is switched on, the cooking fan comes on to keep the fascia and control knobs cool during grilling. The fan may continue to operate for a period after the top oven has been switched off.
PREHEATING
Preheat the oven until the indicator light switches off for the first time, this will take up to 15 minutes depending on the temperature selected.
The oven must be preheated when cooking frozen or chilled foods, and we recommend preheating for yeast mixtures, batters, soufflés, and whisked sponges.
Put the oven shelves in the position required before preheating the oven.
Position baking trays and roasting tins on the middle of the shelves, and leave one clear shelf position between shelves, to allow for circulation of heat.
WHEN USING THE TOP OVEN
As part of the cooking process, hot air is expelled through a vent at the top of the oven. When opening the oven door, care should be taken to avoid any possible contact with potentially hot air, since this may cause discomfort to people with sensitive skin. We recommend that you hold the underneath of the oven door handle.
USING THE MAIN OVEN


WARNING
Accessible parts may be hot when the oven is used. Young children should be kept away.
SETTING A HEATING OPERATION
To start a heating operation, a heating function and a heating temperature must be selected.
Setting a heating function
- Rotate the function control to select the desired heating function.
To modify or cancel the heating function:
- Rotate the function control to select another heating function.
- Rotate the function control to 0 to cancel the heating function.
Setting a heating temperature:
- Rotate the temperature control to select the desired heating temperature. The selected temperature shows in the display.
To modify or cancel the heating temperature:
- Rotate the temperature control to select another heating temperature.
- Rotate the temperature control to 0 to cancel the heating temperature.
PREHEATING
The oven starts preheating when a heating function and heating temperature have been set.
The temperature symbol °C blinks to indicate preheating.
The temperature symbol permanently lights up and an acoustic signal sounds to indicate the oven has reached the set temperature.
Fast preheat function
The fast preheat function automatically activates after a heating operation has been selected that supports the fast preheat function.
The fast preheat reduces the time the oven needs to reach the selected heating temperature.
The display shows the fast preheat symbol.
The fast preheat function automatically deactivates after the selected heating temperature is reached.
COOKING WITH A FANNED OVEN

CAUTION
As this is a high efficiency oven, you may notice the emission of steam from the oven when the door is opened. Please take care when opening the door.
If you are used to cooking with a conventional oven you will find a number of differences to cooking with a fan oven which will require a different approach.

TIP
Foods are cooked at a lower temperature than a conventional oven, so conventional recipe temperatures may have to be reduced. Please refer to the conversion chart below.

TIP
Preheating is generally not necessary as a fan oven warms up quickly.

TIP
There is no flavour transference in a fan oven, which means you can cook strong smelling foods such as fish at the same time as mild foods- e.g. milk puddings.

TIP
When batch baking foods that will rise during cooking- e.g. bread, always ensure that enough space has been left between the shelves to allow for the rise.
- There are no zones of heat in a fan oven as the convention fan at the back of the oven ensures an even temperature throughout the oven. This makes it ideal for batch baking - e.g. when planning a party as all the items will be cooked within the same length of time.

NOTE
When 2 or more shelves are being used, it may be necessary to increase the cooking time slightly.

NOTE
Because the 2 oven shelves are wider than in many ovens, it is possible to cook 2 items per shelf.

NOTE
When roasting meats, you will notice that fat splashing is reduced, which is due in part to the lower oven temperatures, and will help keep cleaning of the oven to a minimum.

NOTE
There is no need to interchange dishes onto different shelves part way through cooking, as with a conventional oven.
DEFROSTING AND COOLING IN THE MAIN OVEN
To defrost frozen foods, turn the oven control to the defrost position, place the food in the centre of the oven and close the door.
To cool foods after cooking prior to refrigerating or freezing, turn the main oven control to the defrost position and open the door.
DEFROSTING TIMES

NOTE
Small or thin pieces of frozen fish or meat-e.g. fish fillets, prawns or mince will take approximately 1-2 hours.

NOTE
Placing food in a single layer will reduce the thawing time.

NOTE
A medium sized casserole or stew will take approximately 3-4 hours.

NOTE
A 1½kg/3lb oven ready chicken will take approximately 5 hours, remove the giblets as soon as possible.

CAUTION
BE SAFE:
Do not defrost stuffed poultry using this method.
Do not defrost larger joints of meat and poultry over 2kg/4lb using this method.
USING THE AIRFRY FUNCTION
Simply choose the AirFry setting on the main oven, then place your chips, vegetables or chicken on the specially designed air fryer tray.
The tray allows more air to circulate speeding up cooking time, reducing the need for any extra oils making cooking healthier.
AirFry is great for cooking chips, meat and to prepare meals that you would normally grill.
There's a few things which don't AirFry well including cakes, pastries and breads as they can become dry or tough. Foods in a wet batter also can not be cooked by AirFrying.
- Select the AirFry function on the main oven and set the temperature to 220°C.
- Position the metal Airfry tray on the 3rd (centre) shelf position from the bottom. Food should be evenly spaced on the airfry tray in a single layer to allow for even cooking.
- Place a baking tray on the shelf position below the AirFry tray to catch any crumbs or drips.

WARNING
For recipes with 30 minutes or longer cooking time a 5-10 minute pre-heat time is recommended.
Frozen or dense foods may require additional cook time.

NOTE
If you're using a non-air fryer recipe, make sure you shorten the cooking time as food will cook faster than a conventional oven.

IMPORTANT
Air Frying in a large oven cavity allows for more food to be airfried at one time, longer cooking times are to be expected. Please adjust cooking times accordingly.

NOTE
It may be necessary to lightly spray the airfry tray with oil to avoid food sticking to it.

IMPORTANT
Greasy foods may cause smoke during the airfry cycle, maintaining a clean oven and using a baking tray below to catch debris is recommended.
| MAIN OVEN FUNCTIONS: RECOMMENDED USES | ||
| Fanned Oven |  | The even temperature in the oven makes this function suitable for batch baking or batch cooking foods. |
| Conventional Oven |  | This function is ideal for traditional roasting. The meat is placed in the middle of the oven, roast potatoes towards the top. |
| Pizza Setting |  | This function is ideal for cooking pizza. The fanned oven operates with the addition of the base element to make the pizza base crispy. |
| Air Fryer |  | The rapidly distributed air makes it suitable for oil-free frying. |
| Defrost/Dough proving |  | Defrost foods with the oven door closed, or cool dishes prior to refrigeration leave the oven door open. Using with the door closed also makes it suitable for proving bread prior to baking. |
| Intensive Bake |  | Suitable for food with ahigh moisture content, such as quiche, bread and cheesecake. It also eliminates the need for baking pastry blind. |
| Top Heat |  | This function is ideal for browning off the top of food following conventional or fancooking, as it is not as fierce as the grill. |
| Base Heat with Fan |  | Use to cook open pies (such as mince pies) the base element ensure that the base is cooked while the fan allows the air to circulate around the filling- without being too intensive. |
| Fanned Grill |  | The fan allows the heat to circulate around the food, ideal for thinner foods such as bacon, fish and gammon steaks. |
| Dual Grill |  | This function cooks food from the top, as the whole grill is working you can cook larger quantities of food. |
| Auto Light |  | Turns on only the oven light, the light remains on when the oven is operating. |
OVEN FURNITURE
- Extra shelves may be ordered from your local supplier.
Baking trays and roasting tins:
For best cooked results and even browning, the recommended size baking trays and roasting tins that should be used are as follows;
- Baking tray 350 mm x 250 mm This size of baking tray will hold up to 12 small cakes.
- Roasting tin 370 mm x 320 mm
Position baking trays and roasting tins on the middle of the shelves, and leave one clear shelf-position between shelves, to allow for circulation of heat.
USING OTHER ACCESSORIES
WOK CRADLE

IMPORTANT
Please ensure the wok cradle sits securely on the 4 pan support fingers.

NOTE
It is important that the wok size fits the cradle, if the wok is too small the cradle will not support it properly.

CAUTION
The cradle will get very hot in use- allow plenty of time for it to cool before you pick it up.
STEAM & INFUSE ACCESSORIES
The Steam & Infuse vertical cooking system is designed to deliver an evenly cooked, healthier, flavourful result every time. Simply fill the flavour pot with stock/ herbs or any other ingredients and place your poultry/ meat over the top.

Supporting poultry or other meat vertically exposes all sides to the oven's heat, promoting a more even cook and allowing the fat to drip out, while flavour is infused from the inside.
Also included are a set of skewers which are ideal for making kebabs and can be suspended over the specially designed rack.


NOTE
If the Steam & Infuse is not supplied as standard with your appliance, it can be purchased through our Customer Care team.

IMPORTANT
The skewers are not to be used in tall 90cm ovens and should always be orientated across the oven so not to come into contact with the oven fan blades.
CLOCK/PROGRAMMER
Please be aware that only the main oven is controlled by the programmer.

NOTE
Your clock/programmer may not have all of these functions.

 | Alarm |
 | Cooking time |
 | End of Cooking time |
 | Time Key |
 | Pizza Function |
 | AirFry Function |
 | Light |
 | Oven Function |
 | Defrost/ Dough Proving |
 | Temperature Unit (Celsius) |
| h:min | Units of time (hours: minutes) |
 | Rapid Pre-Heat |
| Auto Cooking | |
| 88:88 | Time Display |
| Child Lock |
- Left button: minus/decrease
- Middle button: menu to select a function • Right button: plus/increase
- When a function is selected and the time or volume is set, the chosen function will automatically start seven seconds after setting.
MANUAL MODE
If the programmer is not in semi-automatic or full-automatic mode you can use oven functions manually. The manual icon is also on the display.
SETTING THE VOLUME
Press the menu button until "LX" (X=1, 2, or 3) flashes on the display. Use the plus or minus buttons to select a volume level.

SETTING THE TIME

NOTE
The time can only be set when the main oven control knob is in the 0 position or on the light setting.
Double touch the clock icon, then use the plus and minus buttons to adjust.
The clock uses a 24-hour system, that is, 00:00-23:59 (h:min).
The time setting will be automatically saved after 5 seconds of no buttons being touched.

NOTE
The oven functions will not work until the clock time is set.
SETTING TIMERS

NOTE
Timers and alarms can only be set when the main oven control knob is switched to a function mode.
MINUTE MINDER
Touch the clock icon once and use the plus or minus buttons to set a timer.
- When the alarm time is reached, the alarm icon will flash and the alarm will sound. Touch any key to silence the alarm. The alarm will stop automatically after 5 minutes.
- If you want to adjust the timer you have set, you can go to the alarm settings again and press the plus or minus keys to adjust it.
- If you want to cancel the alarm, you can go to the alarm settings again and set the timer to 00:00 (h:min).
SETTING THE COOKING DURATION
- Touch the clock icon twice to activate the cooking time setting.
- Adjust the time display using the plus/minus icons to set the required time for cooking.
- If you want to adjust the cooking time that you have set, you can go to the cooking time setting again and press the plus and minus keys to adjust.
- To cancel the cooking time, you can go to the cooking time settings again and set the cooking time to 00:00 (h:min).
SETTING THE COOKING END TIME
- Touch the clock icon three times to set a specific end cooking time.
- Adjust the time display using the plus/minus icons to show the desired end time for cooking.
- When the end cooking time is reached, the oven will automatically turn off, the end cooking time icon will go off, and the alarm will sound automatically stopping after 5 minutes. To stop the alarm press any key.
- If you don't set an end time of cooking, the oven will only run automatically for 5 hours.
For all the above settings, wait for 5 seconds to automatically save the settings.
When one setting is adjusted and switched to another, the original settings are saved. For example, if the alarm is set and you touch the time button to switch to the clock setting, the alarm setting will still be saved.
ACTIVATING/ DEACTIVATING THE CHILD LOCK
- Press and hold the plus/increase button (right-hand button) for 3-5 seconds. The child lock symbol will appear.
- Once the child lock is active, the buttons will be inactive. A beep signal will be activated if the buttons are pressed.
- To deactivate the child lock, press and hold the plus/increase button (right-hand button) for 3-5 seconds. The child lock symbol will disappear and the appliance can continue to be used.

NOTICE
In case of main power loss for a short time (about 15 minutes) the timer will maintain key lock status.
CLEANING YOUR APPLIANCE
| Cleaning: Do's | |
 | Use warm,soapy water |
 | Wipe the appliance with a damp clothClean the cloth regularly |
 | Dry with a soft dry cloth |
| Cleaning: Don'ts | |
 | Don't use undiluted bleaches or Chloride products |
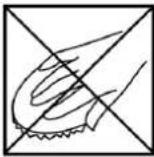 | Don't use Wire Wool, Abrasive cleaners, Nylon pads or Steam Cleaners |
 | Do not wash the cast iron griddle or pan supports in the dishwasher |

NOTE
Always switch off your appliance and allow it to cool down before you clean any part of it.

NOTE
Please take extra care when cleaning over the symbols on the control panel, as this can lead to them fading.

NOTE
Tips: Some foods can mark or damage the metal or paint work e.g; Vinegar, fruit juices and salt. Always clean food spillages as soon as possible.

CAUTION
It is important to clean your appliance regularly as a build up of fat can affect its performance or damage it and may invalidate your guarantee.

CAUTION
In addition to the above, do not use metal scrapers to clean the oven door glass.
STEAM ASSISTED CLEANING
Use hot steam to help gently soften grease & residue in your oven by simply pouring 200ml of cold water and a very small amount of washing-up liquid into the circular indent at the bottom of the oven.
Select the base heat function and the oven temperature 120° C for 20 minutes.
After this time the whole oven will be coated with steam and when cooled slightly, it will be easier to wipe off food residue & grease with a damp sponge.


CAUTION
Do not use the fan oven function when steam cleaning as this can draw moisture into your appliance.

CAUTION
Ensure the oven has cooled before wiping it with a sponge.
APPLIANCE MAINTENANCE
CHANGING THE LIGHTBULB
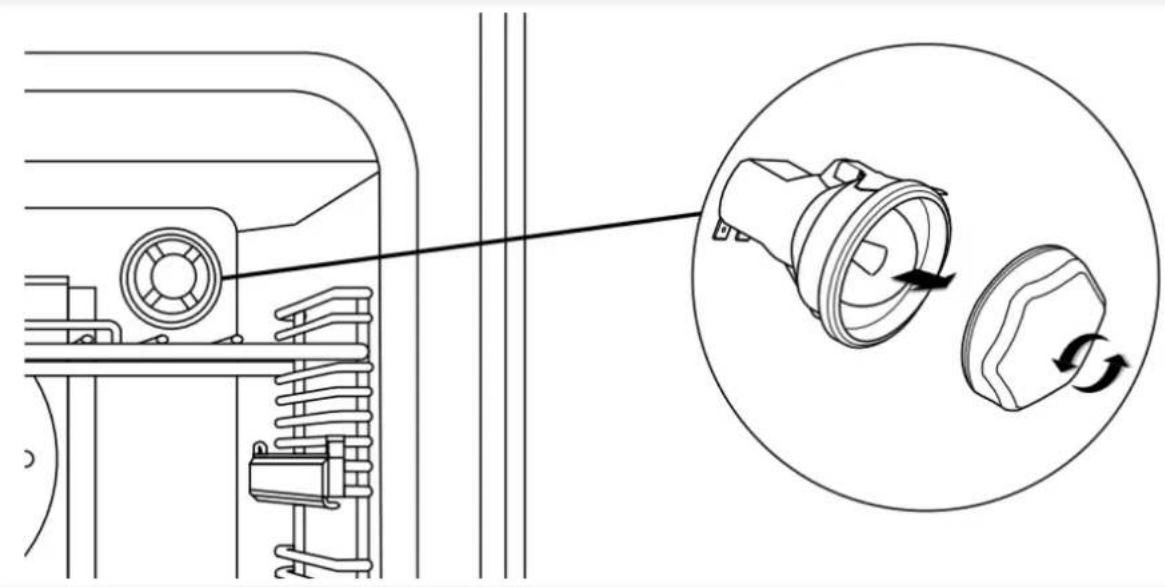
- Remove the oven shelves.
- Unscrew the lens cover by turning anticlockwise.
- Remove the bulb and replace.
- Replace the lens cover and put the oven shelves back.

WARNING
Switch off the power before you change the light bulb.

NOTE
Not all appliances have the same number and type of bulbs. Before you replace your bulb, check to see what type you have. Please remember that bulbs are not covered by your warranty.
REMOVING SHELF RUNNERS


Remove holding screws as per diagrams
STANDARD SHELVES
- Before removing the shelves completely, please make sure that the shelf is unclipped from the retaining tabs. Slightly raise the shelf and insert in the chosen shelf position
- Ensure the shelf is fully pushed back towards the back of the oven, until the shelf stopper is reached.
REMOVING TELESCOPIC SHELVES (IF FITTED)
- Push the front of the runner upwards firmly, ensuring the front clip is released from the shelf guide.

- Pull the runner away from the shelf guide.

- Pull the back clip away from in between the shelf guide.
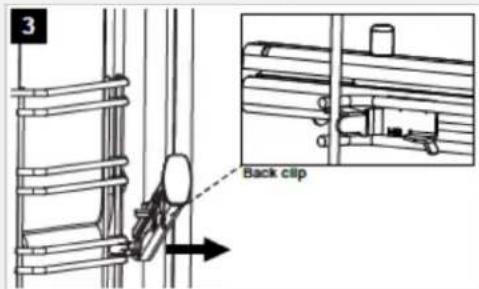
REFITTING TELESCOPIC RUNNERS (IF FITTED)
- Secure the back clip in between the shelf guide. Ensure the runner is fully placed back towards the back of the shelf.

- Locate the front clip onto the shelf guide and firmly push the front runner down until the front clip is secured in place.

- The telescopic runner should now be fitted correctly and secure to the shelf guide.

TECHNICAL DATA
The cookers come in two gas types: Natural gas and Universal LPG.
If the cooker is required to use LPG, a conversion kit can be obtained by contacting the Customer Care Centre.
Before installation check that the cooker is suitable for the gas supply.
To do this check the gas type on the carton sticker or on the data plate behind the bottom of the oven door.
The following shows the supply and operating pressures for various gas supplies.
Operate pressure at appliance test point:
• 20mbar (Natural gas);
- 30mbar (LPG)
Burner Injector Sizes
| Injector Specification | ||
| UK (GB/IE) II2H3+ (20,28-30/37) G30-28-30/G31-37 |
Burner Injector Sizes
| Aux Injector Semi-Rapid | Injector x 2 | ||
| NG 1.0kW LPG | 1.0kW NG 2.0kW | LPG 2.0kW | |
| 0.72 0.5 1.05 0.7 | |||
Burner Injector Sizes
| WARNINGThis cooker must be earthed. | |
| Data badge Lower | part of the front frame |
| Appliance class Class 1 - freestanding cooker | |
| Electrical supply | 230 - 400V ~3N ~ 50 Hz |
| Load @ 230V 5705W | |
| Max. heat input ΣQn 9.00 kW | |
| Type of gas This cooker can be used with Natural Gas and LPG.Please see data badge for your specified gas type. Can be converted from natural gas to LPG. Never attempt to convert an appliance unless the data badge states you can. | |
| Gas category Natural gas I2H Natural gas II2H3+ | |
| Gas pressure settings | G20 Natural gas @ 20 mbar G30 Butane @ 28-30 mbar G31 Propane @ 37 mbar |
| Burner Aeration Fixed | |
| Grill Electric | |
| Hob Burners have | burner heads and caps which are removable for cleaning. Concealed electrodes to each burner. |
ENERGY DATA TABLE
Regulation (EU) 65/2014:
| Product Name: | |
| Brand: Stoves | |
| Size: 60cm | |
| Number of cavities | 2 |
Energy Efficiency
| Hob | |||
| Fuel Type Dual Fuel | |||
| Number of cook zones | 4 Gas hobs | ||
| Symbol Value | |||
| Energy Efficiency per cook zone | Cook zone EEI (%) | ||
| EE gas burner Wok 57.86% | |||
| EE gas hob All burners 60.55% | |||
Energy Efficiency
| Cavity Cavity 1 Cavity 2 Cavity 3 (if | applicable) | |
| Energy efficiency index | 91,3 94,0 | |
| Energy efficiency class | A | A |
| Energy Consumption per cycle (conventional mode) | 0,63 kWh 0,88 kWh | |
| Energy Consumption per cycle (fan-forced convection mode) | 0,01 kWh 0,79 kWh | |
| Heat Source Electric Electric | ||
| Volume 33 Litres 70 Litres | ||
| Energy consumption measured in accordance with BS EN 60350-1 | ||
FRENCH: INTRODUCTION
GETTING TO KNOW YOUR PRODUCT
| APERÇU DE LA CAVITÉ | |
| 1 BANDEAU | |
| 2 GRIL/FOURSUPÉRIEUR | |
| 3 FOUR PRINCIPAL |

NOTE

WARNING

WARNING

WARNING

WARNING
COOKING WITH THE CONVECTION OVEN

CAUTION

IMPORTANT

NOTE

ATTENTION

TECHNICAL DATA
Semi Rapid 1/ Medium 61.91%
Semi Rapid 2/ Medium 61.89%
Auxiliary/ Small -
Gas
hob
EE
All burners 60.55%
SAFETY AND WARNING INFORMATION

WARNING
GET TO KNOW YOUR PRODUCT
| OVEN OVERZICHT | |
| 1 BEDIENINGPANEEL | |
| 2 BOVENSTE OVEN/GRILL | |
| 3 HOOFDOVEN |
Oven/Grill knob
Top

NOTE

WARNING

WARNING

WARNING

WARNING

IMPORTANT

NOTE

CAUTION
TECHNICAL DATA
GET TO KNOW YOUR PRODUCT
MAIN OVEN TEMPERATURE CONTROL

NOTE

WARNING

WARNING

WARNING

WARNING

WARNING

IMPORTANT

NOTE

CAUTION
TECHNICAL DATA
Glen Dimplex Home Appliances, Stoney Lane, Prescot, Merseyside, L35 2XW
EUROPEAN DIRECTIVES

NOTE

WARNING

WARNING

WARNING

WARNING

WARNING

IMPORTANT

NOTE

WARNING

TECHNICAL DATA
EUROPEAN DIRECTIVES
GAS HOB: WHAT TO DO AND WHAT NOT TO DO
DO
MAIN OVEN TEMPERATURE CONTROL KNOB

CAUTION

WARNING

WARNING

WARNING

WARNING

IMPORTANT

CAUTION

WARNING

TECHNICAL DATA
SWEDISH: INTRODUCTION
| ÖVERSIKT AV HÅLLA | |
| 1 FASCIA | |
| 2 GRILL/ TOP UGN | |
| 3 HUVUDUGN |
TOP OVEN/GRILL SELECTOR

MAIN OVEN FUNCTION DIAL

MAIN OVEN TEMPERATURE CONTROL


NOTE

WARNING

WARNING

WARNING

WARNING

WARNING
DEFROSTING AND COOLING IN THE MAIN OVEN

IMPORTANT

NOTE

OBSERVE

TECHNICAL DATA
Glen Dimplex Home Appliances, Stoney Lane, Prescot, Merseyside, L35 2XW
0344 815 3740
www.stoves.co.uk
GDHA Part Number: 094115300
- TABLE OF CONTENTS
- USER GUIDE
- FRENCH: USER GUIDE
- EUROPEAN DIRECTIVES
- DISPOSAL OF PACKAGING MATERIAL
- SAFETY & WARNING INFORMATION
- WARNING
- CAUTION INFORMATION
- CAUTION
- GAS HOB: DO'S & DON'TS
- DO
- DO NOT
- NOTE
- FIRE SAFETY ADVICE
- OTHER SAFETY ADVICE
- GETTING TO KNOW YOUR PRODUCT
- CAVITY OVERVIEW
- TOP OVEN/GRILL DIAL
- MAIN OVEN FUNCTION DIAL
- MAIN OVEN TEMPERATURE CONTROL DIAL
- OVENS & GRILLS
- OVENS
- IMPORTANT
- USING THE HOB
- IGNITION PROCEDURES
- AUTOMATIC IGNITION (IF APPLICABLE)
- FITTING BURNER CAPS AND HEADS
- PAN PLACEMENT
- PAN SIZES REQUIRED
- USING THE GRIDDLE
- BEFORE USING THE GRIDDLE FOR THE FIRST TIME
- USING THE GRILL
- TIP
- THE COOLING FAN
- GRILL PAN AND TRIVET
- USING THE TOP OVEN
- TO TURN ON THE TOP OVEN
- COOLING FAN
- PREHEATING
- WHEN USING THE TOP OVEN
- USING THE MAIN OVEN
- SETTING A HEATING OPERATION
- SETTING A HEATING FUNCTION
- TO MODIFY OR CANCEL THE HEATING FUNCTION
- SETTING A HEATING TEMPERATURE
- TO MODIFY OR CANCEL THE HEATING TEMPERATURE
- THE TEMPERATURE SYMBOL °C BLINKS TO INDICATE PREHEATING
- FAST PREHEAT FUNCTION
- COOKING WITH A FANNED OVEN
- DEFROSTING AND COOLING IN THE MAIN OVEN
- DEFROSTING TIMES
- BE SAFE
- USING THE AIRFRY FUNCTION
- OVEN FURNITURE
- USING OTHER ACCESSORIES
- STEAM & INFUSE ACCESSORIES
- CLOCK/PROGRAMMER
- MANUAL MODE
- SETTING THE VOLUME
- SETTING THE TIME
- SETTING TIMERS
- MINUTE MINDER
- SETTING THE COOKING DURATION
- SETTING THE COOKING END TIME
- ACTIVATING/ DEACTIVATING THE CHILD LOCK
- NOTICE
- CLEANING YOUR APPLIANCE
- STEAM ASSISTED CLEANING
- APPLIANCE MAINTENANCE
- CHANGING THE LIGHTBULB
- REMOVING SHELF RUNNERS
- STANDARD SHELVES
- REMOVING TELESCOPIC SHELVES (IF FITTED)
- REFITTING TELESCOPIC RUNNERS (IF FITTED)
- TECHNICAL DATA
- ENERGY DATA TABLE
- FRENCH: INTRODUCTION
- COOKING WITH THE CONVECTION OVEN
- ATTENTION
- SAFETY AND WARNING INFORMATION
- GET TO KNOW YOUR PRODUCT
- GAS HOB: WHAT TO DO AND WHAT NOT TO DO
- SWEDISH: INTRODUCTION
- TOP OVEN/GRILL SELECTOR
- MAIN OVEN TEMPERATURE CONTROL
- OBSERVE
Brand : STOVES
Model : Richmond Deluxe 60DF
Category : Cooker