
SILK EPIL - Epilator BRAUN - Free user manual and instructions
Find the device manual for free SILK EPIL BRAUN in PDF.
| Brand | Braun |
| Model | Silk-épil (FG 1100) |
| Product type | Precision trimmer / Epilator |
| Power supply | 1 AAA 1.5 V battery (alkaline manganese recommended) |
| Approximate battery life | 120 minutes of shaving |
| Cutting heads | Precision cutting head (2), bikini cutting head (3) |
| Bikini combs | Small comb 5 mm (3a), large comb 8 mm (3b) |
| Usage | Body, face, bikini |
| Power on | On/off switch (I/O) |
| Cleaning | Brush included; head can be rinsed under warm water |
| Lubrication | One drop of sewing machine oil 1-2 times per year |
| Usage precautions | Do not use on irritated skin; keep out of reach of children |
| Warranty | 2 years (excluding normal wear and improper use) |
| Included accessories | Protective cap, brush |
| Used batteries | Do not dispose of in household waste; deposit at collection point |
Frequently Asked Questions - SILK EPIL BRAUN
User questions about SILK EPIL BRAUN
0 question about this device. Answer the ones you know or ask your own.
Ask a new question about this device
Download the instructions for your Epilator in PDF format for free! Find your manual SILK EPIL - BRAUN and take your electronic device back in hand. On this page are published all the documents necessary for the use of your device. SILK EPIL by BRAUN.
USER MANUAL SILK EPIL BRAUN
D/GB/F/E/P/I/NL/DK/N/S/FIN/PL/
CZ/SK/H/SLO/HR/RO/MD/TR/GR/
SRB/LT/LV/EST/BIH/MK/BG/RUS/
UA/Arabic

Braun Infolines
D A
0080027286463
00800 BRAUNINFOLINE
CH
0844-884010
GB
08007837010
IRL
1800509448
F
0800944802
B
080014592
E
901 11 61 84
P
808 20 00 33
1
(02) 6 67 86 23
NL
0800-4455388
DK
70150013
N
22630093
S
020-213321
FIN
020 377 877
PL
0801127286
0801 BRAUN
CZ
221 804 335
SK
02/5710 1135
H
(06-1) 451-1256
SLO
0802822
HR
01/6690330
TR
08002616365
RUS
8 800 200 20 20
UA
+380444286505
HK
852-25249377
(Audio Supplies Company Ltd.)
Deutsch
Thank you for purchasing the Braun Silk-epil FG1100 which precisely and safely removes unwanted hairs from body, face and bikini area. We hope you will enjoy using the appliance. Please read the use instructions carefully and thoroughly before using it.
Important
- The appliance is not intended for use by children or persons with reduced physical, sensory or mental capabilities, unless they are supervised by a person responsible for their safety. Keep the appliance out of reach of children to ensure that they do not play with it.
- Batteries may leak if empty or not used for a long time. In order to protect you and the appliance, please remove batteries in a timely manner and avoid skin contact whilst handling leaking batteries.
- For hygienic reasons, do not share this appliance with other persons.
- Do not use the appliance on irritated or inflamed skin.
- Never use the appliance with a damaged cutting head.
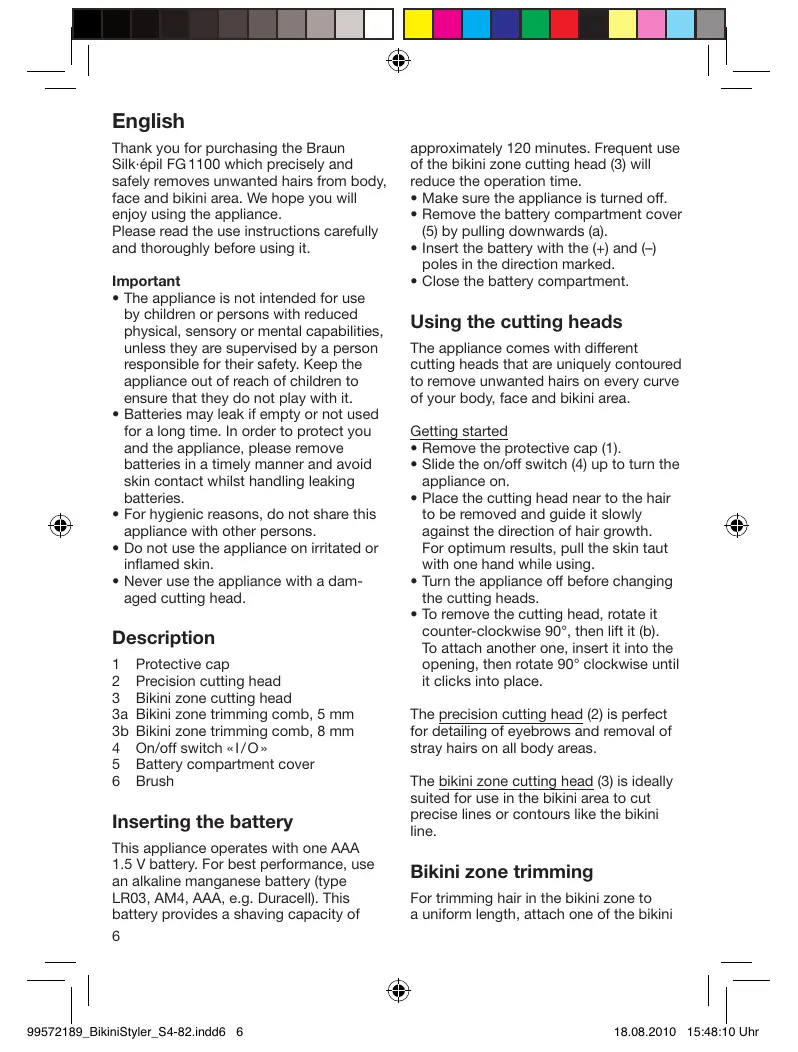
Description
1 Protective cap
2 Precision cutting head
3 Bikini zone cutting head
3a Bikini zone trimming comb, 5 mm
3b Bikini zone trimming comb, 8 mm
4 On/off switch I / O
5 Battery compartment cover
6 Brush
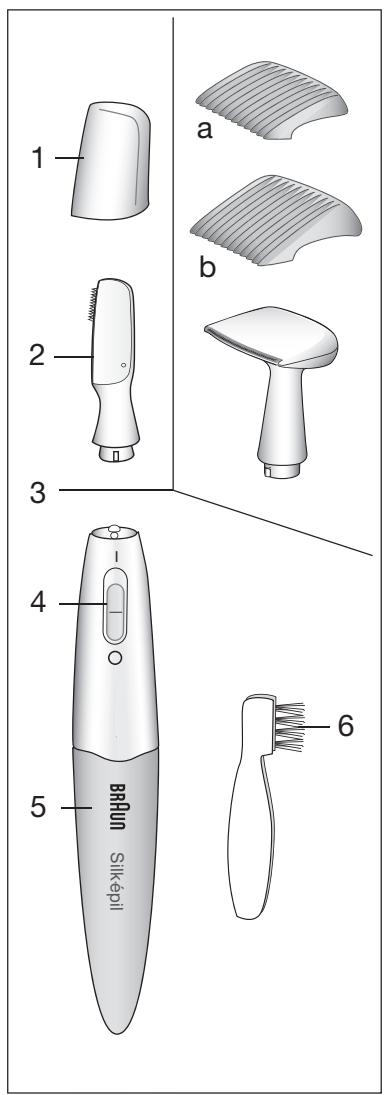
Inserting the battery
This appliance operates with one AAA 1.5 V battery. For best performance, use an alkaline manganese battery (type LR03, AM4, AAA, e.g. Duracell). This battery provides a shaving capacity of
approximately 120 minutes. Frequent use of the bikini zone cutting head (3) will reduce the operation time.
- Make sure the appliance is turned off.
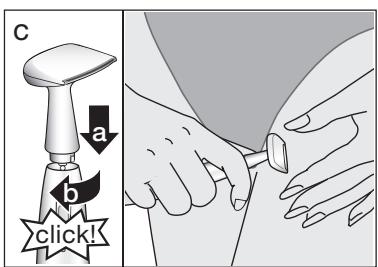
- Remove the battery compartment cover (5) by pulling downwards (a).
- Insert the battery with the (+) and (-) poles in the direction marked.
- Close the battery compartment.
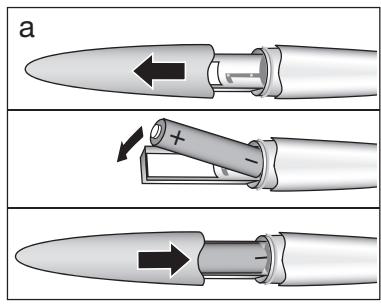
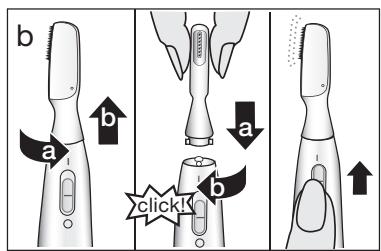
Using the cutting heads
The appliance comes with different cutting heads that are uniquely contoured to remove unwanted hairs on every curve of your body, face and bikini area.
Getting started
- Remove the protective cap (1).
- Slide the on/off switch (4) up to turn the appliance on.
- Place the cutting head near to the hair to be removed and guide it slowly against the direction of hair growth. For optimum results, pull the skin taut with one hand while using.
- Turn the appliance off before changing the cutting heads.
- To remove the cutting head, rotate it counter-clockwise 90^ , then lift it (b). To attach another one, insert it into the opening, then rotate 90^ clockwise until it clicks into place.
The precision cutting head (2) is perfect for detailing of eyebrows and removal of stray hairs on all body areas.
The bikini zone cutting head (3) is ideally suited for use in the bikini area to cut precise lines or contours like the bikini line.
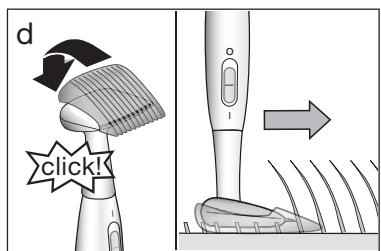
Bikini zone trimming
For trimming hair in the bikini zone to a uniform length, attach one of the bikini
zone trimming combs (3a, 3b). To attach a trimming comb, slide the pointed side over the cutting element, then press the round side onto the bikini zone cutting head so that it snaps into place (d). Guide the appliance with the trimming comb flat against the skin.
Cleaning and maintenance
Always turn off the appliance before cleaning. Clean the appliance after each use:
- Use the brush (6) to wipe away any hair or dust.
- From time to time, you can rinse the detached cutting heads under warm running water. A natural soap may also be used, provided it contains no particles or abrasive substances. Rinse off all foam.
- Please ensure that the cutting head is completely dry before attaching to the body
- For storage, attach the protective cap (1).
We recommend lubricating the cutter element in the head with a drop of light machine oil twice a year or after cleaning with tap water.
Subject to change without notice.
At the end of their life, empty batteries and the appliance should not be thrown away with the general waste or rubbish.
Please dispose of them at a Braun Service Centre or at an appropriate collection point.

Guarantee
We grant a 2 year guarantee on the product commencing on the date of purchase. Within the guarantee period we will eliminate any defects in the appliance resulting from faults in materials or workmanship, free of charge either by repairing or replacing the complete appliance at our discretion.
This guarantee extends to every country where this appliance is supplied by Braun or its appointed distributor.
This guarantee does not cover: damage due to improper use, normal wear or use as well as defects that have a negligible effect on the value or operation of the appliance. The guarantee becomes void if repairs are undertaken by unauthorised persons and if original Braun parts are not used.
To obtain service within the guarantee period, hand in or send the complete appliance with your sales receipt to an authorised Braun Customer Service Centre (address information available online at www.service.braun.com).
For UK only:
This guarantee in no way affects your rights under statutory law.
Warranty
We grant a 24 Month Replacement Warranty on this appliance commencing on the date of purchase.
This warranty applies in all States and Territories of Australia and in New Zealand and is in addition to any mandatory statutory obligations imposed on Procter & Gamble Australia Pty. Ltd., its distributors and its manufacturer. This express warranty does not purport to exclude, restrict or modify any such mandatory statutory obligations.
This warranty only covers defects in the appliance resulting from faults in workmanship or materials. Therefore, if your appliance becomes faulty as a result of faults in workmanship or materials, it will be exchanged by your retailer, on presentation of proof of purchase.
This warranty only applies to domestic or household use of this appliance and the warranty will only apply if the correct operating instructions included with this product have been followed.
The warranty on any appliance replaced under this warranty ends on the expiry of the warranty period that applied to the original appliance.
This warranty does not cover:
A. Damage arising from improper use or operation on incorrect voltages.
B. Breakages to shaver foils, glass jars, etc.
C. Normal wear due to moving parts.
D. Repairs undertaken by unauthorised service personnel or use of non genuine parts.
E. Appliances that are outside the warranty period or are not faulty.
This appliance is not intended for use by young children or infirm persons without supervision. Young children should be
supervised to ensure that they do not play with the appliance.
If the appliance is powered by a cord extension set or electrical portable outlet device these should be positioned so they are not subject to splashing or ingress of moisture.
To the extent permitted by the laws of the Commonwealth of Australia and New Zealand and applicable laws of a State or Territory of Australia, and subject to the second paragraph of this warranty above, this warranty is given in exchange for any other rights you may have against Procter & Gamble Australia Pty. Ltd. or its distributors or manufacturer, whether at law, in tort (including negligence), in equity or under statute.
Please retain proof of purchase of this appliance. If you have any questions in relation to this warranty, please call our Consumer Service line (see below for numbers).
Repairs and service
If you are sending your appliance for repair, please pack the appliance adequately and send it to your nearest Service Agent. For service or replacement parts refer to the authorised Service Agents listed overleaf. Local Service Agents may change from time to time - in that event please contact the Consumer Service free call number below for updated local service agent details.
Australian Consumer Service (free call): 1800641820
New Zealand Consumer Service (free call): 0 800 108 909

N2820
Australian & N.Z. Service Agents
VICTORIA & TASMANIA
Statewide Services Pty Ltd
trading as J A Appliances
17-19 Hossack Avenue
Coburg North, VIC 3058
Tel. (03) 8371 9100
Fax. (03) 9355 8644
Email: jaappliances@
statewideservices.com.au
QUEENSLAND
Walters Import trading as
Brisbane Appliance Service Centre
449 Beaudesert Road
Moorooka
QLD 4105
Tel. (07) 3277 0360
Fax. (07) 3274 2909
Email: basc@waltersimport.com.au
WESTERN AUSTRALIA
Mark 1 Appliances
Unit 1, 46 Abernethy Road
Belmont, WA 6104
Tel. (08) 9475 0911
Fax. (08) 9475 0922
Email: mark1app@iinet.net.au
NEW SOUTH WALES & ACT
Faulder Appliance Services Pty Ltd
Shop 4, 9 Evans Road,
Rooty Hill, NSW 2766
Tel. (02) 9625 3064
Fax. (02) 9625 3037
Email:fas16@bigpond.com
SOUTH AUSTRALIA & NT
Adelaide Service Centre
Shop B2,
Parkholme Shopping Centre
319 Oaklands Road, Parkholme
Adelaide, SA 5043
Tel. (08) 8357 5800
Fax. (08) 8357 5833
Email: ascpkh@adam.com.au
NEW ZEALAND
Key Service Ltd
7D Echelon Place
East Tamaki
Manukau City
Auckland
New Zealand
(PO Box 38569, Howick, Auckland,
New Zealand)
Tel. (09) 916 0960
Fax. (09) 916 0970
Email: key-service-ltd@xtra.co.nz
François
Utilizar as cabecas de corte
trconsumers@custhelp.com
Eληνικα
Euxapiotoupe nou ayopaaote tn ouakeun Braun Silk-epil FG 1100 n oioia apaoge i e akibeta kai aoopaia tic avenuumte cpiexc ano to owa, to npoawto kai nTv nepioxntou pnikiv. Eanizoue ot n xpnon tnc ouakeune th a oac kavantoioe.
Iapakaloumeiaaote pnoeKTika tic ooyie npiv tn xpon.
Σημαντικό
Autn n ouokun dev npoipietai yia xon ano naidia n atoa ma e meuvec oomega tke ndavontikec icakovntec, ektov av niaeovtai ano ato uutebuvvo ia tv aopalea touc. Vvioka uviotouve kpatate tv ouokun makiapia ano naidia.Ta naidia npentie va enontueovtai va v Esaqawicetai otdev nauovmu Tn ouokun.
Oi matapiec mtoepvi va napouiaouv diappon eav elai aoeic n dex xnpoiuovtai yemaoy xpviko diaotma. Tia va npoateueote eaoac kai tvuokneun,napakaoloupea apaipoteTic matapiec ykawoc kai anopuyete tvn eapn te depua evw xepiciote mtatapiec nupapouiazoudiappon.
Tia loyous uivins, mnu oipaceote autn t oukeun me alla atoua.
Mny xnpoonoiite m ouokeun nawv 0e ethetaevo depa n pEvovc.
MnV xonouoioite note tn ouokun eAattwpatikk epaKomns.
Nepiypaqn
1 Pooataeutko KaTaki
2 Kεφαλή κοπης ακριβείας
3 Kepaaln konnc yia nV neipoxn tou μπikiv
3a KoupeutikxTeva yia TnV pEpiOxN Tou μιkiv, 5 mm
3b KoupeutikxTeva yia Tnv nepioxn Tou mukiv, 8 mm
4 iak s avoiμ./kλεισμ.«I/O
5 KaTaki 0nKns nataipia
6 BoOpToa
Mntapie
H oukeun autn aeitoupyei e iia
muatapia AAA 1.5 V. Ia bEaTIOI
anodoo, xnpaioonate alkaikn
muatapia aayaviou (tunOu LR03, AM4, AAA, n.x.Duracell). Autoc o tunoc
muatapiac napexi diakpeia anotpiw-
oic yia nepitou 120 aeTTa. H ouxyn
xpnon tnc kepalnc konnc yia tnV
teipoxn tou mukiv (3) 8e wto
xpovo aeitoupyiac.
Bεβaωθeɪτ Επη Σωκειn εival anενεργοποιμένη.
ApaapeTe TO KATAKI TCS OTHKNC mntapiac (5) Tpaewvtac To npoc ta kataw (a).
EioayTe TmuataipiaeTo8tiko (+) kaiTov apvntiko(-)noLo tOa mJeiia nou UIOSEkuVOTAI.
Kλειοτε ηθήκης μαιatapiας.
XpnonTwvKεφaλωV konns
To Braun Silk-epil diaTei diaopope
Tkec kepaec konnc nou elvai eisikac
oxbiaevc ia va aapaouv t
aenviunctpixec oKeKaTe Kaunl
tou ouatoc, Tou npoownou kaln
Tneipioxn Tou mukiv.
Tia va EekivnoeTe
UAB "Baltic Continent"
P. Lukšio g. 23,
LT-09132 Vilnius
Tel. (85) 274 1788
www.service.braun.com
Pagaminta Kinijoje.
Latviski
Paldies, kaiegadajties Braun Silk-epil trimmeri. Tas drosi un precizi apgriez nevelamos matinus uz kermena, sejas un bikini zona. Mes ceram, ka Jums patiks lietot so ierici.
Pirms icerces lietoanas, ludzu, uzmanigi izlasiet lietoanas instrukciju.
Savarigi
Noctabane Ha 6aTepeyata
AnapaTbT pa60Tu c eHa 6aTePnra TIN AAAOT1,5V.3a ONTHMaHnApaOba n3oJON3BaIte aJIkANHa MaHrAnOba 6aTePnra (TIN LR03,AM4,AAA,HanpImep «Duracell').ToOn TIN 6aTePnR e ODoTaTbUeH 3a oCmryPRABe Ha npOdbJnxKtEnHOCT Ha 6bPcHEHe OT OKO120 MHNUTy. YeCTOTO n3oJON3BaHa Ha 6bPcHeuata rna 3a 6OblaTtHa 6bKNHH-3oHaTa (3) HamaNBA BPEMeTO Ha pa6Ota.
- 6e9ece, ye ennaiatopbTe n3KIOUeH.
MaHHTe Kanaka Ha OTdEnHeHTo 3a 6bAtePnTa (5), KaTo rO n3DbpNaTe HADony (a). - Поставate 6атета TC nOIIOCHT (+) n(-), kAKTo e O6O3HaNo.
- Пoctabete obpaTHo KaNAka Ha otJeHneTo 3a 6aTePnIra.
I3noI3BaHe Ha 6pbcHecuTe IraBn
Braun Silk-epil e OKOMPJIeKToBaH c pa3IuHn 6pbcHEU rIaBn, KOITo ca C OTINHteJEN IPOΦHn 3a OTCpHaRbAHe Ha HExKeJANHTe KOCMn IO BCaK a N3BbKa h BaAsTe TAnO, IIncTeN o6NaCTTa ha 6kKnHn-3OHATA.
IpoROTOBka 3a pa60Ta
- CbaJeTe npeIpa3HTo KaNaYe (1).
ПльзHETe KILOUа 3a BKNIOUBAHe/ИЗКЛIOUBAHe (4)Нarope 3a ДАВКЛIOUHTeурда.
IocTabete 6pbcheata rnaaba do KOCMnte, KOITTO pRbBa da ce otCTpaHrt, n DnKxete 6abHO ypeDa cpeUy Nocokata Ha pactEx HA KOCMnte.3a Da noCTnHHeTe ONTImaJIen pe3yNTat, ONbHete KOkata c eJHaTa pKa, DOKATO C npyraTa DnBxnte ypeDa. - I3KIOHETe YEpaIpeIa dmeMHNTe 6pbcheOeTAt rnaBa.
3a da cbaNITE 6pbchEuaTa rnaBa, 3aBbPTe He Na 90° B noCOKA o6paTHo Ha YacOBHnKOBATA CtpeNka, CneI KOeTo I NOBdHHe (b). 3a Da nocTabeN Dpyra, CnoKeTe R O TBOpA n3abPTe He Na 90° No YacOBHnKOBATA CtpeNka, DokaTo He Ce 3axBaHe HNoDVBHXHO C uPAKaBaHe.
PpeumHata 6pbchesea rnaBa (2)
e npfeKTHa 3a0opmRHe B deTnI
HaBeJNTne IOTcPaHbAHe Na OTdJIHN
KocbMHTa NO qIATO TNO.
Бьсheшатглава,п徳нэнчehа3a БиКИн-ЗОнТа(3) eHaJIbIlnO NOxOДЯша 3a OΦOpMHe Ha ПЕцИЗНI ПИИNIN IIN KOTyp, KaTO HApN. ПИИМТА Ha BKNHInTe.
OΦopMaHe Ha 6nKHH-3oHaTa
3a da oofopMITE KOcMITE B 6bKNHIN-3OHATA C eIhAKBa IbJFKHnA, 3akpeNeTe eHN OH rpeBcHITe 3a oOpomHHe na 6bKNHIN-3OHATA (3a, 3b). 3a da 3akpeNITE, pIb3te HpeBcHSeUH enEMeHT, cIeD KoETo HAtChETe 3a0bneHata C tpaHa Bbpxy 6bCHeuTa Tnaba PpeDaHaNaeHa 3a 6bKNHIn-3OHATA, taKa Ye da Ce 3axBaHe Ha MCTO C uPaKBaHe. DInBeJte UpeJa C taka NocTabeHHre 6beHn 3a oOpomHHe PblTHo DO KOKaTaN (d).
PouncTbaHe npoaPbXka
BnHarn n3knIyBaIte ypeDa npEi nOuCTBaHe. POnCTBaIte ro cIeD BCaKO n3NOr3BaHe:
- ɪnənɪzBaiTe yetka (6), 3a Na otctpaHnte HATpynAnHe KocMn n npax.
- OT Bpeme Ha Bpeme MOKete Da n3nJaKBate CToJNa TeaJaO BDoA OtDeJeHene 6b3Cheu TnaBn. Pnp NoCHCTBaHETo MOKe CTbU ToKa Ta
H3N0P3BaTe O6MHOBEN CanyH, KOITo HcBdRpKa YacTnU NIIaAbpa3HNb CBCTABKn. H3NJaKHeT oIetaHata.
Ybepete ce,Ye 6pbcheeta rnaabe e Hnblno cyxa npedn da mOHTnpate o6patho na ypeda.
- ПисьхpenHeп NOCTaBeTe ppeJa3-HOTO Kanaue (1).
IpenopbYBaMe Bn da cMa3BaTe OCTnETo C eHa Kanka MaunHNO MacNo DBA PtTn ROniHo IIN CneI N3MBAHe C Teuaa BOda.
PpOmeHbUpeHa n/Hn Taun HNCTpyKcIa MoT a Da Ce hBbPbWbAT 6e3 npEdu3BeCTHe.
Clej KaTo 6aTeepnTe Ce n3xa6nT, Te n ypeJa He bVa Da 6bDat n3XBpLnHn B o6u CmEtuaa nnB 6okNyka. MoIm da rIn n3XBpLnTe B noDxOdaun c6OpHn PnykTObe.

TapaHua
HaunTe npOdykTn ca rapaHua
2 roDmHn, cHTaHO OT dataTa ha
NOKyPkata. B pAmKte Ha rapaHcuOnHHa
cPoK 6e3PNaTHo ce OTCpAraHBat
deFeKTne B MaTePnaJIte H
pon3BOdCTBTO qPe3 nonpaKBa, CMHa
ha TaCTN nI cJeN ypeJ, NO ppeHeKa
ha CepBn3Hn CEHTbP. Ta3n rapaHcuNce
pcnHabab bBb BcNcH cTpaHn, KbDeTo
Braun n HeROBnT n3KnIOHTeJen
nCTprbTOP npOdaBaT TO3n ypeJ n
HMA oPraHnEHMe 3a BHOC IINI
OfniHaIIHa pa3npoeJa He 3a6paHraBa
da Ce n3BbPsPi peDbInDEHOTo
rapaHcuONHO ocClyjBaHe.
IrapaunraTa He NOKpnuBa: nobpeiOn OT HnepaBnHa yNtpe6a (pa6ota npri HneOxOndauHnapxeHne, BKNUcbAbe H neNOxDoAnu 3IOTuNHK Ha eNEKTPNueCKn TOK, CUYINBaHe); I3NOCBaHe n He3NaUteJHn DeEeKtN, KOtTO He npeeat Ha HopMaJIHata pa6ota Ha ypeJa. RapauncaTa He ce npni3Haba npri nonpaBkHa h YpeJa To HE tOpM3npaHn Liua a nn Ako He ca N3non3BaHn oPnINAHn pe3eRbHN qacTn Ha Braun. RapauncaTa e BaInDa npri npablnHO nONbJIHEn; Da Ta h NOKyKnA, neuAT n ONDnc B rapauncoHHaT a KapTa.
3a BcNkU peKlAmaUIN, Bb3HKnHaJI N B rapaHnOHHcPCK, IN3npaTeTe ypeJa KaTOKI rAPaHnOHHaTMy KApTaB HAI6Bn3KJc cepBn3 Ha Braun. 3a CnpaBkn 0800 11 003 -NaCIOHaNen TElefoH Na Bf CepBn3 6e3 YBENHeHne Ha TelefoHNHaTa ycnyra nn Wn www.bgs.bg.
Pycckn
БлагорамьмВасяпокугрумера Braun Silk-epil FG1100,КOTOPБI nOMOЖETЛergкОДELИКАТоУдДИТь BOLOСКС C NOBERXHOCTN KOKX TEla,ПИZA uB 3ОЕБИKNHIN.
Haana npodykunra OTBeaet cMaBIM BbICOKM CTAnDapTAM KaHeCTBa, yHKUHOHAhBHOCTn Ndu3aHa. HaJeEMcR, Bbl BOHNO MEpe 6yDeTe DOBoJbHb BAuHM HOBm npNoOpBeTeHNem - rpyMpom Braun.
PpeIeHIOJIb3OBAHNEMJIeKtPnpri6opa BHMAteBNoI NOIIHOCTbIO pOuHTnTe daHHyIOHcTpyKuNIO.
BHHMaHne
3TOT np60p He npedHa3NaeHdI INCnOJIb3OBaHnA DeTbMn IINI dpyfIMNIuamn 63 nOMoUIn nPcMOTpa,ecINI INΦmNEcCKne,CHeCOpHbeNIIy UmCTBeHNbIE CnOCoHOCTnHEIO3BOJIoT Nm 63oNacHOeroNCnOJIb3OBaTb.YcToPcICTBO DoJIxHoXpAHtCBaB HNeOCTynHbIX DnI DeTeMeCTax.HeO6xoIMNo KOHTpOnIpOBaTb,YTO6bI Detn He NCnOJIb3OBaJn DaHHOyeCTPOCTBO KaueCTBEIrpyuKn.
Batapeken Moryt npotekatab,ecn OHn pa3pRjXeHbIyHHe HcNOJIb3YIOTCa DInTeJIbHOE BpEmr. JnToToro, YTObI 3aunTNbCe68nnpboop, NOXanyCTa, N3BLeKaIte batapeKn BpEmr OT BpEmn nN36BaTe KOHTAKa C Koxe npn N3BLeueHm npoteKaIoUxN 6baateek.
-По ГИЕНЕСКHM HOPМAM peKOMeH-уTeCH INcIb3ObA Tb pIn6Op INHINBnDyaJIbHO.
- He nCnoJIb3yIte npIbOp ha pa3dpaKeHHo IINI NOBpeXdHHo Koxe.
OncanHe:
1 3aunTHbIKoJnauK
2 TpMMepДЯTOUeHOrO ydaJIeHnB BOIOCKOB
3 TpmmepIyIyaneHnB0NocOB B 3OHe 6IKHn
3a HacaJkaIJIPOdpabHBHbINBIOLOCKOB B 0He 6KINH C KOPOTKmRpe6Hem (5 mm)
3b HacaJka Jnla NpOpaBnBaHnBBOIcOKOB B 30He 6KKNH C DINHHbIMrpe6Hem (8 mm)
4IpeeknouateJIb(«I»-BKN, «O»-BblKJ.)
5 Kpbiuka 6aTaapeHoro OTecka
6 6TeOuKaJIAYnCTKn
BaTapeiKu
Pnp6op pabotaet c bataeikkoTnna AAA (1,5 B).PeKOMHeHyetcNcOJb30BaTb 9eIOnHO-MapraHceByo6baTaeKy (TNH LR 03,AM4,HanpImepDuracell).BataeKeKa TKaTOrO TnnaobecneHT pa60Ty np60pa npimepHOB TeueHne 120 MmHT. Yactoe NcOJb30-BaHne TpMMepa dIy ydaJIeHn BONocKOB B3OHe 6bIKHH COKpaAaET BpEMpa60tby 6bataeKn.
- Y6eDInTeCb, UTO npn6Op BbIKIIOueH
- CHIMMTE KpbIUKy 6batapeHOrO OTeJa (5), nToTHyB ee BHN3 (a)
- BCTaBbTe 6aTapeiKy nOJIocAMN (+) n (-)
- 3aKpoIte 6aTapeHbI oTceK
IcnoB3ObaHne Silk'epil
Silk-epil HmeeT B habope HeckoIbKO TpIM-MePoB, KOTOpIe PO3BOJIoHT ydAJIaTb HKeJenaTeIbHbIe BOLOCKN C pa3IuHybIX yuaCTKOB BAaIero TeNa, NIIuIa I B 3OHe 6nKnHn.
Haanao pa60tbI:
- CHIMMTE 3aunTHbI KOJIpaQOK (1).
- YCTaHOBnTe nepeKIIouaTeJIb (4) B NOJIOXeHne BKNIQUeHO.
Pa3MecHTne TpMMeP HapOTINB BOJOCKOB, KOTObIe HUxHKO C6pNTb N MeDNeHNO nepEMeuaTe Iero B Hnapa
BHeHH, nPTOBONOJXHOM HnPaBHeNIO POCTA BONOC.
-Парад замену Триммера Heo6xOДИМО ВьКЛЮЧИТь пибор.
- YTO6bI 3aMeHnTb TpIMMpeHa dpyroI, noBOPHeHTE TpIMMpe npoTHB yacOBoB cTpeJKN Ha 90^ NHCHMEte ERO. YCTAHOBHe TpyroY TpIMMpe, BCTABNB EBO B COOTBeTcTByOuOe OTBepCTne BBEPxypn6bopa H NOBepHyB no yacOBoB cTpeJKe Ha 90^ no yacOBoB cTpeJKe.
TpnmmpdIyTOueHOrO ydaenHHBONOCKOB(2) HdeanbHO noIOxOHT dIy ydaENHH OTdEJIbHbIX BONOCKOB Ha IInCe n Tene.
TpmmmpdnyydaJIeHnBONOCKOB30He 6bIKHHN(3)IeaeJbHOpoJXoJNT dnn foPmIPOBaHNPOBHOIINHbIKHH 6be3eDInHO BONOCKa.
IoppaBHHBaHHe B01oc B3OHe 6nKHH
Длп подравимь ВОLOВ 3оhe 6икнИdo Heo6хODIMоДинbl,надeнтЕНа пбор насаду с ДИMHьIM nIkpOТКIM ГeбHem (3a, 3b).ВкlioчтepиборnpвОБДNTeВнaprabLEHmnpOTNBOLOJoxHOMнравЛEHnpoCTA BOLOC(d).
UncTkau yxOa
Bcerda bkyaeTe np6op nepeJ uNCTKo. UcTky np60pa HnyHNO npOBOIDtB:
- IcnoIb3yIte 5eToUky (6)IyIyAneHnBaBOIOcNblIIN3Ipi6opa.
CHTbIe TpHMMepbl MOxHO npOMbIbA Tb ND TeINIO IpTOUHO BDOIO. TaXKe MOxHO NcONb3OBA TbMbIO, eCNI OHO He CoDEpKJTH MeKNIX YAcTuN I a6pa3nHBxBWeCECTB. - Пекд установский Тлимера Небхдиму убейнтыс, УTo OH ПОнhoeчы сухи.
XpaHnTb npH6Op cneNyET cHaTeBtM 3aunTHbIM KOJInaYKom (1).
ДавждыВюг (И полпомьвани пpo'toунoi ВОДо) peKOMeHdyetc СмAZbIaTbpeJyUToY uactb TpIMMepa, КANHyB Na Hee KaNlI OJIeTKOrO MaunH- HOrO MaCna.
M3dJIeHNCOJIb3OBaTbB CooTBcTbN CnHCTpyKcneI NO 3KcNpyataun
He CnEduyET Bbl6paCbIBaTb
NCN0JI3OBoAHHbIE 6aTaapeKIN I
PnIbOpBbI C obUHbIMN 6bITOBbIMN
OTXoDAmI. NpIbOpBbI, PnUIeDJIuNE
B HeRoiHOCTb, a TAKKe IcN0JIb3OBAHbIe 6bTaapeKIN MOXHO CdaTb
B CepBnCHbI LcHTP bPayH nII
B COOTBeTCTByUoJIn I cHTP c6Opa
OTXoDOB.

RU:ИМнорТер/СлужБаnotpe6bnteNei:OOO«ПрктетЗнД ГмБЛДИстрибьюторсаяКомпанURA,PocSIN,125171,MocKBA,JIeHnHrpAaDCKe WOCCE,16A,ctp.2.Ten.8-800-200-20-20.
BY:ИМнорТер:OOO«Злелктресьи Ко》,Баларсь,220012,r.Mинск,ул.Чернышевский,10A,K.412A3.Cервский:OOO«Катрик》,Валарсь,220012,r.Mинск,ул.Чернышевский,10A,K.409.
TapaHTHbIe 063aTeIbCTBa BRAUN
JIaBcex H3dennMbI daem rapaHTnIO
Ha IBa rOda, HauHnaR C MOpHeTa
Pnpo6peTHe N3dennr.
B TceHne rapaHTnHO repnoDa MbI
BeCnPaTHO yctpAHm NytEm peMOHa,
3aMeHbI DeTaeN ININ 3aMeHbI Bcero
H3eJnIJIIObIe 3aOboCKe IepeKtbl, Bb3BaHHbIe HeIOCTaOHTbIM KaueCTBOM MaTePnAIOB INI c6OpKn.
B clyae HeBO3MOXHOCTn peMOHTa B
raptAHINHbI NepNOD IN3dJIe NO MEOXT
6bITb 3aMeHENo HA HOBOE INN
aHaJIoTHNHOE B COOTBETCTBN C 3aKOHOM
"O 3aUNTe npab NOTpe6nten".
「RapantHnO6bPeTAEt CnHy,ToIbKo ecnI DaTa NOKyKnIOJTeBxKdaeTcNeaTbHo NIOINCbIO INepRa (Mara3Ha)Na HocneJeHneCTpaHnceOprrHnAbHoro pyKOBODCTBaNoEcknPyatauun BRAUN, KOTOPaYBJIeTcR rapaHTnHbIM TaHOHOM.
3Ta rapaHTnJa DeiCTBnTeIbHa B IIO6oB CTpAne,B KOTOpYIO 3TO h3JeIHe NOCTabJnTcH pImPo BRAUN NnI Na3aHuYeHbIM NINCTPnObIoTOPOm,IrIe HNkAcKe OOrpaHnUeHnI NO IMNOpTy NnI DpyfNe npabOBBe NOnOxKeHnE He npenrTCTBYOT PpeOCTaBLeHnIO rapaHTnIHoro O6CNYKBAHN.
TapaHTnI He NOKpbIbAeT NOBpeXJeHnI, Bb3BaAHHbIe HHePpAbNbHbIM NCNoJIb3OBAHnEM (CM. TaKKe CnICoK HNXe) HOpMaJIbHbI N3HOC 6pITBeHbIX CETOK NHOxE, DepeKtbl, OKa3bIbAOUne HENaUHeJIbHbI 3ΦΦeKT Ha KaueCTBO pa60bl np6bopa.
3Ta rapaHTnTepaET CnIy,ecnnpeMOHT pnoIN3BOINJLC He yNOnHMOOeHHbIM Ha TO IINOM, I ECNNICNOJIb3OBAHbI He opInrHaIbnHeIe DetanBRAUN.
B Cnlyae npedbAByeHnpeKlamaunno yCNOBNM DaHHOI rapaHTNI, npeaTe N3DeJIne CENIKOM BMeCTe C rapaHTNHBIM TaIOHOM B IIOBOI N3 CEHTPOB cepBcHOrO 06CnYkBaHnB BRAUN.
Bce npyrne Tpe6oBaHn, BkIOUyar Tpe6oBaHn BO3MeuHn y6bITKOB, NCKIOUaOTc, ECNI HaSha OTBeTCTBeHHOCTb He yCTaHOBJeHa B 3aOKOHMO NOPrKe.
Peknaaun, Cb3aHhble c KOMMepueckm KOHTpaKtOM C
PnoaBcUM He nOaIaOT IOJ 3Ty rapaHTIO.
B COOTBETCTBn C 3aKOHOM PΦ N° 2300-1 OT 7.02.1992 r. «O 3aunite npab notpebinte ne» Φπpma BRAUN yctahabJInBaet cspok cnyk6bl Ha CBOI H3dEINRA paBbIM dYBM rOaAM c MOMeHTa npno6pTeHNr HnC M MOMeHTa pom3BOIDCTBA, eCNI daTy npoDAxN yctahOBHTb HEBO3MOXHO.
I3dEINRA BRAUN n3rTOBJIeHbI B COOTBETCTBnC BbICOKIMM
Tpe6oBaHnMn eBpOeNcKOro KauEcTa.
Pn6bepeXHOM nCOpJb3ObaHN m npn CoBIOHeHN npAByN IO kCNpyaTaun, npno6pTeHHO BAmn 3nEJIne BRAUN, MoKET mMeTb 3NaUHTeNbHO 60blu cspOK CUY6bl, HcM cspOK yCTaHOBNeHHB b COOTBeTcBN C PocChmckm 3aKOHm.
CnyuH,Ha KOToPbIe rapaHTnHepacnpocTpaHReTc:
-DeΦeKtbl, BbI3BaHHbIe ΦOpc-MaKOpHbIMN O6CTOJTeJIbCTBaMM;
- IcnoIb3OBAHne B npoepccnHaJIbHbIX UeJIx;
HapyuueHe Tpe6oBaHn pykoOoCTBa nO 3KnpyTaun;
HepnpaBnIbHaN yctaHObKa HaprJKeHHa NITaIOUeI cETn (ecnI 3TO Tpe6yETc)
BHeCHeHnTeXHNueCKNX N3MeHeHn;
-MexaHnueckne NOBpeKdEHHa;
- NOBPEXJDEHNA NO BUNE XINBOTHbIX, Tpbl3yHOB IN HaceKoMbIX (B TOM YCnJIe CnyuAn HaxOxJDeHNA Tpbl3yHOB IN HaceKoMbIX BHUTPI npi60POb)
-Длгпнборов,работаюших ot
Баразeeк,-работа с
HeNOxOДЯшIMи ИИ NICTOsuHbIMи
БаразeиКAMи,ЛIOБIE NOВРжDEHIN,
ВьI3BaHbIe INCTOUsHbIMи IIN
TekuшIMиБаразeиKAMи (COBetyEM
ПОЛьЗОВaTbСТОЛБКО
П_REdoxPанeHbIMи OT bIteKaHIN
БаразeиKAMи);
ДлгБрNTВ-CМТЯНИПОВHAHNA CETKA.
BhimaHne! OpunhaNbHbI IapaTnHbI
TaNIOIeKNTI3bYrNIO pni
obpaueHHBcePBCHbIeHTpJIA
raapntnHoro pemOnTa. Pocne
npOBeENHpeMOHTa TapaANTnHBIM
TaJIOHOM6yJeT YBnTbC3aJNOHeHHbI
opunnnaI NcTa BbINOJIHeHnpeMOHTa
CO UTAMNOM CEPBCHOHO CEHTPAI
noIINcaHbI NOtpeBnteIeM No
IOnyehn H3dEInr H3 peMOHTa.
Tpe6yIte npocTaBneHn DaIb IBO3Bpata
I3dJIINBCEPBNCHOMcHTpe.
B clyuae Bo3HnKHOBeHHcIoxHoCTeC
BbIOpHHeHem rapaHTnHO nII
nocJIerapaHTnHOroO6cnyKbAHn
Ipoocba coo6aTaB 06 3TOM B
INHopMaunOHyCnyK6y CepBnca
BRAUN no Telefohy 8 800 200 20 20
(3BOHOK n3 PocCnN 6eCnJIaTHO).
yKpaaiHcbka
He CnIi BnKnDaTn BnKOpNCTahi 6bataeKnTa npiCtpo pa30m 3i 3BnuaHnMn NObTyBnMn BiXoDamn. HenpnuaTHi
npiCTpoi, a TAKOX BIKOPNCaHi
6atapeynMoXHa 3aTn Do CepBicHOro LcHTpy Braun a60 y BiNIOBHN cENTp 36oby biXOJIb.

TapahtiHi 306OB'3aHHraBraun
Длг BCIX BIVO6B Mн ДАмо ГаHTIO Ha ДБА рOKИ, NOUHAIQUH 3 MOMEHу приДбAHнь ВИРБY.
IpoTAROM rapaHTiHoro nepioy Mm 6e3KOuTobHOZ ycBaEMO uJXOM pemOHTy, ZAMHI detaJIe aBO 3aMIHN BCBoTO BnOby 6bJ-RAI 3aOBcBki DepeKTN, BUKNIKAHIE NOCTaTHbIO JIKCTU MATEPIAIB aBO cKaJaDaHHN.
Y BnIaIky HEmOxKlnBOcTI peMOHTy B rapaNTiHnI nepiOJ bIpiO MoKe 6ytN 3aMInHeHn Ha HOBn a6o anAIONIChn BiINOBiHNO Do 3aKOHy npO 3axNCT npAB CnOxKIBaiv.
Rapantia Na6yBae CNN NnIe, KkUO daTa KynBNI niTBePjxYeTc8 NeaTHKO Ta NiDINCOM dInJepa (MarA3Hn) Ha opriHAnbHomry rapaHTiHOMy TanoHi Braun a0 ha octaHni CTopiu opriHAnbHOi IHCTpyKuii 3 Ecknnyatauii Braun, Jka TakXoMoke 6byr rapaTtHIM TanoHOM.
Lr rapaHTi iincha y oyb-jk kpaH, B
yu cei bpi6 noctabnietcBraun a0o
pnsnaehmN DnCTPn6HOTOPOM, Ta de
koDi OHmEsHen3 imOpTy a0o Hsiu
npabowoi nolokhenHe nepeWkoDjkaotb
HaadAHIO rapaHTiHoro ocbnyrobyaHH.
3ДиСЕнграразн HorO 6ОьУROВБАнг He BПИВае Н дату 3齐ИнчEHЯ ТерМИЧ RApoTHI. RaPoTHI Ha 3aMlHEHЯЧAstMHЗ齐ИнчYeTbCS B MOMeHT 3齐ИнчEHЯ RApoTHI Ha dAnH N BuPi6.
TapaHTI He NOKPbAe NOKoDjKeHHa BKNJIKAHI HEBIPHIM BKNOPNCTAHNM (INB. TAKOX Npepiik HxKue) HopMaJIbHe 3HOuBaHHa CITOK TA HOKIB JnI ROnIHn, DepeKTNI, UO He3NaHUM YINOM BnINBAIOt Ha KaICTb PO6OTn PpNJaNy. Lc rapaHTI BTPaay cniy, kUIO peMOHT 3diCHOCtBcHr HE BNOBHObaKeHOIO dJI bTO Oco6OTo, JaKIO BKNOPNCTOBYIObCe HeOpriHaJIbHi detani Braun.
YBnapdky nped'raJIeHnpeKNaMaIi 3a yMObAMn daHOI rapaHTi, nepeJaITe Bnip6 yKomPiKeTI paO3m 3 rapaHTiHnM TanoHOM y6db-ynkIM 3cHPTIB cepBicHOrO o6cnyroByBaHN Braun.
Bci iHui BIMorn, pa30m 3 BIMorAmn BiiDkoDyBaHnR 36NtKiB, He DiChi, JaKIOu Haa a BiNIObIaDaIbHcTb He BCTaHOBJeHa 3aOKHHM YIHOM.
Binaikn,Ha kHe po3noBcIOJxyeTbcra rapaHTi:
-NepeKTN,BKNIKAhiΦopc-MaxkopHMMO6CTaBHaMn;
BVKOPINCTAHN3PPODECINHO MToIO;
- NopuyeHnBIMoI hCTpyKci3 eknnyatai;
- HeBIPHE BCTaHOBJIENHHA HANpyn Mepexi XJNBJEHNNRA (RkIoo CE BMMArAeTbCn)
3ДИСHEHЯTEXHICHNX3Mih;
-MexaHuiNiNouKOJKeHHa;
ДлгпрILAдIB,иOпрацЮТьHa batapeнкax-poBOTA 3 HeBIIOBIDHMnaboCpauZOBaHIMn batapeKamn,БydЯKI noIskoJKeHnY, BKNJIkaHl cPauZOBaHIMnabo NiITkAQUHmNbatapeKamn;
-ДлгбрИТВ-3IM'ЯТаabo npBaHa cITka.
Y BnnaKny BnHnKHeHn TpydHoUzIB 3 BnKoHaHHaR rapaHTiHoro a60 nicIraRaHrTiHoro o6cLyroBvBaHHn npoxaHH 3BePtaTncb do cepBicHoro ueTrpy Braun B YkpaHi. PII "I.B.C."ByN.ΓmIo6OuHbKa 53,M. Knib.Ten.(044)4286505.
Jla
Lg 100000000000000000000000000000000000000000000000000000000000000000000000000000000000000000000000000
Country of origin: China
Year of manufacture
To determine the year of manufacture, refer to the 3-digit production code located on the battery compartment. The first digit of the production code refers to the last digit of the year of manufacture. The next two digits refer to the calendar week in the year of the manufacture. Example: "647" - The product was manufactured in week 47 of 2006.
all
y
J 1
e 10
a
C. all pL e
Vg 647
·s + 7 阶

g l a 10000000000000000000000000000000000000000000000000000000000000000000000000
aill
. 1
JL
JL
JL
JL
JL
JL
JL
JL
JL
JL
JL
JL
JL
JL
JL
JL
JL
JL
JL
JL
JL
JL
JL
JL
JL
JL
JL
JL
JL
JL
JL
JL
JL
JL
LlU UJ Jn J 1 1 1 1 1 1 1 1 1 1 1 1 1 1 1 1 1 1 1 1 1 1 1 1 1 1 1 1
J 1
$$ \begin{array}{l} \left. \omega \right| _ {0} ^ {\infty} \leq \frac {1}{2} \left(b \left(\frac {1}{2}\right) + 1\right) \ \begin{array}{c} \text {a d a t e} \ \text {a d a t e} \ \text {a d a t e} \ \text {a d a t e} \ \text {a d a t e} \ \text {a d a t e} \ \text {a d a t e} \ \text {a d a t e} \ \text {a d a t e} \ \text {a d a t e} \ \text {a d a t e} \end{array} \ \text {a l a c} \text {a l a c} \text {a l a c} \text {a l a c} \text {a l a c} \text {a l a c} \text {a l a c} \text {a l a c} \text {a l a c} \text {a l a c} \text {a l a c} \text {a l a c} \text {a l a c} \text {a} 9 0 \ \therefore \angle A C E = \frac {1}{2} \cdot \angle C D E = 3 0 ^ {\circ} \ \end{array} $$
(2)
J 1 J 1 J 1 J 1 J 1 J 1 J 1 J 1 J 1 J 1 J 1 J 1 J 1 J 1 J 1 J 1 J 1 J 1 J 1 J 1 J 1 J 1 J 1 J 1 J 1 J 1 J 1 J 1 J 1 J 1 J 1 J 1 J 1 J 1
3a) aLall bll
$$ \begin{array}{l} j \cdot j \cdot j \cdot j \cdot j \cdot j \cdot j \cdot j \cdot j \cdot j \cdot j \cdot j \cdot j \cdot j \cdot j \cdot j \cdot j \cdot j \cdot j \cdot j \cdot j \cdot j \cdot j \cdot j \cdot j \cdot j \cdot j \cdot j \cdot j \cdot j \cdot j \cdot j \cdot j \cdot j \cdot j \ \therefore \text {a l l} \quad \text {a b a i l} \quad \text {p i} \quad \text {s a t} \quad \text {s a t} \quad \text {b a i l} \ j s l o 1 1 j e t s i n j s i n j s i n j s i n j s i n j s i n j s i n j s i n j s i n j s i n j s i n j s i n j s i n j s i n j s i n j s i n j s i n j s i n j s i n j s i n j s i n j s i n j s i n j s i n j s i n j s i n \ \therefore \text {i l k} _ {\alpha} \text {a b a l l} \text {a b a l l} \text {a b a l l} \ \therefore \lim _ {x \to 0} \frac {\sin^ {2} x}{\cos^ {2} x + 1} = \frac {\sin^ {2} x}{\cos^ {2} x + 1} \ \ddot {o} _ {j} \dot {s} \dot {l} \dot {l} l o \dot {l} l o b a n e j o l l \ . (d \cup \dot {s} \dot {a} \dot {l}) \ \end{array} $$
$$ \dots \dots \dots \dots \dots \dots \dots \dots \dots \dots \dots \dots \dots $$
$$ \begin{array}{l} (5) \quad \ddot {a} _ {i j k l} \dot {a} _ {j k l} \dot {a} _ {k l} \dot {a} _ {l k} \dot {a} _ {l k} \dot {a} _ {k l} \dot {a} _ {l k} \dot {a} _ {k l}. \ \therefore (a \text {K L}) \quad J a = 1, \quad \text {如} \quad \text {如} \quad \text {如} \quad \text {如} \ \begin{array}{l} \text {j l a b a l l} \quad \text {i s k i n g} \quad \text {i s} \quad \text {i s} \quad \text {i s} \quad \text {i s} \quad \text {i s} \quad \text {i s} \quad \text {i s} \quad \text {i s} \quad \text {i s} \quad \text {i s} \quad \text {i s} \quad \text {i s} \quad \text {i s} \quad . \end{array} \ \therefore \text {s a l l} \left(-) \text {s} (+)\right) \ \therefore \text {i} _ {\text {i}} \text {i} _ {\text {i}} \text {i} _ {\text {i}} \text {i} _ {\text {i}} \text {i} _ {\text {i}} \text {i} _ {\text {i}} \text {i} _ {\text {i}} \text {i} _ {\text {i}} \text {i} _ {\text {i}} \cdot \ \end{array} $$
J
$$ \mathrm {S i l k} \cdot \mathrm {e p i l} \quad \text {J} $$
$$ \int_ {S} \tilde {u} _ {i j} \tilde {u} _ {k l} \tilde {u} _ {l m} \tilde {u} _ {m n} \tilde {u} _ {n p} d S $$
$$ j _ {0} \equiv \frac {1}{2} \omega_ {0} \frac {\partial}{\partial t} \frac {\partial}{\partial x} \frac {\partial}{\partial y} \frac {\partial}{\partial z} $$
$$ \begin{array}{l} \text {a g g l y p a n d l l c h i i i o g o b l i e} \end{array} $$
$$ \therefore \text {i} \omega \text {l} \omega \text {l l} \text {j b l i d l g} $$
$$ J L a x i s y l \neq c o n t J $$
$$ \begin{array}{l} (1) \quad \text {L a l l} \quad \text {U b c} \quad \text {g a l l} \cdot \ (4) \quad \left. \int_ {0} ^ {1} \frac {\mathrm {d} y}{y} \right| _ {0} ^ {1} \cup \left. \int_ {1} ^ {2} \frac {\mathrm {d} y}{y} \right| _ {0} ^ {1} \cup \left. \int_ {2} ^ {3} \frac {\mathrm {d} y}{y} \right| _ {0} ^ {1} \cdot \ \therefore \int_ {1} ^ {2} 4 x + 1 \int_ {1} ^ {3} 4 x + 1 d x \ \begin{array}{l} \text {g a l l} \ \text {g a l l} \ \text {g a l l} \ \text {g a l l} \ \text {g a l l} \ \text {g a l l} \ \text {g a l l} \ \text {g a l l} \ \text {g a l l} \ \text {g a l l} \ \text {g a l l} \ \text {g a l l} \ \ \left. \frac {1}{2} + \frac {1}{2}\right) \frac {1}{2} + \frac {1}{2} = \frac {1}{2} + \frac {1}{2} \ \ddot {g} \dot {a} \dot {a} \dot {i} \dot {l} g. \dot {g} \dot {a} \dot {l} \dot {l} g a l o g i l \omega s c \ \begin{array}{l} \text {d i s t r i b u t i o n} \ \text {d i s t r i b u t i o n} \ \text {d i s t r i b u t i o n} \ \text {d i s t r i b u t i o n} \ \text {d i s t r i b u t i o n} \ \text {d i s t r i b u t i o n} \ \text {d i s t r i b u t i o} \ \text {d i s t r i b u t i o} \ \text {d i s t r i b u t i o} \ \text {d i s t r i b u t i o} \ \text {d i s t r i b u t i o} \ \text {d i s t r i b u t i o} \ \text {d i s t r i b u t i o} \ \end{array} \ \therefore \vert j \vert \vert \vert j \vert \vert \vert \vert \vert \vert \vert \vert \vert \vert \vert \vert \ \cdot \cdot \cdot \cdot \cdot \cdot \cdot \cdot \cdot \cdot \cdot \cdot \cdot \cdot \cdot \cdot \cdot \cdot \cdot \cdot \cdot \cdot \cdot \cdot \cdot \cdot \cdot \cdot \cdot \cdot \cdot \cdot \cdot \cdot \cdot \cdot \cdot \ 9 0 \quad \text {a} _ {\text {a}} \text {a} _ {\text {a}} \text {a} _ {\text {a}} \text {a} _ {\text {a}} \text {a} _ {\text {a}} \text {a} _ {\text {a}} \text {a} _ {\text {a}} \text {a} _ {\text {a}} \text {a} _ {\text {a}} \text {a} _ {\text {a}} \ \therefore \mathrm {d} c \text {L} \cup \cup \text {d} c \circ \mathrm {L} \cup \text {d} c \quad \text {i f} \quad \text {i f} \ \end{array} $$
$$ \delta \text {i n t e r n a l} \quad \mathrm {s c l} \quad j \text {l a s s i n g} \quad 2 \cdot $$
$$ . a _ {i j} = i l _ {j} $$
$$ \begin{array}{l} \text {a d i t a l} \ \text {a d i t a l} \ \text {a d i t a l} \ \text {a d i t a l} \ \text {a d i t a l} \ \text {a d i t a l} \ \text {a d i t a l} \ \text {a d i t a l} \ \text {a d i t a l} \ \text {a d i t a l} \ $$
$$ \cdot \mathrm {a l l} $$
$$ j 4 \div 1 1 \stackrel {\cdot} {=} \omega g $$
$$ \therefore \vert l _ {\mathrm {a d}} \vert = \vert l _ {\mathrm {b c}} \vert 1 $$
$$ \ddot {z} \dot {z} \dot {z} \dot {z} \dot {z} \dot {z} \dot {z} \dot {z} \dot {z} \dot {z} \dot {z} \dot {z} \dot {z} \dot {z} \dot {z} \dot {z} \dot {z} \dot {z} \dot {z} \dot {z} \dot {z} \ddot {z} 2 $$
$$ \text {a w l a l l} \quad \text {j b l i k} \quad \text {j e} \quad \text {s} \quad \text {w} \quad \text {i} \quad 3 $$
$$ 3 a $$
$$ p _ {l} 5 \text {i} _ {l} w _ {l} w _ {l} $$
$$ 3 b $$
$$ \mu \text {l} 8 \ddot {\text {l}} \text {l} \text {l} \text {l} \text {l} $$
$$ \ll / O \gg \left. \left| \left| \downarrow \right| \right| _ {1} \right| _ {2} \downarrow \downarrow \downarrow \downarrow \downarrow \downarrow \downarrow \downarrow \downarrow \downarrow \downarrow \downarrow \downarrow \downarrow \downarrow \downarrow \downarrow \downarrow \downarrow \downarrow \downarrow \downarrow \downarrow \downarrow \downarrow \downarrow \downarrow \downarrow \downarrow \downarrow \downarrow \downarrow \downarrow \downarrow $$
$$ \therefore \text {L} _ {\text {L}} \text {L} _ {\text {L}} \text {L} _ {\text {L}} \text {L} _ {\text {L}} \text {L} _ {\text {L}} \text {L} _ {\text {L}} \tag {5} $$
$$ \delta \dot {L} \dot {L} \dot {L} 6 $$
$$ \mathrm {d} \leqslant \mathrm {d} \mathrm {d} \mathrm {d} \mathrm {d} \mathrm {d} \mathrm {d} \mathrm {d} \mathrm {d} \mathrm {d} \mathrm {d} \mathrm {d} \mathrm {d} \mathrm {d} \mathrm {d} \mathrm {d} \mathrm {d} \mathrm {d} \mathrm {d} \mathrm {d} \mathrm {d} \mathrm {d}\mathrm {d} $$
$$ \begin{array}{l} \begin{array}{l} \text {i t i t i t y} \ \text {i t i t i t y} \ \text {i t i t i t y} \ \text {i t i t i t y} \ \text {i t i t i t y} \ \text {i t i t i t y} \ \text {i t i t i t y} \ \text {i t i t i t y} \ \text {i t i t i t y} \ \text {1 . 5 i t i t y} \ \text {1 . 5 i t i t y} \ \text {1 . 5 i t i t y} \ \text {1 . 5 i t i t y} \ \text {1 . 5 i t i t y} \ \text {1 . 5 i t i t y} \ \text {1 . 5 i t i t y} \ \text {1 . 5 i} \ \text {1 . 5 i} \ \text {1 . 5 i} \ \text {1 . 5 i} \ \text {1 . 5 i} \ \text {1 . 5 i} \ \text {1 . 5 i} \ \text {1 . 5 i} \ \text {1 . 5 i} \ \text {1 . 5 i} \ \text {1 . 5 } \ \text {1 . 5 } \ \text {1 . 5 } \ \text {1 . 5 } \ \text {1 . 5 } \ \text {1 . 5 } \ \text {1 . 5 } \ \text {1 . 5 } \ \text {1 . 5 } \ \text {1 . 5 } \ \text {1 . 5 } \ \text {1 . 5 } \end{array} \ j _ {i j} i i o \quad \text {以} \quad j _ {i j} j i o \quad \text {以} \quad j _ {i j} j i o \ . L R 0 3, A M 4, A A \quad \left. \begin{array}{l} \text {g a g a} \ \text {g a g a} \end{array} \right) \ \therefore \text {d i a g} = \text {d i a g} _ {\text {d i a g}}. (f l o w) \ 1 2 0 \mathrm {d} \text {a l l} \text {a l l} \ J L a i w 2 1 g o J a d d l o s j S l g. \ \ddot {g} \dot {b} \dot {l} \dot {l} \dot {l} \dot {l} \dot {l} \dot {l} \dot {l} \ . (3) \dot {a} \omega \omega \omega \omega \omega \omega \omega \omega \omega \omega \omega \omega \omega \omega \omega \omega \omega \omega \omega \omega \omega \omega \omega \omega \omega \omega \omega \omega \omega \omega \omega \omega \omega \omega \omega \omega \omega \omega \omega \omega \omega \omega \omega \omega \omega \omega \omega \omega \omega \omega \Omega \ \end{array} $$
$$ j _ {1} j _ {2} \dots j _ {k} $$
$$ \text {S i l k} \cdot \text {e p i l} $$
$$ \mathrm {d} \mathrm {g} \mathrm {g} \mathrm {g} \mathrm {g} \mathrm {g} \mathrm {g} \mathrm {g} \mathrm {g} \mathrm {g} \mathrm {g} \mathrm {g} \mathrm {g} \mathrm {g} \mathrm {g} \mathrm {g} \mathrm {g} \mathrm {g} \mathrm {g} \mathrm {g} $$
$$ \therefore \text {i} a _ {1} g \text {i} a _ {2} g \text {i} a _ {3} g \text {i} a _ {4} g \text {i} a _ {5} g \text {i} a _ {6} g \text {i} a _ {7} g \text {i} a _ {8} g \text {i} a _ {9} g \text {i} a _ {1 0} $$
$$ \therefore \text {d i s t a t e} \quad \text {g a t a t e} \quad \text {i f} \quad \text {g a t e} $$
$$ \left. \int_ {a} ^ {b} \frac {1}{x - y} \right| _ {a} ^ {b} \left| \frac {1}{x - y} \right| _ {a} ^ {b} $$
$$ \cdot j \left| \begin{array}{l l} \end{array} \right| = 1 $$
$$ : \ddot {a} l o \dot {c} \dot {l} b _ {2} x l o $$
$$ j \circ j \cup \text {l a i n g l e} \cup \text {d e s e c u r e} \cup \text {c u m p l e d} \cup \text {d e f} \cup \text {f o r} \quad j! \bullet $$
$$ \left. \right.\left. \right.\left. \right.\left. \right.\left. \right.\left.\left.\left.\left.\left.\left.\left.\left.\left.\left.\left.\left.\left.\left.\left.\left.\left.\left.\left.\left.\left.\left.\left.\left.\left.\left.\left.\left.\left.\right.\right.\right.\right.\right.\right.\right.\right.\right.\right.\right.\right.\right.\right.\right.\right.\right.\right.\right.\right.\right.\right.\right.\right.\right.\right.\right.\right.\right. $$
$$ \ddot {a} _ {i j k l} \text {a l l} \dot {a} _ {i j k l} \text {a l l} \dot {a} _ {i j k l} \text {a l l} $$
$$ \left. \frac {1}{2} \frac {1}{2} \frac {1}{2} \frac {1}{2} \frac {1}{2} \frac {1}{2} \frac {1}{2} \frac {1}{2} \frac {1}{2} \frac {1}{2} \frac {1}{2} \frac {1}{2} \frac {1}{2} \frac {1}{2} \frac {1}{2} \right] $$
$$ \ddot {a} _ {i j k l} = p _ {i j k l} \dot {y} _ {j k} \dot {y} _ {l k} $$
$$ j _ {i} \text {l a n g l e} j _ {i} \text {l a n g l e} i \text {l a n g l e} i \text {l a n g l e} $$
$$ \begin{array}{l} \text {a l l} \end{array} $$
$$ . {4, 5, 6, 7, 8, 9, 1 0, 1 1, 1 2, 1 3, 1 4, 1 5, 1 6, 1 7, 1 8, 1 9, 2 0, 2 1, 2 2, 2 3, 2 4, 2 5, 2 6, 2 7, 2 8, 2 9, 3 0, 3 1, 3 2, 3 3, 3 4, 3 5, 3 6, 3 7, 3 8, 3 9, 4 0, 4 1, 4 2, $$
$$ \begin{array}{l} \text {1 2} \ \text {1 3} \end{array} $$
$$ \mu \omega \mu \omega \mu \omega \mu \omega \mu \omega \mu \omega \mu \omega \mu \omega \mu \omega \mu \omega \mu \omega \mu \omega \mu \omega \mu \omega \mu \omega \mu \omega \mu \omega $$
$$ \therefore \mathrm {d i o l y} \quad \mathrm {d i o l y} \quad \mathrm {d i o l y} \quad \mathrm {d i o l y} $$
$$ \left. \right. \quad \text {a l l} j _ {1} \quad j _ {2} \quad j _ {3} \quad j _ {4} \quad j _ {5} \quad j _ {6} \quad j _ {7} \quad j _ {8} \quad j _ {9} \quad j _ {1 0} \quad j _ {1 1} \quad j _ {1 2} \quad j _ {1 3} \quad j _ {1 4} \quad j _ {1 5} \quad j _ {1 6} \quad j _ {1 7} \quad j _ {1 8} \quad j _ {1 9} \quad j _ {2 0} \quad j _ {2 1} \quad j _ {2 2} \quad j _ {2 3} \quad j _ {2 4} \quad j _ {2 5} \quad j _ {2 6} \quad j _ {2 7} \quad j _ {2 8} \quad j _ {2 9} \quad j _ {3 0} \quad j _ {3 1} \quad j _ {3 2} \quad j _ {3 3} \quad j _ {3 4} \quad j _ {3 5} \quad j _ {3 6} \quad j _ {3 7} \quad j _ {3 8} \quad j _ {3 9} \quad j _ {4 0} \quad j _ {4 1} \quad j _ {4 2} \quad j _ {4 3} \quad j _ {4 4} \quad j _ {4 5} \quad j _ {4 6} \quad j _ {4 7} \quad j _ {4 8} \quad j _ {4 9} \quad j _ {5 0} \quad j _ {5 1} \quad j _ {5 2} \quad j _ {5 3} \quad j _ {5 4} \quad j _ {5 5} \quad j _ {5 6} \quad j _ {5 7} \quad j _ {5 8} \quad j _ {5 9} \quad j _ {6 0} \quad j _ {6 1} \quad j _ {6 2} \quad j _ {6 3} \quad j _ {6 4} \quad j _ {6 5} \quad j _ {6 6} $$
$$ C a u s i o n g L S \text {i} _ {2} = 1 0 0 $$
$$ \dot {s} g \dot {s} \dot {s} \dot {s} \dot {s} \dot {s} \dot {s} \dot {s} \dot {s} \dot {s} \dot {s} \dot {s} \dot {s} \dot {s} \dot {s} \dot {s} \dot {s} $$
$$ \therefore \because y = 1 $$
$$ \mathrm {p e} \quad \text {c o n s t a n t} \quad \text {a r g m a x i l l} \quad \text {b g a s h i l l} \quad \text {s k e l y}. $$
$$ \left. \right.\left. \right.\left. \right.\left. \right.\left.\left.\left.\left.\left.\left.\left.\left.\left.\left.\left.\left.\left.\left.\left.\left.\left.\left.\left.\left.\left.\left.\left.\left.\left.\left.\left.\left.\left.\left.\right.\right.\right.\right.\right.\right.\right.\right.\right.\right.\right.\right.\right.\right.\right.\right.\right.\right.\right.\right.\right.\right.\right.\right.\right.\right.\right.\right.\right.\right. $$
$$ \therefore \dot {x} = \frac {1}{2} $$