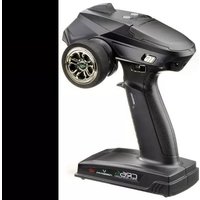
CR6S - Remote control Absima - Free user manual and instructions
Find the device manual for free CR6S Absima in PDF.


| Product Type | Remote Control (Radio Transmitter) |
| Brand | Absima |
| Model | CR6S |
| Number of Channels | 6 |
| Frequency Band | 2.4 GHz |
| Modulation | GFSK |
| Range | Up to 300 meters (line of sight) |
| Battery Type | 4 x AA (not included) or 1S LiPo (optional) |
| Battery Requirement | 4.8V - 6.0V (NiMH) or 3.7V (LiPo) |
| Dimensions (approx.) | 180 x 150 x 80 mm |
| Weight (without batteries) | 350 g |
| Display | LCD with backlight |
| Programming Features | Endpoint adjustment, dual rates, servo reverse, sub-trim |
| Model Memory | 10 models |
| Compatibility | Most Absima receivers (e.g., CR2, CR4) |
| Safety Features | Fail-safe, low battery alarm |
| Maintenance | Clean with dry cloth; avoid moisture |
| Spare Parts Availability | Replacement antennas, gimbals, and batteries available online |
| Repairability | Modular design; user-replaceable gimbals and switches |
| General Information | Designed for RC cars, boats, and aircraft |
| Warranty | 2 years (standard manufacturer warranty) |
Frequently Asked Questions - CR6S Absima
User questions about CR6S Absima
0 question about this device. Answer the ones you know or ask your own.
Ask a new question about this device
Download the instructions for your Remote control in PDF format for free! Find your manual CR6S - Absima and take your electronic device back in hand. On this page are published all the documents necessary for the use of your device. CR6S by Absima.
USER MANUAL CR6S Absima
WARNING:
This product is only for 14 years old or above
© Copyright 2013
Absima GmbH
2.4GHz FHSS
Introduction to your Absima CR6S 2.4 GHz remote control
Thank you for choosing a remote control from Absima.
You get an absolute high performance product with state-of-the-art functionality.
Please read the instruction manual carefully before using it for the first time. The basic safety and warning instructions are an integral part of these instructions and form the basis for handling the product. In this way, you avoid damage that may result from improper use. Keep the operating instructions (printed and/or in PDF format) handy and pass them on to the buyer when the product is sold.
Safety instructions and warnings
Operation of remote-controlled models can result in damage to property and personal injury. Liability insurance is compulsory in many EU countries. If you are not sure whether your liability insurance covers the operation of remote-controlled models, please contact your insurance company. Unauthorized modifications to your Absima product are prohibited, as they are dangerous and may cause damage to the device or persons. Only use original accessories and spare parts. Again the appeal! Please do not put the device into operation until you have carefully read these operating instructions and the following safety instructions.
Remote-controlled models have a considerable hazard potential. The construction and installation of the RC system as well as its operation require technical understanding, care and safety-conscious, responsible behaviour. Errors or improper use can result in considerable damage and serious injuries. A model that is out of control for any reason can cause serious damage to property or personal injury.Moving parts must be smooth-running.
Cables and connections must not be damaged.
This product is not suitable for children under the age of 14.

If you operate the device in conjunction with products from other manufacturers, check their quality and functionality. Each new or changed constellation must be subjected to a careful function and range test before commissioning. Do not operate the device or model if its functionality appears to be impaired. Absima assumes no responsibility and/or liability for third party products.
Configure a new model with the necessary care and peace of mind. Make sure that the drive of the model cannot start unintentionally. Check all functions. Familiarize yourself fully with the operation of the transmitter before putting the model into full operation.
Note that rapid temperature changes may cause condensation to form in the transmitter. In general, humidity can affect the operation of the transmitter and other components of the remote control system. In the event of moisture in electrical appliances, stop operation immediately, disconnect the power supply and allow the appliance to dry out (up to a few days) when open. Then carry out a careful function test.
You must always have visual contact with your model. In fog, heavy rain, snowfall and at night you should refrain from operating your model.
Never operate your model when you are tired or under the influence of alcohol or medication.
Never leave the remote control in the blazing sun.
Intended use: the CR6S remote control system is intended exclusively for the remote control of models.
We reserve the right to change design, specifications and usage requirements without notice.
Always observe the switch-on and switch-off sequence in order to avoid uncontrolled and dangerous starting of the drive!
Switching on / Commissioning: 1. Switch on transmitter / 2. Connect drive battery / 3. Switch on model
Switch off / shut down: 1. Switch off model / 2. Disconnect drive battery / 3. Switch transmitter off
Please observe these points when operating your model:
- Operate model only on suitable surfaces
- It is essential to keep sufficient distance from other persons. Do not endanger other persons, animals or objects. Operate your model only in private places or in places specially approved for this purpose.
- Do not carry out any risky driving manoeuvres near persons.
- Include your own skills and abilities - please do not overestimate yourself.
- If there are signs of malfunctions or problems, please stop immediately and stop driving.
FEATURES:
2.4GHz FHSS technology, 6 channels frequency-hopping spread spectrum, highly resistant to anti-jamming. Receiver response time is 3ms, ensuring a fast response and better control.
Smooth and highly sensitive to control inputs and stable at distances 400-500m
Compatible with a variety of vehicles; suitable for RC cars, RC boats and RC tanks...etc.
With brake and fail safe out of control protection function.
Each 3 channels can be set respectively, supporting mixed control for 1 and 2 channels.
Voltage range of transmitter: 4.8V - 12V (support 1s-3s battery), automatic identification of voltage,
low voltage warning on 7.4V/4.8V
Voltage range of receiver: 3.3V-10V, working current 30mA, supports high voltage servo.
Unique throttle speed limit adjustment function, allows beginners to practise at a safe speed.
Channel 5 and 6 press for lock and press for release, function specially for Crawler accessories.
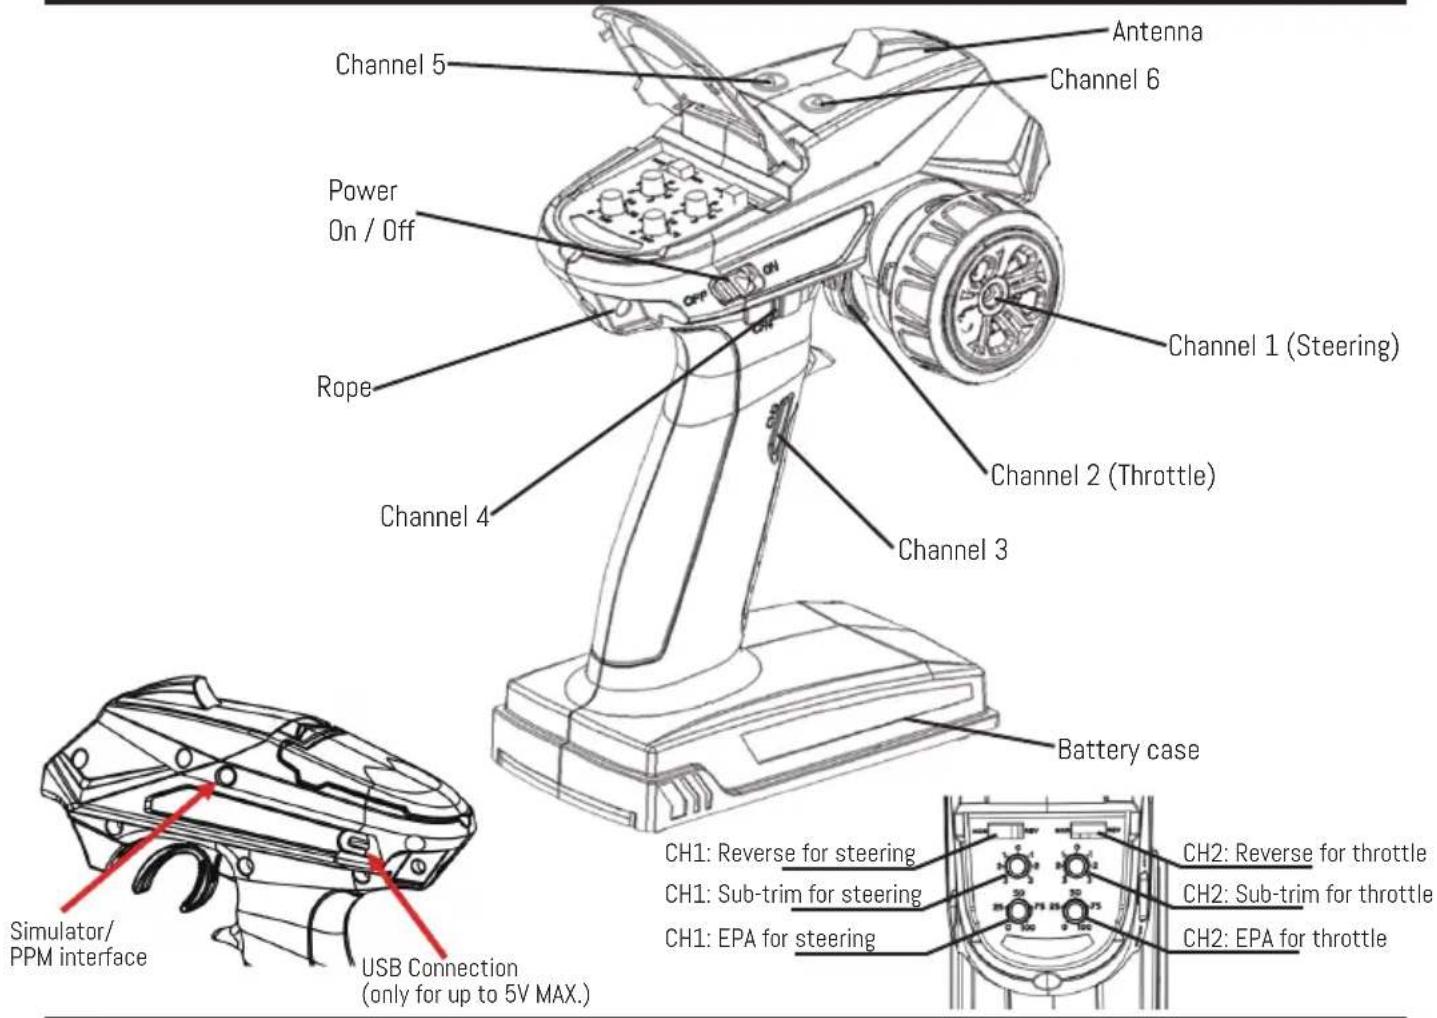
CHANNEL FUNCTION:
BASIC OPERATION:
Battery installation:
-
Open the battery compartment cover.
-
Insert 4 x "AA" batteries or 2S Li-Po batteries
with correct polarity. (No response if batterypolarity reversed)
- Put back battery compartment cover
The battery socket is equipped with anti-reverse insertion function, wrong polarity connection will not damage the transmitter.

natural_image
Technical line drawing of a mechanical component with internal slots and mounting holes (no text or symbols)2S Li-Po rechargeable battery pack
Binding process:
- Power on Transmitter
- Power on Receiver and press button on side of receiver, LED indicator fast •ashing means entering into binding mode, the receiver will automatically searching for the nearest transmitter signal for Binding.
- The indicator will always ON after successful bound.

LED lights:
Direction control mode for servo normal steering:
Blue light is always on.
Mixed direction control mode for tank: Red light is always on.
Low voltage warning: Light flashes slowly.
Enter into the Programming mode: Light fast flashing.

natural_image
Technical line drawing of a car body component (no text or symbols)LED light
Channel 5 and Channel 6:
Channel 5
Press one time CH5 button, indicator LED will stay on and connected servo will move left to end point for 38% and hold.
Press second time, LED off and connected servo will move back to normal.
Channel 6
Press one time CH6 button, indicator LED will stay on and connected servo will move right to end point for 38% and hold.
Press second time, LED off and connected servo will move back (Both movement are fixed at factory setting and not adjustable)


natural_image
Technical line drawing of a mechanical component with no visible text or symbols
natural_image
Top-down schematic of a vehicle or vehicle interior with no visible text, numbers, or symbols
MENU SETTING:
Enter programming mode
Before power on transmitter, turn wheel backward to the maximum, at the same time pull the trigger backward to the maximum.
Hold the position and power on transmitter
Release the wheel and trigger, press 3nd channel button, panel indicator light will go flashing, programming mode on ready for setting.
- Power on

- Turn wheel anticlockwise to the end and hold
- Pull trigger to the end and hold

- Release wheel and trigger back to normal
- Press Channel 3 button, LED light go flashing
Route setting of Channel 1 and Channel 2 / Channel 3 / Channel 4
After enter programming mode
Channel 1 setting
Step 1. >>Turn the steering wheel clockwise point to the angle need for right steering Turn the steering wheel anti-clockwise point to the angle need for left steering
Step 2. >>Pull the trigger point to the route need for throttle forward Push the trigger point to the route need for throttle backward (Brake)
Step 3. >>Only after Step 1 and Step 2, cease for 3 second then press CH3 button for confirm setting and finish (indicator light stay on). If route of Channel 3 and Channel 4 need to do setting also, no need to press CH3 for confirmation, just go to Step 4.
If only Channel 4 need to do setting, then just go to Step 5.

natural_image
Technical line drawing of a handheld device with rotating buttons and a central hub (no text or symbols)
natural_image
Technical line drawing of a mechanical component with internal channels and motion arrows (no text or symbols)
natural_image
Technical line drawing of a mechanical device with no visible text or symbolsChannel 1 route setting Channel 2 route setting Channel 3 button for confirmation

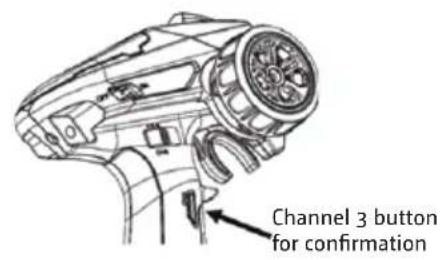
Step 4. >>Tune the knob on the panel which at left down corner for end point of Channel 3 (one side), setting as 25%/50%/75%/100%, after setting done, cease for 3 second then press CH3 button for confirm setting, and finish (indicator light stay on). If route of Channel 4 need to do setting, no need to press CH3 for confirmation, just go to Step 5 Step 5. >>Tune the knob on the panel which at right down corner for end point of Channel 4 (two side), setting as 25%/50%/75%/100%, after setting done, cease for 3 second then press CH3 button for confirm setting and finish (indicator light stay on).
MODE SWITCH:
Switch to mode (General mode / Mix mode)
Push the trigger forward to the maximum, at the same time, turn the Steering wheel clockwise to the maximum, hold and power on the transmitter, when indicator light go flashing, pull the trigger backward to the end, then the indicator light color changes, the trigger should return to the middle position, and the indicator light is always on to indicate that the mode switch is successful.
(the blue light in General mode is always on, and the red light in Mix mode is always on)
- Power on, LED go flashing

- Turn wheel clockwise to the end and hold
- Push trigger to the end and hold

- Pull trigger to the end. Relase trigger and LED change color and stay on
Mix Mode on:
Under Mix Mode, Connect the two ESC signal lines to the Channel 1 and Channel 2 of the receiver, the trigger moves backward and forward to control the rotation of the two motors. The positive and negative rotation of the motor can be set through the two positive and negative switches on the control panel.
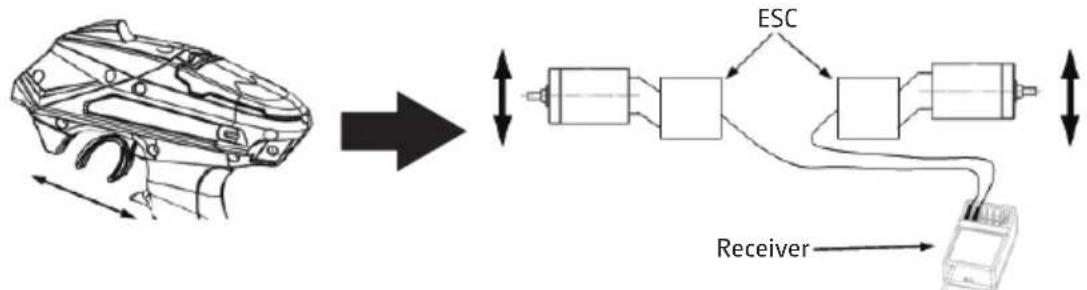
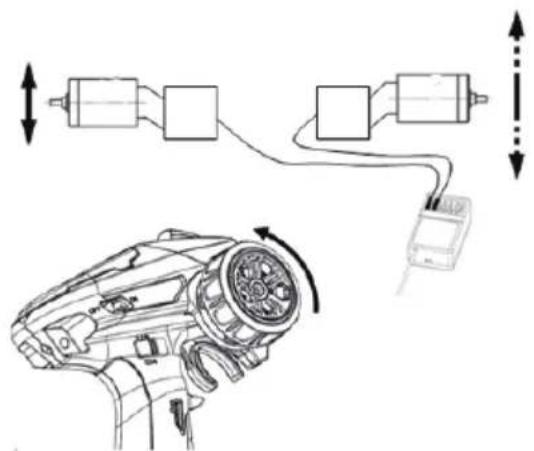
Under Mix Mode, the RC model moves forward at a certain speed. At this time, the speed of the two motors can be adjusted by Channel 1 directional wheel to realize differential steering.
natural_image
Technical line drawing of a mechanical device with bidirectional arrows indicating motion or force (no text or symbols)
Under Mix Mode control, the Channel 1 and Channel 2 pass forward and reverse direction, neutral point and motor route can be set separately.
To switch back to General Mode, go process "Mode switch" once again.
Warranty Terms
By purchasing and using your Absima product, you agree to the warranty terms of Absima GmbH.
The warranty applies only to material and/or functional defects already present at the time of purchase of the product.
Excluded from the guarantee:
• Damage caused by incorrect use
• Damage due to neglect of duty of care
• Damage due to improper handling and maintenance errors
- Fluid damages
Please report warranty claims to your dealer.
If it is necessary to return your product, please enclose your proof of purchase and a detailed description of the fault with the shipment. We also need your complete contact details (legible).
The direct sending to the service department of Absima GmbH requires the previous arrangement. This can be done by telephone under +49 911 65084130 or by e-mail to service@absima.com
The shipping costs are borne by the sender. Parcels that are not free of charge or are subject to charges will not be accepted.
Each incoming warranty case is first checked by our service department for admissibility. Complaints that are not covered by the warranty may incur costs for the inspection. Repairs or services that are not covered by the warranty will be charged in advance.
Disclaimer
Since Absima GmbH cannot at any time monitor the observance of the operating instructions as well as the operation and conditions of use of the product, Absima GmbH does not assume any liability for damages, costs, losses resulting from incorrect handling and/or incorrect operation or in any way related thereto. To the extent permitted by law, the obligation to pay damages, for whatever legal reason, will be limited to the invoice value of the Absima product involved in the event. This does not apply as far as we have to assume unlimited liability due to mandatory legal regulations or gross negligence.
Declaration of conformity
The manufacturer hereby declares that the product complies with the essential requirements and other relevant provisions of the EU Directive.
The declaration of conformity can be found at
http://absima.com/index.php/downloads/erklaerungen/
or can be consulted under
Absima GmbH - Gibitzenhofstrasse 127a/RG - 90443 Nuremberg, Germany can be requested.
Disposal


Waste electronic equipment is a raw material and should not be disposed of with household waste. If the product is at the end of its service life, dispose of it at your local collection points in accordance with the applicable legal regulations. Disposal with household waste or at the expense of the environment is prohibited.
Important! Remove the batteries or rechargeable batteries before disposal. A separate take-back system applies to batteries and rechargeable batteries.
By properly disposing of your old appliances, you make an important contribution to environmental protection.
Absima GmbH
Gibitzenhofstrasse 127 a / RG
90443 Nürberg, Germany
Phone: +49 911 65084130 / Fax: +49 911 65084140
www.absima.com
Technical changes, design and equipment subject to change without notice.






Brand : Absima
Model : CR6S
Category : Remote control