CRUZER3 2878 - Electric mower BRAUN - Free user manual and instructions
Find the device manual for free CRUZER3 2878 BRAUN in PDF.
| Brand | BRAUN |
| Model | CRUZER3 2878 |
| Product type | Rechargeable electric shaver with trimmer |
| Power supply | Rechargeable nickel-metal hydride battery, low-voltage adapter |
| Runtime | Approximately 30 minutes of cordless shaving |
| Charging time | First charge: 4 h; subsequent charges: approximately 1 h |
| Shaving head | Floating foil |
| Integrated trimmer | Yes, two widths: 28 mm (wide) and 14 mm (narrow) |
| Cutting comb | Yes, with length selector (1.2 / 2.8 / 4.4 / 6 mm) |
| Use in the shower | Yes (device unplugged) |
| Cleaning | Under running water (with mild soap) or dry with included brush |
| Replacement parts | Foil and cutter block every 18 months (ref. 2000 series) |
| Charge indicator | Indicator light: on during charging, flashes when fully charged |
| Warranty | 2 years (excluding normal wear and consumable parts) |
| Included accessories | Protective cap, comb, cleaning brush, power cord |
| Safety | Do not modify the adapter; unplug before cleaning |
Frequently Asked Questions - CRUZER3 2878 BRAUN
User questions about CRUZER3 2878 BRAUN
0 question about this device. Answer the ones you know or ask your own.
Ask a new question about this device
Download the instructions for your Electric mower in PDF format for free! Find your manual CRUZER3 2878 - BRAUN and take your electronic device back in hand. On this page are published all the documents necessary for the use of your device. CRUZER3 2878 by BRAUN.
USER MANUAL CRUZER3 2878 BRAUN
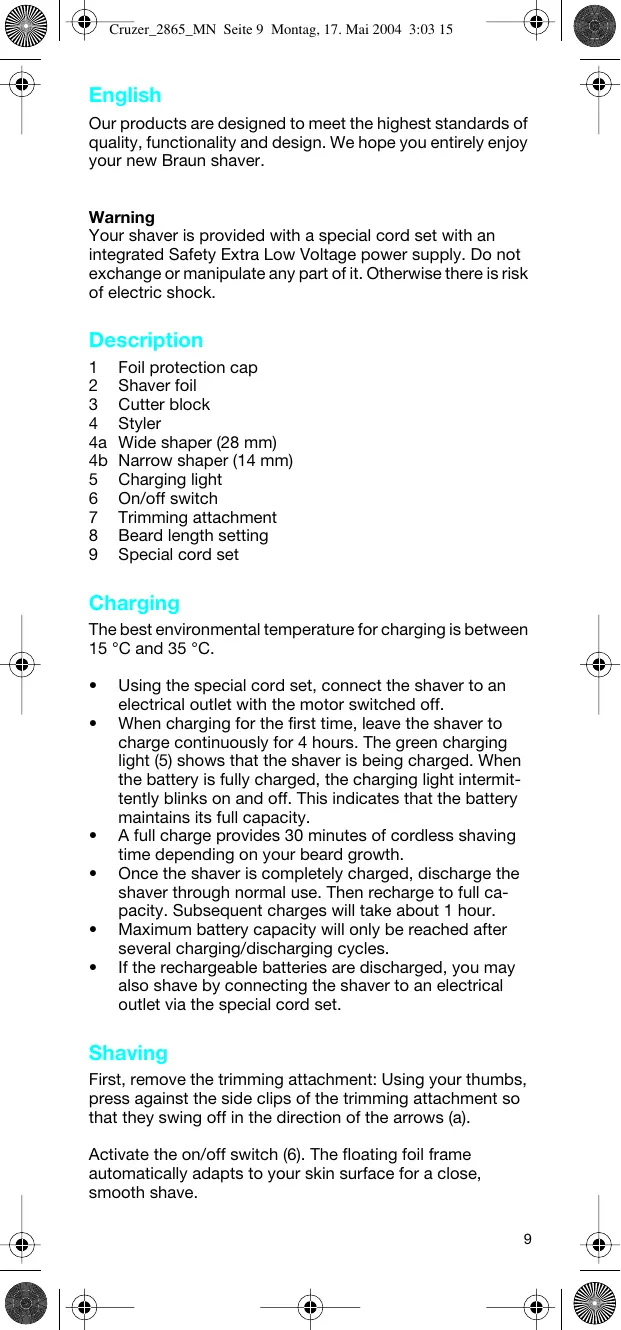
Our products are designed to meet the highest standards of quality, functionality and design. We hope you entirely enjoy your new Braun shaver.
Warning
Your shaver is provided with a special cord set with an integrated Safety Extra Low Voltage power supply. Do not exchange or manipulate any part of it. Otherwise there is risk of electric shock.
Description
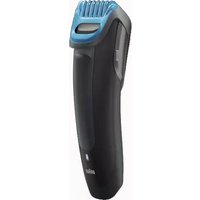
1 Foil protection cap
2 Shaver foil
3 Cutter block
4 Styler
4a Wide shaper (28 mm)
4b Narrow shaper (14 mm)
5 Charging light
6 On/off switch
7 Trimming attachment
8 Beard length setting
9 Special cord set
Charging
The best environmental temperature for charging is between 15^ and 35^ .
- Using the special cord set, connect the shaver to an electrical outlet with the motor switched off.
- When charging for the first time, leave the shaver to charge continuously for 4 hours. The green charging light (5) shows that the shaver is being charged. When the battery is fully charged, the charging light intermittently blinks on and off. This indicates that the battery maintains its full capacity.
- A full charge provides 30 minutes of cordless shaving time depending on your beard growth.
- Once the shaver is completely charged, discharge the shaver through normal use. Then recharge to full capacity. Subsequent charges will take about 1 hour.
Maximum battery capacity will only be reached after several charging/discharging cycles. - If the rechargeable batteries are discharged, you may also shave by connecting the shaver to an electrical outlet via the special cord set.
Shaving
First, remove the trimming attachment: Using your thumbs, press against the side clips of the trimming attachment so that they swing off in the direction of the arrows (a).
Activate the on/off switch (6). The floating foil frame automatically adapts to your skin surface for a close, smooth shave.
For pre-shaving after a few days of not having shaved, use the wide shaper (4a) to pre-cut long hairs. For a close, smooth shave, finish with the foil.
Tips for the perfect shave
We recommend that you shave before washing, as the skin tends to be slightly swollen after washing.
- Hold the shaver at right angles (90^) to the skin (b). Stretch the skin and shave against the direction of beard growth.
- To maintain 100% shaving performance, replace your foil and cutter block at least every 18 months or when worn.
This appliance may also be used in the shower. Before doing so, make sure that it is unplugged!
When using it in the shower, we recommend applying shaving foam or gel.
Using the styler
- The wide shaper (4a) evenly cuts and trims larger areas (c): Ideal for shaping sideburns, moustaches and partial short beards. Press the blue rib to push out the styler (4).
- The narrow shaper (4b) precisely defines lines and edges (d): Ideal for precise contouring. To use the narrow shaper, push out the styler and turn it 180^ .
- Frequent use of the styler may reduce the battery capacity.
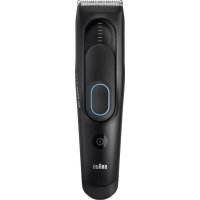
Using the trimming attachment
- The trimming attachment (7) is ideal for beard trimming and keeping it at a constant length.
- Place the trimming attachment onto the shaver foil (2) and press it against the shaver housing until it snaps into place with a click.
- Press the beard length selector (8) (e) and slide it up in order to set the desired beard length (length settings from top to bottom 1.2 ~mm, 2.8 ~mm, 4.4 ~mm, 6 ~mm ). Push out the styler (4).
- Activate the on/off switch and trim against hair growth by guiding the blue transparent comb part over the skin.
After use, pull back the styler. Remove the trimming attachment (a).
Cleaning
Always unplug the appliance before cleaning.
Regular cleaning ensures better shaving performance. Rinsing the shaving head after each shave under running water is an easy and fast way to keep it clean:
- Switch the shaver on (cordless) and rinse the shaving head under hot running water (f). A natural based soap may also be used provided it contains no particles or
abrasive substances. Rinse off all foam and let the shaver run for a few more seconds.
- Next, switch off the shaver, remove the shaver foil and the cutter block. Then leave the disassembled shaving parts to dry.
Alternatively, you may clean the shaver using the brush provided (g):
- Switch off the shaver. Remove the shaver foil.
- Using the brush, clean the cutter block and the inner area of the shaver head. However, do not clean the shaver foil with the brush as this may damage the foil.
Keeping your shaver in top shape
About every four weeks, clean the cutter block with Braun cleaning agents. Put a drop of light machine oil onto the shapers (4a, 4b) and the shaver foil (h).
Replacing the shaving parts
To maintain 100% shaving performance, replace your foil and cutter block at least every 18 months or when worn. Change both parts at the same time for a closer shave with less skin irritation.
(Shaver foil and cutter block: 2000 series)
Preserving the batteries
In order to maintain the optimum capacity of the rechargeable batteries, the shaver has to be fully discharged (by shaving) every 6 months approximately. Then recharge the shaver to full capacity. Do not expose the shaver to temperatures higher than 50^ for extended periods of time.
Environmental notice
This appliance is provided with nickel-hydride rechargeable batteries. To protect the environment, do not dispose of this appliance in the household waste at the end of its useful life. Open the housing as shown on page 46, remove and dispose of the batteries at your retail store or at appropriate collection sites according to national or local regulations.
Subject to change without notice.
This product conforms to the EMC-Directive 89/336/EEC and to the Low Voltage Regulation (73/23 EEC).

Electric specifications see printing on the special cord set.
François
Preservar as baterias
Tips for perfect bartering
Battery removal at the end of the product's useful life
François
We grant 2 years guarantee on the product commencing on the date of purchase. Within the guarantee period we will eliminate, free of charge, any defects in the appliance resulting from faults in materials or workmanship, either by repairing or replacing the complete appliance as we may choose.
This guarantee extends to every country where this appliance is supplied by Braun or its appointed distributor.
This guarantee does not cover: damage due to improper use, normal wear and tear (e.g. shaver foil or cutter block) as well as defects that have a negligible effect on the value or operation of the appliance. The guarantee becomes void if repairs are undertaken by unauthorised persons and if original Braun parts are not used.
To obtain service within the guarantee period, hand in or send the complete appliance with your sales receipt to an authorised Braun Customer Service Centre.
For UK only:
This guarantee in no way affects your rights under statutory law.
François
Garantie
Guarantee and Service Centers
Gillette Australia Pty. Ltd., Scoresby, 5 caribbean Drive Melbourne, Victoria 3179, ⑤ 1800641820
Austria
Gibbons Company
21 Reid Street
P.O. Box HM 11
Hamilton
295 00 22
Brasil
Fixnet Servicios & Comércio Ltda.
R. Gaspar Fernandes, 377
São Paulo - SP
800 16 26 27
Bulgaria
12, Hristo Botev str. Sofia, Bulgaria 359 2528 988
Canada
Gillette Canada Company, Braun Consumer Service 4 Robert Speck Parkway, Mississauga L4Z 4C5, Ontario, ⑧ 1800 387 6657
Česká Republika
PH SERVIS sro., V Mezihori 2, 18000 Praha 8, 266 310 574
Chile
Viseelec, Braun Service Center Chile, Av. Concha y Toro #4399, Puente Alto, Santiago, 02 288 25 18
China
Gillette (Shanghai) Sales Co. Ltd. 550 Sanlin Road, Pudong, Shanghai 200124, 800 86 20 86 21 5849 8000
Colombia
Gillette de Colombia S.A.,
Calle 100 No. 9A-45 Piso 3,
Bogota, D.C., © 018000527286
Croatia
Iskra elektronika d.o.o., Bozidara Magovica 63, 10020 Zagreb, € 1-6 60 17 77
Cyprus
Kyriakos Papavasiliou Trading 70, Kennedy Ave., 1663 Nicosa, 02 314111
Danmark
Gillette Group Danmark A/S, Teglholm Alle 15, 2450 Kobenhavn SV, 70 15 00 13
Djibouti (Republic de)
Ets. Nouraddine,
25 Makram Ebied Street,
P.O.Box 7607
Cairo,
02-2740652
Espana
Braun Espanola S.A.,
Braun Service,
Enrique Granados, 46
Gillette Group UK Ltd.,
Braun Consumer Service,
Aylesbury Road
ThameOX93AX
Oxfordshire
18007837010
Greece
Berson S.A.,
47, Agamemnonos,
17675 Kallithea Athens,
(210)-9478700
Guadeloupe
Ets. Andre Haan S.A.,
Zone Industrielle
B.P.335
97161 Pointe-à-Pitre,
26 68 48
Hong Kong
Audio Supplies Company,
Room 506,
St. George Building,
2 ICE House Street,
Hong Kong
(852) 2524 9377
Hungary
Gillette Group Hungary
Kereskedelmi Kft.,
1037 Budapest,
Szépvölgyi ut 35-37
1801-3800
Iceland
Verslunin Pfaff hf.,
Grenasavegur 13,
Box 714, 121 Reykjavik,
533222
India
Braun Division,
c/o Gillette Div. Op. Pvt. Ltd.,
34, Okhla Industrial Estate,
New Delhi 110 020,
116830218
Iran
Tehran Bouran Company
Irtuc Building, Ferdosisyr
No 874 Enghelab Ave.,
P.O.Box 15815-1391
Tehran 11318,
021-67 0350
Ireland (Republic of)
Gavin's Electronics,
83-84, Lower Camden Street,
Dublin 2,
1800509448
Israel
S. Schestowitz Ltd.,
8 Shacham Str.,
Tel-Aviv, 49517
1800335959
Italia
Gillette Group Italy S.p.A.,
Via G.B. Pirelli, 18
20124 Milano
02/6678623
Jordan
Interbrands
Al Soyfiahdistrict,
opp. Paradaise bakery
P.O.Box 9404,
AL yousef Building
Amman 11191,
6-5827567
Kenya
Radbone-Clark Kenya Ltd.,
P.O.Box 40833
Mombasa Road, Nairobi,
2821276
Korea
Gillette Korea Ltd.
144-27 Samsung-dong,
Kangnam-ku,
Seoul, Korea
080-920-6000
Kuwait
Union Trading Company,
Braun Service Center,
P.O.Box 28 Safat,
Safat Code 13001, Kuwait
04833274
Latvia
72 Bullu Street, House 2
Riga 1067,
2403911
Lebanon
Magnet SAL - Fattal HLDG,
P.O.Box 110-773
Beirut,
14852502
Libya
Al-Muddy Joint-Stock Co.,
Istanbul Street 6,
P.O.Box 4996,Tripoli,
213333421
Lithuania
Elektronas AB,
Kareiviu 6,
LT 2600 Vilnius,
277 76 17
Luxembourg
Sogel S.A.,
Lot 24 Rawang Housing
& Industrial Estate
Mukim Rawang, PO No 210
48,000 Rawang
Selangor Malaysia
(603) 6091 4343
Malta
Kind's,
287, Republic Street,
Valletta VLT04,
247118
Maroc
Braun Service Center
Route Principle #7 Z.I Perchid
Casablanca,
22-533033
Martinique
Decius Absalon,
J. Kalachand & Co. Ltd.,
DBM Industrial Estate, Stage 11,
P.O.B.634
Plaine Lauzun,
2128410
Mexico
Gillette Manufactura, S.A. de C.V./
Netherlands Antilles
Rupchand Sons n.v. (ram's),
Front Street 67, P.O. Box 79
St. Maarten, Philipsburg
052 29 31
New Zealand
Key Service Ltd.,
Sell Agence Ltd.,
59-63 Druces Road.,
Manakau City,
Auckland,
09-2625835
Nippon
Gillette Japan Inc.,
Queens Tower, 13F
3-1, Minato Mirai 2-Chome
Nishi-Ku, Yokohama 220-6013
Japan
045-6803700
Norge
Naranjee Hirjee & Co.,
10 Ruwi High,
P.O.Box 9,Muscat 113
703660
Pakistan
Gillette Pakistan Limited,
Dr. Ziauddin Ahmend Road,
Karachi 74200,
215688930
Paraguay
Paraguay Trading S.A.,
Gillette Philippines Inc.,
Corporate Corner Commerce
Avenues
20/F Tower 1, IL Corporate Centre
1770 Muntinlupa city
02-771071 02-06/-16
Poland
Gillette Poland S.A.,
ul. Domaniewska 41,
02-672 Warszawa,
225488974
Portugal
Grupo Gillette Portuguesa, Lda.,
Braun Service
Gillette Romania srl.
opposite to Fetihi center,
Al Forsan
P.O.Box:269
21411 Jeddah
02-6518670
Singapore (Republic of)
Beste (S) Pte. Ltd.,
No. 6 Tagore Drive,
03-04 Tagore Industrial Building,
Singapore 787623,
(65) 6552 2422
Slovakia
Techno Servis Bratislava,
Bajzova 11/A,
82108 Bratislava,
(02)55563749
Slovenia
Iskra Prins d.d.
Rozna dolina c. IX/6
1000 Ljubljana,
386014769800
South Africa (Republic of)
Fixnet After Sales Service,
159 Queen Street,
Kensington South,
P.O.Box 751770,
Johannesburg 2094,
Kensington South,
116156765
St.Maarten
Rupchand Sons n.v. (ram's),
P.O.Box 79
Philipsburg,
Netherlands Antilles,
522931
St. Thomas
Boolchand's Ltd.,
31 Main Street,
P.O.Box 5667
00803 St. Thomas,
US Virgin Islands,
340 776 0302
Suomi
Gillette Group Finland Oy,
P.O.Box 9
Niittykatu 8, PL 9, 02200 Espoo,
09-452871
Sverige
Gillette Group Sverige AB,
Dept. Sweden, Stockholm Gillette
Rasundavagen 12,
Box 702,
16927 Solna,
020-213321
Syria
Ahmed Hadaya Company
Hadayabuilding
Ain Keresh
Unisyria, P.O. Box 35002
Damascus,
963 011-231433
Taiwan
Audio & Electr. Supplies Ltd.,
Brothers Bldg., 10th Floor,
85 Chung Shan N Rd., Sec. 1,
Taipei (104),
(886) 02 2523 3283
Thailand
Gillette Thailand Ltd.,
175 South Sathorn Road,
Tungmahamek, Sathorn,
11/1 Floor, Sathorn City Tower
Bangkok 10520
(66) 2344 9191/ Exten. 9135
Tunesie
United Arab Emirates
The New Store,
P.O.Box 3029
The Gillette Company
Braun Consumer Service,
1, Gillette Park 4k-16,
Boston, MA 02127-1096
1-800-272-8611
Venezuela
Gillette de Venezuela S.A.,
Saba Stores for Trading,
26th September Street,
P.O.Box 5278
Taiz,
4-25 2388
Yugoslavia
BG Elektronik.
Bulevar kralja Aleksandra 34,
11000 Beograd,
113240030