
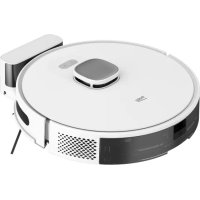
VRR 71414 VB - Robot vacuum BEKO - Free user manual and instructions
Find the device manual for free VRR 71414 VB BEKO in PDF.


| Product type | Robot vacuum cleaner |
| Brand | BEKO |
| Model | VRR 71414 VB |
| Dimensions (L×W×H) | 34 × 34 × 9 cm |
| Weight | 3.2 kg |
| Power supply | Rechargeable Li-ion battery 14.4 V |
| Dust container capacity | 0.4 L |
| Battery life | Approximately 90 minutes |
| Charging time | Approximately 5 hours |
| Suction power | 1200 Pa |
| Noise level | 55 dB(A) |
| Cleaning modes | Auto, Edge, Spot, Scheduled |
| Sensors | Anti-drop, Anti-collision, Dust sensor |
| Scheduling | Yes, via remote control or app |
| Filter | High efficiency filter (HEPA) |
| Main brush | Rubber rolling brush |
| Side brushes | Yes, 2 side brushes |
| Automatic return to base | Yes |
| Display | LED screen |
| Remote control | Included |
| Warranty | 2 years |
Frequently Asked Questions - VRR 71414 VB BEKO
User questions about VRR 71414 VB BEKO
0 question about this device. Answer the ones you know or ask your own.
Ask a new question about this device
Download the instructions for your Robot vacuum in PDF format for free! Find your manual VRR 71414 VB - BEKO and take your electronic device back in hand. On this page are published all the documents necessary for the use of your device. VRR 71414 VB by BEKO.
USER MANUAL VRR 71414 VB BEKO
Robot Vacuum Cleaner
User Manual

VRR 61414 VB
EN - FR - IT - PL - RO - SR - BG - HR - SL - SQ - AR
Please read this guide first!
Dear Customer,
Thank you for choosing a Grundig product. We would like you to achieve the optimal efficiency from this high quality product which has been manufactured with the state of the art technology. Please make sure you read and understand this guide and supplementary documentation fully before use and keep it as a reference. Include this guide with the unit if you hand it over to someone else. Observe all warnings and information herein and follow the instructions.
Symbols and their meanings
Following symbols have been used throughout this guide:

Important information and beneficial advices regarding the usage of the device.

WARNING: Warnings about dangerous situations regarding safety of life and property.

Protection class against electric shock.
1 Important safety and environmental instructions
This section contains safety instructions to prevent hazards that can result in injury or property damage. Any warranty is void if these instructions are not followed.
1.1 General safety
• This appliance complies with international safety standards. - This appliance can be used by children aged 8 years and above, and by persons with reduced physical, sensory or mental capabilities, or lack of experience and knowledge, provided they have been given supervision or instruction concerning use of the appliance in a safe way and understand the hazards involved. Children shall not play with the appliance. Cleaning and user maintenance shall not be made by children without supervision.
- Do not use the appliance if the power cord or the appliance is damaged. Contact authorized service.
- Keep the appliance and its cable out of the reach of children under 8 years of age.
- Do not power your device with a multi-socket.
- Your mains power supply should be in alignment with the specified information on the type tag of the appliance.
- Do not use the appliance with an extension cord. • To prevent damage to the power cord, prevent it from being pinched, crimped or rubbed against sharp edges.
- Do not touch the plug of the appliance with damp or wet hands while the appliance is plugged in. Do not pull on the cord while unplugging the appliance.
1 Important safety and environmental instructions
- Do not vacuum flammable materials and ensure that the cigarette ashes are cooled down before vacuuming them.
- Do not vacuum water and other fluids.
- Protect the appliance against precipitation, humidity and heat sources.
- Do not use the appliance in or near explosive or flammable environments and substances.
- Unplug the appliance before cleaning and maintenance.
- This product is not designed for commercial use, it is intended for use at home and in applications as follows:
- In the staff kitchens of the stores, offices and other working environments,
- In farm houses,
- By customers in hotels, motels or other accommodation facilities;
- In hostels, or similar environments.
- Sleeping places and breakfast environments
- Do not immerse the appliance or its power cord in water for cleaning.
- Do not disassemble the appliance.
- Use only original parts or parts recommended by the manufacturer.
- To prevent blockage of the filter or damage to the motor, do not vacuum cement, plaster or fragments of compressed paper.
- Use the appliance with the adapter delivered with the appliance only. Do not use the appliance without filters, it may get damaged.
- If you keep the packaging materials, keep them out of the reach of children.
1 Important safety and environmental instructions
- This appliance is not intended for use by persons, including children, with physical, sensory, or mental disabilities, or those lacking adequate experience and knowledge, unless they are supervised by a person responsible for their safety or have been instructed on the appliance's operation.
- Children should be supervised to ensure they do not play with the appliance.
- Unplug the adapter before any cleaning or maintenance.
- To avoid any risk of hazard, a damaged adapter must be replaced by the manufacturer, its authorized representative, or a similarly qualified technician.
- Keep fingers, hair, and loose clothing away from moving parts or openings while vacuuming.
- Dispose of used batteries in accordance with local laws and regulations.
- The batteries in this appliance may only be replaced by authorized service personnel.
- Do not mix batteries of different types or old and new batteries together.
- Do not short-circuit the supply terminals.
- Use only with ME1XXFG CM 2600 mAh batteries.
- This appliance should not be operated by children or persons with limited physical, sensory, or cognitive abilities, or those lacking experience and knowledge, unless they are supervised or have been given relevant instructions.
- Children should be supervised to ensure they do not play with the appliance.
1 Important safety and environmental instructions
- Do not put weight on the appliance. Make sure that children and domestic animals do not get on the appliance.
- Do not run the appliance on high grounds like a table or chair.
1.2 Compliance with the WEEE regulations and waste disposal

This product complies with EU WEEE Directive (2012/19/EU). This product bears a classification symbol for waste electrical and electronic equipment (WEEE).
This symbol indicates that this product shall not be disposed of with other household wastes at the end of its service life. Used device must be returned to an official collection point for recycling of electrical and electronic devices. To find these collection systems, please contact your local authorities or the retailer where the product was purchased. Each household performs an important role in recovering and recycling old appliances. Appropriate disposal of used appliances helps prevent potential negative consequences for the environment and human health.
1.3 Packaging information

The product's packaging is made of recyclable materials, in accordance with the National Legislation.
Do not dispose of the packaging waste with the household waste or other wastes; dispose of it at the packaging collection areas specified by local authorities.
1.4 Waste batteries

This symbol on rechargeable batteries/batteries or on the packaging indicates that the rechargeable battery/battery may not be disposed of with regular household rubbish. For certain rechargeable batteries/batteries, this symbol may be supplemented by a chemical symbol. Symbols for mercury (Hg) or lead (Pb) are provided if the rechargeable batteries/batteries contain more than 0.0005% mercury or more than 0.004% lead.
Rechargeable batteries/batteries, including those which do not contain heavy metals, may not be disposed of with household waste. Always dispose of used batteries in accordance with local environmental regulations. Make enquiries about the applicable disposal regulations where you live.
1.5 What to do for energy saving
- When using your appliance, adjust the speed settings according to the surface, in order to save energy.
- Normally, lower speeds are used when cleaning hard surfaces while high speeds are used for cleaning carpets.
1.6 Compliance with the RoHS Directive
The appliance you have purchased complies with the EU's RoHS Directive (2011/65/EU). It does not contain the harmful and forbidden substances specified in the directive.
2 Box content


Robot Vacuum, Charging dock, Charge adaptor
Spare accessories supplied
| 1 filter |
User's manual and product documentation (2 pcs)
Cleaning brush
3 Overview

3 Overview
2.1 Checks and components
- Lidar
- Upper body
- Central body
- Start Cleaning-Pause Button / Sending to Charging Stand button
- Bumper sensor
- Front bumper
- Front bumper hitting sensor
- Charging pins
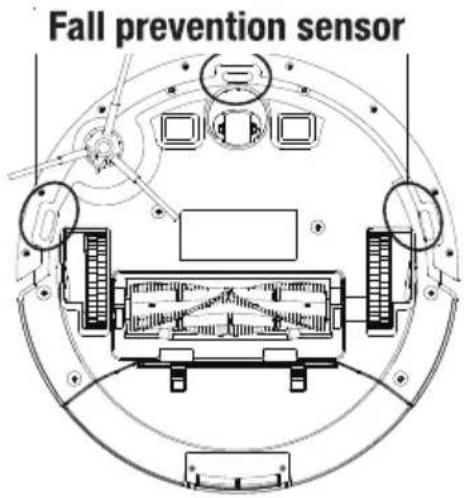
- Fall prevention sensor
- Charging pins
- Front rotating wheel
- Rotating brush
- Rotating brush cover
- Rear wheel
- Side brush
- Charging dock
- Charge adaptor
- On/Off button
- Robot vacuum container
- Container opening button
- Filter opening area
- Cleaning brush
- EPA filter
2.2 Conformity declaration for CE
Arçelik A.Ş. hereby declares that this appliance complies with Directive 2014/53/EU. The complete text of the EU declaration of conformity is available at the following internet address: – Products, from :beko.com
2.3 Technical data
| Adapter voltage 100-24 | 40V~, 50/60 Hz |
| Adapter output 19V / 0.6A | |
| Battery Li-ion: 14.4V / 2.6 Ah | |
| Charging period: 4 - 5.5h hours | |
| Operation time | Up to 130 minutes (in mute position) |
| Dust container capacity | 0.8 L |
| 2.4G Wi-Fi frequency range | 2412-2472 MHz |
| Supported Connections | WLAN IEEE 802.11 b/g/n wireless |
| 2.4G Wi-Fi maximum RF output power | 20 dBm |
| RF exposure information | 2.4G Wi-Fi maximum |
| 2.4G Wi-Fi maximum RF output power | 20 dBm |
| Operating time | Maximum: 70 minsPowerful: 80 minsStandard: 100 minsQuiet: 130 mins |
RF exposure information: The maximum allowed exposure level is calculated according to the 20 cm distance between the appliance and the human body. To comply with the RF exposure condition, a distance of 20 cm should be maintained between the appliance and the person.
The rights to make technical and design changes are reserved.
3 Overview
| Parameter of External Power Supply | |
| Manufacturer E-TEK Electronics Manufactory Co., LTD | |
| Model Identifier ZD012A190060EU | |
| Input Voltage 100-240V~ | |
| Input Frequency 50/60Hz | |
| Input Current 0.5A | |
| Output Voltage 19.0V DC | |
| Output Current 0.6 A | |
| Output Power 11.4W | |
| Average active efficiency 86.37% | |
| Efficiency at low load(10%) 85.71% | |
| No-load power consumption 0.074W | |
4 Installation
1- Remove the protective sponges.

2- Install the charging station.
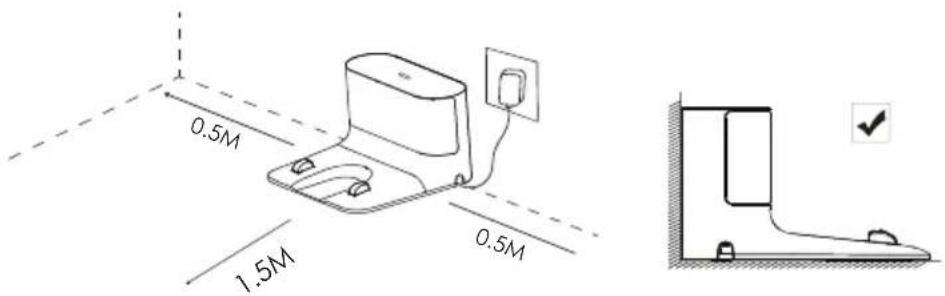
Install the adaptor plug to the charging station and set up the cables to prevent the adaptor cable from wrapping around the machine during vacuuming.


Install the charging station in a location where it can easily be accessed by the vacuum cleaner. Install the charging station on a hard and level ground rather than a carpet.
To ensure smooth operation of the robot, it is advised that no obstacles are present within 1.5 m on the front and within 0.5 m on the left and right sides.
4 Installation

WARNING: If you are going to use the device for the first time or if you have not used it for a long time, fully charge the batteries before using it.

Always keep the charging station plugged, otherwise the robot vacuum cleaner cannot return to the charging station automatically.

For a smooth charging operation, do not move the charging station. When the location is changed, it may delete the available map and create a new map due to the positioning error.

5 Operation

Please charge the machine before first use.

If the product will not be used for a long period of time; fully charge it then turn off the power switch to preserve battery life.
The product should be recharged at least once every three months.
5.1 Intended use
This appliance is intended for household use and it is not suitable for industrial use.
5 Operation
5.2 Charging the appliance
- Bring the on-off button on the side to the on position for the initial power up.

- Place the appliance to the dust collection station so that it shall be aligned with the charging communication pins.


Charging starts after the lighting indicator of charging station flashes 3 times and then it is turned off completely.
5.3 Operation
For the first operation, bring the ON/OFF button on the side from "O" to "I" position. Press "1" button on the robot vacuum cleaner for 3 seconds to turn it on.
- Do not turn off the appliance using ON/OFF button directly during cleaning; otherwise the data of the robot vacuum cleaner cannot be saved.
- If the ON/OFF button is on OFF position, the robot vacuum cleaner will be turned on automatically when it is placed on the charging dock and turned off automatically when it is removed from the charging dock.
- If the robot vacuum cleaner will not be used for a long period of time, bring the ON/OFF button to off position.
5 Operation
Starting the cleaning

Press "1" button to start the automatic cleaning mode. When it is started, the robot vacuum cleaner is removed from the charging dock, performs an automatic scan to create a map, determines the cleaning route in a smart way and divides the area to several regions. The cleaning route is planned along the wall and the robot vacuum cleaner moves forward and backward to clean different regions in order.

WARNING: If the charging level is too low, the cleaning cannot be started. Please charge the appliance before starting the cleaning.

WARNING: Before the cleaning, tidy up all cables to prevent disconnections due to entanglement/pulling of the cables and to prevent damage to the furniture.

WARNING: In the automatic cleaning mode, if the area to be cleaned is less than 10 square meters, the cleaning is performed twice as default.

WARNING: Do not move the charging dock during cleaning and make sure that the station is plugged; otherwise the robot vacuum cleaner may not be able to return for recharging.
Pausing
Press "①" button on the body to stop the robot vacuum cleaner while it is operating. The robot vacuum cleaner switches to pause mode.
Automatic charging: The robot vacuum cleaner returns automatically to recharge after the cleaning is completed.
Manual charging: The robot vacuum cleaner returns automatically to the charging station when you press "button on the upper body when it is in the pause position.
A. If the operation is paused, press the button to recharge automatically. B. If the robot vacuum cleaner is caught up anywhere and cannot find the charging dock, please move the robot vacuum cleaner to the charging station yourself to allow it to be charged.
5 Operation
Point cleaning

Bring the robot vacuum cleaner to the area to be cleaned and press the "①" button twice. When the mode is activated, the robot vacuum cleaner shall clean a square area of 1.5 x 1.5 m by considering itself as the center.
It cannot start the point cleaning operation from the charging dock. When the point cleaning is completed, it does not return to the charging station and remains in its position. Bring it to the charging stand or move it to the charging stand by pressing the button on the upper body.
Vacuum power selection
(Supported with the relevant mobile application only) You may select the desired cleaning power from the application:
- Quiet
- Standard
- Powerful
- Maximum
Remote controlled cleaning
(Supported with the relevant mobile application only) You may direct the robot vacuum cleaner to the area to be cleaned by using the manual remote control mode through the application.
Sleep
The robot vacuum cleaner switches to sleep mode automatically if it remains stationary for 10 minutes. The robot vacuum cleaner switches to sleep mode automatically 10 minutes after it is completely recharged. The sleep mode deactivates the current task.
Resetting the system
Press "1" button for 15 seconds in standby position to reset the system. When the system is reset, the map and the original settings (including virtual limits) on the robot vacuum cleaner are deleted.
For APP account deletion, the customer can press the "remove the product and clear the account" button on the APP to delete all data on the APP and cloud, such as maps, cleaning histories, shared machine, Wi-Fi account password, etc.
5 Operation
5.3.1 Operation with the application
Download the application
To download the application, search for "HomeDirect-SDA" in the mobile app store. Review the mobile application manual for detailed information.
Reset Wi-Fi
Press "1" buttons simultaneously until you hear the aural warning and see the light blinking.
Add a device
- Open the app, create a new account, and follow the instructions in the application.
- Before setting up the Wi-Fi, ensure that the robot vacuum cleaner and the Wi-Fi network meet the following requirements.
A. Robot Vacuum Cleaner:
- The charging level of the robot vacuum cleaner shall be over 20% or the robot vacuum cleaner shall be placed on the charging dock.
B. Wi-Fi network:
- Make sure the password of your wireless network (modem) is correct.
- Do not use any VPN (Virtual Private Network).
- Wi-Fi router shall support 802.11b/g/n and IPv4 protocols.
- The router shall be in the 2.4GHz frequency band or a dual-band router that supports the 2.4GHz band shall be used. The robot vacuum cleaner does not support the 5GHz frequency band.
- If the robot vacuum cleaner cannot connect to the 2.4/5GHz dual-band Wi-Fi network, please select the 2.4GHz network for Wi-Fi settings. You may switch back to the other frequency band when the setting is completed.
- If you are connecting to a hidden network, please ensure that you enter the network name [SSID (sensitive to capitalization)] correctly and that you are connected to a 2.4GHz wireless network.
- If you are using a wireless network extender, please ensure that the network name (SSID) and the password are the same as the main network.
5 Operation
Wi-Fi connection error
| Wi-Fi Status Root Cause | Solution | |
| White light is illuminated continuously. | The robot vacuum cleaner is connected to the router (modem), but it cannot connect to the network. | ·Ensure that the modem is connected to the network.·Contact your network operator to see if there is a problem in the internet data. |
| White light is flashing rapidly | The robot vacuum cleaner cannot connect to the modem | ·Ensure that the network name and the password are not changed.·Reset the Wi-Fi connection, if required. Please refer to the “Resetting Wi-Fi” section in the “Downloading the Application and Resetting the Wi-Fi” part of this manual. |
| White light is flashing slowly. | Wi-Fi is reset. | ·Ensure the Wi-Fi connection of the robot vacuum cleaner. Please review the Mobile Application Manual for detailed directions. Reset the Wi-Fi connection, if required. Please refer to the “Resetting the Wi-Fi” section of this manual |
Network security requirements:
Use TKIP, PSK and AES/CCMP encrypted WPA and WPA2 networks.
5 Operation
5.3.2 Operation modes
Map Management
A. Real time mapping
Real-time creation of a house map may help you understand the cleaning route and the cleaning environment easily. A map of the house is created after cleaning. The map is updated in real time during each vacuuming operation to ensure normal navigation. To create a complete house map:
a. Open the doors of your rooms for the robot vacuum cleaner to map each room; b. Remove any objects that may cause obstruction or blockage of the robot vacuum cleaner; c. Do not change the location of the charging dock or unplug it after the map is created.
B. Repositioning and remapping
If the robot vacuum cleaner is relocated or significant changes are made in the environment, the robot vacuum cleaner tries to reposition to adapt to the new environment and may create the relevant map again. The details are as follows:
a. If repositioning is successful, the robot vacuum cleaner continues cleaning; b. If repositioning is unsuccessful, the robot vacuum cleaner starts over to scan in order to make the mapping again.

WARNING: Ensure that the robot vacuum cleaner always starts the cleaning operation from the charging dock.
During cleaning, do not intervene in the robot vacuum cleaner or change its location.
Room cleaning mode (Supported by the relevant mobile application only)
You may specify the rooms you want to be cleaned with the mobile application, then the robot vacuum cleaner cleans only the room(s) that is/are marked in the map.

5 Operation
- The robot vacuum cleaner may also enter the areas other than the selected area after it starts cleaning; thus please remove the obstacles on the ground around the selected area. Area selection does not provide a secure isolation.
- Regional cleaning may only be started after the robot vacuum cleaner successfully creates a map.
Regional cleaning mode (Supported by the relevant mobile application only)

The dimensions of the region can be determined by holding from the right bottom corner. In the meantime, the dimensions of the displayed area are written on the screen with the dotted line.
Select regional cleaning mode in the application and then specify a cleaning area. The robot vacuum cleaner only cleans the selected area and then returns to the charging dock.
Regional cleaning may only be started after the robot vacuum cleaner successfully creates a map.

Refer to the mobile application operation manual for detailed usage tips.
6 Cleaning and maintenance
Turn off the appliance and unplug it before cleaning it.

WARNING: Never use gasoline, solvent, abrasive cleaners, metal objects or hard brushes to clean the appliance.
6.1 Cleaning the dust container and filters

You may call our call center to order a new filter when your filter reaches the end of its expected life, is deformed or needs to be replaced for a reason.

To achieve the maximum performance with EPA filter, clean it with a brush after each cleaning.
EPA filter is a replaceable accessory.
If you performed a cleaning operation in a space where there is construction dust and dust with very tiny particles, replace your filter with a new one in order not to experience a loss of performance.
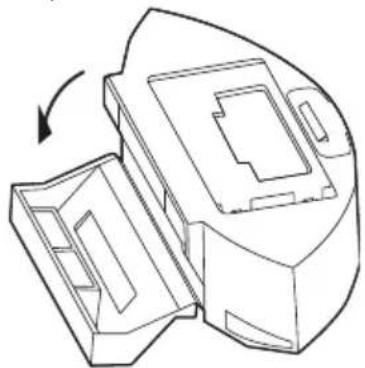
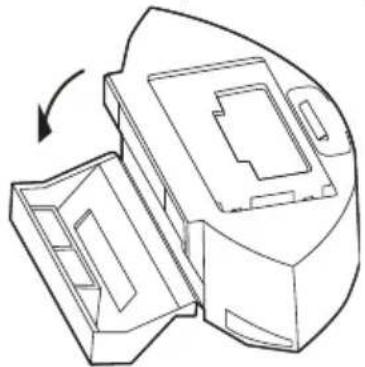
- Remove the dust container by pressing the button as shown below.

- Open the dust container as it is seen below and empty it.
6 Cleaning and maintenance
- Remove the high performance filter and clean the filter using the cleaning brush provided together with the appliance.

- Wash dust container and filter assembly periodically with cold water as required as per the frequency of operation.
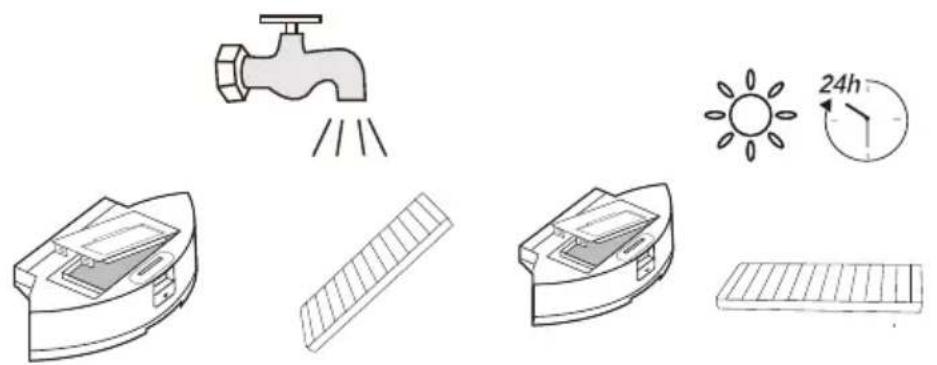
- Leave dust container and filter assembly to dry after washing, and ensure that they are completely dried.

Drying may take 24 to 48 hours.
- Assemble dust container and filter assembly after drying them and then install the assembly to the vacuum cleaner.

WARNING: Do not operate the robot vacuum cleaner without installing the filter group. Otherwise, the appliance may get damaged.
6.2 Cleaning of the brush
- Open the upper cover of the main brush by pressing on the tabs. Pull and remove the main roll upwards. Cut the hair lapped on the roller brush with the cutting and sharp side of the cleaning brush. Then clean the dusts on the roller brush with the bristles of the cleaning brush.
6 Cleaning and maintenance
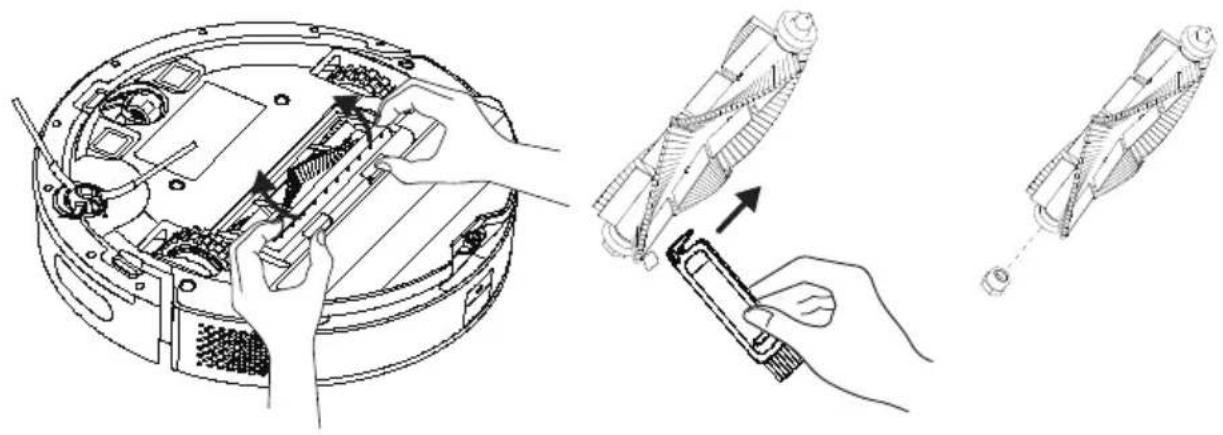
- Replace the brush after cleaning it and close the cover in the direction of the arrow.

6 Cleaning and maintenance
6.3 Cleaning and installation of the side brush

In the long term use, wash the side brush with warm water in order to eliminate the shape deformation. Install it to the robot as it is shown after it has dried.
6.4 Cleaning of the sensors
Clean the sensors and charging pins/electrodes regularly and remove the dust using a dry and soft cloth or a cleaning brush.
Information: You get a notification via the application when sensor cleaning is required.

6 Cleaning and maintenance
7 Troubleshooting
General Error Conditions
| Failure Cause and remedy | |
| Cannot be operated | 1. Charging level is low. Place the robot vacuum cleaner to the charging dock so that it shall be aligned with the charging poles. Bring the button on the left of the robot vacuum cleaner to position “I”; and the vacuum cleaner shall be operated automatically (When the robot vacuum cleaner is completely discharged, you shall need to charge for a while for automatic operation).2. The ambient temperature is very low (under 0 °C) or very high (above 50 °C). Please use the robot vacuum cleaner at an ambient temperature from 0 to 40 °C.3. Please ensure that the on/off button on the side of the robot vacuum cleaner is brought to position “I”. |
| Battery not charging | 1. Please remove the robot vacuum cleaner and check if the indicator light on the charging dock station is illuminated and ensure that both ends of the power adaptor of the charging dock are connected.2. Loose contact. Please clean the spring contacts on the charging dock and the charging contacts on the robot vacuum cleaner.3. Please ensure that the on/off button on the side of the robot vacuum cleaner is brought to position “I”. |
| Does not return to the dock/station for charging | 1. There are too many obstacles around the charging dock. Please place the charging dock to an area free of obstacles.2. The robot vacuum cleaner is too far away from the charging dock. Bring the robot vacuum cleaner closer to the charging dock and try again.3. Make sure that the charging stand station is plugged and there is energy. |
| Abnormal operation Turn off and on again. | |
| Operates with abnormal noise. | Foreign materials may have entered to the main brush, side brushes and the wheels. Please turn off the robot vacuum cleaner and clean it. |
| Cleaning performance is low / dust leaks | 1. Dust container is full. Please clean the dust container.2. Filter is clogged. Please clean or replace the filter.3. Foreign materials may have entered to the main brush. Please clean the main brush. |
7 Troubleshooting
| Cannot connect to the Wi-Fi network. | 1. Wi-Fi signal is weak. Make sure that the Wi-Fi signal in the location of the robot vacuum cleaner is strong.2. There is a cutoff in Wi-Fi connection. Please reset Wi-Fi, download the latest mobile application and try again.3. Password is not entered correctly.4. The router used is a model that operates in 5G frequency band (this robot vacuum supports the 2.4G frequency band only). |
| Timed cleaning feature does not operate | Charging level is low. Timed cleaning can only be started when the charge level is higher than 20%. |
| The vacuum cleaner consumes power while it is in the charging dock | The vacuum cleaner consumes very little amount of power while it is in the charging dock; this feature allows to keep the battery performance in the best level. |
Failure List
When the robot vacuum cleaner switches to the error position, the illuminated home button on the upper body starts to blink red and gives an audible warning. Follow the audible warning to resolve the fault.
| Audible Warning Solution | |
| Error 1: Battery error. Please refer to the manual or the application. | Battery temperature is very high or very low. Wait until the battery temperature reaches the normal values (0 °C~40 °C/32 °F~104 °F). |
| Error 2: Wheel error. Please refer to the manual or the application. | Please check for any foreign material stuck in the wheels and restart the vacuum cleaner. |
| Error 3: Side brush error. Please refer to the manual or the application. | Please check for any foreign material stuck in the side brush and restart the vacuum |
7 Troubleshooting
| Error 4: Main motor error. Please refer to the manual or the application. | ·Please check whether there is any foreign material stuck at the rear of the rotating brush (in the air flow path) and restart the vacuum cleaner.·Please check the dust container and the filter, and restart the vacuum cleaner. |
| Error 5: Turbo brush error. Please refer to the manual or the application. | ·Please remove the rotating brush, and clean the connection part of the rotating brush, rotating brush cover and the dust nozzle. Restart the vacuum cleaner after cleaning. |
| Error 6: Laser sensor error. Please refer to the manual or the application. | ·Please check for any foreign material inside the laser sensor, clean if required and restart the vacuum cleaner. |
| Error 7: Charging operation error. Please clean the charging contact area. | ·Please check for any contamination in the charging area and clean the charging poles. |
| Error 8: Software error. Please turn off and restart again. | ·Please bring the main button to position O and back to position I and restart the vacuum cleaner |
| Error 9: Abnormal operation. Please make sure that the main button is turned on. | ·Please bring the main button to on position initially |
Dear customer,


4 Installation
5 Operation

5 Operation

VCR 5430
IT


4 Installation
5 Operation

5 Operation

charging

4 Installation
5 Operation

5 Operation

4 Installation

5 Operation


5 Operation

□ □ Electric convector
□ Humidifier
Model / Series:
SELLER
Invoice no.:......Date:......
Robot vacuum cleaner Charging station Adapter for


charging
Spare accessories are supplied
| 1 filter |
Instructions for use and product documentation (2 pcs.)
Cleaning brush
3 Overview

2.1 Checks and components
- Lidar
- Upper part of the housing
- Central housing
- Start cleaning-pause button / Send to charging dock button
- Bumper sensor
- Front bumper
- Front bumper impact sensor
- Charging pins
- Drop prevention sensor
- Charging pins
- Front swivel wheel
- Rotating brush
- Rotating brush cover
- Rear wheel
- Side brush
- Charging station
- Charging adapter
- Power button
- Robot vacuum dustbin
- Dustbin release button
- Filter access area
- Cleaning brush
- HEPA filter

4 Installation

WARNING: If you are using the device for the first time or have not used it for a long time, fully charge the batteries before use.

5 Operation

Charge the appliance before first use.

If the product will not be used for an extended period, fully charge it, then turn off the power switch to preserve battery life. The product should be recharged at least once every three months.
5.1 Intended Use

Charging begins after the charging dock's light indicator blinks 3 times and then turns off completely.
5.3 Operation
Press the button “①” to start the automatic cleaning mode. When started, the robot vacuum removes itself from the charging dock, performs an automatic scan to create a map, intelligently determines the cleaning route, and divides the area into several regions. The cleaning route is planned along the wall, and the robot vacuum moves back and forth to clean different regions in order.

WARNING: If the battery level is too low, cleaning cannot be started. Charge the device before starting cleaning.

5 Operation
- The robot vacuum may enter areas other than the selected area after cleaning begins; therefore, please remove obstacles on the floor around the selected area. Selecting an area does not provide safe isolation.
- Cleaning a specific area can only begin after the robot vacuum has successfully created a map.
Specific Area Cleaning Mode (supported only by the relevant mobile app)


The dimensions of the region can be adjusted by dragging from the bottom-right corner. Meanwhile, the dimensions of the displayed area are shown with a dashed line on the screen.
Select the specific area cleaning mode in the app, then define the cleaning area. The robot vacuum cleans only the selected area and then returns to the charging dock.
- Periodically rinse the water tank, dust bin, and filter assembly with cold water, depending on the frequency of use.

- Allow the dust bin and filter assembly to dry after washing, and ensure they are completely dry.

Drying may take 24 to 48 hours.
- Assemble the dust container and filter assembly after drying, then mount the assembly onto the vacuum cleaner.

WARNING: Do not use the robot vacuum without the filter assembly installed. Otherwise, the device may be damaged.
6.2 Cleaning the Brush
- Replace the brush after cleaning and close the cover in the direction of the arrow.

General Error Conditions
| Greška Uzrok i rešenje | |
| Ne radi | 1. Nivo napunjenosti je nizak. Postavite robotski usisivač na stanicu za punjenje tako da bude u ravni sa stu-bovima za punjenje. Dovedite dugme sa leve strane robotskog usisivača u položaj „I”; a usisivač će raditi automatski (kada se robotski usisivač potpuno ispra-zni, moraćete da ga punite neko vreme kako bi mogao automatski da radi).2. Temperatura okoline je veoma niska (ispod 0 °C) ili veo-ma visoka (iznad 50 °C). Koristite robotski usisivač na temperaturi okoline od 0 do 40 °C.3. Vodite računa da je dugme za uključivanje/isključivanje na bočnoj strani robotskog usisivača dovedeno u po-ložaj „I“. |
| Baterija se ne puni | 1. Uklonite robotski usisivač i proverite da li indikatorska lampica na stanici za punjenje svetli i uverite se da su oba kraja adaptera za napajanje priključne stanice za punjenje povezana.2. Labav kontakt. Očistite opružne kontakte na stanici za punjenje i kontakte za punjenje na robotskom usisi-vaču.3. Vodite računa da je dugme za uključivanje/isključivanje na bočnoj strani robotskog usisivača dovedeno u po-ložaj „I“. |
| Ne vraća se na priključnu stanicu da bi se punio | 1. Previše je prepreka oko stanice za punjenje. Postavite priključnu stanicu za punjenje na mesto na kojem nema prepreka.2. Robotski usisivač je predaleko od priključne stanice za punjenje. Približite robota usisivača stanici za punjenje i pokušajte ponovo.3. Vodite računa da je stanica za punjenje uključena i da je ostvareno napajanje električnom energijom. |
| Neadekvatan rad Isključite i ponovo uključite. | |
| Rad uz neredovnu buku. | Strani materijali su možda zaglavljeni u glavnoj četki, bočnoj četki i točkovima. Isključite robotski usisivač i očistite ga. |
7 Troubleshooting
| Performanse čišćenja su niske/prašina izbija | 1. Posuda za prašinu je puna. Očistite posudu za prašinu.2. Filter je začepljen. Očistite ili zamenite filter.3. Strani materijali su se možda zaglavili u glavnoj četki.Očistite glavnu četku. |
| Povezivanje na Wi-Fi mrežu nije moguće. | 1. Wi-Fi signal je slab. Vodite računa da je Wi-Fi signal na mestu gde se nalazi robotski usisivač jak.2. Postoji prekid Wi-Fi veze. Resetujte Wi-Fi, preuzmite najnoviju mobilnu aplikaciju i pokušajte ponovo.3. Lozinka nije ispravno uneta.4. Ruter koji se koristi je model koji radi u frekventnom op- segu od 5G (ovaj robot usisivač podržava samo frek- vencijski opseg od 2,4G). |
| Funkcija određenog vremena čišćenja ne radi | Nivo napunjenosti je nizak. Vremenski definisano čišćenje može započeti samo kada je nivo napunjenosti veći od 20%. |
| Usisivač troši energiju dok je na priključnoj stanici za punjenje | Usisivač troši veoma malo energije dok je na stanici za punjenje; ova funkcija omogućava održavanje performansi baterije na najboljem nivou. |
Error List
When the robot vacuum enters an error state, the illuminated start button on the top of the body begins to blink red and emits an audible warning. Follow the audible warning to resolve the error.
| Zvučno upozorenje Rešenje | |
| Greška 1: Greška baterije. Pogledajte uputstvo ili aplikaciju. | • Temperatura baterije je veoma visoka ili veoma niska. Sačekajte dok temperatura baterije ne dostigne normalne vrednosti (0 °C~40 °C/32 °F~104 °F). |
| Greška 2: Greška točkića. Pogledajte uputstvo ili aplikaciju. | • Proverite da li se u točkovima zaglavio strani materijal i ponovo pokrenite usisivač. |
| Greška 3: Greška bočne četke. Pogledajte uputstvo ili aplikaciju. | • Proverite da li se strani materijal zaglavio u bočnoj četki i ponovo pokrenite usisivač |
7 Troubleshooting
| Greška 4: Greška glavnog motora. Pogledajte uputstvo ili aplikaciju. | Proverite da li se na zadnjoj strani rotirajuće četke (na putu protoka vazduha) zaglavio neki strani materijal i ponovo pokrenite usisivač.Proverite posudu za prašinu i filter i po-novo pokrenite usisivač. |
| Greška 5: Greška turbo četke. Pogledajte uputstvo ili aplikaciju. | Uklonite rotirajuću četku a zatim očistite priključni deo četke, poklopac rotirajuće četke i mlaznicu za prašinu. Ponovo pokrenite usisivač nakon čišćenja. |
| Greška 6: Greška senzora lasera. Pogledajte uputstvo ili aplikaciju. | Proverite da li ima bilo kakvog stranog materijala unutar laserskog senzora, očistite po potrebi i ponovo pokrenite usisivač. |
| Greška 7: Greška punjenja. Očistite kontaktnu oblast za punjenje. | Proverite da li ima bilo kakve kontaminacije u oblasti za punjenje i očistite stubove za punjenje. |
| Greška 8: Greška softvera. Isključite i ponovo pokrenite. | Vratite glavno dugme u položaj O i vratite u položaj I i ponovo pokrenite usisivač |
| Greška 9: Pogrešan rad. Proverite da li je glavno dugme uključeno. | Prvo postavite glavno dugme u položaj za uključeno |

2- Mount the charging station.

4 Assembly

5 Operation

5 Operation
Robot vacuum Charging station Adapter


charging
Supplied accessories
| 1 filtar |

User manual and product documentation (2 pcs)

O
Cleaning brush
3 Overview


4 Installation

WARNING: If you use the product for the first time or if you have not used it for a longer period, fully charge the batteries before use.

Keep the charging station always plugged into the wall outlet, otherwise the robot vacuum cannot automatically return to the charging station.

5 Operation


Place the robot vacuum on the area to be cleaned and press the button twice. When the cleaning mode is activated, the robot vacuum will clean a square area of 1.5 x 1.5 m, positioning itself as the center of that area.
5 Operation

- Open the dust container as shown below and empty it.
- Occasionally wash the dust container and filter assembly with cold water, if necessary, according to frequent use.

- After washing, let the dust container and filter assembly dry and make sure it is completely dry.

Drying may take 24 to 48 hours.
- After drying, assemble the dust container and filter assembly and install it into the vacuum cleaner.

WARNING: Do not operate the robot vacuum if the filter assembly is not installed. Otherwise, the device may be damaged.
6.2 Cleaning the brush


4 Setup

5 Operation

Before first use, charge the device.


5 Operation
C
- After washing, let the dust container and filter assembly dry and make sure they are completely dry.

Robot vacuum charging station

and mounting

2- Install the charging station.

4 Assembly
5 Usage

5 Usage


Power button/
Operation 5


Arabic

- ROBOT VACUUM CLEANER
- PLEASE READ THIS GUIDE FIRST
- SYMBOLS AND THEIR MEANINGS
- IMPORTANT SAFETY AND ENVIRONMENTAL INSTRUCTIONS
- GENERAL SAFETY
- COMPLIANCE WITH THE WEEE REGULATIONS AND WASTE DISPOSAL
- PACKAGING INFORMATION
- WASTE BATTERIES
- WHAT TO DO FOR ENERGY SAVING
- COMPLIANCE WITH THE ROHS DIRECTIVE
- BOX CONTENT
- SPARE ACCESSORIES SUPPLIED
- OVERVIEW
- CHECKS AND COMPONENTS
- CONFORMITY DECLARATION FOR CE
- INSTALLATION
- REMOVE THE PROTECTIVE SPONGES
- INSTALL THE CHARGING STATION
- OPERATION
- INTENDED USE
- CHARGING THE APPLIANCE
- STARTING THE CLEANING
- PAUSING
- POINT CLEANING
- VACUUM POWER SELECTION
- REMOTE CONTROLLED CLEANING
- SLEEP
- RESETTING THE SYSTEM
- OPERATION WITH THE APPLICATION
- DOWNLOAD THE APPLICATION
- RESET WI-FI
- ADD A DEVICE
- WI-FI NETWORK
- NETWORK SECURITY REQUIREMENTS
- OPERATION MODES
- MAP MANAGEMENT
- REAL TIME MAPPING
- REPOSITIONING AND REMAPPING
- ROOM CLEANING MODE (SUPPORTED BY THE RELEVANT MOBILE APPLICATION ONLY)
- REGIONAL CLEANING MODE (SUPPORTED BY THE RELEVANT MOBILE APPLICATION ONLY)
- CLEANING AND MAINTENANCE
- CLEANING THE DUST CONTAINER AND FILTERS
- CLEANING OF THE BRUSH
- CLEANING AND INSTALLATION OF THE SIDE BRUSH
- CLEANING OF THE SENSORS
- TROUBLESHOOTING
- FAILURE LIST
- SELLER
- SPARE ACCESSORIES ARE SUPPLIED
- SPECIFIC AREA CLEANING MODE (SUPPORTED ONLY BY THE RELEVANT MOBILE APP)
- CLEANING THE BRUSH
- ERROR LIST
- MOUNT THE CHARGING STATION
- ASSEMBLY
- SUPPLIED ACCESSORIES
- SETUP
- C
- USAGE
Brand : BEKO
Model : VRR 71414 VB
Category : Robot vacuum