
FK 505 - Photocopier KONICA MINOLTA - Free user manual and instructions
Find the device manual for free FK 505 KONICA MINOLTA in PDF.

| Product Type | Fax Kit for Multifunction Copier |
| Brand | Konica Minolta |
| Model | FK-505 |
| Compatibility | Bizhub 162 / 210 |
| Transmission Mode | G3 |
| Transmission Speed | 33.6 to 2.4 kbps (automatic switching) |
| Transmission Time | Approx. 3 seconds per standard A4 page |
| Scanning Resolution | 8 pixels/mm × 3.85/7.7/15.4 lines/mm; 16 pixels/mm × 15.4 lines/mm |
| Memory Capacity | Built-in memory 5 MB (280 A4 pages); with memory expansion 64 MB (1024 pages) |
| Document Sizes | Up to A3; continuous documents up to 1000 mm |
| Paper Sizes for Reports | A3, B4, A4, B5, A5; Letter, Legal, Ledger (inches) |
| Coding | MH, MR, MMR, JBIG |
| Scanning Functions | Duplex scanning with DF-605 (option) |
| Fax Functions | Memory, direct, manual, broadcast, timer, mailbox, relay, polling, F-code |
| Dialing | Direct, abbreviated, group, programmable, directory |
| Reception | Manual, memory, mailbox, polling |
| Reports | Transmission/reception result, activity, memory data list, etc. |
| Remote Management | PageScope Web Connection (via browser), LSD (PC software) |
| Power Supply | Via the host copier |
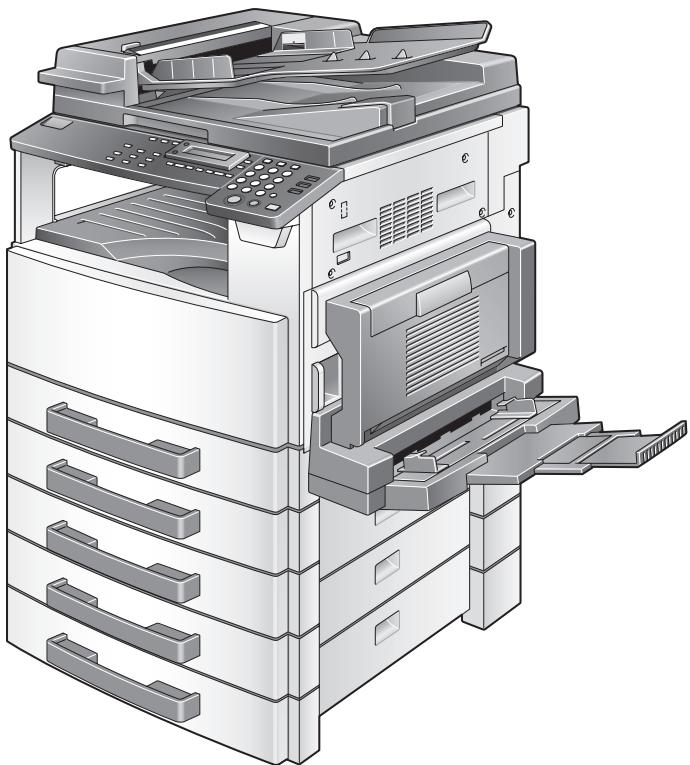
| Dimensions (Host Copier) | Approx. 620 × 690 × 740 mm (W × D × H) |
| Weight (Host Copier) | Approx. 48 kg (without options) |
| Maintenance and Cleaning | Clean the exterior with a soft cloth; do not use solvents. Follow instructions in the manual. |
| Safety | CE compliant; mandatory grounding; do not disassemble; use only the provided cord. |
| Spare Parts and Repairability | Consumables: toner, drum. Options: automatic document feeder DF-605, memory EM-101/102, controller IC-205. |
Frequently Asked Questions - FK 505 KONICA MINOLTA
User questions about FK 505 KONICA MINOLTA
0 question about this device. Answer the ones you know or ask your own.
Ask a new question about this device
Download the instructions for your Photocopier in PDF format for free! Find your manual FK 505 - KONICA MINOLTA and take your electronic device back in hand. On this page are published all the documents necessary for the use of your device. FK 505 by KONICA MINOLTA.
USER MANUAL FK 505 KONICA MINOLTA
Facsimile operations (FK-505)

Contents
Contents
1 Introduction
1.1 User's guides 1-3
1.2 We want you to be a satisfied customer 1-4
1.3 Safety information 1-5
Warning and precaution symbols 1-5
Meaning of symbols 1-6
Disassemble and modification 1-6
Power cord 1-7
Power source 1-8
Power plug 1-9
Grounding 1-10
Installation 1-11
Ventilation 1-12
Actions in response to troubles 1-13
Consumables 1-14
When moving the machine 1-15
Miscellaneous 1-15
USER INSTRUCTIONS - CE Marking 1-16
For New Zealand Users 1-16
Notice for Ni-MH batteries 1-16
2 Precaution
2.1 Part names and their functions 2-3
Main unit 2-3
2.2 Control panel 2-4
Names of control panel parts and their functions 2-4
2.3 Display indications 2-9
In fax mode 2-9
Symbol list 2-10
2.4 Entering text 2-11
Key operation 2-11
Changing input mode 2-11
Inputting example 2-12
3 Faxing
3.1 Dialing 3-3
Using direct dialing to communicate with overseas destinations .3- 3
To fax by entering the fax number directly using the 10-key pad .3-4
To fax using one-touch dialing 3-5
To fax using speed dialing 3-6
To fax using group dialing 3-7
To fax using chain dial 3-8
To fax using program dialing 3-9
To fax using the phone book 3-10
To search the phone book 3-11
To redial the last recipient called 3-13
3.2 Transmission settings 3-14
Adjusting the fax resolution 3-14
To specify the resolution 3-15
3.3 Basic faxing 3-16
To fax using the automatic document feeder 3-16
To fax documents positioned on the original glass 3-18
If the memory becomes full while scanning fax documents 3-19
3.4 Confirmation mode 3-20
To check the counters 3-20
To check the transmission result 3-22
To output a report/list 3-23
Transmission result report 3-24
Reception result report 3-24
Activity report 3-25
Memory data list 3-25
Memory image print 3-25
List of one-touch dial keys 3-26
List of speed dial numbers 3-26
Key setting list 3-26
Relay box list 3-26
Machine status list 3-27
Configuration page 3-27
PCL font list 3-27
4 Fax transmission/Reception methods
4.1 Transmission methods 4-3
4.1.1 Memory transmission 4-3
To specify memory TX 4-3
4.1.2 Direct transmission 4-4
4.1.3 Manual transmission 4-5
To send a fax manually 4-6
4.1.4 Batch transmission 4-7
To fax using batch transmission 4-7
4.1.5 Broadcast transmission 4-8
To fax using broadcast transmission 4-8
4.1.6 Timer transmission 4-11
To fax using timer transmission 4-11
4.1.7 Mailbox transmission 4-13
To fax using mailbox transmission 4-13
4.1.8 Relay initiation transmission 4-15
To fax using relay initiation transmission 4-15
4.1.9 Relay broadcast transmission 4-17
4.1.10 Polling transmission 4-18
To set up polling transmission 4-18
To delete a document from the polling transmission setup 4-20
4.1.11 Canceling (Deleting) a document queued in the memory for
transmission 4-21
To cancel a queued document 4-21
4.2 Reception methods 4-23
4.2.1 Manual reception 4-23
To receive a fax manually 4-23
4.2.2 Memory reception 4-24
4.2.3 Mailbox reception 4-25
To retrieve a document from a mailbox 4-25
4.2.4 Polling reception 4-26
To receive a fax using polling reception 4-26
4.3 Using F codes 4-28
4.3.1 Using mailboxes 4-29
Specifying mailboxes 4-29
F code mailbox transmission/reception 4-29
4.3.2 Specifying F codes 4-30
When sending faxes 4-30
Programming F codes 4-30
5 Using the utility mode
5.1 Specifying the machine settings 5-4
Selecting the MACHINE SETTING menu 5-5
Specifying BUZZER VOLUME 5-6
Specifying INITIAL MODE 5-6
5.2 Paper source settings 5-7
5.3 Admin. management settings 5-8
Selecting the ADMIN. MANAGEMENT menu 5-9
Specifying REMOTE MONITOR 5-10
5.4 Fax registration settings 5-11
Selecting the FAX REGISTRATION menu 5-12
Specifying ONE-TOUCH DIAL 5-13
To program a one-touch dial key 5-13
To change/delete a programmed one-touch dial key 5-15
Specifying SPEED DIAL 5-17
To program a speed dial number 5-17
To change/delete a programmed speed dial number 5-19
Specifying GROUP DIAL 5-21
To program a group of fax numbers 5-21
To change/delete a programmed group of fax numbers 5-23
Specifying PROGRAM DIAL 5-25
To set program dialing 5-25
To change/delete a programmed broadcast transmission 5-27
To change/delete a programmed timer transmission 5-29
To change/delete a programmed mailbox transmission 5-31
To change/delete a programmed polling reception 5-33
To change/delete a programmed relay initiation transmission ....5-35
Specifying BATCH TX 5-37
To set batch transmitting 5-37
To change the batch transmission setting 5-39
To delete the batch transmission setting 5-40
Specifying MAILBOX 5-41
To register a mailbox 5-41
To delete a mailbox 5-42
Specifying RELAY BOX 5-43
To program the relay box 5-43
To delete the relay box 5-45
5.5 TX operation settings 5-46
Selecting the TX OPERATION menu 5-47
Specifying SCAN CONTRAST 5-47
Specifying RESOLUTION 5-48
Specifying DEFAULT TX 5-49
SpecifyingHEADER 5-49
5.6 RX operation settings 5-50
Selecting the RX OPERATION menu 5-52
Specifying MEMORY RX MODE 5-53
To cancel memory reception 5-54
Specifying NO.of RINGS 5-54
Specifying REDUCTION RX 5-55
Specifying RX PRINT 5-55
Specifying RX MODE 5-55
Specifying FORWARD 5-56
Specifying FOOTER 5-57
Specifying SELECT TRAY 5-57
SpecifyingCLOSED NETWORK 5-58
5.7 Communication settings 5-59
Selecting the COMM. SETTING menu 5-59
Specifying TONE/PULSE 5-60
To specify the telephone dialing system 5-60
Specifying LINE MONITOR 5-61
Specifying PSTN/PBX 5-62
To specify the telephone wiring system 5-62
5.8 Reporting settings 5-63
Selecting the REPORTING menu 5-64
Specifying ACTIVITY REPORT 5-64
Specifying RESERV.REPORT 5-65
Specifying TX RESULT REPORT 5-65
Specifying RX RESULT REPORT 5-65
5.9 Initial user data settings 5-66
Selecting the INITIAL USER DATA menu 5-66
Specifying DATE&TIME 5-67
Specifying USER FAX No. 5-67
Specifying USER NAME 5-68
PageScope Web Connection settings page 5-69
6 When a message appears
6.1 What does each message mean? 6-3
6.2 When faxing is not performed correctly 6-4
Faxes cannot be sent 6-4
Faxes cannot be received 6-5
Calls cannot be sent 6-6
7 Miscellaneous
7.1 Specifications 7-3
7.2 Glossary 7-4
7.3 PageScope Web Connection 7-6
What is PageScope Web Connection? 7-6
System requirements 7-8
Accessing PageScope Web Connection 7-8
Using PageScope Web Connection 7-8
About the screen layout 7-9
Logging in as an administrator 7-10
Logging in to administrator mode 7-10
7.4 Local Setup for Diagnostic (LSD) 7-11
About Local Setup for Diagnostic (LSD) 7-11
LSD operating environment 7-11
Outline of setup 7-12
Installing LSD 7-13
Starting up LSD 7-14
Main window of LSD 7-15
Connecting to the machine 7-16
Downloading information from the machine 7-16
Programming a one-touch dial number 7-16
Editing a one-touch dial number 7-18
Programming a speed dial number 7-18
Editing a speed dial number 7-20
Programming a group dial number 7-20
Editing a group dial number 7-21
Printing the list of one-touch dial, speed dial and group dial numbers 7-22
Saving settings to a computer 7-22
Saving settings to a fax machine 7-22
Specifying Utility mode settings 7-23
Checking the total counter 7-26
Checking the configuration page 7-27
Uninstalling LSD 7-27
8 Index
1
Introduction
1 Introduction
1.1 User's guides
The user's guide for this machine is divided into two parts: the bizhub162/210 user's guide and the fax kit FK-505 user's guide.
Read the necessary description according to the required use.
The fax kit FK-505 user's guide contains precautions on the use of this machine. Be sure to read this manual before using the machine.
After reading the user's guide, be sure to store it in a safe place for future reference.
bizhub 162/210 user's guide:
- This manual contains details on the basic operation of this machine, precautions on its use, and operating procedures for the various copy functions.
- Before using the various copy functions, read the bizhub 162/210 user's guide.
Fax kit FK-505 user's guide:
- This manual contains details on the operating procedures for the various fax functions.
- Before using the various fax functions, read the fax kit FK-505 user's guide.
1.2 We want you to be a satisfied customer
Thank you for choosing this machine.
This user's guide describes the functions, operating procedures, precautions, and basic troubleshooting for this machine.
Before using this machine, be sure to read the user's guide thoroughly in order to ensure that you use the machine efficiently. After you have gone through user's guide, store it in the holder and keep it handy at all times.
Note that some of the illustrations of the machine used in the user's guide may be different from what you actually see on your machine.
1.3 Safety information
This section contains detailed instructions on the operation and maintenance of this machine. To achieve optimum utility of this device, all operators should carefully read and follow the instructions in this manual.
Please read the following section before connecting the machine to the supply. It contains important information related to user safety and preventing equipment problems.
Please keep this manual in a handy place near the machine.
Make sure you observe all of the precautions appear in each section of this manual.
KM_Ver.01E_F

Note
Some parts of the contents of this section may not correspond with the purchased product.
Warning and precaution symbols
The following indicators are used on the warning labels or in this manual to categorize the level of safety warnings.

WARNING
Ignoring this warnings could cause serious injury or even death.
Do not ignore this safety advices.

CAUTION
Ignoring this cautions could cause injury or damage to property.
Do not ignore this safety advices.
Meaning of symbols
| Symbol | Meaning | Example | Meaning |
| A triangle indicates a danger against which you should take precaution. | This symbol warns against possible causes of burns. | ||
| A diagonal line indicates a prohibited course of action. | This symbol warns against dis-mantling the device. | ||
| A black circle indicates an imperative course of action. | This symbol indicates you must unplug the device. |
Disassemble and modification

WARNING
Ignoring this warnings could cause serious injury or even death.
Do not ignore this safety advices.
| Warning | Symbol |
| ·Do not attempt to remove the covers and panels which have been fixed to the product. Some products have a high-voltage part or a laser beam source inside that could cause an electrical shock or blindness. | |
| ·Do not modify this product, as a fire, electrical shock, or breakdown could result. If the product employs a laser, the laser beam source could cause blindness. |
Power cord

WARNING
Ignoring this warnings could cause serious injury or even death.
Do not ignore this safety advices.
| Warning | Symbol |
| ·Use only the power cord supplied in the package. If a power cord is not supplied, only use the power cord and plug that is specified in POWER CORD INSTRUCTION. Failure to use this cord could result in a fire or electrical shock. | ! |
| ·Use the power cord supplied in the package only for this machine and NEVER use it for any other product. Failure to ob-serve this precaution could result in a fire or electrical shock. | ! |
| ·Do not scratch, abrade, place a heavy object on, heat, twist, bend, pull on, or damage the power cord. Use of a damaged power cord (exposed core wire, broken wire, etc.) could result in a fire or breakdown. Should any of these conditions be found, immediately turn OFF the power switch, unplug the power cord from the power outlet, and then call your authorized service representative. | ⊗ ⊗ ⊗ |
Power source

WARNING
Ignoring this warnings could cause serious injury or even death.
Do not ignore this safety advices.
| Warning | Symbol |
| ·Use only the specified power source voltage. Failure to do that could result in a fire or electrical shock. | ! |
| ·Connect power plug directly into wall outlet having the same configuration as the plug. Use of an adapter leads to the product connecting to inadequate power supply (voltage, current capacity, grounding), and may result in fire or shock. If proper wall outlet is not available, the customer shall ask qualified electrician for the installation. | ! |
| ·Do not use a multiple outlet adapter nor an extension cord in principle. Use of an adapter or an extension cord could cause a fire or electrical shock. Contact your authorized service representative if an extension cord is required. | × |
| ·Consult your authorized service representative before contacting other equipment on the same wall outlet. Overload could result in a fire. | ! |

CAUTION
Ignoring this cautions could cause injury or damage to property.
Do not ignore this safety advices.
| Caution | Symbol |
| ·The outlet must be near the equipment and easily accessible. Otherwise you can not pull out the power plug when an emergency occurs. | ! |
Power plug

WARNING
Ignoring this warnings could cause serious injury or even death.
Do not ignore this safety advices.
| Warning | Symbol |
| ·Do not unplug and plug in the power cord with a wet hand, as an electrical shock could result. | |
| ·Plug the power cord all the way into the power outlet. Failure to do this could result in a fire or electrical shock. |

CAUTION
Ignoring this cautions could cause injury or damage to property.
Do not ignore this safety advices.
| Caution | Symbol |
| ·Do not tug the power cord when unplugging. Pulling on the power cord could damage the cord, resulting in a fire or elec-trical shock. | ∅ |
| ·Remove the power plug from the outlet more than one time a year and clean the area between the plug terminals. Dust that accumulates between the plug terminals may cause a fire. | ! |
Grounding

WARNING
Ignoring this warnings could cause serious injury or even death.
Do not ignore this safety advices.
| Warning | Symbol |
| ·Connect the power cord to an electrical outlet that is equipped with a grounding terminal. |
Installation

WARNING
Ignoring this warnings could cause serious injury or even death.
Do not ignore this safety advices.
| Warning | Symbol |
| ·Do not place a flower vase or other container that contains water, or metal clips or other small metallic objects on this product. Spilled water or metallic objects dropped inside the product could result in a fire, electrical shock, or breakdown. Should a piece of metal, water, or any other similar foreign matter get inside the product, immediately turn OFF the power switch, unplug the power cord from the power outlet, and then call your authorized service representative. | ⊗ ⊗ ⊗ ⊗ |

CAUTION
Ignoring this cautions could cause injury or damage to property.
Do not ignore this safety advices.
| Caution | Symbol |
| ·After installing this product, mount it on a secure base. If the unit moves or falls, it may cause personal injury. | ● |
| ·Do not place the product in a dusty place, or a site exposed to soot or steam, near a kitchen table, bath, or a humidifier. A fire, electrical shock, or breakdown could result. | ○ |
| ·Do not place this product on an unstable or tilted bench, or in a location subject to a lot of vibration and shock. It could drop or fall, causing personal injury or mechanical break-down. | ○ |
| ·Do not let any object plug the ventilation holes of this product. Heat could accumulate inside the product, resulting in a fire or malfunction. | ○ |
| ·Do not use flammable sprays, liquids, or gases near this product, as a fire could result. | ○ |
Ventilation

CAUTION
Ignoring this cautions could cause injury or damage to property.
Do not ignore this safety advices.
| Caution | Symbol |
| ·Always use this product in a well ventilated location. Operat-ing the product in a poorly ventilated room for an extended period of time could injure your health. Ventilate the room at regular intervals. | ● |
Actions in response to troubles

WARNING
Ignoring this warnings could cause serious injury or even death.
Do not ignore this safety advices.
| Warning | Symbol |
| ·Do not keep using this product, if this product becomes inor-dinately hot or emits smoke, or unusual odor or noise. Imme-diately turn OFF the power switch, unplug the power cord from the power outlet, and then call your authorized service representative. If you keep on using it as is, a fire or electrical shock could result. | → |
| ·Do not keep using this product, if this product has been dropped or its cover damaged. Immediately turn OFF the power switch, unplug the power cord from the power outlet, and then call your authorized service representative. If you keep on using it as is, a fire or electrical shock could result. | ← |

CAUTION
Ignoring this cautions could cause injury or damage to property.
Do not ignore this safety advices.
| Caution | Symbol |
| ·The inside of this product has areas subject to high temper-ature, which may cause burns. When checking the inside of the unit for malfunctions such as a paper misfeed, do not touch the locations (around the fus-ing unit, etc.) which are indicated by a “Caution HOT” caution label. |
Consumables

WARNING
Ignoring this warnings could cause serious injury or even death.
Do not ignore this safety advices.
| Warning | Symbol |
| ·Do not throw the toner cartridge or toner into an open flame. The hot toner may scatter and cause burns or other damage. | ◎ |

CAUTION
Ignoring this cautions could cause injury or damage to property.
Do not ignore this safety advices.
| Caution | Symbol |
| ·Do not leave a toner unit or drum unit in a place within easy reach of children. Licking or ingesting any of these things could injure your health. | ◇ |
| ·Do not store toner units and PC drum units near a floppy disk or watch that are susceptible to magnetism. They could cause these products to malfunction. | ◇ |
When moving the machine

CAUTION
Ignoring this cautions could cause injury or damage to property.
Do not ignore this safety advices.
| Caution | Symbol |
| ·Whenever moving this product, be sure to disconnect the power cord and other cables. Failure to do this could damage the cord or cable, resulting in a fire, electrical shock, or breakdown. | 3-C |
| ·When moving this product, always hold it by the locations specified in the User's Guide or other documents. If the unit falls it may cause severe personal injury. The product may also be damaged or malfunction. | 1 |
Miscellaneous
The Facsimile has been approved in accordance with Council Decision 1999/5/EC for pan-European single terminal connection to the public switched telephone network (PSTN). However, due to differences between the individual PSTNs provided in different countries, the approval does not, of itself, give an unconditional assurance of successful operation on every PSTN network terminal point.
In the event of problems, you should contact your equipment supplier in the first instance.

Note
The manufacturer should ensure that the vendor and user of equipment is clearly informed of the above information by means of packaging and/or user manuals or other forms of user instructions.
This product is approved for DTMF dialing only. When directly connected to the public switched telephone network (PSTN mode) pulse dialing can not be used.
(Pulse dialing may only be used when this product is connected to a PABX.)
USER INSTRUCTIONS - CE Marking
CE
For New Zealand Users
The grant of a telepermit for any item of terminal equipment indicates only that Telecom has accepted that the item complies with minimum conditions for connection to its network. It indicates no endorsement of the product by Telecom, nor does it provide any sort of warranty. Above all, it provides no assurance that any item will work correctly in all respects with another item of tele permitted equipment of a different make or model, nor does it imply that any product is compatible with all of Telecom's network services.
This equipment is not capable, under all operating conditions, of correct operation at the higher speeds for which it is designed. Telecom will accept no responsibility should difficulties arise in such circumstances.
This equipment shall not be set to make automatic calls to the Telecom '111' emergency service.
The reception operation - No. of rings? setting must be configured between 3 and 10.
The call log incorporated in this equipment does not record all answered calls. The call log, therefore may not agree with the Telecom account which may include calls not shown on the log.
This equipment should not be used under any circumstances which may constitute a nuisance to other Telecom customers.
Not all telephones will respond to incoming ringing when connected to the extension socket.
Notice for Ni-MH batteries
Ni-MH (Nickel metal hydride) batteries are installed inside machine as back up memory batteries. Please dispose according to local, state and federal regulations.
2
Precaution
2 Precaution
2.1 Part names and their functions
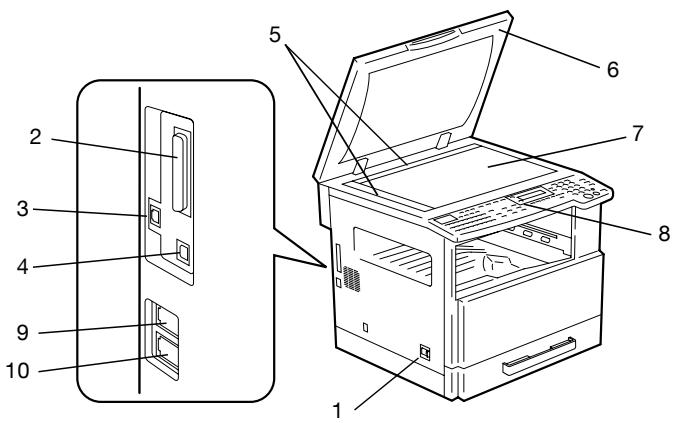
Main unit
| No. | Part name | Description |
| 1 | Power switch | Used to turn the machine on and off. |
| 2 | Parallel interface connector | Used for connecting a parallel cable from the computer. |
| 3 | RJ45 connector for networking | Used for connecting the network cable when this machine is used for internet faxing, network printing and network scanning. |
| 4 | Printer USB connector | Used for connecting a USB cable from the computer. |
| 5 | Document scales | Used to align the document. |
| 6 | Original cover OC-504 | Presses down on the document positioned on the original glass. Standard onbizhub 162 Optional onbizhub 210 |
| 7 | Original glass | When manually feeding a document, position it on the original glass so that it can be scanned. Position the document face down on the glass. |
| 8 | Control panel | Used to start copying or to make various settings. |
| 9 | Telephone line connector (LINE) | User for connecting the telephone cord from the wall jack. |
| 10 | External telephone connector (TEL) | Used for connecting the cord from the telephone. |
- For details on parts other than those described above, refer to the bizhub162/210 user's guide.
2.2 Control panel
Names of control panel parts and their functions
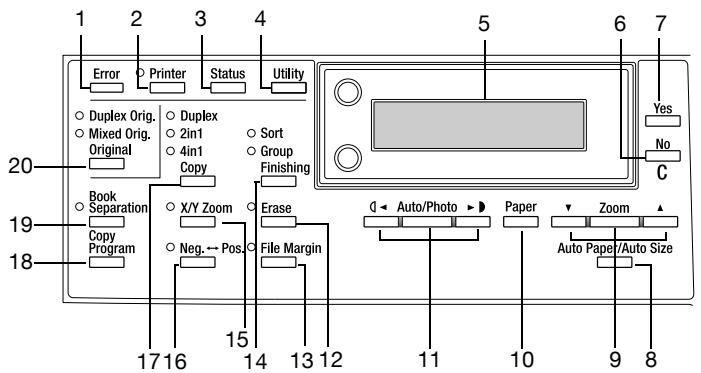
| No. | Part name | Function |
| 1 | “Error” indicator | Lights up or flashes if an error has occurred. |
| 2 | [Printer] key/indicator | Lights up while data is being printed from the computer and flash-ies while data is being sent.For details, refer to the Printer Controller User's Guide. |
| 3 | [Status] key | Used to view the transmission results or the counters, or to print a transmission result report. |
| 4 | [Utility] key | Used to enter utility mode and display the first utility mode screen.MACHINE SETTING, PAPER SOURCE SETUP, USER MANAGEMENT, ADMIN. MANAGEMENT, COPY SETTING 1 & 2,FAX REGISTRATION, TX OPERATION, RX OPERATION,COMM. SETTING, REPORTING, INITIAL USER DATA, NET-WORK SETTING (with the network interface card NC-502), E-MAIL SETTING 1 & 2 (with the network interface card NC-502),SCAN SETTING (with the network interface card NC-502) |
| 5 | Display | Displays setting menus, error messages, and specified settings such as the number of copies and the zoom ratio. |
| 6 | [No/C] key | Erases the entered numbers and letters.Returns to the previous screen. |
| 7 | [Yes] key | Confirms the current setting. |
| 8 | [Auto paper/Auto size] key | Used to select between the auto paper or the auto size function. |
| 9 | [Zoom] key,[▼] and [▲] keys | Used to select a preset enlargement or reduction ratio.A zoom ratio between × 0.25 and × 4.00 can be selected when the paper size is selected manually.(Manual paper selection)A zoom ratio between × 0.50 and × 2.00 can be selected when the paper size is selected automatically.(Auto paper)Used to specify the selection above or below in setting screens and menus. |
| 10 | [Paper] key | Used to select the size of the paper to be printed on. |
| 11 | [Auto/Photo] key, [▲] and [►] keys | • Used to specify the scanning density of copies. • Used to specify the selection at the left or right in setting screens. |
| 12 | [Erase] key | Used to select the area of the document that is erased. |
| 13 | [File margin] key | Press to select the file margin function. |
| 14 | [Finishing] key | Used to select a copy finishing function. |
| 15 | [X/Y zoom] key | Used to specify different scaling proportions for the vertical and horizontal directions. |
| 16 | [Neg. ↔Pos.] key | Press to make copies with the dark- and light-colored areas of the document inverted. |
| 17 | [Copy] key | Used to select the 2in1, 4in1 or duplex copy settings. |
| 18 | [Copy program] key | • Copy programs can be stored. • Stored copy programs can be selected and recalled. |
| 19 | [Book separation] key | Used to select the book separation function. |
| 20 | [Original] key | • Used to select between the duplex orig. function and the mixed orig. function. • If the fax key was pressed, the mixed orig. indicator lights up. The duplex orig. function can be selected only when the reverse automatic document feeder is installed. |
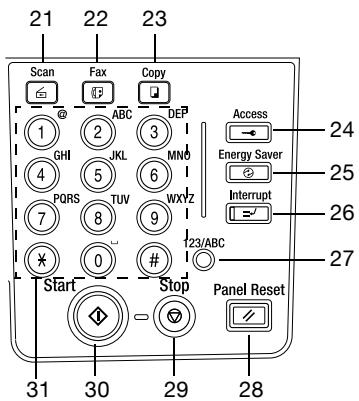
| No. | Part name | Function |
| 21 | [Scan] key | Press to enter scan mode. The indicator lights up in green to indicate that the machine is in scan mode. (Available only when the network interface card NC-502 and the scanner unit SU-502 are installed.) |
| 22 | [Fax] key | Press to enter fax mode. The indicator lights up in green to indicate that the machine is in fax mode. |
| 23 | [Copy] key | Press to enter copy mode. The indicator lights up in green to indicate that the machine is in copy mode. |
| 24 | [Access] key | Used with user management. |
| 25 | [Energy saver] key | Press to enter energy save mode. |
| 26 | [Interrupt] key | Press to enter interrupt mode. The indicator lights up in green to indicate that the machine is in interrupt mode. Press again to cancel interrupt mode and return to the mode before interrupt mode was entered. If the Interrupt key is pressed while a received fax document is being printed, printing stops. Press the Interrupt key again to continue printing the received fax document. |
| 27 | [123/ABC] key | Press to switch the input mode between numbers and letters. |
| 28 | [Panel reset] key | Cancels all copy functions and returns them to their default settings. Cancels all fax functions and returns them to their default settings. Deletes all queued jobs. |
| 29 | [Stop] key | Stops the multi-page copy operation. Stops the fax transmission or reception. |
| 30 | [Start] key | Starts copying. Starts a fax transmission. Queues a copy job if pressed while the machine is warming up. The indicator lights up in green to indicate that the machine is ready to start copying, or it lights up in orange to indicate that the machine is not ready to start copying. |
| 31 | 10-key pad | • Used to specify the number of copies. • Used to enter setting values. • Used to enter fax number. • Used to enter speed dial number. • In fax mode, use the [×] key for tone transmissions (with pulse dialing) and use the [#] key for accessing an outside line. |
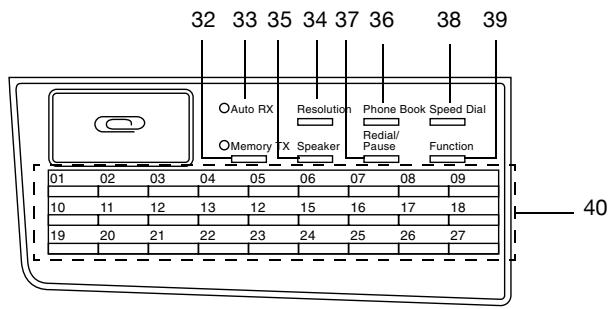
| No. | Part name | Function |
| 32 | “Memory TX” indicator | Lights up when the memory transmission function is selected. |
| 33 | “Auto RX” indicator | Lights up when the automatic reception function is selected. |
| 34 | [Resolution] key | Used to select the image quality (transmission resolution). |
| 35 | [Speaker] key | Press to answer the call. Press again to hang up. |
| 36 | [Phone book] key | Used to display the information programmed for one-touch dial-ing, group dialing and speed dialing. |
| 37 | [Redial/Pause] key | • Redials the last number called. • While dialing, used to generate a pause when transferring from an internal to an external line or receiving information services. |
| 38 | [Speed dial] key | Used to dial previously programmed fax numbers represented by 3-digit numbers. |
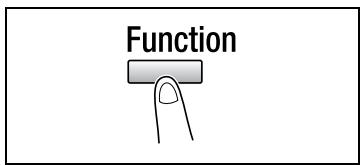
| 39 | [Function] key | Used to select a function. • BROADCAST (broadcast transmission), TIMER TX (timer trans-mission), MAILBOX TX (mailbox transmission), PRINT MAIL-BOX RX (retrieve mailbox faxes), POLLING TX (polling transmission), POLLING RX (polling reception), RELAY INITI-ATE (relay initiation transmission), CANCEL RESERV. (cancel queued job), TX MODE (transmission mode), INTERNET FAX RX (when network interface card NC-502 and scanner unit SU-502 are installed) Refer to “Fax transmission/Reception methods” on page 4-3. |
| 40 | One-touch key | • Used to dial previously programmed fax numbers. • Use keys [01] through [27] for programming one-touch dial keys and group dialing. • Use keys [24] through [27] for setting program dialing. |
2.3 Display indications
In fax mode


| No. | Display indication | Description |
| 1 | Mode or function name | • Indicates the currently selected mode or function settings. • Displays the current menu, function or settings. • Error messages are displayed when errors occur. • The current date and remaining memory is displayed during standby. |
| 2 | Messages | Displays messages such as operating instructions. |
Symbol list
| Symbol | Description | |
| \( \equiv \) | Dialing | A fax number is being dialed. |
| \( \exists \) | Ringing | The machine is being called. |
| \( \square \) | Sending | The document is being sent. |
| \( \square \) | Receiving | A document is being received. |
| \( \square \) | In standby for timer transmission | A document is queued for timer transmission. |
| \( \square \) | In standby for polling transmission | A document is queued for polling transmission. |
| \( \square \) | In standby for mail-box reception | A document is queued for mailbox reception. |
| \( \square \) | In standby for memory reception or polling reception | A document is queued for memory reception or polling reception. |
2.4 Entering text
When specifying the user name or programming one-touch dial keys with the recipient name, letters, accented characters, numbers and symbols can be entered.
Key operation
The 10-key pad will be used to enter numbers and letters, symbols.
List of characters available with each key of the 10-key pad:
| 10-key pad | Available characters* | Available characters with the metric model |
| 1 | (. (period) @_ (underscore) - (hyphen) 1 | |
| 2 | ABC2abc | ÄäÄà/Eæaçç |
| 3 | DEF3def | Éèè |
| 4 | GHI4ghi | iì |
| 5 | JKL5jkl | |
| 6 | MNO6mno | ÑñÖöøò |
| 7 | PQRS7pqrs | β |
| 8 | TUV8tuv | Üüúú |
| 9 | WXYZ9wxyz | |
| 0 | (space) 0 | |
| ¥ | +&/*=!?(.)%[ ]^{"{'}}{ }$;;;<>“£ | |
| # | # |
Changing input mode
Each press of the [123/ABC] key switches the input mode between numbers and letters.
[1]: Numbers can be typed in.
[A]: Letters can be typed in.
Inputting example
To enter the name "NJ Office"
The cursor () flashes alternately with the character at its current location.

Correcting text and input precautions:
- To erase all entered text, press the [No/C] key.
- To delete only part of the entered text, use the [<] and [>] keys to move the cursor (.) to the character that you wish to delete, and then press the [No/C] key.
- To change an entered character, use the [<] and [>] keys to move the cursor (.) below the character that you wish to change, and then press the [No/C] key. Next, enter the new character. The character at the cursor's position is replaced with the new character.
- If the same 10-key pad is needed to enter two characters in a row, press the [▶] key after selecting the first character. (Refer to the above example.)
- To enter a space, press 10-key pad [0].
- To cancel entering text, press the [Panel Reset] key.
3
Faxing
3 Faxing
This machine is a G3 fax. Faxes can only be sent or received with this machine if the recipient's or sender's machine complies with the G3 standard.
3.1 Dialog
The recipient's fax number can be dialed using any of the seven different dialing methods described below.
The procedures described below assume that the fax is being sent using the automatic document feeder.
Using direct dialing to communicate with overseas destinations
If the country code and destination number are entered after the international code, you may hear a busy tone during dialing and transmission may not be possible. In such cases, press the [Redial/Pause] key twice after entering the international code to insert an approx. -6-second pause, and then enter the rest of the number. If this still fails to connect the call, perform manual transmission (p. 4-6).
To fax by entering the fax number directly using the 10-key pad
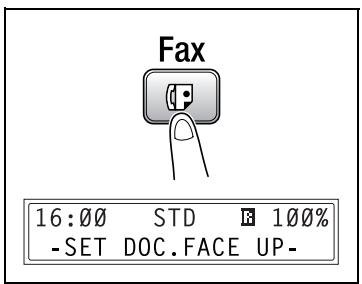
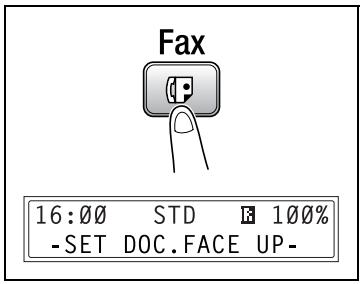
1 Press the [Fax] key to enter fax mode.
2 Load the document into the automatic document feeder.
3 If necessary, change the resolution setting (p. 3-15).
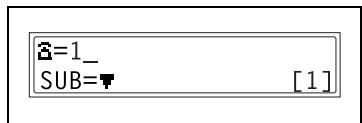
4 Using the 10-key pad, enter the fax number of the recipient. F codes (SUB and SID) can also be entered. For details, refer to "Using F codes" on page 4-28.
Have you entered the number correctly?
The fax number can contain a maximum of 30 digits.
→ The keys that can be used to enter the fax number are: the number keys (0 through 9), 艹 , #, space, and pause
If the [Redial/Pause] key is pressed while entering the fax number, a 3-second pause is added. A pause appears as “P” in the display.
If you wish to change the fax number, press the [No/C] key, and then enter the correct number.
If the machine is connected to a PBX line and the outside line access number has been specified in the communication settings (p. 5-62), enter “#” to dial the outside line access number automatically.
5 Press the [Start] key.
The machine automatically starts scanning the document and sending the fax
To fax using one-touch dialing
If one-touch dial keys have already been programmed with fax numbers, the fax number of a recipient can be specified by pressing just the corresponding one-touch dial key.
For details on programming the one-touch dial keys, refer to "Specifying ONE-TOUCH DIAL" on page 5-13.
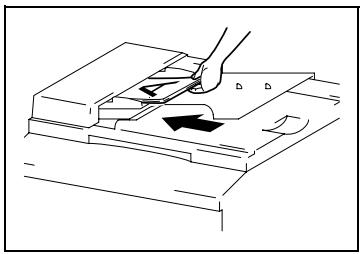
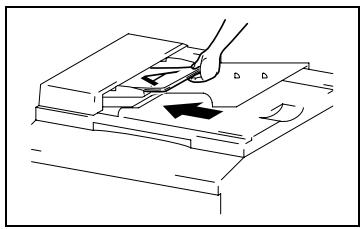
1 Load the document into the automatic document feeder.
- For details on placing the document on the original glass, refer to "To fax documents positioned on the original glass" on page 3-18.
2 Press the one-touch dial key ([01] through [27]) programmed with the fax number that you wish to send the fax to.
| 01 | 02 | 03 | 04 | 05 | 06 | 07 | 08 | 09 |
| 1 | ||||||||
| 10 | 11 | 12 | 13 | 14 | 15 | 16 | 17 | 18 |
| 1 | ||||||||
| 19 | 20 | 21 | 22 | 23 | 24 | 25 | 26 | 27 |
| 1 |
Has the wrong one-touch dial key been pressed?
Press the [No/C] key.
3 If necessary, change the resolution setting (p. 3-15).
4 Press the [Start] key.
The machine automatically starts scanning the document and sending the fax.
ONE-TOUCH DIAL 01
? Do you want to stop the fax transmission?
Press the [Stop] key, and then press the [Yes] key when the next screen appears.
TX CANCEL? YES / CONTINUE=NO
To fax using speed dialing
If speed dial numbers have already been programmed, the fax number of a recipient can be specified quickly by entering the corresponding speed dial number.
For details on programming speed dial numbers, refer to "Specifying SPEED DIAL" on page 5-17.
1 Load the document into the automatic document feeder.
- For details on placing the document on the original glass, refer to "To fax documents positioned on the original glass" on page 3-18.
2 If necessary, change the resolution setting (p. 3-15).
3 Press the [Speed dial] key, and then use the 10-key pad to enter the 3-digit speed dial number.
? Has the wrong speed dial number been entered?
Press the [No/C] key, and then enter the correct number.
4 Press the [Start] key.
The machine automatically starts scanning the document and sending the fax.
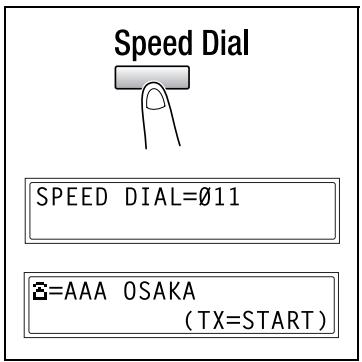
Do you want to stop the fax transmission?
Press the [Stop] key, and then press the [Yes] key when the next screen appears.
To fax using group dialing
If one-touch dial keys have already been programmed with a group of fax numbers, the fax numbers of all recipients in the group can be specified by pressing just the corresponding one-touch dial key.
For details on programming one-touch dial keys with a group of fax numbers, refer to "Specifying GROUP DIAL" on page 5-21.
1 Load the document into the automatic document feeder.
- For details on placing the document on the original glass, refer to "To fax documents positioned on the original glass" on page 3-18.
2 If necessary, change the resolution setting (p. 3-15).
3 Press the one-touch dial key ([01] through [27]) programmed with the group of fax numbers that you wish to send the fax to.
? Has the wrong one-touch dial key been pressed?
Press the [No/C] key.
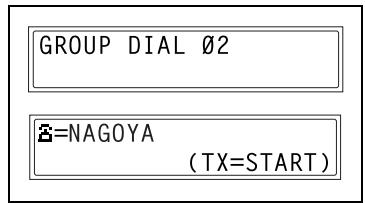
4 Press the [Start] key.
The machine automatically starts scanning the document and sending the fax.
? Do you want to stop the fax transmission?
Press the [Stop] key, and then press the [Yes] key when the next screen appears.

To fax using chain dial
Faxes can be sent to recipients that are specified using any combination of one-touch dial keys, speed dial numbers, direct input using the 10-key pad, and the [Redial] key.
As an example, the following procedure describes how to specify recipients using one-touch keys, then using the 10-key pad.
1 Press the [Speaker] key.
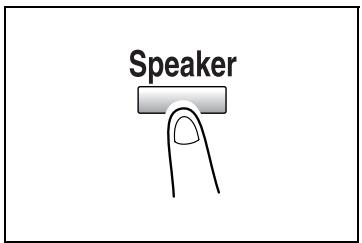
2 Press the desired one-touch key, and then press the [Start] key.
3 After the message SET DOC. FACE UP appears, use the 10-key pad to enter the recipient's fax number.

4 After the message SET DOC. FACE UP appears, load the document into the automatic document feeder.
5 Press the [Start] key.
Do you want to stop the fax transmission?
Press the [Stop] key, and then press the [Yes] key when the next screen appears.
To fax using program dialing
If one-touch dial keys have already been programmed with fax numbers and a transmission/reception function (such as timer transmission or polling reception), that function can be carried out by pressing just the corresponding one-touch dial key.
For details on setting program dialing, refer to "Specifying PROGRAM DIAL" on page 5-25.
1 Load the document into the automatic document feeder.
- For details on placing the document on the original glass, refer to "To fax documents positioned on the original glass" on page 3-18.
- This step is not necessary with polling reception.
2 If necessary, change the resolution setting (p. 3-15).
- This step is not necessary with polling reception.
3 Press the one-touch dial key ([24] through [27]) programmed with the desired function.
? Has the wrong one-touch dial key been pressed?
Press the [No/C] key.
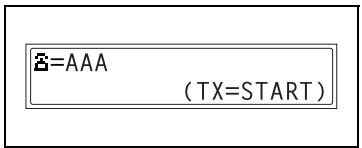
PROGRAMDIAL27 BROADCAST
=AAA TOKYO (TX START)
4 Press the [Start] key.
The programmed function automatically begins.
? Do you want to stop the fax transmission?
Press the [Stop] key, and then press the [Yes] key when the next screen appears.

2 Do you want to cancel the timer transmission?
To cancel a timer transmission, select CANCEL RESERV. from the "FUNCTION" menu (p. 4-21).
To fax using the phone book
The phone book contains all programmed one-touch dialing and speed dialing numbers, allowing you to search for and select the recipient that you wish to send the fax to.
1 Press the [Fax] key to enter fax mode.
2 Load the document into the automatic document feeder.
- For details on placing the document on the original glass, refer to "To fax documents positioned on the original glass" on page 3-18.
3 If necessary, change the resolution setting (p. 3-15).
4 Press the [Phone book] key.

5 Using the [<] and [>] keys, select either LIST or SEARCH, and then press the [Yes] key.
- If LIST was selected: The list of programmed one-touch dialing and speed dialing numbers is displayed. Using the [▲] and [▼] keys, select the desired recipient.
- If SEARCH was selected:
- A screen appears, allowing you to enter the text to be searched for. Search for the desired recipient by entering part (or all) of the name programmed. For details on performing the search, refer to "To search the phone book" on page 3-11.
6 Press the [Start] key.
The machine automatically starts scanning the document and sending the fax.
To search the phone book
1 Press the [Phone book] key.
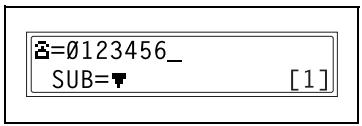
2 Using the [ ] and [ ] keys, select SEARCH, and then press the [Yes] key.
A screen appears, allowing you to enter the text to be searched for.
*LIST 8 YES
3 Using the 10-key pad, enter the first few characters of the name programmed for the desired recipient.
SEARCH->>AAA_ OK=YES
[A]
- Enter the name programmed in the one-touch dial key or the speed dial number. (For details on entering text, refer to "Entering text" on page 2-11.)
From 1 to 10 characters can be entered.
4 Press the [Yes] key.
The number of names beginning with the text entered in step 3 is displayed.
To select a recipient from the displayed search results, skip to step 7.
*SEARCHING*
AAA (10)
SEARCH=YES (SEE=
? Are there no one-touch dialing or speed dialing numbers with names beginning with the entered text?
After “(0)” is displayed, the screen allowing you to enter the search text appears.
5 To narrow down the search results even further, press the [Yes] key, and then enter more search text.
SEARCH->>AAA_
OK=YES [A]
6 Press the [Yes] key.
7 Using the [▼] and [▲] keys, select the desired recipient.
? Does the desired recipient name not appear in the search results?
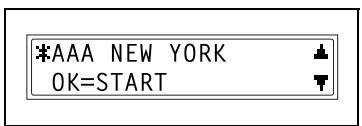
AAA NEW (2)
SEARCH=YES (SEE=
Press the [No/C] key twice to return to the screen allowing you to enter the search text, and then try searching for different text.
8 Press the [Start] key to begin scanning and sending the fax.

Note
The search results appear in the order that they have been programmed as one-touch dial keys or speed dial numbers.
To redial the last recipient called
1 Press the [Fax] key to enter fax mode.
2 Load the document into the automatic document feeder.
3 If necessary, change the resolution setting (p. 3-15).
4 Press the [Redial/Pause] key.
The fax number of the last recipient called is displayed.
5 Press the [Start] key.
The machine automatically starts scanning the document and sending the fax.

3.2 Transmission settings
Adjusting the fax resolution
Selecting one of the following resolutions to match the type of document to be faxed (documents containing a lot of small print, detailed illustrations or photos) will produce a sharper result.
| Document type | Resolution setting |
| Documents with normal print | STD (Standard) |
| Documents containing small print, such as newspapers | Fine, S/F (Super fine) |
| Documents containing detailed illustrations | |
| Documents containing text and objects with varying shades, such as photos | H/T + STD (Half tone + Standard), H/T + Fine (Half tone + Fine) |
| Documents containing objects with varying shades, such as photos | H/T + Fine (Half tone + Fine), H/T + S/F (Half tone + Super fine) |
To specify the resolution
1 Press the [Fax] key to enter fax mode.
The fax screen appears.
2 Position the document.
3 Press the [Resolution] key on the control panel to select the resolution mode.
Resolution

4 Using the [ ] and [ ] keys, select the fax resolution, and then press the [Yes] key.
- If H/T (Half tone) was selected, select STD, FINE or S/F in the next screen.
*STD FINE S/F H/T
-, & YES

Note
Depending on the recipient's fax machine, faxes sent with the Super fine or Super fine+ Half tone setting may not be sent as specified, and instead are sent with the Fine or Half tone setting.
If the Half tone or Super fine + Half tone setting is specified, the fax may be sent with a decreased resolution depending on the quality of the recipient's fax machine or whether the document size is larger than the paper loaded in the recipient's fax machine.
3.3 Basic faxing
To fax using the automatic document feeder
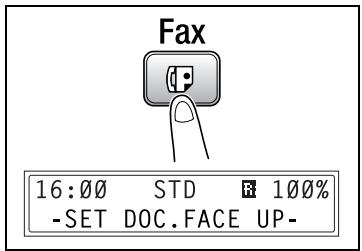
1 Press the [Fax] key to enter fax mode.
The fax screen appears.
2 Load the document face up into the automatic document feeder.
3 Adjust the document guide plates to fit the size of the document
4 If necessary, change the resolution setting (p. 3-15).
5 Using the 10-key pad, enter the fax number of the recipient.
The fax number of a previously programmed recipient can also be specified. Refer to "Dialing" on page 3-3.
6 Press the [Start] key to begin scanning and sending the fax.
Once transmission is finished, a beep is sounded.
If the fax could not be sent, the transmission result report is printed (p. 3-24).
Do you want to stop the transmission?
To stop the transmission, press the [Stop] key.
? Do you want to cancel a scanned document queued for transmission or a fax waiting to be redialed?
Select CANCEL RESERV. from the "FUNCTION" menu (p. 4-21).

Note
If a double-sided document is loaded into the reverse automatic document feeder DF-605 (option for the bizhub 210 only), press the [Original] key until the duplex orig. function is selected.
In no received documents or polling transmission documents are saved in the memory, up to 280 A4 (Letter)-size document pages can be scanned and stored in the memory at one time. However, if the optional expanded memory units are installed, up to 1024 scanned pages can be stored.
While faxing, if the recipient's fax machine is busy or does not answer, for any other reason, such as a transmission error, the fax is not sent correctly, the transmission result report is printed.
To fax documents positioned on the original glass
1 Press the [Fax] key.
The machine enters fax mode, and the fax screen appears.
2 Lift open the automatic document feeder.
3 Position the document face down on the original glass.
4 Align the document on the scales above and to the left of the original glass.
5 If necessary, change the resolution setting (p. 3-15).
6 Using the 10-key pad, enter the fax number of the recipient.
The fax number of a previously programmed recipient can also be specified. Refer to "Dialing" on page 3-3.
7 Press the [Start] key.
8 Press the [Yes] key.
The document is scanned.
9 Press the [Start] key.
Once transmission is finished, a beep is sounded.
If the fax could not be sent, the transmission result report is printed (p. 3-24).
2 Do you want to stop the transmission?
To stop the transmission, press the [Stop] key.
? Do you want to cancel a scanned document queued for transmission or a fax waiting to be redialed?
Select CANCEL RESERV. from the "FUNCTION" menu (p. 4-21).

Note
To specify a scanning area other than the size of the loaded document or if the document size cannot be detected automatically, press the [▼] key.
In the next screen that appears, select MANUAL, and then press the [Yes] key.

Then, select the desired paper size, and then press the [Yes] key.

Note
To scan the next document page, press the [Yes] key, and then position the next document page.
If the memory becomes full while scanning fax documents
If the memory becomes full while scanning a document for memory transmission, only the pages that have been scanned are sent.
With a queued transmission (a fax transmission requested while another fax transmission job is being performed) or timer transmission, if the memory becomes full while scanning the document, a message appears, allowing you to select whether to send just the scanned pages or cancel the transmission. If the transmission is canceled, the data for the scanned pages is deleted. After the other fax transmission or reception is finished, check the amount of memory available, and then try sending the fax again.
If the memory becomes full, all pages that have been scanned are erased.
3.4 Confirmation mode
The number of operations performed since this machine was installed can be checked using the functions available when the [Status] key is pressed.
Items that can be checked from the machine counter menu:
| Machine counter | Description |
| TOTAL COUNT | This count shows the total number of prints made since this machine was installed. |
| SIZE COUNT | This count shows the total number of prints made for the specified paper size. (The paper size that is counted should be set by the service representative.) |
| TOTAL SCAN | This count shows the total number of scans made since this machine was installed. However, the number of pages scanned while making copies is not included. |
| TX PAGES | This count shows the total number of pages faxed since this machine was installed. |
| RX PAGES | This count shows the total number of fax pages received since this machine was installed. |
To check the counters
1 Press the [Status] key.
2 Press the [Yes] key. The machine counter menu appears.
3 Press the [▲] and [▼] keys to select the counter that you wish to check.
4 Press the [Yes] key.
TOTAL PAGE? appears.
5 Press the [No/C] key.
The main screen appears.
TOTAL COUNT=000000 CHECK FINISH=YES
SIZE COUNT=000000 CHECK FINISH=YES
TOTAL SCAN=000000 CHECK FINISH=YES
TX PAGES=000000 CHECK FINISH=YES
RX PAGES=000000 CHECK FINISH=YES
To check the transmission result
The transmission result information for a maximum of 60 sent and received documents is saved.
1 Press the [Status] key twice.
TX/RX RESULT appears.
2 Press the [Yes] key.
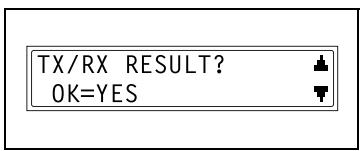
3 Press the [A] and [▼] keys to display the desired transmission results.
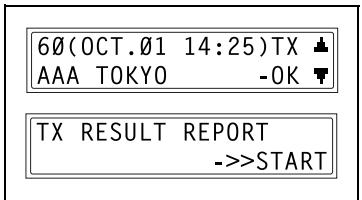
In the transmission result screen, "TX" indicates sent faxes, and "RX" indicates received ones.
- If the [No/C] key is pressed twice while the transmission results are displayed, the main screen appears
- To print the transmission result report, press the [Start] key. After the transmission result report is printed, the main screen appears.
To output a report/list
The various reports and lists of programmed settings can be printed using the functions available when the [Status] key is pressed.
1 Press the [Status] key three times. PRINT REPORT appears.
2 Press the [Yes] key.
A menu appears, showing the reports and lists that can be printed.

3 Press the [A] and [V] keys to select the report/list that you wish to print, and then press the [Yes] key.
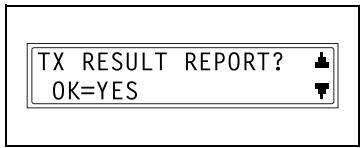
After the specified report/list is printed, the main screen appears again.

Note
Paper of the following sizes can be used to output the reports.
However, when printing on A5 , B5 , or Invoice (8 - 1/2 × 5 - 1/2) paper, the report may be divided among several sheets of paper.
Metric: A5 , B5 , A4 / , B4 , A3
Inch: Invoice (8-1/2 x 5-1/2), Letter, Legal (8-1/2 x 14), Ledger (11 x 17)

Note
The reception/transmission result reports can be checked on screen. For details on viewing the transmission result, refer to "To check the transmission result" on page 3-22.
Transmission result report
The document number, recipient name, date sent, starting time of transmission, number of document pages, time required, mode, and transmission result are printed.
| SESSION | FUNCTION | No. | DESTINATION STATION | DATE | TIME | PAGE | DURATION | MODE | RESULT |
| 0001 | TX | 001 | AAA NEWYORK 012345678 | APR.19 | 18:00 | 010 | 00:02'21" | G3 | NG |
| NG PAGE:1.3.5.7 | |||||||||
Reception result report
The document number, caller name, date received, starting time of reception, number of pages received, time required, mode, and reception result are printed.
| SESSION | FUNCTION | No. | DESTINATION STATION | DATE | TIME | PAGE | DURATION | MODE | RESULT |
| 0001 | RX | 001 | AAA TOKYO 098765432 | APR.19 | 18:00 | 001 | 00:02'21" | ECM | NG |
| 0021:ERROR DURING RX | |||||||||
Activity report
The operation number, document number, date of operation, starting time of transmission/reception, type of operation (transmission or reception), recipient/caller name, number of pages sent/received, mode, and transmission/ reception result are printed.
The machine can also be set to print this report automatically after every 60 transmissions/receptions.
| No. | SESSION | DATE | TIME | TX/RX | DESTINATION STATION | PAGE | DURATION | MODE | RESULT |
| 01 | 0001 | APR.19 | 16:32 | TX--- | AAA NEWYORK 012345678 | 006 | 00:01'16" | ECM | OK |
| 02 | 0002 | APR.19 | 18:00 | ---RX | AAA TOKYO 098765432 | 001 | 00:02'21" | ECM | NG |
| 03 | 0002 | APR.19 | 18:00 | ---RX | AAA TOKYO 098765432 | 012 | 00:02'48" | ECM | OK |
| 04 | 0003 | APR.19 | 19:12 | TX--- | HEAD OFFICE 024682468 | 001 | 00:00'56" | ECM | OK |
Memory data list
This is a list of documents stored in the memory and waiting to be sent, and documents specified for timer transmission, batch transmission or polling reception.
The document number, type of operation being performed, time, recipient/caller name, and number of document pages are printed.
Memory image print
A reduced image of the first page of the document stored in the memory and waiting to be sent in addition to the document number, type of operation being performed, recipient/caller name, date, time, and number of document pages are printed.
List of one-touch dial keys
The recipients programmed in the one-touch dial keys are printed in numerical order of the keys.
| OT-NO. | DESTINATION STATION | DESTINATION NUMBER | DETAIL | SET DATE | |
| OT-01 | AAA NEWYORK | 012345678 | 33.6 | JAN.20.2001 | |
| OT-02 | AAA TOKYO | 098765432 | 14.4 | JAN.20.2001 | |
| OT-03 | HEAD OFFICE | 024682468 | 16:00 | 33.6 | FEB.12.2001 |
| OT-04 | NJ OFFICE | 0P02345678 SUB:#1234 | 14.4 | FEB.12.2001 | |
List of speed dial numbers
The recipients programmed for the speed dial numbers are printed in numerical order.
| SP-NO. | DESTINATION STATION | DESTINATION NUMBER | DETAIL | SET DATE | |
| SP-001 | AMSTERDAM OF-FICE | 0P09876543 | 33.6 | JAN.20.2001 | |
| SP-002 | KOREA OFFICE | 0P01357913 | 14.4 | JAN.20.2001 | |
| SP-003 | ABCDEF | 024682468 | 33.6 | FEB.12.2001 | |
| SP-004 | POST OFFICE | 0224466880 SUB:#5678 | 14.4 | FEB.12.2001 | |
Key setting list
The group dialing and program dialing settings specified for one-touch dial keys are printed in numerical order of the keys.
Relay box list
The status and settings for the 10 relay boxes can be printed and checked.
Machine status list
The current machine settings are printed.
Configuration page
The list of the printer settings is printed.
PCL font list
This function is only available when the image controller IC-205 (optional) is installed.
The PCL font list is printed.
4
Fax transmission/ Reception methods
4 Fax transmission/Reception methods
4.1 Transmission methods
4.1.1 Memory transmission
With memory transmission, the document is scanned, then stored in the memory for transmission (queued transmission).
Memory transmission is selected as the default transmission mode.

Detail
For details on sending faxes through memory transmission, refer to "Basic faxing" on page 3-16.
To specify memory TX
1 Press the [Fax] key to enter fax mode.
The fax screen appears.
2 Load the document into the automatic document feeder.
3 If necessary, change the resolution setting (p. 3-15).
4 Using the 10-key pad, enter the fax number of the recipient.
The fax number of a previously programmed recipient can also
be specified. For details, refer to "Dialing" on page 3-3.
5 Press the [Memory TX] key.
6 Check that the memory TX lamp lights up. If the memory TX lamp is not lit, the direct transmission is selected

7 Press the [Start] key to begin scanning and sending the fax.
Once transmission is finished, a beep is sounded.
If the fax could not be sent, the transmission result report is printed (p. 5-65).
? Do you want to stop the transmission?
Press the [Stop] key, and then press the [Yes] key in the next screen that appears.
4.1.2 Direct transmission
If the memory TX lamp is not lit, the direct transmission is selected. One page of the document at a time can be scanned, according to the transmission status. This ensures that even documents with many pages can be sent.

Note
When faxing using direct transmission, the document should be loaded into the automatic document feeder. Transmission is not possible by positioning the document on the original glass.
If direct transmission is specified while a fax is being sent or received, the transmission will be queued.
With direct transmission, multiple recipients cannot be specified.
Direct transmission and timer transmission cannot be performed at the same time.
4.1.3 Manual transmission
If the machine is connected to a telephone and the same line is used for phoning and faxing, the document can simply be sent after talking with the recipient over the phone.
This is useful, for example, if you wish to tell the recipient that you are sending a fax.

Note
If the recipient's fax machine is set to receive faxes automatically (automatic reception), a beep is sounded without the recipient answering the phone; however, at that time, the telephone cannot be used for talking. If the fax is to be sent after talking on the telephone, use the automatic document feeder.
Manual transmission is possible if a telephone (either purchased or rented) is connected to the TEL port of this machine.

Note
Even when pulse dialing is being used, entering “ × ” produces signals for tone dialing.
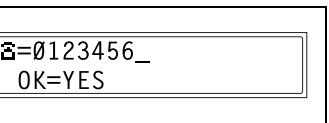
To send a fax manually
1 Load the document into the automatic document feeder.
2 If necessary, change the resolution setting (p. 3-15).
3 Pick up the telephone receiver. Check that the dial tone can be heard.
4 Specify the fax number of the recipient.
- Use the telephone to dial the fax number.
- The fax number of the recipient can also be specified using the keys in the control panel of this machine (p. 3-3).
5 After finishing talking on the phone, the recipient should press the necessary key to start receiving the fax.
Once the recipient's fax machine is ready, a beep is sounded.
6 Press the [Start] key to begin scanning and sending the fax.
7 Replace the telephone receiver.
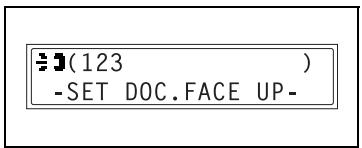
(0123456
-PRESS START KEY-
2 Do you want to stop the transmission?
Press the [Stop] key, and then press the [Yes] key in the next screen that appears.

Note
If the [Speaker] key is pressed instead of picking up the telephone receiver, the speaker can be used for manual transmission in the same way as described above.
4.1.4 Batch transmission
Multiple documents can be stored in the memory and faxed together at a specified time. In order to use this function, the corresponding utility mode function must first be used to program a one-touch dial key with the batch transmission settings (transmission time) (p. 5-37).
To fax using batch transmission
1 Load the document into the automatic document feeder.
2 If necessary, change the resolution setting (p. 3-15).
3 Press the one-touch dial key programmed with the desired batch transmission settings.
4 Press the [Start] key to begin scanning the document.
The document is automatically sent at the specified time.
ONE-TOUCH DIAL 01
2 Do you want to cancel a batch transmission?
Select CANCEL RESERV. from the FUNCTION menu (p. 4-21).
4.1.5 Broadcast transmission
The same document can be sent to multiple recipients at one time.
The recipients can be specified by using the one-touch dial keys, the speed dial numbers or group dialing, by selecting from the phone book, or by entering the fax number using the 10-key pad.

Note
A maximum of 243 recipients can be selected at one time. If recipients are selected by using one-touch dial keys, a maximum of 27 recipients can be specified. If recipients are selected by using speed dial numbers, a maximum of 200 recipients can be specified.
A maximum of 16 recipients can be specified by entering the fax number using the 10-key pad.

Note
With the result report printed after the transmission is finished, you can check whether the fax was sent to all recipients.
To fax using broadcast transmission
1 Position the document.
2 If necessary, change the resolution setting (p. 3-15).
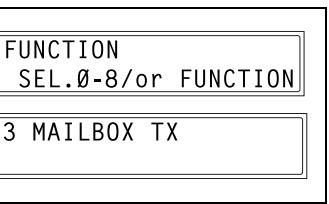
3 Press the [Function] key.

4 Press the [1] key from the 10-key pad.
or
Press the [Function] key once to select BROADCAST, and then press the [Yes] key.
FUNCTION SEL.0-8/or FUNCTION
1 BROADCAST
5 Specify the fax number of the recipient.
Repeat the appropriate operations described below until all recipients have been specified.
? Do you want to use one-touch dial keys?
Press the one-touch dial key programmed with the desired fax number.
Press the [Yes] key, and then specify the next recipient.
? Do you want to use speed dial numbers?
Press the [Speed dial] key, and then use the 10-key pad to enter the 3-digit speed dial number programmed with the desired fax number.
Press the [Yes] key, and then specify the next recipient.
Do you want to use group dialing?
Press the one-touch dial key programmed with the desired group of fax numbers.
Press the [Yes] key, and then specify the next recipient.
Do you want to select from the phone book?
Press the [Phone Book] key, and then select either LIST or SEARCH to select the desired fax number. For details, refer to "To fax using the phone book" on page 3-10.
Press the [Yes] key, and then specify the next recipient.
2 Do you want to enter the number using the 10-key pad?
Enter the fax number of the recipient.
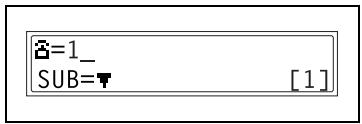
Press the [Yes] key, and then specify the next recipient.
NO.001=ONE-TOUCH 01
NO.001=AAA TOKYO OK=YES (Fin.=START)
NO.002=SPED 011
NO.002=AAAOSAKA OK=YES(Fin.=START)
6 Press the [Start] key.
A message appears, allowing you to select whether or not to check the recipients.
7 To check the recipients, press the [Yes] key. If you do not wish to check the recipients, continue with step 9.
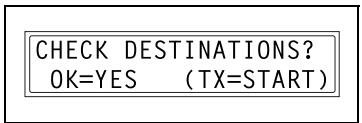
The recipients specified in step 5 are displayed in the order that they were selected.
8 Check the recipient, and then press the [Yes] key.
After all recipients have been checked, Fin. START appears in the display.
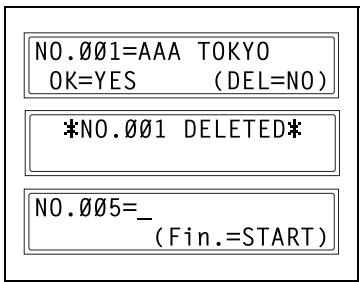
? Do you want to delete the displayed recipient?
Press the [No/C] key.
9 Press the [Start] key to begin scanning and sending the fax.
2 Do you want to stop the transmission?
Press the [Stop] key, and then press the [Yes] key in the next screen that appears. All selected recipients are cleared
2 Do you want to stop the timer transmission?
Select CANCEL RESERV. from the FUNCTION menu (p. 4-21).
4.1.6 Timer transmission
A document can be scanned and stored in the memory to be sent at a specified time. This function is convenient for sending documents with a large number of pages at discounted calling times.

Note
The time is set for a 24-hour period.
If the machine is not programmed with the current time (p. 5-67), the fax cannot be sent at the specified time.
A timer transmission cannot be performed at the same time as a direct transmission.

Note
Timer transmission can be combined with broadcast transmission, mailbox transmission, polling reception, or relay initiation transmission.
To fax using timer transmission
1 Position the document.
2 If necessary, change the resolution setting (p. 3-15).
3 Press the [Function] key.

4 Press the [2] key from the 10-key pad.
or
Press the [Function] key twice to select TIMER TX, and then press the [Yes] key.
A screen appears, allowing you to specify the transmission time.
FUNCTION SEL.0-8/or FUNCTION
2 TIMER TX
5 Using the 10-key pad, enter the desired transmission time, and then press the [Yes] key.
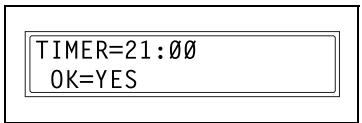
2 Do you want to correct the time?
Press the [No/C] key, and then enter the correct time.
6 Specify the fax number of the recipient. For details, refer to "Dialing" on page 3-3.

7 Press the [Start] key.
The machine scans the document, then enters transmission standby mode.
Do you want to stop the timer transmission?
Select CANCEL RESERV. from the FUNCTION menu (p. 4-21).
4.1.7 Mailbox transmission
The fax can be sent to a recipient's mailbox.
This is perfect for sending an important document to a specific person.

Note
Mailbox transmission is compatible with F code transmission. Machines compatible with F codes can be specified as recipients for mailbox transmission.
To fax using mailbox transmission
1 Position the document.
2 If necessary, change the resolution setting (p. 3-15).
3 Press the [Function] key.

4 Press the [3] key from the 10-key pad.
or
Press the [Function] key three times to select MAILBOX TX, and then press the [Yes] key.
5 Specify the recipient, and then press the [Yes] key. For details, refer to "Dialing" on page 3-3.
A screen appears, allowing you to specify the mailbox ID.
6 Using the 10-key pad, enter the mailbox ID of the recipient.
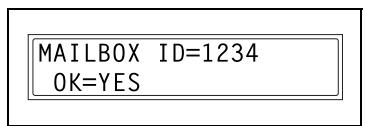
- Enter the mailbox ID (SUB) (20 digits or less) registered for the recipient.
- The only characters that can be used in the mailbox ID are 0 through 9, × , and #.
- If the recipient is specified using a one-touch dial key or a speed dial number also programmed with a SUB, the SUB is displayed as the mailbox ID. If necessary, change the mailbox ID.
2 Do you want to correct the mailbox ID?
Press the [No/C] key, and then enter the new number.
7 Press the [Yes] key.
8 Using the 10-key pad, enter the password.
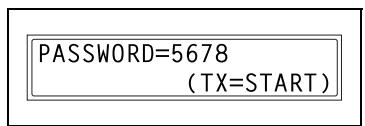
- Enter the password (20 digits or less) if a password has been set for the recipient's mailbox.
- The only characters that can be used in the password are 0 through 9, × , and #.
? Do you want to correct the password?
Press the [No/C] key, and then enter the new number.
9 Press the [Start] key to begin scanning and sending the fax.
? Do you want to stop the timer transmission?
Select CANCEL RESERV. from the FUNCTION menu (p. 4-21).

Note
The same ID cannot be used as the relay box ID and mailbox ID.
The recipient's machine and mailbox settings must be specified.
In order for the recipient to check fax documents, the mailbox ID is needed.
4.1.8 Relay initiation transmission
Documents can be sent from this machine (transmitting station) to another fax machine (acting as a relay station), which then sends the documents to multiple recipients (receiving stations). By relaying the documents through a fax machine closer to the remote recipients, the transmission time and cost for the transmitting station are reduced.
In order to fax using relay initiation transmission, a relay box must first be programmed at the relay station.

Note
Relay initiation transmission is compatible with F code transmission.
Only machines that are compatible with relay broadcast transmission should be specified as relay stations. This machine can be specified as a relay station.
Relay initiation transmission and mailbox transmission cannot be performed at the same time.
In order to fax using relay initiation transmission, a relay box ID must first be programmed at the relay station (p. 5-35).
To fax using relay initiation transmission
1 Position the document.
2 If necessary, change the resolution setting (p. 3-15).
3 Press the [Function] key.
4 Press the [7] key from the 10-key pad.
or
Press the [Function] key seven times to select RELAY INITIATE, and then press the [Yes] key.
FUNCTION SEL.0-8/or FUNCTION
7 RELAY INITIATE
5 Specify the relay station, and then press the [Yes] key. For details, refer to "Dialing" on page 3-3.
A screen appears, allowing you to specify the relay box ID.
6 Using the 10-key pad, enter the relay box ID.
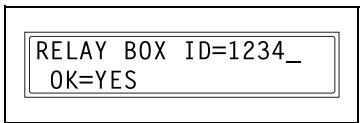
- Enter the relay box ID (20 digits or less) programmed at the relay station.
- The only characters that can be used in the mailbox ID are 0 through 9, × , and #.
? Do you want to correct the ID?
Press the [No/C] key, and then enter the new number.
7 Press the [Yes] key.
A screen appears, allowing you to specify the password.
8 Using the 10-key pad, enter the password.
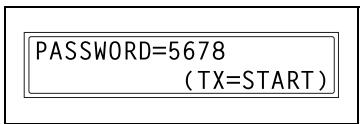
- Enter the password (20 digits or less) if a password has been set at the relay station.
- The only characters that can be used in the password are 0 through 9, *, and #.
Do you want to correct the password?
Press the [No/C] key, and then enter the new number.
9 Press the [Start] key to begin scanning and sending the fax.
4.1.9 Relay broadcast transmission
If this machine is specified as a relay station, it can receive documents sent from another fax machine (transmitting station), then send the documents to multiple recipients (receiving stations).
In order to fax using relay broadcast transmission, a relay box must first be programmed. A maximum of 10 relay boxes can be programmed. For details on programming a relay box, refer to "Specifying RELAY BOX" on page 5-43.

Note
Relay broadcast transmission is compatible with F code transmission. In order for the machine to function as a relay station, a 4-digit relay box ID must first be programmed (p. 5-43).
In order to fax using relay broadcast transmission, the receiving stations (final recipients) must be programmed in a relay box (p. 5-43).
The document is printed at the receiving stations.
The same ID cannot be used as the relay box ID and mailbox ID.
A maximum of 50 recipients can be specified using one-touch dial keys, speed dial numbers and group dialing.
4.1.10 Polling transmission
Documents scanned and saved in the memory can be retrieved by the recipient.

Note
Polling transmission is compatible with F code transmission.
A maximum number of 30 documents can be saved in the memory.
If the memory is full, polling transmission cannot be set.
With polling transmission, the recipient incurs the cost of the call.
To set up polling transmission
1 Position the document.
2 If necessary, change the resolution setting (p. 3-15).
3 Press the [Function] key.

4 Press the [5] key from the 10-key pad.
or
Press the [Function] key 5 times to select POLLING TX, and then press the [Yes] key.

5 Using the [<] and [>] keys, select either SINGLE or MULTI, and then press the [Yes] key.
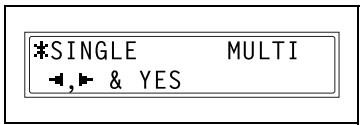
- To allow only one polling transmission request, then delete the document from the memory, select SINGLE.
- To allow multiple polling transmission requests, select MULTI. The document is stored in the memory until it has been deleted.
6 Using the 10-key pad, enter the 4-digit polling ID, and then press the [Yes] key.
POLLING ID=1234
OK=YES
If you do not wish to set a polling ID, skip to step 8.
The polling ID can be set to any number between 0000 and 9999.
2 Do you want to correct the ID?
Press the [No/C] key, and then enter the new number.
7 Using the 10-key pad, enter the 4-digit password.
PASSWORD=5678
(TX=START)
- If you do not wish to set a password, continue with step 8.
- The password can be set to any number between 0000 and 9999.
2 Do you want to correct the password?
Press the [No/C] key, and then enter the new number.
8 Press the [Start] key.
The machine scans the document, then enters standby mode.
Do you want to stop the transmission?
Press the [Stop] key, and then press the [Yes] key in the next screen that appears. All selected recipients are cleared
2 Do you want to stop the polling transmission?
Select CANCEL RESERV. from the FUNCTION menu (p. 4-21).
To delete a document from the polling transmission setup
1 Press the [Function] key.

2 Press the [5] key from the 10-key pad.
or
Press the [Function] key 5 times to select POLLING TX, and then press the [Yes] key.
FUNCTION SEL.0-8/or FUNCTION
5 POLLING TX
If polling transmission has been set, a screen appears, allowing you to specify the polling ID.
3 Using the [ ] and [ ] keys, select either SINGLE or MULTI, and then press the [Yes] key.
*SINGLE MULTI 一 , 一 一 & YES
-
To allow only one polling transmission request, then delete the document from the memory, select SINGLE.
-
To allow multiple polling transmission requests, select MULTI. The document is stored in the memory until it has been deleted.
4 Using the 10-key pad, enter the polling ID, and then press the [Yes] key.
POLLING ID=1234 OK=YES
? Do you want to correct the ID?
Press the [No/C] key, and then enter the new number.
5 Press the [No/C] key to delete from the memory the document set for polling transmission.
[ \text{REGISTERED!} ] KEEP?
[ \text{KEEP=YES} ] (DEL=NO)
? Do you want to keep the polling transmission setting?
POLL TX DOC.DELETED
Press the [Yes] key.
4.1.11 Canceling (Deleting) a document queued in the memory for transmission
Of the documents stored in the memory and waiting to be sent, a specific document can be selected and deleted.
To cancel a queued document
1 Press the [Function] key.

2 Press the [8] key from the 10-key pad.
or
Press the [Function] key 8 times to select CANCEL RESERV., and then press the [Yes] key.
FUNCTION SEL.Ø-8/or FUNCTION
8 CANCEL RESERV.
The details (specified transmission
time/type of transmission) of the jobs queued in the memory are displayed.
What appears in the display for a polling transmission job?
The polling transmission ID appears.
Have no jobs been queued in the memory?
The message NONE appears.
3 Using the [▲] and [▼] keys, select the job to be deleted.
- The following types of job are displayed.
MEMORY: Memory transmission
B-CAST: Broadcast transmission
TIMER: Timer transmission
M.B. TX: Mailbox transmission
POLL-TX: Polling transmission
POLL-RX: Polling reception
RELAY: Relay initiation transmission
FORWARD: Fax forwarding
- To check the recipient of the currently displayed transmission job, press the [▶] key. After checking, press the [Yes] key to return to the previous screen.
4 Press the [Yes] key to delete the displayed job.
FUNCTION menu appears in the display.
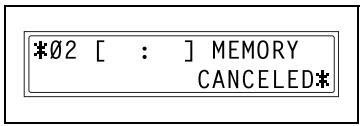
5 To delete another queued job, repeat steps 2 and 4.
4.2 Reception methods

Note
Paper of the following sizes can be used to print fax documents.
Metric: A5 , B5 , A4 / , B4 , A3
Inch: Invoice (8-1/2 × 5-1/2), Letter ☐, Legal (8-1/2 × 14), Ledger (11 × 17)
4.2.1 Manual reception
This machine normally receives faxes automatically. However, if a telephone is connected and the same line is used for phoning and faxing, the document can simply be received after talking with the caller over the phone.

Note
Manual reception is possible if a telephone is connected to the TEL port of this machine.
To receive taxes manually, use the corresponding utility mode function to select the manual reception mode (p. 5-53).
To receive a fax manually
1 After the telephone rings, pick up the receiver to talk with the caller.
2 After talking and the caller's fax machine sounds long beeps, press the [Start] key.
The machine starts receiving the fax.
? Were the long beeps not sounded by the caller's fax machine?
If the caller's fax machine is set to send automatically, the long beeps may not be sounded.
3 If the telephone receiver is replaced, the fax reception is finished and the machine sounds a beep.
4.2.2 Memory reception
This machine automatically prints faxes that it has received. However, when receiving confidential faxes, the received document can be stored in the memory and printed at a specified time or when memory reception is turned off.

Detail
Memory reception is set using the corresponding utility mode function. For details on changing the setting, refer to "Specifying MEMORY RX MODE" on page 5-53.
4.2.3 Mailbox reception
If mailbox numbers and F codes (mailbox IDs and passwords) have already been programmed on this machine, this function can be used to receive only those faxes with an identical mailbox ID and password specified by the caller.
Since the received fax can only be retrieved after entering the corresponding mailbox ID, confidential faxes can safely be sent and received.

Detail
For details on programming the mailboxes, refer to "Specifying MAILBOX" on page 5-41.
To retrieve a document from a mailbox
1 Press the [Function] key.

2 Press the [4] key from the 10-key pad.
or
Press the [Function] key 4 times to select PRINT MAILBOX RX, and then press the [Yes] key.
A screen appears, allowing you to enter the mailbox ID.
FUNCTION SEL.0-8/or FUNCTION
4 PRINT MAILBOX RX
3 Using the 10-key pad, enter the 4-digit mailbox ID, and then press the [Yes] key.
Do you want to correct the ID?
Press the [No/C] key, and then enter the new number.
4.2.4 Polling reception
Using polling reception, documents set up in other fax machines can be received.

Note
Polling reception is compatible with F code transmission.
A maximum of 243 recipients can be selected at one time. If recipients are selected by using one-touch dial keys, a maximum of 27 recipients can be specified. If recipients are selected by using speed dial numbers, a maximum of 200 recipients can be specified. If fax numbers are being typed in, a maximum of 16 can be specified.
To receive a fax using polling reception
1 Press the [Function] key.
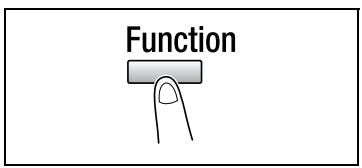
2 Press the [6] key from the 10-key pad.
or
Press the [Function] key 6 times to select POLLING RX, and then press the [Yes] key.
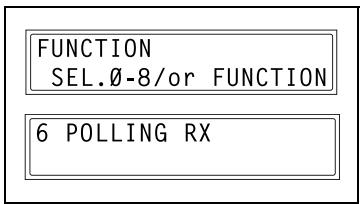
3 Specify the fax number to be called.
For details, refer to step 5 of "To fax using broadcast transmission" on page 4-8.
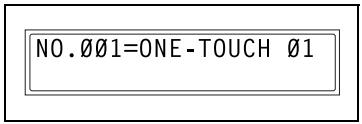
4 To enter the polling ID and password, press the [▼] key.
- If there is no need to enter a polling ID and password, skip to step 7.
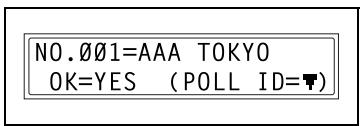
5 Using the 10-key pad, enter the polling ID (20 digits or less), and then press the [Yes] key.
POLLING ID=1111_OK=YES
2 Do you want to correct the ID?
Press the [No/C] key, and then enter the new number.
6 Using the 10-key pad, enter the password (20 digits or less), and then press the [Yes] key.
PASSWORD=2222 OK=YES
? Do you want to correct the password?
Press the [No/C] key, and then enter the new number.
7 To specify multiple fax numbers, repeat steps 3 through 6.
NO.002= (Fin.=START)
- If you do not wish to specify other fax numbers, continue with step 8.
8 Press the [Start] key.
A message appears, allowing you to select whether or not to check the fax numbers to be called.
9 To check the numbers to be called, press the [Yes] key.
- If you do not wish to check the numbers to be called, skip to step 11.
CHECK DESTINATIONS? OK=YES (RX=START)
10 The fax numbers specified in step 3 are displayed in the order that they were selected.
Check the fax numbers, and then press the [Yes] key.
After all fax numbers have been checked, Fin. START appears in the display.
? Do you want to delete the displayed fax number?
Press the [No/C] key.
11 Press the [Start] key.
4.3 Using F codes
This machine is compatible F code transmissions.
F codes are mailbox functions, such as SUB (sub-addresses), SEP (selective polling), SID and PWD (passwords), regulated by the G3 standards of the ITU-T (International Telecommunication Union). Mailbox transmission and reception is possible only with similar machines compatible with F code transmission. Using the 10-key pad, the following F codes can be set, depending on the use.
F codes
- SUB:
Specify when transmitting while using F codes.
SID:
Specify when limiting the recipient/caller with a password.
- SEP:
Specify when calling another fax machine to receive a document set up in it (polling reception).

Note
The F code function is only available with fax machines that have this function as well. Ask your partner, if their machine can process F code transmissions.
If one-touch dial keys or speed dial numbers are programmed with F codes (SUB and SID), the appropriate F code can quickly be transmitted to the recipient/caller.
4.3.1 Using mailboxes
Specifying mailboxes
Mailboxes can be used if they are set up using the corresponding utility mode function. For details, refer to "Mailbox reception" on page 4-25.
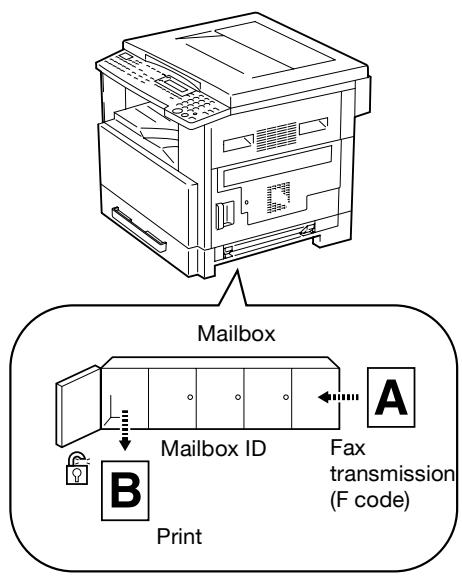
F code mailbox transmission/reception
A maximum of 5 mailboxes can be set up. Since a mailbox ID is required in order to retrieve documents received in the different mailboxes, confidential faxes can safely be sent and received.

Detail
For details, refer to "Specifying MAILBOX" on page 5-41.
If one-touch dial keys or speed dial numbers are programmed with F codes, the appropriate F code can quickly be transmitted.

Detail
For details, refer to "Mailbox transmission" on page 4-13.
4.3.2 Specifying F codes
When sending faxes
F codes can be specified when the 10-key pad is being used to enter the fax number of a recipient while sending a fax.
1 Using the 10-key pad, enter the fax number of the recipient.
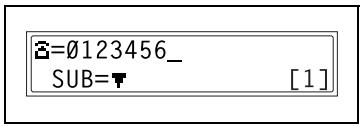
2 Press the [] key, and then use the 10-key pad to enter the SUB.
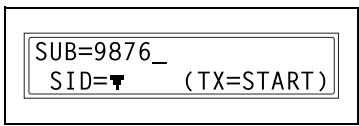
- A number up to 20 digits long can be entered for the SUB.
- To enter an SID, continue with step 3.
If an SID will not be entered, continue with step 4.
2 Do you want to correct the SUB?
Hold down the [No/C] key, and then enter the new number.
3 Press the [] key, and then use the 10-key pad to enter the SID.
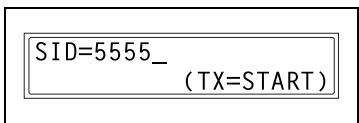
- A number up to 20 digits long can be entered for the SID.
2 Do you want to correct the SID?
Hold down the [No/C] key, and then enter the new number.
4 Press the [Start] key to begin scanning and sending the fax.
Programming F codes
F codes can be specified when programming one-touch dial keys or speed dial numbers.

Note
For details, refer to "Fax registration settings" on page 5-11.
5
Using the utility mode
5 Using the utility mode
There are sixteen menus in the utility mode.
| No. | Name | Description |
| 1 | MACHINE SETTING | Used to specify settings for the machine's operating environment.* |
| 2 | PAPER SOURCE SETUP | Used to specify the size and type of paper loaded in tray1. In addition, auto tray switching can be enabled for each tray. |
| 3 | USER MANAGEMENT | For details on this menu, refer to the bizhub 162/210 user's guide. |
| 4 | ADMIN. MANAGEMENT | |
| 5 | COPY SETTING 1 | |
| 6 | COPY SETTING 2 | |
| 7 | FAX REGISTRATION | Used to specify the default setting for each fax function. |
| 8 | TX OPERATION | Used to specify the default setting for TX operation. |
| 9 | RX OPERATION | Used to specify the default setting for RX operation. |
| 10 | COMM. SETTING | Used to specify the default setting for communicating environment. |
| 11 | REPORTING | Used to specify the default setting for each report function. |
| 12 | INITIAL USER DATA | Used to specify setting for the initializing user data. |
| 13 | NETWORK SETTING | Available only if the optional network interface card NC-502 is installed. For details, refer to the user's guide for the network card NC-502. |
| 14 | E-MAIL SETTING 1 | Available only if the optional scanner unit SU-502 is installed. For details, refer to the user's guide for the scanner unit SU-502. |
| 15 | E-MAIL SETTING 2 | |
| 16 | SCAN SETTING |
- Only the description for specifying settings for the fax functions is described here. For details on the settings, refer to the bizhub 162/210 user's guide.
The utility mode settings can also be specified from LSD (Local Setup for Diagnostic). For details, refer to "About Local Setup for Diagnostic (LSD)" on page 7-11.

Note
Depending on the installed options and specified installation region, some utility mode functions cannot be set.
5.1 Specifying the machine settings
From the "MACHINE SETTING" menu, various settings for the machine's operating environment can be specified. Refer to the following table for details on each function.
| No. | Name | Description |
| 1 | AUTO PANEL RESET | This function can be used to set the length of time until the auto panel reset operation is performed after copying or the last operation is finished. When the auto panel reset operation is performed, the copy mode screen is automatically displayed. In fax mode, the auto panel reset operation is performed after 1 minute has elapsed, regardless of the setting specified for this function. • Default setting: 1 min. |
| 2 | ENERGY SAVE MODE | For details on this menu, refer to the bizhub 162/210 user's guide. |
| 3 | AUTO SHUT OFF | |
| 4 | DENSITY (ADF) | |
| 5 | DENSITY (BOOK) | |
| 6 | PRINT DENSITY | The density for printing copies, computer printouts or faxes can be set to one of five settings. For details on this menu, refer to the bizhub 162/210 user's guide. |
| 7 | LCD CONTRAST | For details on this menu, refer to the bizhub 162/210 user's guide. |
| 8 | LANGUAGE | |
| 9 | BUZZER VOLUME | This function can be used to set the volume of alarms and the beep sounded when a key is pressed. • Default setting: LOW. |
| 0 | INITIAL MODE | This function can be used to set the mode (copy mode or fax mode) that the machine starts up in or returns to after the control panel is reset. • Default setting: COPY. |
Selecting the MACHINE SETTING menu
1 Press the [Utility] key.
MACHINE SETTING appears.
2 From the 10-key pad, press the key [1] to [0] for the machine setting function that you wish to set.
The machine setting functions are as follows:
1 AUTO PANEL RESET
2 ENERGY SAVE MODE
3 AUTO SHUT OFF
4 DENSITY (ADF)
5 DENSITY (BOOK)
6 PRINT DENSITY
7 LCD CONTRAST
8 LANGUAGE
9 BUZZER VOLUME
0 INITIAL MODE
? Do you want to quit changing the machine settings?
Press the [No/C] key. STOP SETTING? appears.
Press the [Yes] key to quit changing the settings.
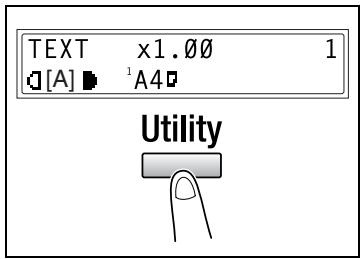
Specifying BUZZER VOLUME
1 Select BUZZER VOLUME in the MA-CHINE SETTING menu. For details, refer to page 5-5.
2 Press the [ ] and [ ] keys to set the buzzer volume to HIGH, LOW or OFF.
3 Press the [Yes] key.
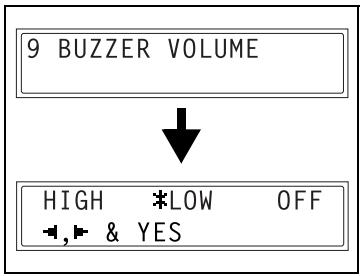
Specifying INITIAL MODE
1 Select INITIAL MODE in the MA-CHINE SETTING menu. For details, refer to page 5-5.
2 Press the [A] and [B] keys to select either COPY or FAX.
3 Press the [Yes] key.
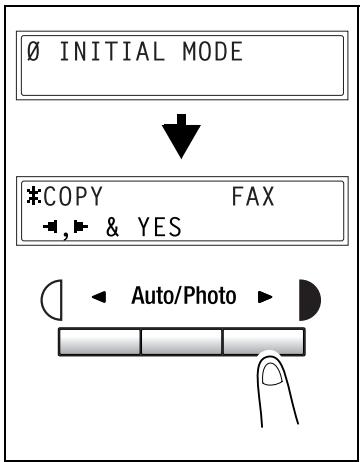
5.2 Paper source settings
From the PAPER SOURCE SETUP menu, the various settings for each paper tray can be specified.
| No. | Name | Description |
| 1 | INCH/METRIC | This function can be used to set the size measurement system for the paper loaded in each tray. It can be used to select whether paper measured in centimeters (METRIC), such as A4 and B5 sizes, or paper measured in inches (INCH), such as Letter size, is loaded. If no particular setting is selected, the paper size is detected automatically.*If METRIC is selected for a paper tray on a model set to use inch measurements, paper loaded into that tray cannot be used in fax mode.If INCH is selected for a paper tray on a model set to use metric measurements, paper loaded into that tray cannot be used in fax mode.For metric area:Default setting: METRIC.For inch area:Default setting: INCH. |
| 2 | TRAY1 PAPER | This function can be used to set the type of paper (PLAIN, OHP, CARD or ENVELOPE) loaded into the Tray1, and the size of the paper (AUTO or SIZE INPUT). If the paper size is set to SIZE IN-PUT, type in the paper size.*If a setting other than PLAIN or AUTO is selected, paper loaded into Tray1 cannot be used in fax mode.Default setting: PLAIN and AUTO. |
| 3 | PAPER TYPE | For details on this menu, refer to the bizhub 162/210 user's guide. |
- For details on the settings, refer to the bizhub 162/210 user's guide.
The utility mode settings can also be specified from LSD (Local Setup for Diagnostic). For details, refer to "About Local Setup for Diagnostic (LSD)" on page 7-11.
5.3 Admin. management settings
From the ADMIN. MANAGEMENT menu, various functions for controlling the use of the machine can be set. In order to set an ADMIN. MANAGEMENT function, the administrator access number must be entered.
| No. | Name | Description |
| 1 | AUTO SHUT OFF | This function can be used to set whether or not the auto power-off function is performed.*Default setting: ENABLE. |
| 2 | COPY TRACK | A maximum of 20 accounts can be specified in order to control the use of the machine.*Turn on/off user management.Register account access numbers.Change/delete account access numbers.Display/clear the total count for a specific account.Clear the total counts for all accounts. |
| 3 | REMOTE MONITOR | This function can be used to set whether or not the machine can be accessed and the status of the machine can be checked from the service center.The manufacturer's default setting is LIMITED.For details, consult with the service representative. |
- For details on the settings, refer to the bizhub 162/210 user's guide.
The utility mode settings can also be specified from LSD (Local Setup for Diagnostic). For details, refer to "About Local Setup for Diagnostic (LSD)" on page 7-11.

Note
The registering and setup of the administrator access number should be performed by the service representative. For details, contact the service representative.
The administrator of this machine should be sure not to lose the administrator access number.
Selecting the ADMIN. MANAGEMENT menu
1 Press the [Utility] key four times. ADMIN. MANAGEMENT appears.
2 Press the [Yes] key.
3 From the 10-key pad, press the key ([1] through [3]) for the ADMIN. MANAGEMENT function that you wish to set.
The admin. management functions are as follows:
1 AUTO SHUT OFF
2 COPY TRACK
3 REMOTE MONITOR
ADMIN. MANAGEMENT? OK=YES / or 1-3

4 Using the 10-key pad, enter the 6-digit administrator access number, and then press the [Yes] key.
? Do you want to correct the administrator access number?
Press the [No/C] key, and then enter the new number.
ADMIN.NO = ****** OK=YES

Note
If, at any time, you wish to quit setting an admin. management function, press the [No/C] key. When the message STOP SETTING? appears, press the [Yes] key to quit.
Specifying REMOTE MONITOR
1 Select REMOTE MONITOR in the ADMIN. MANAGEMENT menu. For details, refer to page 5-9.
2 Press the [A] and [B] keys to select either LIMITED or FULL or OFF.
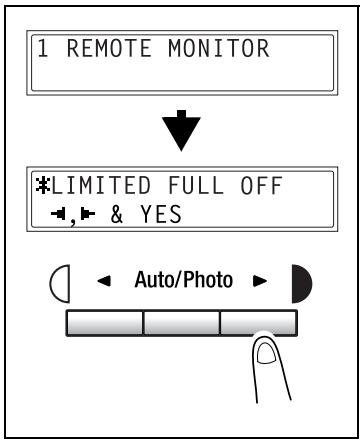
3 Press the [Yes] key.
- If LIMITED or OFF was selected, the ADMIN.MANAGEMENT menu appears again.
- If FULL was selected, a screen appears allowing you to enter the password. Using the 10-key pad, enter the 4-digit password, and then press the [Yes] key.
PASSWORD=2222 OK=YES
5.4 Fax registration settings
From the FAX REGISTRATION menu, various settings can be specified in order to take advantage of this machine's many fax functions.
| No. | Name | Characteristic/Description |
| 1 | ONE-TOUCH DIAL | This function can be used to program one-touch dial keys with fax numbers, allowing the recipient to be specified easily and accurately without the need to manually enter the number using the 10-key pad.A maximum of 27 settings can be programmed. This dialing method is convenient for programming numbers where faxes are frequently sent to. |
| 2 | SPEED DIAL | This function can be used to program speed dial numbers with fax numbers, allowing the recipient to be specified easily and accurately without the need to manually enter the number using the 10-key pad.A maximum of 200 fax numbers can be programmed. |
| 3 | GROUP DIAL | This function can be used to program a single one-touch dial key with a maximum of 50 different fax numbers as one group.Programming a one-touch dial key with a group of fax numbers is convenient when documents are frequently sent to a set group of multiple recipients. |
| 4 | PROGRAM DIAL | This function can be used to program one-touch dial keys with fax numbers and a transmission/reception function (such as timer transmission or polling reception), allowing that function to be carried out by pressing just the corresponding one-touch dial key. |
| 5 | BATCH TX | This function can be used to specify the batch transmission setting (transmission time) for a one-touch dial key programmed with recipient fax numbers, so multiple documents can be stored in the memory and sent out together at the specified time. |
| 6 | MAILBOX | This function can be used to specify mailbox IDs in order to receive faxes with mailbox reception only if the mailbox ID sent by the caller matches the mailbox ID set on this machine. |
| 7 | RELAY BOX | This function can be used to program the relay boxes in order for this machine (acting as a relay station) to receive a document from another fax machine (transmitting station), then transmit the document to multiple recipients (receiving stations). |
The settings for items 1 through 3 can also be specified from LSD (Local Setup for Diagnostic). For details, refer to "About Local Setup for Diagnostic (LSD)" on page 7-11.
If optional network interface card NC-502 and scanner unit SU-502 are installed, settings for items 1 through 3 can also be specified from the network tool PageScope Web Connection. For details, refer to "What is PageScope Web Connection?" on page 7-6.
Selecting the FAX REGISTRATION menu
1 Press the [Utility] key seven times. FAX REGISTRATION appears.
2 From the 10-key pad, press the key ([1] through [7]) for the fax registration function that you wish to set.
The fax registration functions are as follows:
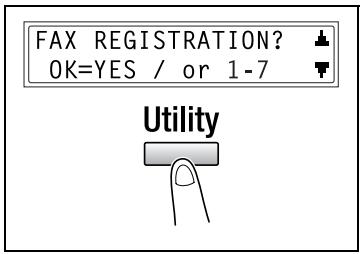
If, at any time, you wish to quit programming, changing or deleting a fax registration function, press the [No/C] key. When the message STOP REGISTRATION? appears, press the [Yes] key to quit.
Specifying ONE-TOUCH DIAL
If the one-touch dial keys are programmed with fax numbers, the recipient can be specified easily and accurately without the need to manually enter the number using the 10-key pad.
A maximum of 27 numbers can be programmed.
To program a one-touch dial key
1 Select the ONE-TOUCH DIAL in the FAX REGISTRATION menu. For details, refer to page 5-12.

2 Press the one-touch dial key that you wish to program.
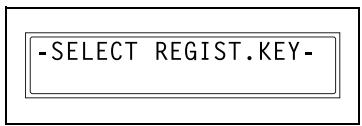
3 Enter the name of the programmed number.
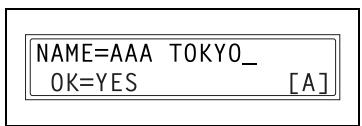
For details on entering text, refer to "Entering text" on page 2-11.
Text up to 20 characters long can be entered for the name.
4 Press the [Yes] key.
5 Using the 10-key pad, enter the fax number of the recipient.
- The fax number can contain a maximum of 30 digits.
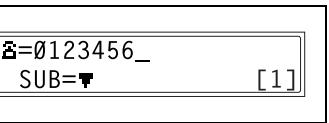
For details on the characters that can be entered. Refer to "To fax by entering the fax number directly using the 10-key pad" on page 3-4.
- To enter a SUB, continue with step 7.
- If a SUB will not be entered, press the [Yes] key after entering the fax number, and then skip to step 9.
- If you wish to change the fax number, press the [No/C] key, and then enter the correct number.
- For details on F codes (SUB and SID), refer to "Using F codes" on page 4-28.
6 Press the [] key, and then use the 10-key pad to enter the SUB.
- A number up to 20 digits long can be entered for the SUB.
- To enter an SID, continue with step 8.
If an SID will not be entered, skip to step 9.
2 Do you want to correct the SUB?
Hold down the [No/C] key, and then enter the new number.
7 Press the [] key, and then use the 10-key pad to enter the SID.
- A number up to 20 digits long can be entered for the SID.
? Do you want to correct the SID?
Hold down the [No/C] key, and then enter the new number.
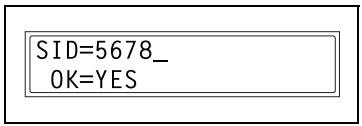
8 Press the [Yes] key.
9 Press the [A] and [B] keys to select the desired modem speed.
10 Press the [Yes] key.
The settings are registered. To program another one-touch dial key, repeat steps 3 through 11.
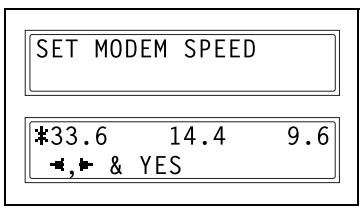
11 Press the [No/C] key to finish programming.
The FAX REGISTRATION menu appears again.
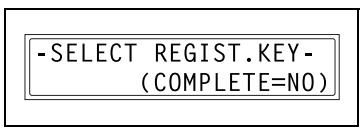
To change/delete a programmed one-touch dial key
1 Select the ONE-TOUCH DIAL in the FAX REGISTRATION menu. For details, refer to page 5-12.

2 Press the one-touch dial key that you wish to change or delete.
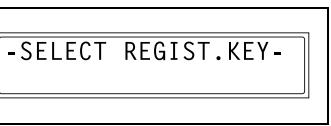
3 Press the [No/C] key.
- If a one-touch dial key programmed with a group of fax numbers or a transmission/reception function is pressed, the message shown at the right appears. To delete the programmed settings, press the [No/C] key. The FAX REGISTRATION menu appears again.
- To change the group dialing or program dialing settings, refer to page 5-21 and page 5-25.
4 Press the [<] and [>] keys to select either EDIT or DELETE, and then press the [Yes] key.
If EDIT was selected, the name is displayed. (Continue with step 6.)
- If DELETE was selected, the settings programmed for the one-touch dial key are deleted and the SELECT REGIST. Key screen appears again.
- If you try to change the settings for a one-touch dial number used in group dialing or program dialing, a confirmation message appears, asking whether or not to change the corresponding settings programmed in group dialing or program dialing.
If the [Yes] key is pressed, the corresponding settings programmed in group dialing or program dialing are changed.
If the [No/C] key is pressed, the corresponding settings programmed in group dialing or program dialing are deleted.
- If a one-touch dial number used in group dialing or program dialing is deleted, it is also deleted from the corresponding group dialing or program dialing.
5 Change the name, fax number, F codes (SUB and SID) and modem speed as desired.
- For details on changing the fax number, refer to “Entering text” on page 2-11.
- For details on changing the F codes (SUB and SID) or modem speed, refer to page 5-13.
6 When you are finished making changes, press the [Yes] key.
To change the settings of another one-touch dial key, repeat steps 3 through 7.
7 Press the [No/C] key to return to the FAX REGISTRATION menu.

Note
If "Batch TX" is specified for a one-touch dial key that is changed, the batch transmission time setting is cancelled. Specify the batch transmission settings again.
Specifying SPEED DIAL
If speed dial numbers are programmed with fax numbers, the recipient can be specified easily and accurately without the need to manually enter the number using the 10-key pad.
A maximum of 200 fax numbers (001 to 200) can be programmed.
To program a speed dial number
1 Select the SPEED DIAL in the FAX REGISTRATION menu. For details, refer to page 5-12.
2 SPEED DIAL
2 Using the 10-key pad, enter the 3-digit speed dial number (ex. 011) that you wish to program.
SPEEDDIAL=011
3 Enter the name of the programmed number.
NAME=AAA OSAKA_ OK=YES [A]
For details on entering text, refer to "Entering text" on page 2-11.
Text up to 20 characters long can be entered for the name.
4 Press the [Yes] key.
5 Using the 10-key pad, enter the fax number of the recipient.
- The fax number can contain a maximum of 30 digits.
=0124578_ OK=YES [1]
For details on the characters that can be entered. Refer to "To fax by entering the fax number directly using the 10-key pad" on page 3-4.
- To enter a SUB, continue with step 7.
- If a SUB will not be entered, press the [Yes] key after entering the fax number, and then skip to step 9.
- For details on F codes (SUB and SID), refer to "Using F codes" on page 4-28.
Do you want to correct the fax number?
Hold down the [No/C] key, and then enter the new number.
6 Press the [] key, and then use the 10-key pad to enter the SUB.
- A number up to 20 digits long can be entered for the SUB.
- To enter an SID, continue with step 8.
If an SID will not be entered, skip to step 9.
Do you want to correct the SUB?
Hold down the [No/C] key, and then enter the new number.
7 Press the [▼] key, and then use the 10-key pad to enter the SID.
- A number up to 20 digits long can be entered for the SID.
? Do you want to correct the SID?
Hold down the [No/C] key, and then enter the new number.
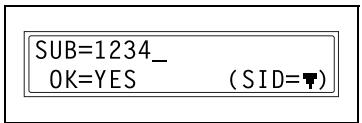
8 Press the [Yes] key.
9 Press the [A] and [B] keys to select the desired modem speed.
10 Press the [Yes] key.
The settings are registered. To program another speed dial number, repeat steps 3 through 11.
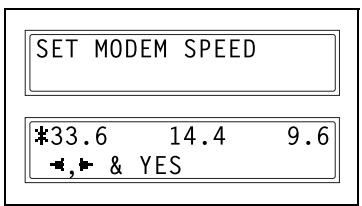
11 Press the [No/C] key to finish programming.
The FAX REGISTRATION menu appears again.
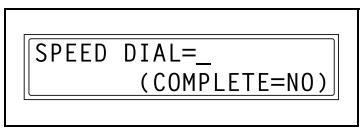
To change/delete a programmed speed dial number
1 Select the SPEED DIAL in the FAX REGISTRATION menu. For details, refer to page 5-12.
2 SPEED DIAL
2 Using the 10-key pad, enter the speed dial number that you wish to change or delete.
SPEEDDIAL=011
3 Press the [No/C] key.
REGISTERED! KEEP? OK=YES(EDIT/DEL=NO)
4 Press the [A] and [B] keys to select either EDIT or DELETE, and then press the [Yes] key.
*EDIT DELETE
→, → & YES
- If EDIT was selected, the name is displayed. (Continue with step 6.)
- If DELETE was selected, the settings programmed for the speed dial number are deleted and the speed dial input screen appears again.
- If you try to change the settings for a speed dial number used in group dialing or program dialing, a confirmation message appears, asking whether or not to change the corresponding settings programmed in group dialing or program dialing.
If the [Yes] key is pressed, the corresponding settings programmed in group dialing or program dialing are changed.
If the [No/C] key is pressed, the corresponding settings programmed in group dialing or program dialing are deleted.
- If a speed dial number used in group dialing or program dialing is deleted, it is also deleted from the corresponding group dialing or program dialing.
5 Change the fax number, F codes (SUB and SID), and modem speed as desired.
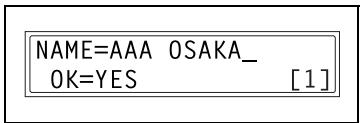
- For details on making changes, refer to "Entering text" on page 2-11.
- For details on changing the F codes (SUB and SID) or modem speed, refer to page 5-17.
6 When you are finished making changes, press the [Yes] key.
- To change the settings of another speed dial number, repeat steps 3 through 7.
7 Press the [No/C] key to return to the FAX REGISTRATION menu.
Specifying GROUP DIAL
A single one-touch dial key can be programmed with a maximum of 50 different fax numbers as one group. Programming a one-touch dial key with a group of fax numbers is convenient when documents are frequently sent to a set group of multiple recipients.
To program a group of fax numbers
1 Select the GROUP DIAL in the FAX REGISTRATION menu. For details, refer to page 5-12.
3 GROUP DIAL
2 Press the one-touch dial key that you wish to program.
-SELECT REGIST KEY-
3 Enter the name of the group, and then press the [Yes] key.
GROUP NAME=1 [1]
For details on entering text, refer to "Entering text" on page 2-11.
Text up to 20 characters long can be entered for the name.
4 By using the one-touch dial keys or the speed dial numbers, specify the recipients.
NO.001=ONE-TOUCH 01
? Do you wish to cancel the current selection?
Press the [No/C] key, and then specify the correct recipient.
5 Press the [Yes] key, and then specify another recipient.
NO.001=GROUP 1 OK=YES (Fin.=START)
- Repeat steps 5 and 6 until all recipients have been specified.
- A maximum of 50 different fax numbers can be specified as one group.
- With group dialing, a one-touch dial key programmed with a group can be specified. In that case, the number of fax numbers programmed in the specified one-touch dial key (group dial key) is added.
6 When you are finished specifying recipients, press the [Start] key.
The settings are registered.
To program another group, repeat steps 3 through 7.

7 Press the [No/C] key to finish programming.
The FAX REGISTRATION menu appears again.

To change/delete a programmed group of fax numbers
1 Select the GROUP DIAL in the FAX REGISTRATION menu. For details, refer to page 5-12.

2 Press the one-touch dial key that you wish to change or delete.

3 Press the [No/C] key.
4 Press the [A] and [B] keys to select either EDIT or DELETE, and then press the [Yes] key.
If EDIT was selected, the group name is displayed. (Continue wi
- If DELETE was selected, the group dialing settings are deleted and the SELECT REGIST_KEY screen appears again.
5 If you wish to change the name of the group, enter the new name, and then press the [Yes] key.
- For details on making changes, refer to "Entering text" on page 2-11.
The one-touch dial names are displayed in the order that they were specified.
6 To delete the displayed recipient, press the [No/C] key.
To keep the displayed fax number, press the [Yes] key.
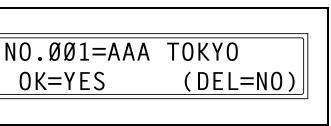
The next one-touch dial name is displayed.
7 When you are finished making changes, press the [Start] key.
To change the settings of another group of fax numbers, repeat steps 3 through 8.

Press the [No/C] key to return to the FAX REGISTRATION menu.

Specifying PROGRAM DIAL
If one-touch dial keys have been programmed with fax numbers and a transmission/reception function, that function can be carried out by pressing just the corresponding one-touch dial key.
Transmission/reception functions that can be programmed:
- Broadcast transmission
- Timer transmission
- Mailbox transmission
- Polling reception
Relay initiation transmission
To set program dialing
1 Select the PROGRAM DIAL in the FAX REGISTRATION menu. For details, refer to page 5-12.
4 PROGRAM DIAL
2 Press the one-touch dial key ([24] through [27]) programmed with the desired function.
-SELECT REGIST KEY-
3 From the 10-key pad, press the key ([1] through [3], [6] or [7]) for the desired function.
FUNCTION SEL.1/2/3/6/7
Functions that can be selected:
1 BROADCAST
2 TIMER TX
3 MAILBOX TX
6 POLLING RX
7 RELAY INITIATE
4 Follow the instructions for the selected function.
- "To fax using broadcast transmission" on page 4-8
- "To fax using timer transmission" on page 4-11
- "To fax using mailbox transmission" on page 4-13
- "To receive a fax using polling reception" on page 4-26
- "To fax using relay initiation transmission" on page 4-15
The settings are registered.
5 To specify other program dialing settings, repeat steps 3 through 5.
6 Press the [No/C] key to finish programming.
The FAX REGISTRATION menu appears again.
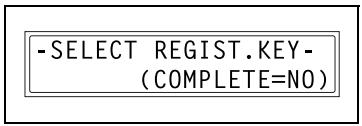
To change/delete a programmed broadcast transmission
1 Select the PROGRAM DIAL in the FAX REGISTRATION menu. For details, refer to page 5-12.
4 PROGRAMDIAL
2 Press the one-touch dial key ([24] through [27]) programmed with the broadcast transmission that you wish to change or delete.
-SELECT REGIST KEY-
3 Press the [No/C] key.
REGISTERED! KEEP? OK=YES(EDIT/DEL=NO)
4 Press the [A] and [B] keys to select either EDIT or DELETE, and then press the [Yes] key.
*EDIT DELETE
→, → & YES
- If EDIT was selected, the specified recipients are displayed in c
- If DELETE was selected, the program dialing settings are deleted and the SELECT REGIST. Key appears again.
5 To delete the displayed recipient, press the [No/C] key.
To keep the displayed recipient, press the [Yes] key.
The next recipient is displayed.
6 When you are finished making changes, press the [Start] key.
- Other program dialing settings can be programmed or changed.
NO.005=
Fin.=START [1]
7 To check the recipients, press the [Yes] key.
- When you are finished checking the recipients, press the [Start] key.
If you do not wish to check the recipients, press the [Start] key.
Press the [No/C] key to return to the FAX REGISTRATION menu.
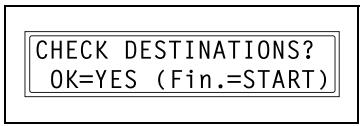
CHECK DESTINATIONS? OK=YES (Fin.=START
-SELECT REGIST KEY-(COMPLETE=NO)
To change/delete a programmed timer transmission
1 Select the PROGRAM DIAL in the FAX REGISTRATION menu. For details, refer to page 5-12.
4 PROGRAMDIAL
2 Press the one-touch dial key ([24] through [27]) programmed with the timer transmission that you wish to change or delete.
-SELECT REGIST KEY-
3 Press the [No/C] key.
REGISTERED! KEEP? OK=YES(EDIT/DEL=NO)
4 Press the [A] and [B] keys to select either EDIT or DELETE, and then press the [Yes] key.
*EDIT DELETE
→, → & YES
- If EDIT was selected, the programmed transmission time is displayed. (Continue with step 6.)
- If DELETE was selected, the program dialing settings are deleted and the SELECT REGIST_KEY screen appears again.
5 To change the transmission time, press the [No/C] key, and then use the 10-key pad to enter the correct time. If you do not wish to change the transmission time, press the [Yes] key.
TIMER=21:00 OK=YES (DEL=NO)
The recipient is displayed.
6 To change the recipient, press the [No/C] key, and then by using the one-touch dial keys or the speed dial numbers, or by entering the fax number using the 10-key pad, specify a different recipient.
=0123456 OK=YES (DEL=NO)
- Change the F codes (SUB and SID) as desired.
7 Press the [Yes] key.
- Other program dialing settings can be changed.
Press the [No/C] key to return to the FAX REGISTRATION menu.
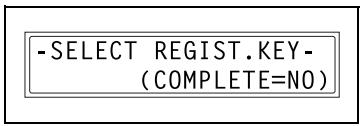
To change/delete a programmed mailbox transmission
1 Select the PROGRAM DIAL in the FAX REGISTRATION menu. For details, refer to page 5-12.
4 PROGRAM DIAL
2 Press the one-touch dial key ([24] through [27]) programmed with the mailbox transmission that you wish to change or delete.
-SELECT REGIST KEY-
3 Press the [No/C] key.
REGISTERED! KEEP? OK=YES(EDIT/DEL=NO)
4 Press the [A] and [B] keys to select either EDIT or DELETE, and then press the [Yes] key.
*EDIT DELETE
→, → & YES
If EDIT was selected, the specified recipient is displayed. (Cont
- If DELETE was selected, the program dialing settings are deleted and the SELECT REGIST_KEY screen appears again.
5 To change the recipient, press the [No/C] key, and then by using the one-touch dial keys or the speed dial numbers, or by entering the fax number using the 10-key pad, specify a different recipient.
=0123456 OK=YES (DEL=NO)
6 Press the [Yes] key.
The mailbox ID is displayed.
7 To change the mailbox ID, press the [No/C] key, and then use the 10-key pad to enter the new ID.
MAILBOX ID=1234 OK=YES (DEL=NO)
8 Press the [Yes] key.
The password is displayed.
9 To change the password, press the [No/C] key, and then use the 10-key pad to enter the new password.
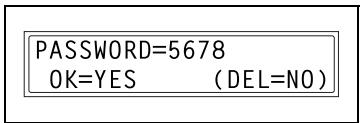
10 Press the [Yes] key.
Other program dialing settings can be changed.
11 Press the [No/C] key to return to the FAX REGISTRATION menu.

To change/delete a programmed polling reception
1 Select the PROGRAM DIAL in the FAX REGISTRATION menu. For details, refer to page 5-12.
4 PROGRAMDIAL
2 Press the one-touch dial key ([24] through [27]) programmed with the polling reception that you wish to change or delete.
-SELECT REGIST KEY-
3 Press the [No/C] key.
REGISTERED! KEEP? OK=YES(EDIT/DEL=NO)
4 Press the [A] and [B] keys to select either EDIT or DELETE, and then press the [Yes] key.
*EDIT DELETE
→, → & YES
- If EDIT was selected, the specified recipients are displayed in c
- If DELETE was selected, the program dialing settings are deleted and the SELECT REGIST_KEY screen appears again.
5 To delete the displayed recipient, press the [No/C] key.
To keep the displayed recipient, press the [Yes] key.
- To add a recipient, in the screen containing "Fin.=START", specify a recipient using the one-touch dial keys or the speed dial numbers, or by entering a fax number using the 10-key pad.
The next recipient is displayed.
6 When you are finished making changes, press the [Start] key.
Other program dialing settings can be changed.
NO.005=_ (Fin.=START)
7 To check the recipients, press the [Yes] key.
- When you are finished checking the recipients, press the [Start] key.
If you do not wish to check the recipients, press the [Start] key.
Press the [No/C] key to return to the FAX REGISTRATION menu.
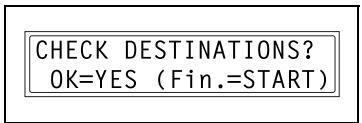
CHECK DESTINATIONS? OK=YES (Fin.=START
-SELECT REGIST KEY-(COMPLETE=NO)
To change/delete a programmed relay initiation transmission
1 Select the PROGRAM DIAL in the FAX REGISTRATION menu. For details, refer to page 5-12.
4 PROGRAMDIAL
2 Press the one-touch dial key ([24] through [27]) programmed with the relay initiation transmission that you wish to change or delete.
-SELECT REGIST KEY-
3 Press the [No/C] key.
REGISTERED! KEEP? OK=YES(EDIT/DEL=NO)
4 Press the [A] and [B] keys to select either EDIT or DELETE, and then press the [Yes] key.
*EDIT DELETE
→, → & YES
If EDIT was selected, the specified recipient is displayed. (Cont
- If DELETE was selected, the program dialing settings are deleted and the SELECT REGIST. Key screen appears again.
5 To change the recipient, press the [No/C] key, and then by using the one-touch dial keys or the speed dial numbers, or by entering the fax number using the 10-key pad, specify a different recipient.
=0123456 OK=YES (DEL=NO)
6 Press the [Yes] key.
The relay box ID is displayed.
7 To change the relay box ID, press the [No/C] key, and then use the 10-key pad to enter the new ID.
RELAYBOXID=1234 OK=YES (DEL NO)
8 Press the [Yes] key.
The password is displayed.
9 To change the password, press the [No/C] key, and then use the 10-key pad to enter the new password.

10 Press the [Yes] key.
Other program dialing settings can be changed.
11 Press the [No/C] key to return to the FAX REGISTRATION menu.
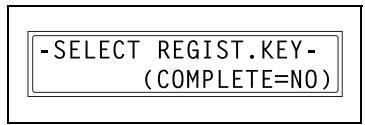
Specifying BATCH TX
If the batch transmission setting (transmission time) is specified for a one-touch dial key programmed with recipient fax numbers, multiple documents can be stored in the memory and sent out together at the specified time.

Note
The one-touch dial key must first be programmed with the fax number of the recipient for the batch transmission.
To set batch transmitting
1 Select the BATCH TX in the FAX REGISTRATION menu. For details, refer to page 5-12.
5 BATCH TX
2 Press the one-touch dial key programmed with the recipient that you wish to send the batch transmission fax to.
-SELECT REGIST KEY-
A screen appears, allowing you to specify the transmission time.
? Was the one-touch dial key that was pressed one programmed for group dialing, program dialing, or not registered fax number, or not programmed at all?
An error message appears.
REGISTERED! GROUP
REGISTERED! PROGRAM
*NOT REGISTERED!*
*NOT FAX NO.
3 Using the 10-key pad, enter the desired transmission time, and then press the [Yes] key.
TX TIME=15:30
OK=YES
4 Press the [No/C] key to return to the FAX REGISTRATION menu.

To change the batch transmission setting
5 BATCH TX
-SELECT REGIST KEY-
TX TIME=15:30 OK=YES (DEL=NO)
TX TIME=06:30 OK=YES (DEL=NO)
-SELECT REGIST KEY-(COMPLETE=NO)
1 Select the BATCH TX in the FAX REGISTRATION menu. For details, refer to page 5-12.
2 Press the one-touch dial key programmed with the batch transmission setting that you wish to change.
3 Press the [No/C] key, and then use the 10-key pad to enter the new transmission time.
4 When you are finished making changes, press the [Yes] key.
Press the [No/C] key to return to the FAX REGISTRATION menu.
To delete the batch transmission setting
1 Select the BATCH TX in the FAX REGISTRATION menu.
For details, refer to page 5-12.
5 BATCH TX
2 Press the one-touch dial key programmed with the batch transmission setting that you wish to delete.
-SELECT REGIST KEY-
3 Press the [No/C] key.
A confirmation message appears, asking whether or not to delete the batch transmission setting.
TX TIME=15:30
OK=YES (DEL=NO)
4 Press the [Yes] key.
The SELECT REGIST. Key screen appears again.
TX TIME= :
DELETE BATCH=YES
Specifying MAILBOX
Mailbox IDs must first be specified in order to receive taxes with mailbox reception only if the mailbox ID sent by the caller matches the mailbox ID set on this machine.

Note
A mailbox ID cannot be the same as a relay box ID.
To register a mailbox
1 Select the MAILBOX in the FAX REGISTRATION menu. For details, refer to page 5-12.
6 MAILBOX
2 Using the 10-key pad, enter the mailbox number. The mailbox number can be set to any number between 1 and 5.
MAILBOX NO. = SELECT 1-5
3 Using the 10-key pad, enter the 4-digit mailbox ID, and then press the [Yes] key.
- The mailbox ID can be set to any number between 0000 and 9999.
MAILBOX 5 ID=1234 OK=YES
? Do you want to change the mailbox ID?
Press the [No/C] key, and then enter the new number.
4 Using the 10-key pad, enter the 4-digit password, and then press the [Yes] key.
PASSWORD=5678 OK=YES
The password can be set to any number between 0000 and 9999.
- If no password is to be specified, press the [Yes] key without entering anything.
2 Do you want to change the password?
Press the [No/C] key, and then enter the new password.
To delete a mailbox
1 Select the MAILBOX in the FAX REGISTRATION menu. For details, refer to page 5-12.
2 Using the 10-key pad, enter the number of the mailbox that you wish to delete.
3 Press the [No/C] key. A screen appears, allowing you to enter the mailbox ID.
4 Using the 10-key pad, enter the 4-digit mailbox ID, and then press the [Yes] key. The specified mailbox is deleted.
The specified mailbox is deleted.
6 MAILBOX
MAILBOX NO.= SELECT 1-5
REGISTERED! KEEP?
KEEP=YES (DEL=NO)
OLD M-BOX5 ID=1234 OK=YES
2 Do you want to change the mailbox ID?
Press the [No/C] key, and then enter the new number.
5 Press the [Panel reset] key.
The main screen appears again.
MAILBOX NO. = SELECT 1-5
Specifying RELAY BOX
A relay box ID must first be set in order for this machine (acting as a relay station) to receive a document from another fax machine (transmitting station), then transmit the document to multiple recipients (receiving stations).

Note
A relay box ID cannot be the same as a mailbox ID.
This machine (acting as a relay station) can be set to send back a relay result report. The fax number of the recipient of the report (either the transmitting station or any other recipient) can be specified using the one-touch dial keys, a speed dial number or the 10-key pad. If the recipient is to be specified using a one-touch dial key or a speed dial number, before using this function, be sure that the one-touch dial key or speed dial number is programmed with the fax number of the report recipient.
To program the relay box
1 Select the RELAY BOX in the FAX REGISTRATION menu.
For details, refer to page 5-12.
7 RELAY BOX
2 Using the 10-key pad, enter the relay box number.
The relay box number can be set to any number between 0 and 9.
RELAYBOXNO. = 5 SELECT0-9
3 Using the 10-key pad, enter the 4-digit relay box ID, and then press the [Yes] key.
The relay box ID can be set to any number between 0000 and 9999.
RELAYBOX5ID=1234 OK=YES
2 Do you want to change the relay box ID?
Press the [No/C] key, and then enter the new number.
4 Using the 10-key pad, enter the 4-digit password, and then press the [Yes] key.
PASSWORD=5678 OK=YES
The password can be set to any number between 0000 and 9999.
- If no password is to be specified, press the [Yes] key without entering anything.
Do you want to change the password?
Press the [No/C] key, and then enter the new password.
5 To send back a relay result report, specify the recipient using either a one-touch dial key or speed dial number programmed with the recipient's fax number, and then press the [Yes] key.
REPORT SPEED001
A screen appears, allowing you to specify the receiving stations.
6 Using the one-touch dial keys or the speed dial numbers, or by entering the fax number using the 10-key pad, specify a receiving station, and then press the [Yes] key.
NO.001=ONE-TOUCH 01
- A maximum of 50 recipients can be specified as receiving stations. Repeat this step until all desired receiving stations are specified.
2 Do you want to delete the currently selected recipient?
Press the [No/C] key.
7 When you are finished specifying all receiving stations, press the [Start] key.
NO.005=_ (Fin.=START)
The FAX REGISTRATION menu appears again.
To delete the relay box
1 Select the RELAY BOX in the FAX REGISTRATION menu. For details, refer to page 5-12.
2 Using the 10-key pad, enter the number of the relay box that you wish to delete.
3 Press the [No/C] key. The specified relay box is deleted. To delete another relay box, repeat steps 3 and 4.
4 Press the [Panel reset] key. The main screen appears again.
7 RELAY BOX
RELAYBOXNO. = 5 SELECT0-9
REGISTERED! KEEP?
KEEP=YES (DEL=NO)
RELAYBOXNO. = SELECT0-9
5.5 TX operation settings
From the TX OPERATION menu, various functions for sending faxes can be set.
| No. | Name | Characteristic/Description |
| 1 | SCAN CONTRAST | This function can be used to set the default scanning contrast level to one of five settings between LIGHT and DARK.For dark-colored paper (media), select a setting towards LIGHT.For faint or colored text, select a setting toward DARK. |
| 2 | RESOLUTION | This function can be used to set the default scanning resolution (image quality) to one of the following: “Standard”, “Fine”, “Super fine”, “Half tone + Standard”, “Half tone + Fine” or “Half tone + Super fine”.Default setting: Standard. |
| 3 | DEFAULT TX | This function can be used to set the default transmission mode to MEM.TX or ADF TX.MEM. TX: memory transmissionADF TX: direct transmissionDefault setting: MEM.TX. |
| 4 | HEADER | This function can be used to set the default setting (ON or OFF) for adding the header (date sent, sender's name and fax number, etc.) when sending faxes.Default setting: ON. |
The utility mode settings can also be specified from LSD (Local Setup for Diagnostic). For details, refer to "About Local Setup for Diagnostic (LSD)" on page 7-11.
If optional network interface card NC-502 and scanner unit SU-502 are installed, settings can also be specified from the network tool PageScope Web Connection. For details, refer to "What is PageScope Web Connection?" on page 7-6.
Selecting the TX OPERATION menu
1 Press the [Utility] key eight times. TX OPERATION appears.
2 From the 10-key pad, press the key ([1] through [4]) for the TX operation function that you wish to set.
The TX operation functions are as follows:
1 SCAN CONTRAST
2 RESOLUTION
3 DEFAULT TX
4 HEADER
TX OPERATION? OK=YES / or 1-4

Utility

Note
If, at any time, you wish to quit setting a TX operation function, press the [No/C] key. When the message STOP SETTING? appears, press the [Yes] key to quit.
Specifying SCAN CONTRAST
1 Select the SCAN CONTRAST in the TX OPERATION menu. For details, refer to page 5-47.
1 SCAN CONTRAST
2 Press the [<] and [>] keys to select one of the five settings between LIGHT and DARK, and then press the [Yes] key.
LIGHT DARK
The TX OPERATION menu appears again.
Specifying RESOLUTION
1 Select the RESOLUTION in the TX OPERATION menu.
For details, refer to page 5-47.
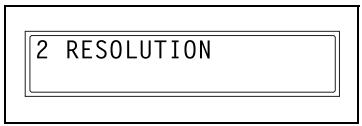
2 Press the [A] and [B] keys to select the desired resolution setting, and then press the [Yes] key.
The resolution settings appear as follows.
STD: Standard
FINE: Fine
S/F: Super fine
H/T: Half tone
If H/T was selected, a screen appears, allowing you to make a detailed setting. (Continue with step 4.)
If any setting other than H/T was selected, the TX OPERATION menu appears again.
3 Press the [A] and [B] keys to select the desired halftone setting, and then press the [Yes] key.
The halftone settings appear as follows.
STD: Standard
FINE: Fine
S/F: Super fine
The TX OPERATION menu appears again.
Specifying DEFAULT TX
1 Select the DEFAULT TX in the TX OPERATION menu.
For details, refer to page 5-47.
3 DEFAULT TX
2 Press the [< ] and [> ] keys to select either MEM.TX or ADF TX, and then press the [Yes] key.
The TX OPERATION menu appears again.
*MEM.TX ADF TX
& YES
Specifying HEADER
1 Select the HEADER in the TX OPERATION menu.
For details, refer to page 5-47.
4HEADER
2 Press the [A] and [B] keys to select either ON or OFF, and then press the [Yes] key.
The TX OPERATION menu appears again.
ON OFF
& YES
5.6 RX operation settings
From the RX OPERATION menu, various functions for receiving faxes can be set.
| No. | Name | Characteristic/Description |
| 1 | MEMORY RX MODE | This function can be used to set whether to allow (ON) memory re-ception or not (OFF). In cases when confidential faxes are being received, the received document can be stored in the memory and printed at a specified time or when memory reception is set to OFF.A password can be set to specify the starting time or ending time of memory reception, or to cancel the function.The set starting time and ending time are valid every day until memory reception is turned off.Default setting: OFF. |
| 2 | NO. of RINGS | This function can be used to set the number of rings between 1 and 16 until the call is answered. |
| 3 | REDUCTION RX | This function can be used to set whether documents longer than the paper are printed reduced (ON), split (OFF), or discarded (CUT). However, when sending a document more than 24 mm longer than the paper, CUT is not available. (In this case, the document is split.)Default setting: ON. |
| 4 | RX PRINT | This function can be used to set whether the fax is only printed after all document pages have been received (MEMORY RX) or printing begins as soon as the first page of the document is received (PRINT RX).Default setting: MEMORY RX. |
| 5 | RX MODE | This function can be used to set the reception mode to automatic reception (AUTO RX) or manual reception (MANUAL RX). Automatic reception: Automatically begins receiving after the set number of rings.Manual reception: Does not automatically receive the fax. Reception begins after making a connection by picking up the telephone receiver or pressing the [Speaker] key, then pressing the [Start] key.Default setting: AUTO RX. |
| 6 | FORWARD | This function can be used to set whether or not the received document is forwarded.Forward (ON): The received document is forwarded to the speci-fied fax number or e-mail address.Forward and print (ON(PRINT)): The received document is printed by this machine at the same time that it is forwarded to the speci-ified fax number or e-mail address.Do not forward (OFF): The document is not forwarded.Default setting: OFF.(In order to forward the document to an e-mail address, the op-tional scanner unit SU-502 is required.) |
| 7 | FOOTER | This function can be used to set whether or not the reception information (date received, number of pages, etc.) is printed at the bottom of each received document.Default setting: OFF. |
| 8 | SELECT TRAY | This function can be used to select which paper tray can be used to supply paper when printing received documents or transmission reports. (A paper tray that cannot be used for supplying paper can also be specified.) |
| 9 | CLOSED NETWORK | This function can be used to set whether or not the fax is received if the sender's fax number does not match the fax number programmed in one of this machine's one-touch dial keys or speed dial numbers. • Default setting: OFF. |
The utility mode settings can also be specified from LSD (Local Setup for Diagnostic). For details, refer to "About Local Setup for Diagnostic (LSD)" on page 7-11.
If optional network interface card NC-502 and scanner unit SU-502 are installed, settings can also be specified from the network tool PageScope Web Connection. For details, refer to "What is PageScope Web Connection?" on page 7-6.
Selecting the RX OPERATION menu
1 Press the [Utility] key nine times. RX OPERATION appears.
2 From the 10-key pad, press the key ([1] through [9]) for the RX operation function that you wish to set.
The RX operation functions are as follows:
1 MEMORY RX MODE
2 NO. of RINGS
3 REDUCTION RX
4 RX PRINT
5 RX MODE
6 FORWARD
7 FOOTER
8 SELECT TRAY
9 CLOSED NETWORK

Note
If, at any time, you wish to quit setting/changing an RX operation function, press the [No/C] key. When the message STOP SETTING? appears, press the [Yes] key to quit.
To exit the RX OPERATION menu, press the [Panel Reset] key. The main screen appears again.
Specifying MEMORY RX MODE
1 Select the MEMORY RX MODE in the RX OPERATION menu. For details, refer to page 5-52.
1 MEMORY RX MODE
2 Press the [A] and [B] keys to select ON, and then press the [Yes] key.
ON OFF 1, & YES
3 Using the 10-key pad, enter the time for memory reception to begin, and then press the [Yes] key.
ON TIME=20:00 OK=YES
- To specify that memory reception stays on from the time that it is set to ON until it is manually canceled, press the [Yes] key without entering a start time. (Skip to step 5.)
4 Using the 10-key pad, enter the time for memory reception to end, and then press the [Yes] key.
OFF TIME = 09:00 OK=YES
5 Using the 10-key pad, enter the 4-digit password used to cancel memory reception, and then press the [Yes] key.
PASSWORD=5678 OK=YES
- If no password is to be specified, press the [Yes] key without entering anything.
The RX OPERATION menu appears again.
To cancel memory reception
Memory reception is automatically canceled at the specified ending time, and the received documents are printed. If no ending time has been set or if you wish to cancel memory reception before the ending time, follow the procedure described below.
1 Select the MEMORY RX MODE in the RX OPERATION menu. For details, refer to page 5-52.
1 MEMORY RX MODE
2 Press the [A] and [B] keys to select OFF, and then press the [Yes] key.
If a password was specified, continue with step 4.
- If a password was not specified, all received documents stored in the memory are printed, and the RX OPERATION menu appears again.
3 Using the 10-key pad, enter the 4-digit password, and then press the [Yes] key.
PASSWORD=5678 OK=YES
All received documents stored in the memory are printed, and the RX OPI
Specifying NO.of RINGS
1 Select the NO. of RINGS in the RX OPERATION menu. For details, refer to page 5-52.
2 NO. of RINGS
2 Using the 10-key pad, enter the desired number of rings, and then press the [Yes] key.
NO.of RINGS= 2(1-16) OK=YES
The number of rings can be set between 1 and 16.
The RX OPERATION menu appears again.
Specifying REDUCTION RX
1 Select the REDUCTION RX in the RX OPERATION menu.
For details, refer to page 5-52.
3 REDUCTION RX
2 Press the [< ] and [> ] keys to select either ON (print the document reduced), OFF (split the printout) or CUT (discard any excess), and then press the [Yes] key.
*ON OFF CUT
& YES
The RX OPERATION menu appears again.
Specifying RX PRINT
1 Select the RX PRINT in the RX OPERATION menu.
For details, refer to page 5-52.
4 RX PRINT
2 Press the [A] and [B] keys to select either MEMORY RX or PRINT RX, and then press the [Yes] key.
*MEMORY RX PRINT RX 8, & YES
The RX OPERATION menu appears again.
Specifying RX MODE
1 Select the RX MODE in the RX OPERATION menu.
For details, refer to page 5-52.
5 RX MODE
2 Press the [A] and [B] keys to select either AUTO RX or MANUAL RX, and then press the [Yes] key.
The RX OPERATION menu appears again.
*AUTO RX MANUAL RX 8 YES
Specifying FORWARD
1 Select the FORWARD in the RX OP-ERATION menu.
For details, refer to page 5-52.
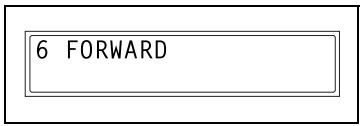
2 Press the [ ] and [▶] keys to select either ON, ON(PRINT) or OFF, and then press the [Yes] key.
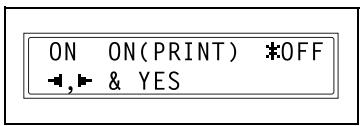
- If ON or ON(PRINT) was selected, a screen appears, allowing you to specify the forwarding location. (Continue with step 4.)
If OFF was selected, the RX OPERATION menu appears again.
3 Using the one-touch dial keys or the speed dial numbers, or by entering the fax number using the 10-key pad, specify a fax number, and then press the [Yes] key.
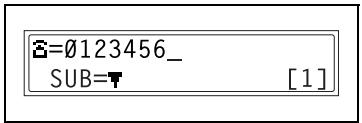
The RX OPERATION menu appears again.

Note
An e-mail address can be specified as a forwarding location only when the optional scanner unit SU-502 is installed.
For details, refer to the user's guide for the scanner unit SU-502.
Specifying FOOTER
1 Select the FOOTER in the RX OPERATION menu.
For details, refer to page 5-52.
7 FOOTER
2 Press the [ ] and [ ] keys to select either ON or OFF, and then press the [Yes] key.
The RX OPERATION menu appears again.
ON OFF 8 YES
Specifying SELECT TRAY
1 Select the SELECT TRAY in the RX OPERATION menu.
For details, refer to page 5-52.
8 SELECT TRAY
2 Press the [▲] and [▼] keys to select a paper tray, and then press the [Yes] key.
TRAY1 OK=YES
3 Press the [A] and [B] keys to select either DISABLE or ENABLE, and then press the [Yes] key.
The RX OPERATION menu appears again.
DISABLE ENABLE
Specifying CLOSED NETWORK
1 Select the CLOSED NETWORK in the RX OPERATION menu. For details, refer to page 5-52.
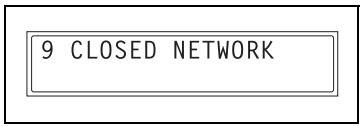
2 Press the [A] and [B] keys to select either ON or OFF, and then press the [Yes] key.
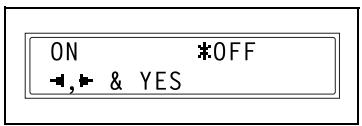
The RX OPERATION menu appears again.
5.7 Communication settings
From the COMM.SETTING menu, various functions are available for specifying communication settings.
| No. | Name | Characteristic/Description |
| 1 | TONE/PULSE | This function can be used to specify the dialing system. If this function is not correctly set to the type of dialing system used, faxes cannot be sent. Select the correct setting after checking which type of dialing system is used by your telephone line. |
| 2 | LINE MONITOR | This function can be used to set the volume when monitoring communication to HIGH, LOW or OFF. • Default setting: LOW. |
| 3 | PSTN/PBX | This function can be used to set whether the connected telephone wiring is a public switched telephone network (PSTN) or a private branch exchange (PBX). For a PBX system, the outside line access number (or extension number) must be specified. |
The utility mode settings can also be specified from LSD (Local Setup for Diagnostic). For details, refer to "About Local Setup for Diagnostic (LSD)" on page 7-11.
If optional network interface card NC-502 and scanner unit SU-502 are installed, settings can also be specified from the network tool PageScope Web Connection. For details, refer to "What is PageScope Web Connection?" on page 7-6.
Selecting the COMM. SETTING menu
1 Press the [Utility] key ten times.
COMM. SETTING appears.
2 From the 10-key pad, press the key ([1] through [3]) for the communication setting function that you wish to set.
The communication setting functions are as follows:
1 TONE/PULSE
2 LINE MONITOR
3 PSTN/PBX
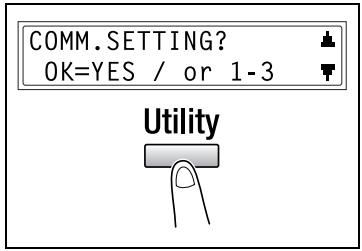

Note
If, at any time, you wish to quit setting/changing an comm. setting function, press the [No/C] key. When the message STOP SETTING? appears, press the [Yes] key to quit.
To exit the COMM. SETTING menu, press the [Panel reset] key. The main screen appears again.
Specifying TONE/PULSE
There are two types of telephone dialing systems: tone dialing (PB) and pulse dialing (DP10pps or DP20pps). Faxes cannot be sent if this machine is not set to the system used by your telephone line. Select the correct setting after checking which type of dialing system is used.
To specify the telephone dialing system
1 Select the TONE/PULSE in the COMM. SETTING menu. For details, refer to page 5-59.
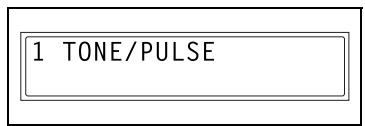
2 Press the [< ] and [> ] keys to select either TONE (for tone dialing) or PULSE (for pulse dialing), and then press the [Yes] key.

3 If PULSE was selected, select either 10pps or 20pps, and then press the [Yes] key. The COMMSETTING menu appears again.

Specifying LINE MONITOR
1 Select the LINE MONITOR in the COMM. SETTING menu. For details, refer to page 5-59.
2 LINE MONITOR
2 Press the [< ] and [> ] keys to select either HIGH, LOW or OFF, and then press the [Yes] key.
*HIGH LOW OFF
→,→ & YES
The COMMSETTING menu appears again.
Specifying PSTN/PBX
The connected wiring system can be set to either PSTN (Public Switched Telephone Network) or PBX (Private Branch Exchange).
For a PBX system, the outside line access number (or extension number) must be specified. The outside line access number (or extension number) is programmed in the [#] key.
To specify the telephone wiring system
1 Select the PSTN/PBX in the COMM. SETTING menu. For details, refer to page 5-59.
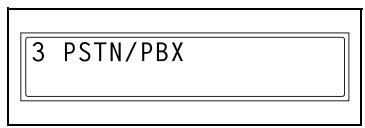
2 Press the [ ] and [ ] keys, select either PSTN (Public Switched Telephone Network) or PBX (Private Branch Exchange), and then press the [Yes] key.
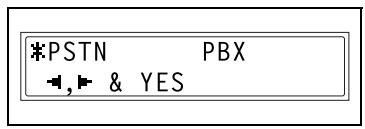
3 If PBX was selected, use the 10-key pad to enter the number that should be dialed to access the outside line, and then press the [Yes] key.
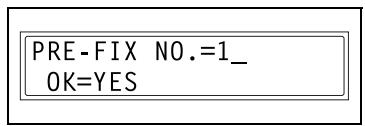
The COMM.SETTING menu appears again.
5.8 Reporting settings
From the REPORTING menu, various functions are available for specifying which reports are automatically printed.
| No. | REPORTING | Characteristic/Description |
| 1 | ACTIVITY REPORT | Every 60 transmissions/receptions, a report can be printed to show the results of the transmissions/receptions. This function can be used to set whether the report is printed automatically when the 60th transmission/reception is reached. • Default setting: ON. |
| 2 | RESERV REPORT | If multiple recipients are specified for transmission, such as with broadcast transmission and polling reception, a report can be printed to show specified settings. This function can be used to set whether this report is printed automatically. • Default setting: OFF. |
| 3 | TX RESULT REPORT | This function can be used to set whether the report showing the result of a transmission is printed automatically after the transmission is finished. • Default setting: OFF. |
| 4 | RX RESULT REPORT | This function can be used to set whether the report showing the result of a reception is printed automatically after mailbox reception is finished. (If regular reception is not finished normally, a report will always be printed, regardless of the selected setting.) • Default setting: OFF. |
The utility mode settings can also be specified from LSD (Local Setup for Diagnostic). For details, refer to "About Local Setup for Diagnostic (LSD)" on page 7-11.
If optional network interface card NC-502 and scanner unit SU-502 are installed, settings can also be specified from the network tool PageScope Web Connection. For details, refer to "What is PageScope Web Connection?" on page 7-6.
Selecting the REPORTING menu
1 Press the [Utility] key eleven times. REPORTING appears.
2 From the 10-key pad, press the key ([1] through [4]) for the reporting function that you wish to set.
The reporting functions are as follows:
1 ACTIVITY REPORT
2 RESERV.REPORT
3 TX RESULT REPORT
4 RX RESULT REPORT
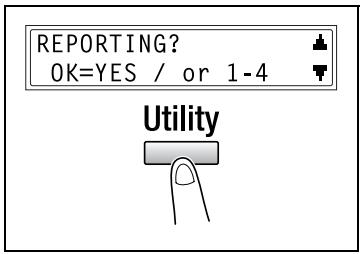

Note
If, at any time, you wish to quit setting/changing a reporting function, press the [No/C] key. When the message STOP SETTING? appears, press the [Yes] key to quit.
To exit the REPORTING menu, press the [Panel reset] key. The main screen appears again.
Specifying ACTIVITY REPORT
1 Select the ACTIVITY REPORT in the REPORTING menu. For details, refer to page 5-64.
2 Press the [< ] and [>] keys to select either ON or OFF, and then press the [Yes] key.
The REPORTING menu appears again.
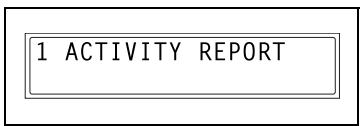
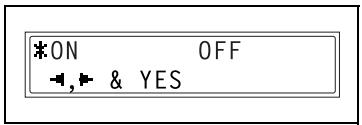
Specifying RESERV.REPORT
1 Select the RESERV. REPORT in the REPORTING menu.
For details, refer to page 5-64.
2 RESERV.REPORT
2 Press the [A] and [B] keys to select either ON or OFF, and then press the [Yes] key.
The REPORTING menu appears again.
ON OFF -, & YES
Specifying TX RESULT REPORT
1 Select the TX RESULT REPORT in the REPORTING menu.
For details, refer to page 5-64.
3 TX RESULT REPORT
2 Press the [▲] and [►] keys to select either ON or OFF, and then press the [Yes] key.
The REPORTING menu appears again.
ON OFF
& YES
Specifying RX RESULT REPORT
1 Select the RX RESULT REPORT in the REPORTING menu.
For details, refer to page 5-64.
4 RX RESULT REPORT
2 Press the [ ] and [ ] keys to select either ON or OFF, and then press the [Yes] key.
The REPORTING menu appears again.
ON OFF
& YES
5.9 Initial user data settings
From the INITIAL USER DATA menu, various functions are available for specifying the machine's user data.
| No. | Name | Description |
| 1 | DATE&TIME | The date and time for the machine can be specified. |
| 2 | USER FAX NO. | The fax number for the machine can be specified. |
| 3 | USER NAME | The fax name for the machine can be specified. |
The settings for items 2 and 3 can also be specified from LSD (Local Setup for Diagnostic). For details, refer to "About Local Setup for Diagnostic (LSD)" on page 7-11.
If optional network interface card NC-502 and scanner unit SU-502 are installed, settings for items 2 and 3 can also be specified from the network tool PageScope Web Connection. For details, refer to "What is PageScope Web Connection?" on page 7-6.
Selecting the INITIAL USER DATA menu
1 Press the [Utility] key twelve times. INITIAL USER DATA appears.
2 From the 10-key pad, press the key ([1] through [3]) for the initial user data function that you wish to set.
The initial user data functions are as follows:
1 DATE&TIME
2 USER FAX NO.
3 USER NAME
INITIAL USER DATA? OK=YES / or 1-3


Note
If, at any time, you wish to quit setting/changing a initial user data function, press the [No/C] key. When the message STOP SETTING? appears, press the [Yes] key to quit.
Specifying DATE&TIME
1 Select the DATE&TIME in the INITIAL USER DATA menu.
For details, refer to page 5-66.
1 DATE&TIME
2 Using the 10-key pad, enter the current time and date.
Enter the settings in the following order: hours, minutes, year, month, and day.
14:00 '04 01 14
SET HOUR (OK=YES)
3 Press the [Yes] key to display the time zone setting. Press the [▲] and [▼] keys to select the appropriate time zone.
4 Press the [Yes] key.

Note
The time zone setting is available only if the scanner unit SU-502 is installed.
Specifying USER FAX No.
1 Select the USER FAX NO. in the INITIAL USER DATA menu.
For details, refer to page 5-66.
2 Using the 10-key pad, enter the fax number.
3 Press the [Yes] key.
2 USER FAX NO.
= OK=YES [1]


Specifying USER NAME
1 Select the USER NAME in the INITIAL USER DATA menu. For details, refer to page 5-66.
2 Using the 10-key pad, enter the user name for the machine. Each press of the [123/ABC] key switches the input mode between numbers and letters. [1]: Numbers can be typed in. [A]: Letters can be typed in.
3 Press the [Yes] key.
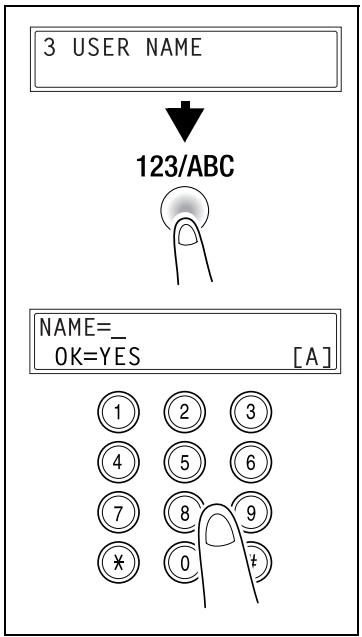
PageScope Web Connection settings page
The various fax settings can also be checked or changed if you log into PageScope Web Connection in admin. mode.
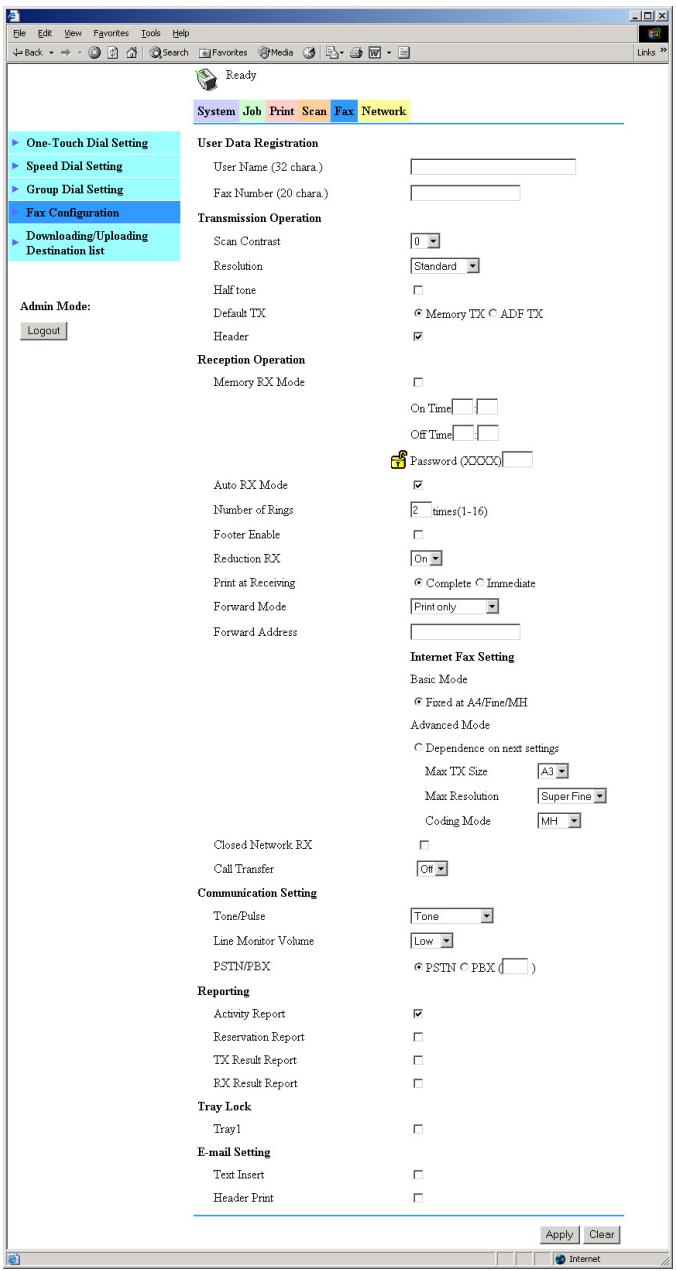
- This page appears as shown when optional image controller IC-205 is installed.

Detail
For details, refer to "PageScope Web Connection" on page 7-6.
6
When a message appears
6 When a message appears
6.1 What does each message mean?
| Message | Cause | Remedy |
| LINE PROBLEM (Flashing alternately) CHECK LINE | The telephone dialing system or telephone wiring system are not set correctly. | Check the telephone dialing system or telephone wiring system and use the appropriate utility mode function to make the correct settings. |
| The telephone cable is not attached correctly. | Correctly connect the telephone cable. | |
| *COMM失误* (#########) | Communication is not possible because of some problem in the machine. | Check the transmission results. |
| Communication is not possible because of a problem with the recipient/caller's fax machine. | ||
| *REDIAL ALL Failed* | All radial attempts failed because either the recipient's line is busy or there was no answer. | Check the condition of the recipient's line, and then try sending the fax again. |
| *MEMFULL/TX CANCEL* | While sending a fax, the size of the data for the scanned image has exceeded the capacity of the memory. | Retrieve all received faxes stored in the memory. |
| Send the fax by direct transmission. | ||
| *MEMFULL/RX CANCEL* | While receiving a fax, the size of the data for the scanned image has exceeded the capacity of the memory. | Retrieve all received faxes stored in the memory. |
| HANG UP THE PHONE | The receiver of the connected telephone is lifted. | Replace the receiver of the connected telephone on the hook. |
| TEXT ×1.00 1 ([A]) #XXX: Fax Err | A fax error occurred while an operation was being performed in copy mode. | Press the [Fax] key to check the error condition, and take appropriate measures. |
| TEXT ×1.00 1 ([A]) #XXX: Comm.Err | A fax transmission error occurred while an operation was being performed in copy mode. | Press the [Fax] key to check the error condition, and take appropriate measures. |
| *PLEASE WAIT!* ADMINISTERED BY PC | This machine is accessing LSD, RSD or the Admin. Mode of PageScope Web Connection. | Log off from PageScope Web Connection. Exit LSD. If no operation is performed for 600 seconds, the main screen appears. |
6.2 When faxing is not performed correctly
Faxes cannot be sent
| Symptom | Possible cause | Remedy |
| The document cannot be scanned. | The document is too thick. | Position the document on the original glass to send it. (p. 3-18) |
| The document is too thin or too small. | Position the document on the original glass to send it. (p. 3-18) | |
| The original glass is dirty. | Wipe the glass with a soft, dry cloth. | |
| The document was scanned at an angle. | The document is not positioned correctly. | Adjust the document guide plates for the size of the document. (p. 3-16) |
| The fax received by the recipient is not clear. | The document is not positioned correctly. | Position the document correctly. (p. 3-18) |
| The original glass is dirty. | Wipe the glass with a soft, dry cloth. | |
| The text in the document is too faint. | Adjust the scanning contrast. (p. 5-47) | |
| There is a problem with the telephone connection or with the recipient's fax machine. | Check that this machine can make clean copies. If it can, try sending the fax again. | |
| The fax received by the recipient is blank. | The document was sent with the front side facing down (while using the automatic document feeder). | Load the document with the front side facing up, and then try sending the fax again. (p. 3-16) |
| Faxes cannot be sent automatically. | The fax number is wrong. | Check the fax number. |
| A number specifically for telephone calls is being dialed. | Check the number. | |
| There is a problem with the recipient's fax machine (it is out of paper, it is not set to receive faxes automatically, it is turned off, etc.). | Contact the recipient. |
Faxes cannot be received
| Symptom | Possible cause | Remedy |
| The received fax is not clear. | Paper that does not meet specifications has been used. | Use paper that meets specifications. |
| The paper is damp. | Replace the paper. | |
| The toner is empty. | Replace the toner bottle with a new one. | |
| There is a problem with the telephone connection or with the caller's fax machine. | Check that the machine can make clean copies. If it can, have the caller send the fax again. | |
| The received fax is blank. | The toner is empty. | Replace the toner bottle with a new one. |
| The caller sent the back of the fax pages. | Contact the caller. | |
| Faxes cannot be received automatically. | The machine is set to receive faxes manually. | Set the machine to automatic reception. (p. 4-23) |
| The memory is full. | Load paper if it is empty, and then print the faxes stored in the memory. | |
| Some error occurred. | Follow the instructions in any messages that appear on the display. | |
| Black streaks appear through the copy. | There is a problem with the telephone connection or with the caller's fax machine. | Check that the machine can make clean copies. If it can, have the caller send the fax again. |
Calls cannot be sent
| Symptom | Possible cause | Remedy |
| Nothing can be heard from the connected telephone. | The cord from the telephone is not connected correctly to the main unit. | Correctly connect the tele- phone cord to the main unit. |
| The telephone cord from the wall jack is not connected cor- rectly to the main unit. | Correctly connect the tele- phone cord from the wall jack to the main unit. | |
| Transmitting. | Check again after the trans- mission is finished. | |
| After dialing, the ringing can- not be heard. | The telephone dialing system is not set correctly. | Correctly set the telephone di- aling system. (p. 5-60) |
| After the [Speaker] key is pressed, it is difficult to hear the recipient/caller's voice. | The monitoring volume is too low. | Increase the monitoring vol- ume. (p. 5-61) |
| The ringing of the telephone is too low (loud). | The ringer volume of the con- nected telephone is set too low (loud). | Adjust the ringer volume of the connected telephone. |
7
Miscellaneous
7 Miscellaneous
7.1 Specifications
| Specifications | |
| Transmission mode | G3 |
| Wiring application | General subscriber telephone line, NCC each line |
| Connection method | Direct connection (using a modular jack) |
| Transmission speed | 33.6, 31.2, 28.8, 26.4, 24.0, 21.6, 19.2, 16.8, 14.4, 12.0, 9.6, 7.2, 4.8, 2.4 kbps (automatic switching) |
| Transmission time | 3 seconds* |
| Scanning density | 8 dots/mm × 3.85/7.7/15.4 lines/mm, 16 dots/mm × 15.4 lines/mm** |
| Document size | Maximum A3 □, continuous documents (maximum 1000 mm) possible |
| Report paper size | Metric: A3 □, B4 □, A4 □/□, B5 □, A5 □ Inch: Invoice (8-1/2 × 5-1/2) □, Letter □/□, Legal (8-1/2 × 14) □, Ledger (11 × 17) □ |
| Scanning storage | With built-in memory (5 MB): 280 pages With expanded memory (64 MB): 1024 pages (With A4 documents) |
| Coding | MH, MR, MMR, JBIG |
- This is the speed for transmitting an A4-size document containing approximately 700 characters at high-speed (33.6 kbps) using the standard resolution (8 dots/mm×3.85 lines/mm). The transmission time for only the image information and the communication control time are not included. In addition, the actual transmission time differs depending on the contents of the document, the recipient's fax machine and the condition of the wiring.
** Direct transmission is supported only with the automatic document feeder.
7.2 Glossary
| Term | Definition |
| Automatic redialing | If a call cannot be completed, for example if the recipient's machine is busy, the recipient is automatically called again. If a document queued in the memory to be sent contains multiple pages, until the time for redialing has been reached, it is advanced in the queue and sent. |
| Book document | A bound document such as a book or catalog. |
| F codes | F codes are mailbox functions, such as “SUB” (sub-addresses), “SEP” (selective polling), “SID” and “PWD” (passwords), regulated by the G3 standards of the ITU-T (International Telecommunication Union). Mailbox transmission/reception and relay initiation transmission are possible only with similar machines compatible with F code transmission. |
| G3 communication | Communications in conformance with the G3 standard (an international standard for facsimile communications); fax communications via an analog line (general subscriber line). |
| General subscriber line | Analog telephone lines (public network) |
| Internet fax | Faxes can be transmitted via the Internet or an Intranet instead of through telephone lines. Instead of a fax number, the recipient's e-mail address is specified and the scanned image (TIFF format) can be sent as an e-mail message to a computer or Internet fax. In addition, e-mail messages from computers can be received as images. |
| JBIG coding method | New method of data compression/decompression, standardized by the Joint Bi-level Image Expert Working Group, a subcommittee of the International Telecommunications Union (ITU-T). Effective for transferring large amounts of data or high-resolution image data such as halftones. |
| Manual reception | Receiving a fax document after talking on the telephone. |
| Manual transmission | Sending a fax document after talking on the telephone. |
| Memory | Stores fax and copy image data. By installing optional expanded memory units, much more image data can be stored in the memory. |
| Memory reception | When paper runs out or a paper misfeed occurs while receiving a fax, the data is automatically stored in the memory and printed out later. Even if the paper runs out during the night or when the user is away, the fax document can still be received. |
| Network scanner | This is a function that allows scanned images to be sent to a computer via a network. They can also be sent as e-mail messages or uploaded to FTP servers. |
| On-hook dialing | Dials without the hand set picked up. Press the [Speaker] key to use this function. |
| PBX | Abbreviation for private branch exchangeExchange equipment installed in a company or a plant to connect a number of telephone sets with multiple station lines in order to enable unrestricted communications between the telephone sets. |
| Protocols | The necessary rules for communication |
| Touch-tone signals | A signal used on the telephone line; used when calling on a push-button line or using push-button services. By pressing the [×] key in the 10-key pad, touch-tone signals are used, even if a dial phone line is connected. |
7.3 PageScope Web Connection
What is PageScope Web Connection?
PageScope Web Connection is a device control utility program provided by the HTTP server built into the network interface card. This utility can be used with a Web browser as an interface for remotely controlling the machine and network interface card.
- This page appears as shown when optional image controller IC-205, expanded memory unit EM-101, expanded memory unit EM-102, and job separator JS-503 are installed.
Here are some examples of the types of tasks that can be performed with PageScope Web Connection.
- Change settings
Change network settings
Change fax settings
Remote status monitoring
Check the details of machine trays, information about consumables, or the total number of prints
Check the status of jobs that are being printed, or held in the print queue (Jobs can also be deleted if you have logged in to the Administrator mode.)
System requirements
PageScope Web Connection can be used in the following system environments.
| OS | Windows 95 (OSR 2.5), Windows 98, Windows 98 SE, Windows ME, Windows NT 4.0, Windows 2000, or Windows XP |
| Browser | Microsoft Internet Explorer 4.0 or later Netscape Navigator 4 or later |
Accessing PageScope Web Connection
PageScope Web Connection is accessed directly using a web browser.
1 Start up your web browser.
2 Enter the IP address of the machine into the URL box, and then press the [Enter] key. http://
- (Example) If the machine IP address is 192.168.0.10, enter: http://192.168.0.10/
3 The PageScope Web Connection screen appears.

Note
In order to access PageScope Web Connection, an IP address must be assigned to the machine.
Using PageScope Web Connection
PageScope Web Connection is used in the same way as other internet web pages. Click on links in the page to jump to that page, and use the [Back] and [Next] buttons to navigate through pages that have already been loaded.
About the screen layout
The following screen appears when you access PageScope Web Connection.

Note
Screen images used in this manual may differ from the actual screen display. They are also subject to change without notice.
| No. | Part name | Description |
| 1 | Logo | Click on this to jump to the manufacturer's web site. |
| 2 | Logo | Click on this to jump to the PageScope web site. |
| 3 | Status display | Displays the current status of the machine. |
| 4 | Administrator password | Enter the administrator password to log in to the administrator mode. |
| 5 | Tabs | These are used to select the various categories of settings. |
| 6 | Menu | This is used to select various setting items or display information. |
| 7 | Information/set-tings display | Displays the details for the item selected from the menu. |
Logging in as an administrator
Some of the settings available in PageScope Web Connection can only be changed by an administrator. These settings are only displayed when you log in to the administrator mode.
Logging in to administrator mode
1 Enter the administrator password in the "Admin Password:" box at the left of the screen.
2 Click the [Login] button to log in to the administrator mode.
3 To log out again, click the [Logout] button.

Note
The default password for administrator mode is "sysadm".
Be sure to change the administrator password before using administrator mode.

Note
The machine cannot be used while you are logged into PageScope Web Connection with administrator mode.
7.4 Local Setup for Diagnostic (LSD)
About Local Setup for Diagnostic (LSD)
By installing Local Setup for Diagnostic (LSD) onto a computer connected to the machine, you to change machine settings and check the counters and machine status from the computer.
The following operations can be performed using LSD.
- Save machine one-touch dialing, speed dialing and group dialing information onto a computer
- Change machine one-touch dialing, speed dialing and group dialing information
- Change Utility mode settings
- Check the counters
- Check the configuration page
LSD operating environment
The following environment is required in order to install LSD onto a computer.
| Item | Operating environment |
| Operating system | Windows 98 Second Edition, Windows Me, Windows 2000 Professional, Windows XP |
| Processor | Pentium II or faster |
| Memory | Memory capacity recommended for the operating system. There should be enough memory for the operating system and the applications used. |
| Available hard disk space | 100 MB or more |
| Web browser | Internet Explorer version 5.0 or later |
- Interface used for connecting USB interface with a USB cable

Note
Use a USB cable with an A-type connector (4-pin male) and a B-type connector (4-pin male). We recommend that the USB cable be no more than 3 meters long.
Outline of setup
Before using LSD, the machine must be connected to the computer, and LSD must be installed on the computer.
1 Connect the machine to the computer.
2 Install the TWAIN driver and printer driver included with the machine.
- For details on the installation procedure, refer to the corresponding manuals for the printer driver and the TWAIN driver.
3 Install LSD onto the computer.
- For details on the installation procedure, refer to "Installing LSD" on page 7-13.
Installing LSD
As an example, the procedure for the bizhub 162 is described below.
1 Double-click "setup.exe" in the folder "LSD".
2 The installer starts up.
3 Select the desired installation language.
4 Click the [Next] button, and then follow the on-screen instructions.
5 When a message appears, indicating that the installation of LSD is finished, click the [Finish] button.
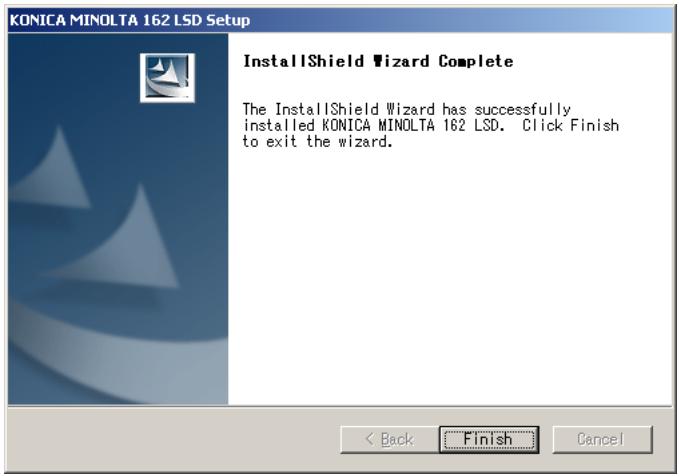
The installation of LSD is completed.
Starting up LSD
Click the Start button, point to "Programs", and then click "KONICA MINOLTA 162 LSD".

The main window of LSD appears.
Main window of LSD
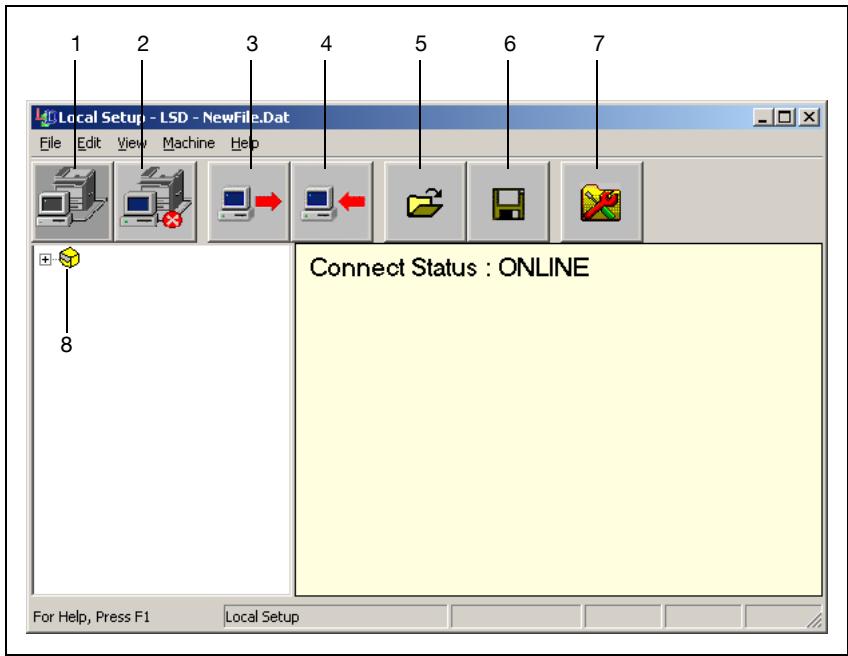
| No. | Name | Description |
| 1 | Connect to machine button | Click this button to connect the machine with the computer. |
| 2 | Disconnect button | Click this button to cut the connection between the machine and the computer. |
| 3 | Upload button | Click this button to send the settings file to the machine. |
| 4 | Download button | Click this button to send the machine's settings to the computer. |
| 5 | Open button | Click this button to open the settings file. |
| 6 | Save As button | Click this button to save the settings file. |
| 7 | Utility settings but- ton | Click this button to display the Utility Setting dialog box. |
| 8 | Machine icon | Click ☑ beside the machine icon to display the machine one-touch dialing, speed dialing and group dialing settings. |
Connecting to the machine
1 Click
- A connection can also be created by clicking "Connect" on the "Machine" menu.
When LSD is connected to the machine, "Connect Status: ONLINE" appears.

Note
While operations are being performed in LSD, the machine cannot be operated from its control panel.
Downloading information from the machine
Click
- The information can also be downloaded by clicking "Download" on the "Machine" menu.
Programming a one-touch dial number
1 Click +++ beside the machine icon, and then click "One Touch".
2 From the list that is displayed, double-click the one-touch dial number to be programmed.
- A maximum of 27 one-touch dial numbers can be programmed.
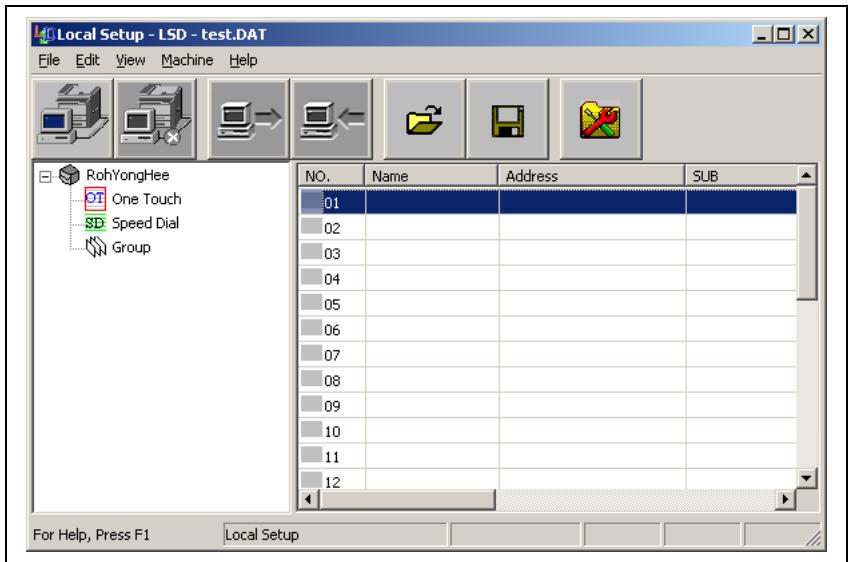
3 In the Register One Touch dialog box for the selected number, specify the desired settings.
- Only numbers and letters can be typed in.
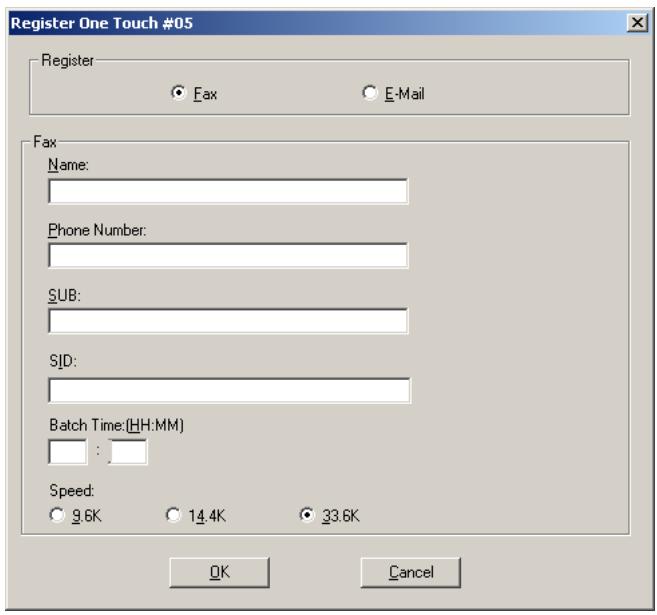
4 Click the [OK] button.
Programming of the one-touch dial number is completed.
Editing a one-touch dial number
1 Click beside the machine icon, and then click "One Touch".
2 From the list that is displayed, double-click the one-touch dial number to be edited.
- If a programmed one-touch dial number is selected, the information can be changed.

Detail
When editing the information, the "Cut", "Copy", "Paste" and "Delete" commands on the "Edit" menu can be selected.
Programming a speed dial number
1 Click ++ beside the machine icon, and then click "Speed Dial".
2 From the list that is displayed, double-click the speed dial number to be programmed.
- A maximum of 200 speed dial numbers can be programmed.
3 In the Register Speed Dial dialog box for the selected number, specify the desired settings.
- Only numbers and letters can be typed in.
4 Click the [OK] button.
Programming of the speed dial number is completed.
Editing a speed dial number
1 Click beside the machine icon, and then click "Speed Dial".
2 From the list that is displayed, double-click the speed dial number to be edited.
- If a programmed speed dial number is selected, the information can be changed.

Detail
When editing the information, the "Cut", "Copy", "Paste" and "Delete" commands on the "Edit" menu can be selected.
Programming a group dial number
1 Click beside the machine icon, and then click "Group".
2 From the list that is displayed, double-click the group dial number to be programmed.
- A maximum of 27 group dial numbers can be programmed.
3 In the Register Group dialog box for the selected number, select a number to programmed in the group, and then click or .
4 Type in the name of the group.
5 Click the [OK] button.
Programming of the group is completed.

Reminder
Program group dialing after programming one-touch dial and speed dial numbers.
Editing a group dial number
From the list that is displayed, double-click the group dial number to be edited.
- If a programmed group dial number is selected, the information can be changed.
Printing the list of one-touch dial, speed dial and group dial numbers
1 On the "File" menu, click "Print".
The following dialog box appears.
2 Select the check box for the items to be printed, and then click the [OK] button.
Saving settings to a computer
1 Click to send the settings to the machine.
- The settings can also be saved by clicking "Save As" on the "File" menu.
2 Specify the folder where the file is to be saved, and then type in the name of the file.
3 Click the [Save] button.
Saving settings to a fax machine
Click
- The settings can also be saved to the machine by clicking "Upload" on the "Machine" menu.
Specifying Utility mode settings
Utility mode settings specified from the machine's control panel can be specified from the Utility Setting dialog box of LSD.
Click
- This dialog box can also be displayed by clicking "Utility Setting" on the "Machine" menu.
The Utility Setting dialog box appears.
The following parameters can be specified from LSD.
| Menu | Function |
| Machine Setting | Auto Panel Reset |
| Auto Shut OFF | |
| Density(ADF) | |
| Buzzer Volume | |
| Initial Mode | |
| Density(Book) | |
| Energy Save Mode | |
| Print Density | |
| LCD Density | |
| Language setting | |
| Paper Source | Inch/Metric |
| Paper Type | |
| Tray1 Paper | |
| Copy Setting(1) | Paper Priority |
| Density Priority | |
| Density Level(A) | |
| Density Level(M) | |
| Margin Setting | |
| Small Original | |
| Binding Position | |
| Erase Setting | |
| Copy Setting2 | Mixed Original |
| Copy Priority | |
| Output Priority | |
| 4in1 Copy Order | |
| Crisscross Mode | |
| Duplex Copy | |
| TX Operation | Scan contrast |
| Resolution | |
| Default TX | |
| Header | |
| RX Operation | Memory RX Mode |
| Reduction RX | |
| RX Print Mode | |
| RX Mode | |
| Forward Mode | |
| No. of rings | |
| Select Tray | |
| Footer | |
| Closed Network | |
| Administrator | Administrator |
| Administrator Mode | |
| Copy Track | |
| Communication/Report | Communication setting |
| Report setting | |
| E-Mail Setting | Sender Name |
| E-Mail Address | |
| SMTP Server Address | |
| SMTP Port No. | |
| SMTP Timeout | |
| Default Subject | |
| E-Mail Mode | |
| TEXT Insert | |
| E-Mail Setting(2) | POP3 Server Address |
| POP3 Account | |
| POP3 Password | |
| POP3 Port No. | |
| POP3 Timeout | |
| Auto reception | |
| Reply Address | |
| Header Print | |
| Network Setting | DHCP |
| Specify IP address | |
| DNS Configuration | |
| Gateway TX | |
| Scanner Setting | Resolution |
| Image format | |
| Coding Method |

Note
While operations are being performed in LSD, the machine cannot be operated from its control panel.
Checking the total counter
On the "Machine" menu, click "Total Counter".
The Total Counter dialog box appears.
Checking the configuration page
On the "Machine" menu, click "Configuration".
The Machine Status dialog box appears.
Uninstalling LSD
1 Click the Start button, point to "Programs", then "KONICA MINOLTA 162 LSD", and then click "Uninstall".
2 Follow the on-screen instructions.
3 When the following dialog box appears, the uninstallation is completed.
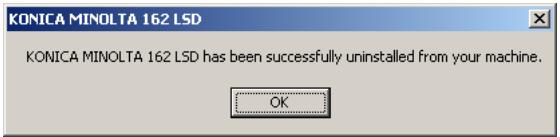
8
Index
8 Index
A
Activity report 5-64
Administrative settings 5-8
B
Batch transmission 4-7
Setup 5-37
Broadcast transmission 4-8
C
Canceling queued document .4-21
Communication settings Monitoring volume 5-61
Control panel 2-4
D
Dialing 3-3
Direct transmission 4-4
E
Error messages 6-3
F
F codes 4-28
Fax resolution 3-14
Fax transmission Basic faxing 3-16
Dialing 3-3
Loading documents into the automatic document feeder 3-16
Positioning documents on the original glass 3-18
G
Glossary 7-4
Group dialing 3-7 Setup 5-21
L
LSD 7-11
M
Machine settings 5-4
Mailbox reception 4-25
Mailbox setup 5-41
Mailbox transmission 4-13
Main unit 2-3
Manual reception 4-23
Manual transmission 4-5
Memory full 3-19
Memory reception 4-24
0
One-touch dialing 3-5 Setup 5-13
P
PageScope Web Connection .. 7-6
Paper source Setup 5-7
Phone book 3-10
Polling reception 4-26
Polling transmission 4-18
Program dialing 3-9 Setup 5-25
Programming fax settings .... 5-11
Q
Queued jobs report 5-65
R
Reception result report 5-65
Reception settings Footer printing 5-57
Forwarding setup 5-56
Memory reception mode ..5-53
Number of rings 5-54
Printing mode 5-55
Reception mode 5-55
Reduced printing 5-55
Tray selection 5-57
Relay box setup 5-43
Relay broadcast
transmission 4-17
Relay initiation transmission ..4-15
Remote monitor 5-10
S
Speed dialing 3-6
Setup 5-17
T
Timer transmission 4-11
Total count 3-20
Transmission result report ....5-65
Transmission results 3-22
Transmission settings
Default transmission mode 5-49
Resolution 5-48
Scanning contrast 5-47
U
Utility mode 5-3