
DI2510F - Photocopier KONICA MINOLTA - Free user manual and instructions
Find the device manual for free DI2510F KONICA MINOLTA in PDF.

| Product Type | Multifunction digital photocopier (copy, print, fax) |
| Brand | KONICA MINOLTA |
| Model | DI2510F |
| Copy speed | 25 copies/minute (A4) |
| Copy resolution | 600 x 600 dpi |
| Paper sizes | A3, A4, A5, B4, B5 |
| Document feeder capacity | 50 sheets (automatic duplex) |
| Paper tray capacity | Standard tray 500 sheets, multifunction tray 100 sheets |
| Duplex | Integrated automatic |
| Fax functions | Super G3, 500-page memory, PC send |
| Touch screen | Backlit monochrome LCD screen |
| Dimensions (W x D x H) | 620 x 670 x 630 mm |
| Weight | Approx. 65 kg |
| Power supply | 230 V, 50 Hz, 1.5 kW |
| Energy consumption | Max. 1.5 kW, standby 100 W |
| Noise level | Less than 65 dB(A) in operation |
| Maintenance | Regular cleaning of feeder, exposure glass, and waste toner box |
| Security | Administrator lock, 8-digit code, protection against unauthorized access |
| Common replacement parts | Toner cartridge, drum, maintenance kit, waste toner box |
| Repairability | Repairability score: 7/10 (estimate) |
| Optional accessories | Finishing unit, network module, scan to folder kit |
| Included software | PageScope for network management |
| General information | User manual available in French, English, German |
Frequently Asked Questions - DI2510F KONICA MINOLTA
User questions about DI2510F KONICA MINOLTA
0 question about this device. Answer the ones you know or ask your own.
Ask a new question about this device
Download the instructions for your Photocopier in PDF format for free! Find your manual DI2510F - KONICA MINOLTA and take your electronic device back in hand. On this page are published all the documents necessary for the use of your device. DI2510F by KONICA MINOLTA.
USER MANUAL DI2510F KONICA MINOLTA
[Additional Functions]
The essentials of imaging
www.konicaminolta.net
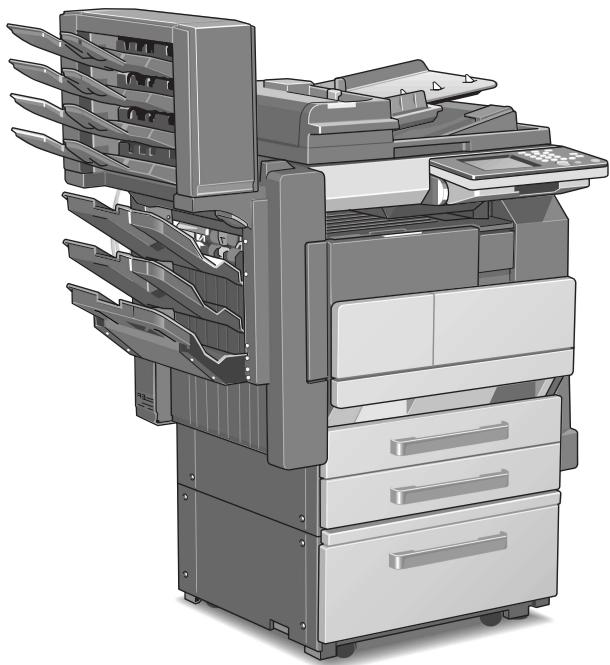
Di2510/Di3010/Di3510 Di2510f/Di3510f
natural_image
Illustration of a multi-tiered printer or scanner system with multiple blades and control panels (no text or symbols visible)
Administrator Management Screens
Administrator Settings
Setting Machine Access
Removing Penalties
A maximum of 999 copies can be specified at one time with this machine.
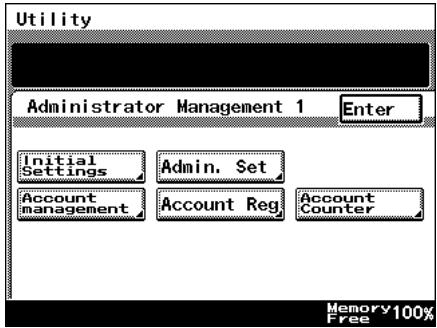
1.1 Administrator Management Screens
To display the Administrator Management screens
This explains the method for displaying the Administrator Management screens.
1 Press the [Utility] key.
2 Touch [Admin. Management].
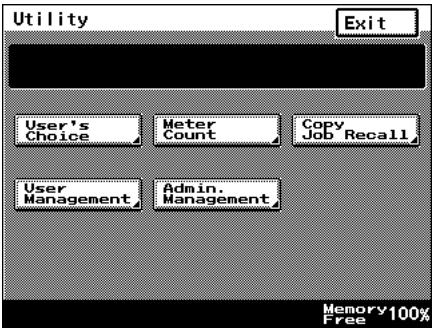
3 Use the 10-Key Pad to type in the 8-digit administrator code (Admin. Password), and then touch [Enter].

Note
f the administrator code is incorrectly entered, the message "Incorrect administrator code. Try again." appears accompanied by a beeping sound. Fol-
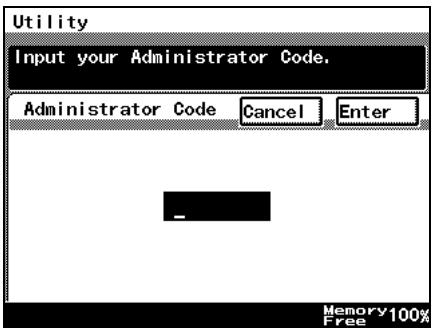
low the instructions in the message that appears and type in the correct administrator code.
If the “Access Lock” function is set to “ON”, incorrectly typing the administrator code is counted as an incorrect attempt to access the machine. After three incorrect attempts to access the machine, even if the correct administrator code is entered on a later attempt, an error message appears and access to the Administrator Management screen is denied. To allow access to the Administrator Management screen, turn the machine off, then on again, and then type in the correct administrator code.
Keep the administrator code in a safe place hidden from the general user.
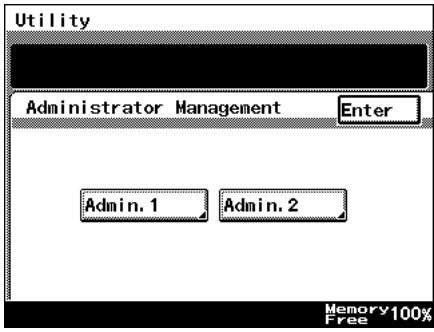
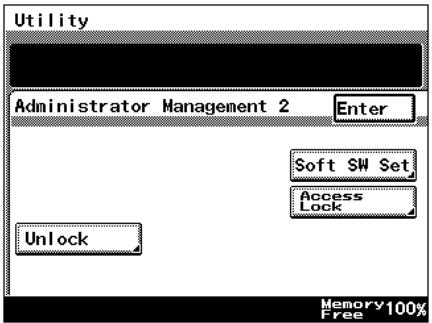
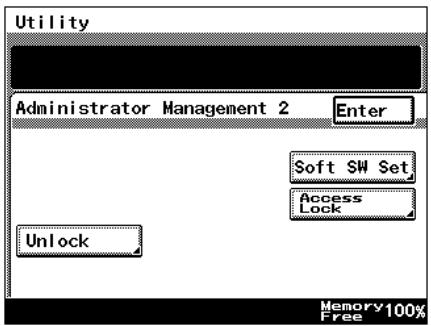
4 Touch [Admin. 1] or [Admin. 2] to display the desired screen.
- For details on the Administrator Management 2 screen, refer to page 1-5.
5 From the screen that appeared, touch the key for the operation that you wish to perform or the function whose setting you wish to specify.

Note
After account management settings have been specified for the Di2510/Di3010/Di3510, the [Account Reg], [Account Counter] keys appear only if one of following options is installed.
Printer Controller, Network Interface Card Network Scan Kit (or Internet Fax & Network Scan Kit).
If "Copy Track Mode" is set to "1000 Accounts" or "OFF", neither the [Account Reg] nor the [Account Counter] keys will appear.
1.2 Administrator Settings
Changing the administrator access code
This explains the method to specify or change the administrator access code.
To set the administrator access code
1 Follow the procedure described in "To display the Administrator Management screens" on page 1-1 to display the Administrator Management screen.
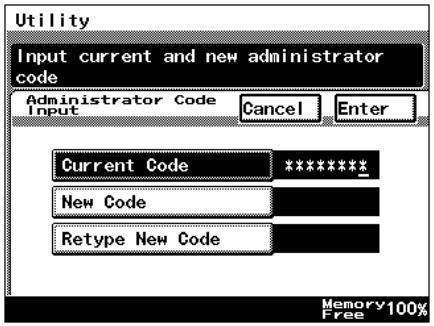
2 Touch [Admin. 1], and then touch [Admin. Set].
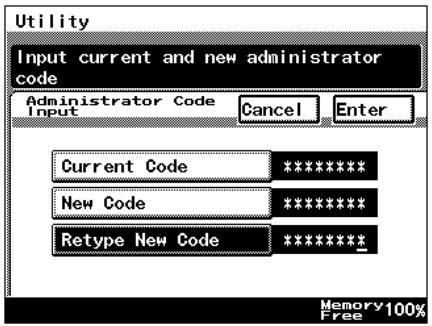
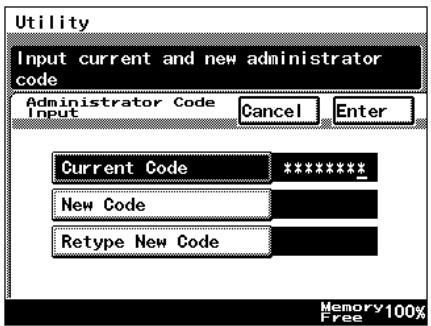
3 Touch [Administrator Code Input].

4 Touch [Current Code], and then use the 10-Key Pad to type in the currently specified 8-digit administrator code (Admin. Password).
- Press the [C] key to erase all entered text.
- To return to the previous screen, touch [Cancel].
5 Touch [New Code], and then use the 10-Key Pad to type in the new 8-digit administrator code (Admin. Password).
○ Press the [C] key to erase all entered text.
○ To return to the previous screen, touch [Cancel].
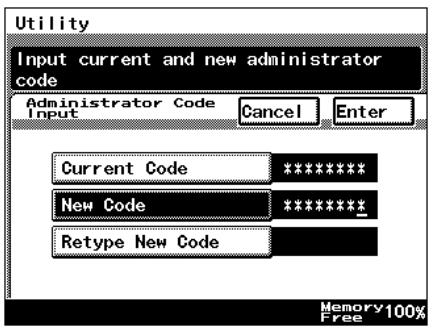
6 Touch [Retype New Code], and then use the 10-Key Pad to retype the new 8-digit administrator code (Admin. Password).
○ Press the [C] key to erase all entered text.
○ To return to the previous screen, touch [Cancel].
7 Touch [Enter].

Note
If an incorrect administrator code is entered, an error message appears.
Type in the correct administrator code. The error message may appear in any of the following cases.
The code entered beside "Current Code" does not match the registered administrator code.
The code entered beside "New Code" is not an 8-digit number.
The code entered beside "Retype New Code" does not match the code entered beside "New Code".
If the “Access Lock” function is set to “ON”, incorrectly typing the administrator code is counted as an incorrect attempt to access the machine. After three incorrect attempts to access the machine, even if the correct administrator code is entered on a later attempt, an error message appears and the administrator code cannot be changed. To change the administrator code, turn the machine off, then on again, and then type in the correct administrator code.
1.3 Setting Machine Access
Access Lock
The “Access Lock” function is used to specify whether (“On”) or not (“Off”) access to Administrator mode, lock jobs and user boxes is monitored.
If the “Access Lock” function is set to “On”, the number of incorrect attempts to access Administrator mode, lock jobs and user boxes is counted. After three incorrect attempts, access to the machine is denied. To allow Administrator mode to be accessed again, turn the machine off, then on again. However, to allow lock jobs and user boxes to be accessed again, the penalty must be removed. For more details, refer to the Printer Controller User Manual.
To make settings for the "Access Lock" function
1 Follow the procedure described in "To display the Administrator Management screens" on page 1-1 to display the Administrator Management screen.
2 Touch [Admin. 2], and then touch [Access Lock].
3 To use the "Access Lock" function, touch [ON]. To stop using the "Access Lock" function, touch [OFF].
4 Touch [Enter].
- To return to the previous screen, touch [Cancel].
5 Continue touching [Enter] to return to the Utility screen, and then touch [Exit] to return to the Basics screen.
1.4 Removing Penalties
Unlock
If the “Access Lock” function is set to “ON” and the optional printer controller is installed, the penalty must be removed in order to allow access after incorrect attempts to access lock jobs and user boxes. For more details, refer to the User Manual for the printer controller.
In addition, to allow access after incorrect attempts to access Administrator mode, turn the machine off, then on again.
Copyright
2003
KONICA MINOLTA BUSINESS TECHNOLOGIES, INC.
The information contained in this manual is subject to change without notice to incorporate improvements made on the product or products the manual covers.