
DI3010 - Photocopier KONICA MINOLTA - Free user manual and instructions
Find the device manual for free DI3010 KONICA MINOLTA in PDF.

| Product Type | Multifunction Digital Copier |
| Brand | KONICA MINOLTA |
| Model | DI3010 |
| Main Functions | Copy, print, scan (depending on options) |
| Copy Speed | 30 copies per minute (A4) |
| Copy Resolution | 600 x 600 dpi |
| Supported Paper Formats | A3, A4, A5, envelopes |
| Feed Tray Capacity | 500 sheets (standard) |
| Power Supply | 230 V, 50/60 Hz |
| Power Consumption | 1.2 kW (max) during operation; 10 W in standby |
| Dimensions (L × W × H) | 600 × 600 × 500 mm |
| Weight | 50 kg |
| Noise Level | Less than 65 dB(A) during operation |
| Maintenance and Cleaning | Regularly clean the platen, rollers, and feeder with a lint-free cloth |
| Safety | Place in a well-ventilated room; negligible ozone emission under normal conditions |
| Spare Parts and Consumables | Drum, toner, rollers, staplers available |
| Repairability | Estimated repairability index of 7/10 |
| General Information | Professional office use; manufacturer's warranty 1 year |
Frequently Asked Questions - DI3010 KONICA MINOLTA
User questions about DI3010 KONICA MINOLTA
0 question about this device. Answer the ones you know or ask your own.
Ask a new question about this device
Download the instructions for your Photocopier in PDF format for free! Find your manual DI3010 - KONICA MINOLTA and take your electronic device back in hand. On this page are published all the documents necessary for the use of your device. DI3010 by KONICA MINOLTA.
USER MANUAL DI3010 KONICA MINOLTA
The essentials of imaging
www.konicaminolta.net
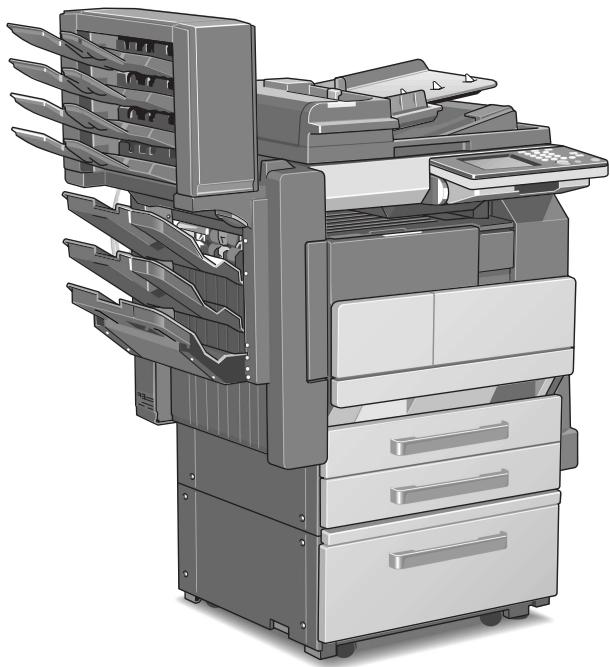
Di2510/Di3010/Di3510
natural_image
Illustration of a multi-tiered printer or scanner system with multiple blades and folders (no text or symbols visible)1
Read First
Introduction
Safety Information
Precautions
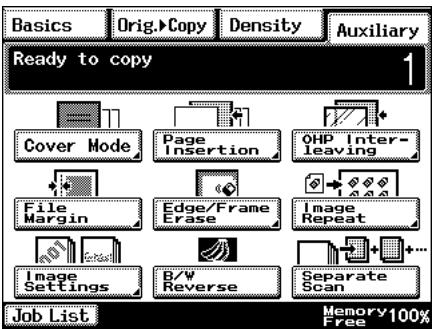
Auxiliary Functions
Utility Mode Operations
Administrator Management Operations
Appendix
Contents
1 Introduction
1.1 Introduction....1-2
Structure of the Manual....1-2
1.2 Explanation of Manual Conventions 1-3
1.3 Explanation of Basic Concepts and Symbols....1-4
Paper Feeding....1-4
"Width" and "Length" 1-5
Paper Orientation....1-5
Portrait and Landscape....1-5
Display Icons....1-6
Paper Supply Icons....1-6
1.4 Energy Star ^® 1-7
What is an ENERGY STAR ^® Product?......1-7
2 Safety Information
2.1 Warning and Precaution Symbols....2-2
2.2 Meaning of Symbols 2-2
WARNING....2-3
CAUTION 2-4
2.3 Precautions for Routine Use....2-5
2.4 USER INSTRUCTIONS 2-5
CE Marking (Declaration of Conformity) 2-5
For New Zealand Users: 2-6
2.5 Laser Safety 2-7
Internal Laser Radiation....2-7
CDRH Regulation....2-8
For European Users....2-8
For Denmark Users....2-8
For Finland, Sweden Users....2-9
For Norway Users 2-9
Laser Safety Label 2-10
Ozone Release 2-10
Acoustic Noise 2-11
3 Precautions
3.1 Installation Precautions 3-2
Installation Site 3-2
Power Source 3-2
Space Requirements 3-3
3.2 Operation Precautions 3-4
Operating environment 3-4
Proper use 3-4
Transporting the copier.... 3-5
Care of copier supplies 3-5
Storage of copies.... 3-6
3.3 Legal Restrictions on Copying 3-7
4 Auxiliary Functions
4.1 “Cover Mode” Function 4-2
Adding Cover Pages 4-2
To make settings for the "Cover Mode" function 4-3
4.2 “Page Insertion” Function 4-5
Inserting Pages (Interleaves) Between Copies 4-5
To make settings for the "Page Insertion" function.... 4-6
4.3 “OHP Interleaving” Function.... 4-7
Inserting Pages Between Copies of Transparencies...... 4-7
To make settings for the "OHP Interleaving" function.... 4-8
4.4 "File Margin" Function 4-10
Making Copies With Binding Margins 4-10
To make settings for the "File Margin" function 4-10
4.5 "Edge/Frame Erase" Function 4-12
Erasing Sections of Copies 4-12
To make settings for the "Edge/Frame Erase" function.... 4-13
4.6 "Image Repeat" Function 4-14
Printing Multiple Copies of the Same Document Page on
One Sheet 4-14
To make settings for the "Image Repeat" function 4-14
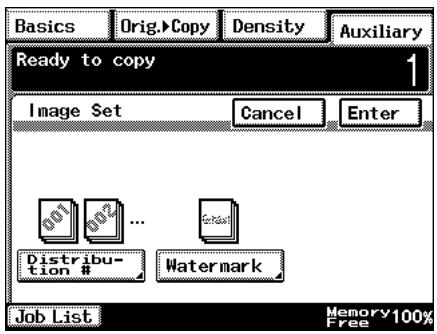
4.7 “Distribution #” Function.... 4-16
Printing Distribution Numbers on Sets of Copies 4-16
To make settings for the "Distribution #" function 4-16
4.8 “Watermark” Function 4-18
Printing Copies with a Watermark 4-18
To make settings for the "Watermark" function 4-18
4.9 "Image Stamping" Function....4-20
To make copies using the "Image Stamping" function....4-20
4.10 “Black-White Reverse” Function....4-22
Reversing White- and Black-Colored Areas of Copies ....4-22
To set the “Black-White Reverse” function....4-22
4.11 “Separate Scan” Function....4-23
Scanning a Document in Separate Batches 4-23
To make copies using the "Separate Scan" function 4-23
5 Utility Mode Operations
5.1 Utility Mode Screens....5-2
Utility screen....5-2
User's Choice screen....5-2
Meter Count screen....5-3
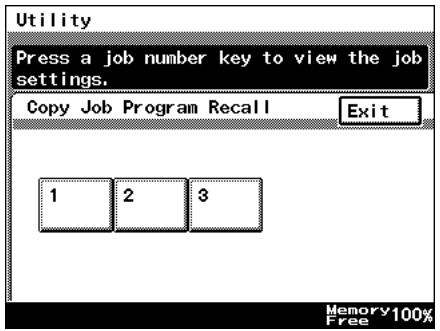
Copy Job Program Recall screen 5-3
User Management screen....5-3
Administrator Management screens ....5-4
5.2 User's Choice Functions....5-5
5.3 Changing Default Settings 5-7
To set the "Memory Recall" function 5-7
To set the "Mixed Original Detection" function....5-8
To set the "Language Selected for LCD" function....5-9
To set the "Original ▶ Copy Default" function .....5-10
To set the "Auto Paper/Auto Size" function....5-11
To set the "Drawer Priority" function 5-12
To set the "Special Paper" function....5-13
To set the “Multiple-in-1 and Booklet Copy Zoom” function....5-14
To set the “Energy Save Mode” function....5-15
To set the "Sleep Mode Setting" function....5-16
To set the "LCD Back-light Off" function 5-17
To set the "Auto Panel Reset" function 5-18
To set the "Plug-In Counter, ID key Reset" function 5-19
To set the "4in1 Copy Order" function....5-20
To set the “Density Priority” function....5-21
To set the "Default Copy Output Levels" function 5-22
To set the "Printing Density" function....5-23
To set the "Output Priority" function 5-24
To set the "Intelligent Sorting" function 5-25
To set the "Output Tray" function (optional) 5-26
To set the ““Small” Originals” function....5-27
To set the "Scanner Dry" function 5-28
To set the "Crease/Center Staple" function
(Only when the finisher or saddle kit are installed) 5-29
To set the “Density (ADF only)” function (Only when the duplexing document feeder is installed)....5-30
5.4 Registering an Image Stamp.... 5-31 To register an image stamp.... 5-31
5.5 Viewing Counters (“Meter Count” Function).... 5-34 To view the counters .... 5-34
5.6 Using Copy Programs.... 5-35 To store a copy program.... 5-35 To delete a copy program.... 5-36 To use a copy program.... 5-37
5.7 User Management Functions .... 5-38 To adjust beep volumes (“Confirmation Beep” and “Alarm Volume” functions).... 5-38 To clean the touch panel (“Panel Cleaning” function).... 5-39 To dehumidify the duplexing document feeder (“Dehumidify” function).... 5-40 To replenish the toner (“Toner Replenisher” function).... 5-40
6 Administrator Management Operations
6.1 Administrator Management Screens.... 6-2 To display the Administrator Management screens.... 6-2
6.2 Initial Settings....6-4 Specify the date and time....6-4 To set the date and time....6-4 Specify the time zone....6-5 To set the time zone....6-5
6.3 Administrator Settings.... 6-7 Changing the administrator access code .... 6-7 To set the administrator access code.... 6-7 Copy Number Limits .... 6-9 To specify the maximum number of copies that can be printed .... 6-9 Disable Sleep Mode .... 6-10 To disable the Sleep mode.... 6-10
6.4 Account Management Settings....6-11 Account Management Mode....6-11 To set the Account Management Mode....6-12 Account Information data....6-14 To print account information data....6-14 Clear all counters....6-15 Changing Account Information....6-16
6.5 Setting Account Registration....6-17
Account Registration....6-17
To register accounts....6-17
Account Counter 6-21
To check the number of prints made by each account ......6-21
6.6 Setting Machine Access....6-22
Access Lock....6-22
To make settings for the "Access Lock" function 6-22
6.7 Configuring Functions (Soft Switches)....6-24
Specifying Settings for Resetting Copy Mode with the Duplexing
Document Feeder Installed (Mode 429) 6-25
6.8 Removing Penalties....6-26
Unlock 6-26
7 Appendix
7.1 Specifications....7-2
Copier Di2510/Di3010/Di3510 7-2
Duplexing Document Feeder AFR-19 7-4
Mixed Width Document Sizes 7-4
Duplex Unit AD-16 7-5
Switchback Unit SB-1....7-5
Paper Feed Cabinet PF-124 7-5
2Way Paper Feed Cabinet PF-210 7-6
Large Capacity Cabinet PF-122....7-6
Built in Finisher FN-117....7-6
Additional Bin Kit AK-1 7-7
Mail Bin Kit MK-1....7-7
Punch Kit PK-6....7-8
Saddle Kit SK-1....7-8
Job Separator JS-203 7-8
7.2 Care of the Copier 7-9
Cleaning....7-9
Housing cover 7-9
Original glass 7-9
Operation panel....7-10
Original glass 7-10
7.3 Function Combination Table....7-11
7.4 Paper Size and Zoom Ratio Tables 7-17
Paper Sizes....7-17
Zoom Ratios....7-18
7.5 Consumables....7-21
Paper 7-21
Toner Bottle 7-21
Staple Cartridges....7-22
8 Index
8.1 Index 8-2
Basic Operations
For details on the following topics, refer to the “Basic Operations” volume of this User Manual.
1 Introduction
2 Available Features
3 Before Making Copies
4 Basic Copy Operations
5 Copy Paper
6 Original Documents
7 Specifying Copy Settings
8 Touch Panel Messages
9 Troubleshooting
10 Index
Introduction
1
1.1 Introduction
Structure of the Manual
This manual is divided into two parts: Advanced Operations and Basic Operations.
The Advanced Operations volume of this User Manual contains precautions on the use of this copier. Be sure to read this volume before using the machine. The Basic Operations volumes of the User Manual contain information on the many functions available. After reading the User Manual, be sure to store it in a safe place for future reference.
● Advanced Operations
This volume provides precautions for using the machine, descriptions on the Auxiliary functions and on functions for use by the administrator (Utility Mode and Administrator Mode functions), procedures for replacing parts and supplies, troubleshooting procedures and machine specifications.
● Basic Operations
This volume contains precautions for using the machine and descriptions on the procedures for basic operations. The Basic Operations volume is a quick reference for immediate use of the copier.
1.2 Explanation of Manual Conventions
The marks and text formats used in this manual are described below.

WARNING
Failure to observe instructions highlighted in this manner may result in fatal or critical injuries.
→ Observe all warnings in order to ensure safe use of the copier.

CAUTION
Failure to observe instructions highlighted in this manner may result in serious injuries or property damage.
→ Observe all cautions in order to ensure safe use of the copier.

Note\*
(*May also appear as "Important" or "Tip")
Text highlighted in this manner contains useful information and tips to ensure safe use of the copier.
1 The number 1 as formatted here indicates the first step of a sequence of actions.
2 Subsequent numbers as formatted here indicate subsequent steps of a sequence of actions.
? Text formatted in this style provides additional assistance.
An illustration inserted here shows what operations must be performed.
→ Text formatted in this style describes the action that will ensure the desired results are achieved.
[Copy] key
The names of keys on the control panel are written as shown above.
1.3 Explanation of Basic Concepts and Symbols
The use of words and symbols in this manual are explained below.
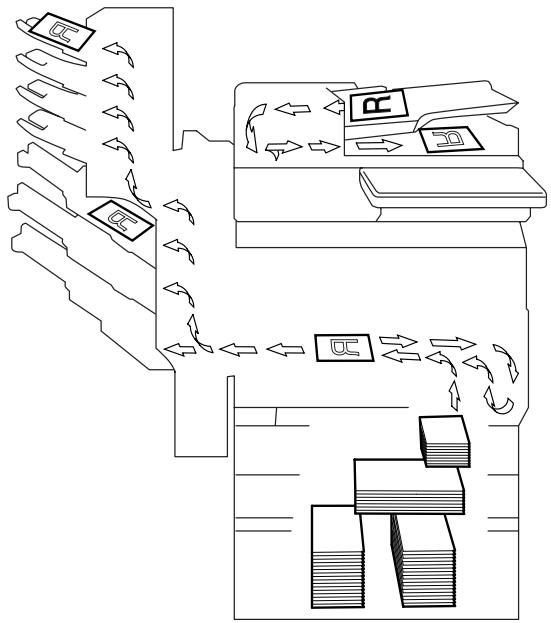
Paper Feeding
During printing, paper is supplied from the right side of the copier and fed into the output tray on top or the output option at the left with the printed surface of the page facing down. The paper feed direction is shown by the arrows in the diagram below.
flowchart
graph TD
    A["Receipt"] --> B{Payment Process}
    B -->|Proceeds| C["Storage"]
    C --> D["Recycle"]
    D --> E["End"]
"Width" and "Length"
Whenever paper dimensions are mentioned in this manual, the first value always refers to the width of the paper (shown as "Y" in the illustration) and the second to the length (shown as "X").

natural_image
Technical line drawing of a mechanical device with no visible text or symbolsPaper Orientation
Lengthwise (☐)
If the width (Y) of the paper is shorter than the length (X), the paper has a vertical or portrait orientation, indicated by either "L" or □.
natural_image
Technical line drawing of a mechanical device with no visible text or symbolsCrosswise ( □ )
If the width (Y) of the paper is longer than the length (X), the paper has a horizontal or landscape orientation, indicated by either "C" or □.
natural_image
Technical line drawing of a mechanical device with internal components and mounting base (no text or symbols)Portrait and Landscape
Portrait
With the “portrait” orientation, the paper is vertical, like a portrait.
Landscape
With the “landscape” orientation, the paper is horizontal, like a landscape.
Display Icons

Plain paper

Thick paper

Overhead projector transparencies

Envelope
Paper Supply Icons
The icons shown below may appear, indicating that no more paper remains.
The paper is empty.

1.4 Energy Star®

As an ENERGY STAR ^® Partner, we have determined that this machine meets the ENERGY STAR ^® Guidelines for energy efficiency.
What is an ENERGY STAR® Product?
An ENERGY STAR ^® product has a special feature that allows it to automatically switch to a “low-power mode” after a period of inactivity. An ENERGY STAR ^® product uses energy more efficiently, saves you money on utility bills and helps protect the environment.
Safety Information
2
This section contains detailed instructions on the operation and maintenance of this machine. To achieve optimum utility of this device, all operators should carefully read and follow the instructions in this manual. Please keep this manual in a handy place near the machine.
Please read the next section before using this device. It contains important information related to user safety and preventing equipment problems.
Make sure you observe all of the precautions listed in this manual.
* Ver06
Please note that some parts of the contents of this section may not correspond with the purchased product.
2.1 Warning and Precaution Symbols
 WARNING: WARNING: | Ignoring this warning could cause serious injury or even death. |
 CAUTION: CAUTION: | Ignoring this caution could cause injury or damage to property. |
2.2 Meaning of Symbols

A triangle indicates a danger against which you should take precaution.

This symbol warns against cause burns.

A diagonal line indicates a prohibited course of action.

This symbol warns against dismantling the device.

A black circle indicates an imperative course of action.

This symbol indicates you must unplug the device.

WARNING
 | Do not modify this product, as a fire, electrical shock, or breakdown could result. If the product employs a laser, the laser beam source could cause blindness.Do not attempt to remove the covers and panels which have been fixed to the product. Some products have a high-voltage part or a laser beam source inside that could cause an electrical shock or blindness. |
 | Use only the power cord supplied in the package. If a power cord is not supplied, only use the power cord and plug that is specified in POWER CORD INSTRUCTION.Failure to use this cord could result in a fire or electrical shock.Use the power cord supplied in the package only for this machine and NEVER use it for any other product. Failure to observe this precaution could result in a fire or electrical shock.Use only the specified power source voltage. Failure to do that could result in a fire or electrical shock.Do not use a multiple outlet adapter to connect any other appliances or machines. Use of a power outlet for more than the marked current value could result in a fire or electrical shock. |
 | Do not unplug and plug in the power cord with a wet hand, as an electrical shock could result. |
 | Plug the power cord all the way into the power outlet. Failure to do this could result in a fire or electrical shock. |
 | Do not scratch, abrade, place a heavy object on, heat, twist, bend, pull on, or damage the power cord. Use of a damaged power cord (exposed core wire, broken wire, etc.) could result in a fire or breakdown.Should any of these conditions be found, immediately turn OFF the power switch, unplug the power cord from the power outlet, and then call your authorized service representative.Do not use an extension cord, in principle. Use of an extension cord could cause a fire or electrical shock. Contact your authorized service representative if an extension cord is required. |
 | Do not place a flower vase or other container that contains water, or metal clips or other small metallic objects on this product. Spilled water or metallic objects dropped inside the product could result in a fire, electrical shock, or breakdown.Should a piece of metal, water, or any other similar foreign matter get inside the product, immediately turn OFF the power switch, unplug the power cord from the power outlet, and then call your authorized service representative. |
 | Do not keep using this product, if this product becomes inordinately hot or emits smoke, or unusual odor or noise. Immediately turn OFF the power switch, unplug the power cord from the power outlet, and then call your authorized service representative. If you keep on using it as is, a fire or electrical shock could result.Do not keep using this product, if this product has been dropped or its cover damaged. Immediately turn OFF the power switch, unplug the power cord from the power outlet, and then call your authorized service representative. If you keep on using it as is, a fire or electrical shock could result. |
 | Do not throw the toner cartridge or toner into an open flame. The hot toner may scatter and cause burns or other damage. |

Connect the power cord to an electrical outlet that is equipped with a grounding terminal.
CAUTION

- Do not use flammable sprays, liquids, or gases near this product, as a fire could result.
- Do not leave a toner unit or drum unit in a place within easy reach of children. Licking or ingesting any of these things could injure your health.
- Do not let any object plug the ventilation holes of this product. Heat could accumulate inside the product, resulting in a fire or malfunction.
- Do not install this product at a site that is exposed to direct sunlight, or near an air conditioner or heating apparatus. The resultant temperature changes inside the product could cause a malfunction, fire, or electrical shock.
- Do not place the product in a dusty place, or a site exposed to soot or steam, near a kitchen table, bath, or a humidifier. A fire, electrical shock, or breakdown could result.
- Do not place this product on an unstable or tilted bench, or in a location subject to a lot of vibration and shock. It could drop or fall, causing personal injury or mechanical breakdown.
- After installing this product, mount it on a secure base. If the unit moves or falls, it may cause personal injury.
- Do not store toner units and PC drum units near a floppy disk or watch that are susceptible to magnetism. They could cause these products to malfunction.

The inside of this product has areas subject to high temperature, which may cause burns. When checking the inside of the unit for malfunctions such as a paper misfeed, do not touch the locations (around the fusing unit, etc.) which are indicated by a “CAUTION HOT” caution label.

Do not place any objects around the power plug as the power plug may be difficult to pull out when an emergency occurs.

The socket-outlet shall be installed near the machine and shall be easily accessible as the power plug may be difficult to pull out when an emergency occurs.

- Always use this product in a well ventilated location. Operating the product in a poorly ventilated room for an extended period of time could injure your health. Ventilate the room at regular intervals.
- Whenever moving this product, be sure to disconnect the power cord and other cables. Failure to do this could damage the cord or cable, resulting in a fire, electrical shock, or breakdown.
- When moving this product, always hold it by the locations specified in the User manual or other documents. If the unit falls it may cause severe personal injury. The product may also be damaged or malfunction.
- Remove the power plug from the outlet more than one time a year and clean the area between the plug terminals. Dust that accumulates between the plug terminals may cause a fire.
- When unplugging the power cord, be sure to hold onto the plug. Pulling on the power cord could damage the cord, resulting in a fire or electrical shock.
2.3 Precautions for Routine Use

- Do not store toner units, PC drum units, and other supplies and consumables in a place subject to direct sunlight and high temperature and humidity, as poor image quality and malfunction could result.
- Do not attempt to replace the toner unit and PC drum unit in a place exposed to direct sunlight. If the PC drum is exposed to intense light, poor image quality could result.
- Do not unpack a toner unit or PC drum unit until the very time of use. Do not leave an unpacked unit standing. Install it immediately or poor image quality could result.
- Do not keep toner units and PC drum units in an upright position or upside down, as poor image quality could result.
- Do not throw or drop a toner unit or PC drum unit as poor image quality could result.
- Do not use this product in an area where ammonia or other gases or chemicals are present. Failure to do so may shorten the service life of the product, cause damage or decrease performance.
- Do not use this product in an environment with a temperature outside the range specified in the User manual, as a breakdown or malfunction could result.
- Do not attempt to feed stapled paper, carbon paper or aluminum foil through this product, as a malfunction or fire could result.

Do not touch or scratch the surface of the toner unit developing roller and the PC drum, as poor image quality could result.

Use the supplies and consumables recommended by the dealer. Use of any supply or consumable not recommended could result in poor image quality and breakdown.
2.4 USER INSTRUCTIONS
CE Marking (Declaration of Conformity)
This product complies with the following EU directives:
89/336/EEC, 73/23/EEC, 93/68/EEC, and 1999/5/EC directives.
This declaration is valid for the area of the European Union.
This device must be used with shielded interface cables. The use of non-shielded cable is likely to result in interference with radio communications and is prohibited under EU directives.
CE
For New Zealand Users:
The grant of a Telepermit for any item of terminal equipment indicates only that Telecom has accepted that the item complies with minimum conditions for connection to its network. It indicates no endorsement of the product by Telecom, nor does it provide any sort of warranty. Above all, it provides no assurance that any item will work correctly in all respects with another item of Telepermitted equipment of a different make or model, nor does it imply that any product is compatible with all of Telecom's network service.
This equipment is not capable, under all operating conditions, of correct operation at the higher speeds for which it is designed. Telecom will accept no responsibility should difficulties arise in such circumstances.
This equipment shall not be set to make automatic calls to the Telecom "111" Emergency Service.
The call log incorporated in this equipment does not record all answered calls. The call log, therefore may not agree with the Telecom account which may include calls not shown on the log.
This equipment should not be used under any circumstances which may constitute a nuisance to other Telecom customers.
Not all telephones will respond to incoming ringing when connected to the extension socket.
2.5 Laser Safety
This is a digital machine which operates using a laser. There is no possibility of danger from the laser provided the machine is operated according to the instructions in this manual.
Since radiation emitted by the laser is completely confined within protective housing, the laser beam cannot escape from the machine during any phase of user operation.
This machine is certified as a Class 1 laser product: This means the machine does not produce hazardous laser radiation.
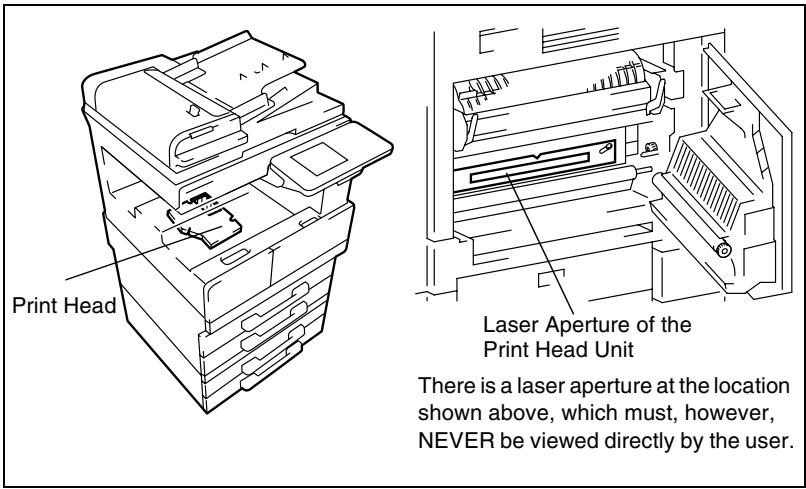
Internal Laser Radiation
Maximum Average Radiation Power: 28.9 W at the laser aperture of the print head unit.
Wavelength: 770-795 nm
This product employs a Class 3b laser diode that emits an invisible laser beam.
The laser diode and the scanning polygon mirror are incorporated in the print head unit.
The print head unit is NOT A FIELD SERVICE ITEM:
Therefore, the print head unit should not be opened under any circumstances.
CDRH Regulation
This machine is certified as a Class 1 Laser product under Radiation Performance Standard according to the Food, Drug and Cosmetic Act of 1990. Compliance is mandatory for Laser products marketed in the United States and is reported to the Center for Devices and Radiological Health (CDRH) of the U.S. Food and Drug Administration of the U.S. Department of Health and Human Services (DHHS). This means that the device does not produce hazardous laser radiation.
The label shown on page 2-10 indicates compliance with the CDRH regulations and must be attached to laser products marketed in the United States.
CAUTION
Use of controls, adjustments or performance of procedures other than those specified in this manual may result in hazardous radiation exposure.
This is a semiconductor laser. The maximum power of the laser diode is 5 mW and the wavelength is 770-795 nm.
For European Users
CAUTION
Use of controls, adjustments or performance of procedures other than those specified in this manual may result in hazardous radiation exposure.
This is a semiconductor laser. The maximum power of the laser diode is 5mW and the wavelength is 770-795 nm.
For Denmark Users
ADVARSEL
For Finland, Sweden Users
LOUKAN 1 LASERLAITE
KLASS 1 LASER APPARAT
VAROITUS!
A laser safety label is attached to the outside of the machine as shown below.

Ozone Release

CAUTION
Locate the Machine in a Well Ventilated Room
→ A negligible amount of ozone is generated during normal operation of this machine. An unpleasant odor may, however, be created in poorly ventilated rooms during extensive machine operations. For a comfortable, healthy, and safe operating environment, it is recommended that the room well ventilated.
REMARQUE
Machine Noise Regulation 3 GSGV, 18.01.1991: The sound pressure level at the operator position according to EN 27779 is equal to or less than 70dB(A).
Precautions
3
3.1 Installation Precautions
Installation Site
To ensure utmost safety and prevent possible malfunctions, install the copier in a location that meets the following requirements.
A location away from curtains, etc. that may catch fire and burn easily
A location that is not exposed to water or other liquids
A location free from direct sunlight
- A location out of the direct airflow of an air conditioner or heater, and not exposed to extremely high or low temperatures
A well-ventilated location
- A location that is not exposed to high humidity
A location that is not extremely dusty
- A location not subjected to undue vibrations
A stable and level location
A location where ammonia or other organic gases are not generated
- A location that does not put the operator in the direct airflow of exhaust from the copier
A location that is not near any kind of heating devices
Power Source
The power source requirements are as follows.
● Voltage fluctuation: Maximum ±10%
● Frequency fluctuation: Maximum ±0.3 Hz
- Use a power source with as little voltage or frequency fluctuations as possible.
Space Requirements
To ensure easy copier operation, supply replacement, and maintenance, adhere to the recommended space requirements detailed below.

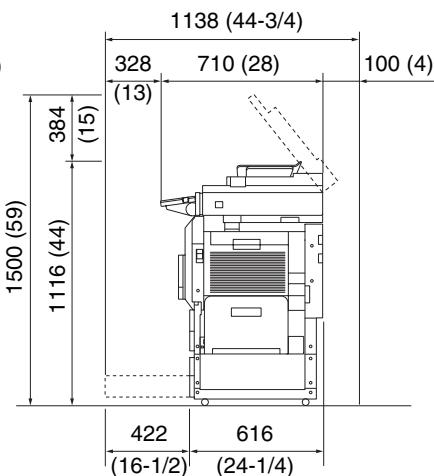
Unit: mm (inch)

Note
Be sure to allow a clearance of 100 mm (4 in.) or more at the back of the copier for the ventilation duct.
3.2 Operation Precautions
Operating environment
The environmental requirements for correct operation of the copier are as follows.
- Temperature: 15°C (59°F) to 35°C (95°F) with fluctuations of no more than 10°C (18°F) within an hour
● Humidity: 15% to 85% with fluctuations of no more than 10% within an hour
Proper use
To ensure the optimum performance of the copier, follow the precautions listed below.
- Never place heavy objects on the original glass or subject it to shocks.
- Never open any copier doors or turn off the copier while it is making copies; otherwise, a paper jam will occur.
- Never bring any magnetized object or use flammable sprays or liquids near the copier.
- Always make sure that the power plug is completely plugged into the electrical outlet.
Always make sure that the copier's power plug is visible and not hidden by the copier. - Always unplug the copier from the electrical outlet if the unit is not to be used for a long period of time.
- Always provide good ventilation when making a large number of continuous copies.

CAUTION
If the ventilation duct at the top of the copier becomes blocked, the inside of the copier will accumulate heat, resulting in a malfunction or fire.
→ Do not place any objects over the ventilation duct.

CAUTION
The area around the fusing unit is extremely hot.
→ Be careful not to touch any parts around the fusing unit, other than those indicated in this manual, in order to reduce the risk of burns. Be especially careful not to touch parts marked with warning labels, and their surrounding areas.
→ If you get burnt, immediately cool the skin under cold water, and then seek professional medical advice.
Transporting the copier
If you need to transport the copier over a long distance, consult your technical representative.
Care of copier supplies
Use the following precautions when handling the copier supplies (toner cartridge, paper, etc.).
- Store the supplies in a location that meets the following requirements.
Free from direct sunlight
Away from any heating apparatus
Not subjected to high humidity
Not extremely dusty
Store in a sealed plastic bag in a cool, dark place paper that has been removed from its wrapper but not loaded into the copier.
- Only use toner that has been manufactured specifically for this copier. Never use other types of toner.
- Keep all supplies out of the reach of children.

CAUTION
Precautions for handling toner:
→ Be careful not to spill toner inside the copier or get toner on your clothes or hands.
→ If your hands become soiled with toner, immediately wash them with soap and water.
→ If toner gets in your eyes, immediately flush them with water, and then seek professional medical advice.
Storage of copies
Copies that are to be kept for a long time should be kept where they are not exposed to light in order to prevent them from fading.
- Adhesive that contains solvent (e.g., spray glue) may dissolve the toner on copies.
3.3 Legal Restrictions on Copying
Certain types of documents must never be copied with the purpose or intent to pass copies of such documents off as the originals.
The following is not a complete list, but is meant to be used as a guide to responsible copying.
- Personal checks
- Travelers checks
● Money orders
● Certificates of deposit
● Bonds or other certificates of indebtedness - Stock certificates
- Food stamps
● Postage stamps (canceled or uncanceled) - Checks or drafts drawn by government agencies
● Internal revenue stamps (canceled or uncanceled) - Passports
- Immigration papers
● Motor vehicle licenses and titles
● House and property titles and deeds
● Identification cards, badges, or insignias
● Copyrighted works without permission of the copyright owner
In addition, it is prohibited under any circumstances to copy domestic or foreign currencies, or works of art without permission of the copyright owner.
When in doubt about the nature of a document, consult with legal counsel.
Auxiliary Functions
4
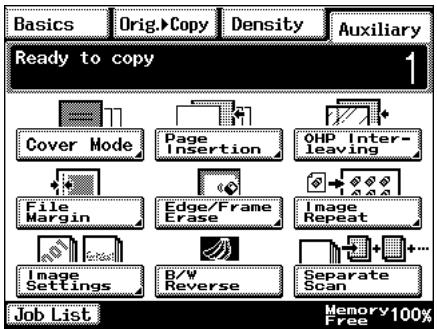
This chapter contains descriptions on making copies using the Auxiliary functions.
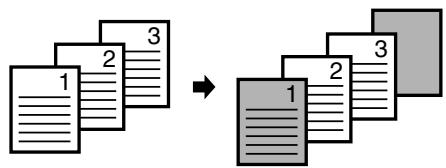
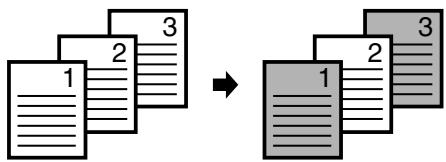
4.1 "Cover Mode" Function
Adding Cover Pages
When two or more sheets are being copied, cover pages using paper other than the document paper can be added.

Note
Load the paper for the cover pages into a paper drawer different than the drawer that contains the paper for the document.
Load paper for the cover pages with the same orientation and size as the paper for the document.
The optional duplexing document feeder must be installed.
Cover Mode settings
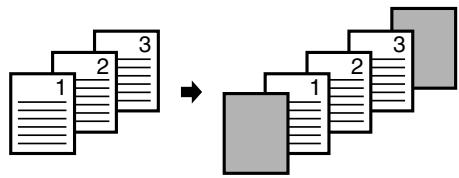
● Front Cover: Blank
Back Cover: None
● Front Cover: Blank
Back Cover: Blank
● Front Cover: Blank
Back Cover: With Image
flowchart
graph TD
    A["Document 1"] --> B["Document 2"]
    B --> C["Document 3"]
    C --> D["Final Image Block"]
flowchart
graph LR
    A["1"] --> B["2"]
    B --> C["3"]
    D["1"] --> E["2"]
    E --> F["3"]
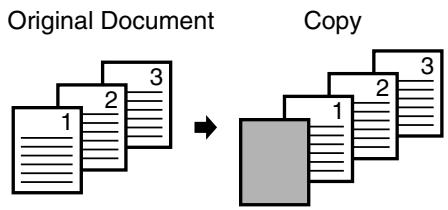
● Front Cover: With Image Back Cover: None
● Front Cover: With Image Back Cover: Blank
● Front Cover: With Image Back Cover: With Image
flowchart
graph TD
    A["1"] --> B["2"]
    B --> C["3"]
    D["1"] --> E["2"]
    E --> F["3"]
flowchart
graph TD
    A["Document 1"] --> B["Document 2"]
    B --> C["Document 3"]
    D["Document 1"] --> E["Document 2"]
    E --> F["Document 3"]
To make settings for the "Cover Mode" function
1 Load the document into the duplexing document feeder.
2 Touch [Auxiliary], and then touch [Cover Mode].
3 Select the desired Front Cover and Back Cover settings, and then touch the button below "Cover Paper".
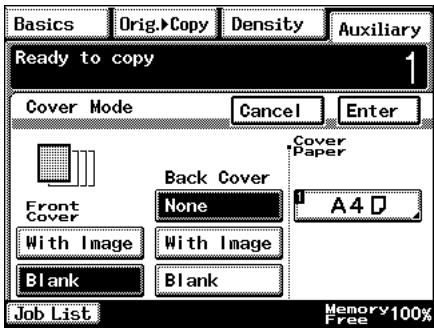
4 Select the paper drawer that contains the paper for the cover pages, and then touch [Enter].
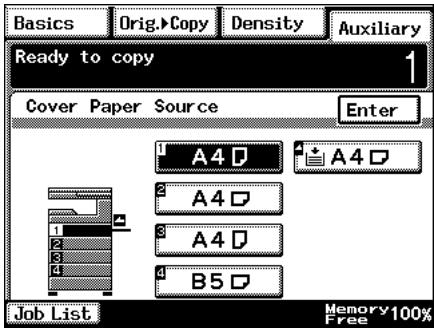
5 Touch [Enter].
○ If [Cancel] is touched, the setting is cancelled.
6 Press the [Start] key.
The copies are printed.
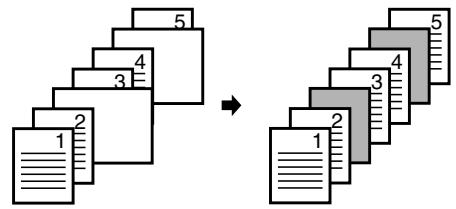
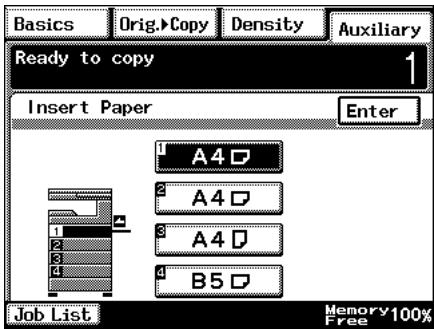
4.2 "Page Insertion" Function
Inserting Pages (Interleaves) Between Copies
When two or more sheets are being copied, paper (interleaves) other than the document paper can be inserted.

Tip
At the locations where you wish to insert interleaves, insert paper with a different orientation or size as the paper for the original, and then load the document into the duplexing document feeder.
Load the paper for the interleaves into a paper drawer different than the drawer that contains the paper for the document.
Load the paper for the interleaves with the same orientation and size as the paper for the document.
This function cannot be used together with the "Cover Mode" function.
This function cannot be used together with booklet-printing and mixed original sizes.

Note
The optional duplexing document feeder must be installed.
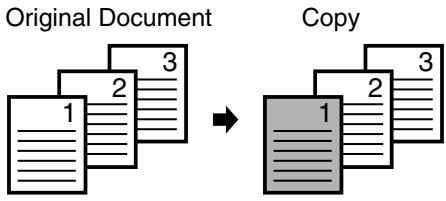
Paper Insertion settings
- Blank
flowchart
graph TD
    A["Document 1"] --> B["Layer 2"]
    C["Document 3"] --> D["Layer 4"]
    E["Document 4"] --> F["Layer 5"]
    G["Document 5"] --> H["Layer 6"]
    style A fill:#f9f,stroke:#333
    style C fill:#f9f,stroke:#333
    style E fill:#f9f,stroke:#333
    style G fill:#f9f,stroke:#333
    style B fill:#ccf,stroke:#333
    style D fill:#ccf,stroke:#333
    style F fill:#ccf,stroke:#333
    style H fill:#ccf,stroke:#333
- With Image
To make settings for the "Page Insertion" function
1 Load the document into the duplexing document feeder.
2 Touch [Auxiliary], and then touch [Page Insertion].

3 Select either the [With Image] or the [Blank] Page Insertion setting, and then touch the button below "Insert Paper".
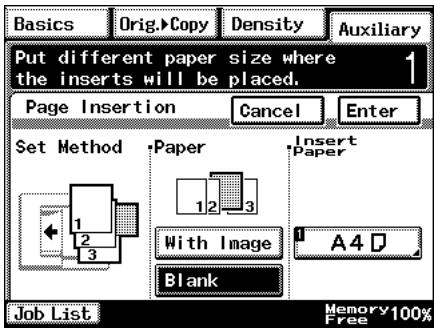
4 Select the paper drawer that contains the paper for the interleaves, and then touch [Enter].
5 Touch [Enter].
○ If [Cancel] is touched, the setting is cancelled.
6 Press the [Start] key. The copies are printed.
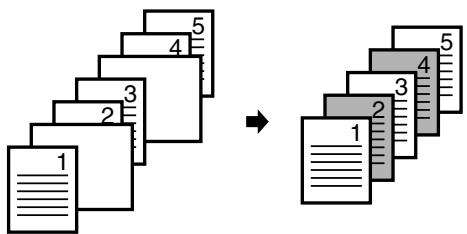
4.3 “OHP Interleaving” Function
Inserting Pages Between Copies of Transparencies
When copying overhead projector transparencies, paper (interleaves) can be inserted between copies of the transparencies.

Tip
Load the paper for the interleaves into a paper drawer, and load the overhead projector transparencies into the multiple bypass tray.
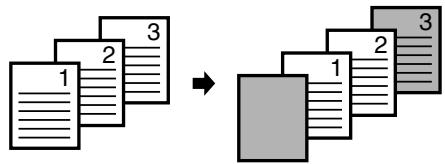
OHP Interleaving settings
- Blank
flowchart
graph TD
    A["1"] --> B["2"]
    B --> C["1"]
    C --> D["2"]
- With Image
To make settings for the "OHP Interleaving" function
1 Load the document into the duplexing document feeder or position it on the original glass.
2 Touch [Auxiliary], and then touch [OHP Interleaving].

3 Select either the [With Image] or the [Blank] OHP Interleaving setting, and then touch the button below "Insert Paper".
4 Select the paper drawer that contains the paper for the transparency interleaves, and then touch [Enter].
5 Touch [Enter].
○ If [Cancel] is touched, the setting is cancelled.
6 Press the [Start] key.
The copies are printed.
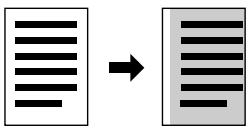
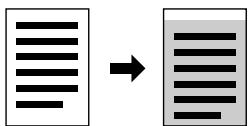
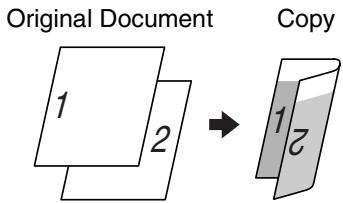
4.4 “File Margin” Function
Making Copies With Binding Margins
Copies can be made with binding margins and the image shifted to the side so that the text is not hidden when the copies are bound.
File Margin settings
- The position of the binding margin can be at the left side or at the top of the paper.
● The width of the binding margin can be specified.
The image of the document is shifted to the right to make a margin along the left edge of the copy.
Original Document
Copy
The image of the document is shifted to the bottom to make a margin along the top edge of the copy.
Original Document
Copy
To make settings for the "File Margin" function
1 Load the document into the duplexing document feeder or position it on the original glass.
2 Touch [Auxiliary], and then touch [File Margin].
3 Select the desired File Margin setting.
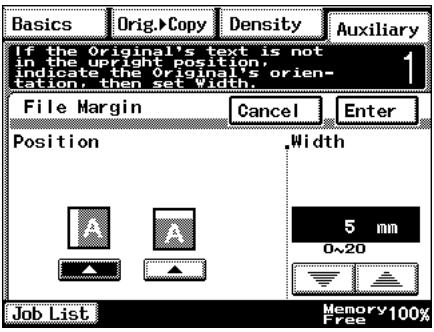

Tip
If the setting for the left binding position is selected for double-sided copying, the front and back sides of the page will be printed with the same orientation.
If the setting for the top binding position is selected for double-sided copying, the back side of the page is printed upside down.
4 Touch ▲ and ▼ to specify the width of the binding margin, and then touch [Enter].
○ If [Cancel] is touched, the setting is cancelled.
5 Press the [Start] key.
The copies are printed.
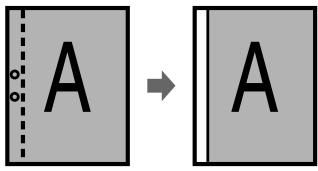
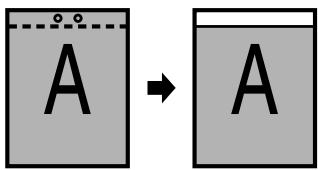
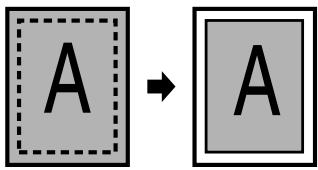
4.5 “Edge/Frame Erase” Function
Erasing Sections of Copies
When copying documents with punch holes, the pages can be printed with part of the document erased.
Edge/Frame Erase settings
● The left side of the document is erased.
● The top edge of the document is erased.
● A frame around the document is erased.
Original Document
Copy
To make settings for the "Edge/Frame Erase" function
1 Load the document into the duplexing document feeder or position it on the original glass.
2 Touch [Auxiliary], and then touch [Edge/Frame Erase].
3 Select the desired Edge/Frame Erase setting.

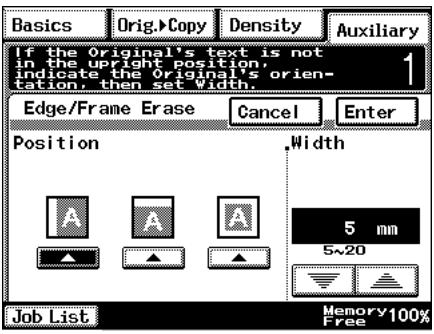
4 Touch ▼ and ▲ to specify the width of the erased area, and then touch [Enter].
○ If [Cancel] is touched, the setting is cancelled.
5 Press the [Start] key.
The copies are printed.
4.6 "Image Repeat" Function
Printing Multiple Copies of the Same Document Page on One Sheet
The "Image Repeat" function can be used as shown below.
- To copy an A4-size page at full size onto an A3-size sheet of paper
- To reduce an A4-size page and print multiple copies onto an A4-size sheet of paper
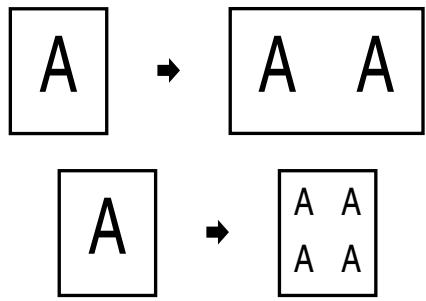
flowchart
graph TD
    A["A"] --> B["A A"]
    A --> C["A A"]
    C --> D["A A"]
To make settings for the "Image Repeat" function
1 Load the document into the duplexing document feeder or position it on the original glass.
2 Touch [Auxiliary], and then touch [Image Repeat].

3 Touch [Size Input].
To automatically detect the document size, touch [Auto Detect].
4 Select the size of the document.
○ If the document has a non-standard size, touch [Custom Size], and then specify the size of the document.
5 Touch [X].
Use the 10-Key Pad to type in the length of side X for the paper that is loaded.
6 Touch [Y].
Use the 10-Key Pad to type in the length of side Y for the paper that is loaded.
7 Touch [Enter].
○ If [Cancel] is touched, the setting is cancelled.
8 Press the [Start] key.
The copies are printed.
4.7 “Distribution #” Function
Printing Distribution Numbers on Sets of Copies
Each set of copies can be printed with a distribution number added to the background.

Tip
If the “Distribution #” function is used, the “Sort” Finishing setting is selected.
After "999" is printed, the number returns to "000".
To make settings for the “Distribution #” function
1 Load the document into the duplexing document feeder or position it on the original glass.
2 Touch [Auxiliary], and then touch [Image Settings].
3 Touch [Distribution #].
4 Specify the desired Distribution # settings.
○ Using the 10-Key Pad, type in the first distribution number to be printed.
☐ If [First page only] is selected, the distribution number is only printed on the first page of each copy set.
☐ If [All Pages] is selected, the distribution number is printed on all pages of each copy set.
- Touch [Darker], [Normal] or [Lighter] to specify the print density for the distribution number.
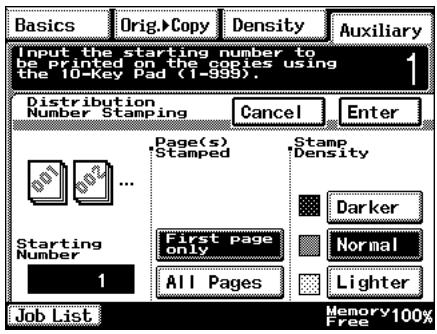
5 Touch [Enter].
○ If [Cancel] is touched, the setting is cancelled.
6 Press the [Start] key.
The copies are printed.
4.8 "Watermark" Function
Printing Copies with a Watermark
Copies can be printed with a watermark added to the background.
To make settings for the "Watermark" function
1 Load the document into the duplexing document feeder or position it on the original glass.
2 Touch [Auxiliary], and then touch [Image Settings].
3 Touch [Watermark].

4 Select the watermark to be printed and the pages that the watermark will be added to.
☐ If [First page only] is selected, the watermark is only printed on the first page of each copy set.
○ If [All Pages] is selected, the watermark is printed on all pages.
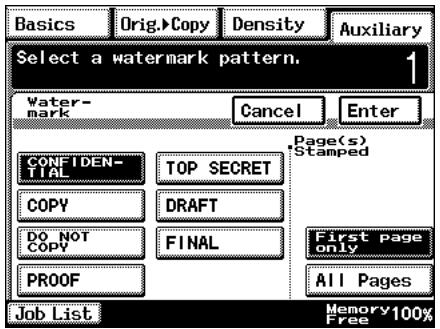
5 Touch [Enter].
○ If [Cancel] is touched, the setting is cancelled.
6 Press the [Start] key.
The copies are printed.
4.9 "Image Stamping" Function
With this function, copies can be printed with a watermark of a scanned image added to the background.
Refer to “Registering an Image Stamp” on page 5-31 for registration methods.

Note
The optional hard disk must be installed.
To make copies using the "Image Stamping" function
1 Load the document into the duplexing document feeder or position it on the glass.
2 Touch [Auxiliary], and then touch [Image Settings].
3 Touch [Image Stamping].

4 Touch [Set], select the registration number to be used, and then touch [Enter].
☐ You can check this by selecting [Check], pressing the [Start] key, and copying the registered image.
5 Select the desired printing position.
○ If [First page only] is selected, the image is only printed on the first page.
○ If [All Pages] is selected, the image is printed on all pages.
6 Touch [Enter].
○ If [Cancel] is touched, the setting is cancelled.
7 Press the [Start] key.
The copies are printed.
4.10 "Black-White Reverse" Function
Reversing White- and Black-Colored Areas of Copies
Copies can be printed with the white- and black-colored areas of the original image reversed.

natural_image
Simple black-and-white graphic showing an apple inside a square and a white apple in the right square, with two gray arrows pointing right (no text or symbols)
Tip
The white and black colors of the distribution number and watermark will not be reversed.
The white and black colors of the original cannot be reversed after the document has been scanned.
To set the "Black-White Reverse" function
1 Load the document into the duplexing document feeder or position it on the original glass.
2 Touch [Auxiliary], and then touch [Black-White Reverse].

3 Press the [Start] key.
The copies are printed.
4.11 “Separate Scan” Function
Scanning a Document in Separate Batches
When copying a document with a large number of pages, the document can be divided and scanned in separate batches, and then it can be printed as a single document.

Tip
If the memory becomes full while scanning, scanning is stopped. If this occurs, press the [Start] key to print the pages that were scanned before scanning was stopped.
To make copies using the "Separate Scan" function
1 Load the document into the duplexing document feeder or position it on the original glass.
2 Touch [Auxiliary], and then touch [Separate Scan].

3 Press the [Start] key.
The document is scanned.
4 After the first document batch is scanned, load the second document batch into the duplexing document feeder or position it on the original glass, and then press the [Start] key.
5 After all document batches have been scanned, touch [Finish].
6 Press the [Start] key.
The copies are printed.
Utility Mode Operations
5
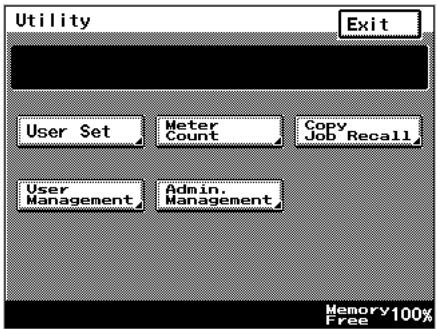
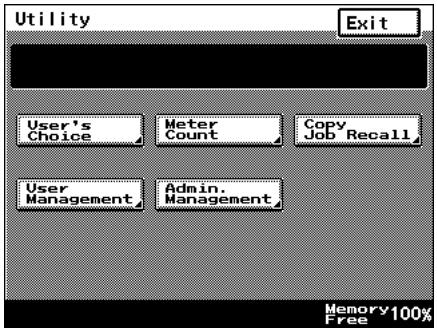
5.1 Utility Mode Screens
This chapter contains descriptions on the various copy programs and settings available in the Utility mode.
Utility screen
This screen appears when the [Utility] key is pressed.

The following screens appear when the corresponding button is touched.
User's Choice screen
This screen provides functions for specifying various default settings for the copier.

Meter Count screen
This screen shows the total number of copies printed since the copier was installed.
Copy Job Program Recall screen
From this screen, a programmed copy job can be recalled.
User Management screen
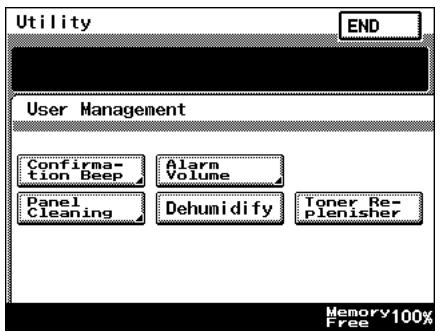
This screen provides various functions for safely and correctly using the copier.
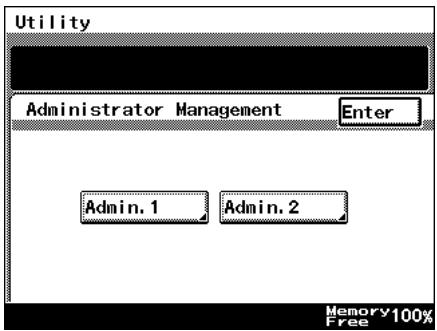
Administrator Management screens
There are two screens: Administrator Management 1 and Administrator Management 2. The administrator access code must be entered before these screens can be displayed.
For details on the functions available from the Administrator Management screens, refer to “6 Administrator Management Operations”.
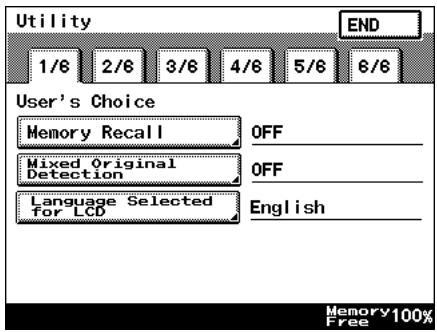
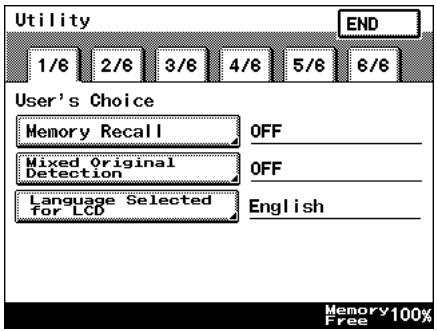
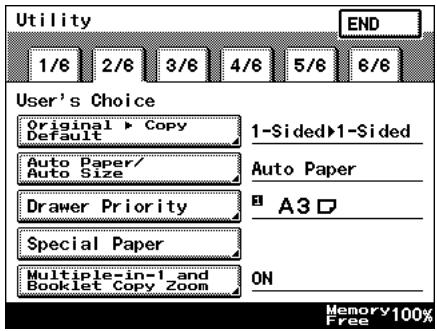
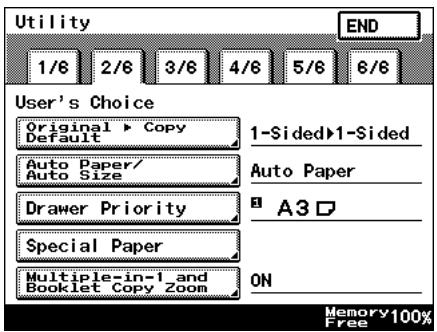
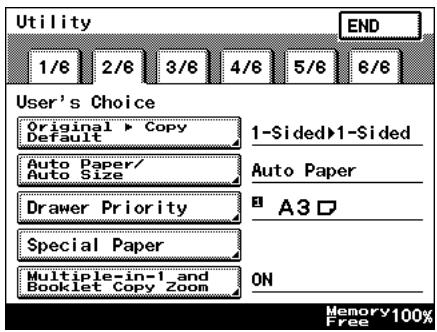
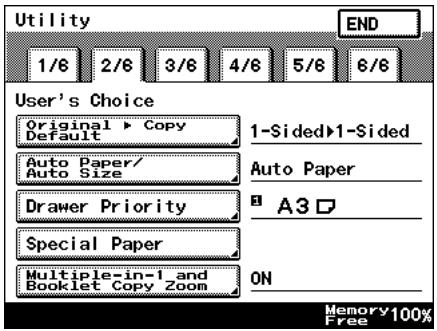
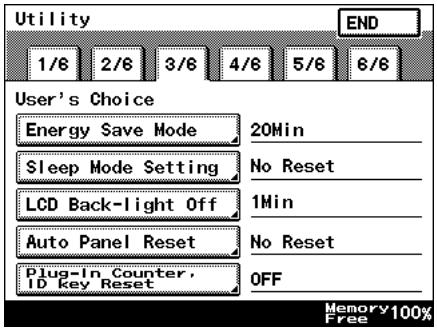
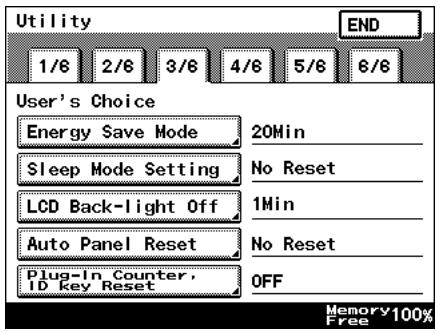
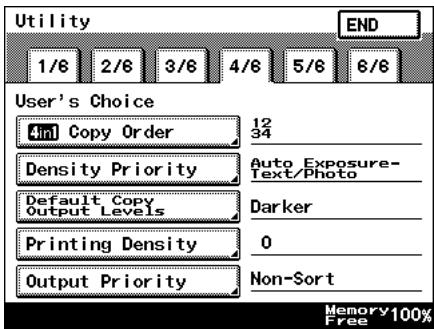
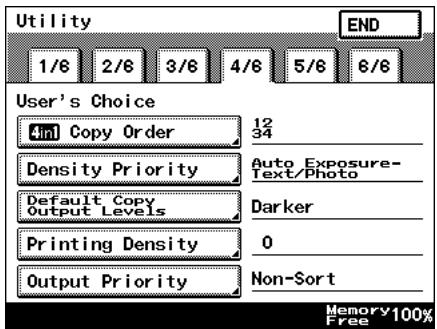
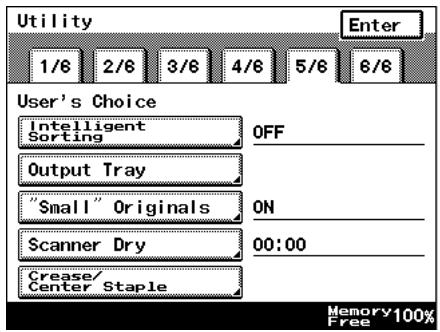
5.2 User's Choice Functions
The functions available on the User's Choice screen are described below.
Changing the settings for the following functions changes the default setting (the setting selected after the copier is turned on or the [Panel Reset] key is pressed).
The underlined settings indicate the default settings.
| Tab | Function | Settings |
| 1/6 | Memory Recall | ON, OFF |
| Mixed Original Detection | ON, OFF | |
| Language Selected for LCD | Japanese, English, German, French, Dutch, Italian, Spanish, Portuguese, Norwegian, Danish, Swedish, Finnish, | |
| 2/6 | Original ▶ Copy Default | 1-Sided ▶ 2-Sided, 2-Sided ▶ 2-Sided, 1-Sided ▶ 1-Sided |
| Auto Paper/Auto Size | Auto Paper, Auto Size, Manual | |
| Drawer Priority | 1st paper drawer | |
| Special Paper | Normal, Not for 2 Sided, Recycled, Special | |
| Multiple-in-1 and Booklet Copy Zoom | ON, OFF | |
| 3/6 | Energy Save Mode | 1 to 240 minutes, 15 minutes |
| Sleep Mode Setting | 1 to 240 minutes, 15 minutes | |
| LCD Back-light Off | 1 to 240 minutes, 1 minutes | |
| Auto Panel Reset | No Reset, 30 seconds 1 min, 2 min, 3 min, 5 min | |
| Plug-In Counter, ID key Reset | ON, OFF | |
| 4/6 | 4in1 Copy Order | 112, 1334, 214 |
| Density Priority | Auto, ManualText, Photo, Text/Photo | |
| Default Copy Output Levels | Auto(Lighter, Normal, Darker)Manual One of nine settings between “Lighter” and “Darker” can be selected. One of nine settings between “Lighter” and “Darker” can be selected. | |
| Printing Density | -2, -1, 0, 1, 2 | |
| Output Priority | Non-Sort, Sort, Group, Corner Staple*, 2-Point Staple*, Hole Punch*Options | |
| 5/6 | Intelligent Sorting | ON, OFF |
| Output Tray | Specify the bin of the finisher (option). | |
| “Small” Originals | ON, OFF | |
| Scanner Dry | Specify the time for dehumidifying the scanner. | |
| Crease/Center Staple | Crease (-10 to +10, 0) Center staple (-10 to +10, 0) | |
| 6/6 | Density (ADF only) | Mode 1, Mode 2 |
5.3 Changing Default Settings
The procedures for changing each of the User's Choice settings are described below.
To set the "Memory Recall" function
This function is used to specify whether or not the last image copied can be recalled and printed again.
1 Press the [Utility] key.
2 Touch [User's Choice].
3 Touch [1/6], and then touch [Memory Recall].
4 Touch [ON] or [OFF], and then touch [Enter].
☐ If [ON] is selected, the previously copied image data can be printed again, even after copying has finished or while the copier is stand-by.
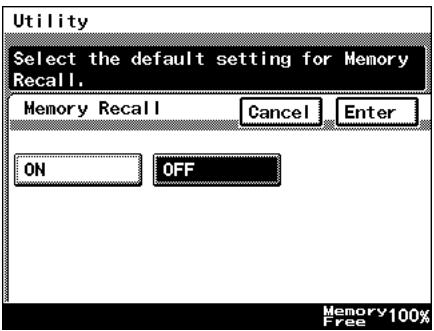
5 Touch [END] to return to the Utility screen, and then touch [Exit] to return to the Basics screen.
To set the "Mixed Original Detection" function
This function is used to specify whether or not the “Mixed Original Detection” function is set as the default.
1 Press the [Utility] key.
2 Touch [User's Choice].
3 Touch [1/6], and then touch [Mixed Original Detection].
4 Touch [ON] or [OFF], and then touch [Enter].
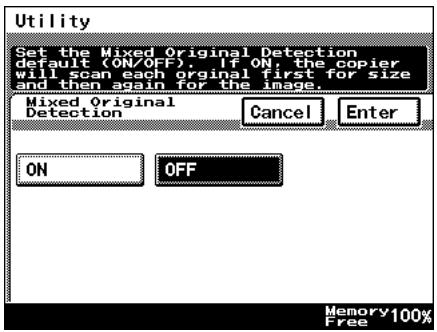
5 Touch [END] to return to the Utility screen, and then touch [Exit] to return to the Basics screen.
To set the "Language Selected for LCD" function
This function is used to specify the language for the screens that appear in the touch panel.
1 Press the [Utility] key.
2 Touch [User's Choice].
3 Touch [1/6], and then touch [Language Selected for LCD].

4 Select the desired language, and then touch [Enter].
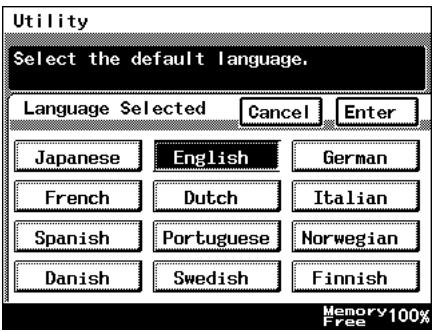
5 Touch [END] to return to the Utility screen, and then touch [Exit] to return to the Basics screen.
To set the "Original ▶ Copy Default" function
The function specifies the default Orig. ▶ Copy setting.
1 Press the [Utility] key.
2 Touch [User's Choice].
3 Touch [2/6], and then touch [Original ▶ Copy Default].

4 Select the desired setting, and then touch [Enter].
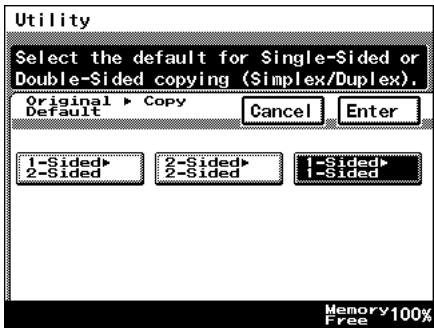
5 Touch [END] to return to the Utility screen, and then touch [Exit] to return to the Basics screen.
To set the "Auto Paper/Auto Size" function
This function is used to specify whether the “Auto Paper” Paper setting, the “Auto Size” Zoom setting or the “Manual” setting is set as the default.
1 Press the [Utility] key.
2 Touch [User's Choice].
3 Touch [2/6], and then touch [Auto Paper/Auto Size].
4 Select the desired setting, and then touch [Enter].

5 Touch [END] to return to the Utility screen, and then touch [Exit] to return to the Basics screen.
To set the "Drawer Priority" function
You can specify the priority of the paper that is selected (paper drawer).
For example, if you specify a paper drawer for paper that you use frequently, (recycled paper, single-sided only paper, etc.), that drawer will have priority when supplying paper. However, this function will not operate when there are settings such as auto paper selection, or where paper is limited.
1 Press the [Utility] key.
2 Touch [User's Choice].
3 Touch [2/6], and then touch [Drawer Priority].
4 Select the desired paper drawer, and then touch [Enter].
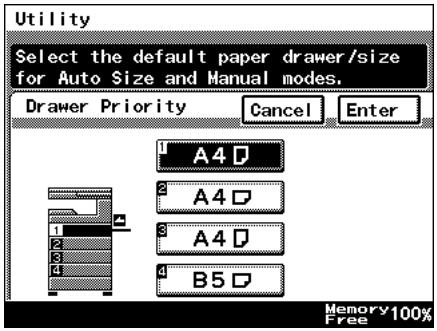
5 Touch [END] to return to the Utility screen, and then touch [Exit] to return to the Basics screen.
To set the "Special Paper" function
This function is used to specify the default paper type for a paper drawer when special paper, for example, recycled paper, is loaded into a particular paper drawer.

Tip
If a particular paper drawer is set to be loaded with special paper, the paper in that paper drawer will not be selected during automatic paper selection.
1 Press the [Utility] key.
2 Touch [User's Choice].
3 Touch [2/6], and then touch [Special Paper].
4 Select the paper drawer loaded with special paper, select the paper type, and then touch [Enter].
☐ S: Recycled Paper Selecting this mode means that when auto paper selection is selected, that paper tray will not be selected. For example, when plain paper and recycled paper are both able to be used, but where plain paper is mainly used, selecting
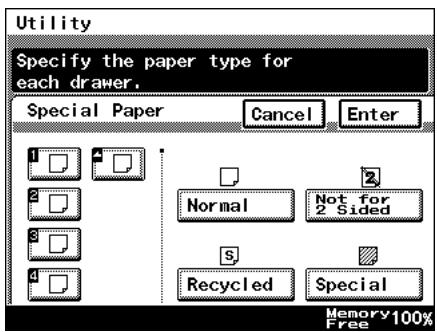
this mode will meant that plain paper will have priority when being used.
○ 2: Not for 2 Sided paper
Selecting this mode will mean that double sided copies on paper in that paper tray will not be possible.
○ : Special paper
Selecting this mode will mean that when using auto paper selection, this will not be included in auto tray change.
When using colored paper for cover pages or interleaves, selecting this setting reduces operating errors.
5 Touch [END] to return to the Utility screen, and then touch [Exit] to return to the Basics screen.
To set the “Multiple-in-1 and Booklet Copy Zoom” function
This function is used to specify whether or not the preset Zoom setting appropriate for the document and paper size is set when a 2in1 or a 4in1 Copy setting is selected.
1 Press the [Utility] key.
2 Touch [User's Choice].
3 Touch [2/6], and then touch [Multiple-in-1 and Booklet Copy Zoom].
4 Touch [ON] or [OFF], and then touch [Enter].
☐ If [OFF] is selected, specify the Zoom settings for the 2in1 and 4in1 Copy settings.
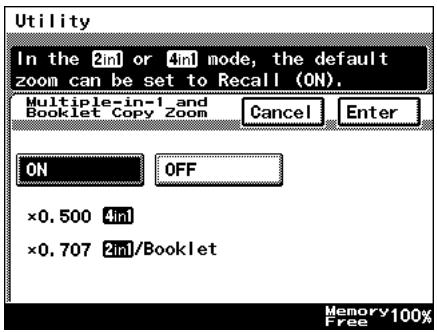
5 Touch [END] to return to the Utility screen, and then touch [Exit] to return to the Basics screen.
To set the "Energy Save Mode" function
This function is used to specify when the copier automatically enters Energy Saver mode after no operation is performed for the set length of time.
1 Press the [Utility] key.
2 Touch [User's Choice].
3 Touch [3/6], and then touch [Energy Save Mode].

4 Press the [C] key to erase the value.
Use the 10-Key Pad to specify the desired length of time, and then touch [Enter]. (Specify a length of time between 1 and 240 minutes.)
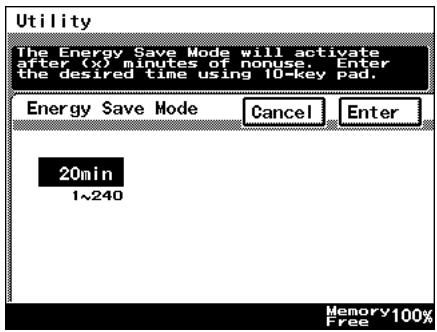
5 Touch [END] to return to the Utility screen, and then touch [Exit] to return to the Basics screen.
To set the "Sleep Mode Setting" function
This function is used to specify the period of time where there is no input, after which the copier automatically turns the printer heater off.
To display [No Reset], you need to first display [No Reset] in Specifying Administrator Settings. For details, refer to “Administrator Settings” on page 6-7.
1 Press the [Utility] key.
2 Touch [User's Choice].
3 Touch [3/6], and then touch [Sleep Mode Setting].
4 Press the [C] key to erase the value.
○ Use the 10-Key Pad to specify the desired length of time, and then touch [Enter].
(Specify a length of time between 1 and 240 minutes.)
○ Selecting the [No Reset] key means that sleep functions will no longer operate.
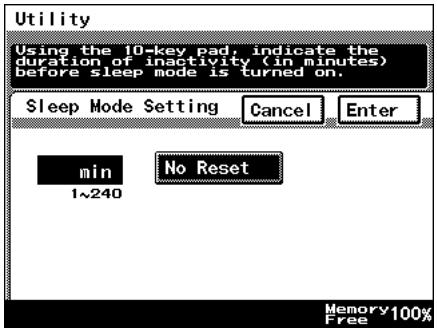
5 Touch [END] to return to the Utility screen, and then touch [Exit] to return to the Basics screen.
To set the "LCD Back-light Off" function
This function is used to specify when the backlight for the touch panel automatically goes off after no operation is performed for the set length of time.
1 Press the [Utility] key.
2 Touch [User's Choice].
3 Touch [3/6], and then touch [LCD Back-light Off].

4 Press the [C] key to erase the value.
Use the 10-Key Pad to specify the desired length of time, and then touch [Enter]. (Specify a length of time between 1 and 240 minutes.)

Tip
If the preheat and sleep set- tings are short because of the
LCD Back-light being set to off, then the Backlight will be turned off after the specified preheat or sleep time.
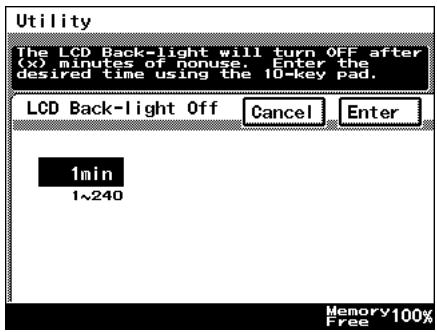
5 Touch [END] to return to the Utility screen, and then touch [Exit] to return to the Basics screen.
To set the "Auto Panel Reset" function
This function is used to specify when the Basics screen is automatically displayed if no operation is performed while a program or settings are being specified.
1 Press the [Utility] key.
2 Touch [User's Choice].
3 Touch [3/6], and then touch [Auto Panel Reset].

4 Select the desired length of time until the Basics screen is displayed, and then touch [Enter].
☐ The length of time until the Basics screen is displayed can be set to 30 seconds, 1, 2, 3 or 5 minutes, or “No Reset”.
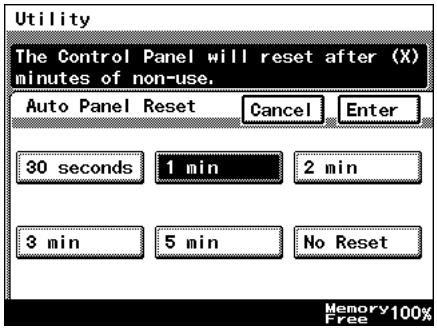
5 Touch [END] to return to the Utility screen, and then touch [Exit] to return to the Basics screen.
To set the "Plug-In Counter, ID key Reset" function
Pressing the [Access] key when specifying administrator settings specifies whether or not to return to default settings, with the exception of when the data controller magnetic card is removed.
1 Press the [Utility] key.
2 Touch [User's Choice].
3 Touch [3/6], and then touch [Plug-In Counter, ID key Reset].
4 Touch [ON] or [OFF], and then touch [Enter].
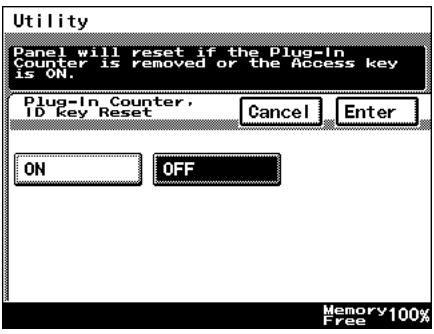
5 Touch [END] to return to the Utility screen, and then touch [Exit] to return to the Basics screen.
To set the "4in1 Copy Order" function
This function is used to specify the page orientation for making 4in1 copies.
1 Press the [Utility] key.
2 Touch [User's Choice].
3 Touch [4/6], and then touch [4in1 Copy Order].
4 Select the page orientation for making 4in1 copies, and then touch [Enter].
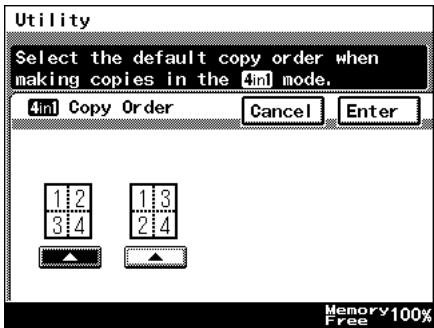
5 Touch [END] to return to the Utility screen, and then touch [Exit] to return to the Basics screen.
To set the "Density Priority" function
This specifies the default printing density / copy mode settings.
1 Press the [Utility] key.
2 Touch [User's Choice].
3 Touch [4/6], and then touch [Density Priority].
4 Select the desired settings, and then touch [Enter].
☐ The default Output Density can be set to either [Auto] or [Manual].
○ The default Original Image Type can be set to [Text], [Photo] or [Text/Photo].
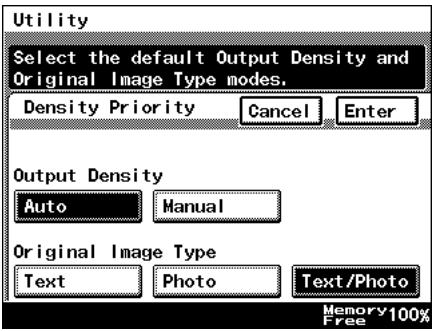
5 Touch [END] to return to the Utility screen, and then touch [Exit] to return to the Basics screen.
To set the "Default Copy Output Levels" function
This specifies the auto and manual default printing density level settings.
1 Press the [Utility] key.
2 Touch [User's Choice].
3 Touch [4/6], and then touch [Default Copy Output Levels].

4 Select the desired settings, and then touch [Enter].
☐ The default Auto density level can be set to [Lighter], [Normal] or [Darker].
○ The default Manual density level can be adjusted by one level at a time.
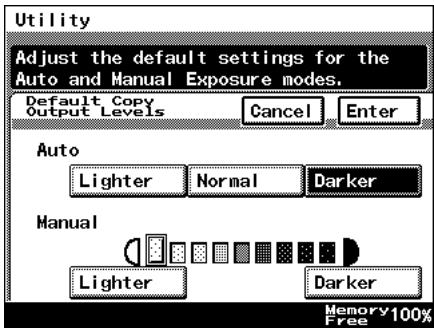
5 Touch [END] to return to the Utility screen, and then touch [Exit] to return to the Basics screen.
To set the "Printing Density" function
This specifies the default printing density level settings from -2 to 2, in 5 steps.
1 Press the [Utility] key.
2 Touch [User's Choice].
3 Touch [4/6], and then touch [Printing Density].

4 Select the desired settings, and then touch [Enter].
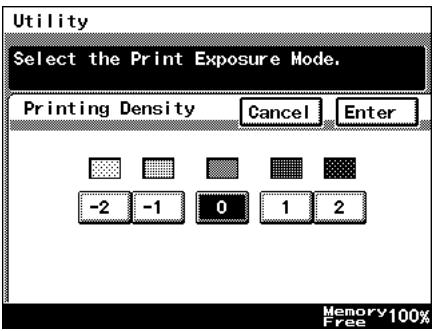
5 Touch [END] to return to the Utility screen, and then touch [Exit] to return to the Basics screen.
To set the "Output Priority" function
This specifies the default finishing modes that are selected by priority.
1 Press the [Utility] key.
2 Touch [User's Choice].
3 Touch [4/6], and then touch [Output Priority].

4 Select the desired settings, and then touch [Enter].
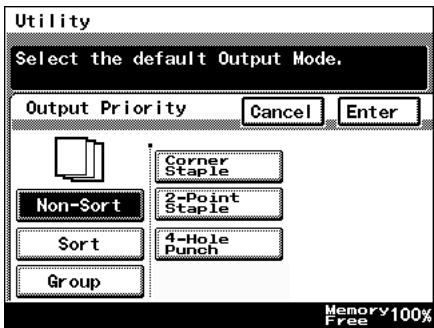
5 Touch [END] to return to the Utility screen, and then touch [Exit] to return to the Basics screen.
To set the "Intelligent Sorting" function
This function is used to specify whether or not the “Sort” and the “Non-Sort” settings are automatically selected according to the number of pages in the document.
1 Press the [Utility] key.
2 Touch [User's Choice].
3 Touch [5/6], and then touch [Intelligent Sorting].

4 Touch [ON] or [OFF], and then touch [Enter].
If [ON] is selected, the "Non-Sort" setting is automatically selected when a document consisting of only one page is loaded into the duplexing document feeder, and the "Sort" setting is automatically selected when a document consisting of two or more pages is placed in the duplexing document feeder.
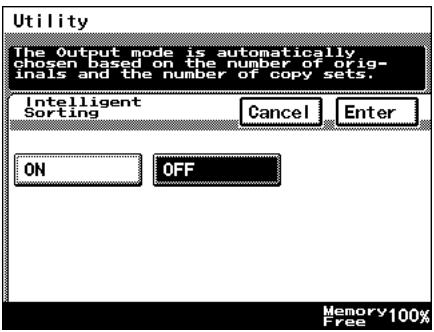
5 Touch [END] to return to the Utility screen, and then touch [Exit] to return to the Basics screen.
To set the "Output Tray" function (optional)
This function is used to specify how copies and computer printouts are separated and which output tray they are assigned to.

Tip
[Output Tray] only appears if the finisher or the job separator is installed.
1 Press the [Utility] key.
2 Touch [User's Choice].
3 Touch [5/6], and then touch [Output Tray].
4 Select the appropriate output tray settings, and then touch [Enter].
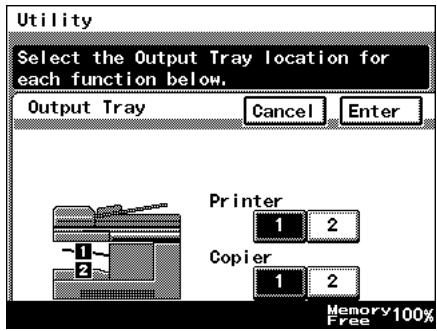
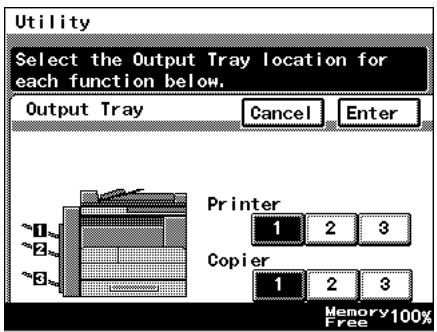
5 Touch [END] to return to the Utility screen, and then touch [Exit] to return to the Basics screen.
To set the ““Small” Originals” function
This function is used to specify whether or not a small-sized original can be copied when the [Start] key is pressed.
1 Press the [Utility] key.
2 Touch [User's Choice].
3 Touch [5/6], and then touch ["Small" Originals].

4 Touch [ON] or [OFF], and then touch [Enter].
○ If [ON] is selected, a copy can be made using the specified paper.
○ If [OFF] is selected, a message appears, indicating that the paper should be selected.
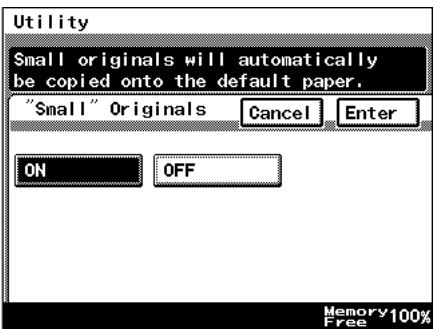
5 Touch [END] to return to the Utility screen, and then touch [Exit] to return to the Basics screen.
To set the "Scanner Dry" function
The automatic scanner dry function may be set in order to prevent condensation on the scanner resulting from sudden temperature changes.
1 Press the [Utility] key.
2 Touch [User's Choice].
3 Touch [5/6], and then touch [Scanner Dry].

4 Use the 10-Key Pad to specify the time when scanner drying begins, and then touch [Enter].
○ Specify the time in the 24-hour format.
○ To erase the value, press the [C] key.
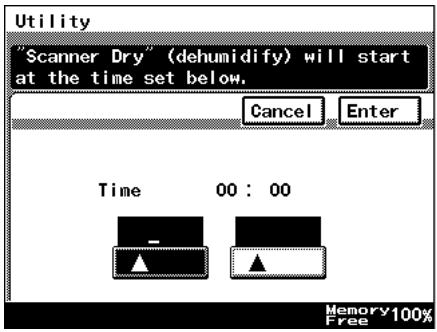
5 Touch [END] to return to the Utility screen, and then touch [Exit] to return to the Basics screen.
To set the “Crease/Center Staple” function (Only when the finisher or saddle kit are installed)
When the optional saddle kit (including the finisher) is installed, this controls the offset for creases created using the booklet creation mode, and for any specified center staples.
1 Press the [Utility] key.
2 Touch [User's Choice].
3 Touch [5/6], and then touch [Crease/Center Staple].

4 Touch ▲ and ▼ to adjust the setting, and then touch [Enter].
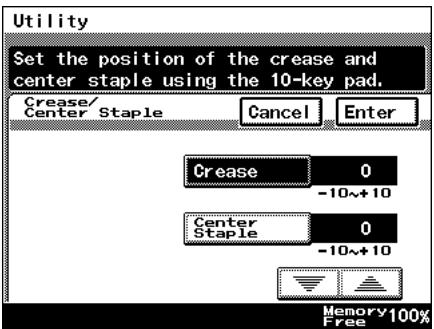
5 Touch [END] to return to the Utility screen, and then touch [Exit] to return to the Basics screen.
To set the “Density (ADF only)” function (Only when the duplexing document feeder is installed)
This function is used to adjust the density level when the optional duplexing document feeder is used.
1 Press the [Utility] key.
2 Touch [User's Choice].
3 Touch [6/6], and then touch [Density (ADF only)].
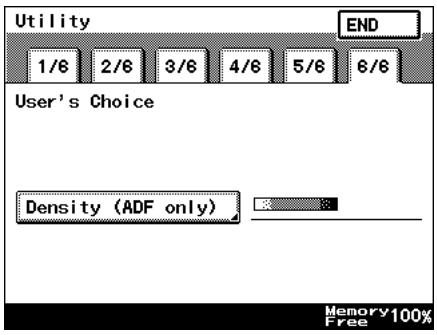
4 Select the desired default setting, and then touch [Enter].
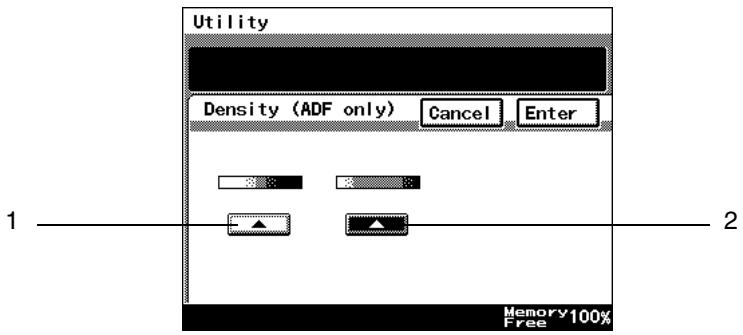
1: The setting on the left is most appropriate for scanning normal documents (such as those created with a word processor).
2: The setting on the right is most appropriate for scanning faint document (such as those written with pencil).
5 Touch [END] to return to the Utility screen, and then touch [Exit] to return to the Basics screen.
5.4 Registering an Image Stamp
Before the Auxiliary function “Image Stamping” can be used, an image must be registered. A maximum of five images can be registered. For details on using the “Image Stamping” function, refer to ““Image Stamping” Function” on page 4-20.

Note
The optional hard disk must be installed.
To register an image stamp
1 Press the [Utility] key.
2 Touch [User Set].
3 Touch [Image Mem. Input].
4 Touch [Input], and then touch desired registration key.
To erase a stored image, touch [Delete], and then touch the number from where you wish to delete the image.
To check a stored image, touch [Check], and then touch the number where the image that you wish to check is stored.

5 Select the size of the image document.
Touch [Enter].
To continue scanning a standard-sized image document, skip to step 9.
To scan a non-standard-sized image document, touch [Custom Size].
6 Press the [C] key to erase the current value, and then use the 10-Key Pad to type in the length of side X for the image document (between 25 and 432 mm).
Touch [Y], and then press the [C] key to erase the current value.
Use the 10-Key Pad to type in the length of side Y for the image document (between 25 and 297 mm).
7 Touch [Enter].
8 Position the document on the glass, and then select the orientation of the document.
9 Press the [Start] key.
The image is scanned.
The image stamp is registered.
5.5 Viewing Counters (“Meter Count” Function)
With the “Meter Count” function, the following counters can be viewed.
| Total counter | This counter shows the total number of copies and printouts made since the copier was installed. |
| Copier Total counter | This counter shows the total number of copies made. |
| Copier Size counter | This counter shows the total number of copies made on the specified paper size. (The paper size that is counted should be set at the service center) |
| Copier 2-Sided counter | This counter shows the total number of double-sided copies made. |
| Printer Total counter | This counter shows the total number of printouts made. |
| Printer Size counter | This counter shows the total number of computer printouts made on the specified paper size. (The paper size that is counted should be set at the service center) |
| Printer 2-Sided counter | This counter shows the total number of double-sided computer printouts made. |
| Scanner counter | This counter shows the total number of pages that have been scanned. |
| Account Total counters | These counters show the total number of copies and printouts made for each account currently registered. (A counter for each registered account is listed.) |
To view the counters
1 Press the [Utility] key.
2 Touch [Meter Count].
3 After checking the various counters, touch [Exit].
- There are two Meter Count screens. To view the other screen, touch [Next].
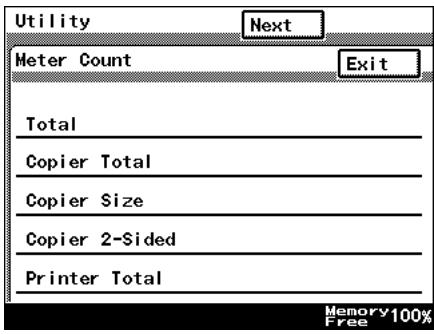
4 Touch [Exit] to return to the Basics screen.
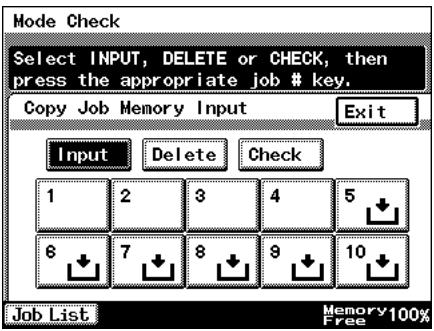
5.6 Using Copy Programs
Up to 10 sets of copy settings can be stored as copy programs.
To store a copy program
1 Press the [Mode Check] key.
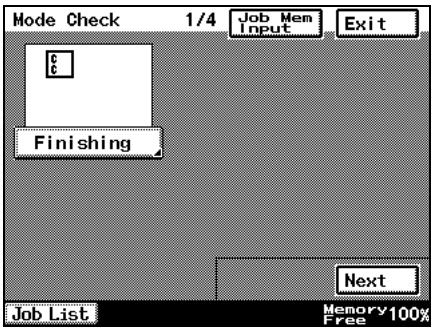
2 Touch [Job Mem Input], and then touch the number where you wish to store the copy program.
○ Number buttons on which ↓ does not appear have already been assigned a copy program.
If a button that has already been programmed is selected, the previously assigned copy program is deleted.
3 Touch [Check], and then touch a number button.
4 Check the programmed settings.
To display screen 2/2, touch [Next]. To return to screen 1/2, touch [Back].
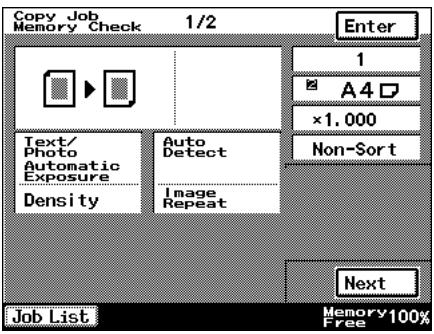
5 Touch [Enter] to return to the Mode Check screen, and then touch [Exit] to return to the Basics screen.
To delete a copy program
Individual copy programs can be deleted.
1 Press the [Mode Check] key.
2 Touch [Job Mem Input].
3 Touch the number button assigned with the copy program that you wish to delete, and then touch [Delete].
- The copy program is deleted, and ↓ appears on the button.
4 Touch [Exit] to return to the Mode Check screen, and then touch [Exit] to return to the Basics screen.
To use a copy program
1 Press the [Utility] key.
2 Touch [Copy Job Recall].
3 Touch the button assigned with the copy program that you wish to use.
○ Only buttons that have been assigned a copy program are displayed.
4 Check the settings, and then touch [Enter].
5 Set the document, and press the [Start] key.
5.7 User Management Functions
The following settings can be specified or operations can be performed from the User Management screen.
● Confirmation beep volume
- Alarm beep volume
- Touch panel cleaning
- Dehumidifying
- Toner replenishing
To adjust beep volumes (“Confirmation Beep” and “Alarm Volume” functions)
You can adjust the volume of the electronic beep used when pressing a key on the copier, or beeps issued to indicate alarms.
The following procedure describes how to adjust the volumes of two types of beeps. Additionally, beep volumes can be easily adjusted per user. Refer to “User Assistance” in the Basic Operations manual for details.
√ [Confirmation Beep]: This function is used to adjust the volume of the beep that is sounded when a touch panel button is touched. (Default setting: 3)
√ [Alarm Volume]: This function is used to adjust the volume of the alarm that is sounded when a paper misfeed occurs or an incorrect operation is specified. (Default setting: 3)
1 Press the [Utility] key.
2 Touch [User Management], and then touch the button for the beep that you wish to adjust.
3 Touch ▲ and ▼ to select the desired volume, and then touch [Enter].
4 Touch [END] to return to the Utility screen, and then touch [Exit] to return to the Basics screen.
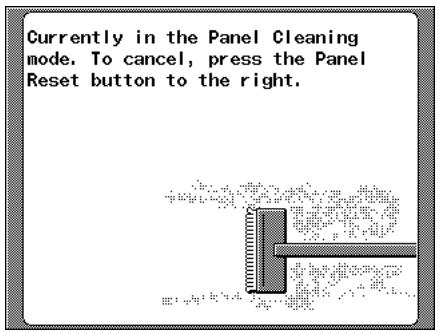
To clean the touch panel (“Panel Cleaning” function)
By setting panel cleaning, you can clean the panel without accidentally pressing panel buttons.
1 Press the [Utility] key.
2 Touch [User Management], and then touch [Panel Cleaning].
- To cancel the function, press the [Panel Reset] key.
To dehumidify the duplexing document feeder (“Dehumidify” function)
When there are rapid changes in the temperature of a room, or high humidity, condensation ^1 may occur on the surface of the photosensitive receptor drum ^2 or the scanner on the copier, resulting in blurred images. When this occurs, use the “De-humidify” function (Approximately 5 minutes) to remove the condensation.
If you wish to remove condensation at a set time every day. For details, refer to “To set the “Scanner Dry” function” on page 5-28.
*1 Condensation: a phenomenon where atmospheric water collects on the photo-sensitive receptor drum or the scanner, forming water droplets.
*2 Photosensitive receptor drum: the part that contacts the film copy.

Note
When you wish to remove condensation from the photosensitive receptor drum, contact your local technical representative.
You can still copy if there during dehumidifying. (however, dehumidifying will be interrupted.)
To specify a time to perform the dehumidifying operation, refer to page 5-28.
1 Press the [Utility] key.
2 Touch [User Management], and then touch [Dehumidify].
The dehumidifying operation begins.
To replenish the toner (“Toner Replenisher” function)
This function is used when copies are temporarily faint although plenty of toner remains, such as immediately after the toner bottle is replaced or after copying a large quantity of documents with large printed areas. If this occurs, toner can be replenished.
1 Press the [Utility] key.
2 Touch [User Management], and then touch [Toner Replenisher].
The toner is replenished.
Administrator Management Operations
6
6.1 Administrator Management Screens
To display the Administrator Management screens
This explains the method for displaying the Administrator Management screens.
1 Press the [Utility] key.
2 Touch [Admin. Management].

Note
The functions on the Administrator Management screens cannot be specified while a job is being performed. After the job is finished, touch [Admin. Management] again, and then specify the desired setting.
3 Use the 10-Key Pad to type in the 8-digit administrator code, and then touch [Enter].

Note
If the administrator code is incorrectly entered, the message "Incorrect administrator code. Try again." appears accompanied by a beeping sound. Follow the instructions in the
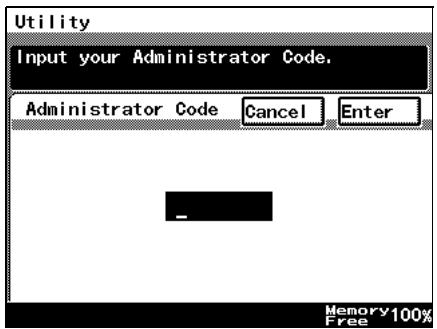
message that appears and type in the correct administrator code.
If the “Access Lock” function is set to “ON”, incorrectly typing the administrator code is counted as an incorrect attempt to access the machine. After three incorrect attempts to access the machine, even if the correct administrator code is entered on a later attempt, an error message appears and access to the Administrator Management screen is denied. To allow access to the Administrator Management screen, turn the machine off, then on again, and then type in the correct administrator code.
Keep the administrator code in a safe place hidden from the general user.
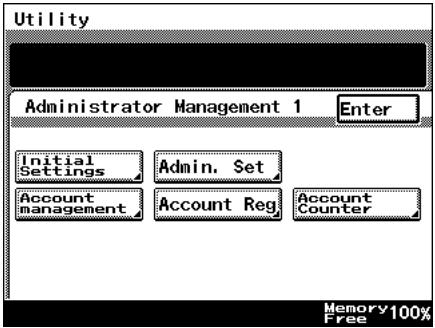
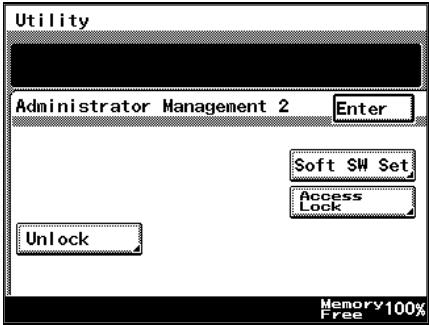
4 Touch [Admin. 1] or [Admin. 2] to display the desired screen.
For details on the Administrator Management 1 screen, refer to page 6-4. For details on the Administrator Management 2 screen, refer to page 6-22.
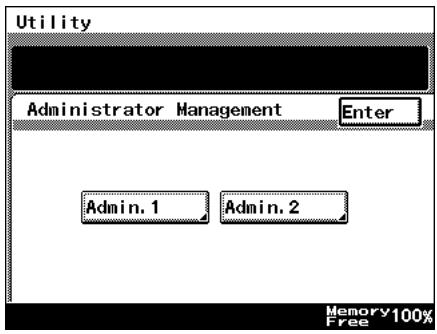
5 From the screen that appeared, touch the key for the operation that you wish to perform or the function whose setting you wish to specify.

Note
After account management settings have been specified, the [Account Reg], [Account Counter] keys appear only if one of following options is installed. Printer Controller, Network Interface Card Network Scan Kit (or Internet Fax & Network Scan Kit) For details, refer to "To set the Account Management Mode" on page 6-12.
If "Copy Track Mode" is set to "1000 Accounts" or "OFF", neither the [Account Reg] nor the [Account Counter] keys will appear.
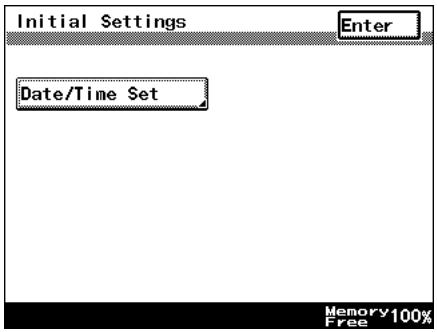
6.2 Initial Settings
Specify the date and time
Specify the date and time so that they will be correctly recorded in the reports.
To set the date and time
1 Follow the procedure described in "To display the Administrator Management screens" on page 6-2 to display the Administrator Management screen.
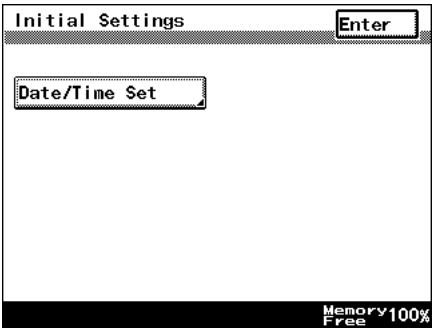
2 Touch [Admin. 1], and then touch [Initial Settings].
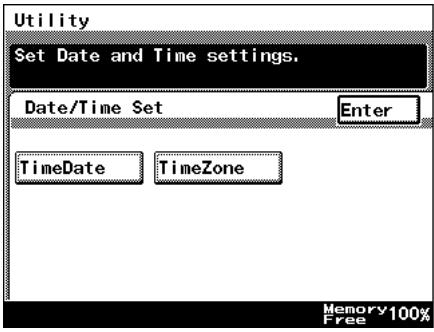
3 Touch [Date/Time Set].
4 Touch [TimeDate].
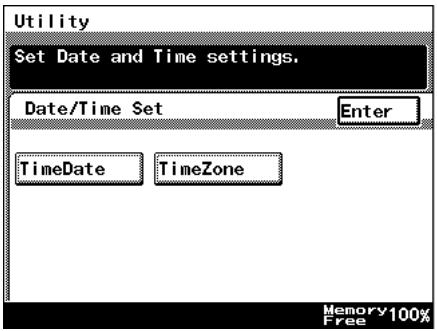
5 Use the 10-Key Pad to type in the current date and time, and then touch [Enter].
○ To re-enter the entered value, press the [C] key.
- Touch the button for the year, month, day, hour or minutes, and then use the 10-Key Pad to enter the value.
○ Enter four digits for the year.
○ Enter the time in the 24-hour format.
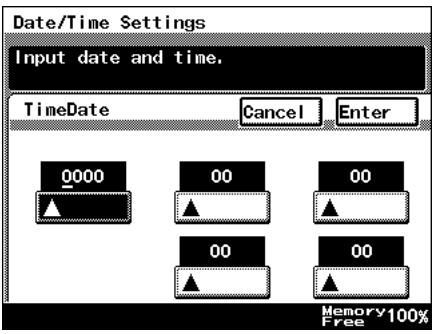
6 Continue touching [Enter] to return to the Utility screen, and then touch [Exit] to return to the Basics screen.
Specify the time zone
Specify the time difference from Greenwich Mean Time, which is added to the header of mails that are sent.
To set the time zone
1 Follow the procedure described in "To display the Administrator Management screens" on page 6-2 to display the Administrator Management screen.
2 Touch [Admin. 1], and then touch [Initial Settings].
3 Touch [Date/Time Set].
4 Touch [TimeZone].
5 Touch ▲ and ▼ to adjust the setting, and then touch [Enter].
- The time difference can be adjusted in 30-minute intervals.
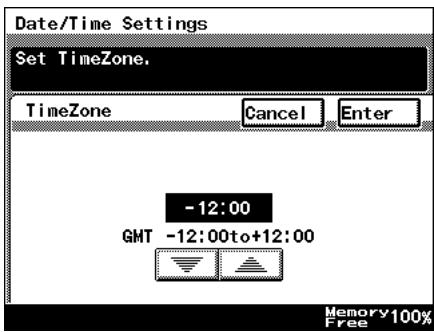
6 Continue touching [Enter] to return to the Utility screen, and then touch [Exit] to return to the Basics screen.
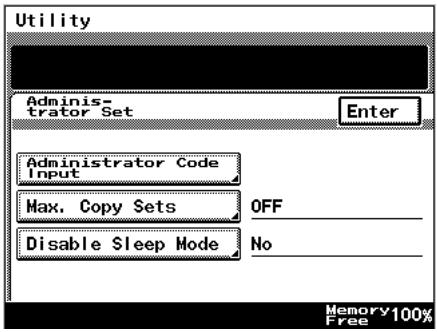
6.3 Administrator Settings
Changing the administrator access code
This explains the method to specify or change the administrator access code.
To set the administrator access code
1 Follow the procedure described in "To display the Administrator Management screens" on page 6-2 to display the Administrator Management screen.
2 Touch [Admin. 1], and then touch [Admin. Set].
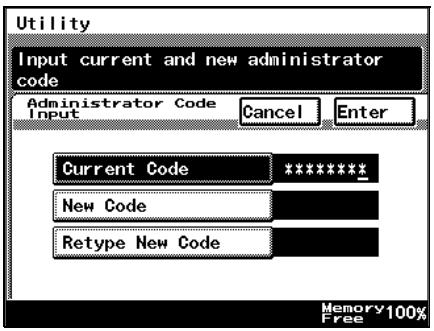
3 Touch [Administrator Code Input].
4 Touch [Current Code], and then use the 10-Key Pad to type in the currently specified 8-digit administrator code.
- Press the [C] key to erase all entered text.
○ To return to the previous screen, touch [Cancel].
5 Touch [New Code], and then use the 10-Key Pad to type in the new 8-digit administrator code.
○ Press the [C] key to erase all entered text.
○ To return to the previous screen, touch [Cancel].
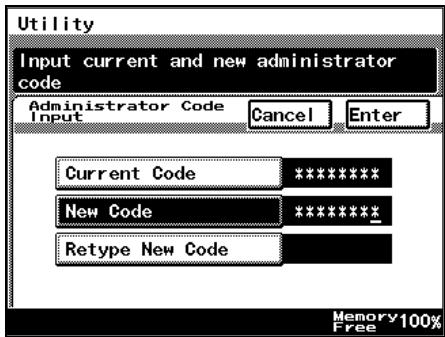
6 Touch [Retype New Code], and then use the 10-Key Pad to retype the new 8-digit administrator code.
○ Press the [C] key to erase all entered text.
○ To return to the previous screen, touch [Cancel].
7 Touch [Enter].
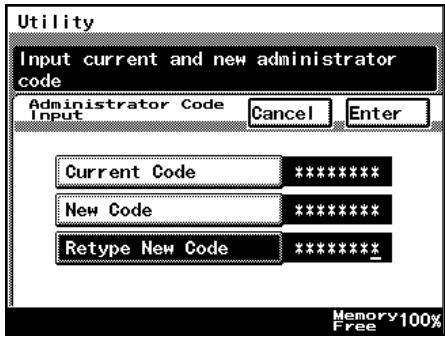

...
Note
If an incorrect administrator code is entered, an error message appears.
Type in the correct administrator code. The error message may appear in any of the following cases.
The code entered beside "Current Code" does not match the registered administrator code.
The code entered beside "New Code" is not an 8-digit number.
The code entered beside "Retype New Code" does not match the code entered beside "New Code".
If the “Access Lock” function is set to “ON”, incorrectly typing the administrator code is counted as an incorrect attempt to access the machine. After three incorrect attempts to access the machine, even if the correct administrator code is entered on a later attempt, an error message appears and the administrator code cannot be changed. To change the administrator code, turn the machine off, then on again, and then type in the correct administrator code.
Copy Number Limits
This is used to specify the maximum number of copies that can be printed.
To specify the maximum number of copies that can be printed
1 Follow the procedure described in "To display the Administrator Management screens" on page 6-2 to display the Administrator Management screen.
2 Touch [Admin. 1], and then touch [Admin. Set].
3 Touch [Max. Copy Sets].

4 Use the 10-Key Pad to specify the maximum number of copies, and then touch [Enter].
○ Numbers between 1 and 99 can be specified.
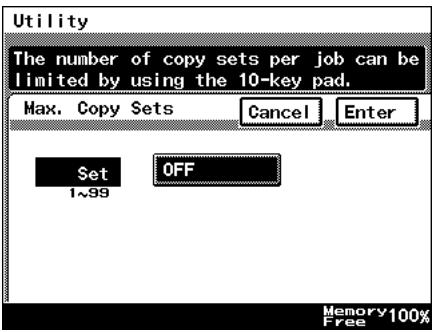
5 Continue touching [Enter] to return to the Utility screen, and then touch [Exit] to return to the Basics screen.
Disable Sleep Mode
This parameter is used to disable the Sleep function, which automatically turns off the printer heater after no operation is performed for a specified length of time.
To disable the Sleep mode
1 Follow the procedure described in "To display the Administrator Management screens" on page 6-2 to display the Administrator Management screen.
2 Touch [Admin. 1], and then touch [Admin. Set].
3 Touch [Disable Sleep Mode].

4 Touch [Yes] or [No], and then touch [Enter].
If [Yes] is selected, [No Reset] appears in the screen for the "Sleep Mode Setting" function, which is available from the User's Choice screen.
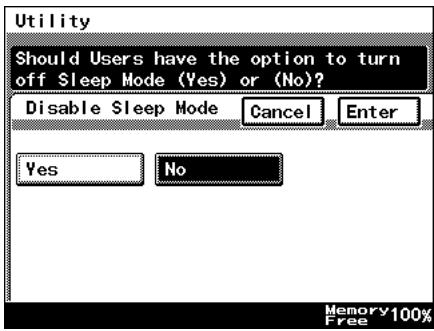
5 On the User's Choice [3/6] sleep mode setting screen, select [No].
6 Continue touching [Enter] to return to the Utility screen, and then touch [Exit] to return to the Basics screen.
6.4 Account Management Settings
Account Management Mode
The number of copies and the number of prints can be managed per account. Additionally, users can be limited by management of accounts.
● [100 Accounts 1]
Enter the security code to make copies. Alternatively, the following can be configured per account.
○ Account name: program or change the account name
Can be specified only if the optional Printer Controller, Network Interface Card and Network Scan Kit (or Internet Fax & Network Scan Kit) is installed.
- Security code: program or change the security code
○ Account number: program or change the account number
- Print upper limit: limit the maximum number of prints that can be made for each account
○ Total counter: displays the total counter value for each account. Additionally, clears the counter value
● [100 Accounts 2]
Copies can be made whether or not they have entered the security code. Alternatively, the following can be configured per account by entering the registered access code.
○ Account name: program or change the account name
Can be specified only if the optional Printer Controller, Network Interface Card and Network Scan Kit (or Internet Fax & Network Scan Kit) is installed.
- Registered access code: program or change the registered access code
○ Account number: program or change the account number
- Print upper limit: limit the maximum number of prints that can be made for each account
○ Total counter: displays the total counter value for each account. Additionally, clears the counter value
![KONICA MINOLTA DI3010 - ● [100 Accounts 2] - 1](/content/2025/01/139667/images/be7e0525c4b64675ac828286820d480075ae0662b1b4e18bbc4d4731481586de.jpg)
Note
The [100 Accounts 2] key appears only if the following options are installed.
Printer controller
Network Interface Card
Network scan kit or Internet Fax & Network Scan Kit
● [1000 Accounts]
Enter the account number to make copies. Additionally, the following can be configured per account.
○ Total counter: displays the total counter value for each account. Additionally, clears the counter value
To set the Account Management Mode
You can manage the number of pages that can be copied per account.
1 Follow the procedure described in "To display the Administrator Management screens" on page 6-2 to display the Administrator Management screen.
2 Touch [Admin. 1], and then touch [Account management].
3 Touch [Copy Track Mode].
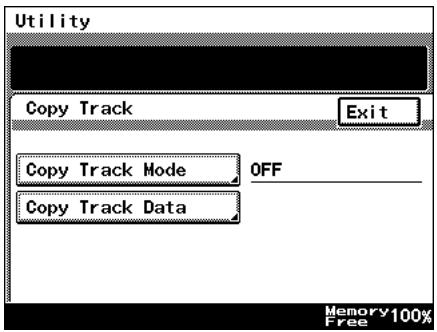
4 Select the desired account information methods, and touch the [Enter] key.
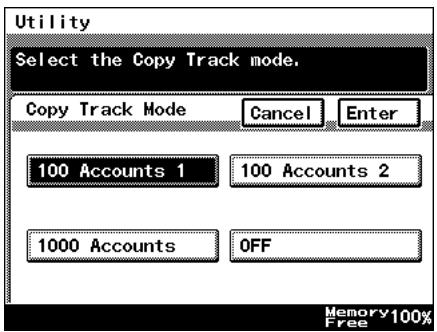
5 This will set the default account information. Select [Yes], and touch [Enter].

Note
When programming or changing account information data, please set the default account information data. However, depending on the currently specified account information method, the default screen may not be displayed.

Note
When setting [100 Accounts 1] or [100 Accounts 2], please program account names, etc. for each account. Please refer to “Account Registration” for details.
6 Continue touching [Enter] to return to the Utility screen, and then touch [Exit] to return to the Basics screen.
Account Information data
When carrying out account management settings, you can confirm usage for each account, or clear counter values. Alternatively, when carrying out 100 Account Management, you can change account numbers, print maximum limits, and access codes. You can also clear all counter values at once.
To print account information data
1 Follow the procedure described in "To display the Administrator Management screens" on page 6-2 to display the Administrator Management screen.
2 Touch [Admin. 1], and then touch [Account management].
3 Touch [Copy Track Data].

4 Set A4 L paper in the 1st paper drawer, then press the [Start] key. Account management data is printed.

5 Continue touching [Enter] to return to the Utility screen, and then touch [Exit] to return to the Basics screen.
Clear all counters
1 Follow the procedure described in "To display the Administrator Management screens" on page 6-2 to display the Administrator Management screen.
2 Touch [Admin. 1], and then touch [Account management].
3 Touch [Copy Track Data].
4 Select the page number of the account you wish to clear.

Tip
If you wish to clear all the total counters accounts at once, touch [All Counter Reset].
5 Select the total keys of the accounts you wish to clear, and press the [C] key.

Tip
If you wish to cancel clearing of accounts, press the [Interrupt] key.
If you wish to clear the total counter of other accounts, repeat steps 4 and 5.
6 Continue touching [Enter] to return to the Utility screen, and then touch [Exit] to return to the Basics screen.
Changing Account Information
1 Follow the procedure described in "To display the Administrator Management screens" on page 6-2 to display the Administrator Management screen.
2 Touch [Admin. 1], and then touch [Account management].
3 Touch [Copy Track Data].
4 Select the page number of the account you wish to change.

5 Select the key for the page you wish to change, and press the [C] key.
6 Use the 10-Key Pad to type in the value you wish to change.

7 Continue touching [Enter] to return to the Utility screen, and then touch [Exit] to return to the Basics screen.
6.5 Setting Account Registration
Account Registration
Accounts can be registered for departments in a company or for individuals. The number of prints can be restricted for each account, access codes specified, or unauthorized use of the copier restricted.
100 account management is required in Administrator Management Mode. For details, refer to “To set the Account Management Mode” on page 6-12.
The procedure for registering accounts differs depending on whether or not the optional Printer Controller, Network Interface Card and Network Scan Kit (or Internet Fax & Network Scan Kit) is installed.
To register accounts
1 Follow the procedure described in "To display the Administrator Management screens" on page 6-2 to display the Administrator Management screen.
2 Touch [Admin. 1], and then touch [Account management].
3 Touch [Copy Track Data].
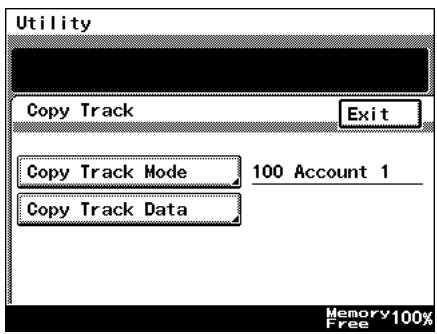
4 Touch the page number key for the account to be registered.

Note
All account counter data can be deleted by touching [All Counter Reset].

5 Using the 10-Key Pad, enter the account number, Copy Limit and account access code.
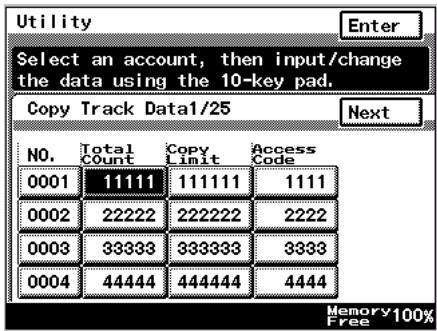
6 Continue touching [Enter] to return to the Utility screen, and then touch [Exit] to return to the Basics screen.
1 Follow the procedure described in "To display the Administrator Management screens" on page 6-2 to display the Administrator Management screen.
2 Touch [Admin. 1], and touch [Account Reg].
3 Select the account key to program or change.
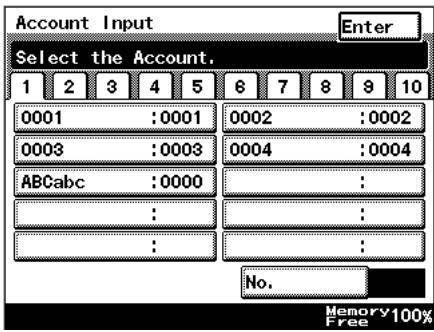
4 Touch [Account Name].

5 To enter the name of the account, use the character buttons that appear in the touch panel.
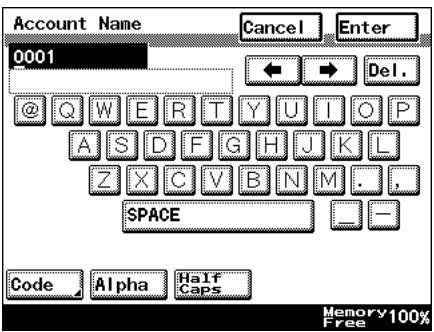
6 Touch [Enter].
7 Touch [Access Number], and enter the access code for the account.
8 Touch [Enter].
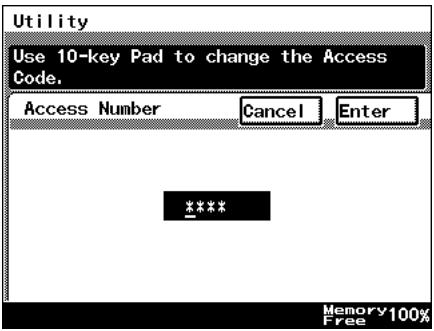
9 Touch [Account Number], and enter the account number using the 10-Key Pad.
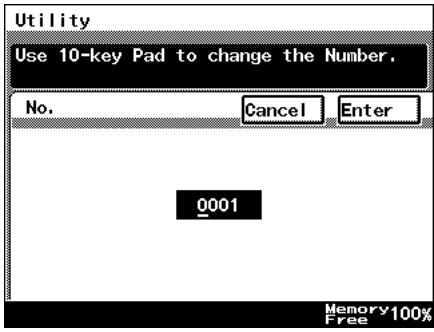
10 Touch [Enter].
11 Touch [Max. Print Page], and enter the upper print limit using the 10-Key Pad.
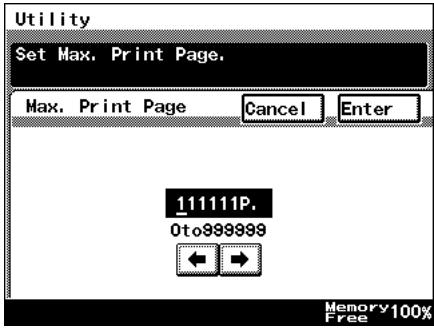
12 Touch [Enter].

Tip
Where you wish to change the programmed details, repeat from step 3, entering the correct details.
To delete programmed details, at step 4, press the [Delete] key.
13 Continue touching [Enter] to return to the Utility screen, and then touch [Exit] to return to the Basics screen.
Account Counter
The number of prints made by each account can be checked.
To check the number of prints made by each account
1 Follow the procedure described in "To display the Administrator Management screens" on page 6-2 to display the Administrator Management screen.
2 Touch [Admin. 1], and then touch [Account Counter].
3 Touch the button for the account whose counter you wish to view, and then touch [Enter].
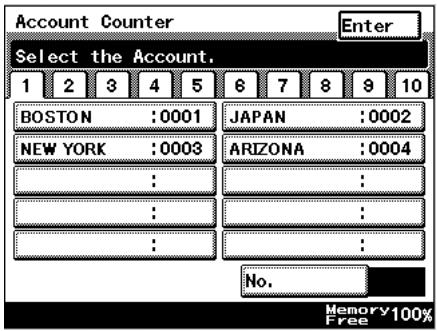
4 After checking the counter, then touch [Enter].
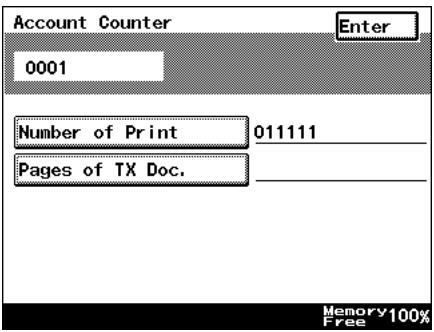
5 Continue touching [Enter] to return to the Utility screen, and then touch [Exit] to return to the Basics screen.
6.6 Setting Machine Access
Access Lock
The “Access Lock” function is used to specify whether (“On”) or not (“Off”) access to Administrator mode, lock jobs and user boxes is monitored.
If the “Access Lock” function is set to “On”, the number of incorrect attempts to access Administrator mode, lock jobs and user boxes is counted. After three incorrect attempts, access to the machine is denied. To allow Administrator mode to be accessed again, turn the machine off, then on again. However, to allow lock jobs and user boxes to be accessed again, the penalty must be removed. For more details, refer to the Printer Controller User Manual.
To make settings for the "Access Lock" function
1 Follow the procedure described in "To display the Administrator Management screens" on page 6-2 to display the Administrator Management screen.
2 Touch [Admin. 2], and then touch [Access Lock].
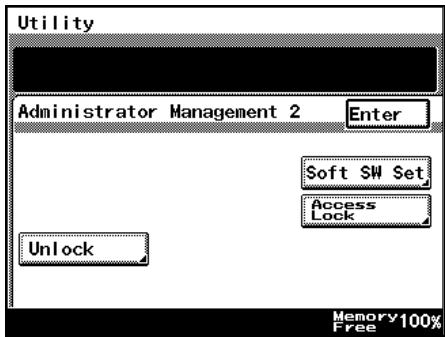
3 To use the "Access Lock" function, touch [ON]. To stop using the "Access Lock" function, touch [OFF].
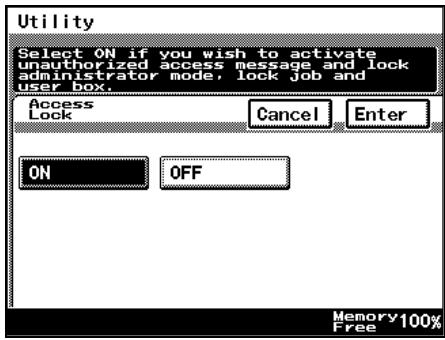
4 Touch [Enter].
- To return to the previous screen, touch [Cancel].
5 Continue touching [Enter] to return to the Utility screen, and then touch [Exit] to return to the Basics screen.
6.7 Configuring Functions (Soft Switches)
Soft switches for functions can be set according to your use.

Note
Do not alter any modes or bits not mentioned in this manual.
| Soft Switching Settings | |
| Mode specification | Specifies the soft switch setting item with 3 digits. |
| Bit specification | An 8-digit number comprising the mode. Each bit from 0 to 7 is specified with a binary number (0 or 1) to configure functions. |
| HEX specification | Allows the functions to be set using hexadecimal numbers (a combination of 0 to 9 and A to F).For example, the bit specification of “0011 0000” would be “30” in hexadecimal. |
Reference: The table below gives some sample bit (binary) and hexadecimal (16-base) equivalents
| Decimal | Bit specification (binary) | HEX specification (hexadecimal) |
| 0 | 0000 0000 | 00 |
| 1 | 0000 0001 | 01 |
| 2 | 0000 0010 | 02 |
| 3 | 0000 0011 | 03 |
| 4 | 0000 0100 | 04 |
| 5 | 0000 0101 | 05 |
| 6 | 0000 0110 | 06 |
| 7 | 0000 0111 | 07 |
| 8 | 0000 1000 | 08 |
| 9 | 0000 1001 | 09 |
| 10 | 0000 1010 | 0A |
| 11 | 0000 1011 | 0B |
| 12 | 0000 1100 | 0C |
| 13 | 0000 1101 | 0D |
| 14 | 0000 1110 | 0E |
| 15 | 0000 1111 | 0F |
| 16 | 0001 0000 | 10 |
| : | : | : |
| 255 | 1111 1111 | FF |
Specifying Settings for Resetting Copy Mode with the Duplexing Document Feeder Installed (Mode 429)
Settings can be specified for the time until Copy mode is reset after a copy job scanned using the duplexing document feeder is finished.
Settings at time of purchase
| Bit | 7 | 6 | 5 | 4 | 3 | 2 | 1 | 0 | |
| Setting | 0 | 0 | 1 | 0 | 0 | 0 | 0 | 0 | (HEX: 00) |
How to Set
The grayed out cells are the settings at the time of purchase.
| Bit | Details | Setting | Explanation |
| 7, 6 | 00 | * Do not change these bits. | |
| 5 | Specifies whether or not Copy mode is reset after a copy job scanned using the duplexing document feeder is finished | 0 | Do not clear |
| 1 | Clear | ||
| 4, 3, 2, 1, 0 | 00000 | * Do not change these bits. |
6.8 Removing Penalties
Unlock
If the “Access Lock” function is set to “ON” and the optional printer controller is installed, the penalty must be removed in order to allow access after incorrect attempts to access lock jobs and user boxes. For more details, refer to the User Manual for the printer controller.
In addition, to allow access after incorrect attempts to access Administrator mode, turn the machine off, then on again.
Appendix
7
7.1 Specifications
Copier Di2510/Di3010/Di3510
| Specification | |
| Type | Desktop |
| Platen | Fixed platen (mirror scanning) |
| Photo conductor | OPC |
| Copying system | Digital laser copying |
| Developing system | MTHG developing method |
| Fusing system | Heat-roller-fixing system |
| Resolution | 600 dpi |
| Document | Types: Sheets, booksSize: Maximum A3 L, Weight: 3 kg |
| Paper types | Plain paper ( 56 g/m^2 to 90 g/m^2 ), recycle paper ( 56 g/m^2 to 90 g/m^2 )Specialty Paper*: thick paper ( 91 g/m^2 to 210 g/m^2 ) overhead projector transparencies, postcards, envelopes, label sheetsCan only be fed through the multiple bypass tray.* Specialty paper can only be used with the multiple bypass tray. |
| Paper sizes | <1st paper drawer, 2nd paper drawer>In metric:A3 L, B4 L, A4 L/C, B5 L/C, A5 LIn inch:Ledger L ( 11 × 17 L ), Legal L ( 8-1/2 × 14 L ),Letter L/C ( 8-1/2 × 11 L/C )(Width: 3-1/2 to 11-3/4 in., Length: 5-1/2 to 17 in.)Multiple bypass tray:A3 L,B4 L, A4 L/C, B5 L/C, A5 L/C, B6 L(Width: 90 mm to 297 mm, Length: 140 mm to 432 mm) |
| Paper capacity | <1st paper drawer, 2nd paper drawer>Plain paper, recycle paper: 550 sheets each. ( 64 g/m^2 )Multiple bypass tray:Plain paper, recycle paper: 150 sheetsSpecialty paper: 50 sheetsEnvelopes: 10 sheets |
| Warm-up time | Less than 17 seconds when the power switch is on, less than 15 seconds when the sub power switch is on. (at room teperature ( 23^ )) |
| First copy | Di3510Less than 4.8 seconds(for A4 C paper loaded into the 1st drawer)Di3010/Di2510Less than 5.3 seconds(for A4 C paper loaded into the 1st drawer) |
| Copy speed | Di3510For A4 C paper loaded into the 1st drawer: 35 sheets/min.(A4 C)Di3010For A4 C paper loaded into the 1st drawer: 30 sheets/min.(A4 C)Di2510For A4 C paper loaded into the 1st drawer: 25 sheets/min.(A4 C) |
| Magnification ratios | Full size: × 1.000Enlargement ratios: × 1.154, × 1.414, × 1.545 and × 2.000Reduction ratios: × 0.816, × 0.707 and × 0.500, minimal (× 0.930)Zoom ratios: × 0.250 to × 4.000 (in × 0.001 increments) |
| Multiple copies | 1 to 999 sheets |
| Density control | Automatic, manual and photo manual |
| Image loss | Leading edge: 4 mm; Trailing edge: 4 mm;Rear edge: 4 mm; Front edge: 4 mm |
| Power requirements | 220-240 V: 10 A 50/60 Hz |
| Power consumption | Less than 1365 W+10% |
| Dimensions | 677 mm (width) × 710 mm (depth) × 718 mm (height) |
| Memory | 64 MB |
| Weight | 74 kg |
Duplexing Document Feeder AFR-19
| Specification | |
| Document feed methods | Plain paper: Single-sided and double-sided documents“Mixed Orig Detection” function: Various sizes of single-sided and double-sided documents |
| Document paper type | Standard method: Plain paper• Single-sided: 35 g/m2 to 128 g/m2• Double-sided: 50 g/m2 to 128 g/m2“Mixed Orig Detection” function: Plain paper (50 g/m2 to 128 g/m2) |
| Document paper size | Plain paper: A3 L, B4 L, A4 L/C, B5 L/C, A5 CMixed document sizes: Refer to the table below. |
| Capacity of document feeder | Maximum 80 sheets (80 g/m2) |
| Power requirements | Supplied by main unit |
| Power consumption | Less than 48 W |
| Dimensions | 582 mm (width) × 558 mm (depth) × 145 mm (height) |
| Weight | Less than 9.4 kg |
Mixed Width Document Sizes
| Specification | |
| Paper type | Plain paper, recycle paper ( 56 g/m^2 to 90 g/m^2 ) |
| Paper size | A3 L, B4 L, A4 L/C, A5 L |
| Power requirements | Supplied by main unit |
| Power consumption | Less than 10 W |
| Dimensions | 89 mm (width) × 419 mm (depth) × 358 mm (height) |
| Weight | About 2.2 kg |
Switchback Unit SB-1
| Specification | |
| Paper type | Plain paper, recycle paper ( 56 g/m^2 to 90 g/m^2 ) |
| Paper size | A3 L, B4 L, A4 L/C, A5 L |
| Power requirements | Supplied by main unit |
| Power consumption | Less than 15 W |
| Dimensions | 338 mm (width) × 481 mm (depth) × 148 mm (height) |
| Weight | About 1.7 kg |
Paper Feed Cabinet PF-124
| Specification | |
| Paper type | Plain paper, recycle paper ( 56 g/m^2 to 90 g/m^2 ) |
| Paper size | A3 L, B4 L, A4 L/C, B5 L/C |
| Paper capacity | 500 sheets ( 80 g/m^2 ) |
| Power requirements | Supplied by main unit |
| Power consumption | Less than 15 W |
| Dimensions | 570 mm (width) × 548 mm (depth) × 263 mm (height) |
| Weight | About 22 kg |
2Way Paper Feed Cabinet PF-210
| Specification | |
| Paper type | Plain paper, recycle paper ( 56 g/m^2 to 90 g/m^2 ) |
| Paper size | A3 L, B4 L, A4 L/C, B5 L/C, A5 L |
| Paper capacity | 500 sheets × 2 drawers (80 g/m^2) |
| Power requirements | Supplied by main unit |
| Power consumption | Less than 15 W |
| Dimensions | 570 mm (width) × 548 mm (depth) × 263 mm (height) |
| Weight | About 27 kg |
Large Capacity Cabinet PF-122
| Specification | |
| Paper type | Plain paper ( 56 g/m^2 to 90 g/m^2 ) |
| Paper size | A4 C |
| Paper capacity | 2,500 sheets ( 80 g/m^2 ) |
| Power requirements | Supplied by main unit |
| Power consumption | Less than 45 W |
| Dimensions | 570 mm (width) × 564 mm (depth) × 263 mm (height) |
| Weight | About 26 kg |
Built in Finisher FN-117
| Specification | |
| Output trays | 1st drawer, 2nd drawer |
| Settings | Normal functions: “Non-sort”, “Sort”, “Sort”/“Staple”, “Group” and “Saddle Staple” settingsHole-punch functions: “Non-sort”/“Punch”, “Sort”/“Punch” and “Sort”/“Staple”/“Punch” settings |
| Paper type | Plain paper (56 g/m ^2 to 90 g/m ^2 )Postcard (190 g/m ^2 )Envelopes, overhead projector transparencies, label sheets. |
| Paper size | A3 L, A4 L/C |
| Paper capacity | 1st drawerPlain paper ( 56 g/m^2 to 90 g/m^2 ) (A4 L or smaller): Maximum 200 sheetsPostcards, envelopes, overhead projector transparencies and label sheets: Maximum 20 sheets2nd drawerPlain paper ( 56 g/m^2 to 90 g/m^2 ) (A4 L or smaller): Maximum 1,000 sheetsB4 L: Maximum 500 sheetsPostcards, envelopes, overhead projector transparencies and label sheets; Maximum 20 sheets |
| “Staple” setting | Densely printed paper: 2 to 50 sheets |
| “Punch” setting (option) | Number of punched holes: 4 |
| Power requirements | Supplied by main unit |
| Power consumption | Less than 66 W |
| Dimensions | 319 (435) mm (width) × 558 mm (depth) × 573 mm (height)(The values within parentheses are the measurements with a media tray installed.) |
| Weight | About 21.4 kg (including the horizontal transport unit) |
| Accessories | 1 staple cartridge MS-5D (5,000 staples) |
Additional Bin Kit AK-1
| Specification | |
| Number of bins | 1 Bin |
| Paper capacity | Plain paper (56 g/m2 to 90 g/m2): Maximum 200 sheets postcards, envelopes, overhead projector transparencies, label sheets: Maximum 20 sheets |
| Dimensions | 282 mm (width) × 368 mm (depth) × 57 mm (height) |
| Weight | About 0.7 kg |
Mail Bin Kit MK-1
| Specification | |
| Number of bins | 4 Bins |
| Paper type | Plain paper, recycle paper ( 56 g/m^2 to 90 g/m^2 ) |
| Paper size | A4 C |
| Paper capacity | Maximum 125 sheets ( 80 g/m^2 ) × 4 |
| Dimensions | 624 mm (width) × 503 mm (depth) × 390 mm (height) |
| Weight | About 8 kg (unit weight), less than 12 kg (gross weight) |
| Power requirements | Supplied by finisher |
Punch Kit PK-6
| Specification | |
| Number of punched holes | 4 Holes |
| Paper type | Plain paper, recycle paper ( 60 g/m^2 to 163 g/m^2 ) |
| Paper size | A3 L, A4 C |
| Power requirements | Supplied by finisher |
| Dimensions | 114 mm (width) × 461 mm (depth) × 136 mm (height) |
| Weight | About 1.9 kg |
Saddle Kit SK-1
| Specification | |
| Number of bins | 1 Bin |
| Paper type | Plain paper, recycle paper (56 g/m2 to 90 g/m2) |
| Paper size | A3 L, A4 L |
| Paper capacity | Plain paper (56 g/m2 to 90 g/m2): 200 sheets |
| “Staple” setting | Densely printed paper: 2 to 15 sheets |
| Dimensions | 445 (576) mm (width) × 203 (281) mm (depth) × 478 mm (height)(The values within parentheses are the measurements with a media tray installed.) |
| Weight | 9.3 kg |
| Accessories | 1 staple cartridge MS-2C (2,000 staples) |
| Power requirements | Supplied by finisher |
Job Separator JS-203
| Specification | |
| Number of bins | 1 Bin (considering the trays of the copier as 2 bins) |
| Paper type | Plain paper, recycle paper ( 56 g/m^2 to 90 g/m^2 )Speciality paper: thick paper ( 91 g/m^2 to 210 g/m^2 ), overhead projector transparencies, postcards, envelopes, label sheets) |
| Paper size | A3 L, A4 L/C |
| Paper capacity | JS-203100 sheets ( 80 g/m^2 )Copy output tray250 sheets ( 80 g/m^2 ) |
| Dimensions | 450 mm (width) × 443 mm (depth) × 75 mm (height) |
| Weight | About 1.7 kg |
7.2 Care of the Copier
Cleaning
Set the power switch of the copier to "O" before cleaning it.
Housing cover
→ Clean the surface of the housing cover by wiping it with a soft cloth dampened with a mild household detergent.

natural_image
Line drawing of a hand inserting a component into a computer monitor (no text or symbols)Original glass
→ Clean the original glass by wiping it with a soft, dry cloth.
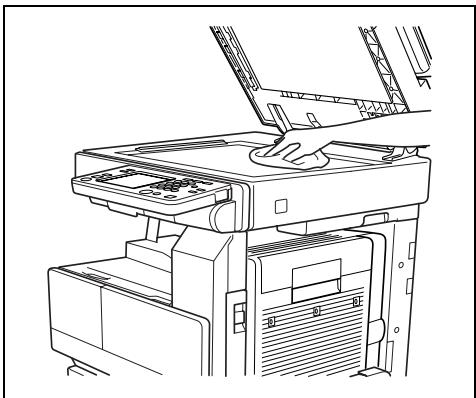
natural_image
Line drawing of a printer with an open lid and internal components (no text or symbols)Operation panel
→ Clean the operation panel by wiping it with a soft, dry cloth.

Note
Pressing too hard on the operation panel or the touch panel may damage them. In addition, never use mild household detergent or glass cleaner to clean the operation panel or touch panel.
natural_image
Technical line drawing of a mechanical assembly with no visible text or symbolsOriginal glass
→ Clean the original glass by wiping it with a soft, dry cloth.
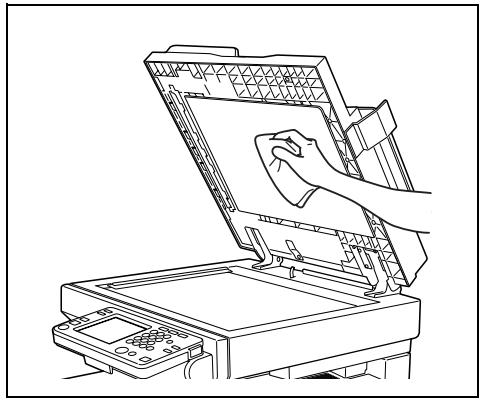
natural_image
Line drawing of a printer with a hand cleaning the cover (no text or symbols)7.3 Function Combination Table
| 1 | 2 | 3 | 3 | 3 | 7 | 9 | 12 | ||||||
| Setting selected first | Paper | ||||||||||||
| Setting selected later | Auto Paper | ||||||||||||
| Number of copies | Number of copies | Number of copies | Number of copies | Number of copies | Number of copies | Number of copies | Number of copies | Number of copies | Number of copies | Number of copies | Number of copies | ||
| 9 | Zoom | Paper drawer (*1) | Multiple bypass tray (OHP) | Multiple bypass tray (thick paper) | Multiple bypass tray (envelopes) | Multiple bypass tray (plain paper) | Single-sided only paper | Paper drawer (*1) | Multiple bypass tray (OHP) | Multiple bypass tray (thick paper) | Multiple bypass tray (envelopes) | Multiple bypass tray (plain paper) | Single-sided only paper |
| 12 | Single-sided only paper | Auto Paper | Multiple bypass tray (thick paper) | Multiple bypass tray (envelopes) | Multiple bypass tray (plain paper) | Single-sided only paper | Single-sided only paper | Auto Paper | Multiple bypass tray (thick paper) | Multiple bypass tray (envelopes) | Multiple bypass tray (plain paper) | Single-sided only paper | Single-sided only paper |
| 12 | Number setting | Auto Paper | Paper drawer (*1) | Multiple bypass tray (OHP) | Multiple bypass tray (thick paper) | Multiple bypass tray (envelopes) | Single-sided only paper | Auto Paper | Paper drawer (*1) | Multiple bypass tray (OHP) | Multiple bypass tray (thick paper) | Multiple bypass tray (envelopes) | Single-sided only paper |
| 12 | Number setting | Auto Paper | Paper drawer (*1) | Multiple bypass tray (OHP) | Multiple bypass tray (thick paper) | Multiple bypass tray (envelopes) | Single-sided only paper | Auto Paper | Paper drawer (*1) | Multiple bypass tray (OHP) | Multiple bypass tray (thick paper) | Multiple bypass tray (envelopes) | Single-sided only paper |
| 12 | Auto Paper | Auto Paper | Paper drawer (*1) | Multiple bypass tray (OHP) | Multiple bypass tray (thick paper) | Multiple bypass tray (envelopes) | Single-sided only paper | Auto Paper | Paper drawer (*1) | Multiple bypass tray (OHP) | Multiple bypass tray (thick paper) | Multiple bypass tray (envelopes) | Single-sided only paper |
| 12 | Auto Paper | Auto Paper | Paper drawer (*1) | Multiple basis tray (OHP) | Multiple basis tray (thick paper) | Multiple basis tray (envelopes) | Single-sided only paper | Auto Paper | Paper drawer (*1) | Multiple basis tray (OHP) | Multiple basis tray (thick paper) | Multiple basis tray (envelopes) | Single-sided only paper |
| 12 | Auto Paper | Auto Paper | Paper drawer (*1) | Multiple basis tray (OHP) | Multiple basis tray (thick paper) | Multiple basis tray (envelopes) | Single-sided only paper | Auto Paper | Paper drawer (*1) | Multiple basis tray (OHP) | Multiple basis tray (thick paper) | Multiple basis tray (envelopes) | Single-sided only paper. |
| 12 | Auto Paper | Auto Paper | Paper drawer (*1) | Multiple basis tray (OHP) | Multiple basis tray (thick paper) | Multiple basis tray (envelopes) | Single-sided only paper | Auto Paper | Paper drawer (*1) | Multiple basis tray (OHP) | Multiple basis tray (thick paper) | Multiple basis tray (envelopes) | Single-sided only paper. |
| 12 | Auto Paper | Auto paper | Paper drawer (*1) | Multiple basis tray (OHP) | Multiple basis tray (thick paper) | Multiple basis tray (envelopes) | Single-sided only paper | Auto Paper | Paper drawer (*1) | Multiple basis tray (OHP) | Multiple basis tray (thick paper) | Multiple basis tray (envelopes) | Single-sided only paper. |
| 12 | Auto Paper | Auto paper | Paper drawer (*1) | Multiple basis tray(OHP) | Multiple basis tray (OHP) | Multiple basis tray (thick paper) | Single-sided only paper | Auto Paper | Paper drawer (*1) | Multiple basis tray (OHP) | Multiple basis tray (thick paper) | Multiple basis tray (envelopes) | Single-sided only paper. |
| 12 | Auto Paper | Auto paper | Paper drawer (*1) | Multiple basis tray(OHP) | Multiple basis tray (OHP) | Multiple basis tray (thick paper) | Single-sided only paper | Auto Paper | Paper drawer(*1) | Multiple basis tray (OHP) | Multiple basis tray (thick paper) | Multiple basis tray (envelopes) | Single-sided only paper. |
| 12 | Auto Paper | Auto paper | Paper drawer (*1) | Multiple basis tray(OHP) | Multiple basis tray (OHP) | Multiple basis tray (thick paper) | Single-sided only paper | Auto Paper | Paper drawer (*1) | Multiple basis tray (OHP) | Multiple bypass tray (OHP) | Multiple basis tray (thick paper) | Single-sided only paper. |
| 12 | Auto Paper | Auto paper | Paper drawer (*1) | Multiple basis tray(OHP) | Multiple basis tray (OHP) | Multiple basis tray (thick paper) | Single-sided only paper | Auto Paper | Paper drawer (*1) | Multiple basis tray (OHP) | Multiple basis tray (thick paper) | Multiple basis tray (envelopes) | Single-sided only paper. |
| 12* | Auto Paper | Auto paper | Paper drawer (*1) | Multiple basis tray(OHP) | Multiple basis tray (OHP) | Multiple basis tray (thick paper) | Single-sided only paper | Auto Paper | Paper drawer (*1) | Multiple basis tray (OHP) | Multiple basis tray (thick paper) | Multiple basis tray (envelopes) | Single-sided only paper. |
| 12* | Auto Paper | Auto paper | Paper drawer (*1)* | Multiple basis tray(OHP) | Multiple basis tray (OHP) | Multiple basis tray (thick paper) | Single-sided only paper | Auto Paper | Paper drawer (*1)* | Multiple basis tray (OHP) | Multiple basis tray (thick paper) | Multiple basis tray (envelopes) | Single-sided only paper. |
| 12* | Auto Paper | Auto paper | Paper drawer (*1)* | Multiple basis tray(OHP) | Multiple basis tray (OHP) | Multiple basis tray (thick paper) | Single-sided only paper | Auto Paper | Paper drawer (*1)* | Multiple basis tray (OHP) | Multiple basis trays (OHP) | Multiple basis tray (thick paper) | Single-sided only paper. |
| 12* | Auto Paper | Auto paper | Paper drawer (*1)* | Multiple basis tray(OHP) | Multiple basis tray (OHP) | Multiple basis tray (thick paper) | Single-sided only paper | Auto Paper | Paper drawer (*1)* | Multiple basis tray (OHP) | Multiple basis tray (thick paper) | Multiple basis tray (envelopes) | Single-sided only paper. |
| 11* | Auto Paper | Auto paper | Paper drawer (*1)* | Multiple basis tray(OHP) | Multiple basis tray (OHP) | Multiple basis tray (thick paper) | Single-sided only paper | Auto Paper | Paper drawer (*1)* | Multiple basis tray (OHP) | Multiple basis tray (thick paper) | Multiple basis tray (envelopes) | Single-sided only paper. |
| 11* | Auto Paper | Auto paper | Paper drawer (*2)* | Multiple basis tray(OHP) | Multiple basis tray (OHP) | Multiple basis tray (thick paper) | Single-sided only paper | Auto Paper | Paper drawer (*2)* | Multiple basis tray (OHP) | Multiple basis tray (thick paper) | Multiple basis tray (envelopes) | Single-sided only paper. |
| 11* | Auto Paper | Auto paper | Paper drawer (*2)* | Multiple basis tray(OHP) | Multiple basis tray (OHP) | Multiple basis tray (thick paper) | Single-sided only paper | Auto Paper | Paper drawer (*2)* | Multiple basis tray (OHP) | Multiple bypass tray (OHP) | Multiple bypass tray (thick paper) | Single-sided only paper. |
| 11* | Auto Paper | Auto paper | Paper drawer (*2)* | Multiple basis tray(OHP) | Multiple basis tray (OHP) | Multiple basis tray (thick paper) | Single-sided only paper | Auto Paper | Paper drawer (*2)* | Multiple bypass tray (OHP) | Multiple bypass tray (thick paper) | Multiple bypass tray (envelopes) | Single-sided only paper. |
| 11* | Auto Paper | Auto paper | Paper drawer (*2)* | Multiple basis tray(OHP) | Multiple basis tray (OHP) | Multiple basis tray (thick paper) | Single-sided only paper | Auto Paper | Paper drawer (*2)* | Multiple bypass tray (OHP) | Multiple bypass tray (thick paper) | Multiple bypass tray (envelopes) | Single-sided only paper. |
| Settingselectedfirst | 26 | 29 | 30 | Finishing | Auxiliary | ||
| 1 | Paper | Number/notes | Auto Paper | Double-4in1 | 4 | ||
| Booklet Creation | 5 | ||||||
| Mixed Orig Detection | 6 | ||||||
| Original Orientation (*b) | 7 | ||||||
| Margin (*b) | 8 | ||||||
| 9 | Zoom | Density | Auto | 1 | 0 | ||
| Multiple bypass tray (OHP) | 9 | ||||||
| Multiple bypass tray (thick paper) | 10 | ||||||
| Multiple bypass tray (envelopes) | 11 | ||||||
| Multiple bypass tray (plain paper) | 12 | ||||||
| Single-sided only paper | 13 | ||||||
| Single-sided only paper | 14 | ||||||
| Single-sided only paper | 15 | ||||||
| Single-sided only paper | 16 | ||||||
| Single-sided only paper | 17 | ||||||
| Single-sided only paper | 18 | ||||||
| Single-sided only paper | 19 | ||||||
| Single-sided only paper | 20 | ||||||
| Single-sided only paper | 21 | ||||||
| Single-sided only paper | 22 | ||||||
| Single-sided only paper | 23 | ||||||
| Single-sided only paper | 24 | ||||||
| Single-sided only paper | 25 | ||||||
| Single-sided only paper | 26 | ||||||
| Single-sided only paper | 27 | ||||||
| Single-sided only paper | 28 | ||||||
| Single-sided only paper | 29 | ||||||
| Single-sided only paper | 30 | ||||||
| Single-sided only paper | 31 | ||||||
| Single-sided only paper | 32 | ||||||
| Single-sided only paper | 33 | ||||||
| Single-sided only paper | 34 | ||||||
| Single-sided only paper | 35 | ||||||
| Single-sided only paper | 36 | ||||||
| Single-sided only paper | 37 | ||||||
| Single-sided only paper | 38 | ||||||
| Single-sided only paper | 39 | ||||||
| Single-sided only paper | 40 | ||||||
| Single-sided only paper | 41 | ||||||
| Single-sided only paper | 42 | ||||||
| Single-sided only paper | 43 | ||||||
| Single-sided only paper | 44 | ||||||
| Single-sided only paper | 45 | ||||||
| Single-sided only paper | 46 | ||||||
| Single-sided only paper | 47 | ||||||
| Single-sided only paper | 48 | ||||||
| Single-sided only paper | 49 | ||||||
| Single-sided only paper | 50 | ||||||
| Single-sided only paper | 51 | ||||||
| Single-sided only paper | 52 | ||||||
| Single-sided only paper | 53 | ||||||
| Single-sided only paper | 54 | ||||||
| Single-sided only paper | 55 | ||||||
| Single-sided only paper | 56 | ||||||
| Single-sided only paper | 57 | ||||||
| Single-sided only paper | 58 | ||||||
| Single-sided only paper | 59 | ||||||
| Single-sided only paper | 60 | ||||||
| Single-sided only paper | 61 | ||||||
| Single-sided only paper | 62 | ||||||
| Single-sided only paper | 63 | ||||||
| Single-sided only paper | 64 | ||||||
| Single-sided only paper | 65 | ||||||
| Single-sided only paper | 66 | ||||||
| Single-sided only paper | 67 | ||||||
| Single-sided only paper | 68 | ||||||
| Single-sided only paper | 69 | ||||||
| Single-sided only paper | 70 | ||||||
| Single-sided only paper | 71 | ||||||
| Single-sided only paper | 72 | ||||||
| Single-sided only paper | 73 | ||||||
| Single-sided only paper | 74 | ||||||
| Single-sided only paper | 75 | ||||||
| Single-sided only paper | 76 | ||||||
| Single-sided only paper | 77 | ||||||
| Single-sided only paper | 78 | ||||||
| Single-sided only paper | 79 | ||||||
| Single-sided only paper | 80 | ||||||
| Single-sided only paper | 81 | ||||||
| Single-sided only paper | 82 | ||||||
| Single-sided only paper | 83 | ||||||
| Single-sided only paper | 84 | ||||||
| Single-sided only paper | 85 | ||||||
| Single-sided only paper | 86 | ||||||
| Single-sided only paper | 87 | ||||||
| Single-sided only paper | 88 | ||||||
| Single-sided only paper | 89 | ||||||
| Single-sided only paper | 90 | ||||||
| Single-sided only paper | 91 | ||||||
| Single-sided only paper | 92 | ||||||
| Single-sided only paper | 93 | ||||||
| Single-sided only paper | 94 | ||||||
| Single-sided only paper | 95 | ||||||
| Single-sided only paper | 96 | ||||||
| Single-sided only paper | 97 | ||||||
| Single-sided only paper | 98 | ||||||
| Single-sided only paper | 99 | ||||||
| Single-sided only paper | 100 | ||||||
| Single-sided only paper | 101 | ||||||
| Single-sided only paper | 102 | ||||||
| Single-sided only paper | 103 | ||||||
| Single-sided only paper | 104 | ||||||
| Single-sided only paper | 105 | ||||||
| Single-sided only paper | 106 | ||||||
| Single-sided only paper | 107 | ||||||
| Single-sided only paper | 108 | ||||||
| Single-sided only paper | 109 | ||||||
| Single-sided only paper | 110 | ||||||
| Single-sided only paper | 111 | ||||||
| Single-sided only paper | 112 | ||||||
| Single-sided only paper | 113 | ||||||
| Single-sided only paper | 114 | ||||||
| Single-sided only paper | 115 | ||||||
| Single-sided only paper | 116 | ||||||
| Single-sided only paper | 117 | ||||||
| Single-sided only paper | 118 | ||||||
| Single-sided only paper | 119 | ||||||
| Single-sided only paper | 120 | ||||||
| Single-sided only paper | 121 | ||||||
| Single-sided only paper | 122 | ||||||
| Single-sided only paper | 123 | ||||||
| Single-sided only paper | 124 | ||||||
| Single-sided only paper | 125 | ||||||
| Single-sided only paper | 126 | ||||||
| Single-sided only paper | 127 | ||||||
| Single-sided only paper | 128 | ||||||
| Single-sided only paper | 129 | ||||||
| Single-sided only paper | 130 | ||||||
| Single-sided only paper | 131 | ||||||
| Single-sided only paper | 132 | ||||||
| Single-sided only paper | 133 | ||||||
| Single-sided only paper | 134 | ||||||
| Single-sided only paper | 135 | ||||||
| Single-sided only paper | 136 | ||||||
| Single-sided only paper | 137 | ||||||
| Single-sided only paper | 138 | ||||||
| Single-sided only paper | 139 | ||||||
| Single-sided only paper | 140 | ||||||
| Single-sided only paper | 141 | ||||||
| Single-sided only paper | 142 | ||||||
| Single-sided only paper | 143 | ||||||
| Single-sided only paper | 144 | ||||||
| Single-sided only paper | 145 | ||||||
| Single-sided only paper | 146 | ||||||
| Single-sided only paper | 147 | ||||||
| Single-sided only paper | 148 | ||||||
| Single-sided only paper | 149 | ||||||
| Single-sided only paper | 150 | ||||||
| Single-sided only paper | 151 | ||||||
| Single-sided only paper | 152 | ||||||
| Single-sided only paper | 153 | ||||||
| Single-sided only paper | 154 | ||||||
| Single-sided only paper | 155 | ||||||
| Single-sided only paper | 156 | ||||||
| Single-sided only paper | 157 | ||||||
| Single-sided only paper | 158 | ||||||
| Single-sided only paper | 159 | ||||||
| Single-sided only paper | 160 | ||||||
| Single-sided only paper | 161 | ||||||
| Single-sided only paper | 162 | ||||||
| Single-sided only paper | 163 | ||||||
| Single-sided only paper | 164 | ||||||
| Single-sided only paper | 165 | ||||||
| Single-sided only paper | 166 | ||||||
| Single-sided only paper | 167 | ||||||
| Single-sided only paper | 168 | ||||||
| Single-sided only paper | 169 | ||||||
| Single-sided only paper | 170 | ||||||
| Single-sided only paper | 171 | ||||||
| Single-sided only paper | 172 | ||||||
| Single-sided only paper | 173 | ||||||
| Single-sided only paper | 174 | ||||||
| Single-sided only paper | 175 | ||||||
| Single-sided only paper | 176 | ||||||
| Single-sided only paper | 177 | ||||||
| Single-sided only paper | 178 | ||||||
| Single-sided only paper | 179 | ||||||
| Single-sided only paper | 180 | ||||||
| Single-sided only paper | 181 | ||||||
| Single-sided only paper | 182 | ||||||
| Single-sided only paper | 183 | ||||||
| Single-sided only paper | 184 | ||||||
| Single-sided only paper | 185 | ||||||
| Single-sided only paper | 186 | ||||||
| Single-sided only paper | 187 | ||||||
| Single-sided only paper | 188 | ||||||
| Single-sided only paper | 189 | ||||||
| Single-sided only paper | 190 | ||||||
| Single-sided only paper | 191 | ||||||
| Single-sided only paper | 192 | ||||||
| Single-sided only paper | 193 | ||||||
| Single-sided only paper | 194 | ||||||
| Single-sided only paper | 195 | ||||||
| Single-sided only paper | 196 | ||||||
| Single-sided only paper | 197 | ||||||
| Single-sided only paper | 198 | ||||||
| Single-sided only paper | 199 | ||||||
| Single-sided only paper | 200 |
| 47 | 44 | 43 | |||||||||||||||||
O: The functions can be combined.
—: The functions cannot be combined. Later functions cannot be set.
△: The function set last has priority. No warning message will appear. The function set first will be cancelled.
▲: When making double-sided copies from single-sided documents, later functions cannot be set and a warning message appears.
\ :This is not a satisfactory combination since the first function is cancelled when other required simultaneous settings are specified. In addition, the other simultaneous settings are required for the setting selected later.
①: The function set first has priority. A warning message will appear. Later functions cannot be set.
②: The "Auto Size" Zoom setting is selected.
③: The “Sort” setting is automatically selected.
④: The zoom setting specified using the “Multiple-in-1 and Booklet Copy Zoom” function on the User’s Choice screen is recalled.
⑤: The function selected first is not performed.
⑥: The function selected later is not performed.
⑦: The zoom setting specified using the “Multiple-in-1 and Booklet Copy Zoom” function on the User’s Choice screen is recalled.
⑧: The “2-Point Staple” setting is automatically changed to the “Center Staple” setting. The “Corner Staple” setting cannot be selected.
⑨: These functions cannot be selected if the document is fed through the duplexing document feeder. The function set first has priority. No warning message will appear. The function selected later is not performed.
⑩: These functions cannot be selected if the document is fed through the duplexing document feeder. The function set later has priority. No warning message will appear. The function selected first is not performed.
⑪: The setting changes according to the setting specified from the User's Choice screen.
⑫: The settings can be specified, but the function selected first is not performed.
⑬: The settings can be specified, but the function selected later is not performed.
⑭: This setting cannot be selected since the “Booklet Creation” setting is not selected.
^ a: The function selected first is not performed if documents of mixed sizes are being copied. ( ^2 )
*b: The function selected later is not performed if documents of mixed sizes are being copied. (*2)
⑰: This setting cannot be selected since the “Booklet Creation” setting is selected.
⑱:This setting cannot be selected since the “Book” setting is selected.
⑲: This setting cannot be selected since the “Book” setting cannot be selected.
■: A warning message should appear.
■: The settings can be selected, but either the function will automatically be cancelled or the function is not performed.
7.4 Paper Size and Zoom Ratio Tables
Paper Sizes
| Paper Format | Metric Size | English Size |
| A3 Wide | 311 mm × 457 mm | 12-1/4 in. × 18 in. |
| A3 | 297 mm × 420 mm | 11-3/4 in. × 16-1/2 in. |
| A4 | 210 mm × 297 mm | 8-1/4 in. × 11-3/4 in. |
| A5 | 148 mm × 210 mm | 5-3/4 in. × 8-1/4 in. |
| A6 | 105 mm × 148 mm | 4-1/4 in. × 5-3/4 in. |
| B4 | 257 mm × 364 mm | 10 in. × 14-1/4 in. |
| B5 | 182 mm × 257 mm | 7-1/4 in. × 10 in. |
| B6 | 128 mm × 182 mm | 5 in. × 7-1/4 in. |
| Paper Format | English Size | Metric Size | |
| Ledger | 11 in. × 17 in. | 279 mm × 432 mm | |
| 11 in. × 14 in. | 11 in. × 14 in. | 279 mm × 356 mm | |
| Computer | 10-1/8 in. × 14 in. | 257 mm × 356 mm | |
| 10 in. × 14 in. | 10 in. × 14 in. | 254 mm × 356 mm | |
| 9-1/4 in. × 14 in. | 9-1/4 in. × 14 in. | 236 mm × 356 mm | |
| Legal | 8-1/2 in. × 14 in. | 216 mm × 356 mm | |
| Foolscap | Government Legal | 8-1/2 in. × 13 in. | 216 mm × 330 mm |
| Foolscap | 8 in. × 13 in. | 203 mm × 330 mm | |
| Foolscap | 8-2/3 in. × 13 in. | 220 mm × 330 mm | |
| Foolscap | Folio | 8-1/4 in. × 13 in. | 210 mm × 330 mm |
| 8-1/4 in. × 11-3/4 in. | 8-1/4 in. × 11-3/4 in. | 210 mm × 301 mm | |
| Letter | 8-1/2 in. × 11 in. | 216 mm × 279 mm | |
| Government Letter | 8 in. × 10-1/2 in. | 203 mm × 267 mm | |
| Quarto | 8 in. × 10 in. | 203 mm × 254 mm | |
| Statement | Invoice | 5-1/2 in. × 8-1/2 in. | 140 mm × 216 mm |
| 4 in. × 6 in. | 4 in. × 6 in. | 102 mm × 152 mm | |
Zoom Ratios
| Metric Sizes | ||
| Document Paper Size | Desired Paper Size | Zoom Ratio |
| A3297 mm × 420 mm11-3/4 in. × 16-1/2 in. | A4 | ×0.707 |
| A5 | ×0.500 | |
| B4 | ×0.866 | |
| B5 | ×0.610 | |
| A4210 mm × 297 mm8-1/4 in. × 11-3/4 in. | A5 | ×0.707 |
| A6 | ×0.500 | |
| B5 | ×0.866 | |
| B6 | ×0.610 | |
| A3 | ×1.414 | |
| B4 | ×1.224 | |
| A5148 mm × 210 mm5-3/4 in. × 8-1/4 in. | A6 | ×0.707 |
| B6 | ×0.866 | |
| A4 | ×1.414 | |
| A3 | ×2.000 | |
| B4 | ×1.733 | |
| B5 | ×1.224 | |
| A6105 mm × 148 mm4-1/4 in. × 5-3/4 in. | A4 | ×2.000 |
| A5 | ×1.414 | |
| B5 | ×1.733 | |
| B6 | ×1.224 | |
| B4257 mm × 364 mm10 in. × 14-1/4 in. | A4 | ×0.816 |
| A5 | ×0.577 | |
| B5 | ×0.707 | |
| B6 | ×0.500 | |
| A3 | ×1.154 | |
| B5182 mm × 257 mm7-1/4 in. × 10 in. | A5 | ×0.816 |
| A6 | ×0.577 | |
| B6 | ×0.707 | |
| A3 | ×1.640 | |
| A4 | ×1.154 | |
| B4 | ×1.414 | |
| B6128 mm × 182 mm5 in. × 7-1/4 in. | A6 | ×0.816 |
| A4 | ×1.640 | |
| A5 | ×1.154 | |
| B4 | ×2.000 | |
| B5 | ×1.414 | |
| English Sizes | ||
| Document Paper Size | Desired Paper Size | Zoom Ratio |
| Ledger11 in. × 17 in.279.4 mm × 431.8 mm | 11 in. × 14 in. | × 0.823 |
| Legal | × 0.722 | |
| Foolscap | × 0.764 | |
| Letter | × 0.647 | |
| Invoice | × 0.500 | |
| 11 in. × 15 in.279.4 mm × 381 mm | 11 in. × 14 in. | × 0.933 |
| Legal | × 0.772 | |
| Foolscap | × 0.772 | |
| Letter | × 0.733 | |
| Invoice | × 0.500 | |
| 11 in. × 14 in.279.4 mm × 355.6 mm | Legal | × 0.772 |
| Foolscap | × 0.772 | |
| Letter | × 0.772 | |
| Invoice | × 0.500 | |
| Legal8-1/2 in. × 14 in.215.9 mm × 355.6 mm | Foolscap | × 0.928 |
| Letter | × 0.785 | |
| Invoice | × 0.607 | |
| 11 in. × 17 in. | × 1.214 | |
| Foolscap8-1/2 in. × 13 in.215.9 mm × 330.2 mm | Letter | × 0.846 |
| Invoice | × 0.647 | |
| 11 in. × 17 in. | × 1.294 | |
| 11 in. × 14 in. | × 1.076 | |
| Letter8-1/2 in. × 11 in.215.9 mm × 279.4 mm | Invoice | × 0.647 |
| 11 in. × 17 in. | × 1.294 | |
| 11 in. × 14 in. | × 1.272 | |
| Invoice5-1/2 in. × 8-1/2 in.139.7 mm × 215.9 mm | 11 in. × 17 in. | × 2.000 |
| 11 in. × 14 in. | × 1.647 | |
| Legal | × 1.545 | |
| Foolscap | × 1.529 | |
| Letter | × 1.294 | |
Zoom ratio = Paper size/Document size
1 in. (inch) = 25.4 mm
1 mm = 0.0394 in. (inch)
7.5 Consumables
In order to maintain the condition of this machine, the following consumables are needed.
For best copy quality, we recommend that the specified supplies be used.
For information on or for purchasing supplies, contact your nearest technical representative.
Paper
In addition to plain paper, thick paper and overhead projector transparencies are also available.

Note
In order to protect unwrapped paper from humidity, keep it in a plastic bag and stored in a cool, dark location.
natural_image
Line drawing of a 3D rectangular box with cutouts and edges (no text or symbols)Toner Bottle
Toner is the black powder used to create the text and lines.

Note
Only use toner that has been manufactured specifically for this copier.
Do not throw away the used toner cartridges. Instead, keep them in their boxes to be collected by your service representative.

natural_image
Simple line drawing of a cylindrical object with segmented ends and a small circular mark on the side (no text or symbols)Staple Cartridges
MS-5D for the finisher
Staples for staple binding
5,000 staples are provided in the staple cartridge.
natural_image
Technical line drawing of a mechanical component with no visible text or symbolsMS-2C for the saddle kit
Staples for staple binding
2,000 staples are provided in the staple cartridge.
natural_image
Pure mechanical diagram showing a clamping device with no text or symbolsIndex
8
8.1 Index
Numerics
2way Paper feed cabinet 7-6
A
Account management 6-11
Account registration 6-17
Additional bin kit 7-7
Administrator code 6-7
Administrator management 6-2
Administrator settings 6-7
Auto panel reset 5-18
Auto paper 5-11
Auto size 5-11
B
Black-White reverse 4-22
Built in finisher 7-6
C
Care of the copier 7-9
Consumables 7-21
Copy program 5-35
Cover mode 4-2, 4-3
Crease/Center staple 5-29
D
Date and time 6-4
Density 5-21, 5-23
Distribution # 4-16
Drawer priority 5-12
Duplex unit 7-5
Duplexing document feeder 7-4
E
Edge/Frame erase 4-12, 4-13
Energy save mode 5-15
F
File margin 4-10
Function combination table 7-11
|
ID key 5-19
Image repeat 4-14
Image stamp 5-31
Image stamping 4-20
Initial settings 6-4
Installation site 3-2
J
Job separator 7-8
L
Landscape 1-5
Language selected 5-9
Large capacity cabinet 7-6
LCD back-light off 5-17
Legal restrictions on copying 3-7
M
Mail bin kit 7-7
Memory recall 5-7
Meter count 5-34
Mixed original detection 5-8
Mixed width document sizes 7-4
Multiple-in-1
2in1 copy 5-14
4in1 copy 5-14, 5-20
0
OHP Interleaving 4-7
Operating environment 3-4
Operation precautions 3-4
Output tray 5-26
P
Page insertion 4-5, 4-6
Panel cleaning 5-39
Paper 7-21
Paper feed cabinet 7-5
Paper feeding 1-4
Paper orientation 1-5
Paper sizes 7-17
Paper supply 1-6
Plug-in counter 5-19
Portrait 1-5
Power source 3-2
Punch kit 7-8
S
Saddle kit 7-8
Scanner dry 5-28
Separate scan 4-23
Sleep mode 5-16
Soft switches 6-24
Space requirements 3-3
Special paper 5-13
Specifications 7-2
Specify the date and time 6-4
Staple cartridges 7-22
Switchback unit 7-5
T
Time zone 6-5
Toner bottle 7-21
Toner replenisher 5-40
U
Unlock 6-26
User management 5-38
Utility mode 5-2
W
Watermark 4-18
Z
Zoom ratios 7-18
- For the preservation of forests, this manual was made using bagasse (sugar cane fibers used in the production of wood-free paper).
- For the protection of the global environment and human welfare, this manual was printed using soy ink.

natural_image
Blue circular logo with horizontal white stripes (no text or symbols)KONICA MINOLTA
Copyright
2003
KONICA MINOLTA BUSINESS TECHNOLOGIES, INC.
Printed in Japan
The information contained in this manual is subject to change without notice to incorporate improvements made on the product or products the manual covers.