
MF2838 - Multifunction Printer KONICA MINOLTA - Free user manual and instructions
Find the device manual for free MF2838 KONICA MINOLTA in PDF.
| Product type | Monochrome laser multifunction printer |
| Brand | KONICA MINOLTA |
| Model | MF2838 |
| Dimensions (W x D x H) | 410 x 375 x 330 mm |
| Weight | 10.5 kg |
| Power supply | 220-240 V, 50/60 Hz |
| Power consumption | Operating: 500 W max, standby: 10 W |
| Main functions | Print, copy, scan, fax |
| Printing technology | Monochrome laser |
| Print speed | Up to 28 pages per minute (A4) |
| Print resolution | Up to 1200 x 1200 dpi |
| Standard paper capacity | 250 sheets (main tray) |
| Monthly duty cycle | Up to 20,000 pages |
| Toner cartridge type | TN-238 (black) |
| System compatibility | Windows, macOS, Linux |
| Maintenance and cleaning | Clean the exterior with a soft, dry cloth. Use the cleaning function in the printer's settings. |
| Safety | Auto shut-off, control panel lock, CE compliance |
| Spare parts and repairability | Consumables available (toner, drum). Spare parts from authorized dealers. |
| General information | Compact multifunction printer suitable for small and medium-sized businesses. |
Frequently Asked Questions - MF2838 KONICA MINOLTA
User questions about MF2838 KONICA MINOLTA
0 question about this device. Answer the ones you know or ask your own.
Ask a new question about this device
Download the instructions for your Multifunction Printer in PDF format for free! Find your manual MF2838 - KONICA MINOLTA and take your electronic device back in hand. On this page are published all the documents necessary for the use of your device. MF2838 by KONICA MINOLTA.
USER MANUAL MF2838 KONICA MINOLTA
Minoltafax 2800/3800
User Manual
Quick reference Minoltafax 2800/3800
| Function | Keys |
| Entering numbers | |
| One touch | [SET] + [1] + one touch |
| Speed dial | [SET] + [2] + speed dial |
| Group dial | [SET] + [3] + one touch |
| Program dial | [SET] + [4] + one touch |
| Batch transmission | [SET] + [5] + one touch |
| Set relay box | [SET] + [6] |
| Send | |
| Memory transmission | [START] |
| Direct transmission | [SPEAKER] + [START] |
| Default setting transmission | [SET] + 2x [V/PIN CODE] + [1] |
| Timer transmission | [FUNCTION] + [2] |
| Broadcast | [FUNCTION] + [1] |
| Relay transmission | [FUNCTION] + [8] |
| Polling TX | [FUNCTION] + [6] |
| Mailbox TX | [FUNCTION] + [3] |
| Forwarding | [SET] + 2x [V/PIN CODE] + [3] |
| Closed network | [SET] + 2x [V/PIN CODE] + [2] |
| Delete schedule | [SCHEDULE] + [NO] |
| Reception | |
| Default settings | [SET] + 3x [V/PIN CODE] + [7] |
| Setting memory reception | [SET] + 3x [V/PIN CODE] + [1] |
| Printing memory reception | [FUNCTION] + [5] |
| Mailbox reception | [SET] + 3x [V/PIN CODE] + [5] |
| Printing mailbox | [FUNCTION] + [4] |
| Polling reception | [FUNCTION] + [7] |
| Group polling | [SET] + 3x [V/PIN CODE] + [9] |
| Setting rings | [SET] + 3x [V/PIN CODE] + [2] |
| Multi page print | [SET] + 3x [V/PIN CODE] + [3] |
| Reduction | [SET] + 3x [V/PIN CODE] + [4] |
Quick reference Minoltafax 2800/3800
| Function | Keys |
| User data | |
| Date & time | [SET] + 6x [V/PIN CODE] + [1] |
| Fax number | [SET] + 6x [V/PIN CODE] + [2] |
| User name | [SET] + 6x [V/PIN CODE] + [3] |
| Department number | [SET] + 6x [V/PIN CODE] + [4] |
| Scanning and printing | |
| Resolution | [SET] + [V/PIN CODE] + [1] |
| Contrast | [SET] + [V/PIN CODE] + [2] |
| Image density | [SET] + [V/PIN CODE] + [3] |
| Reduction | [SET] + [V/PIN CODE] + [4] |
| Recording paper size | [SET] + [V/PIN CODE] + [5] |
| Reports and lists | |
| Default setting reports | [SET] + 5x [V/PIN CODE] + corresponding one touch key |
| Print reports | [REPORT] + as many times [V/PIN CODE] until the desired report displays + [YES] |
| Show on display | [JOURNAL] + as many times [V/PIN CODE] until the desired report displays + [YES] |
| Drum counter | [SET] + 4x [V/PIN CODE] + [9] |
| Machine settings | |
| LCD contrast | [SET] + 4x [V/PIN CODE] + [1] |
| Dial method | [SET] + 4x [V/PIN CODE] + [2] |
| Buzzer settings | [SET] + 4x [V/PIN CODE] + [3] |
| Speaker | [SET] + 4x [V/PIN CODE] + [4] |
| Remote access | [SET] + 4x [V/PIN CODE] + [5] |
| Header | [SET] + 2x [V/PIN CODE] + [4] |
| Footer | [SET] + 3x [V/PIN CODE] + [8] |
| Power save mode | [SET] + 4x [V/PIN CODE] + [7] |
| Power save timer | [SET] + 4x [V/PIN CODE] + [8] |
Contents
1 Introduction
1.1 We want you to be satisfied customers 1-1
1.2 How does a fax machine work? 1-2
1.3 Certificate for machines with CE marking.. 1-3 CTR 21 approval. 1-3
1.4 Safety precautions 1-4
Laser safety 1-4
Internal laser radiation 1-4
Ozone release warning 1-4
1.5 Characteristics 1-6
2 Installation
2.1 Location 2-1 Environment .2-2 Power supply. 2-2
2.2 Unpacking 2-3
- Installing the paper input tray 2-3
- Installing the paper output tray 2-3
- Installing the paper stacking tray 2-3
2.3 Machine layout 2-4 Minolta fax 2800/3800 2-4 Memory upgrade (optional accessory) 2-7 Printer controller PCL5e- extension (optional accessory) 2-7 TWAIN interface driver (optional accessory) 2-7 I-fax card upgrade (optional accessory) 2-7 2. Paper tray (optional accessory) 2-7 Module for 2nd telephone for Minolta fax 2800 (optional accessory) 2-7
2.4 Control panel, display and keys 2-8
2.5 Toner cartridge and drum cartridge 2-11
2.6 Installing the drum cartridge 2-12
2.7 Installing the toner cartridge.. 2-14
2.8 Installing the 2nd paper tray (optional) 2-16
2.9 Adding paper 2-17
2.10 Connecting the cables 2-20
Connecting the ferrite cores 2-20
Connecting the telephone line cable 2-21
Connecting the power cable 2-21
2.11 Operating the machine 2-22
3 Data entry
3.1 Preparation 3-1
3.2 Typing conventions in this manual 3-1
3.3 Enter text 3-1
Special characters 3-2
Overview of the machine settings 3-3
3.4 Entering your fax number 3-5
3.5 Entering your company name 3-6
3.6 Entering date and time 3-7
3.7 Entering department number and password 3-8
3.8 Set phone type 3-12
Dialling mode 3-12
PBX or PSTN 3-13
3.9 Storing numbers 3-15
Sub addressing (F CODE SUB) 3-15
What is F CODE? 3-16
Entering one-touch numbers 3-16
Entering speed dial numbers. 3-18
Changing one-touch- or speed dial numbers 3 - 19
Erasing one-touch- or speed dial numbers 3 - 21
Entering groups 3-22
Changing / deleting members of a group 3-24
Deletingawhole group 3-26
3.10 Advanced settings 3-27
Buzzer volume. 3-27
Header. 3-28
Footer 3-29
LCD Contrast 3-30
Power save mode 3-31
Setting the power save time 3-32
Remote diagnosis 3-33
Setting the monitor volume 3-34
3.11 2nd telephone line (optional) 3-35
Entering your fax number. 3-35
Selecting the line 3-36
Dial mode for the 2nd line 3-37
4 Send
4.1 Transmission 4-1
Notes on original documents. 4-1
Using carrier film 4-2
4.2 Transmission Settings 4-4
Default setting resolution. 4-5
Contrast. 4-6
Default contrast setting 4-6
Closed network 4-7
Default transmission setting 4-8
Fax forwarding 4-9
4.3 Dialling modes 4-11
Program dialling. 4-12
4.4 Memory transmission 4-14
4.5 Direct transmission 4-15
4.6 Delayed transmission (timer) 4-16
Program dialling, timer transmission. 4-18
4.7 Broadcasting 4-19
Program dialling, broadcast transmission 4-20
4.8 Relay transmission 4-21
Start relay transmission 4-22
Program dialling relay transmission 4-23
Set relay boxes 4-24
4.9 Polling transmission 4-26
4.10 Mailbox transmission 4-28
Program dialling, mailbox transmission. 4 - 29
4.11 Batch transmission 4-30
4.12 Delete schedules 4-31
5 Reception
5.1 Manual reception 5-1
5.2 Automatic reception 5-2
5.3 Memory reception during printer problem 5-2
5.4 Memory reception 5-3
5.5 Mailbox reception 5-5
Setting up a mailbox 5-5
Printing the content of a mailbox 5-7
5.6 Polling reception 5-8
Programming, polling RX. 5-10
5.7 Group polling 5-11
5.8 Settings for receiving a fax.. 5-14
Setting the paper size. 5-14
Setting number of rings 5-15
Setting multiple page printing 5-16
Setting reduction RX 5-17
Closed network 5-18
Setting the image exposure 5-19
Selecting paper tray (optional accessory) 5-20
6 Copy
6.1 Copying from the document feeder 6-1
6.2 Set reduction rate 6-2
7 Connecting the fax machine to the computer
7.1 Preparation 7-1
Placing the ferrite cores. 7-1
7.2 PC connection 7-2
7.3 Setting up the fax machine as a PC fax and PC scanner .... 7-3
Modem specifications 7-3
7.4 Scanner mode 7-4
Installing the TWAIN driver 7-4
Scanning using the TWAIN driver 7-4
Setting the scan settings 7-5
Scanning in class 1 mode. 7-5
7.5 Using your fax machine as a PC fax 7-5
7.6 Using your fax machine as a PC printer (optional) 7-6
Print settings 7-6
Installing GDI driver (optional) 7-13
Installing PCL5e printer driver (optional) 7-14
7.7 Using your fax machine as an internet fax (optional) 7-15
Entering the e-mail settings 7-15
Entering the server settings 7-17
Setting the POP3 interval 7-18
Entering the time-out setting 7-19
Setting error report 7-20
Setting the time zone 7-21
Sending e-mails 7-22
Downloading e-mails from the server 7-23
Error messages on the LCD. 7-24
8 Reports and lists
8.1 Basic report settings 8-2
Default settings journal 8-2
Default setting reservation report 8-3
Default setting transmission report 8-4
Default setting RX confirmation 8-5
Default setting broadcast report 8-6
Default setting toner order 8-7
8.2 Printing reports 8-8
8.3 Displaying the transmission results 8-9
8.4 Displaying the counter 8-10
Drum counter 8-10
9 Troubleshooting
9.1 Cleaning 9-1
Cleaning the machine 9-1
Cleaning the transport rollers 9-1
Cleaning the scanner 9-2
9.2 Clearing paper jams 9-3
9.3 Error messages 9-8
Error-LED 9-8
Alarms. 9-8
Error messages on the LCD. 9-8
9.4 Troubleshooting 9-10
10 Appendix
10.1 Specifications 10-1
10.2 Index 10-4
10.3 CE marking (declaration of conformity) 10-10
10.4 END USER LICENSE AGREEMENT 10-10
1 Introduction
1.1 We want you to be satisfied customers
Thank you for deciding to buy a Minolta fax system. The multi-functional system described in this user manual will hereafter be referred to as Minoltafax 2800/3800.
Read this User Manual carefully before starting up your machine and always keep the instructions to hand.
To achieve the best possible results and effective use of the machine, this User Manual provides you with information on the following subjects.
- Installation
- Entering data
- Sending/receiving/copying
- Reports and lists
- Maintenance and troubleshooting.
Additional information and help in the event of an error is available from:
The technical service of your Minolta representative
our Internet Website http://www.minolta.com.uk.
Please keep the serial number (see nameplate) and the date of purchase to hand so that we can quickly provide you with the right help in the event of an error.
We want you to be satisfied customers.
Subject to changes.
1.2 How does a fax machine work?
A fax machine can be connected to a normal telephone system without taking any special precautions, just like a normal telephone set. The function of a fax machine is quite similar to that of a telephone.
The way a fax machine works is simple: Documents that are to be transmitted are at first scanned. The machine does not recognise the letters but reads the picture, dot by dot, and marks each dot as black or white. That is why you can not only transmit texts but also pictures and photos. The information is then digitised and compressed so that the fax machine can send it quickly over the telephone line to another fax machine which reverses the process, reading and marking each dot as black or white on a sheet of paper.
When you are "called" by a fax machine, your telephone rings as normal. Therefore you cannot know whether your are receiving a fax call or a telephone call before picking up the receiver.
At the beginning of a fax transmission you will hear shrill sounds. Those sounds are the so called "hand shaking" and function as an introduction sequence before the actual transmission, just as interlocutors - often - introduce themselves at the beginning of a telephone call. In the introductory sequence the technical features of both machines are matched to make sure the transmission and the reception are conducted to a high standard.
With your Minolta fax 2800/3800 you do not need to listen to the introductory sequence. How to program the machine accordingly will be explained later in this manual. Furthermore you will also find information about the settings that come with the machine, that have to be made when installing, or the settings that can be made at a later stage. Most of the features of the fax machine work independently, so that you can program only the settings you need for the moment and ignore all others.
By the way, the word "fax" is a combination of the Latin "facere" (to make) and "simile" (similar) describing the process of making a copy which is similar to the original. This artificial word "fax" has nowadays become widely accepted in everyday language, replacing the older term facsimile. A copy is therefore to be made "similar" to the original. Fax machines are also called facsimile machines.
Now, enjoy your new fax machine.
1.3 Certificate for machines with CE marking
CTR 21 approval
Annex II
The equipment has been approved in accordance with Council Decision 98/482/EC for pan-European single terminal connection to the public switched telephone network (PSTN). However, due to differences between the individual PSTNs provided in different countries, the approval does not, by itself, give an unconditional assurance of successful operation on every PSTN network termination point.
In cases of problems, you should contact your equipment supplier in the first instance.
1.4 Safety precautions
Follow the safety advice to ensure safe operation of the machine.
- Only connect the machine to a suitable power point.
- Make sure the power is not turned off over night.
- Always pull the plug, never the wire, when you want disconnect the machine from the power supply. If possible, connect the machine directly to a wall outlet.
- Do not unscrew any parts, if not specifically requested in this manual. If necessary contact your technical service.
- Never open the machine while it is transmitting or printing.
Take care not to let humidity into the machine. - Make sure no objects fall into the machine.
- If a problem occurs that cannot be solved following the procedures described in this manual, make sure you contact the technical service.
- Follow the recommended maintenance procedures regularly.
- Do not open any parts of the machine or switch it off when the machine is in use.
- Do not allow any magnetic objects near the machine.
- Switch the machine off immediately and remove the socket if the machine becomes unusually hot or if smoke or an unusual smell occurs.
Used cartridges may be taken back by the technical service station as a part of the maintenance procedures.
Laser safety
This fax machine contains a page printer which operates by means of a laser. This machine does not impose any danger as long as it is used according to the procedures described in this manual. The laser is limited to the interior of the machine. The environment is protected from the laser emission by the covers of the machine.
Internal laser radiation
Medium radiation: 1.03 (mW) wave length: 770-810 (nm)
The machine works with an invisible class IIlb laser. The printer head unit must not be opened, cleaned or repaired by the user.
Ozone release warning
During printer operation, a small quantity of ozone is released. This amount is not large enough to harm anyone. However, be sure the room where the fax machine is being used has adequate ventilation, especially
if you are printing a high volume of material or if the fax machine is being used continuously over a long period.
1.5 Characteristics
Your new fax machine is a compact multi-functional device facilitating your work and reducing your fax communication times. The features of the unit include scanning of originals into the memory for delayed transmission, allowing simultaneous reception of fax messages and vice versa.
Type
A4 format, G3 desktop laserfax
Up to 33.600 bps transmission speed
- MH/MR/MMR/JBIG, ECM coding
Automatic document feeder up to 50 pages (A4)
- Double-spaced LCD with 20 characters
64 level grey scale.
Fax functions
- Delayed transmission
Relay broadcast initiation - Multi tasking operation interface
- Polling RX/TX
- Confidential reception/emailbox transmission.
2 Installation
2.1 Location
Please take into consideration the following recommendations.
- Avoid direct exposure to sunlight and place the machine away from heaters.
- Avoid humid or dusty locations.
- Place the machine on an even, non-vibrating surface.
- Keep the machine away from magnetic fields (TV sets, radios).
- Avoid locations close to ventilation openings, air conditioners and heaters.
- The machines should be easily accessible from all sides.
- Make sure no liquids can enter the machine.
- Keep all covers closed when the machine is in standby, as this will prevent the transmission or receipt of documents. If the cover is opened during transmission or reception, the connection will be interrupted.
- Avoid extreme fluctuations in temperature as this could lead to humidity inside the machine. This could lead to incorrect document scanning and printing.
- Ensure there is enough space (approx. 40cm clearance around the machine), for optimum operation and easy access.
- Ensure there is a clearance of at least 150mm between the wall and the machine for optimum ventilation.
- Do not place any items which are heavier than 3kg on the machine.
Environment
The optimum environmental conditions for your copier are:
- Temperatures between 10^ and 32^ (with a max. fluctuation of 10^ per hour)
- Humidity level between 15% and 85% (with a max. fluctuation of 20% per hour).
Power supply
The following tolerances apply:
Voltage fluctuation: ±10%
Frequency fluctuation: ± 0,3%
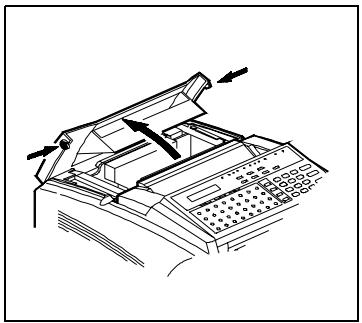
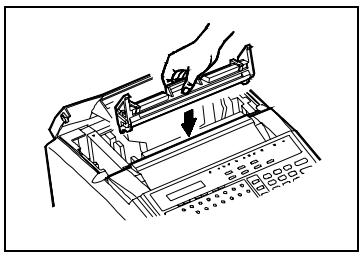
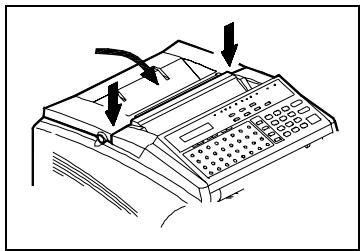
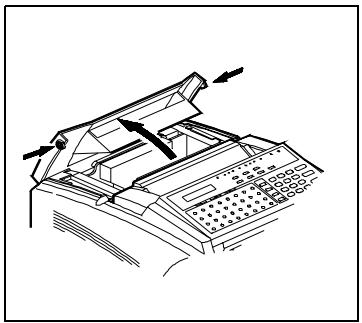
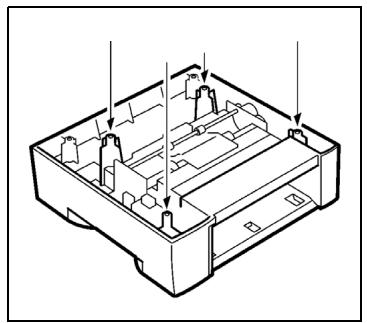
2.2 Unpacking
Installing the paper input tray
Insert the pins from the document feeder in the appropriate slots.

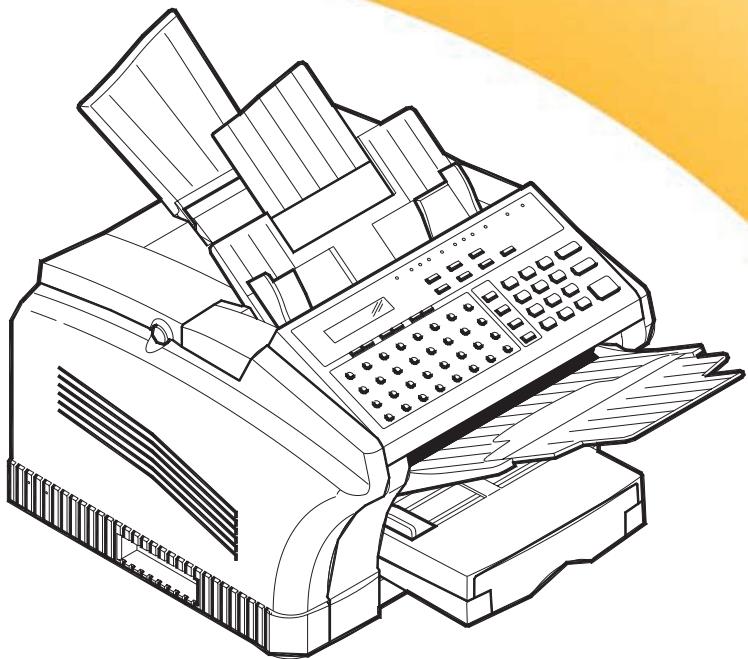
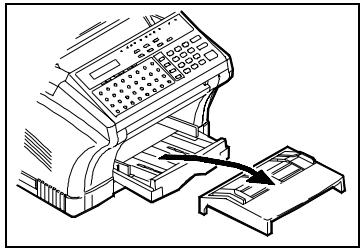
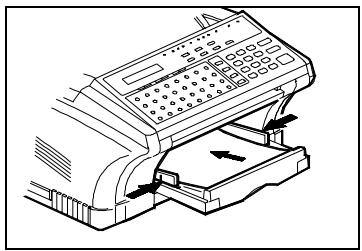
Installing the paper output tray
Insert the pins from the paper output tray in the appropriate slots.
Ensure that the tray snaps into place.
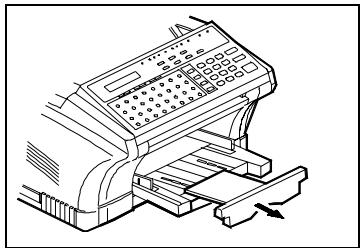
Installing the paper stacking tray
Insert the pins from the document cover in the appropriate slots.

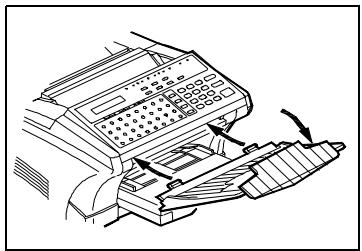
2.3 Machine layout
Minoltafax 2800/3800
Front view
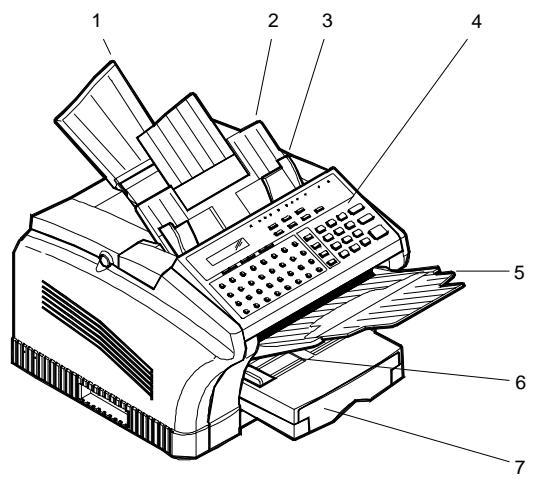
| Pos. | Description | Description |
| 1 | Paper stacking tray | Copies printed/incoming/copied documents are stored here (max. 100 sheets of plain paper). |
| 2 | Document feeder | Insert the document face down into the ADF for copying or fax transmission. |
| 3 | Document guide | Holds the document in the feeder in place. |
| 4 | Control panel | Keys and displays used to operate the machine. |
| 5 | Document exit tray | After scanning the document is fed onto this tray. |
| 6 | Manual single sheet feeder | Takes single sheets of varying paper formats and types which are fed manually for printing. |
| 7 | Paper tray (1st paper tray) | Holds up to 250 sheets of A4 paper |
Rear view

| Pos. | Description | Description |
| 1 | RS-232C interface | Interface for sending, receiving and scanning by PC. |
| 2 | LAN interface | Interface for operation in a network (only available with optional accessories) |
| 3 | Terminal for 2nd telephone cable | A second telephone line can be connected to this terminal (Minoltafax 2800 only with optional accessories). |
| 4 | Parallel interface | Interface for operation as a PC printer (only available with optional accessories). |
| 5 | Telephone terminal | Terminal for the telephone cable. |
| 6 | Power terminal | Terminal for the power cable. |
| 7 | Mains switch | Used to switch the machine on and off. |
Internal view
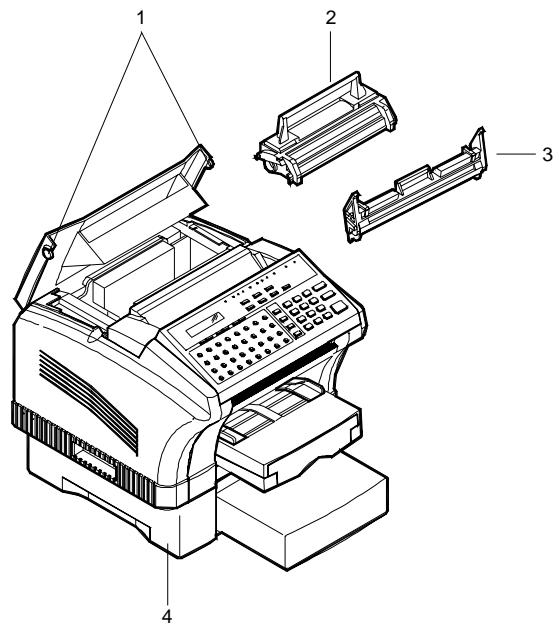
| Pos. | Description | Description |
| 1 | Release buttons | Press both buttons simultaneously to open the printer cover. |
| 2 | Toner cartridge | Contains the toner. |
| 3 | Drum cartridge | Places the toner on the paper. |
| 4 | 2. Paper tray (optional accessory) | Holds up to 500 sheets of A4 paper. |
Memory upgrade (optional accessory)
Upgrades the memory capacity of the system.
If you make a large quantity of copies which take up a lot of memory, you should increase the RAM of the system using the upgrade option. This epitomizes the data flow.
The following memory upgrade is available:
8MB memory upgrade.
Printer controller PCL5e- extension (optional accessory)
enables the system to be used as a PCL5e printer (600 dpi).
TWAIN interface driver (optional accessory)
Enables the copier to be used as a scanner.
I-fax card upgrade (optional accessory)
Allows transmission of E-Mails.
2. Paper tray (optional accessory)
Holds up to 500 sheet A4 paper.
Module for 2nd telephone for Minoltafax 2800 (optional accessory)
Allows the use of a 2nd telephone line.
2.4 Control panel, display and keys
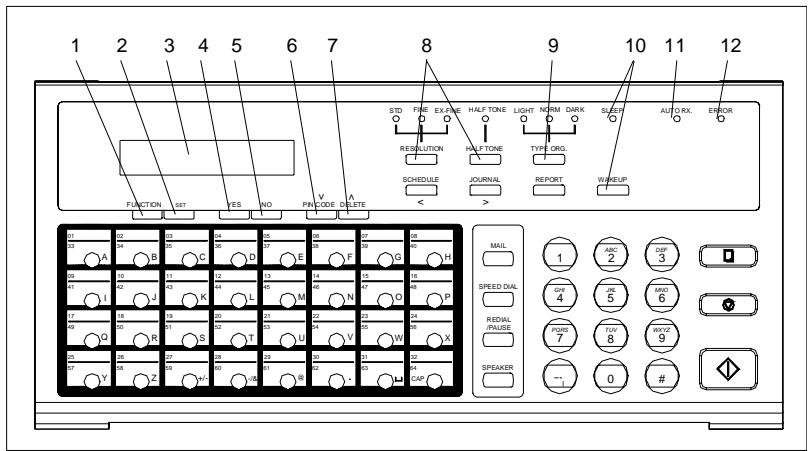
| No. | Display/key | Function |
| 1 | FUNCTION | Press this key to open the menu. Select the required function using the numeric keys. |
| 2 | SET | Press this key to access the programming menu. Select the desired function using [V/CODE] or [DELETE] or the numeric keys. |
| 3 | LCD(Liquid Crystal Display) | Shows the status of the machine and contains information about the operation modes. |
| 4 | YES | Press this key to confirm settings. |
| 5 | NO | Press this key to interrupt an operation. |
| 6 | V/PIN CODE | Press this key to enter your PIN CODE and scroll through the function menus. Some telephone systems require a PIN CODE for transmission. |
| 7 | DELETE | Press this key to correct entries and scroll through the function menus. |
| 8 | RESOLUTION/HALF TONE | Press these keys to change the resolution settings. |
| 9 | TYPE ORG. | Press this key to manually change the contrast settings. |
| 10 | WAKE UP | Press this key to set the system in operation mode. This LED lights up, when the energy save mode is active. |
| 11 | AUTORX LED | LED is on when the Memory RX Mode has been set. |
| 12 | ERROR LED | This LED is on, if an error occurs. |
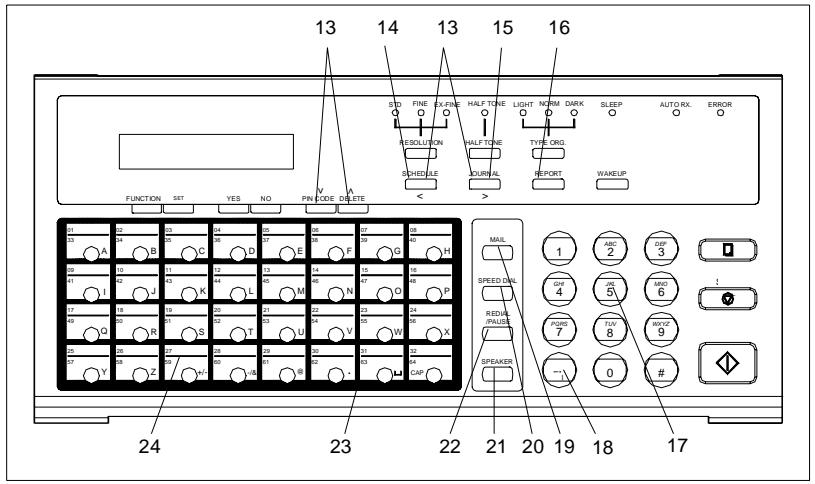
| No. | Display/key | Function |
| 13 | Arrow keys | Press this key to move the cursor through the programming menus. |
| 14 | SCHEDULE | Press this key to check the contents of the memory. |
| 15 | JOURNAL | Press this key to display results from the last 60 transmissions in the display. |
| 16 | REPORT | Press this key to print the different reports. |
| 17 | NUMERIC KEYS | Use these keys to enter numbers and letters, eg. fax numbers and destination names. Telephone numbers |
| 18 | * | Press this key to switch from tone dialling to pulse dialling (only effective together with the speaker key) |
| 19 | Press this key to receive or send e-mails (only available with optional accessory). | |
| 20 | SPEED DIAL | Use this key to enter a three-digit speed dial number. |
| 21 | SPEAKER | Press this key to set up a connection as with a telephone. |
| 22 | REDIAL/PAUSE | Use this key to either redial or to generate a pause. |
| 23 | ONE TOUCH | Use this key to dial a stored number. Also you may program the last 8 keys for special functions. |
| 24 | +/- | Press this key to save a combination form speed dial and one touch dial. |
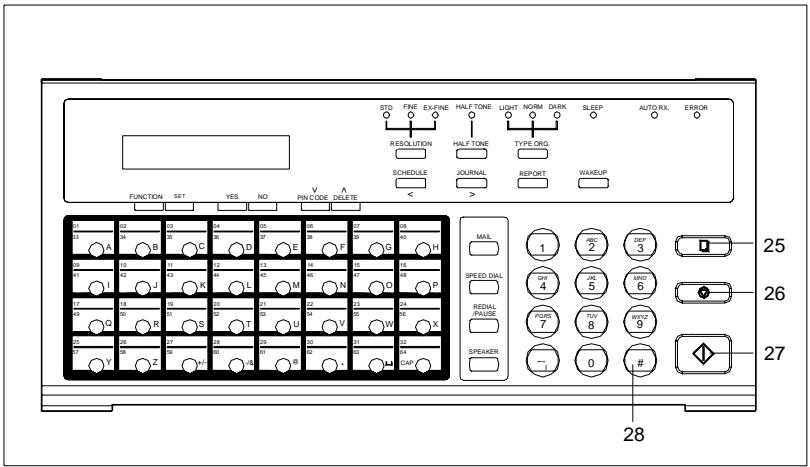
| No. | Display/key | Function |
| 25 | COPY | Press this key to start the copy function. |
| 26 | STOP | Press this key to interrupt copying, transmission and reception operations. |
| 27 | START | Press this key to start copying, transmission and reception operations. |
| 28 | # | Press this key to access an internal line or a PSTN line when the machine is set for use over a PBX line. |
2.5 Toner cartridge and drum cartridge
This machine produces images and characters by applying the toner through the drum cartridge onto the page to be printed.
The drum cartridge should be handled with care when installed or replaced, to ensure proper performance at all times. Never expose the cartridge to direct sunlight or any other direct light. Store the cartridge in an environment that is not subject to extreme heat or humidity. Detailed information on the care and handling of the drum cartridge can be found in the actual packaging and operating manual.
The toner cartridge should be replaced when "toner low" is displayed.
Please consult the regulations for disposal of such products in your area.
Used cartridges may be taken back by the technical service station as a part of the maintenance procedures.

Note
To avoid damage by light on the drum cartridge cover it with a cloth after removing it from the machine.
2.6 Installing the drum cartridge

WARNING
The heating element will be hot and could burn you!
The temperature of the heating element can reach up to 120^ .
Do not touch the heating element.

WARNING
Toner cartridges can be a health risk!
Toner, if swallowed can be a danger to your health.
If you come in contact with the toner, remember to wash your hands immediately with cold water and soap.
Only use cartridges which are specifically designed for this machine. Original accessories and consumables provide optimum print quality and minimum maintenance. For further information, please contact your technical service.
1 Press the release buttons on both sides of the machine. Lift up the upper part of the unit as far as it will go.
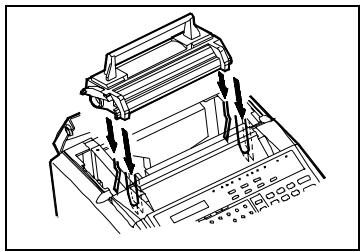
2 Hold the handle of the cartridge in both hands.
3 Place the drum cartridge on the green guides.

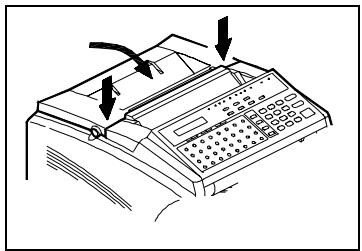
4 Close the machine. Ensure that the cover snaps into place.
2.7 Installing the toner cartridge

WARNING
The heating element will be hot and could burn you!
The temperature of the heating element can reach up to 120^ .
Do not touch the heating element.

WARNING
Toner cartridges can be a health risk!
Toner, if swallowed can be a danger to your health.
If you come in contact with the toner, remember to wash your hands immediately with cold water and soap.
Only use cartridges which are specifically designed for this machine. Original accessories and consumables provide optimum print quality and minimum maintenance. For further information, please contact your technical service.
1 Press the release buttons on both sides of the machine. Lift up the upper part of the unit as far as it will go.
2 Shake the new cartridge a few times. This should release any solid toner.
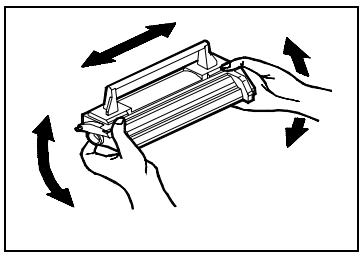
Hold the handle of the cartridge in both hands. Place the drum cartridge on the green guides.
4 Close the machine. Ensure that the cover snaps into place.
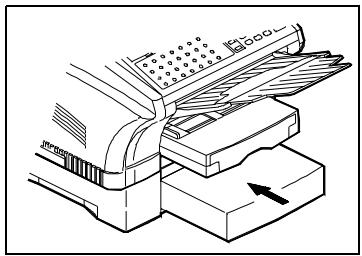
2.8 Installing the 2^nd paper tray (optional)
The 2^nd paper tray is available as optional accessory. Holds up to 500 sheets of A4 paper.
1 Remove the package. Make sure the fax machine is turned off.
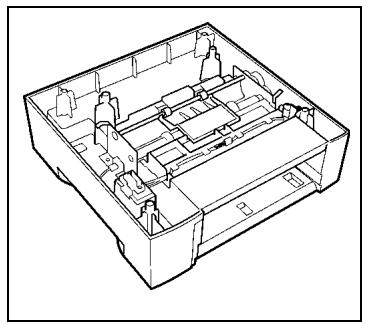
2 Place the fax machine on the 2nd paper tray.
3 Switch the fax machine on.
2.9 Adding paper
Standard paper tray - 250 sheets
The paper tray holds up to 250 sheets A4 paper. When filling the paper tray, remember to remove any remaining paper as this may lead to malfunctions.
1 Remove the transparent cover of the paper tray.
2 Pull the paper guides out as far as they will go.
3 Fan the paper well and align the sheets.

4 Place the paper in the tray and push the paper guides toward the paper.
2^nd paper tray - 500 sheets
This paper tray will only take A4L paper.
Pull the paper tray out of the cassette.
Push the plate in the tray down until it locks in position.
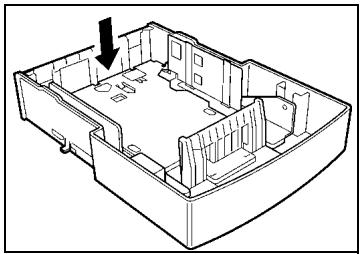
3 Add the paper.
If you use letter head paper, place the face with the print downwards.
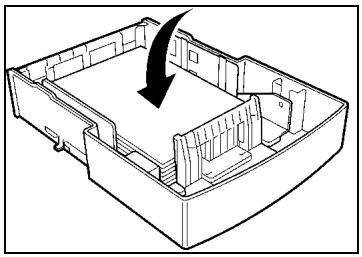
4 Make sure the corners of the paper are below the edges.
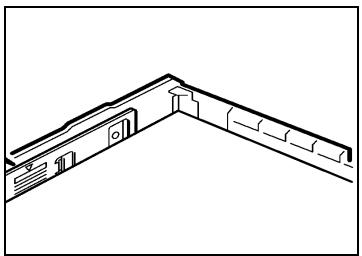
5 Check that you have not exceeded the maximum height (see marking on the paper tray).
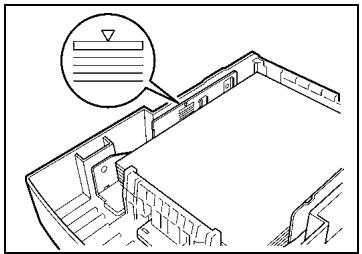
6 Place the cover on the paper tray.

7 Put the 2^nd paper tray back into the cassette.
2.10 Connecting the cables
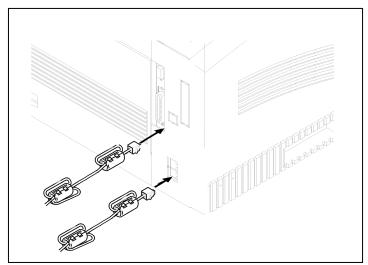
Connecting the ferrite cores
The ferrite cores avoid radio interference to disturb the fax transmission. Place the core on the telephone cable as described.
1 Wind the end with the jack that goes into the fax machine once around the black core, so that 2 layers of cable are inside the core. The distance between the jack and the core must be 1 ~cm .
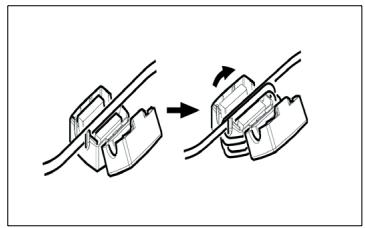
2 Close the core.
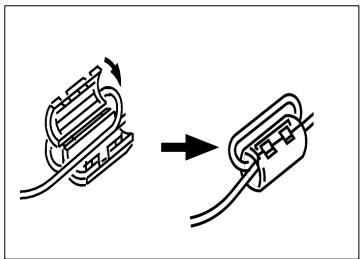
3 Wind the end with the jack that goes into the fax machine three times around the grey core, so that 4 layers of cable are inside the core. The distance between the black core and the grey core must be 10cm .
4 Close the core.
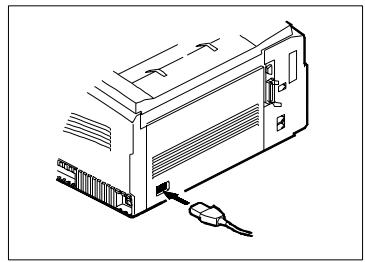
Connecting the telephone line cable
Plug the end of the telephone cord for the standard telephone line into the bottom terminal on the righthand side at the back of the machine.
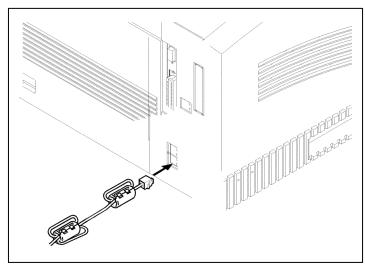
Plug the end of the 2nd telephone cable for the 2nd telephone line into the upper terminal on the righthand side of the machine (Minoltafax 2800 only available with optional accessory).
3 Connect the other ends of the telephone cables with the telephone outlet on the wall.
Connecting the power cable
Plug the power cable into socket on the left of the machine. Then connect it to the wall socket.
2.11 Operating the machine
1 Move the power switch to ON.
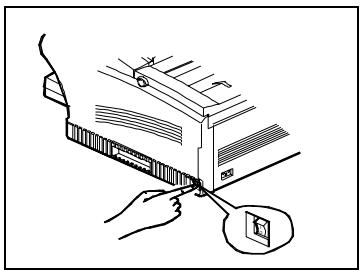
2 After approximately 30 seconds the display shown beside will light up. The machine is now ready for operation.
JAN.09 13:00 100%
-SET DOC. FACE DOWN
3 Data entry
3.1 Preparation
Before you can operate all the functions on your fax machine, you must enter several settings. This chapter explains how to set your name, your line type and the remote locations with which you may wish to communicate.
You can always interrupt the process by pressing [STOP]. The setting will then not be saved. If you do not press any key for more than 30 seconds, the procedure is interrupted and the system will return to stand by.
3.2 Typing conventions in this manual
If nothing else is requested, all keys are to be pressed one after the other. This is also the case if they are connected by a "+" to facilitate the layout. "Press [0] + [5] + [YES]" means: Press the numeric key [0], then the numeric key [5] and then the key named [YES].
3.3 Enter text
You can use the one-touch keys to enter characters. To enter special characters, follow the instructions given in the tables below. Press [YES] to save the relevant setting. To add a space, press speed dial key [31]. In case of a mistake you can move the cursor with the arrow keys [JOURNAL] and [SCHEDULE] and overwrite the wrong text. Also you can delete text with [DELETE]. Press the one touch key [32], to switch from capital letters to small letters.
Special characters
Press one touch key [28] as many times as shown in the table. You may also scroll through the special characters. Reaching the end, the first character will be shown again.
| One-touch key 28 | & | One-touch key 28 | & | One-touch key 28 | & |
| Press -/& twice | & | Press -/& 10 times | . | Press -/& 18 times | $ |
| Press -/& 3 times | # | Press -/& 11 times | , | Press -/& 19 times | : |
| Press -/& 4 times | * | Press -/& 12 times | ! | Press -/& 20 times | ; |
| Press -/& 5 times | - | Press -/& 13 times | + | Press -/& 21 times | @ |
| Press -/& 6 times | / | Press -/& 14 times | = | Press -/& 22 times | % |
| Press -/& 7 times | ( | Press -/& 15 times | < | Press -/& 23 times | [ |
| Press -/& 8 times | ) | Press -/& 16 times | > | Press -/& 24 times | ] |
| Press -/& 9 times | ” | Press -/& 17 times | ? | Press -/& 25 times | ' |
Press one touch key [29] as many times as shown in the table. You may also scroll through the special characters. Reaching the end, the first character will be shown again.
| One-touch key 29 | * | One-touch key 29 | * | One-touch key 29 | * |
| Press @ once | Ä | Press @ 9 times | é | Press @ 17 times | ç |
| Press @ 2 times | ä | Press @10 times | i | Press @ 18 times | Æ |
| Press @ 3 times | Ö | Press @ 11 times | ó | Press @ 19 times | Ñ |
| Press @ 4 times | ö | Press @ 12 times | ú | Press @ 20 times | ü |
| Press @ 5 times | Ü | Press @ 13 times | Å | Press @ 21 times | Ø |
| Press @ 6 times | ü | Press @ 14 times | i | Press @ 22 times | ø |
| Press @ 7 times | á | Press @ 15 times | à | Press @ 23 times | β |
| Press @ 8 times | É | Press @ 16 times | ° |
Overview of the machine settings
Use the keys [SET] and [V/PIN CODE] to access the following functions. Press [SET] and then [V/PIN CODE] an many times as needed to show the desired function in the display. Then press the numeric key according to the desired function. Detailed descriptions of the procedure will be provided in the corresponding chapters.
| Group | Function | Default setting |
| Storing Numbers | 1 one-touch2 speed dial3 group dial4 program dial5 batch transmission6 relay transmission | off |
| Scanning and printing | 1 resolution2 contrast3 Print density4 reduce copies5 paper size | StandardNormlevel 4offA4 |
| Transmission setting | 1 basic setting2 closed network3 fax retransmission4 header | Memory transmit offonoff |
| Receiving setting | 1 memory reception2 number of rings3 multipage print4 reduction5 mailbox-RX6 closed network7 reception mode8 footer9 continuos polling | on2offonoffAutooffoff |
| Machine settings | 1 LCD contrast2 dial type3 buzzer sound4 monitor5 remote diagnosis6 PBX / PSTN7 energy save mode8 energy save timer9 drum counter | tone diallowlowoffPSTNTimer15 minutes |
| Reports | 1 Journal2 Schedule report3 TX confirmation4 RX confirmation5 broadcast report6 toner replacement | onoffoffoffoffoff |
| User data | 1 date & time2 number3 user name4 department number | off |
| Printer | 1 auto Selecting the Paper Cassette 2 number of copies 3 symbol set 4 font number 5 line number 6 print font 7 PCL4 8 GDI | off 1 IBM-US 1 64 not applicable off off |
| 2nd telephone line | 1 2. line number 2 TX block 3 2nd line tone/pulse | 2nd line priority tone |
| internet fax | 1 e-mail 2 server 3 POP 3 interval 4 time out setting 5 error report 6 time zone | on, 30 minutes 3 minutes on |
3.4 Entering your fax number
You can place your name and fax number in the header. Check the format with your telephone company. The header will appear at the top of the faxes you send. Up to 20 characters can be entered.
Press speed dial [27] to enter "+"
Press [31] to add blanks.
1 Press [SET] and 6 times [V/PIN CODE]
INITIAL USER DATA? YES / or 1-4
2 Press [2] on the numeric keypad and enter your fax number.
= OK=YES)
3 Press [YES] to confirm the entry and [NO] to cancel the entry.
JAN.09 13:00 100% -SET DOC.FACE DOWN-
3.5 Entering your company name
You can either enter your company name, your name or both. Up to 32 characters can be entered.
You can switch between capital and small letter by pressing one touch key [32]. Press [31] to add blanks. Enter special characters by pressing one touch keys [28] and [29].
Refer to Section 3.3 for instructions on how to make the entries.
1 Press [SET] and 6 times [V/PIN CODE].
INITIAL USER DATA? YES / or 1-4
2 Press [3] on the numeric keypad and enter your name.
Name= OK=YES
3 Press [YES] to confirm the entry and [NO] to cancel the entry.
JAN.09 13:00 100% -SET DOC.FACE DOWN-
3.6 Entering date and time
The date and time appear on the display, the activity report and the other fax machine's printouts.
1 Press [SET] and 6 times [V/PIN CODE].
INITIAL USER DATA? YES / or 1-4
2 Press [1] on the numeric keypad and enter the time and date (YYMMDD).
14:46 '00 05 09 SET TIME (OK=YES)
3 Press [YES] to confirm the entry and [NO] to cancel the entry.
JAN.09 13:00 100% -SET DOC.FACE DOWN-
3.7 Entering department number and password
With this function you can assign each user a department number and a password, which must be entered in the machine before a document can be sent or polled.
Setting department number and password
1 Press [SET] and 6 times [V/PIN CODE].
INITIAL USER DATA? YES / or 1-4
2 Press [4] on the numeric keypad and press [YES].
SWITCH *REGISTER -SELECT&PUSH"YES"-
3 Enter the department number using the keypad (0-9).
DEPARTMENT NO= SELECT 0-9
4 Use the numeric keypad to enter the 4 digit password and press [YES].
DEPARTMENT 4 PW= OK=YES
5 Press [STOP] to terminate the entry.
JAN. 09 13:00 100% -SET DOC. FACE DOWN-
Changing department number and password
1 Press [SET] and 6 times [V/PIN CODE].
INITIAL USER DATA?
YES / or 1-4


2 Press [4] on the numeric keypad and press [YES].
SWITCH *REGISTER
-SELECT&PUSH"YES"-
3 Enter the department number using the keypad (0-9).
DEPARTMENT NO=
SELECT 0-9
4 Press [NO].
Use the numeric keypad to enter the old 4 digit password and press [YES].
OLD DEPART 4 PW=
OK=YES)
6 Enter the new department number using the keypad (0-9).
DEPARTMENT NO=
SELECT 0-9
7 Use the numeric keypad to enter the new 4 digit password and press [YES].
DEPARTMENT 4 PW=
OK=YES
8 Press [STOP] to terminate the entry.
JAN. 09 13:00 100%
-SET DOC. FACE DOWN
Deleting department number and password
1 Press [SET] and 6 times [V/PIN CODE].
INITIAL USER DATA? YES / or 1-4
2 Press [4] on the numeric keypad and press [YES].
SWITCH *REGISTER -SELECT&PUSH"YES"-
3 Enter the department number using the keypad (0-9).
DEPARTMENT NO= SELECT 0-9
4 Press [NO].
Use the numeric keypad to enter the old 4 digit password and press [YES].
8 Press [STOP] to terminate the entry.
JAN.09 13:00 100% -SET DOC.FACE DOWN-

Note
You can only change the password after entering the old one.
Using the department number
If you choose "on" the system is locked for users who do not have a department number or a password. If no department number or password is set, an error message will appear in the display. Press [STOP] and [V/PIN CODE] and enter your pin code.
1 Press [SET] and 6 times [V/PIN CODE].
INITIAL USER DATA?
YES / or 1-4


2 Press [4] on the numeric keypad and press [YES].
*SWITCH REGISTER
-SELECT&PUSH"YES"-
3 Use the arrow keys to select the desired setting and press [YES].
*ON OFF
-SELECT&PUSH"YES"-
4 Press [STOP] to terminate the entry.
JAN.09 13:00 100%
-SET DOC. FACE DOWN
You may enter the department number, password and name of the staff member in the table below.
| Dep. No. | Department password | Name |
| 0 | ||
| 1 | ||
| 2 | ||
| 3 | ||
| 4 | ||
| 5 | ||
| 6 | ||
| 7 | ||
| 8 | ||
| 9 |
3.8 Set phone type
Use this function to adjust your fax machine to your telephone connection.
Dialling mode
Choose the dialling mode which applies to your telephone connection. Tone dialling (DTMF) dials the number by transmitting a combination of beeps. Pulse dialling dials by transmitting a number of pulses for each dialled number.
1 Press [SET] and 4 times [V/PIN CODE].
MACHINE OPERATION? YES / or 1-9
2 Press [2] on the numeric keypad, select the required setting using the arrow keys and press [YES].
*TONE PULSE -SELECT&PUSH"YES"-
3 Press [STOP] to terminate the entry.
JAN. 09 13:00 100% -SET DOC. FACE DOWN-

Note
If you do not know the dialling mode, do the following to test it. Dial "9" on your telephone. If you hear clicking noises in the receiver, the impulse dialling mode is used. If you hear a single tone, the tone dialling mode is used.
PBX or PSTN
Here you set the line type the fax machine uses. If your telephone line is directly registered at you telephone company, and they assigned you your telephone number, you are using PSTN. If your telephone has an extension number for internal calls, you are using PBX. PBX line allows dial numbers (prefix no.) line access.
PSTN
1 Press [SET] and 4 times [V/PIN CODE].
MACHINE OPERATION? YES / or 1-9
2 Press [6] on the numeric keypad and select PSTN with the arrow keys and press [YES].
*PSTN PBX -SELECT&PUSH"YES"-
3 Press [STOP] to terminate the entry.
JAN.09 13:00 100% -SET DOC.FACE DOWN-
PBX
If you have to dial a number for an external line, line access is achieved by a prefix number. The prefix is limited to 4 digits. If you press a key for outside line access that does not have a number, line access is achieved by flash function.
If you are not familiar with the flash function for line access, please contact the manufacturer or service staff for your PBX system. If you don't need to dial a number for line access, but just press a key, please ask the manufacturer or the service staff of your PBX system for the function of line access.
1 Press [SET] and 4 times [V/PIN CODE].
MACHINE OPERATION? YES / or 1-9
2 Press [6] on the numeric keypad and select PBX with the arrow keys and press [YES].
PSTN *PBX -SELECT&PUSH"YES"-
3 Use the numeric keypad to enter the prefix and press [YES].
PRE-FIX NO= OK=YES
Press only [YES] to activate the flash function.
4 Press [STOP] to terminate the entry.
JAN.09 13:00 100% -SET DOC.FACE DOWN-

Note
If you delete the prefix, the system changes for line access by prefix to line access by flash function. When the flash function is used the machine will carry out the line access automatically. To dial inside a PBX system, press [#] before the entering the fax number.
3.9 Storing numbers
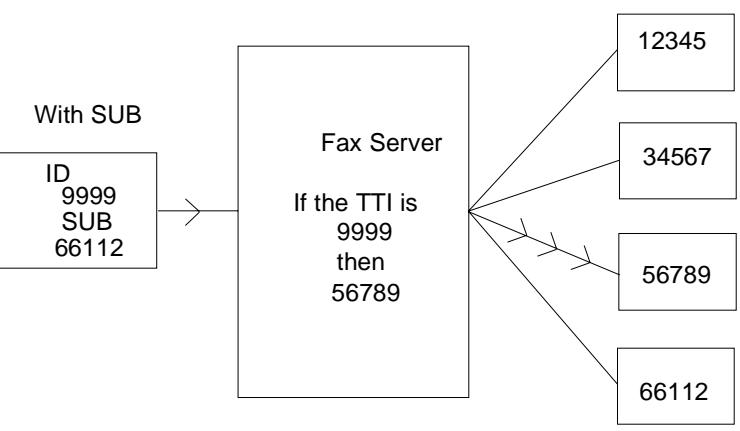
Sub addressing (F CODE SUB)
When entering one-touch and speed dial numbers it is possible to enter a sub-address. This enables you for instance to access sub-addresses directly from the server. The sub-address is limited to 10 digits.
What is F CODE?
You can program your system with a confidential polling or mailbox. For this you need the F CODE. The F CODE functions like a key and a lock. You always have to set an F CODE to set up a box, i.e. to install the lock. Everyone wanting to access the box needs the corresponding key, in this case the corresponding F CODE. Otherwise on communication is possible. If required, you may assign an F CODE password, as a second security measure. This way you gain maximum security for your documents.
In various steps you will be asked to enter an F CODE. There are three different F CODE settings:
F CODE SEP (selective polling TX/RX)
Set this F CODE if you are preparing a document for confidential polling. Only recipients that have the same F CODE stored in their machine can poll the document. If a partner has stored a document using SEP, you must use the F CODE SEP to poll the document.
F CODE SUB
Use this F CODE to address sub-addresses in a server net work directly.
- F CODE password (PWD)
If you wish to protect your mailbox with a second lock, you can assign an additional password. Enter the desired password as a 4 digit number.

Note
The F CODE function is only available with fax machines that have this function as well. Ask your partner, if their machine can process F CODE transmissions.
Entering one-touch numbers
Use this function [01] - [32] ([01] - [64] for Minoltafax 3800) to store your most frequently called fax numbers for instant recall or to arrange call groups (for more information, refer to "Entering Call Groups").
You can switch between capital and small letter by pressing one touch key [32]. Press [31] to add blanks. Enter special characters by pressing one touch keys [28] and [29].
The one touch keys on the Minoltafax 3800 are assigned double function. Select the second level [33] - [64] of the one touch keys by pressing the corresponding key twice.
1 Press [SET].
DIAL REGISTRATION?
YES / or 1-6

2 Press [1] on the numeric keypad.
-SELECT REGIST. KEY
3 Press the desired one-touch key.
ONE-TOUCH 01
4 Press [YES].

Use the numeric keypad to enter the desired fax number and press [YES].
= 123456
OK=YES (SUB=▼)
Press [V/PIN CODE] to enter a sub address.
6 Enter the name and press [YES].
Name=MINOLTA_
OK=YES (DEL=NO)
7 Press the next one-touch key.
-SELECT REGIST. KEY
(COMPLETE=NO)
8 Continue repeating the process from step 2 until all speed dial numbers have been entered.
ONE-TOUCH 02
9 Press [NO] and [STOP] to terminate the entry.
JAN. 09 13:00 100%
-SET DOC. FACE DOWN
Entering speed dial numbers
Similar to the one-touch keys, you can store fax numbers as speed dial numbers. The seed dial number is a three digit number that stand for the complete number you want to dial. Up to 100 speed dial numbers can be stored (001-100).
You can switch between capital and small letter by pressing one touch key [32]. Press [31] to add blanks. Enter special characters by pressing one touch keys [28] and [29].
The one touch keys on the Minoltafax 3800 are assigned double function. Select the second level [33] - [64] of the one touch keys by pressing the corresponding key twice.
1 Press [SET].
DIAL REGISTRATION? ▲
YES / or 1-6
2 Press [2] on the numeric keypad.
SPEEDDIAL =
OK=YES
3 Enter the desired speed dial number as a three digit number using the keypad.
=
OK=YES
4 Use the numeric keypad to enter the desired fax number and press [YES].
=123456
OK=YES
(SUB=▼)
Press [V/PIN CODE] to enter a sub address.
5 Enter the name and press [YES].
Name=MINOLTA_
OK=YES
(DEL=NO)
6 Continue repeating the process from step 3 until all speed dial numbers have been entered.
SPEEDDIAL =
COMPLETE=NO
7 Press [NO] and [STOP] to terminate the entry.
JAN. 09 13:00 100%
-SET DOC. FACE DOWN
Changing one-touch- or speed dial numbers
You can change one-touch/speed dial keys by following the procedure below. The example below describes how to change a one-touch key. Press [2] on the numeric keypad, enter the speed dial number and follow the instructions.
You can switch between capital and small letter by pressing one touch key [32]. Press [31] to add blanks. Enter special characters by pressing one touch keys [28] and [29].
The one touch keys on the Minoltafax 3800 are assigned double function. Select the second level [33] - [64] of the one touch keys by pressing the corresponding key twice.
1 Press [SET].
DIAL REGISTRATION? YES / or 1-6
Press [1] on the numeric keypad.
-SELECT REGIST. KEY
3 Press the desired one-touch key and [YES].
ONE-TOUCH 01
4 Press [NO].
REGISTERED! KEEP? OK=YES (EDIT/DEL=NO)
5 Select "enter" using the arrow keys and press [YES].
*EDIT DELETE -SELECT&PUSH"YES"-
6 Use the numeric keypad to enter the number and press [YES].
=123456_ OK=YES (DEL=NO)
7 Use the numeric keypad to enter the new sub-address if required and press [YES].
SUB: OK=YES
8 If necessary, enter the new name and press [YES].
NAME=MINOLTA_ OK=YES (DEL=NO)
9 Press the next one-touch key and continue repeating the process until all desired one-touch keys have been changed.
-SELECT REGIST. KEY-(COMPLETE=NO)
10 Press [NO] and [STOP] to terminate the entry.
JAN.09 13:00 100% -SET DOC. FACE DOWN-
Erasing one-touch- or speed dial numbers
You can erase one-touch or speed dial numbers by following the procedure below. The example below describes how to delete a one-touch key. Press [2] on the numeric keypad, enter the speed dial number and follow the instructions.
The one touch keys on the Minoltafax 3800 are assigned double function. Select the second level [33] - [64] of the one touch keys by pressing the corresponding key twice.
1 Press [SET].
DIAL REGISTRATION? YES / or 1-6
2 Press [1] on the numeric keypad.
-SELECT REGIST. KEY
3 Press the desired one-touch key and [YES].
ONE-TOUCH 01
4 Press [NO].
REGISTERED! KEEP? OK=YES (EDIT/DEL=NO)
5 Select "delete" using the arrow keys and press [YES.]
EDIT *DELETE -SELECT&PUSH"YES"-
6 Press the next one touch key and repeat the procedure from point 3 until all desired one touch keys are deleted.
-SELECT REGIST. KEY-(COMPLETE=NO)
7 Press [NO] and [STOP] to terminate the entry.
JAN.09 13:00 100% -SET DOC. FACE DOWN-
Entering groups
Your fax machine can scan the same document once and then send it to numerous other fax machines (call groups). For this function memory transmission must be selected (see chapter "Sending") Use this function, if you frequently send to the same group. You can program up to 32 groups, each having up to 50 destinations (Minoltafax 3800 64 groups). Speed dial numbers may also be entered. To enter a speed dial number, press [SPEED DIAL] under point 5.
You can switch between capital and small letter by pressing one touch key [32]. Press [31] to add blanks. Enter special characters by pressing one touch keys [28] and [29].
The one touch keys on the Minoltafax 3800 are assigned double function. Select the second level [33] - [64] of the one touch keys by pressing the corresponding key twice.
1 Press [SET].
DIAL REGISTRATION? YES / or 1-6
2 Press [3] on the numeric keypad.
-SELECT REGIST. KEY-
3 Press the one-touch key where the group is to be stored and press [YES].
ONE-TOUCH 01
4 Enter the name of the group.
GROUP NAME=OK=YES
5 Press [YES].
NO.009=
6 Press the one-touch key where the fax number is stored.
Press [SPEED DIAL] and enter the 3-digit speed dial number to store a speed dial number.
NO001=Berlin OK=YES (Fin.=START)
7 Press [YES] to enter other numbers.
NO.002=_(Fin.=Start)
8 Press the one-touch key where the fax number is stored. Press [START] to terminate the entry.
NO002=Tokyo (Fin.=Start)
9 Press [NO] to end the process.
- SELECT RGIST. KEY-(COMPLETE=NO)
10 Press [STOP] to return to the standard display.
JAN.09 13:00 100% -SET DOC.FACE DOWN-

Note
You may also store a sub-address or a selective polling number under a group dial.
Changing / deleting members of a group
Use this function to change or delete individual members of a group.
1 Press [SET].
DIAL REGISTRATION? ▲
YES / or 1-6
2 Press [3] on the numeric keypad.
-SELECT REGIST. KEY
3 Press the one-touch key where the desired group is stored and press [YES].
ONE-TOUCH 01
4 Press [NO].
REGISTERED! KEEP?
OK=YES (EDIT/DEL=NO)
5 Select "enter" using the arrow keys and press [YES.]
*EDIT DELETE
-SELECT&PUSH"YES"-
6 Press [YES].
GROUP NAME=Sales
OK=YES (DEL=NO)
7 Press [NO] to delete the member.
NO.002=BERLIN
OK=YES (DEL=NO)
8 Enter the destination number using the one-touch key or speed dial and press [YES].
Z003=Bern
OK=YES
9 Press [START] to terminate the entry.
NO.003=
(Fin. START)
10 Press [NO] to end the process.
- SELECT RGIST. KEY-(COMPLETE=NO)
11 Press [STOP] to return to the standard display.
JAN. 09 13:00 100%
-SET DOC. FACE DOWN
Deleting a whole group
To delete a group proceed as follows:
1 Press [SET].
DIAL REGISTRATION? ▲
YES / or 1-6
2 Press [3] on the numeric keypad and then the one-touch key where the group is stored.
-SELECT REGIST. KEY
3 Press [NO].
REGISTERED! KEEP?
OK=YES (EDIT/DEL=NO)
4 Select "delete" using the arrow keys and press [YES.]
EDIT *DELETE
-SELECT&PUSH"YES"-
5 Press [NO] to end the process.
- SELECT RGIST. KEY-
(COMPLETE=NO)
6 Press [STOP] to return to the standard display.
JAN. 09 13:00 100%
-SET DOC. FACE DOWN
3.10 Advanced settings
You can adjust the machine to your personal requirements with the following settings.
Buzzer volume
Use this function to set the buzzer tone, for example, when an error occurs or when keys are pressed. Follow the procedure below:
1 Press [SET] and 4 times [V/PIN CODE].
MACHINE OPERATION? YES / or 1-9
2 Press [3] on the numeric keypad.
3 BUZZER VOLUME
3 Use the arrow keys to select the desired setting and press [YES].
*HIGH LOW OFF -SELECT&PUSH"YES"-
4 Press [STOP] to terminate the entry.
JAN.09 13:00 100% -SET DOC.FACE DOWN-
Header
Your fax number, your name, the number of pages to be transmitted, date and time appear in the header. This information is transmitted to the other fax machine. The fax machine takes the data from the user settings for this function.
Use this function to print a header on the transmitted pages at the destination. Follow the procedure below:
1 Press [SET] and 2 times [V/PIN CODE].
TX OPERATION?
YES / or 1-4

2 Press [4] on the numeric keypad.
4HEADER
3 Use the arrow keys to select the desired setting and press [YES].
*ON OFF -SELECT&PUSH"YES"-
4 Press [STOP] to terminate the entry.
JAN.09 13:00 100% -SET DOC.FACE DOWN-
Footer
The footer shows the number of pages, an ID number and the date and time of the transmission. Use this function to print a footer on the received pages. Follow the procedure below:
1 Press [SET] and 3 times [V/PIN CODE].
RX OPERATION? YES / or 1-9
2 Press [8] on the numeric keypad.
8 FOOTER
3 Use the arrow keys to select the desired setting and press [YES].
*ON OFF -SELECT&PUSH"YES"-
4 Press [STOP] to terminate the entry.
JAN.09 13:00 100% -SET DOC.FACE DOWN-
LCD Contrast
Use this function to adjust the LCD contrast of the display to the light conditions on site. Follow the procedure below:
1 Press [SET] and 4 times [V/PIN CODE].
MACHINE OPERATION? YES / or 1-9
2 Press [1] on the numeric keypad.
1 LCD CONTRAST
3 Use the arrow keys to select the desired setting and press [YES].
DARK Light -SELECT&PUSH"YES"-
4 Press [STOP] to terminate the entry.
JAN.09 13:00 100% -SET DOC.FACE DOWN-
Power save mode
The power save function reduces the power consumption of the machine when in standby mode. The factory setting is "Timer". If you want to change the setting, follow the procedure below:
1 Press [SET] and 4 times [V/PIN CODE].
MACHINE OPERATION? YES / or 1-9
2 Press [7] on the numeric keypad.
7 POWER SAVE MODE
3 Use the arrow keys to select the desired setting and press [YES].
OFF *Timer -SELECT&PUSH"YES
4 Set the desired start time using the numeric keypad and press [YES].
ON TIME = _0:00 OK=YES
5 Set the desired end time using the numeric keypad and press [YES].
OFF TIME= _0:00 OK=YES
6 Press [STOP] to terminate the entry.
JAN.09 13:00 100% -SET DOC.FACE DOWN-

Note
If you operate the machine in a PC mode (I-fax, PCL4, GDI, PCL5e) press [WAKE UP] to return to the operating mode.
Setting the power save time
Use this function to set the interval in which the machine shuts down automatically, without need to program the time again. This function is only available if the power save mode is set to "TIMER". If you want to change the setting, follow the procedure below:
1 Press [SET] and 4 times [V/PIN CODE].
MACHINE OPERATION? YES / or 1-9
2 Press [8] on the numeric keypad.
8 POWER SAVE TIME
3 Use the numeric keypad to enter the desired interval and press [YES].
TIME = _min (1-120) OK YES (DEL NO)
4 Press [STOP] to terminate the entry.
JAN.09 13:00 100% -SET DOC.FACE DOWN-
Remote diagnosis
This function enables the technical service to check settings using the telephone line. Ask the technical service to make this option available. If you want to change the setting, follow the procedure below:
1 Press [SET] and 4 times [V/PIN CODE].
MACHINE OPERATION? YES / or 1-9
2 Press [5] on the numeric keypad.
5 REMOTE MONITOR
3 Use the arrow keys to select the desired setting and press [YES].
*ON OFF -SELECT&PUSH"YES"-
4 Press [STOP] to terminate the entry.
JAN.09 13:00 100% -SET DOC.FACE DOWN-
Setting the monitor volume
With this function you can set the volume of the monitor, to hear the build up of the communication.
1 Press [SET] and 4 times [V/PIN CODE].
MACHINE OPERATION? YES / or 1-9
2 Press [4] on the numeric keypad.
4 LINE MONITOR
3 Use the arrow keys to select the desired setting and press [YES].
*HIGH LOW OFF -SELECT&PUSH"YES"-
4 Press [STOP] to terminate the entry.
JAN.09 13:00 100% -SET DOC.FACE DOWN-
3.11 2^nd telephone line (optional)
The module for the 2^nd telephone line is available as an option for the Minoltafax 2800. The installation must be done by the technical service. For the Minoltafax 3800 this option is standard:
Entering your fax number
You can place your name and fax number in the header. The header will appear at the top of the faxes you send. Up to 20 characters can be entered.
The information in the header help the receiving station to identify the sender.
Enter the "+" by pressing [28] 13 times.
Press [31] to add blanks.
1 Press [SET] and 8 times [V/PIN CODE].
1 LINE 2 FAX NO.
YES / or 1-3


2 Press [1] on the numeric keypad and enter your fax number.

OK=YES)
3 Press [YES] to confirm the entry and [NO] to cancel the entry.
JAN. 09 13:00 100%
-SET DOC. FACE DOWN
Selecting the line
Use this function to set the priority for the telephone lines. Also you can lock one of the lines. The locked line is then only available for reception. Choose from the following options:
-
- Priority TX (if possible messages are sent using the 1st line).
-
- Priority TX (if possible messages are sent using the 2nd line).
-
- Lock TX (1st line is locked for sending).
-
- Lock TX (2nd line is locked for sending).
1 Press [SET] and 8 times [V/PIN CODE].
1 LINE 2 FAX NO.
YES / or 1-3


2 Press [2] on the numeric keypad.
LINE 1 TX PRIORITY
OK=YES
3 Select the desired setting using [V/PIN CODE] or [DELETE] and press [YES].
LINE 2 TX PRIORITY
OK=YES


4 Press [STOP] to terminate the entry.
JAN.09 13:00
100%
-SET DOC. FACE DOWN
Dial mode for the 2^nd line
Choose the dialling mode which applies to your 2^nd telephone line. Tone dialling (DTMF) dials the number by transmitting a combination of beeps. Pulse dialling dials by transmitting a number of pulses for each dialled number.
1 Press [SET] and 8 times [V/PIN CODE].
1 LINE 2 FAX NO.
YES / or 1-3


2 Press [3] on the numeric keypad.
3 LINE 2 TONE PULSE
OK=YES
3 Use the arrow keys to select the desired setting and press [YES].
*TONE
PULSE
-SELECT&PUSH"YES"-
4 Press [STOP] to terminate the entry.
JAN.09
13:00
100%
-SET DOC. FACE DOWN
4 Send
4.1 Transmission
Notes on original documents
Your new fax machine can transmit the following document sizes. You can place up to 50 sheets of A4 paper in the Automatic Document Feeder (ADF).
148 mm - 280 mm width
- 128 mm - 356 mm length.
If the document is longer than 380~mm , the machine recognises a document jam and stops scanning the document.
Use yellow, green-yellow or light blue colours for information you do not want to be transmitted.
Make sure ink, glue, correction fluid, etc. are completely dry before you send a fax.

CAUTION
Staples and paper clips may damage the machine.
Remove all staples and paper clips before sending a document.
Using carrier film
Documents that meet the following characteristics must be photocopied or placed in a carrying film before they can be sent. Make sure to insert the closed edge of the carrying film first in the document feeder.
- paper sizes less than 128 mm wide or less than 100 mm long;
- paper lighter than 60 g/m^2 ;
- folded, torn, wrinkled, damp, rough or curled documents;
chemically treated and pressure sensitive copy paper.
Placing the documents
1 Insert the document face down in the document feeder.
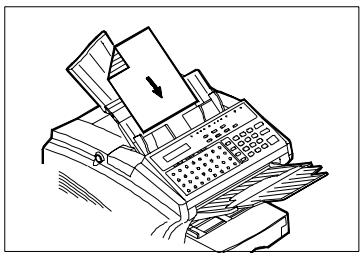
2 Place the document in the centre of the ADF and adjust the paper guides so that they lightly touch the edges of the document.
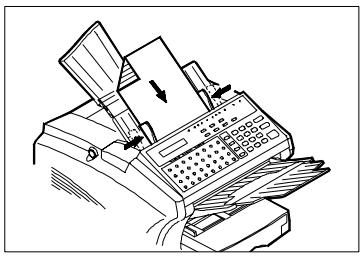
You can insert up to 50 pages of A4 into the document feeder. Make sure the pages are well placed and aligned before starting the transmission. Remove any staples before placing the document in the feeder.
If the paper is curled or pages stick together, more than one page at a time could be fed into the machine which can lead to paper jams or faulty transmissions. In this case you should insert the pages one by one to ensure correct feeding of the documents.
The standard transmission memory holds approx. 192 pages of the ITU Test Document 1 in standard resolution (Minoltafax 3800 576 pages). Ensure the displayed memory capacity does not drop to 0% during scanning, as this may cancel the process.
4.2 Transmission Settings
Resolution
1 Insert the document into the ADF.
If you send documents with normal print or typed documents, it is not necessary to make any further adjustments. To change the resolution press [RESOLUTION].
[RESOLUTION] allows three adjustments:
| Standard | This is the normal resolution for most typed documents and simple drawings (e.g. use of typewriters). |
| Fine | Resolution for fine print, e.g. newspaper with small letters and fine lines. |
| S. Fine | This resolution is suitable for fine print e.g. highly detailed illustrations. |

Note
Additionally press [HALFTONE] for transmissions that require greyscale printing.
Default setting resolution
If you set the resolution via the control panel, this setting is only kept for the current transmission. You can change the resolution permanently.
Follow the procedure below:
1 Press [SET] and once [V/PIN CODE].
SCANNING&PRINTING? YES / or 1-5
2 Press [1] on the numeric key pad, select the required setting using the arrow keys and press [YES].
*STD FINE EX-FINE -SELECT&PUSH"YES"-
3 Press [STOP] to terminate the entry.
JAN.09 13:00 100% -SET DOC.FACE DOWN-
Contrast
Press [TYPE ORG.] on the operation panel to set the contrast. If you raise the contrast, fine differences in tone on the document are enhanced and transmitted more clearly. However, information may be lost during this process.
Default contrast setting
If you set the contrast via the control panel, the setting will only apply to the current transmission. You can change the resolution permanently. Follow the procedure below:
1 Press [SET] and once [V/PIN CODE].
SCANNING&PRINTING?
YES / or 1-5
2 Press [2] on the numeric key pad, select the desired setting using the arrow keys and press [YES].
LIGHT *NORMAL DARK
-SELECT&PUSH"YES"-
3 Press [STOP] to terminate the entry.
JAN. 09 13:00 100%
-SET DOC. FACE DOWN
Closed network
This function minimises the communication with recipients which are stored as one-touch or speed dial numbers on your machine.
1 Press [SET] and 2 times [V/PIN CODE].
TX OPERATION?
YES / or 1-4


2 Press [2] on the numeric key pad, select the required setting using the arrow keys and press [YES].
*ON OFF -SELECT&PUSH"YES"-
3 Press [STOP] to terminate the entry.
JAN.09 13:00 100% -SET DOC.FACE DOWN-
Default transmission setting
This function enables you to store the memory transmission or direct transmission as a default setting.
1 Press [SET] and 2 times [V/PIN CODE].
TX OPERATION?
YES / or 1-4


2 Press [1] on the numeric key pad, select the required setting using the arrow keys and press [YES].
*MEM TX ADF TX -SELECT&PUSH"YES"-
3 Press [STOP] to terminate the entry.
JAN. 09 13:00 100% -SET DOC. FACE DOWN-

Note
For group transmission, broadcast and timer transmission, memory transmission must be active.
Fax forwarding
Use this function to pass fax messages on to a maximum of 20 destinations. You can choose whether only messages from one sender are to be passed on, or if all incoming messages are to be forwarded.
1 Press [SET] and 2 times [V/PIN CODE].
TX OPERATION? YES / or 1-4
2 Press [3] on the numeric key pad.
3 FAX FORWARDING
3 Enter a number between 1 - 20 and press [YES].
FORWARD NO=_1 OK=YES / or 01-20
4 Press [V/PIN CODE] to turn the function on or off and press [YES].
FORWARD 01=ON OK=YES
5 Press [V/PIN CODE] to enter the day when forwarding is to start and press [YES].
SEL. START DAY=SUN. OK=YES / or 0-6
6 Press [V/PIN CODE] to enter the day when forwarding is to stop and press [YES].
SEL. STOP DAY=SUN. OK=YES / or 0-6
7 Enter the time for transmission using the numeric key pad and press [YES].
START TIME=00:00 OK=YES (DEL=NO)
8 Enter the time to end the transmission using the numeric key pad and press [YES].
STOP TIME=00:00 OK=YES (DEL=NO)
9 Press [V/PIN CODE] to set whether the transmitted messages are to be printed by your machine and press [YES].
10 Enter the complete fax number of the destination and press [YES].
If you do not enter any number, all incoming messages will be forwarded.
=123456_
OK=YES (DEL=NO)
11 Enter the complete fax number of the destination and press [YES].
=234567_
OK=YES (DEL=NO)
12 If you want to program a further destination, enter a new number (1-20) and press [YES].
FORWARD NO = _1
OK=YES / or 01-20
13 Press [STOP] to terminate the entry.
JAN. 09 13:00 100%
-SET DOC. FACE DOWN
4.3 Dialling modes
There are six different dialling methods available.
Insert the document face down into the ADF and dial with the dialling method of your choice.
Manual dialling using the numeric key pad
Enter the number using the numeric key pad. You can check the number on the display and, if necessary, delete it and then
$$ = 1 2 3 4 5 6 _ (T X = S t a r t) $$
enter the new number. Then, press [START]. A maximum of 30 digits can be entered using the numeric key pad.
Automatic dialling using one-touch dialling
Press one of the programmed one-touch keys [01] - [32] (Minoltafax 3800 [01] - [64]).
After scanning the document, the machine will automatically dial the number.
The one touch keys on the Minoltafax 3800 are assigned double function. Select the second level [33] - [64] of the one touch keys by pressing the corresponding key twice.
Automatic dialling using speed dialling
1 Press [SPEED DIAL] and enter the three-digit speed dial number (001-100).
$$ S P E E D \quad D I A L = 0 0 1 $$
2 The name of the remote fax machine appears on the display. Press [START]. After scanning the document the machine will dial automatically.
$$ = \text {T O K Y O} \quad (\text {T X} = \text {S t a r t}) $$
Automatic call groups
Press one of the one-touch keys [01] - [32] (Minoltafax 3800 [01] - [64]). If a group is stored, its name will appear on the display.
GROUPDIAL=MINOLTA
After scanning the document the machine will dial automatically.
Program dialling
Use the last 8 one-touch keys [25] - [32] (Minoltafax 3800 [57] - [64]) to program the following functions: The one touch keys on the Minoltafax 3800 are assigned double function. Select the second level [33] - [64] of the one touch keys by pressing the corresponding key twice.
- Timer transmission, see "Program dialling, timer transmission" on page 4-18.
- Broadcast, see "Program dialling, broadcast transmission" on page 4-20.
- Polling reception, see Programming polling reception on page 5-10.
- Mailbox transmission, see "Program dialling, mailbox transmission" on page 4-29. "Polling reception" on page 5-8.
Relay transmission, see "Program dialling relay transmission" on page 4-23.

Note
The functions broadcast, polling, mailbox transmission and relay transmission can be combined with timer transmission.
Combination dialling
You can use this function to dial the pre-dial number you have stored in a one-touch key or as a speed dial number. It is necessary that the pre-dial number and a [+] character (e.g. 123+ ) are stored as one-touch number or speed dial number. Then recall the first part of the number from memory and then enter the second part manually.
1 Press the one-touch key or speed dial key where you have stored the pre-dial number.
ONE TOUCH DIAL 03=
2 Press [YES].
= 123+
3 Enter a further number and press [START].
=123456
(TX=Start)
You can also enter the second part of the number using the one-touch keys or the speed dial numbers. It is not possible to add a second number with a [+] to the entry.
4.4 Memory transmission
The memory transmission should be selected as the default transmission mode. This gives the advantage, that documents are available again after they are fed into the memory. It is also possible to feed documents into the memory while the communication is proceeding. The documents in memory are processed automatically. Memory transmission is safer because pages with transmission errors are sent again automatically.
1 Insert the document face down into the ADF.
一 = ENTER FAX NO. or FUNCTION
2 Dial the telephone number with one of the one-touch keys or speed dial numbers.
=123456_ (TX=Start)
3 Press [START] to scan the document into the memory. It will be automatically sent from memory.
MEMORY 100% 123456

Note
Your Minolta fax 2800/3800 is equipped with ECM (Error Correction Mode). This function repeats data that may have been lost due to bad line conditions.
4.5 Direct transmission
You can send directly from the ADF if not enough memory is available to scan all of the document you want to transmit.
1 Place the document face down in the document feeder and press [SPEAKER] on the control panel.
空 = ENTER FAX NO. or FUNCTION
2 Dial the number with the numeric key pad, one-touch or seed dial number, wait for the response of the destination and press [START].
(234567) -PUSH START KEY-
4.6 Delayed transmission (timer)
This function is used to send at a preprogrammed time, e.g. to a recipient on a different time zone or to take advantage of lower transmission rates at specific times.
The timer function is only available when memory transmission is active. You can use one of the one touch keys to program the delayed transmission (see "Program dialling, timer transmission" on page 4-18).
Insert the document face down in the document feeder.
Adjust contrast and resolution if necessary.
1 Press [FUNCTION] and [2] on the numeric key pad.
TIMER = 00:00 OK YES
2 Enter the desired transmission time and press [YES].
TIMER = 12 : 30 OK=YES
3 Enter the call number.
ENTER FAX NO. OR FUNCTION
4 Press [YES]. The machine scans the document into memory.
=123456_ OK=YES (SUB=▼)
5 [NO] to terminate the entry.
TIMER = 12:30 OK YES (COMPLETE NO)
6 Press [NO] to end the process.
JAN.09 13:00 100% -SET DOC.FACE DOWN-
If the memory becomes full during the scan process, your fax will return to stand-by mode. In this case repeat the programming procedure when enough memory is available again.

Note
The functions broadcast, polling, mailbox transmission and relay transmission can be combined with timer transmission.
Program dialling, timer transmission
You may also program one of the one-touch keys [25] - [32] (Minoltafax 3800 keys [57] - [64]) for the timer function.
1 Press [SET].
DIAL REGISTRATION? YES / or 1-6
2 Press [4] on the numeric key pad and the desired one-touch key [25] - [32] (Minoltafax 3800 [57] - [64]).
-SELECT REGIST. KEY
3 Press [2] on the numeric key pad.
FUNCTION SEL. 1/2/3/7/8
4 Enter the desired transmission time and press [YES].
TIMER = 12:30 OK=YES
5 Enter the call number.
ENTER FAX NO. OR FUNCTION
6 Press [YES].
= 123456_- OK YES (SUB =
7 Press [STOP] to terminate the entry.
DIAL REGISTRATION? YES / or 1-6

Note
The functions broadcast, polling, mailbox transmission and relay transmission can be combined with timer transmission.
4.7 Broadcasting
Your Minoltafax 2800 is capable of sending documents from the memory to up to 148 recipients (Minoltafax 3800 180 recipients) using the direct dial, one-touch, speed and group dial. The machine dials and transmits the document sequentially to each recipient. If one of the numbers is engaged, your fax machine will dial the next one and finally return to the engaged number and try again. After broadcasting, it will automatically print a report and return to stand-by mode. If the function reservation report has been selected, a list of the destinations will be printed following the scanning.
Insert the document face down in the document feeder.
Adjust contrast and resolution if necessary.
1 Press [FUNCTION] and [1] on the numeric key pad.
1 BROADCAST
2 Enter the desired number using the numeric key pad, one-touch keys or speed dial and press [YES].
NO.001=OK=YES
3 Repeat this procedure until you have entered all recipients.
NO. 002=234567 OK=YES
4 Press [START] to terminate the entry.
NO. 003= (Fin.=START)
5 Press [YES] to confirm the entries or press [START] to begin the transmission.
CHECK DESTINATION? OK=YES (Fin.=START)
- When checking the recipients, you may confirm them by pressing [YES], erase them from the broadcast transmission or change them by pressing [NO].
Program dialling, broadcast transmission
You may also program one of the one-touch keys [25] - [32] (Minoltafax 2800/3800 keys [57] - [64]) for the broadcast function.
1 Press [SET].
DIAL REGISTRATION? YES / or 1-6
2 Press [4] on the numeric key pad and the desired one-touch key [25] - [32] (Minoltafax 3800 [57] - [64]).
-SELECT REGIST. KEY
3 Press [1] on the numeric key pad.
FUNCTION SEL. 1/2/3/7/8
4 Enter the desired number and press [YES].
NO.001=OK=YES
5 Repeat this procedure until you have entered all recipients.
NO. 002=234567 OK=YES
6 Press [START] to terminate the entry.
NO. 003=_ (Fin.=START)
7 Press [YES] to confirm the entries or press [START] to begin the transmission.
CHECK DESTINATION? OK=YES (Fin.=START)
- When checking the recipients, you may confirm them by pressing [YES], erase them from the broadcast transmission or change them by pressing [NO].
8 Press [STOP] to terminate the entry.
DIAL REGISTRATION? YES / or 1-6
4.8 Relay transmission
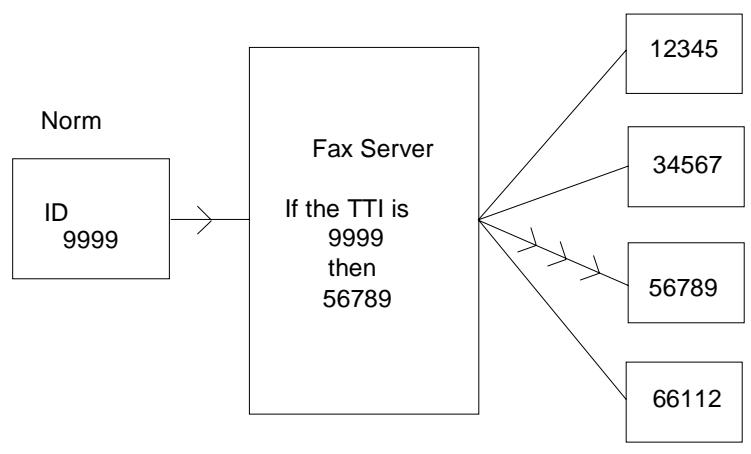
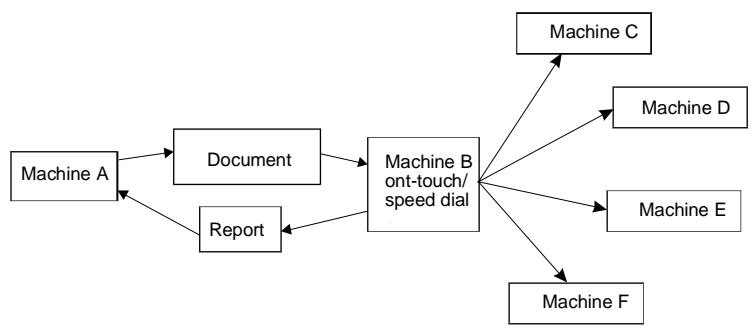
This function takes advantage of a remote fax machine's memory to reduce communication costs. You send a document to one or several fax machines and they in turn send the document to several destinations. If you use several identical machines in your company, you can use a tree-structured distribution.
This function enables you to transmit the documents to a recipient and inform that fax machine to forward your faxed document to the number(s) programmed in its relay box.

Note
Machines A and B must be compatible and both must have the "relay broadcasting" function, even if they are different models.
If the relay location (hub) and final destination are abroad, then you can reach all destinations with only one long-distance call.
Start relay transmission
Use this function to start the relay transmission. The entries made must match the entries of the relay station. The relay box in the hub is set for transmission.
1 Press [FUNCTION] and [8] on the numeric key pad.
8 RELAY INITIATE
2 Enter the number of the relay station (hub) using the numeric key pad, one-touch or speed dial and press [YES].
=123456_ OK=YES (DEL=NO)
3 Use the numeric key pad to enter the four-digit relay box ID and press [YES].
RELAYBOXID=OK=YES
Use the numeric key pad to enter the 4 digit password, if required and press [YES].
PASSWORD=OK=YES
The machine scans the pages and automatically starts transmitting them.

Note
According to the settings of the relay station, a transmission report will be sent back.
Program dialling relay transmission
You may also program one of the one-touch keys [25] - [32] (Minoltafax 2800/3800 keys [57] - [64]) for the relay function.
1 Press [SET].
DIAL REGISTRATION?
YES / or 1-6


2 Press [4] on the numeric key pad and the desired one-touch key [25] - [32] (Minoltafax 3800 [57] - [64]).
-SELECT REGIST. KEY
3 Press [8] on the numeric key pad.
FUNCTION
SEL. 1/2/3/7/8
4 Enter the number of the relay station (hub) using the numeric key pad, one-touch or speed dial and press [YES].
=123456_
OK=YES (DEL=NO)
Use the numeric key pad to enter the four-digit relay box ID and press [YES].
RELAYBOXID =
OK=YES
6 Use the numeric key pad to enter the 4 digit password, if required and press [YES].
TOKEN=
OK= YES
7 Press [STOP] to terminate the entry.
DIAL REGISTRATION?
YES / or 1-6


Set relay boxes
This function relates to the relay station (see machine "B" in the illustration on page 4-21). I.e. setting the relay box of your machine as a hub in a relay transmission. You can configure up to 5 relay boxes. Pleas note that the recipient must be stored in the relay station as one-touch, speed dial or group dial numbers.
1 Press [SET].
DIAL REGISTRATION? ▲
YES / or 1-6
2 Press [6] on the numeric key pad.
6 RELAY BOX
3 Use the numeric key pad to set a number (0-4) for the relay box.
RELAYBOX4ID=OK YES
4 Use the numeric key pad to enter the four-digit relay box ID and press [YES].
Relaisbox 1 ID=1234
OK=Ja (Lösch=Nein)
Use the numeric key pad to enter the 4 digit password, if required and press [YES].
RELAYBOX1PW=1234
OK= YES (DEL=NO)
6 Enter the complete number of the destination of the transmission report, using the numeric key pad and press [YES].
REPORT=
OK=YES
7 Enter the fax numbers of the recipients using the one-touch, speed dial or group dial.
NO001=Berlin
OK=YES (Fin.=START)
8 Press [YES].
NO.001=Berlin
OK=YES (Fin.=START)
9 Repeat the procedure starting with point 7 until all destinations are set and press [START].
NO.002=
(Fin. Start)
10 Press [STOP] to terminate the entry.
JAN. 09 13:00 100%
-SET DOC. FACE DOWN
4.9 Polling transmission
The Minoltafax 2800/3800 enables you to store documents which the recipient can retrieve when required. The document can even consist of several pages.
Your Minoltafax offers you a single mode and a multiple mode. In single mode, the document can only be polled once. After that the document is not available any more. In multiple mode, the document is scanned and polled from memory. After the polling the document remains in memory so that several pollings are possible. To delete the document, select "Delete document".
In various steps you will be asked to enter an F CODE. There are three different F CODE settings:
F CODE SEP (selective polling TX/RX)
Set this F CODE if you are preparing a document for confidential polling. Only recipients that have the same F CODE stored in their machine can poll the document. If a partner has stored a document using SEP, you must use the F CODE SEP to poll the document.
F CODE SUB
Use this F CODE to address sub-addresses in a server net work directly.
- F CODE password (PWD)
If you wish to protect your mailbox with a second lock, you can assign an additional password. Enter the desired password as a 4 digit number.
Insert the document into the ADF in order to scan it. Adjust contrast and resolution if necessary.
1 Press [FUNCTION] and [1] on the numeric key pad.
6 POLLING TX
2 Use the numeric key pad to enter the four-digit polling ID and press [YES].
POLLING ID =1234 OK=YES (DEL=NO)
3 Use the numeric key pad to enter the 4 digit password, if required and press [YES].
POLLING PW=1234
OK=YES (DEL=NO)
Press only [YES] if you do not want to enter a password.
4 Press [YES] to continue.
If you enter an ID already in use, press [NO] to delete the document.
REGISTERED! KEEP? OK=YES (EDIT/DEL=NO)
Use the arrow keys to select the desired setting and press [YES].
*SINGLE MULTI -SELECT&PUSH"YES"-
The machine scans the document into memory.

Note
For polling without an ID (F CODE SEP) only one document is available at the fax number. For polling with ID (F CODE SEP) callers can poll several documents from one fax number. However, they must know the ID. Each document is assigned its own ID. You can also combine both options. If you store several documents using F CODE SEP, it is advisable to prepare a table of content without an ID.
4.10 Mailbox transmission
This function is used to transmit a document to a mailbox. This is helpful if only a specific person should be reading the message. However, both machines must be of the same type.
The transmission is only executed if both mailbox ID codes are identical. This prevents the document from being transmitted to an incorrect mailbox.
The document is scanned into the remote fax machine's memory and can only be printed if the recipient enters the correct 4-digit mailbox passcode.
Ask for the mailbox ID of the receiving machine before the transmission.
Insert the document face down in the document feeder. Adjust contrast and resolution if necessary.
1 Press [FUNCTION] and [1] on the numeric key pad.
3 MAIL BOX TX
2 Enter the number and press [YES].
= 123456 OK YES (DEL = NO)
3 Use the numeric key pad to enter the four-digit mailbox ID for the recipient and press [YES].
MAILBOX ID = OK=YES
Use the numeric key pad to enter the 4 digit password, if required and press [YES].
PASSWORD=OK=YES
If the destination has not stored a password, just press [YES].
The machine scans the document into memory.
Program dialling, mailbox transmission
You may also program one of the one-touch keys [25] - [32] (Minoltafax 2800/3800 keys [57] - [64]) for the mailbox function.
1 Press [SET].
DIAL REGISTRATION?
YES / or 1-6


2 Press [4] on the numeric key pad and the desired one-touch key [25] - [32] (Minoltafax 3800 [57] - [64]).
-SELECT REGIST. KEY
3 Press [3] on the numeric key pad.
FUNCTION
SEL. 1/2/3/7/8
4 Enter the number and press [YES].
= 123456
OK=YES (DEL=NO)
Use the numeric key pad to enter the four-digit mailbox ID for the recipient and press [YES].
MAILBOX ID =
OK=YES
6 Use the numeric key pad to enter the 4 digit password, if required and press [YES].
PASSWORD =
OK=YES
If the destination has not stored a password, just press [YES].
7 Press [STOP] to terminate the entry.
DIAL REGISTRATION?
YES / or 1-6


4.11 Batch transmission
Use this function to store several documents in memory and send all of them at a specific time. In this way the receiving station need only be called once. The recipient must be stored as a one-touch dial number.
Insert the document face down in the document feeder.
1 Press [SET].
DIAL REGISTRATION? YES / or 1-6
2 Press [5] on the numeric key pad and the desired one-touch key.
-SELECT REGIST. KEY
3 Enter the desired transmission time and press [YES].
- Insert further documents in the ADF for scanning.
TX TIME=12:30 OK=YES
4 Press [NO] to cancel the entry or press a one-touch key to store further transmissions.
-SELECT REGIST. KEY-(COMPLETE=NO)
After the described procedure is terminated, the batch transmission is stored under the selected one-touch key. You can delete the batch transmission by deleting the one-touch key.
4.12 Delete schedules
This function enables you to delete programmed transmissions and data stored in the memory. If you stored more than one transmission, press [V/ PIN CODE] and [DELETE] to scroll through the entries.
1 Press [SCHEDULE] on the control panel.
JAN. 09 13:00 100%
-SET DOC. FACE DOWN
2 Press [STOP] to delete the transmission.
001 [12:30] Timer
Press [JOURNAL] to display additional information. Press
[V/PIN CODE] or [DELETE] to scroll through the entries. Press [STOP], to interrupt the entry.
The document is deleted from memory.
3 Press [STOP] to return to the standard display.
JAN. 09 13:00 100%
-SET DOC. FACE DOWN
5 Reception
5.1 Manual reception
Basically, manual reception only makes sense if you are expecting voice calls on the same line. You should keep this in mind when you set the reception mode. Because the machine has no telephone receiver a separate phone must be attached to the same telephone wall outlet. Plug the telephone jack in the same outlet as the fax machine. Answer the call and press [START].
Default reception setting
1 Press [SET] and 3 times [V/PIN CODE].
RX OPERATION?

YES / or 1-9

2 Press [7] on the numeric keypad, select the required setting using the arrow keys and press [YES].
*AUTO MANUAL
-SELECT&PUSH"YES"-
If you select AUTO, the system
will answer the calls automatically after the set number of rings. If you select MANUAL, you have to take the receiver off the telephone, wait for the fax signal and press [START].
3 Press [NO] to terminate the
entry.
JAN. 09 13:00 100%
-SET DOC. FACE DOWN
5.2 Automatic reception
Automatic reception is set as default. No further settings are required.
The machine will answer each call after a set number of rings. The factory setting is one ring.
5.3 Memory reception during printer problem
Incoming data is stored in the memory as described below.
no paper
paper jam
no toner
- printer cover open
no imaging unit.
As soon as the error has been eliminated, the data will be automatically printed.
5.4 Memory reception
When you use this function, the message will be stored in the memory. Only if you switch off the memory reception option and enter the correct password, will the fax message be printed out. Instead of a password, you can also program a time when the message is to be printed. (Also see next page.)
1 Press [SET] and 3 times [V/PIN CODE].
RX OPERATION?
YES / or 1-9


2 Press [1] on the numeric keypad, select the required setting using the arrow keys and press [YES].
*ON OFF
-SELECT&PUSH"YES"-
3 Enter the time when you want to start the memory RX option and press [YES].
ON TIME = 12:30
OK=YES
4 Enter the time when you want to end the memory RX option and press [YES].
OFF TIME = 12:50
OK=YES
Use the numeric keypad to enter the 4 digit password, if required, and press [YES].
PASSWORD=
OK=YES
If you do not want to use a password, just press [YES].
6 Press [STOP] to terminate the entry.
JAN.09 13:00 100%
-SET DOC. FACE DOWN
Printing memory reception
1 Press [FUNCTION] and [5] on the numeric keypad.
5 PRINT MEMORY RX
2 Use the numeric keypad to enter the 4 digit password and press [YES].
PASSWORD=OK=YES
Your fax machine prints the message.
5.5 Mailbox reception
This function is used to receive a document in a mailbox. This is helpful if only a specific person should be reading the message. However, both machines must be of the same type.
The reception is only executed if both mailbox ID codes are identical. This prevents the document from being transmitted to an incorrect mailbox.
Before transmission inform the sender about your mailbox ID.
The incoming document is stored in the Minoltafax 2800/3800 memory and will only be printed once the correct 4-digit mailbox number and, if required, the 4-digit mailbox ID have been entered. You can configure up to 10 mailboxes.
Setting up a mailbox
1 Press [SET] and 3 times [V/PIN CODE].
RX OPERATION?
YES / or 1-9


2 Press [5] on the numeric keypad and enter a mailbox number using the numeric keypad (0-9).
MAILBOX NO. =
SELECT 0-9
3 Enter a 4-digit mailbox ID using the numeric keypad (0000 -9999) and press [YES].
MAILBOX 1 ID =_
OK=YES
4 Use the numeric keypad to enter the 4 digit password, if required as additional safety and press [YES]
MAILBOX 1PW=_
OK=YES
If you do not want to use a password, just press [YES].
5 Press [STOP] to terminate the entry.
RX OPERATION?
YES / or 1-9


Deleting a mailbox
1 Press [SET] and 3 times [V/PIN CODE].
RX OPERATION? YES / or 1-9

2 Press [5] on the numeric keypad and enter the number of the mailbox to be deleted using the numeric keypad (0-9).
MAILBOX NO. = SELECT 0-9
3 Press [NO].
RGISTERED! KEEP?
KEEP=YES (DEL=NO)
4 Enter the 4-digit password of the mailbox to be deleted using the numeric key pad (0000-9999) and press [YES] to delete the box or press [NO] to delete the p
OLD M-BOX 1PW=1234 OK=YES (DEL=NO)
5 Enter the number of the next mailbox to be deleted using the numeric key pad (0-9) and continue as described above.
MAILBOX NO.=_ SELECT 0-9
6 Press [STOP] to end the process.
JAN.09 13:00 100% -SET DOC.FACE DOWN-
Printing the content of a mailbox
1 Press [FUNCTION] and [4] on the numeric keypad.
4 PRINT MAILBOX RX
2 Enter the number using the numeric keypad (0-9).
MAILBOX NO.=_ SELECT 0-9
3 Use the numeric keypad to enter the 4 digit password and press [YES].
5.6 Polling reception
The polling reception function is used to poll documents from remote fax machines as long as the documents have been placed either in the feeder or the memory of the remote fax machine.
In various steps you will be asked to enter an F CODE. There are three different F CODE settings:
F CODE SEP (selective polling TX/RX)
Set this F CODE if you are preparing a document for confidential polling. Only recipients that have the same F CODE stored in their machine can poll the document. If a partner has stored a document using SEP, you must use the F CODE SEP to poll the document.
F CODE SUB
Use this F CODE to address sub-addresses in a server net work directly.
F CODE password (PWD)
If you wish to protect your mailbox with a second lock, you can assign an additional password. Enter the desired password as a 4 digit number.
1 Press [FUNCTION] and [7] on the numeric keypad.
7 POLLING RX
2 Enter the desired number using the numeric keypad, one-touch keys or speed dial and press [V/PIN CODE].
NO.001=123456 OK=YES (SEP=▼)
Press [YES] to continue from point 5 without entering a polling ID and a password. Confirm the fax number by pressing [YES].
3 Enter the polling ID of the recipient using the numeric keypad and press [YES].
POLLING ID =1234 OK=YES (DEL=NO)
Up to 20 characters can be entered.
Use the numeric keypad to enter the 4 digit password, if required and press [YES].
POLLING PW=1234 OK=YES (DEL=NO)
Up to 20 characters can be entered.
5 Press [START] to terminate the entry.
NO.002= (Fin.=START)
6 Press [YES] to confirm the entries or press [START] to begin the transmission.
CHECK DESTINATION? OK=YES (Fin.=START)
- When checking the recipients, you may confirm them by pressing [YES], erase them from the broadcast transmission or change them by pressing [NO].
7 Press [START] to terminate the entry.
JAN.09 13:00 100% -SET DOC.FACE DOWN-
The machine starts polling.

Note
For polling without an ID (F CODE SEP) only one document is available at the fax number. For polling with ID (F CODE SEP) you can poll several documents from one fax number. However, you must know the ID. Each document is assigned to individual ID. You may combine both procedures. If the other fax machine stores several documents using F CODE SEP, it is advisable to prepare a table of content without an ID.
Programming, polling RX
You may also program one of the one-touch keys [25] - [32] (Minoltafax 2800/3800 keys [57] - [64]) for the polling function.
1 Press [SET].
DIAL REGISTRATION? YES / or 1-6
2 Press [4] on the numeric key pad and the desired one-touch key [25] - [32] (Minoltafax 3800 [57] - [64]).
-SELECT REGIST. KEY
3 Press [7] on the numeric keypad.
FUNCTION SEL.1/2/3/7/8
4 Enter the desired number(s) using the key pad, one-touch, speed or group dial and confirm each by pressing [YES].
NO.001=OK=YES
5 Press [START] to terminate the entry.
NO. 003=_ (Fin.=START)
6 Press [YES] to confirm the entries or press [START] to begin the transmission.
CHECK DESTINATION? OK=YES (Fin.=START)
- When checking the recipients, you may confirm them by pressing [YES], erase them from the pollin transmission or change them by pressing [NO].
7 Press [START] to terminate the entry.
JAN.09 13:00 100% -SET DOC.FACE DOWN-

Note
You may also combine polling with the timer function.
5.7 Group polling
Use this function to poll documents from up to 10 calling groups, each of which may have up to 10 members. Also you can set the week day and the time.
In various steps you will be asked to enter an F CODE. There are three different F CODE settings:
F CODE SEP (selective polling TX/RX)
Set this F CODE if you are preparing a document for confidential polling. Only recipients that have the same F CODE stored in their machine can poll the document. If a partner has stored a document using SEP, you must use the F CODE SEP to poll the document.
F CODE SUB
Use this F CODE to address sub-addresses in a server net work directly.
- F CODE password (PWD)
If you wish to protect your mailbox with a second lock, you can assign an additional password. Enter the desired password as a 4 digit number.
1 Press [SET] and 3 times [V/PIN CODE].
RX OPERATION?
YES / or 1-9


2 Press [9] on the numeric keypad, select the required setting using the arrow keys and press [YES].
POLL GROUP NO. = 01 OK=YES/or 1-10
3 Press [V/PIN CODE] or [DELETE] to set whether you want to activate the group and press [YES] to continue.
POLL GROUP 01= OFF OK=YES


4 Press [V/PIN CODE] to enter the day when polling is to start and press [YES].
SEL. START DAY=SUN. OK=YES / or 0-6


Press [V/PIN CODE] to enter the day when polling is to stop and press [YES].
SEL. STOP DAY=SUN. OK=YES / or 0-6


6 Enter the time for transmission using the numeric keypad and press [YES].
START TIME=00:00 OK=YES (DEL=NO)
7 Enter the time for transmission using the numeric keypad and press [YES].
STOP TIME=00:00 OK=YES (DEL=NO)
8 Use the numeric keypad to enter the radial interval for the whole operation and press [YES].
REDIAL TIME OK=YES / or 1-8
9 Enter the required fax number(s) and confirm by pressing [YES].
NO.001=OK=YES
10 Enter the polling ID of the sender using the numeric keypad and press [YES].
POLLING ID =1234 OK=YES (DEL=NO)
Up to 20 characters can be entered.
11 Use the numeric keypad to enter the 4 digit password, if required and press [YES].
POLLING PW=1234 OK=YES (DEL=NO)
- Your password must match the password of the other fax machine.
12 Press [START] to terminate the entry. If you want to enter further numbers, repeat the procedure form point 9.
NO.002= (Fin.=START)
13 Press [YES] to confirm the entries or press [START] to begin the transmission.
CHECK DESTINATION? OK=YES (Fin. START)
- When checking the recipients, you may confirm them by pressing [YES], erase them from the pollin transmission or change them by pressing [NO].
14 Press [START] to terminate the entry.
JAN. 09 13:00 100%
-SET DOC. FACE DOWN

Note
For polling without an ID (F CODE SEP) only one document is available at the fax number. For polling with ID (F CODE SEP) you can poll several documents from one fax number. However, you must know the ID. Each document is assigned to individual ID. You may combine both procedures. If the other fax machine stores several documents using F CODE SEP, it is advisable to prepare a table of content without an ID.
5.8 Settings for receiving a fax
Setting the paper size
This function enables you to select the desired paper format for printing. You can choose between A4, Letter and Legal.
1 Press [SET] and once [V/PIN CODE].
SCANNING&PRINTING?
YES / or 1-5
2 Press [5] on the numeric keypad.
5 REC PAPER SIZE
3 Use the arrow keys to select the desired setting and press [YES].
^* A4 LETTER LEGAL
-SELECT&PUSH"YES"-
4 Press [STOP] to terminate the entry.
SCANNING&PRINTING?
YES / or 1-5


Setting number of rings
This function enables you to set the number of rings before the machine answers an incoming call. Follow the procedure below :
1 Press [SET] and 3 times [V/PIN CODE].
RX OPERATION? YES / or 1-9
2 Press [2] on the numeric keypad, enter the required setting using numeric key pad and press [YES].
NO.of RINGS = 12 (1-16) OK=YES (DEL=NO)
3 Press [STOP] to terminate the entry.
RX OPERATION? YES / or 1-9
Setting multiple page printing
This function enables you to print a copy of the incoming document during reception. If you select ON (SORT), your machine will sort the copies if you are receiving a document consisting of several pages (Batch sorting). Follow the procedure below:
1 Press [SET] and 3 times [V/PIN CODE].
RX OPERATION?
YES / or 1-9


2 Press [3] on the numeric keypad, select the required setting using the arrow keys and press [YES].
*ON ON(SORT) OFF -SELECT&PUSH"YES"-
3 Press [STOP] to terminate the entry.
JAN. 09 13:00 100% -SET DOC. FACE DOWN-
Setting reduction RX
This function enables you to determine what will happen if the incoming document is longer than your fax paper. 3 settings are available.
ON: The fax machine reduces the size of the image so that it can be printed on A4 paper.
OFF: The fax machine will not reduce the received document but print the remaining information on a second page.
CUT: The machine will not print the lower part of the image in case it does not exceed 18mm . Where the length does exceed 10mm , it will continue printing on a second page.
1 Press [SET] and 3 times [V/PIN CODE].
RX OPERATION?
YES / or 1-9


2 Press [4] on the numeric keypad, select the required setting using the arrow keys and press [YES].
*ON
OFF
CUT
-SELECT&PUSH"YES"-
3 Press [STOP] to terminate the entry.
JAN.09
13:00
100%
-SET DOC. FACE DOWN
Closed network
This function minimises the communication with recipients which are stored as one-touch or speed dial numbers on your machine.
1 Press [SET] and 3 times [V/PIN CODE].
RX OPERATION?
YES / or 1-9


2 Press [6] on the numeric keypad, select the required setting using the arrow keys and press [YES].
*ON OFF -SELECT&PUSH"YES"-
3 Press [STOP] to terminate the entry.
JAN. 09 13:00 100%
-SET DOC. FACE DOWN
Setting the image exposure
Use this function to adjust the intensity of the printout. Follow the procedure below:
1 Press [SET] and once [V/PIN CODE].
SCANNING&PRINTING? YES / or 1-5

2 Press [3] on the numeric keypad.
3 PRINT DENSITY
3 Use the arrow keys to select the desired setting and press [YES].
DARK(□□□□□)LIGHT -SELECT&PUSH"YES"-
4 Press [STOP] to terminate the entry.
SCANNING&PRINTING? YES / or 1-5

Selecting paper tray (optional accessory)
This function enables you to assign the printing functions of your Minoltafax 2800/3800 to both paper trays. If you select ON (shift) the machine will automatically switch to the full tray if one becomes empty. If you select OFF an error messaged will display.
1 Press [SET] and 7 times [V/PIN CODE].
SET PRINTER?
YES / or 1-8


2 Use the arrow keys to select the desired setting and press [YES].
*ON OFF
-SELECT&PUSH"YES"-
3 Press [STOP] to terminate the entry.
JAN. 09 13:00 100%
-SET DOC. FACE DOWN
6 Copy
6.1 Copying from the document feeder
You can use your Minoltafax 2800/3800 to produce up to 99 copies in one operation. If you select (SORT=YES), the machine will sort the copies of a multi-page document.
1 Insert the document face down into the ADF.
- Adjust contrast and resolution if necessary.
空 = ENTER FAX NO. or FUNCTION
2 Press [COPY] on the control panel.
*COPY* COPIES=0_ OK START
3 Enter the required quantity using the numeric key pad and press [START].
*COPY* COPIES=02 OK START (SORT YES)
Press [YES] to have the copies sorted.
The machine starts copying.
6.2 Set reduction rate
You can use this function to reduce long documents to max. 70% . Please note that you can use this function copy mode only. 2 settings are available.
ON: The fax machine reduces the size of the image so that it can be printed on A4 paper.
OFF: The fax machine will not reduce the received document but print the lower part of the image on a second page.
1 Press [SET] and once [V/PIN CODE].
SCANNING&PRINTING? YES / or 1-5

2 Press [4] on the numeric key pad, select the required setting using the arrow keys and press [YES].
*ON OFF -SELECT&PUSH"YES"-
3 Press [STOP] to terminate the entry.
JAN. 09 13:00 100% -SET DOC. FACE DOWN-
7 Connecting the fax machine to the computer
7.1 Preparation
The parallel cable only serves for PCL and GDI print. Use the serial cable to operate the optional fax software for sending, receiving, scanning and printing with the standard fax resolution. Scanning with the serial cable is done by an optional TWAIN driver. The parallel cable must not exceed 3 meters in length. Only use shielded cables.
Placing the ferrite cores
Ferrite corres ensure that radio interference does not disturb the data transmission. Afix the cores to the connection cable as described below. If you use the serial interface, you only need to use the ferrite core, if the cable is longer than 3 meters.
The ferrite core is available as follows: Order no. 0700-0056-01 (Kitegawa).
1 Place the cable in the ferrite core. Place the core close to the jack.
2 Close the core.
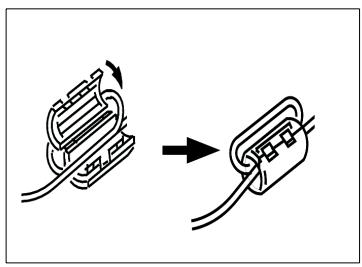
7.2 PC connection
1 Make sure that PC an fax machine are both turned off.
2 Connect the printer cable and/or the RS232C cable to the corresponding terminals on the machine.
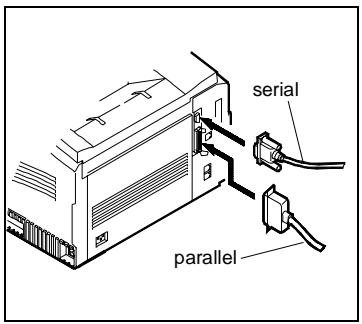
3 Connect the other end of the cable to your computer's parallel port.
4 Start the PC and switch the fax machine on.
7.3 Setting up the fax machine as a PC fax and PC scanner
If you have installed LaserFAX, Unimessage or WinFax Pro V 10.0 on your PC for these functions, then there is no need to make any further changes. The software is available as an optional accessory. For further information please refer to the relevant software manual.
If you use the machine as a PC fax machine, only the machine's modem is in use. With the LaserFax the achieved compatibility allows a transfer rate of up to 14400 bps between PC and the Minoltafax 2800/3800.
Use a 9-pin RS-232C interface cable, wired 1:1 (available as an optional accessory).
Modem specifications
The fax machine has the following protocol specifications:
Standard: EIA-578 Class 1 Fax/Modem, no data modem included.
Speed with HDLC support 300 bps.
7.4 Scanner mode
Installing the TWAIN driver
Proceed as follows to install the optional TWAIN driver using Windows95/ 98 and NT4.0.
1 Insert the driver disk in drive A: or D: (depending on the user specific hardware).
2 Click on "Start" and select "Execute".
3 Enter "A:\Setup" (or "D:\Setup" depending on the user specific hardware).
4 The driver installation menu will appear on the screen. Follow the instructions until the installation has been completed.
Scanning using the TWAIN driver
Please proceed as follows, e.g. using Microsoft Photo Editor:
1 Click on "File" in your PC program.
2 Click on "Scan Image".
3 Enter your settings under the control panel.
4 Insert the document into the ADF.
5 Click on "Scan".
Setting the scan settings
| Option | Function |
| Mode | Includes the settings "Text" for text documents and "Photo" for images. |
| Brightness | You may choose between "Normal", "Light" and "Dark". |
| Paper Size | Includes the paper formats A4, letter and legal. |
| Resolution | Select from 200x100 dpi, 220x200 dpi and 300x300 dpi. |
| Setting | Here you can select the baud rate and the port. |
Scanning in class 1 mode
A fax software must be installed on you computer. The scan is sent in fax resolution to the computer. The applications Unimessage and LaserFAX offer a button "Scan". Please proceed as follows:
1 Insert the document into the document feeder of the system.
2 Use your fax software 888 to dial and click on "OK".
The documents in the document feeder are scanned.
7.5 Using your fax machine as a PC fax
This function allows you to send documents that you have created on your computer without printing them first. Also, faxes can be sent directly to your computer for editing. The fax will not have to be scanned separately. This option is only available is a fax software is installed on the computer and the settings are correct.
7.6 Using your fax machine as a PC printer (optional)
Install the optional printer driver on your computer according to the manufacturer's instructions. The Minoltafax 2800/3800 supports PCL4 GDI and PCL5e printer drivers. For printing in PCL4 mode, use the HP-LaserJetll printer driver. Maximum resolution with PCL4 emulation is 300 dpi. The PCL4 print mode is the standard mode for the Minoltafax 2800/3800. The optional GDI drivers support 600 dpi print resolution, if the necessary optional memory is installed. When the PCL5e option is installed the Print menu on the display of the fax machine will only show 5 sub menus. For further information please refer to the manual for the optional accessory.
Print settings
Number of copies
This function enables you to store the number of copies as a default setting.
1 Press [SET] and 7 times [V/PIN CODE].
SET PRINTER?
YES / or 1-8


2 Press [2] on the operation panel.
2 NO. OF COPIES OK=YES
3 Enter the required quantity using the numeric key pad and press [START].
NO.of COPIES=02 OK=START (DEL=NO)
4 Press [STOP] to terminate the entry.
JAN.09 13:00 100% -SET DOC. FACE DOWN-
Symbols
Use this function to set the font for printing in DOS-mode.
1 Press [SET] and 7 times [V/PIN CODE].
SET PRINTER? YES / or 1-8

2 Press [3] on the numeric key pad.
3 SYMBOL SET
3 Select the desired setting using [V/PIN CODE] or [DELETE] and press [YES].
SYMBOL SET=IBM-US OK=YES

4 Press [STOP] to terminate the entry.
JAN.09 13:00 100% -SET DOC.FACE DOWN-
Font-number
A number from 1-6 is assigned to the printer's fonts. If the PC does not assign a font, choose one from the pre-selected fonts.
1 Press [SET] and 7 times [V/PIN CODE].
SET PRINTER?
YES / or 1-8

2 Press [4] on the numeric key pad.
4 FONT NUMBER
3 Use the numeric key pad to select the required font and press [YES].
FONT NUMBER=1
OK=YES (DEL=NO)
4 Press [STOP] to terminate the entry.
JAN. 09 13:00 100%
-SET DOC. FACE DOWN
Line number
Use this function to set the number of lines the printer prints on one page. Per page you can print between 5 and 127 lines. This function is only available in DOS-mode. However, it is likely that your computer will override this function.
1 Press [SET] and 7 times [V/PIN CODE].
SET PRINTER?
YES / or 1-8

2 Press [5] on the numeric key pad.
If the PCL5e option is installed, press [2] on the numeric key pad.
5 LINE NUMBER
3 Use the numeric key pad to enter the required quantity and press [YES].
LINE NUMBER=64
OK=YES (DEL=NO)
4 Press [STOP] to terminate the entry.
JAN. 09 13:00 100%
-SET DOC. FACE DOWN
Printing fonts
Use this function to print a test page with the internal fonts of the printer and a list of the current fonts.
1 Press [SET] and 7 times [V/PIN CODE].
SET PRINTER?
YES / or 1-8

2 Press [6] on the numeric key pad.
If the PCL5e option is installed, press [5] on the numeric key pad. Your fax machine prints the list.
PRINT FONT
PCL4
Use this function to set the PCL4 emulation for the Minoltafax 2800/3800. In this case the resolution printed will be 300 dpi. Delete all current documents form memory before making the setting. Switch the machine off and on again to activate the current setting.
1 Press [SET] and 7 times [V/PIN CODE].
SET PRINTER?
YES / or 1-8

2 Press [7] on the numeric key pad.
7 PCL4
3 Use the arrow keys to select the desired setting and press [YES].
*ON
OFF
-SELECT&PUSH"YES"-
4 Switch the machine off and after approximately 6 seconds on again.
PCL4/GDI Auswahl
The memory is erased automatically after the setting.
GDI (optional accessory)
Use this function to set the GDI emulation for the Minolta fax 2800/3800. In this case the resolution printed will be 600 dpi. However, a memory upgrade is required. Delete all current documents form memory before making the setting. Switch the machine off and on again to activate the current setting.
1 Press [SET] and 7 times [V/PIN CODE].
SET PRINTER?
YES / or 1-8

2 Press [8] on the numeric key pad.
8 GDI
3 Use the arrow keys to select the desired setting and press [YES].
*ON OFF
-SELECT&PUSH"YES"-
4 Switch the machine off and after approximately 6 seconds on again.
PCL4/GDI Auswahl
The memory is erased automatically after the setting.
Installing GDI driver (optional)
Proceed as follows to install the optional GDI driver using Windows95/98 and NT4.0.
1 Click on "Start" and select "Printer" from the menu "Setting".
2 Click on "Add Printer".
3 In the installation window, click on "local" and on "next".
4 Insert the driver disk in drive A: or D: (depending on the user specific hardware).
A list of printers is displayed on the screen. Click on "Disk"
Click on "Browse" and select the file "Mi28-38.inf. Click "OK".
7 In the window "Install from disk", click "OK", select the desired printer and click on "next".
8 Follow the instructions until the installation has been completed.
Installing PCL5e printer driver (optional)
The optional PCL5e printer driver prints up to 8 pages per minute with a resolution of 600 dpi. PCL5e printers support Windows 95/98, Windows2000 and Windows NT4.0. Proceed as follows to install the printer driver using Windows 95. For further information, please refer to the driver manual.
1 Click on "Start" and select "Printer" from the menu "Setting".
2 Click on "Add Printer".
3 In the installation window, click on "local" and on "next".
4 Insert the CD in your CD-ROM drive.
A list of printers is displayed on the screen. Click on "Disk"
In the window "Install from disk", click "OK", select the desired printer and click on "next".
7 Follow the instructions until the installation has been completed.
7.7 Using your fax machine as an internet fax (optional)
Use the optional I-Fax upgrade to send documents as .tiff files to e-mail addresses. You can store the e-mail addresses as one-touch key, speed dial or group dial. For this, proceed as described in chapter 3. When the telephone symbol appears in the display, press [MAIL] on the operation panel and enter the e-mail adress. Groups can consist of e-mail addresses and fax numbers. Whenn you are asked to set the coding, select the desired setting using the arrow keys and press [YES] You can also use program dialling, broadcast and timer transmission with e-mails. For this, press [MAIL] on the operation panel and enter the desired e-mail address instead of the fax number. Using the functions timer transmission and broadcast, you can also combine e-mail addresses with fax numbers.
Entering the e-mail settings
Please ask you system administrator for the following setting, to ensure correct operation of the internet fax option. Make sure that the settings in the net are made before installing the machine. Press [29] to enter @.
- Account name
E-mail password
E-mail address - SMTP IP address
- POP3 IP address.
1 Press [SET] and 8 times [V/PIN CODE].
INTERNET FAX?
OK=YES / or 1-6


2 Press [1] on the numeric key pad, enter your name and press [YES].
Name= OK=YES
3 Enter your e-mail address and press [YES].
E-Mail=_ OK=YES (DEL=NO)
4 Enter your account name and press [YES].
Account = OK=YES (DEL=NO)
5 Enter your e-mail password and press [YES].
$$ \begin{array}{c} \text {P W D} = _ {-} \ \text {O K} = \text {Y E S} \quad (\text {D E L} = \text {N O}) \end{array} $$
6 Enter your e-mail address as return address and press [YES].
$$ \begin{array}{c} \text {E R R O R} \ \text {O K = Y E S} \quad (\text {D E L = N O}) \end{array} $$
7 Press [STOP] to terminate the entry.
$$ \begin{array}{c c c} \text {JAN. 09 13:00} & 100 \% \ \text {-SET DOC. FACE DOWN-} \end{array} $$
Entering the server settings
Enter your IP address for the SMTP server and the POP3 server. After the entry restart the system.
1 Press [SET] and 8 times [V/PIN CODE].
INTERNET FAX?
OK=YES or 1-6


2 Press [2] on the numeric key pad, enter the IP adress for the SMTP server and press [YES].
SMTP=140.135.12.1
OK=YES (DEL=NO)
3 Enter the IP address for the POP3 server and press [YES].
POP3=140.135.12.1
OK=YES (DEL=NO)
4 Press [STOP] to terminate the entry.
JAN. 09 13:00 100%
-SET DOC. FACE DOWN

Note
An IP address consists of 4 blocks of digits, separated by dots. Make sure not to enter a dot before the first and after the last block.
Setting the POP3 interval
Use this function to set the interval for your system to check for new e-mails. If you select off, no e-mails will be downloaded from the server. If you select ON, ensure that the interval is not too short. If necessary check the length of the interval with the system administrator. After the entry restart the system.
1 Press [SET] and 8 times [V/PIN CODE].
INTERNET FAX?
OK=YES / or 1-6


2 Press [3] on the numeric key pad, select the required setting using the arrow keys and press [YES].
*ON OFF -SELECT&PUSH"YES"-
3 Enter the desired interval and press [YES].
TIME = _min (1-120) OK YES (DEL NO)
4 Press [STOP] to terminate the entry.
JAN.09 13:00 100% -SET DOC.FACE DOWN-
Entering the time-out setting
Use this function to set the time the machine can use to build up a connection with the server. It is advisable the keep the default setting. Check a longer period with your system administrator first. After the entry restart the system.
1 Press [SET] and 8 times [V/PIN CODE].
INTERNET FAX?
OK=YES / or 1-6


2 Press [4] on the numeric key pad.
4 TIME OUT SETTING
3 Enter the desired time and press [YES].
TIME OUT= min.(1-5)
4 Press [STOP] to terminate the entry.
JAN. 09 13:00 100%
-SET DOC. FACE DOWN
Setting error report
Use this function to print an error report in case of communication problems. After the entry restart the system.
1 Press [SET] and 8 times [V/PIN CODE].
INTERNET FAX?
OK=YES / or 1-6


2 Press [5] on the numeric key pad, select the required setting using the arrow keys and press [YES].
*ON OFF -SELECT&PUSH"YES"-
3 Press [STOP] to terminate the entry.
JAN. 09 13:00 100% -SET DOC. FACE DOWN-
Setting the time zone
This function is used to select the time zone. For western Europe this is GMT + 01:00 (GMT=Greenwich Mean Time). After the entry restart the system.
1 Press [SET] and 8 times [V/PIN CODE].
INTERNET FAX? OK=YES / or 1-6
2 Press [6] on the numeric key pad, select the required setting using [V/PIN CODE] oder [DELETE] and press [YES].
Time Zone=GMT :00▼▲&YES
3 Press [STOP] to terminate the entry.
JAN.09 13:00 100% -SET DOC.FACE DOWN-
Sending e-mails
You can send e-mails a broadcast, timer or group transmission. You can use these functions at the same time with e-mails and fax numbers. Also you can use the program dialling for e-mails. Press [29] to enter @.
1 Insert the document face down into the ADF.
ENTER FAX NO. OR FUNCTION
Press [MAIL] on the operation panel and enter the e-mail address using the letter keys, one-touch or speed dial.
TO= OK= START (Von=▼)
3 Press [V/PIN CODE] and enter your name.
FROM= OK= START (ANSW=▼)
4 Press [V/PIN CODE] and enter your e-mail address.
REPLY= OK= START (CODE=▼)
Press [V/PIN CODE], select the desired encoding using the arrow keys and press [YES].
*MH MR MMR JBIG -SELETC&PUSH"YES"-
6 Press [START].
JAN.09 13:00 100% -SET DOC.FACE DOWN-
Downloading e-mails from the server
By default the machine downloads e-mails according to the set POP3 interval from the server. If you want to download e-mails during the interval, proceed as follows. Make sure the machine is in stand by mode an no document is in the ADF.
Press [MAIL] and [START] on the operation panel.
INTERNET FAX
(RX=START)
The e-mail is printed.
Error messages on the LCD
| Message | Description |
| *Machine time out | No network connection could be made. |
| *I-fax error report* | An error report is printed. |
| *-no e-mail-* | There are no e-mails on the server. |
| *no POP3 conn.* | The machine could not build a connection to the POP3 server. |
| *No SMPT-conn.* | The machine could not build a connection to the SMPT server. |
| *Mailbox full* | The mailbox is full and can not store any firhter e-mails. |
| *MIME-error* | The machine can only receive .tiff and .txt files. |
| *Net not install.* | The machine does not recognise a network connection. |
| *Net time out* | The machine could not build a connection to the e-mail server before the programmed time was over. |
| *No entry* | Data in the e-mail or server settings are missing. |
| *password error* | A wrong password was entered. |
| *POP3-comm. error* | A POP3 protocol error occurred. |
| *POP3 time out* | The machine could not build a connection to the POP3 server before the programmed time was over. |
| *SMPT-comm. error* | A SMTP protocol error occurred. |
| *SMTP time out* | The machine could not build a connection to the SMTP server before the programmed time was over (transmission). |
| *TIFF-error* | The received file is no standard format and can not be printed. |
8 Reports and lists
| Report/List | Content |
| Activity report | Includes information such as: time of transmission, transmission mode, recipient, number of pages, transmission time and transmission result (OK/errror). |
| TX confirmation | Lists the numbers called and the starting time. The report is printed automatically after every transmission and transmission error. |
| RX confirmation | It includes a list of the confidential and multiple polling documents as well as the reception error. |
| Reservation report | The reservation report contains a list of reservations for broadcasting and polling. |
| Memory data list | Includes information such as: time stored in the memory, transmission mode, recipient and number of pages. |
| Image printout | Includes information such as: time of transmission, transmission mode, recipient, number of pages, modem setting, dialling mode and a copy of the first page containing the memory data. |
| Broadcasting report | Includes information such as: transmission mode, time of transmission and number of pages. |
| Continued polling | Lists the result of a group polling |
| Key allocation report | Lists the settings for group and program dialling. |
| Relay box list | Lists the result of a relay transmission |
| Memory overflow report | Is printed in case of memory overflow |
| One-touch list | Lists all recipients stored as one-touch numbers. |
| Speed dial list | Lists all recipients stored as speed dial numbers. |
| Status list | Lists the current machine settings. |
| RAM error report | Prints a list of the machine settings which could not be saved due to a memory error. |
| Power failure report | It contains a list of all documents which could not be transmitted during the power failure ie. data which was lost. |
8.1 Basic report settings
Default settings journal
Use this function to set if the journal (activity report) is to be printed automatically. If you select OFF, the journal can be printed on demand, by pressing [JOURNAL].
1 Press [SET] and 5 times [V/PIN CODE].
REPORT? YES / or 1-6

2 Press [1] on the numeric key pad.
1 ACTIVITY REPORT
3 Use the arrow keys to select the desired setting and press [YES].
*ON OFF -SELECT&PUSH"YES"-
4 Press [STOP] to terminate the entry.
JAN.09 13:00 100% -SET DOC.FACE DOWN-
Default setting reservation report
Use this function to set if the reservation report is to be printed automatically. The reservation report contains a list of reservations for broadcasting and polling.
1 Press [SET] and 5 times [V/PIN CODE].
REPORT?
YES / or 1-6


2 Press [2] on the numeric key pad.
2 RESERV. REPORT
3 Use the arrow keys to select the desired setting and press [YES].
*ON
OFF
-SELECT&PUSH"YES"-
4 Press [STOP] to terminate the entry.
JAN.09
13:00
100%
-SET DOC. FACE DOWN
Default setting transmission report
Use this function to set if the transmission report is to be printed automatically. If you sent the message from memory, a part of the first page is printed on the report. If you sent the message from ADF, the content of the message is not printed on the report.
1 Press [SET] and 5 times [V/PIN CODE].
REPORT? YES / or 1-6

2 Press [3] on the numeric key pad.
3 TX RESULT REPORT
3 Use the arrow keys to select the desired setting and press [YES].
*ON OFF -SELECT&PUSH"YES"-
4 Press [STOP] to terminate the entry.
JAN.09 13:00 100% -SET DOC.FACE DOWN-
Default setting RX confirmation
Use this function to set if the confirmation is to be printed automatically.
1 Press [SET] and 5 times [V/PIN CODE].
REPORT?
YES / or 1-6

2 Press [4] on the numeric key pad.
4 RX RESULT REPORT
3 Use the arrow keys to select the desired setting and press [YES].
*ON OFF
-SELECT&PUSH"YES"-
4 Press [STOP] to terminate the entry.
JAN.09 13:00 100%
-SET DOC. FACE DOWN
Default setting broadcast report
Use this function to set if the broadcast report is to be printed automatically.
1 Press [SET] and 5 times [V/PIN CODE].
REPORT?
YES / or 1-6


2 Press [5] on the numeric key pad.
5 BROADCAST REPORT
3 Use the arrow keys to select the desired setting and press [YES].
*ON
OFF
-SELECT&PUSH"YES"-
4 Press [STOP] to terminate the entry.
JAN.09
13:00
100%
-SET DOC. FACE DOWN
Default setting toner order
Use this function to set if the machine should automatically order new toner.
1 Press [SET] and 5 times [V/PIN CODE].
REPORT?
YES / or 1-6

2 Press [6] on the numeric key pad.
6 TONER LOW REPORT
3 Use the arrow keys to select the desired setting and press [YES].
*ON OFF -SELECT&PUSH"YES"-
4 Enter the complete number of the technical service, using the numeric key pad and press [YES].
=123456_
OK=YES (DEL=NO)
5 Press [STOP] to terminate the entry.
JAN. 09 13:00 100%
-SET DOC. FACE DOWN
8.2 Printing reports
This function enables you to print the following reports and lists:
TX confirmation
RX confirmation
Activity report
- Memory data list
- Image printout
- One-touch list
Speed dial list
Key allocation report
- Status list
- Group polling (continued polling)
Relay box list.
1 Press [REPORT] on the control panel.
TX RESULT REPORT OK=YES

2 Press [V/PIN CODE] or [DELETE] until the desired report is displayed and then press [YES]:
REPORT PRINTIING -SET DOC FACE DOWN
The report is printed.

Note
You can print the result of the transmission on the back of the document. For this, place the document facing up on the multi-purpose tray and press [JOURNAL] + [START].
8.3 Displaying the transmission results
This function enables you to display results from the last 60 transmissions. A transmission report can also be printed later.
1 Press [JOURNAL].
020(JAN. 02 00 00:28)TX▲
123456
-NG▼
2 Select the desired entry using [V/PIN CODE] or [DELETE].
REPORT PRINTIING -SET DOC FACE DOWN
Press [START] to print the entry.
8.4 Displaying the counter
Drum counter
Use this function to check how many pages have been printed.
1 Press [SET] and 4 times [V/PIN CODE].
MACHINE OPERATION? YES / or 1-9
2 Press [9] on the numeric key pad.
9 DRUM COUNTER
3 Press [YES] to quit the display.
DRUM COUNTER=000007 OK=YES (DEL=NO)
4 Press [STOP] to terminate the entry.
JAN.09 13:00 100% -SET DOC.FACE DOWN-
9 Troubleshooting
9.1 Cleaning
Cleaning the machine
Clean the machine when necessary. Before cleaning the machine switch it off and unplug the power cable.
Cleaning the transport rollers
1 Open the operation panel.
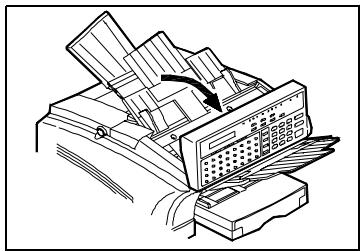
2 Clean the transport roller using a soft cloth and a mild detergent.
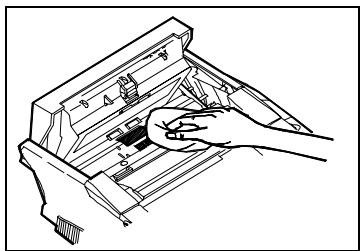
3 Close the control panel firmly.
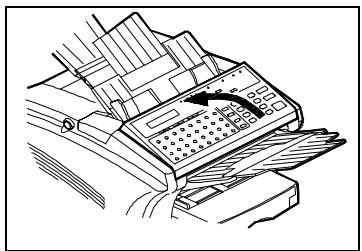
Cleaning the scanner
1 Open the operation panel.

2 Use a soft, dry cloth to wipe the reading unit.
- Never use water or detergent.
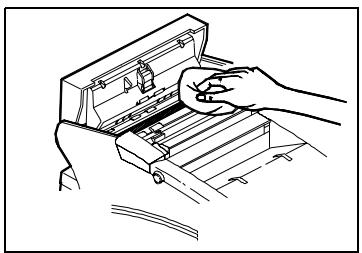

CAUTION
The machine may be damaged if instructions are not followed properly.
Never use alcohol or solvents!
→ Always unplug the machine before you clean it!

Note
Make sure the cloth does not get stuck in the machine and damages any of the components.
Never leave anything inside the machine.
The MINOLTA cleaning kit (No. 8918-561) is highly recommended for cleaning the rollers and the scanner.
9.2 Clearing paper jams
Clearing a paper jam in the paper tray
1 Remove the transparent cover of the paper tray and carefully remove the paper.
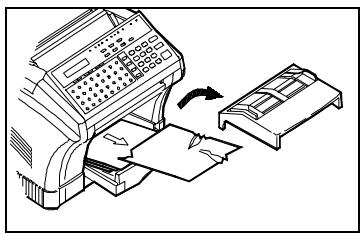
Clearing paper jams at the paper exit
1 Press the release buttons on both sides of the printer cover and open the upper part of the housing completely.
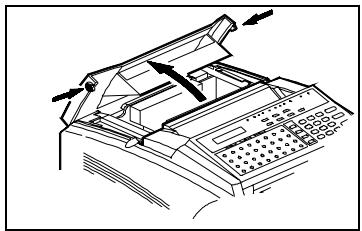
2 Pull the jammed paper in the direction of the arrow.
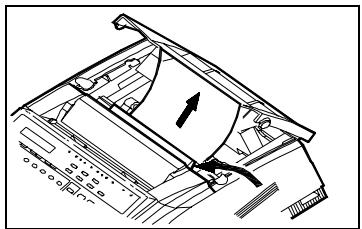
Clearing a paper jam in the multi-purpose tray
Pull the jammed paper in the direction of the arrow.

Clearing a paper jam in the 2^nd paper tray (optional)
1 Carefully pull out the paper tray.
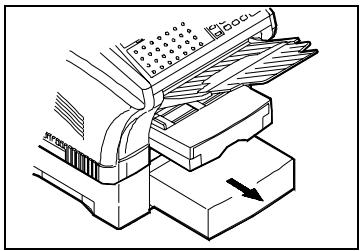
2 Remove the jammed paper from the paper tray.
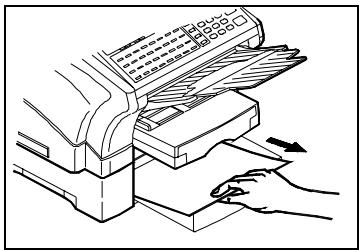
3 Replace the paper tray and close it.
Clearing a paper jam inside the machine

CAUTION
The heating element will be hot and could burn you!
The temperature of the heating element can reach up to 120^ .
Do not touch the heating element.

CAUTION
Danger of electric shock inside the copier!
There are a number of high voltage parts in the machine.
Do not touch any parts which are labelled accordingly.
1 Press the release buttons on both sides of the cover. Lift up the upper part of the unit until you hear a 'click'.

2 Get hold of the toner cartridge and carefully pull it out of the machine.
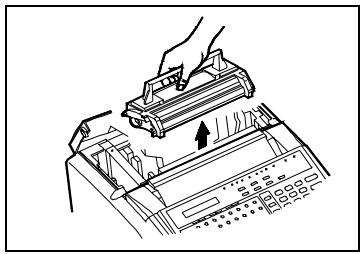
3 Carefully pull out the drum cartridge.
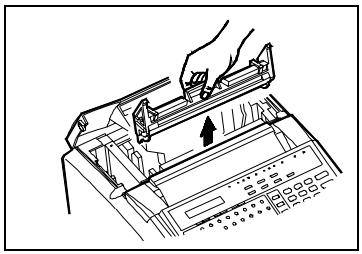
4 Remove the jammed paper with an upwards action.
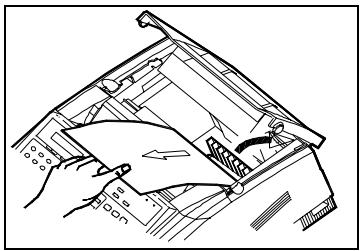
5 Replace the drum cartridge in the corresponding guides.
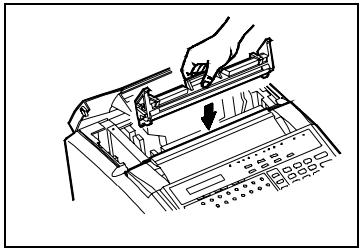
6 Replace the toner cartridge in the corresponding guides.
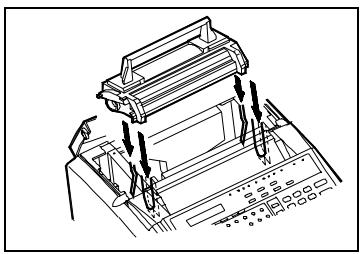
7 Close the unit.
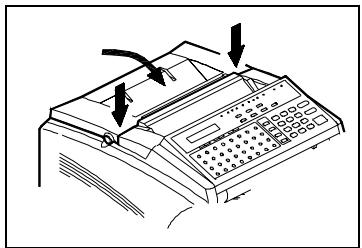
Clearing a paper jam in the document feeder
1 Open the operation panel and remove the document from the ADF.
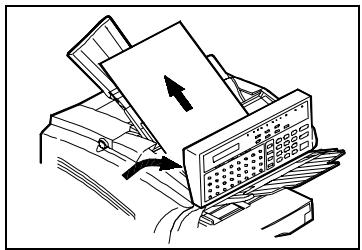
2 Open the operation panel and remove the jammed paper.

3 Close the control panel firmly.
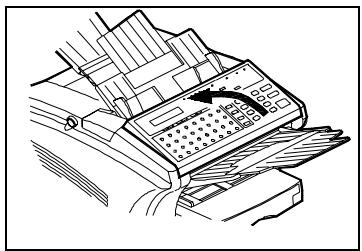
9.3 Error messages
Error-LED
| Error-LED | Description | Solution |
| ON | Malfunction | Follow the instructions on the LCD. |
| BLINKING | Malfunction | Call the technical service. |
Alarms
| Alarm | Description | Solution |
| Three short beeps | Wrong key was pressed. | Press the correct key. |
| Short beeps (last. 2 Secs.) | Communication error | Follow the instructions on the LCD. |
| Three long beeps | Malfunction | Follow the instructions on the LCD. |
| 20 short beeps | Malfunction | Call the technical service. |
Error messages on the LCD
| Message | Description | Solution |
| *Warning!* Document jam | The original is jammed inside the machine. | Follow the instructions given earlier in this chapter. |
| *Warning!* Printer open | The top cover is not closed properly. | Close the cover firmly. |
| *Warning* Paper jam | Print paper jam | Follow the instructions given earlier in this chapter. |
| *Warning* Machine error | Malfunction | Call the technical service. |
| *Warning* GDI not set | Either no memory is available or the GDI print mode is not set. | Open the menu "PRINTING" to set the print mode. |
| *Warning!* No Paper | The paper cassette has run out of paper. | Insert the paper. |
| *Warning!* No Toner | The toner cartridge has run out of toner. | Replace the toner cartridge. |
| *Warning!* Scanner open | The control panel is not closed properly. | Close the control panel firmly. |
| *Warning!* Memory full | During sending / receiving in memory mode the capacity of the memory was exceeded. | Press [STOP] and print the documents from the memory. Press [YES], to delete the last document from the memory. Ask the remote side to transmit again. |
| *Warning!* Toner empty | The toner cartridge has run out of toner. | Replace the toner cartridge. |
| *Warning!* Toner low | The toner cartridge has run out of toner. | Replace the toner cartridge. |
| *Warning!* TX stopped *Warning!* RX stopped | No memory available | Wait until enough memory space becomes available again. |
| *Data kept* Press Copy | PC data is in the fax memory | Press [COPY] to print the stored data. |
| *Wrong Mailbox ID* | Mailbox transmission The mailbox you entered doe not match the mailbox of the other fax machine. Mailbox reception The mailboxID of the other fax machine does not match your mailbox ID. | Check the mailbox ID and start the transmission again. Inform the other party of the correct mailbox ID and ask them to start the transmission again. |
| *Wrong Page Count* | The number of pages entered does not match the actual number. | Check the number of pages and try again. |
| *No Memory at RX* | The remote side has not enough memory available to receive. | Send again whenever the remote side is ready. |
| *ID is used* | The mailbox ID entered is already assigned. | Enter a new mailbox ID. |
| *No mailbox func.* | The other fax machine is not equipped with the mailbox function. | Cancel mailbox transmission and try again. |
| *No Relay Func.* | The receiving fax machine does not have the relay function. | Cancel the relay transmission and try again. |
| *Line check* | The machine has to telephone line connection. | Check whether the telephone cable is properly plugged. |
| * Not stored * | There is no number stored in this key. | Press the correct one-touch key or enter the correct speed dial number. |
| *Comm. Error * | The communication was not successful. | Press [STOP] and try to send again or ask the remote side to send again. |
| *Redial* Problem | Redial was unsuccessful even after repeated attempts. | Press [STOP], check the fax number and try again. |
9.4 Troubleshooting
If your machine does not operate properly, read the following instructions carefully. If none of the suggested solutions solve the problem, please contact the technical service.

CAUTION
Danger of electric shock inside the copier!
There are a number of high voltage parts in the machine.
Do not touch any parts which are labelled accordingly.
| Problem | Troubleshooting |
| No display | Make sure the power plug is connected properly. Check whether the power switch is on. Check whether the wall socket is working properly by connecting another device. |
| The fax machine is switched on but does not receive. | Check if the machine is in auto reception mode. Check if the memory is full, or if the paper tray is empty. |
| The other location does not receive. | Make a copy to check whether your machine operates properly. |
| The ADF does not work. | Check the size of the document and if it is placed properly in the feeder. |
| The printouts have black lines. | Make a copy with your machine. If the copy shows no lines the problem is at the other location. |
| No dial tone can be heard. | Check your telephone. If the telephone works properly, contact the technical service. |
| Communication error | Most errors are caused by bad lines. Please try again to contact the other fax machine. If the problem persists, contact the technical service. |
| The received document is blurred. | Make a copy to check whether your machine operates properly. Ask for a new transmission. |
| Print of received documents and copies are blurred. | Adjust the paper guides. |
| The copy quality is poor. | If the copy shows black lines, clean the scanner. If the printout is too light or blurred, remove the toner cartridge and shake it. |
| Pages come out wrinkled and there are frequent paper jams and double feedings. | Check the paper size and quality and make sure the paper is not curled or folded. |
| Printout quality is becoming worse. | Replace the drum cartridge. |
| The reception copy is distorted. | The problem is probably at the remote side. Ask for a new transmission. |
| The other fax machine's printouts are blurred. | Make a copy. If the copy is blurred, clean the scanner. If the error persists, call the technical service. If the copy is clear, the problem is probably at the remote side. |
10 Appendix
10.1 Specifications
| General | |
| Compatibility | G 3 |
| Max. Modem Speed | 33.600 bps (automatic fallback) |
| Coding | MR, MH, MMR, JBIG |
| ECM error correction | yes |
| Multi tasking operation interface | yes |
| Printing resolution | 600 dpi |
| Memory capacity | 2 MB (Minolta fax 3800 6 MB) |
| RTC backup | 2.5 years |
| Optional accessories | Memory upgrade 8 MB, DGI printer driver, PCL5e printer driver, TWAIN driver; I-fax upgrade, module for 2nd telephone line |
| Send | |
| Transmission speed | 2.5 seconds (ITU test document No.1) |
| Broadcasting | 148 remote locations (Minoltafax 3800 180 remote locations) |
| Memory transmit | yes |
| Manual/ADF transmission | yes |
| Timer transmission | yes |
| Polling transmission | yes, up to 50 files |
| Mailbox transmission | yes |
| Closed user group | yes |
| Relay transmission | yes |
| Batch send | yes |
| Transmission resolution | 203 x 98 dpi |
| 203 x 196 dpi | |
| 203 x 392 dpi | |
| Reception | |
| Mailbox reception | yes |
| Polling reception | yes |
| Closed network | yes |
| Memory reception | yes |
| Reduction | yes |
| Reception mode | Automatic/Manual |
| Print mode | 100 % Cut Automatic reduction (70%-100%) |
| Header/Footer | yes |
| Reception resolution | 203 x 98 dpi 203 x 196 dpi 203 x 392 dpi 300 x 300 dpi |
| Backup reception | yes |
| Dialling | |
| One-touch dialling | 32 keys (Minoltafax 3800 2 x 32 keys) |
| Speed dialling | 100 speed dial numbers |
| Program dial keys | 8 keys (Minoltafax 2800 one-touch keys 25-32, Minoltafax 3800 one-touch keys 57-46) |
| Auto. radial | yes |
| Combination dialling | yes |
| Reports | |
| Transmission report | yes |
| Transmission error report | yes |
| Reception report | yes |
| Activity report | yes |
| Memory data list | yes |
| Key allocation list | yes |
| Broadcasting report | yes |
| Relay report | yes |
| Mailbox reception report | yes |
| Status list | yes |
| Consumables report | yes |
| Power failure report | yes |
| RAM error report | yes |
| Service data list | yes |
10.2 Index
Numerics
2nd paper tray 2-18
A
Adding Paper 2-18
Automatic reception 5-2
B
Batch send 4-30
Broadcast report, default setting 8-6
Broadcast transmission, program dialling 4-20
Broadcasting 4-19
C
Cancel entry 3-1
Changine, groupdial 3-24
Changing, one touch key 3-19
Clearing a paper jam inside the machine 9-5
Closed network 4-7,5-18
Confidential reception 5-3
Confirmation, RX report default setting 8-5
Consumables 2-11
Copies, reduction 6-2
Copy 6-1
Copying,document feeder 6-1
D
Default transmission setting 4-8
Delete, mailbox 5-6
Delete, programming 4-31
Deleting, groups 3-26
Deleting, one touch keys 3-21
Dialling mode 3-37
Dialling options 4-11
Direct reception 5-1
Displaying the counter 8-10
Displaying the report 8-9
Displays 2-8
Drum cartridge, changing 2-12
E
E-mail settings 7-15
Enter, call group 3-22
Enter, company name 3-6
Enter, date 3-7
Enter, fax number 3-5
Enter, one-touch dial 3-16
Enter, speed dial 3-18
Enter, text 3-1
Entry of data 3-1
Error report 7-20
F
Faxforwarding 4-9
Feeding the document into the document feeder 4-2
Ferrite cores 2-20,7-1
Font-number 7-8
Fonts 7-7
Functions 1-6
G
GDI print emulation 7-12
Group polling 5-11
1
Installation, document feeder 2-3
Installing the GDI driver 7-13
Installing, paper output tray 2-3
Installing, paper stacking tray 2-3
Installing, PCL5e 7-14
Internet fax 7-20
J
Journal, default setting 8-2
L
Line number 7-9
Location, temperature 2-2
M
Machine layout 2-4
Mailbox reception 5-5
Mailbox transmission, program dialling 4-29
Manual transmission 4-15
Memory reception 5-2
N
Number of copies 7-6
0
Operating the fax option 2-22
P
Paper jam, 1st paper tray 9-3
Paper jam, 2nd paper tray 9-4
Paper jam, document feeder 9-7
Paper jam, exit 9-3
Paper jam, multi-purpose tray 9-3
Paper tray, installing 2-16
Paper, adding 2-17
Paper, refill 2-17
PBX,PSTN 3-13
PC connection 7-1, 7-2
PC printer 7-6
PC scanner 7-4
PC-fax 7-5
Polling reception 5-8
Polling RX, program dialling 5-10
Polling transmission 4-26
POP3 interval 7-18
Power connection 2-21
Power supply 2-2
Print, content of a mailbox 5-7
Print, PCL4 7-11
Printing fonts 7-10
Printing memory reception 5-4
Printing, reports 8-8
R
Receiving e-mails 7-23
Relay transmission 4-21
Relay transmission, program dialling 4-23
Removing paper jams 9-3
Reports and lists 8-1
Reservation report, default setting 8-3
S
Scanner, cleaning 9-2
Secure transmission 4-28
Selecting the line 3-36
Send 4-1
Sending a document from the memory 4-14
Sending e-mails 7-22
Server settings 7-17
Set dialling mode 3-12
Set relay boxes 4-24
Set, phone type 3-12
Setting a department number 3-8
Setting the number 3-35
Setting the time zone 7-21
Setting up a mailbox 5-5
Setting, buzzer volume 3-27
Setting, contrast 4-6
Setting,drum counter 8-10
Setting,footer 3-29
Setting, header 3-28
Setting, image exposure 5-19
Setting, LCD contrast 3-30
Setting, monitor volume 3-34
Setting,paper size 5-14
Setting, power save 3-32
Setting, power save mode 3-31
Setting, reduction RX 5-17
Setting,remote diagnosis 3-33
Setting, reports 8-2
Setting, resolution 4-4
Setting, rings 5-15
Setting, selecting the paper tray 5-20
Setting, send 4-4
Settings of the printer 7-6
Size of document 4-1
Special characters, entering 3-2
Special documents 4-2
Specifications 10-1
Speed dial keys 3-19,3-21
Start relay transmission 4-22
Sub addressing 3-15
T
Telephone and power cable 2-20
Telephone line, 2nd 3-35, 3-36, 3-37
Time 3-7
Time-out setting 7-19
Timer transmission 4-16
Timer transmission, program dialling 4-18
Toner cartridge, changing 2-14
Toner order, default setting 8-7
Transmission report, default setting 8-4
Transport roller, cleaning 9-1
Troubleshooting 9-10
U
Unpacking 2-3
Using your fax machine as an internet fax 7-15
10.3 CE marking (declaration of conformity)
We hereby guarantee that the fax machine and options covered by this declaration comply with the information given below. This declaration applies to countries within the European Union (EU)
This product complies with the following EU directives: 89/336/EEC, 73/23/EEC, 93/68/EEC and 1999/5/EC
For a complete declaration of conformity, please contact Minolta tel.: +49-511-7404-346, Fax +49-511-7404-272. Pleas keep the serial number of your fax machine ready.

CAUTION
Radio interference by wrong cable types
Only use a shielded interface cable. If you use other cables you may cause radio interference. This is not allowed due to EC regulations.
Only use shielded cables.
10.4 END USER LICENSE AGREEMENT
PLEASE READ CAREFULLY THE LICENSE AGREEMENT BELOW BEFORE OPENING THIS PACKAGED SOFTWARE. OPENING THIS PACKAGE INDICATES YOUR ACCEPTANCE OF THE TERMS AND CONDITION BELOW. IF YOU DO NOT AGREE WITH THEM, YOU SHOULD PROMPTLY RETURN THE PACKAGE UNUSED.
1. SOFTWARE
"Software" means the computer program contained in this package (which may include digitally encoded, machine readable, scalable outline font data as encoded in a special format), together with all codes, techniques, software tools, format, design, concepts, methods and ideas associated with the computer program and all documentation related thereto.
2. LICENSE AGREEMENT
This is a license agreement and not an agreement for sale. Minolta owns, or has been licensed from other owners, copyrights in the Software. Except as stated in this Agreement, you are not granted any rights to patents, copyrights, trade names, trademarks (whether registered or unregistered), or any other rights, franchises or licenses in respect of the Software. Title to the Software and any copy made from it is retained by Minolta or such other owners.
3. LICENSE
Minolta, hereby grant to you, and you agree to accept a non-exclusive, non-transferable and limited license and you may:
- install and use the Software on a single computer and one associated printer.
- use the Software only for your own customary business or personal purpose.
- make a copy of the Software for backup or installation purpose only in support of the normal and intended use of the Software.
- transfer possession of copies of the Software to another party by transferring a copy of this Agreement and all other documentation along with at least one complete unaltered copy of the Software, provided that (i) you must, at the same time, either transfer to such other party or destroy all your other copies of the Software. (ii) such transfer of possess ion terminates your license from Minolta, and (iii) such other party shall ac cept and be bound by these license terms by its initial use of the Software.
4. RESTRICTIONS
- You shall not without the written consent of Minolta:
use, copy, modify, merge or transfer copies of the Software except as provided herein.
reverse assemble or reverse compile the Software except as permitted by law; or
Sublicense, rent, lease or distribute the Software or any copy thereof.
2 You shall not export or re-export the Software in any form under violation of export restrictions by the government of your country.
5. LIMITED WARRANTY
Minolta warrants the media on which the Software is recorded to be free from defects in materials and workmanship under normal use. Warranty details and limitations for the Software are described in the Statement of Limited Warranty which was supplied with the hardware. With the exception of the foregoing express warranties applicable to hardware and media only, the Software is not warranted and is provided "AS IS." SUCH WARRANTY ARE IN LIEU OF ALL OTHER WARRANTYES, EXPRESS OR IMPLIED, INCLUDING, BUT NOT LIMITED TO, THE IMPLIED WARRANTY OF MERCHANTABILITY AND FITNESS FOR A PARTICULAR PURPOSE.
6. LIMITATION OF REMEDIES
IN NO EVENT WILL MINOLTA BE LIABLE FOR ANY LOST PROFITS, LOST DATA, OR ANY OTHER INCIDENTAL OR CONSEQUENTIAL
DAMAGES THAT RESULT FROM USE OR INABILITY TO USE THE SOFTWARE, EVEN IF MINOLTA OR ITS AUTHORIZED REMARKETERS HAVE BEEN ADVISED OF THE POSSIBILITY OF SUCH DAMAGES OR FOR ANY CLAIM BY YOU BASED ON A THIRD PARTY CLAIM.
7. TERMINATION
You may terminate your license at any time by destroying the Software and all your copies of it or as otherwise described in these terms. Minolta may terminate your license if you fail to comply with these terms. Upon such termination, you agree to destroy all your copies of the Software.
8. GOVERNING LAW
This Agreement shall be governed by the laws of the country where the delivery is made to the original customer.
9. GOVERNMENT END USERS
If you are acquiring the Software on behalf of any unit or agency of the United States Government, the following provisions apply. Use, duplication or disclosure by the Government is subject to restrictions as set forth in the Rights in Technical Data and Computer Software clause at FAR 252.227-7013, subdivision (b)(3)(ii) or subparagraph (c)(1)(ii), as appropriate. Further use, duplication or disclosure is subject to restrictions applicable to restricted rights software as set forth in FAR 52.227-19(c)(2).
YOU ACKNOWLEDGE THAT YOU HAVE READ THIS AGREEMENT, UNDERSTAND IT, AND AGREE TO BE BOUND BY ITS TERMS AND CONDITIONS. NEITHER PARTY SHALL BE BOUND BY ANY STATEMENT OR REPRESENTATION NOT CONTAINED IN THIS AGREEMENT. NO CHANGE IN THIS AGREEMENT IS EFFECTIVE UNLESS WRITTEN AND SIGNED BY PROPERLY AUTHORIZED REPRESENTATIVES OF EACH PARTY. BY OPENING THE PACKAGE, YOU AGREE TO ACCEPT THE TERMS OF THIS AGREEMENT.
ENDVERBRAUCHER-LIZENZVERTRAG
- Minoltafax 2800/3800
- Quick reference Minoltafax 2800/3800
- Contents
- Introduction
- Installation
- Data entry
- Send
- Reception
- Copy
- Connecting the fax machine to the computer
- Reports and lists
- Troubleshooting
- Appendix
- We want you to be satisfied customers
- How does a fax machine work?
- Certificate for machines with CE marking
- CTR 21 approval
- Safety precautions
- Laser safety
- Internal laser radiation
- Ozone release warning
- Characteristics
- Type
- Fax functions
- Location
- Environment
- Power supply
- Unpacking
- Installing the paper input tray
- Installing the paper output tray
- Installing the paper stacking tray
- Machine layout
- Rear view
- Memory upgrade (optional accessory)
- Printer controller PCL5e- extension (optional accessory)
- TWAIN interface driver (optional accessory)
- I-fax card upgrade (optional accessory)
- Paper tray (optional accessory)
- Module for 2nd telephone for Minoltafax 2800 (optional accessory)
- Control panel, display and keys
- Toner cartridge and drum cartridge
- Note
- Installing the drum cartridge
- WARNING
- Installing the toner cartridge
- Installing the 2nd paper tray (optional)
- Adding paper
- Standard paper tray - 250 sheets
- 2nd paper tray - 500 sheets
- Connecting the cables
- Connecting the ferrite cores
- Connecting the telephone line cable
- Connecting the power cable
- Operating the machine
- Preparation
- Typing conventions in this manual
- Enter text
- Special characters
- Overview of the machine settings
- Entering your fax number
- Entering your company name
- Entering date and time
- Entering department number and password
- Setting department number and password
- Changing department number and password
- Deleting department number and password
- Using the department number
- Set phone type
- Dialling mode
- PBX or PSTN
- PSTN
- PBX
- Storing numbers
- Sub addressing (F CODE SUB)
- What is F CODE?
- F CODE SEP (selective polling TX/RX)
- F CODE SUB
- - F CODE password (PWD)
- Entering one-touch numbers
- Entering speed dial numbers
- Changing one-touch- or speed dial numbers
- Erasing one-touch- or speed dial numbers
- Entering groups
- Changing / deleting members of a group
- Deleting a whole group
- Advanced settings
- Buzzer volume
- Header
- Footer
- LCD Contrast
- Power save mode
- Setting the power save time
- Remote diagnosis
- Setting the monitor volume
- 2nd telephone line (optional)
- Entering your fax number
- Selecting the line
- Dial mode for the 2nd line
- Transmission
- Notes on original documents
- CAUTION
- Using carrier film
- Placing the documents
- Transmission Settings
- Resolution
- Default setting resolution
- Contrast
- Default contrast setting
- Closed network
- Default transmission setting
- Fax forwarding
- Dialling modes
- Manual dialling using the numeric key pad
- Automatic dialling using one-touch dialling
- Automatic dialling using speed dialling
- Automatic call groups
- Program dialling
- Combination dialling
- Memory transmission
- Direct transmission
- Delayed transmission (timer)
- Program dialling, timer transmission
- Broadcasting
- Program dialling, broadcast transmission
- Relay transmission
- Start relay transmission
- Program dialling relay transmission
- Set relay boxes
- Polling transmission
- Mailbox transmission
- Program dialling, mailbox transmission
- Batch transmission
- Delete schedules
- Manual reception
- Default reception setting
- Automatic reception
- Memory reception during printer problem
- Memory reception
- Printing memory reception
- Mailbox reception
- Setting up a mailbox
- Deleting a mailbox
- Printing the content of a mailbox
- Polling reception
- F CODE password (PWD)
- Programming, polling RX
- Group polling
- Settings for receiving a fax
- Setting the paper size
- Setting number of rings
- Setting multiple page printing
- Setting reduction RX
- Setting the image exposure
- Selecting paper tray (optional accessory)
- Copying from the document feeder
- Set reduction rate
- Preparation
- Placing the ferrite cores
- PC connection
- Setting up the fax machine as a PC fax and PC scanner
- Modem specifications
- Scanner mode
- Installing the TWAIN driver
- Scanning using the TWAIN driver
- Scanning in class 1 mode
- Using your fax machine as a PC fax
- Using your fax machine as a PC printer (optional)
- Print settings
- Number of copies
- Symbols
- Font-number
- Line number
- Printing fonts
- PCL4
- GDI (optional accessory)
- Installing GDI driver (optional)
- Installing PCL5e printer driver (optional)
- Using your fax machine as an internet fax (optional)
- Entering the e-mail settings
- Entering the server settings
- Setting the POP3 interval
- Entering the time-out setting
- Setting error report
- Setting the time zone
- Sending e-mails
- Downloading e-mails from the server
- Basic report settings
- Default settings journal
- Default setting reservation report
- Default setting transmission report
- Default setting RX confirmation
- Default setting broadcast report
- Default setting toner order
- Printing reports
- Displaying the transmission results
- Displaying the counter
- Drum counter
- Cleaning
- Cleaning the transport rollers
- Cleaning the scanner
- Clearing paper jams
- Clearing paper jams at the paper exit
- Clearing a paper jam in the multi-purpose tray
- Clearing a paper jam in the 2nd paper tray (optional)
- Clearing a paper jam inside the machine
- Clearing a paper jam in the document feeder
- Error messages
- Error-LED
- Alarms
- Error messages on the LCD
- Troubleshooting
- Danger of electric shock inside the copier!
- Specifications
- Index
- Numerics
- A
- B
- C
- D
- E
- F
- G
- 1
- J
- L
- M
- N
- 0
- P
- R
- S
- T
- U
- CE marking (declaration of conformity)
- Radio interference by wrong cable types
- END USER LICENSE AGREEMENT
- SOFTWARE
- LICENSE AGREEMENT
- LICENSE
- RESTRICTIONS
- LIMITED WARRANTY
- LIMITATION OF REMEDIES
- TERMINATION
- GOVERNING LAW
- GOVERNMENT END USERS
- ENDVERBRAUCHER-LIZENZVERTRAG
Brand : KONICA MINOLTA
Model : MF2838
Category : Multifunction Printer