
MCF 26310 BAF - Microwave BEKO - Free user manual and instructions
Find the device manual for free MCF 26310 BAF BEKO in PDF.


| Product Type | Freestanding Microwave with Grill |
| Brand | Beko |
| Model | MCF 26310 BAF |
| Capacity | 25 Liters |
| Microwave Power | 900 Watts |
| Grill Power | 1000 Watts |
| Dimensions (H x W x D) | 31.5 cm x 52.3 cm x 42.2 cm |
| Weight | 16 kg |
| Color | Black |
| Control Type | Digital Touch & Knob |
| Display | LED Digital |
| Turntable Diameter | 25 cm |
| Auto Cook Programs | 8 presets |
| Defrost Function | Weight & Time Defrost |
| Child Lock | Yes |
| Interior Lighting | Yes |
| Interior Material | Stainless Steel |
| Cleaning | Easy-clean enamel interior |
| Safety Features | Child lock, overheat protection, door safety switch |
| Spare Parts Availability | Glass turntable, roller ring, waveguide cover |
| Rated Voltage | 230 V, 50 Hz |
| Rated Current | 10 A |
| Wattage Consumption | 1400 W (max) |
Frequently Asked Questions - MCF 26310 BAF BEKO
User questions about MCF 26310 BAF BEKO
0 question about this device. Answer the ones you know or ask your own.
Ask a new question about this device
Download the instructions for your Microwave in PDF format for free! Find your manual MCF 26310 BAF - BEKO and take your electronic device back in hand. On this page are published all the documents necessary for the use of your device. MCF 26310 BAF by BEKO.
USER MANUAL MCF 26310 BAF BEKO
MCF 26310 BAF
Please read this user manual first!
Dear Valued Customer,
Thank you for preferring this Beko appliance. We hope that you get the best results from your appliance which has been manufactured with high quality and state-of-the-art technology. For this reason, please read this entire user manual and all other accompanying documents carefully before using the appliance and keep it as a reference for future use. If you handover the appliance to someone else, give the user manual as well. Follow the instructions by paying attention to all the information and warnings in the user manual.
Remember that this user manual may also apply to other models. Differences between models are explicitly described in the manual.
Meanings of the Symbols
Following symbols are used in various sections of this user manual:

Important information and useful hints about usage.

Warnings for dangerous situations concerning the safety of life and property.
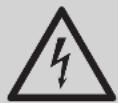
Warning for electric shock.
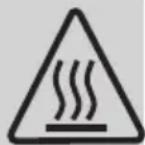
Warning for hot surfaces.
1
Important safety and environmental instructions
Important Safety Instructions Read Carefully And Keep For Future Reference
1.1 Safety warnings
This section contains safety instructions that will help protect from risk of fire, electric shock, exposure to leak microwave energy, personal injury or property damage. Failure to follow these instructions shall void any warranty.
- Beko Microwave Ovens comply with the applicable safety standards; therefore, in case of any damage on the appliance or power cable, it should be repaired or replaced by the dealer, service center or a specialist and authorized service alike to avoid any danger. Faulty or unqualified repair work may be dangerous and cause risk to the user.
• This appliance is intended
to be used in household and similar applications such as:
-Staff kitchen areas in shops, offices and other working environments; -Farm houses -By clients in hotels, motels and other residential type environments; -Bed and Breakfast type environments.
- Microwave oven is intended used freestanding.
- It is not intended for industrial or laboratory use.
- Do not attempt to start the oven when its door is open; otherwise you may be exposed to harmful microwave energy. Safety locks should not be disabled or tampered with.
• The microwave oven is intended for heating food and beverages. Drying of food or clothing and heating of warming pads, slippers, sponges, damp
Important safety and environmental instructions
cloth and similar may lead to risk of injury, ignition or fire.
- Do not place any object between the front side and the door of the oven. Do not allow dirt or cleaning agent remnants to build up on the closure surfaces.
- Any service works involving removal of the cover that provides protection against exposure to microwave energy must be performed by authorized persons/service. Any other approach is dangerous.
- Your product is intended for cooking, heating and defrost food at home. It must not be used for commercial purposes.
- Your oven is not designed to dry any living being.
- Do not use your appliance to dry clothes or kitchen towels.
- Do not use this appliance
outdoors, in bathrooms, in humid environments, or in places where it can get wet.
- No responsibility or warranty claim shall be assumed for damages arising from misuse or improper handling of the appliance.
- Never attempt to dismantle the appliance. No warranty claims are accepted for damage caused by improper handling.
- Only use the original parts or parts recommended by the manufacturer.
- Do not leave this appliance unattended while it is in use.
• Always use the appliance on a stable, flat, clean, dry, and non-slip surface.
- The appliance should not be operated with an external clock timer or separate remote control system.
- Before using the appliance
1
Important safety and environmental instructions
for the first time, clean all parts. Please see the details given in the “Cleaning and Care” section.
- Operate the appliance for its intended purpose only as described in this manual.
• Appliance becomes very hot while it is in use. Pay attention not to touch the hot parts inside the oven.
- Do not operate the oven empty.
- Cooking utensil may get hot due to the heat transferred from the heated food to the utensil. You may need oven gloves to hold the utensil.
- Utensils shall be checked to ensure that they are suitable for use in microwave ovens.
- Do not place the oven on stoves or other heat generating appliances. Otherwise, it may be damaged and the warranty becomes
void.
- Steam may come out while opening the covers or the foil after cooking the food.
- The appliance and its accessible surfaces may be very hot when the appliance is in use.
- Door and outer glass may be very hot when the appliance is in use.
- Make sure that your mains power supply complies with the information supplied on the rating plate of the appliance.
- The only way to disconnect the appliance from the power supply is to remove the power plug from the power outlet.
- Use the appliance with a grounded outlet only.
- Never use the appliance if the power cable or the appliance itself is damaged.
- Do not use this appliance with an extension cord.
Important safety and environmental instructions
- Never touch the appliance or its plug with damp or wet hands.
- Place the appliance in a way so that the plug is always accessible.
- Prevent damage to the power cable by not squeezing, bending, or rubbing it on sharp edges. Keep the power cable away from hot surfaces and naked flame. • Make sure that there is no danger that the power cable could be accidentally pulled or that someone could trip over it when the appliance is in use.
- Unplug the appliance before each cleaning and when the appliance is not in use.
- Do not pull the power cable of the appliance to disconnect it from its power supply and never wrap its power cable around the appliance.
- Do not immerse the appliance, power cable, or power plug in water or any other liquids. Do not hold it under running water.
- When heating food in plastic or paper containers, keep an eye on the oven due to the possibility of ignition.
- Remove the wire strings and/or metal handles of paper or plastic bags before placing bags to the oven.
- If smoke is observed, switch off or unplug the appliance if safe to do so and keep the door closed in order to stifle any flames.
- Do not use microwave oven for storage. Do not leave paper items, cooking material or food inside the oven when it is not being used. • The contents of feeding bottles and baby food
Important safety and environmental instructions
Jars should be stirred or shaken and the temperature checked before consumption, in order to avoid burns.
• This appliance is a Group 2 Class B ISM equipment. Group 2 contains all ISM (Industrial, Scientific and Medical) equipment in which radio-frequency energy is intentionally generated and/or used in the form of electromagnetic radiation for the treatment of material, and spark erosion equipment.
- Class B equipment is suitable for use in domestic establishments and establishments directly connected to a low voltage power supply network.
- Do not use cooking oil in the oven. Hot oil may damage the components and materials of the oven, and it may even cause skin burns.
- Pierce food with thick crust such as potatoes, courgettes, apples and chestnuts.
• Appliance must be placed so that the rear side is facing the wall.
- Before moving the appliance, please secure the turntable to prevent damage.
• Eggs in their shell and whole hard-boiled eggs must not be heated in microwave ovens since they may explode, even after microwave heating has ended.
WARNING: If the door or door seals are damaged, the oven must not be operated until it has been repaired by a competent person.
WARNING: It is hazardous for anyone other than a competent person to carry out any service or repair operation which involves the removal of a cover which gives pro-
Important safety and environmental instructions
tection against exposure to microwave energy.
WARNING: Liquids and other foods must not be heated in sealed containers since they are liable to explode.
• The oven should be cleaned regularly and any food deposits removed.
- There should be at least 30 cm of free space above the top surface of the oven.
- Do not overcook foods; otherwise, you may cause a fire.
- Do not use chemicals or steam-assisted cleaners to clean the appliance.
- Extreme caution is advised when the appliance is used near children or persons with restricted physical, sensory, or mental abilities.
- This appliance can be used by children aged 8 years and above, and by persons with reduced physical, sensory, or mental capabilities, or lack of experience and knowledge, provided they have been given supervision or instruction concerning use of the appliance in a safe way and understand the hazards involved.
Children shall not play with the appliance. Cleaning and user maintenance shall not be made by children unless they are older than 8 and supervised.
- Danger of choking! Keep all packaging materials away from children.
- Keep the product and its power cable out of reach of children under 8 years old.
- Do not cook food directly on the glass tray. Put food in or on appropriate kitchen utensils before placing them in the oven.
• Metallic containers for food and beverages are
not allowed during microwave cooking. Otherwise, sparking may occur.
- This product is not designed to be built-in. Do not place the product in a cabinet or box while it is in use.
- Failure to maintain the oven in a clean condition could lead to deterioration of the surface that could adversely affect the life of the appliance and possibly result in a hazardous situation.
The appliance shall not be cleaned with a steam cleaner.
Microwave heating of beverages can result in delayed eruptive boiling, therefore care must be taken when handling the container.
WARNING: When the appliance is operated in the combination mode, children should only use the oven under adult supervision due to the temperatures generated.
oven under adult supervision due to the temperatures generated.
Cleaning: Do not place the appliance in water or other liquids. Clean the housing only with a sponge/cloth moistened in warm, soapy water. Do not use harsh, abrasive cleaners. See the Cleaning and care and Storage sections for detailed cleaning instructions.
1.2 Compliance with the WEEE Directive and Disposing of the Waste Product:
This product complies with EU WEEE Directive (2012/19/EU). This product bears a classification symbol for waste electrical and electronic equipment (WEEE).
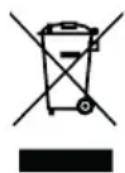
This symbol indicates that this product shall not be disposed with other household wastes at the end of its service life. Used device must be returned to official collection point for recycling of electrical and electronic devices. To find these collection systems please contact to your local authorities or retailer where the product was purchased. Each household performs important role in recovering and recycling of old appliance. Appropriate disposal of used appliance
1
Important safety and environmental instructions
helps prevent potential negative consequences for the environment and human health.
1.3 Compliance with RoHS Directive
The product you have purchased complies with EU RoHS Directive (2011/65/EU). It does not contain harmful and prohibited materials specified in the Directive.
1.4 Package information
Packaging materials of the product are manufactured from recyclable materials in accordance with our National Environment Regulations. Do not dispose of the packaging materials together with the domestic or other wastes. Take them to the packaging material collection points designated by the local authorities.
2 Your microwave oven
2.1 Overview
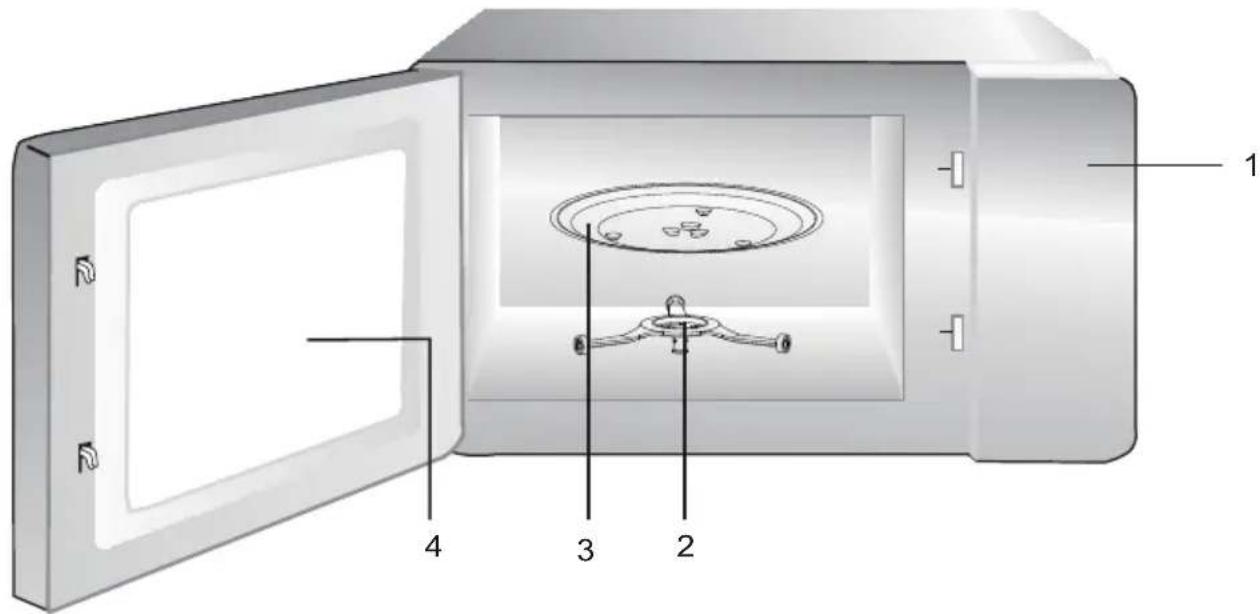
- Control panel
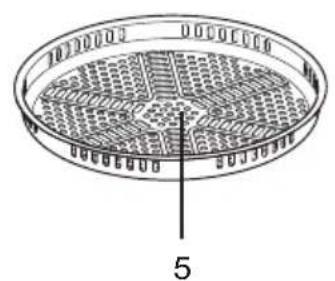
- Turntable ring assembly
- Glass tray
- Oven window
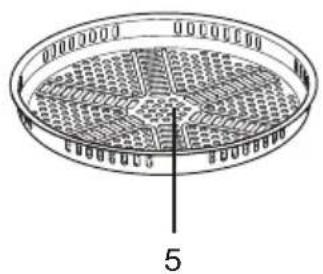
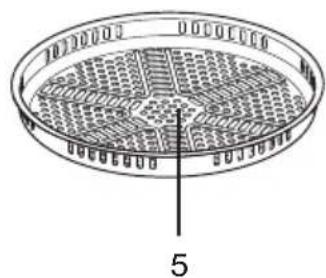
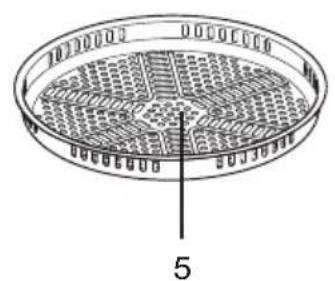
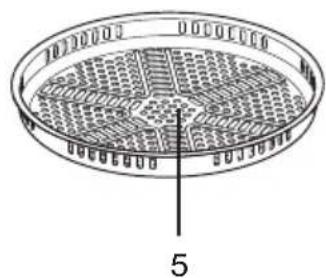
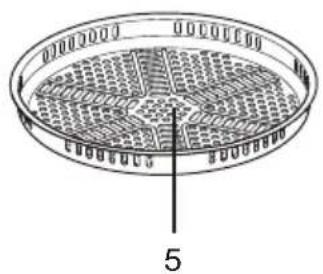
- Bake tray (Cannot be used in conjunction with microwave function and can be placed on the bake rack)
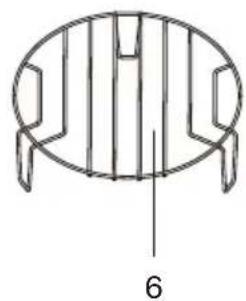
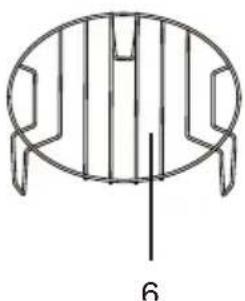
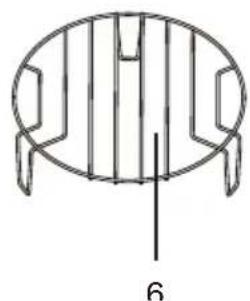
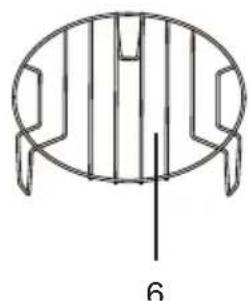
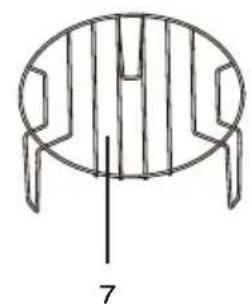
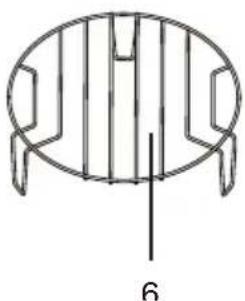
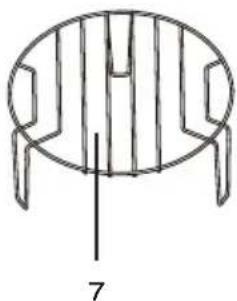
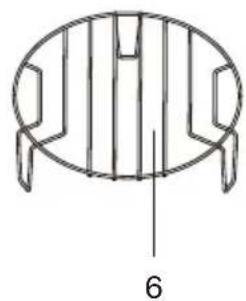
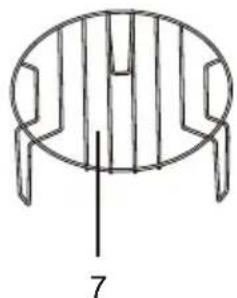
- Lower Wire Rack (For the microwave and for baking and roasting in the oven.)
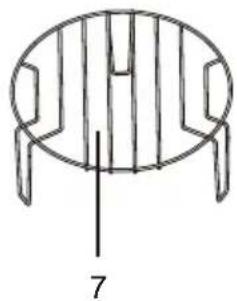
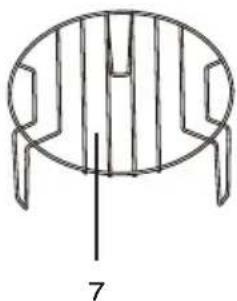
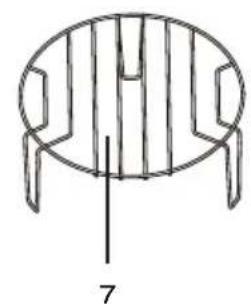
- Higher Wire Rack (For grilling, e.g. steaks, sausages and for toasting bread. As a support for shallow dishes.)
2.2 Technical data
| Model MCF 26310 BAF | |
| Voltage / Frequency 230V~ 50Hz | |
| Power input - Microwave 1450W | |
| Power output - Microwave 900W | |
| Grill 1000W | |
| Convection 2100W | |
| Microwave frequency 2450MHz | |
| Turntable diameter 288 mm | |
| External dimensions 495*424*290 mm | |
| Oven capacity 27 L | |
Markings on the product or the values stated in other documents supplied with the product are values obtained under laboratory conditions as per relevant standards. These values may vary according to the usage of the appliance and ambient conditions. Power values are tested at 230V.
2 Your microwave oven
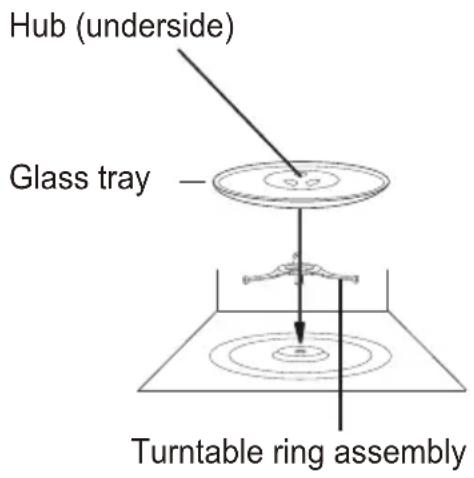
2.3 Installing the turntable
- Never place the glass tray upside down. The glass tray should never be restricted.
- Both glass tray and turntable ring assembly must always be used during cooking.
- All food and containers of food must always be placed on the glass tray for cooking.
- If glass tray or turntable ring assembly crack or break, contact your nearest authorized service center.
3 Installation
3.1 Installation
- Remove all packing material and accessories. Examine the oven for any damage such as dents or broken door. Do not install if oven is damaged.
- Remove any protective film found on the microwave oven cabinet surface.
- Do not remove the light brown Mica cover that is attached to the oven cavity to protect the magnetron.
- Select a level surface that provides enough open space for the intake and/or outlet vents.
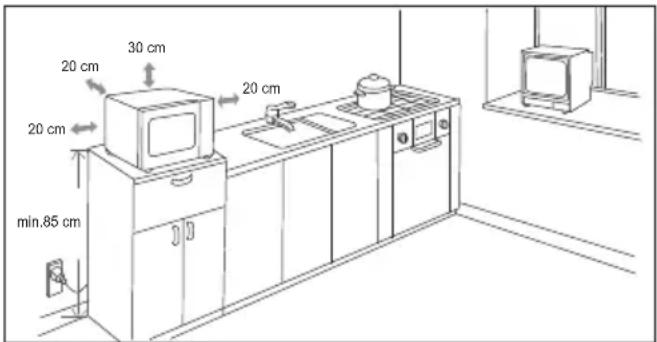
- Minimum installation height is 85 cm.
- The rear surface of the appliance shall be placed against a wall. Leave a minimum clearance of 30 cm above the
oven, a minimum clearance of 20 cm is required between the oven and any adjacent walls.
- Do not remove the legs from the bottom of the oven.
- Blocking the intake and/or outlet openings can damage the oven.
- Place the oven as far away from radios and TV as possible. Operation of microwave oven may cause interference to your radio or TV reception. 2. Plug your oven into a standard household outlet. Be sure the voltage and the frequency is the same as the voltage and the frequency on the rating label.

WARNING: Do not install oven over a range cooktop or other heat-producing appliance. If installed near or over a heat source, the oven could be damaged and the warranty would be void.
The accessible surface may be hot during operation.
4 Operation
4.1 Control panel
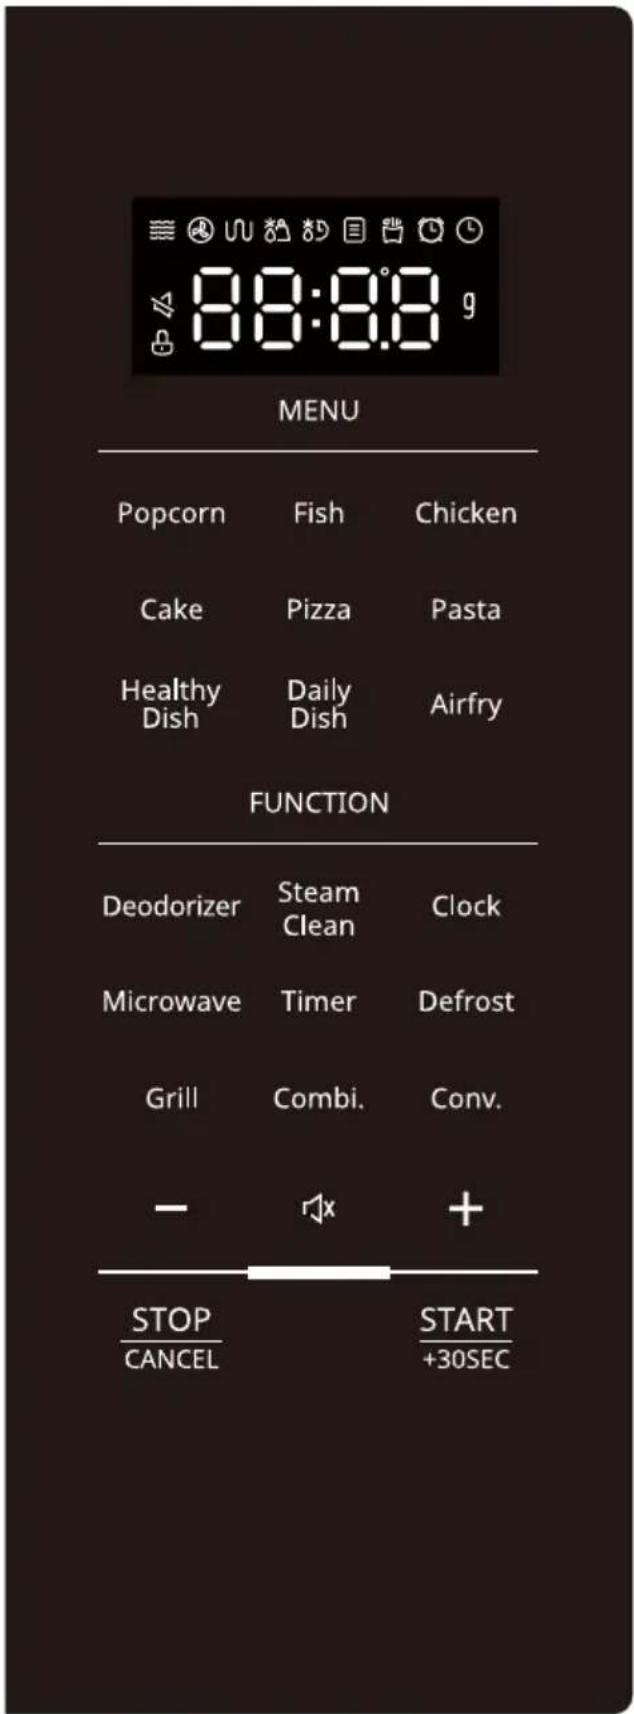
Display
Cooking time, power, indicators and clock time are displayed.
 | Microwave |
 | Convection |
 | Grill |
 | Defrost by weight |
 | Defrost by time |
 | Auto menu |
 | Airfryer |
 | Alarm |
 | Clock/ Childlock |
 | Mute |
 | Child lock |
| Gram | |
| ○ | Temperature |
Menu
- Auto cook buttons: Instant settings to cook popular foods.
Function
- Deodorizer: Press to remove food odors in microwave.
- Steam Clean: Press to steam clean the microwave.
- Clock: Press to set clock time. It is also used to set child lock.
- Microwave: Press to set microwave power level.
- Timer: Press to set the alarm timer.
- Defrost: Press to defrost food based on time/weight.
- Grill: Press to set grill cooking program.
4 Operation
- Combi.: Press to set microwave, grill and convection combination cooking program.
- Conv.: Press to set convection cooking.
- -/+ : Press to set time. Long press to increase/decrease speed.
- Mute: Press to mute.
- STOP / CANCEL: Press to pause/cancel at any settings. Press twice to turn off the display.
- START / +30SEC: Press to start/confirm at any settings. Press for express cooking at standby mode.
When the microwave oven is first powered on, the screen will display "0:00", and the buzzer will ring once to enter the standby mode.
4.2 Clock setting
- In waiting state, press "Clock" once, and then the screen displays "00:00". The hour figures will flash.
- Press "+/-" to adjust the hour figures. The input time should be within 0-23.
- Press "Clock" to confirm, and the minute figures will flash.
- Press "+/-" to adjust the minute figures. The input time should be within 0-59.
- Press "Clock" to finish clock setting.

- The clock will not work if it is not set when powered.
- After step 4, if you do not press "Clock" within 5 minutes, the oven will go back to the previous status automatically.
4.3 Kitchen timer
- In waiting state, press "Timer" once, and the screen displays "0:00".
- Press "+/-" to adjust the enter time. The maximum value is 95:00.
- Press "Timer" to confirm setting.

During kitchen timer, any other programs cannot work.
4.4 Microwave cooking
- In waiting state, press "Microwave", and "P100" will display.
- Press "+/-" or press "Microwave" repeatedly to set the power level. "P100, P90, P80, P70, P60, P50, P40, P30, P20, P10" are available.
- Press "START/+30SEC" to confirm. Default cook time 15:00 will display.
- Press "+/-" to set the cook time. The maximum value is 95:00.
- Press "START/+30SEC" to start cooking.
4.5 Grill cooking
- Press "Grill" once, and "G" will display.
- Press "START/+30SEC" to confirm, default cook time 15:00 will display.
- Press "+/-" to set the cook time. The maximum value is 95:00.
- Press "START/+30SEC" to start cooking.

- If half the grill time passes, the oven sounds to remind you to turn the food over. In order to have a better effect of grilling food, you can turn the food over, close the door and then press "START/+30SEC" to continue cooking. If no operation, the oven will work automatically.
- In the cooking process, when you increase or reduce the time, half time prompt is no affected.
4 Operation
4.6 Convection cooking
- Press "Conv." once. and "150°C" will display.
- Press "Conv." repeatedly to choose temperature from 150° C to 240° C.
- Press "Start/+30SEC." to confirm the temperature, if you press "START/+30SEC" again, the oven will start preheating. when preheating temperature is reached the buzzer will sound twice. You can open the oven door and place food in it.
- Or press "+/-" to set the cook time directly. The maximum value is 95:00.
- Press the "Start/+30SEC" to start working.
4.7 Combi cooking
- Press "Combi." once, the screen will display "C-1", and press "Combi." repeatedly to choose the power you want, and "C-1, C-2, C-3, or C-4" will display.
- Press "START/+30SEC" to confirm the mode, default cook time 15:00 will display.
- Press "+/-" to set the cook time. The maximum value is 95:00.
- Press "START/+30SEC" to start cooking.
| Combination instructions Instructions display Microwave Grill Convection | ||||
| 1 C-1··· | ||||
| 2 C-2··· | ||||
| 3 C-3··· | ||||
| 4 C-4··· | ||||
4.8 Defrost by weight
- In waiting state, press "Defrost" once, and the screen displays "dEF1".
- Press "START/+30SEC" to confirm, 100g displays.
- Press "+/-" to set the defrost weight within 100~2000g.
- Press "START/+30SEC" to start defrosting.

The buzzer will sound to remind of turning over the food during defrosting.
4.9 Defrost by time
- In waiting state, press "Defrost" twice, and the screen displays "dEF2".
- Press "START/+30SEC" to confirm, 15:00 displays.
- Press "+/-" to set the defrost time. The maximum value is 95:00.
- Press "START/+30SEC" to start defrosting.
4 Operation

The buzzer will sound to remind you to turn over the food during defrosting.
4.10 Multi-Stage cooking
Two stages can be set at most. If one stage is defrosting, it should be placed in the first stage automatically. The buzzer will ring once after each stage, and the next stage will begin. Kitchen Timer, Auto menu, Speed cooking, or Preheating cannot be set as one of the multi-stage stages.
Example: If you want to defrost the food for 10 minutes, then grill it for 10 minutes, you can follow these steps.
- Press "Defrost" twice, and the screen will display "dEF2".
- Press "START/+30SEC" to confirm, 15:00 displays.
- Press "+/-" to adjust the defrost time until 10:00 displays.
- Press "Grill" once, "G" displays, press "START/+30SEC" to confirm.
- Press "+/-" to adjust the grill time until 10:00 displays.
- Press "START/+30SEC" to start cooking.
4.11 Express microwave cooking
In standby state, press "START/+30SEC" to start cooking with 100% power for 30 seconds directly.
4.12 Child lock
Lock: In standby state, press "Clock" for 3 seconds. The buzzer will sound to enter the children-lock state, and the lock indicator will light.
Lock quitting: In locked state, press "Clock" for 3 seconds. The buzzer will sound denoting that the lock is released, and the lock indicator will disappear.
4.13 Deodoriser
- In standby state, press "Deodoriser", and the screen displays "dE".
- Press "START/+30SEC" to start working.
4.14 Steam clean
- In standby state, press "Steam Clean", and the screen displays "SC".
- Press "START/+30SEC" to start working.
4 Operation

Pour equal parts of water into a wide open microwave-safe container. When finished working, wipe the steamed surfaces with a clean sponge to help remove food and odors from the surfaces.
4.15 Healthy dish
- In waiting state, press "Healthy Dish" once, and "Hd01" will display.
- Press "Healthy Dish" repeatedly to choose the menu from "Hd01" to "Hd05".
- Press "START/+30SEC" to confirm the submenu. The default weight or servings of the menu will display.
- Press "+/-" to set the weight or servings.
- Press "START/+30SEC" to start cooking.
Health dish chart
| MENU/ Display Weight/ Display Time (min' sec") Power | |||
| Hd01Quinoa | 100g 3'00"/15'00" | P100/P50 | |
| 200g 5'00"/15'00" | |||
| Hd02Couscous | 200g 4'00"/8'00" | P100/P50 | |
| 300g 5'00"/10'00" | |||
| Hd03Macaroni | 100g 10'00" | P80 | |
| 200g 12'00" | |||
| Hd04Brown Rice | 200g 5'30"/25'00" | P100/P50 | |
| 300g 8'00"/30'00" | |||
| Hd05Oatmeal | 2 servings 3'30"/3'30" | P100/P50 | |
| 4 servings 5'30"/5'30" | |||
4.16 Daily dish
- In waiting state, press "Daily Dish" once, and "dd01" will display.
- Press "Daily Dish" repeatedly to choose the menu from "dd01" to "dd12".
- Press "START/+30SEC" to confirm the submenu. The default weight or servings of the menu will display.
- Press "+/-" to set the weight or servings.
- Press "START/+30SEC" to start cooking.
4 Operation
Daily dish chart
| MENU/ Display Weight/ Display Time (min' sec") Power | |||
| dd01Frozen Peas | 200g 4'00" | P100 | |
| 400g 7'00" | |||
| dd02Frozen mix Vegetable | 200g 4'00" | P100 | |
| 400g 7'00" | |||
| dd03Frozen Broccoli | 200g 5'00" | P100 | |
| 400g 8'00" | |||
| dd04Fresh Spinach | 200g 2'30" | P100 | |
| 400g 4'30" | |||
| dd05Frozen green beans | 200g 5'00" | P100 | |
| 400g 8'00" | |||
| dd06Potatoes without skin | 400g 6'00" | P100 | |
| 800g 10'00" | |||
| dd07Potatoes with skin | 2 (~200g/pc) 8'30" | P100 | |
| 4 (~200g/pc) 15'00" | |||
| dd08Frozen lasagna | 300g 15'00" | C-1 | |
| 600g 20'00" | |||
| dd09Grill chicken breasts | 200g 16'00" | Grill 60% +Conv. 240°C | |
| 400g 20'00" | |||
| dd10Lamb rack | 900g 35'00" C-4 | ||
| dd11Roast beef | 900g 35'00" C-4 | ||
| dd12Grill garlic bread | 200g 9'00" C-4 | ||
4.17 Auto menu
For example, set the fish menu for 350g.
- In waiting state, press "Fish" once, and "150g" will display.
- Press "Fish" repeatedly until 350g displays.
- Press "START/+30SEC" to start cooking.
4 Operation
Menu Chart
| MENU/ Display Weight/ Display Time (min' sec") Power | |||
| A01 Popcorn | 50g 1'40" | P100 | |
| 100g 2'00" | |||
| A02 Fish | 150g 3'00" | P80 | |
| 250g 4'00" | |||
| 350g 5'30" | |||
| 450g 6'30" | |||
| 650g 8'30" | |||
| A03 Chicken | 500g 29'00" | C-4 (beep to turn the food over) | |
| 750g 34'00" | |||
| 1000g 39'00" | |||
| 1200g 44'00" | |||
| A04 Cake | 475g 60'00" | Preheat 160°C / Conv.160°C | |
| A05 Pizza | 100g 8'00" | C-4200g 10'00" | |
| 300g 12'00" | |||
| A06 Pasta | 50g (cold water 450g) 18'00" | P80100g (cold water 8 | |
| 150g (cold water 1200g) 22'00" | |||

- The buzzer will sound to remind you to turn over the food during the chicken menu.
- In the Cake Menu, the oven will start preheating. When the preheating temperature is reached, the buzzer will sound twice. You can open the oven door and place food in it. Press "START/+30SEC" to start cooking.
4.18 Airfryer
- In the waiting state, press "Airfry" repeatedly to choose the menu, and "AF01~AF10" will display in order.
- Press "START/+30SEC" to start cooking.
4 Operation
| MENU/ Display Weight/ Display Time (min' sec") Power | |||
| AF01Frozen French Fries | 300g 6'00"/16'00" | G-100% + Conv.-240°C / G-60% + Conv.-240°C | |
| AF02Frozen Potato Wedges | 450g 15'00"/15'00" | G-100% + Conv.-240°C / G-60% + Conv.-240°C | |
| AF03Frozen Chicken nuggets | 350g 22'00" G-60% + Conv.-240°C | ||
| AF04Frozen Fried Squid | 250g 16'00" G-60% + Conv.-240°C | ||
| AF05Frozen Onion Ring | 250g 16'00" G-60% + Conv.-240°C | ||
| AF06Frozen Breaded Prawns | 250g 18'00" G-60% + Conv.-240°C | ||
| AF07Frozen Fried Chicken Cutlet | 400g 24'00" G-60% + Conv.-240°C | ||
| AF08Grilled Fresh Fish Fillets | 300g 18'00" G-60% + Conv.-240°C | ||
| AF09Frozen Buffalo Chicken wings | 420g 22'00" G-60% + Conv.-240°C | ||
| AF10Frozen Fried Chicken Wings | 500g (~70g/pc) | 28'00" G-60% + Conv.-240°C | |

The buzzer will sound to remind you to turn over the food during cooking.
5 Cleaning and maintenance
5.1 Cleaning and care

WARNING: Never use gasoline, solvent, abrasive cleaning agents, metal objects, or hard brushes to clean the appliance.
WARNING: Never immerse the appliance or its power cable in water or in any other liquid.
- Turn off the oven and remove the power plug from the wall socket before cleaning.
- Wait for the appliance to completely cool down.
- Keep the inside of the oven clean. When food splatters or spilled liquids adhere to oven walls, wipe with a damp cloth. Mild detergent may be used if the oven gets very dirty. Avoid the use of spray and other harsh cleaners as they may stain, streak or dull the door surface.
- The outside surfaces should be cleaned with a damp cloth. To prevent damage to the operating parts inside the oven, water should not be allowed to seep into the ventilation openings.
- Wipe the both sides of the door and window, the door seals and adjacent parts frequently with a damp cloth to remove any spills or spatters. Do not use abrasive cleaner.
- A steam cleaner is not to be used.
- Do not allow the control panel to become wet. Clean with a soft, damp cloth. When cleaning the control panel, leave oven door open to prevent oven from accidentally turning on.
- If steam accumulates inside or around the outside of the oven door, wipe with a soft cloth. This may occur when the
microwave oven is operated under high humidity condition. And it is normal.
- It is occasionally necessary to remove the glass tray for cleaning. Wash the tray in warm sudsy water or in a dishwasher.
- The roller ring and oven floor should be cleaned regularly to avoid excessive noise. Simply wipe the bottom surface of the oven with mild detergent. The roller ring may be washed in mild sudsy water or dishwasher. When removing the roller ring from cavity floor for cleaning, be sure to replace in the proper position.
- Remove odors from your oven by combining a cup of water with the juice and skin of one lemon in a deep microwaveable bowl, microwave for 5 minutes. Wipe thoroughly and dry with a soft cloth.
- When it becomes necessary to replace the oven light, please consult a dealer to have it replaced.
- Please do not dispose this appliance into the domestic rubbish bin; it should be disposed to the particular disposal center provided by the municipalities.
- When the microwave oven with grill function is first used, it may produce slight smoke and smell. This is a normal phenomenon because the oven is made of a steel plate coated with lubricating oil, and the new oven will produce fumes and odor generated by burning the lubricating oil. This phenomenon will disappear after a period of using.
5 Cleaning and maintenance
5.2 Storage
- If you do not intend to use the appliance for a long time, please store it carefully.
- Please make sure that the appliance is unplugged, cooled down and totally dry.
- Store the appliance in a cool and dry place.
- Keep the appliance out of the reach of children.
5.3 Handling and transportation
- During handling and transportation, carry the appliance in its original packaging. The packaging of the appliance protects it against physical damages.
- Do not place heavy loads on the appliance or the packaging. The appliance may be damaged.
- Dropping the appliance will render it non-operational or cause permanent damage.
6 Troubleshooting
| Normal | |
| Microwave oven interferes with TV reception | Radio and TV reception may be interfered when microwave oven is operating. It is similar to the interference caused by small electrical appliances, like mixer, vacuum cleaner, and electric fan. It is normal. |
| Oven light is dimmed In low power microwave cooking, oven light may be dimmed. It is normal. | |
| Steam accumulating on door, hot air coming out of vents | During cooking, steam may arise from the food. Most of this steam will get out from vents. But some may accumulate on a cool place like oven door. It is normal. |
| Oven started accidentally with no food in it. | It is not allowed to run the appliance without any food inside. It is very dangerous. |
| Problem Possible Reason Solution | ||
| Oven cannot be started. 1) | Power cable is not plugged in properly. | Unplug. Then plug again after 10 seconds. |
| 2) Fuse is blown or circuit breaker is activated. | Replace fuse or reset circuit breaker (repaired by professional personnel of our company). | |
| 3) Trouble with outlet. Test the | outlet with other electrical appliances. | |
| Oven does not heat. 4) | Door is not closed properly. Close | the door properly. |
Read this user manual first!
Dear customer,
| [C7W0] | Microwave |
| [YXE7] | Convection |
| Grill |
| Defrost by weight |
| [BKXA] | Defrost by time |
| Auto menu |
| Airfryer |
| [T650] | Alarm |
| Clock/ Childlock |
| [2AH4] | Mute |
| Child lock |
| maw | Gram |
| ° | Temperature |
Menu
| Microwave |
| Convection |
| Grill |
| Defrost by weight |
| Defrost by time |
| Auto menu |
| Airfryer |
| Alarm |
| Clock/ Childlock |
| Mute |
| [XBCY] | Child lock |
| Gram | |
| ○ | Temperature |
Menu
- Auto-cook buttons: Immediate settings for cooking popular foods.
Function
3 Installation
3.1 Installation
- PLEASE READ THIS USER MANUAL FIRST
- MEANINGS OF THE SYMBOLS
- IMPORTANT SAFETY AND ENVIRONMENTAL INSTRUCTIONS
- IMPORTANT SAFETY INSTRUCTIONS READ CAREFULLY AND KEEP FOR FUTURE REFERENCE
- SAFETY WARNINGS
- COMPLIANCE WITH THE WEEE DIRECTIVE AND DISPOSING OF THE WASTE PRODUCT
- COMPLIANCE WITH ROHS DIRECTIVE
- PACKAGE INFORMATION
- YOUR MICROWAVE OVEN
- OVERVIEW
- TECHNICAL DATA
- INSTALLING THE TURNTABLE
- INSTALLATION
- OPERATION
- CONTROL PANEL
- DISPLAY
- MENU
- FUNCTION
- CLOCK SETTING
- KITCHEN TIMER
- MICROWAVE COOKING
- GRILL COOKING
- CONVECTION COOKING
- COMBI COOKING
- DEFROST BY WEIGHT
- DEFROST BY TIME
- MULTI-STAGE COOKING
- EXPRESS MICROWAVE COOKING
- CHILD LOCK
- DEODORISER
- STEAM CLEAN
- HEALTHY DISH
- DAILY DISH
- AUTO MENU
- AIRFRYER
- CLEANING AND MAINTENANCE
- CLEANING AND CARE
- STORAGE
- HANDLING AND TRANSPORTATION
- TROUBLESHOOTING
- READ THIS USER MANUAL FIRST
Brand : BEKO
Model : MCF 26310 BAF
Category : Microwave