WTK3-020 - Weather Station LA CROSSE TECHNOLOGY - Free user manual and instructions
Find the device manual for free WTK3-020 LA CROSSE TECHNOLOGY in PDF.
Download the instructions for your Weather Station in PDF format for free! Find your manual WTK3-020 - LA CROSSE TECHNOLOGY and take your electronic device back in hand. On this page are published all the documents necessary for the use of your device. WTK3-020 by LA CROSSE TECHNOLOGY.
USER MANUAL WTK3-020 LA CROSSE TECHNOLOGY
Congratulation on owning your K3-020.To get most of your purchase, be sure to carefully read this manual and keep it on hand for later reference when necessary. Developed from advanced technology, K3-020 provides the digital compass functionand also chronograph, timekeeping, daily alarm, countdown timer, pacer and dual time function. In order to utilize the above features of K3-020, it is advisable to use watch in conformity with the below notes: Avoid exposing K3-020 to extreme conditions for an unreasonable time. Avoid rough uses or severe impacts to your K3-020
- Do not open K3-020 unless a certified service agency.
- Clean K3-020 occasionally with a soft and moistened cloth
- Keep K3-020 away from magnets or the appliances contain magnetic objects such as mobile phones, speakers and motors.
- Store K3-020 in a dry place when it is not in use:
3.0 Function ofthe Watch
Current Time Mode Time System: + Hour, minute second. AM (A), P.M (P) + Switch between 12-hour and 24-hour format +_ Bar graph animation at the rate of 1 second Calendar System: + Month, date and day of week display. Auto calculation of leap year/day of week Compass Mode + 16 compass directions. ie. NE,S.W, NE, SE, SW, NW, NNE and etc + Magnetic north pointer Compass lock Backward bearing Declination setting and calibration Daily Alarm Mode + Daily alarm + Houriy chime Chronograph Mode + Measurement unit: 1/100 second + Measuring capacity: 99 hours 59 minutes 59.99 seconds + Bar graph animation at the rate of 1/10 second. Timer Mode Measurement unit: 1 second Measuring capacity: 99 hours 59 minutes 59 seconds Bar graph animation at the rate of 1 second. Multi-phase alert at last 5,4,3,2,1 second(s) Sounds long beep when reach zero Pacer Mode + Pacer beat: 40 to 180 beats per minute Dual Time Mode Time System: + Hour, minute second. A.M (A), P.M (P) +_ Bar graph animation at the rale of 1 second
4.0 Major Function Mode
5.0 Current Time Mode - Current Time and Date Display
day of the week current time bar graph monitor (second) Time Display ISTISTP] date, month Date Display Current Time Mode Current Time Mode + Current Time Mode includes two displays. They are the Time Display and Date Display. + Press the [ST/STP. button to change the display between the Time Display and Date Display. Time Display +_ The day of week of the current time is exhibited on the 1st row ofthe display. The current lime (hour, minute) and the current time (second) are exhibited on the 2nd and the 3rd row of the display. +_ The elapse of time is animated (at the rate of 1 second) by the bar graph. Date Display +_ The day of week of the current time and the current time hour, minute) is exhibited on the 1st row and the 2nd_ofthe display. The date (month, day) of the current time is exhibited on the 3rd row of the display. +_ The elapse of time is animated (at the rate of 1 second) by the bar graph. Note: Hold down [St/Stp] button in Date Display Lo switch the date format between Month-Date and Date-Month.
PO ILapsoÙ canne En To Set the Current Time Mode To select the setting display, hold down the [MODE] button for 2 seconds in the Current Time Mode. Once it get into the setting display, the Second' digits Start flashing. Press the [MODE] button Lo select the flashing (setting item) as shown in the diagram. When the second digits start flashing, press the {tart/stop] or [lap/reset] button to reset them to zero When one of he settings (minute, hour, year, month, date) is flashing, press the [ST.STP.] or [LAP/RESET] button to change the number; hold down the IST/STP.] or [LAP/RESET] button to change the number at a higher speed When the 12 or ,24 digits start flashing, press the IST/STP.] or [LAP/RESET] button to select between the 12 or 24 hour format. When the 12/24 hour format is set, press the [MODE] button to exit the setting display. I NO key-stoke has been activated for 1 minute during the setting display, it will return to Current Time Mode.
alarm time {hour, minute) & alarm Daily Alarm hour chime indicator Mode indicator Daily Alarm Mode + K3-020 provides a daily alarm function for the current time. When the daily alarm is ON, K3-020 will beeps for 20 seconds when the alarm time is reached K3-020 also provides a hourly chime function for the current time. When the houriy chime is ON, K3-020 will sound beep beep' every hour on the hour. Daily Alarm Display +_ The daily alarm time (hour, 2nd row of the display. To Set the Hourly Chime ON/OFF +_ To setthe houriy chime between ON or OFF, press the ILAP/RESET] button in the Daily Alarm Mode. + When the chime indicator is appeares, the chime is ON. To Set the Daily Alarm ON/OFF +_ To setthe daily alarm between ON or OFF, press the IST/STP. button in the Daily Alarm Mode. + When the daily alarm indicator appeares, the daily alarm is ON te) is exhibited on the
To Set the Alarm Time Mode ‘To select the setting display, hold down the [MODE] button for 2 seconds in the Daily Alarm Mode. Once it get into the setting display, the Minute’ digits start flashing. Press the [MODE] button to select the flashing (setting item) as shown in the diagram + When one of the settings (minute, hour) is flashing, press the [ST/STP] or [LAP/RESET] button to change the number; hold down the [ST./STP] or ILAP/RESET] button to change the number at a higher speed When the hour is set, press the [MODE] button to exit the setting display. I NO key-stoke has been activated for 1 minute during the setting display, it will return to Daily Alarm Mode.
«bar graph 2 animator running time running time (hour) {minute} running time 1100 (second) Second Zero Display Chronograph Mode +_K3-020 provides a stopwatch function. +_ The measurement unit of the chronograph is 1100 second, and is measuring capacity is 99 hours, 59 minute and 59.99 second +_The Chronograph can be used to measure elapsed time (elapse of time) and lap time (read the elapse of time without stopping the measurement). Chronograph Display The running time (hour, minute) is exhibited on the 2nd row of the display. The running time (second, 1/100 second) is exhibited on the 3rd row of the display. The elapse of time is animated {at the rate of 1/100 second) by the bar graph
Iap time Lap Display [Lap/Reset] } | [Lap/Reset] (St/St Zero Display "RD ISt/Stp.] | fSt/Stp.] ILap/Rese:] (HE)
To Measure the Elapse of Time +_ In Zero Display, press the [ST/STP] button once to start ne measurement (the digits wil start running): press the [ST/STP. button once again to stop the measurement (the digits wil stop running). The time (elapsed time) that elapsed from the 1 st IST./STP] key-stoke to the 2 nd [ST.STP.] key-stoke will be exhibited on the display. Repeat the above mentioned key operations, it will getthe accumulative elapsed time that the chronograph is running To Get Lap Time + When the chronograph is running, press the ILAP/RESET] button to get and view the lap time. In Lap Time Display, press the [LAP/RESET] button to return to counting display. + During the Lap Time Display is exhibited, the elapsed time is stil measuring on the background continuous. To Reset the Chronograph +_ To record a new set of elapsed time, press the ILAP/RESET] button (when the chronograph has. stopped ) to reset the chronograph
Countdown Timer Mode running time ber graph our) animator . running time running time (minute) (secound) ° Countdown Timer Display
K3-020 provides a countdown timer function The measurement unit of the timer is 1 second, and its measuring capacity is 99 hours, 59 minutes and 59 seconds. The Countdown timer can be used to timekeeping for a fix period of time (target time) ie. {he Watch wil Start running from the target time to zero. K3-020 will beep for few seconds when zero is reached Countdown Timer Display The running time (hour, minute) is exhibited on the 2nd row of the display. The running time (second) is exhibited on the 3rd row of the display. The elapse of time is animated {at the rate of 1 second) by the bar graph
To select the seing display, hold down the [MODE] button for 2 seconds in the Countdown Timer Mode. Once it get into the setting display, the Second digits start flashing. Press the [MODE] button to select the flashing (setting item) as shown in the diagram. When one of the settings (second, minute, hour) is flashing, press the [ST./STP. or [LAP/RESET] button to change the number: hold down the [ST/STP] or ILAP/RÉSET] button to change the number at a higher speed When the hour is set, press the [MODE] button to the setting display. IFNO key-stoke has been activated for 1 minute during the setting display, it wil return to Countdown Timer Mode.
8.2 Coundown Timer Mode - Using the Coundown Timer
bar graph animator fais) running time our rünning time LES D AE) (second) SE ESündoun Timer Display To Use the Timer + Once the target time has been set (for example 30 minutes), press the [ST/STP button to start the measurement (the digits will start running); press the IST/STP. button once again to stop the measurement {he digits will Stop running). The elapsed time will be exhibited on the display throughout the measurement. +_ When the countdown time is come to zero, press [lap/rese] button to re-load the target time. To Re-load the Timer +_ To re-load the timer display to target time, press the ILAP/RESET] button (when the timer has stopped ) to re-load the timer. Timer Alarm Sound + K3-020 will beep once when it comes to the last 5,4,3.2 and 1 second(s) + K3-020 will sound a long beep when reach zero.
El in beats per minute) Pacer Display Pacer Mode + K3-020 provides a pacer function + When the pacer is activated, it will generate beeps at a pre-defined pacer beeping rate. +_ The pacer beeping rate can be set from 40 to 180 beats per minute (in step of 5 beats per minute). Pacer Display +_ The pacer beeping rate (in beats per minute) is exhibited on the 2nd row of the display. To Use the Pacer + Once the pacer beeping rate has been set (for example 60 BPM), press the [ST./STP] button will start the beeping. When K3-020 is beeping, press the [ST./STP.] button once again to stop the beeping.
Pacar Mode mnuooe] | movE] [ST/STP] ne nude — hold[ST/STP] dom 1Lap/Reset] desoase moe] — _$ holdfLapReset] + Pacer Mode Set \g Sequence To Set the Pacer Mode (Pacer Beeping Rate) To select ne selting display, hold down the [MODE] button for 2 seconds in the Pacer Mode. Once it get into the setting display, the ;Pacer Beeping Rate’ digits start flashing. When the .Pacer Beeping Rate’ (in beats per minute) is flashing, press the IST/STP.] or [LAP/RESET] button to change the number hold down the [ST./STP.] or LAP/RESET] button to change the number at a higher speed When the Pacer Beeping Rate‘ is set, press the IMODE] button to exit the setting display. I NO key-stoke has been activated for 1 minute during the setting display, it will return to Pacer Mode.
bar graph animator dual time (hour) dual üme dual time (rinute) (second) Dual Time Mode Dual Time Mode + K3-020 provides a dual time function which provides the supplementary function to current time. +_The dual time is synchronize with the current time. Dual Time Display +_ The dual time (hour, minute) and the dual time second) are exhibited on the 2nd and the 3rd row of the display. + The elapse of time is animated (at the rate of 1 second) by the bar graph.
To Set the Dual Time Mode To select ne selting display, hold down the [MODE] button for 2 seconds in the Daily Alarm Mode. Once it get into the setting display, the Minute‘ digits start flashing. Press the [MODE] button to select the flashing (setting item) as Show in the diagram. When one of the settings (minute, hour) is flashing, press the [ST./STP.] or [LAP/RESET] button to srisre] Dual ie Mode oh HGDEI change the number; hold down the [ST/STP.] or k S | ILAP/RESET] button lo change the number al a hold[ST/STP] higher speed + When the hour is set, press the [MODE] button to — exit the setting display. moe + IFNO key-stoke has been activated for 1 minute Lap/Resel fépresel 1 during the setting display, it wil return to Dual Time Es Mae holdfLapReset] Dual Time Mode Soting Soquonco
The Precautions when Using the Compass Mode + Keep K3-020 away from magnets or any appliances that contain magnetic felds such as mobile phones, speakers, motors and etc. K3-020, like most magnetic compass, points Lo the magnetic north which is slightiy different from he true north Check the What is Magnetic Declination’ section for more detail on declnation: :_ Perform the compass calibration on the following conditions:
1) Use K3-020 in the fist time,
2) When the magnetic distortion icon DIST" indicator is flashing,
3)The battery has been roplaced, and 4)Using K3-020 on a location where is apart from the place in Compass Mode which the compass had been calibrated. To achieve an aceurate result, you should avoid measuring a direction on the following conditions:
1) K3-020 is close to magnetic or metal objects,
2) K3-020 is close to electrical appliances, and
3) K3-020 is inside a moving object or a ferroconcrete building,
Compass Mode K3-020 includes a digital compas function. When the Compass Mode is selected, it provides compass directions (N,E,S.W, and etc), compas compas bearing and the magnetic north pole direction. magnetic Gresdon +_ The Compass Mode also includes a battery saving north = feature, that is {he Standby Mode. For saving the pointer compass battery, the Compass will change to the Standby bearing Mode after 1 minute Compass Display Compass Mods +_ The compass direction and the bearing are exhibited any key except on the {st and 2 nd row of the display respectively. 1 minute LIGHT] «The direction of the magnetic nor is animated by the bar graph. Standby Mode +_ In the Standby Mode, press any button except the [Light] button once to return to Compass Mode. Compass Standby Mode
What is Magnetic Declination Magnetic North True Norih + The Magnetic North Pole which is slighti different from the True North Pole. K3-020, Ike most magnetic compasses, points to the Magnetic: \ North Pole. But, everything measure from a map is related to the True \/ North Pole. / Magnetic Magnetic | Declination The angular difference behveen Magnetic North Pole and True North Declination ZA ei NN Paie le called magnetic decination. fe amount {degrees and minutes)
and direction (easterly and westerly) depend on were you are. + For serious compass user or who intends lo perform aceurate navigation, compass must be adjusted to compensate of magnetic declination. K3-020 also includes a compensation setting for Magnetic Deciination. Check the coming /Calibrating the Compass* section for more details of he setting Magnetic Declination Information + Most topographie maps shown magnetic north pale and or the magnetic declination information, This manual includes the magnetic declination for some major cities. Check the Magnetic Declination at Major Cities* section for more detail + Forthose cities whose names are not included in the list, you may refer the links below (as at 28 Aug 2004)
Magnetic Declination Compensation Dacinaion 29 We Nono agree Decinaten) Compensate an objects bearing by subtract westerly {W) magnetic declination or add eastery (E) magnetic declination with the magnetic bearing. Example 1 + Westerly magnetic declination (W) magnetic bearing (MB): 323° + The true bearing (TB) = 323° (MB) - 23° (W D: 28; the = 300° Example 2 + Easteny magnetic declination (E): 22°; the magnetic bearing (MB): 278* + The true bearing (TB) = 278*(MB) + 22*(E) = 300° This Watch will compensate the compass bearing a Ken wherever the magnetic declination is either Westerly as rue bearing. (ve) declination or Eastery declination (+ve) = automaticall, i the user input the magnetic declination _— angle of the city which close lo the users current ru pont location into the watch during the calibration. Compass te Brain sta pe KES LE) Magna cime) Check the ,Calibrating the Compass’ section for more details of the calibration
11.4 Compass Mode - Magnetic Declination at Major Cities
11.5 Compass Mode - Beñore Calibrating the Compass
un TÉompass Model Mode LLapiRosai tee vu | = Cabraton. Calibration Sequence To Calibrate the compass + Perform the compass calibration on the following conditions:
1) when K3-020 is used the first time,
2) when K3-020 ,DIST'indicator is flashing,
3) the battery has been replaced, and
4) use the compas in a location where is apart from
the place in which the compas had been calibrated IMPORTANT: If the K3-020 has NOT been calibrated, the direction reading may be inaccurate. + Check the Magnetic Declination at Major Cities" section to get the magnetic declination of the city which close to your current location, because such angle wil be inputted into the Watch during the calibration:
11.6 Compass Mode - Calibrating the Compass
Calibration Rotation‘ Mode To Calibrate the Compass To select Magnetic Declination Setting Mode, hold down the [MODE] button for 2 seconds in the Compass Mode. Once it gets into the Setting Mode, the DEC indicator will appear on the 1st row of the display. When the digit starts flashing, press the [ST/STP. button to set magnetic declination (from - 90 to 90) until the desired angle appears. + When the magnetic declination has been set, press the [MODE] button to go to the Calibration ,Rotationt Mode. Once it gets into the ,Rotation' Mode, the ,CAL' indicator will be appeared on 1st row of the display and the north pole pointer starts moving. Hold the Watch on a flat surface which is parallel to the horizon, then steadily rotate the Watch anticlockwise and keep the pointer towards the same direction during the rotation. When the rotation is completed, press the [MODE] button to return to Compass Mode
11.7 Compass Mode - Compass Direction and Bearing
Compass Direction Compass Bearing To define the Direction of an Object +_ The direction of an object (from a point) can be specified in term of either compass direction or compass bearing. K3-020 provides. both compass direction and compass bearing The Compass Points +_ The compass directions are North, Northeast, East. Southeast, South, Southwest, West and Northwest, and etc. + Forthe examples in the adjacent diagram, the compass direction of object B from point A is East. The compas direction of object C from point À is Southeast The Compass Bearing +_ The digital bearing direction of an object is defined as the angular difference between North and the object, (Assuming that 0° for Norh, and the Measuring range is from 0° to 359° } For the examples in the adjacent diagram, the compass bearing of object B from point À is 90°. The compass bearing of object C from point A is 135°. The compass bearing of object D from point A is
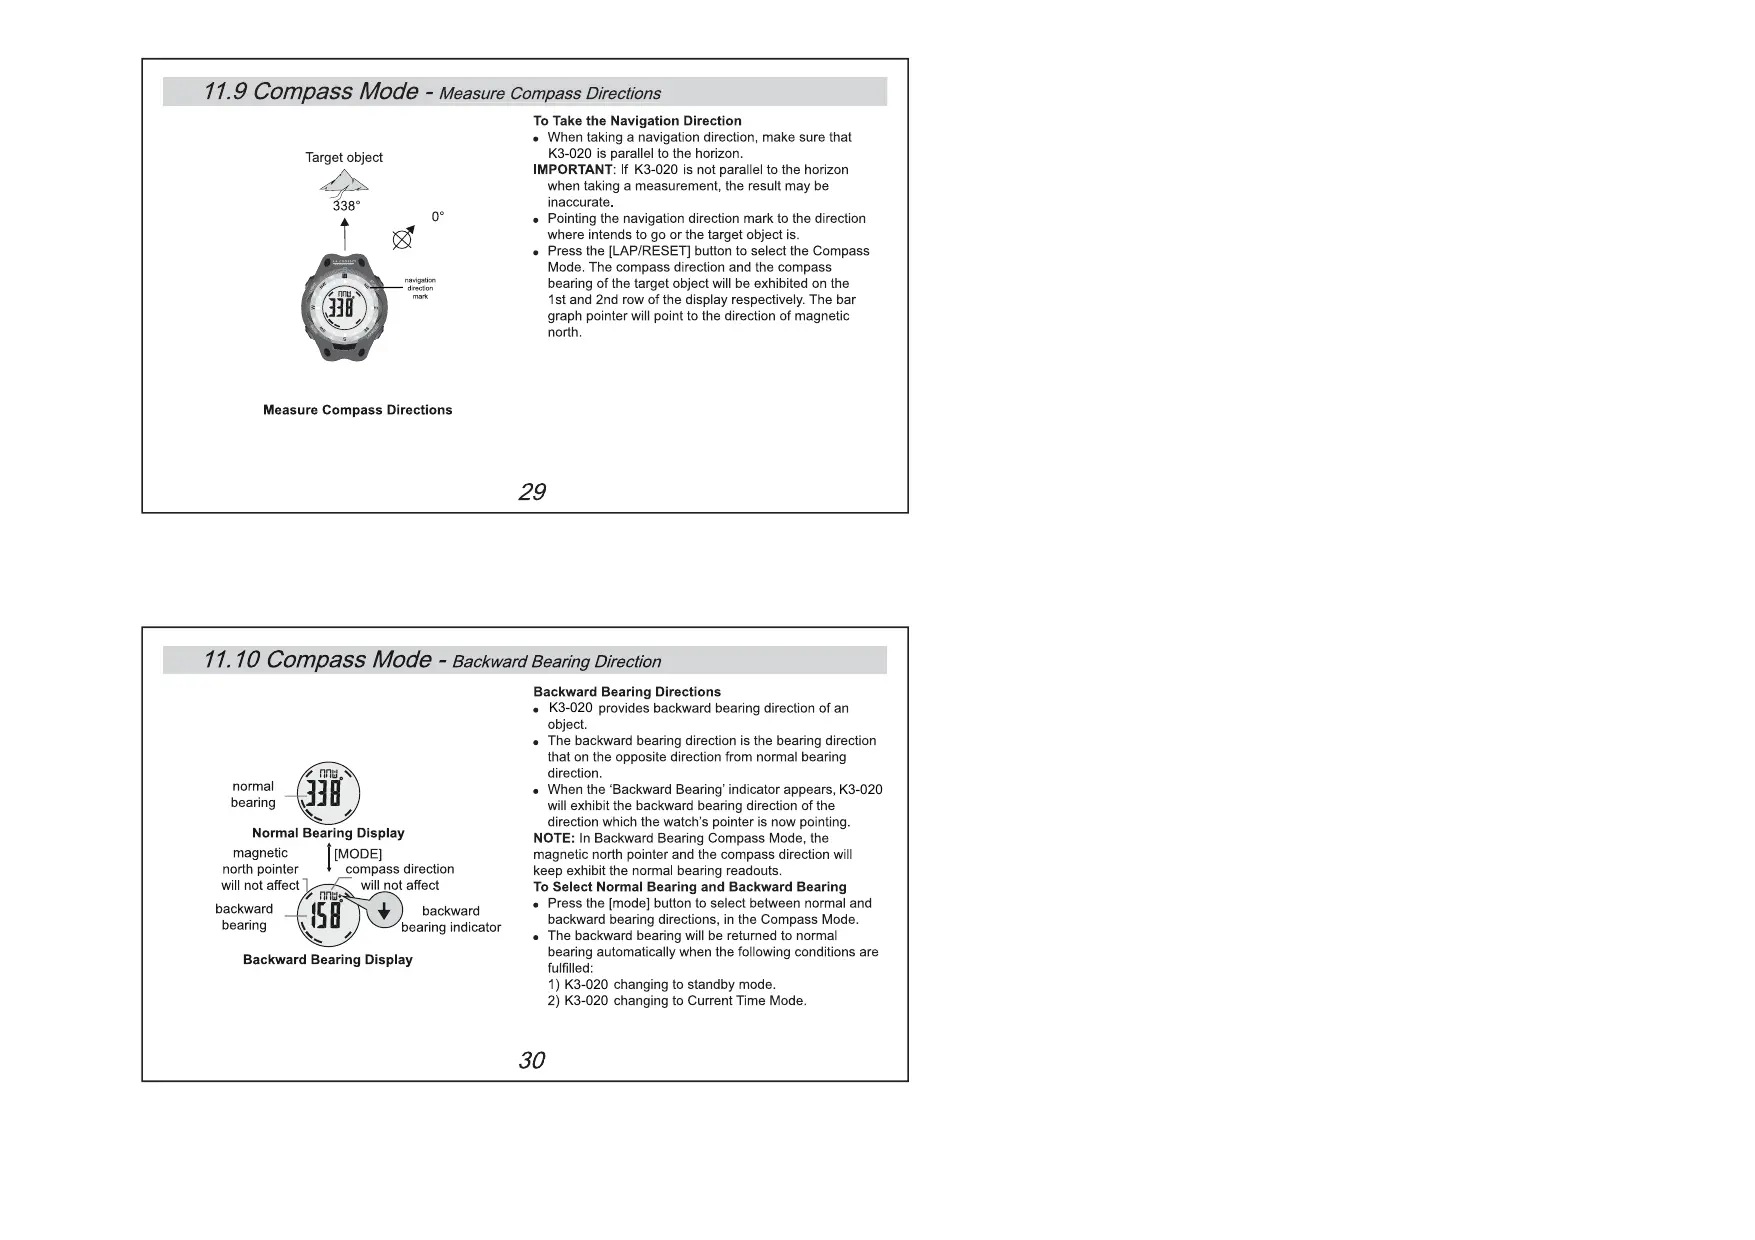
11.9 Compass Mode - measure Compass Directions
To Take the Navigation Direction + When taking a navigation direction, make sure that Target object K3-020 is parallel to the horizon. IMPORTANT: ff K3-020 is not parallel to the horizon when taking a measurement, the result may be inaccurate. Pointing the navigation direction mark to the direction where intends to go or the target object is. Press the [LAP/RESET] button to select the Compass Mode. The compas direction and he compass bearing of the target object will be exhibited on the ‘ist and 2nd row of the display respectively. The bar graph pointer will point to the direction of magnetic: north. Measure Compass Directions.
11.10 Compass Mode - Backward Bearing Direction
Backward Bearing Directions +_K3-020 provides backward bearing direction of an object. +_ The backward bearing direction is the bearing direction that on the opposite direction from normal bearing direction. normal + When the ‘Backward Bearing'indicator appears, K3-020 bearing will exhibit the backward bearing direction of the direction which the watch's pointer is now pointing, Normal Bearing Display NOTE: In Backward Bearing Compass Mode, the magnetic [MODE] magnetic north pointer and the compas direction will north pointer compas direction Keep exhibit the normal bearing readouts. wil not affect will not affect To Select Normal Bearing and Backward Bearing backward backward + Press the [mode] button to select between normal and bearing heating indlcator backward bearing directions, in the Compass Mode. +_The backward bearing will be returned to normal bearing automatically when the following conditions are fulilled
1) K3-020 changing to standby mode.
2) K3-020 changing to Current Time Mode.
Backward Bearing Display
11.11 Compass Mode - Compass Lock
Bearing unlocked Display el ] IST/STP] Compass lock indicator Bearing Locked Display Compass Lock + K3-020 provides a compass lock function to secure important compass reading +_ When the compass lock indicator is exhibited, {he compass reading will not be changed even K3-020 is pointing to another object To Lock/Unlock the Compass Lock + Press the [ST/STP. butlon to lockunlock the compas readings in the Compass Mode. +_ The compas lock will be unlocked automatically when the following conditions are fufflled:
1) K3-020 is changing to standby mode.
2) K3-020 is changing to Current Time Mode.
mouñtain A & : pointA à 270 Mountain B 135° Check One's Position By Backward Bearing Check One's position by Backward Bearing K3-020 can be used lo check ones position in the outdoor by using backward bearing:
1. Spot two distant identifiable landmarks from your
current position, for the example in the adjacent diagram, the Iwo landmarks are mountain À and B. . Consult a map to find out the mountain À and B's locations on the map. Using K3-020 to check out the backward bearings of mountain À and B from one's position, such as 135° or mountain À and 270° for mountain B. Use protractor and ruler to draw the line 135° and lines 270° on the map which starting from the mountain À and B respectively,
5. The position will be at the intersection point
point A) ofthe lines 135° and 270°.
11.13 Compass Mode - Application ofthe Compass I!
To Check the Track Course Correct + When hiking on a trail, K3-020 can keep the trail course correct + Forthe example in the adjacent diagram, the correct {rail is running from point À to point E : Before the Hiking pointE a + Before the hiking, mark the tuming points of the trail on finish point) & fe map such as the point À, B, C, D'and'E. Using a protractor to check out the compass bearings of these markings as follows:
1) Point B from point À (315°),
2) Point C from point B (0°).
3)Point D from point C (225°), and 4)Point E from point D (315°) During the Hiking — point A + Using K3-020 to take the navigation direction at the {starting point) tuming points. IMPORTANT: ff you doubt of the conditions and directions A Sample Trail On À Map of the trail, consult the park office before starting your hiking.
Current Time Mode Pacer Mode . Time System: AM, PM, Hour, minute, second, and + Setting Range: 40 bpm to 180 bpm display with bar graph animation at the rate of + Setting step: 5 bpm 1 second Dual Time Mode < Time Format: 12-hour or 24-hour format . Time System: AM, PM, Hour, minute, second, + Calendar: Month, date and day of week display and display with bar graph animation at the rate of (Auto-Calendar function for leap year and day of 4 second week) Compass Mode Alarm Mode + Compass bearing Resolution: 1° + Daily alarm and hourly chime + Magnetic North Pole Pointer: 16 pointers +_ Alarm sound: 30 seconds + Compass direction: 16 directions Chronograph Mode + Compass bearing Display Range: 0° to 359° + Resolution: 1/100 second + Others: Digital bearing reading Lock and + Measuring Range: 99 hours 59 minutes Digital backward bearing
For warrranty work, technical support, or information contact : http///www.lacrossetechnology.fr http://www.lacrossetechnology.net http://www.lacrossetechnology.it http://www.lacrossetechnology.be Al right reserved. This handbook must not be reproduced in any form, even in excerpts, or duplicated or processed using electronic or mechanical procedures without written permission ofthe This handbook may contain mistakes and printing error. The information in this handbook is regularly checked and corrections made in the next issue. We apologise for any inconvenience, but accept no liability for technical mistakes or printing errors, or their consequences.All trademarks and patents are acknowledged and infringements will be pursue.