
GF-1 - External flash RICOH - Free user manual and instructions
Find the device manual for free GF-1 RICOH in PDF.
| Product type | External photo flash |
| Brand | RICOH |
| Model | GF-1 |
| Dimensions (L × H × P) | 65 mm × 95 mm × 80 mm |
| Weight (without batteries) | Approximately 240 g |
| Power supply | 4 AA batteries (alkaline, lithium, or rechargeable NiMH) |
| Battery life (alkaline batteries) | Approximately 200 flashes |
| Recycle time | Approximately 4,7 s (NiMH), 5 s (alkaline) |
| Guide number (ISO 100) | 20 (24 mm) to 30 (105 mm) |
| Light coverage | 24-105 mm (18 mm with wide panel) |
| Flash modes | Automatic TTL, automatic ambient flash, manual flash, slave (SLAVE1/SLAVE2) |
| Special functions | Bounce flash (45-90°), reflector panel, built-in wide panel, AF auxiliary light, flash compensation |
| Color temperature | 5 600 K |
| Flash duration | 1/250 s (full power) to 1/20 000 s (TTL) |
| Safety | Overheat protection, auto power off after 30 min (standby), 60 min (slave mode) |
| Maintenance and cleaning | Clean with a dry cloth. Do not use solvents. |
| Included accessories | Flash stand, instruction manual, warranty card |
| Compatibility | Ricoh type R, GR Digital, GR Digital II, Caplio GX100, GX200 cameras |
Frequently Asked Questions - GF-1 RICOH
User questions about GF-1 RICOH
0 question about this device. Answer the ones you know or ask your own.
Ask a new question about this device
Download the instructions for your External flash in PDF format for free! Find your manual GF-1 - RICOH and take your electronic device back in hand. On this page are published all the documents necessary for the use of your device. GF-1 by RICOH.
USER MANUAL GF-1 RICOH
En External TTL Flash INSTRUCTION MANUAL
De Externer TTL-Blitz BEDIENUNGSANLEITUNG
Fr Flash TTL externe MANUEL D'INSTRUCTIONS
Es Flash externo TTL MANUAL DE INSTRUCCIONES
It Flash TTL esterno MANUALE DI ISTRUZIONI
Ru BHeuHnY BcNbIbIka TTL PYKOBODCTBO NO 3KcPJIyATAUIN
External TTL Flash
INSTRUCTION MANUAL
Read Before Use
Thank you for purchasing this Ricoh equipment.
The GF-1 is a flash designed for use exclusively with cameras equipped with the Ricoh flash interface (hereafter, Type R cameras).
- When the GF-1 is attached to compatible Type R cameras, it can be used as a TTL automatically controlled flash.
Cameras other than Type R: All other cameras except those described above.
With the GR Digital, GR Digital II, Caplio GX100, Caplio GX200, the flash can be used in Ambient light auto and Manual flash modes.
- For the latest information on the cameras supported by this flash, please visit the Ricoh website.
http://www.ricoh.com/r(dc/option/other/
Before using the equipment, please be sure to read the instruction manual, check the content and correctly use the equipment.
Warning Symbols
Various symbols are used throughout this instruction manual and on the product to prevent physical harm to you or other people and damage to property. The symbols and their meanings are explained below.
| Danger | This symbol indicates matters that may lead to imminent risk of death or serious injury if ignored or incorrectly handled. |
| Warning | This symbol indicates matters that may lead to death or serious injury if ignored or incorrectly handled. |
| Caution | This symbol indicates matters that may lead to injury or physical damage if ignored or incorrectly handled. |
SampleWarnings
| The 1 symbol alerts you to actions that must be performed. | |
| The 2 symbol alerts you to prohibited actions. The 3 symbol may be combined with other symbols to indicate that a specific action is prohibited. | |
| Examples Do not touch | Do not disassemble |
Observe the following precautions to ensure safe use of this equipment.
Danger
| Do not attempt to disassemble, repair or alter the equipment yourself. The high-voltage circuitry in the equipment poses significant electrical hazard. | |
| Do not attempt to disassemble, alter or directly solder the batteries. | |
| Do not put the batteries in a fire, attempt to heat them, use them in a high temperature environment such as next to a fire or inside a car, or abandon them. Do not put them into water or the sea or allow them to get wet. | |
| Do not attempt to pierce, hit, compress, drop, or subject the batteries to any other severe impact or force. | |
| Do not use a battery that is significantly damaged or deformed. | |
| Warning | |
| Turn off the power immediately in the event of abnormalities such as smoke or unusual odors being emitted. Remove the batteries as soon as possible, being careful to avoid electric shocks or burns. | |
| Turn off the power immediately if any metallic object, water, liquid or other foreign object gets into the flash unit. Remove the batteries as soon as possible, being careful to avoid electric shocks or burns. | |
| Follow these precautions to prevent the batteries from leaking, overheating, igniting or exploding. · Do not use any batteries other than those specifically recommended for the equipment. · Do not carry or store together with metal objects such as ballpoint pens, necklaces, coins, hairpins, etc. · Do not put the batteries into a microwave or high pressure container. · If leakage of battery fluid or a strange odor, color change, etc. is noticed during use or during charging, remove the batteries from the flash unit immediately and keep them away from fire. | |
| Keep the battery used in this equipment out of the reach of children to prevent accidental ingestion. Consumption is harmful to human beings. If swallowed, seek medical assistance immediately. | |
| Keep the equipment out of the reach of children. | |
| Do not touch the internal components of the equipment if they become exposed as a result of being dropped or damaged. The high-voltage circuitry in the equipment could lead to an electric shock. Remove the batteries as soon as possible, being careful to avoid electric shocks or burns. Take the equipment to your nearest dealer or service center if it is damaged. | |
| Do not use the equipment in wet areas as this could result in fire or electric shock. | |
| Do not use the equipment near flammable gases, gasoline, benzene, thinner or similar substances to avoid the risk of explosion, fire or burns. | |
| Do not use the equipment in locations where usage is restricted or prohibited as this may lead to disasters or accidents. | |
| Do not fire the flash direct to the eye at short distance. It may damage the eye. When taking flash picture especially toward a baby, it is recommended to keep the flash unit at least 1 meter (3.3 feet) away from the subject. | |
| Do not leave or store the flash unit in temperatures over 40°C, such as in an automobile. | |
| Caution | |
| Contact with fluid leaking from a battery can lead to burns. If part of your body comes in contact with a damaged battery, rinse the area with water immediately. (Do not use soap.) If a battery starts to leak, remove it immediately from the equipment and wipe the battery chamber thoroughly before inserting a new battery. | |
| Do not allow the flash unit to get wet. In addition, do not operate it with wet hands. Both pose the risk of electric shock. | |
| Do not fire the flash at drivers of vehicles, as this may cause the driver to lose control and result in a traffic accident. | |
| Do not use the flash in unstable locations. You may lose your balance, fall or drop the flash, resulting in injury. | |
| To prevent the flash from overheating or deteriorating, keep the number of continuous flashes to no more than 20 flashes. After 20 continuous flashes, do not use the flash for at least 10 minutes. With cameras other than Type R, the flash will fire automatically and continue firing in interval shooting mode; do not use the flash in this mode. | |
| Do not use benzine, thinner or other alcoholic agents to clean the unit. | |
| Remove the batteries when not in use for a long period of time. |
Supplied Equipment
- Flash - Flash stand - Instruction manual - Pouch
Warranty
Name of Parts
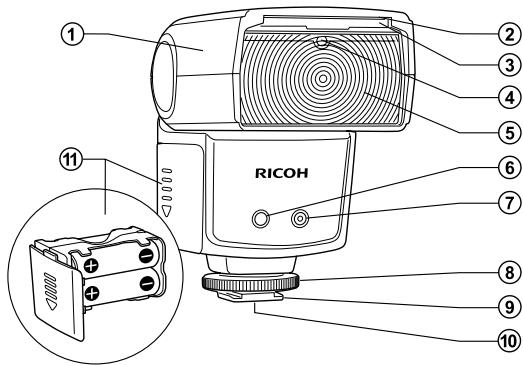
① Flash head
② Catch-light panel
③ Wide panel (18 mm)
④ Slave sensor
⑤ Flash element
⑥ AF auxiliary light
⑦ Ambient light automatic sensor
⑧ Lockring
⑨ Hot shoe mounting foot
Hot shoe contacts
Battery magazine
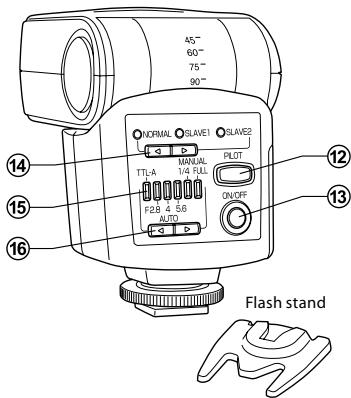
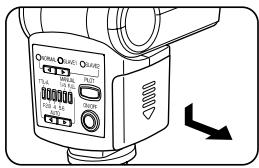
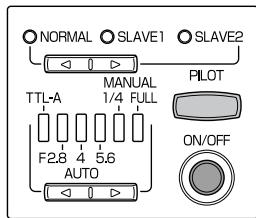
⑫ PILOT lamp / Test flash button
⑬ ON/OFF button
14 Mode select button (NORMAL SLAVE1 SLAVE2)
15 Flash power level indication lamps (6 LEDs)
⑥ Flash power level select button

- In manual flash output adjustment mode, the two rightmost flash power level indication lamps (1/4 and FULL) will light up. (Only when using Type R cameras)
Caution
Before attaching or removing the flash unit, turn off the power of both the flash unit and the camera.
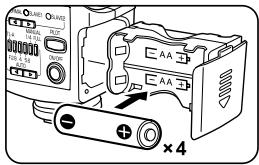
Inserting batteries
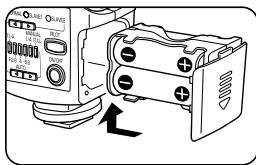
1 Slide down the battery magazine's cover and pull out the battery magazine.
2 Insert 4 × AA batteries as shown in the illustration. Check the polarity of the batteries and make sure to insert them correctly.
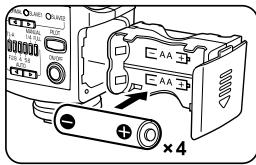
3 Insert the battery magazine into the flash unit and slide up the cover to close it.

Caution
- Replace the batteries with new batteries all of the same type and brand, or with fully charged rechargeable batteries all of the same type and brand. In addition, always replace all four batteries at the same time. If the batteries are inserted in the wrong direction, the flash will not work.
- When replacing the batteries right after the flash fired consecutively, overheating may occur; be careful not to burn yourself.
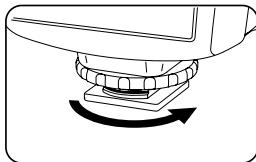
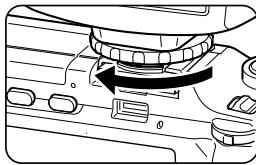
Mounting the flash on a camera
1 Turn the lock ring as shown in the illustration to loosen it.
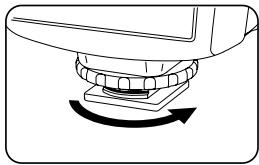
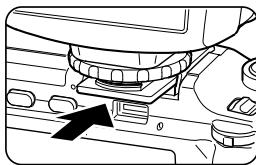
2 Insert the flash unit into the hot shoe on the camera. Securely insert the flash unit all the way into the hot shoe.

3 Turn the lock ring as shown in the illustration to fix the flash unit to the camera.
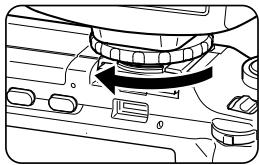
Removing the flash from a camera
1 Loosen the lock ring completely before removing the flash unit.
Turning on the flash
1 Press the ON/OFF button to turn on the flash. When the power is turned on, the PILOT lamp lights up in red and the flash starts to charge.
2 After a few seconds, when the PILOT lamp turns green, the flash is completely charged and ready to be used.
Turning off the flash
1 Keep the ON/OFF button pressed for about 2 seconds to turn off the flash.
Power saving mode
To save battery power, the flash unit will automatically enter stand-by mode about 2 minutes after the camera's Auto Power Off is activated. In stand-by mode, the PILOT lamp blinks in red every 2 seconds.
If you operate any of the buttons on the flash unit, or if the camera is turned on, the flash will automatically wake up from stand-by mode.
If the flash unit is left in stand-by mode for 30 minutes, the Auto Power Off function will be activated and the flash will be turned off completely. To use the flash in such case, turn on the power of the flash unit again.
- In slave mode the flash unit will not enter stand-by mode and the Auto Power Off function will be activated only after 60 minutes.
Only with Type R cameras
In this mode, when you press the shutter release button the flash will automatically fire at the most appropriate level.
- In movie, dynamic range (DR), interval shooting, or M-Cont Plus (H) mode, the flash will not fire.
1 Turn on the camera.
2 When you press the ON/OFF button on the flash unit, it will turn on automatically in TTL mode.
3 When the PILOT lamp turns green, the flash is ready for shooting.
4 Press the shutter release button halfway to focus on the subject.
5 Press the shutter release button to fire the flash and take the picture.
6 When using a zoom lens, if the focal length changes, the illumination coverage changes accordingly and the flash unit is automatically adjusted for the optimal illumination angle.
When using the flash, the shutter speed and aperture of the camera depend on the position of the camera's mode dial, as follows.
- When the flash mode on the camera is set to Flash Synchro, the shutter speed is automatically adjusted to match ambient light conditions.
| Mode | Shutter speed | Aperture |
| ☐ | Automatic | Automatic |
| P | Automatic | Automatic |
| A | Automatic | Selected aperture |
| S | Selected shutter speed | Automatic |
| M | Selected shutter speed | Selected aperture |
Reference
About the illumination coverage
With Type R cameras, the illumination coverage will vary from 24 mm to 105 mm, depending on the focal length.
You can use a illumination coverage of 105mm to cover also focal lengths beyond 105mm toward the telephoto end. However, when using focal lengths under 24mm toward the wide angle end, please use the wide panel (18 mm). In such case, the illumination coverage will not be automatically linked to the zoom position.
- All illumination coverage values given are 35-mm camera equivalents.
About the focal length
If the image appears too dark even when using flash, get closer to the subject or select a higher ISO setting on the camera.
To Better Enjoy Flash Photography
Ambient light auto flash
1 Set the flash mode to NORMAL with the Mode select button and the flash power level to F2.8 - 5.6 with the Flash power level select button. If the subject is relatively far or if you want a short interval between flashes, select a power level of F2.8. To get a deeper depth of field, select a power level of F5.6.
2 Manually select the aperture on the camera to match the aperture value selected on the flash unit. If the camera does not offer the exact same value, select the closest value. When using a zoom lens, check the aperture value again after adjusting the zoom and correct the aperture value if necessary.
3 Set a shutter speed slower than 1/250 second.
-
For details on the camera's settings, see the Camera User Guide.
-
Depending on the shooting conditions (subject, surroundings, color and reflectiveness of the background, etc.) the resulting image may not come out as you expected. In such case, try changing the aperture value on the camera or the shooting distance.
Type R cameras
Set the shooting mode to Manual exposure or Aperture priority mode. The correct exposure cannot be achieved in mode, Program shift mode or Shutter priority mode.
Also, when the ISO setting is set to AUTO, the flash unit will be automatically adjusted to match the selected setting. If the ISO setting is set to a certain value, please check the procedure for cameras other than Type R.
- In movie, dynamic range (DR), interval shooting, or M-Cont Plus (HI) mode, the flash will not fire.
Cameras other than Type R
The ISO setting on the camera is not linked with the flash unit. Manually select the aperture value on the camera to match the ISO setting, using the following table as reference.
| Aperture value on the flash unit | ISO64 | ISO80 | ISO100 | ISO200 | ISO400 |
| 2.8 | 2.2 | 2.5 | 2.8 | 4 | 5.6 |
| 4 | 3.2 | 3.6 | 4 | 5.6 | 8 |
| 5.6 | 4.5 | 5 | 5.6 | 8 | 11 |
Manual flash
When you cannot get the exposure you intended using the TTL auto or Ambient light auto mode, you can use manual flash to set the desired flash output level.
1 Set the flash mode to NORMAL with the Mode select button and the flash power level to FULL or 1/4 with the Flash power level select button.
2 When using manual flash, use the following formula to select the aperture value.
Aperture value = Guide No. ÷ Shooting distance
Example) If the guide No. is 20 and the shooting distance is 5 m, the appropriate aperture value is 20 ÷ 5 = 4 , that is F4.
The flash unit's output (guide No.) varies depending on the zoom position. Refer to "Guide No. Table (ISO 100)" on the page EN - 18.
3 Set a shutter speed slower than 1/250 second.
- For details on the camera's settings, see the Camera User Guide.
- In movie, dynamic range (DR), interval shooting, or M-Cont Plus (HI) mode, the flash will not fire.
Only with Type R cameras
With Type R cameras the flash output level can be changed on the camera within the range 1/1 to 1/64.
1 Set the flash mode to NORMAL with the Mode select button and the flash power level to Manual flash output adjustment (the two rightmost flash power level indication lamps on) with the Flash power level select button. Adjust the flash output level while checking the image on the picture display on the camera.
Perform the manual flash output level adjustment only after the flash is attached to the camera.
Slave flash
This flash unit features a slave flash function.
In slave flash mode, this flash unit will fire when it detects the light from another flash.
The slave flash function is especially effective in the following situations.
- When you do not want to
illuminate the subject from the front with the main flash light source
- When you want the this flash unit to fire without having it attached to the hot shoe
- When the distance to the subject is too far and the flash cannot reach the subject
- When you want to add several flashes to an array
Caution
- If the flash does not fire, check the position and the angle of the flash.
- In slave flash mode, if the flash accidentally detects other camera's flash, it may fire before shooting. Check that the flash unit is ready for another fire by the PILOT lamp.
SLAVE1: Mode for cameras with a pre-flash (triggered once) and a main flash (Type R and other cameras)
SLAVE2: Mode for cameras with a main flash only
Following is the explanation for how to use the camera's built-in flash as a trigger.
Type R cameras
If you are using the camera's built-in flash as a trigger, do not attach this flash unit to the hot shoe. The built-in flash may not be able to open.
1 Turn on the power of the camera and the flash unit and set the flash to always fire.
2 Set the flash mode to SLAVE1 with the Mode select button. When set to slave mode, the flash unit's AF auxiliary light blinks.
3 Set the flash power level to Ambient light auto (F2.8 to 5.6) or Manual flash (1/4 or FULL) with the Flash power level select button.
Caution
The camera's Red-eye flash function is not available.
When using Ambient light auto
Set the aperture value.
1 Manually select the aperture on the camera to match the aperture value selected on the flash unit. If the camera does not offer the exact same value, select the closest value. When using a zoom lens, check the aperture value again after adjusting the zoom and correct the aperture value if necessary.
2 Use the supplied flash stand or other device to place the flash unit at the desired location and adjust its angle as desired.
3 Press the camera's shutter release button once to check that the flash fires under the conditions selected.
If the flash does not fire, verify the position of the slave sensor and the operating distance.
If after checking the results of a test shot the image is too dark, select a smaller aperture value on the camera. If it is too bright, select a larger aperture value instead.
When using Manual flash
Use the following formula to select the aperture value.
Aperture value = Guide No. of this flash unit ÷ Distance between the main light source and the subject
For details about this flash unit's guide No., refer to "Guide No. Table (ISO 100)" on the page EN - 18.
Cameras other than Type R
Using the Mode select button, set the flash mode to SLAVE1 or SLAVE2, according to the type of the camera's built-in flash. In this case, the camera's Red-eye flash function is not available.
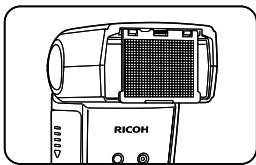
Wide panel
- You can pull out the built-in wide panel and place it on the flash as shown in the illustration to use a shooting angle of 18mm .
- The catch-light panel will be pulled out at the same time so please push the catch-light panel back inside.
Caution
Return the wide panel to its place when using bounce flash.
Reference
The wide panel diffuses the light of the flash, making it effective when you want to use a softer light or shooting close-ups.
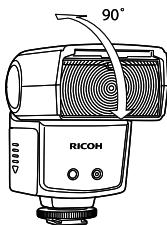
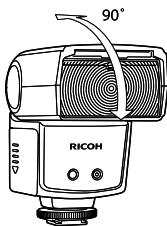
Bounce flash
Mostly when shooting indoors, you can use the ceiling or walls to reflect the light of the flash (Bounce flash). Bounce flash can reduce hard shadows and result in more natural pictures. Bounce flash can also be convenient when shooting babies and toddlers for whom a direct flash would be too harsh.
- You can change the angle of the flash head upwards and set it to 45^ 60^ 75^ 90^ .
Caution
When using bounce flash, the illumination coverage is fixed at 50~mm .
- When the ceiling or walls are too far, the reflected light of the flash may not be enough and the bounce flash may not be effective.
- If the ceiling or walls are not white, the reflected light may be affected, taking their color.
- If the reflected light is attenuated too much and the bounce flash is not effective enough, select a higher ISO setting on the camera.
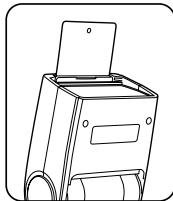
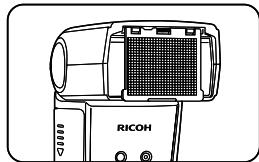
Catch-light panel
When using bounce flash, you can also use the catch-light panel at short distance to direct some of the light at a human subject, adding a glint in their eyes and brightening their expression.
- When you pull out the wide panel, the catch-light panel will be pulled out at the same time. Push the wide panel back inside.
- When using the catch-light panel, set the flash head upwards at a 90^ and use bounce flash.
Flash compensation
When using Type R cameras, you can compensate the flash output level using the TTL auto or Ambient light auto mode. For details, see the Camera User Guide.
1st curtain / 2nd curtain synchronization
For details, see the Camera User Guide.
Specifications
| Guide No. | 20 (at 24 mm) - 30 (at 105 mm) 16 (at 24 mm, using the wide panel) |
| Illumination Coverage | 24 mm - 105 mm (18 mm with the wide panel) Automatically linked to the focal length of the lens as per the auto power zoom (only Type R cameras) |
| Power Source | 4 × AA batteries (sold separately) • Lithium batteries and rechargeable NiMH batteries can be used. |
| Battery Life | Approx. 200 flashes with alkaline batteries (based on Ricoh's measurements) |
| Energy Saving | Enters stand-by mode after about 2 minutes of the camera entering stand-by mode or being turned off. Powers off automatically after 30 minutes in stand-by mode. In slave mode, powers off automatically after 60 minutes without operation. |
| Flash Interval | Approx. 4.7 seconds (with rechargeable Nickel-hydrogen batteries) Approx. 5 seconds (with alkaline batteries) |
| Flash Output Adjustment | Pre-flash TTL, Ambient light automatic, Manual flash |
| AF Auxiliary Light | Built-in |
| Color Temperature | 5,600K |
| Flash Duration | 1/250 second (full power flash) 1/250 - 1/20,000 second (TTL flash) |
| Slave Flash | SLAVE1, SLAVE2 switching |
| Dimensions (W×H×D) | 65 mm × 95 mm × 80 mm (2.6×3.7×3.2 inch) |
| Weight | Approx. 240 g (excluding batteries) |
- The specifications of the equipment may change without prior notice.
Guide No. Table (ISO 100)
| Zoom position | Flash output level | ||||||
| FULL | 1/2 | 1/4 | 1/8 | 1/16 | 1/32 | 1/64 | |
| 24mm | 20 | 14 | 10 | 7 | 5 | 4 | 3 |
| 28mm | 22 | 16 | 11 | 8 | 6 | 4 | 3 |
| 35mm | 24 | 17 | 12 | 8 | 6 | 4 | 3 |
| 50mm | 26 | 18 | 13 | 9 | 7 | 5 | 3 |
| 70mm | 28 | 20 | 14 | 10 | 7 | 5 | 4 |
| 85mm | 29 | 21 | 15 | 10 | 7 | 5 | 4 |
| 105mm | 30 | 21 | 15 | 11 | 8 | 5 | 4 |
- All values given at ISO100. For values at ISO200 multiply by 1.4 × ; for values at ISO400 multiply by 2 × .
- When using slave flash, and with cameras other than Type R, the zoom position is fixed at 24 mm.
Troubleshooting
The flash unit will not charge.
- Check the polarity of the batteries. If a battery was inserted in the wrong direction, insert it in the correct direction.
- Check whether the batteries are empty. In such case, replace with new batteries.
The flash unit will not fire.
- Check whether the flash unit is correctly attached to the camera. Insert the flash unit all the way into the hot shoe and tightly close the lock ring.
- If the hot shoe contacts are dirty, wipe them clean with a soft, dry cloth.
- If the flash was powered off automatically by the Auto Power Off function, turn on the flash unit again.
The picture is over- or underexposed.
- Check the flash mode. If it is set to Manual flash, set it to TTL mode.
INFORMATION TO THE USER
USA FCC Part15 Class B
The equipment has been tested and found to comply with the limits for a Class B digital device, pursuant to part 15 of the FCC Rules. These limits are designed to provide reasonable protection against harmful interference in a residential installation. This equipment generates, uses, and can radiate radio frequency energy and if not installed and used in accordance with the instructions, may cause harmful interference to radio communications. However, there is no guarantee that interference will not occur in a particular installation. If this equipment does cause harmful interference to radio or television reception, which can be determined by turning the equipment off and on, then user is encouraged to try to correct the interference by one or more of the following measures:
Reorient or relocate the receiving antenna.
- Increase the separation between the equipment and receiver.
- Connect the equipment to an outlet on a circuit different from that to which the receiver is connected.
- Consult the dealer or an experienced radio/TV technician for help. Changes or modifications not expressly approved by the party responsible for compliance could void the user's authority to operate the equipment. Properly shielded and grounded cables and connectors must be used for connection to a host computer in order to comply with FCC emission limits. An AC adapter with a ferrite core must be used for RF interference suppression.
This device complies with Part 15 of the FCC Rules.
Operation is subject to the following two conditions:
(1) This device may cause harmful interference, and
(2) This device must accept any interference received, including interference that may cause undesired operation.
Note to Users in Canada
Note: This Class B digital apparatus complies with Canadian ICES-003
Fill in all the prescribed details and safely keep the warranty after making sure all the information is correct.
Customer Support
Ricoh Service Centers
In case of malfunction, please contact one of the Ricoh service centers listed in the Camera User Guide of the digital camera.
- Reproduction in full or part is prohibited without permission. © 2009 Ricoh Co., Ltd.
- The content of this instruction manual may change without prior notice.
RICOH COMPANY, LTD.
Ricoh Building, 8-13-1, Ginza, Chuo-ku, Tokyo 104-8222, Japan
Externer TTL-Blitz
© 2009 Ricoh Co., Ltd.
Oberrather StraBe 6, D-40472, Dusseldolf, Germany
http://www.ricohpmmc.com
RICOH COMPANY, LTD.
Ricoh Building, 8-13-1, Ginza, Chuo-ku,
Tokyo 104-8222, Japan
Flash TTL externe
MANUEL D'INSTRUCTIONS
© 2009 Ricoh Co., Ltd.
Ricoh Building, 8-13-1, Ginza, Chuo-ku, Tokyo 104-8222, Japan
Flash externo TTL
Ricoh Building, 8-13-1, Ginza, Chuo-ku, Tokyo 104-8222, Japan
Flash TTL esterno
© 2009 Ricoh Co., Ltd.
Ricoh Building, 8-13-1, Ginza, Chuo-ku, Tokyo 104-8222, Japan
BHeHnBa BCnbIwka TTL

* In pyuHoi peXmI pEryIIpOBeK bCbIbUKN, BKNUOaTOBcTaBA KpaIHN npABybIX nIHdNAtOpMaOHCToBcIbUKN (1/4n FULL). (TolNo kprncnONb3ObaHN mIoTOKaMepeType R)
Bhumahne!
Peped yctahOBKOINIINCHTNIEMBHEHNEBCbIaKNOTKIOUHTe NITAHINE BCbIaKNINΦOTOKaMepbbl.
yctaHOBka aKKyMnyIaTOPOB
1 CdbnHbTe KpbIuKy akymyJIaTOphORO OTEcka N m3BNeKHTe Maar3IN akymyJIaTOpa.

2 BCTabBe 4 aKKymyIaTopa AA KaK pOKa3aHO Ha pCsyHke. IpoBepBe TIOJARpOcTB aKKymyIaTOpOB IN y6eJIteCb, YTO OH N BCTABJIeHb npaBUNbHO.
3 BctaBbTe aKKyMylrTopHbI Maara3H IN B KOPNYC BCbliWKN ⅢakpoTBe KpbIshky, CdbnHyB ee bBepx.
Bhumahne!
- YctaHOBITE HObIe 6aTapeH TORO Je TnA n MapKn, NIOBOCTbU 3apJxEHNbIe AKyMylrTOpbl TORO Je TnA nMapKn. 3aMeHnTE Bce YeIbpe AkkymyIITopora OndOBPeMeHNO. Ecn npYcTaHOBKE AkkymyIITOpOB HApuySeHa NOIpaRHOCTb, BCbnHska He 6dyet pa6oTaTB.
- Пи замени AkkyMnyTOpOB cop3aY nocne TOrO, KaK bblna BbInlHHeа српь BCNbIteк,БydTe OCTOPoxHbI - BCNbIka MOket HaraPebTaCn I MyB3aTbO OXOni.
UcTaHOBKa BCnblIshKn Ha KaMepy
1 NopbHnTe KOBIc0- nKCatOp KAK NOKa3HaHO npCyuKHe, uO6bO cNaBtB erO.
2 BCTaBtBe BCnbluKy B kpenIe H aanTepa Hot Shoe Ha kamepe. BCTaBtBe BCnbluKy B aanTep Hot Shoe do ynopa.
3 ПовернITE КлььцофкacTop KAKOKa3Ha HO npCysHKe,NTO6b3aKpeNtB BCnbluKHa KaMpe.
CHATNE BCNBIUKC KamepbI
BbIKJIouHHe BCnblIuKn
1ДяВькlioуени BCblshи НжмITE KнОпКУ ON/OFF uyepeKnBaIte B TeueHne npIMeHNo 2cekyI.
PexkIM 3heproc6epekeHn
ДлгзэкнOMHIMЗарядakkymЛТОВВсьшkaabTOMATUeCKN BxOJNTm PeKIMr OTROBHOCTN pIIMePHO Yepe3 2MHytbTOCNE TOrO, KAK cpa6aTbBaetФyHKnJIABTOOTKIIHOnENKAMepb. B peximE rTOBOHCTLamMaPILOT MIRAEt KApchYIM Uepe3 KcKdIbe 2 cekyHdbI. Пин HaxatmИ NIO60I KHONKn HA BCbIbIe IINI pRn BKIIuChENI KAMEpbl BCbIbIa KABOMATUeCEKN nepExoDIT B pa6Ouyn peKIM. EcIn BCbIbIa HakoITcB PEXIMe rTOBOHCTN 30 MmHTy, AKTNBUPETcФHyNKlauB ATOOTKIIHOnENEHN, IN BCbIbIa BbIKIQUaETcN PNOHCTbU. B 3OM CnUyae IINCnOJIb3OBaHnB BCbIbIa HeO6XODIMO CHOBA BKLOUHTb PINTAHNe BCbIbIu.
- B noДиЧИнЕНСМ РжIMе BCblшka He NepeхODNT B ржIMM roTOBHOCTN, И ФИнCUЯ ABTOOTKЛЮЧЕНИА AKТINВИРУЕТС TОЛКо chepe3 60 мИнHT.
TolboKcKaMepamrTypeR
B 3TOM pexime npin HaxaTMn CnYCKOBK KHOJNK BCbIbka cpa6aTaBAeT ABTOMATmUeCKn CONTMAmJIbHOH MOUChOCTbIO.
- B peximax Buaedeocbemkn,ДиhamMueckORO Diana3aOHa, CbeMkn
СИнтраволим n peximme Прdedыd,плIOc (BIC.) BCblka He
срабатвает.
1 BkHouTe KaMepy.
2Пинхашии КнОПКИ ON/OFF Ha BCnblIke OHa abTomaTneckn BKIOUaTeCЯВ peKIMe TTL.
3 Korga lamna PILOT cTahet 3eHebIM, BCnblka roToBa Ka pa6ote.
4 HaxMMTe CnYCKOByo KHOJky Do nIOBOHbI, YTO6bl CcOKyCupOBaTbCa Ha OBekeT.
5 Haxmte cnyckobyIO KHONky, yTO6bI CdeJaTb CHMOK CO BCblIKoN.
6 EcnnpnIcNOJb3OBAHmN 3ym-ObBeKtNBa I3MeHnTb fokyCHOe paccTOHHe, COOTBETCTBEHNO I3MeHnEETCA 30Ha OCBSeEHHa BCblkOJ, IN BcblkOJ HaCTpaINBaETCABTOMaTNUeCKn DnI ONTIIMAbHOrO YrTa OCBSeEHnn.
PnI NcNoJIb3OBAHN BcBbIKN BbIepeKKa N daNpaRMa KaMEpbI 3aBICrT OT NIOJKeHIN IkaJIbI peKMOB.
- Ecnla Ha Kamepe BybopahepXM CnHPOHH BcbliKu, Bbydejckka perynpnyetcABTOMATUeCKN B 3aBcIMOCTN OT yCNOBBI BHEUHERO OCBeJHNEI.
KaMepbl,OTnHbIe OT Type R
3aMepe ISO Ha kaMepe He CBsHaC pEeKHMOM BCnbluKc. C nOmoUbIo pInBVeHHeN HIXe Tablncb BybEpnte BpyHyIO 3naHeHne DnaApaqmbIy COBtETCBMn CO 3haHeHem IEM.
| Знанени дизафрагмы на BCпьшke | ISO64 | ISO80 | ISO100 | ISO200 | ISO400 |
| 2,8 | 2,2 | 2,5 | 2,8 | 4 | 5,6 |
| 4 | 3,2 | 3,6 | 4 | 5,6 | 8 |
| 5,6 | 4,5 | 5 | 5,6 | 8 | 11 |
Puyhoe ynpablenHe BCbIshKoJ
Ecni c NOMOsubpo pekmma ABO TTL INI ABTOmatueckoro pekmma dIra BHeWHO OCEBeeHnne HyaETC JOCTNHyTb Jekaemoi KcN03uIciu, MOXHO BCNOIb3OBAbTC pyHbIM ynpabNeHem BCbluKoI dI 3aDaHHJEAeMaEMORYPOOBH IINTEHCNIBHOCTN BCbluKoI.
1 KhoNkoBb6pa pexkma BcNbiuK uYCTAHOBITE peXIM NORMAL, KhoNkoBb6pa MoHocTN BcNbiuK uYCTAHOBITE ypoBeBb FULL nnn 1/4.
2 Pn pyuHOM ynpaBHeHm BCbnIbKo IcNcOJIb3yIte cIeNyUOyIO opMny npn Bb6ope 3NaeparMbI.
3haeHne dnaoparmbl =Beyuee cncn o CbeMoohoe pacctoHne
Pmme) Ecnl Beyuee uCNO paBHO 20, a cbemooHoe pacCTOHe -5
M, COOTBETCTByIOue 3haeHne dnaoparmbl 20÷5=4,t.e.F4.
Moohoctb BCbIbIaIKn (Beyuieee YncNo) 3abNcT OT nolooheny 3yma.Cm."Ta6nla Beyuix Nucen (ISO 100)"Ha cTp.RU-18.
3 YctaHOBtE BbIepKkMeIeHHee 1/250 ckyHbl.
-
Побпбеме о насточьх Камерbl sm.В Руковордва по Экглуаташи Фотокамерbl.
-
BézIMAX BVIDEOCbEMKи,ДИнAMMUECKOДИАПАЗОHA,СИNTePBAIOM IéZIMe Ппeбд.плЮс (ВИс.) BCПьШа He cpa6aBtBaET.
ToIbkoHaKaMepaxTypeR
B KaMepax Type R yPoBeHMoUHcTn BCIIuKm MOXHO m3MeHrTaHa foToKaMepe B dIaIa3OHe ot 1/1 do 1/64.
1 CnomooubIO KhoTKn BbIbOpa pexMma yctAHOBnTEpeKIM BCbnuNORMAL,a c nomooBIO kHOtKn BblOpa MOUHOCm BCbnuK3aadTpePnuHyIO HAcTPOky INHeHCINBOCTM BCbnuK (3aoropTcBA kmaqHnx Cnpaba INDkaTopa ypOBnMoUHOCm BCbnuK).HaCtpoTe MoUHocTb BCbnuK, npObepra ChmKn Ha DCnJIeae KAMEpbI.
BbInonHnTe pyHyu HacTPOky MoUHcToN BCbIshKn TOnbKO eCIn BCbIsha YctaHOBHeHa Ha KaMepe.
CmHxpoHn3aunBcNbIuKn
DahHoe m3deneIne IMeet fYHKUIO CNHXPOHN3aun BCbIuKN.
BpejMme CnHxPOHn3aun BCbnblkcn cp6abTbBaHne
pnpocxodn npn o6hapykeHn CBETa OTdpyro BCbluKn.
KaMepbI,OTnHbIe OT Type R
KhONK BvB6Opa pExkima YctahOnBte peXIM BCbIbIKM SLAVE1 IINSLAVE2, B 3abCnMoCTN OT TnA BCTpoEHNO BCbnIKK Kamepb. BOTOM CUYae FyHKIIa Kamepb "KpaCshrIra3a" HeDcOtYNHa.
Umpokoyrolbhi paccenBaTeNb
BbMOKTe BbIDBHyTb 1nPOKOyroBnHbI paCCeVBATEbN yCTaHOBtBe rHO BA CbIbUkY KaK noka3aHO Ha pCsyHKe, YTO6bl NCNOIb30BaTb YrOg CbEmKn 18 MM.
- OДнOBРЕМENHO BыДВИНЕТСЯпЕь Дд COЗДАПИЗ 6ЛКOKВ Глэз, exe СLEДУТ 3aДВИНΥТБ HA MECTO.
BhmuHne!
PnI nCpOJIb3OBOAHm OTpaJeHHoB BCIIbIKu 3aDbHbTe naHeB IJIy Co3dAnHg 6JIKNOB B rJa3ax Ha MeCTO.
PoncheHne
ShikoKoyroIbbln paCCSeBaTeB paCCeBaET cbET BcblIshK, yTO Heo6OJIMIO, YTObIyIOnyUHtB 0JIee MrgKINCBET INI pRcBMeKKPyrHINMIIaHOM.
OtpaxeHHa Bcblska
Пин CBemkeВ NOMeUeHm MOKHO
NcNoJIb3ObAte NOTOLOK IINI CTHeIДЯ
OTpaJKeHnB CBtA BcbluKIn ("OTpaJKeHnAa BcbluKHa)OTpaJKeHnB CbbluKMa MOKET
ymEnbWntb pe3KHe TEsH n Bpe3yIbTate
CdEnaTb CHMOK BoJee eCTeBHeHbIM.
OTpaJKeHnA BcbluKMa MOKET 6bITb
YyoDhOn pNi CBemke MaJeHbKnx DetTei,
DAI KOTOpBx PnmaR BcbluKMa MOKET OKa3aTcBcIuM oRkoI.
PnIcNcNoJIbOBAHmKamEpTReRMOJHO KOMNEHINOBaTb PpOBeHB INHTeCNBHOCTN BCbluKNs C NMOUZbIOpeXMAABTO TTL nIaBOMATNuCeKoRE pEXMAI dNBEHsero OCBSeueHnI. NDoPO6Hee CM.BYKoBOdCTBe NO kCnIpyaTuMΦOTokAmepbI.
CmHxponn3aunno 1/2 uTOpKe
Iopno6hee cm. B PykoBOdCTBe no 3KcNpyaTuIN FOToKApEpbI.
Ponck u yctpaHene HncnpaBHOte
Bcnbka He 3apjxaeTc.
- Повoberte поларноctь кakymулторов.Если кakymултор
6ын bCTавен Нерравиьно,ИЗБлкITE erо и установite
3aHOBO,Co6bIOДА поларноctь.
-ПюверьTe, He pa3ржelveи AkkyMnyIaTOpbl.ВЗTom cIyae BCTaBbTe HOBbIe AkkyMnyIaTOpbl.
Bcniuka He pa6oTaT.
- Поверът,правлъно Ль BCblшka поДкlioЧЕКа камеpe.Вставът BCblшky Bадатр Hot Shoeи потно 3атянite Ковло-фкCatop.
- Ecnln KOhtaktbla aanrepa Hot Shoe 3aqr3neHbI, npotpnte Ix MraKo cyXo caFetKo.
- EcnI BcNbIiKa 6bIa BbIKIIOHeA ABTomAtuCeKn fYHKUeH ABTOOTKIOUeHnR, BKIOUHTe BCbnIky.
CnHMOK nepe3KcnoHnpoBaHHbI nIe HDo3KcnoHnpoBaHHbI.
Texnuecka noepkka Jn KIneHTOB
CepBnchbIe zentpRicoh
B C Lyuye HeCNpaHbOCTN 6OBaTneBc B OdM N3 cepBnCbHx 函TpoB RicOH, yka3aHbXbY PyKoBOdCTBO NO kCtPnAataunI ζπpOBoΦ ΦOTAKAMEpb。
ПОНhoe ИИн частунhoe Всороньдане залршени 6e3 COOTBETCTBYUOERO paЗршени.
© 2009 Ricoh Co., Ltd.
CopejkanHe daHOrO pyKoBODCTBa IIO 3KcIpyatauMIO MOKeT 6bItb N3MeHeHO 6e3 npEbaPntJIbHorO yBeOMJeHn.
RICOH COMPANY, LTD.
Ricoh Building, 8-13-1, Ginza, Chuo-ku, Tokyo 104-8222, Japan

- INSTRUCTION MANUAL
- Read Before Use
- Warning Symbols
- SampleWarnings
- Danger
- Supplied Equipment
- Name of Parts
- Caution
- Inserting batteries
- Mounting the flash on a camera
- Removing the flash from a camera
- Turning on the flash
- Turning off the flash
- Power saving mode
- Only with Type R cameras
- Reference
- About the illumination coverage
- About the focal length
- To Better Enjoy Flash Photography
- Ambient light auto flash
- Type R cameras
- Cameras other than Type R
- Manual flash
- Slave flash
- Following is the explanation for how to use the camera's built-in flash as a trigger.
- When using Ambient light auto
- When using Manual flash
- Wide panel
- Bounce flash
- Catch-light panel
- Flash compensation
- 1st curtain / 2nd curtain synchronization
- Guide No. Table (ISO 100)
- Troubleshooting
- The flash unit will not charge.
- The flash unit will not fire.
- The picture is over- or underexposed.
- INFORMATION TO THE USER
- USA FCC Part15 Class B
- Note to Users in Canada
- Customer Support
- Ricoh Service Centers
- RICOH COMPANY, LTD.
- MANUEL D'INSTRUCTIONS
- Bhumahne!
- yctaHOBka aKKyMnyIaTOPOB
- UcTaHOBKa BCnblIshKn Ha KaMepy
- CHATNE BCNBIUKC KamepbI
- BbIKJIouHHe BCnblIuKn
- PexkIM 3heproc6epekeHn
- TolboKcKaMepamrTypeR
- KaMepbl,OTnHbIe OT Type R
- Puyhoe ynpablenHe BCbIshKoJ
- ToIbkoHaKaMepaxTypeR
- CmHxpoHn3aunBcNbIuKn
- KaMepbI,OTnHbIe OT Type R
- Umpokoyrolbhi paccenBaTeNb
- BhmuHne!
- PoncheHne
- OtpaxeHHa Bcblska
- CmHxponn3aunno 1/2 uTOpKe
- Ponck u yctpaHene HncnpaBHOte
- Bcnbka He 3apjxaeTc.
- Bcniuka He pa6oTaT.
- CnHMOK nepe3KcnoHnpoBaHHbI nIe HDo3KcnoHnpoBaHHbI.
- Texnuecka noepkka Jn KIneHTOB
- CepBnchbIe zentpRicoh
Brand : RICOH
Model : GF-1
Category : External flash