
Mi 4K Laser Projector 150” - Projector Xiaomi - Free user manual and instructions
Find the device manual for free Mi 4K Laser Projector 150” Xiaomi in PDF.



| Product Type | 4K Laser Projector |
| Display Technology | ALPD 3.0 Laser |
| Resolution | 4K UHD (3840 x 2160) |
| Brightness | 5000 ANSI Lumens |
| Contrast Ratio | 3000:1 |
| Projection Size | Up to 150 inches |
| Throw Ratio | 0.233:1 (ultra-short throw) |
| Light Source Life | 25,000 hours |
| Audio | Dual 10W speakers with Dolby Audio |
| Connectivity | HDMI 2.0 x3, USB 3.0 x2, Bluetooth 4.2, Wi-Fi 802.11ac |
| Dimensions (W x H x D) | 410 x 291 x 88 mm |
| Weight | 7.6 kg |
| Power Supply | AC 100-240V, 50/60Hz |
| Power Consumption | 300W (max) |
| Operating Temperature | 0°C to 35°C |
| Storage Temperature | -20°C to 60°C |
| Cleaning | Use a soft, dry cloth; clean lens with lens cleaning kit |
| Safety Warnings | Do not look into the laser beam; keep away from children |
| Spare Parts & Repairability | Filter cleaning and replacement; user-serviceable parts: power cord, remote control |
| Supported HDR | HDR10, HLG |
| Built-in OS | MIUI TV (Android TV-based) |
Frequently Asked Questions - Mi 4K Laser Projector 150” Xiaomi
User questions about Mi 4K Laser Projector 150” Xiaomi
0 question about this device. Answer the ones you know or ask your own.
Ask a new question about this device
Download the instructions for your Projector in PDF format for free! Find your manual Mi 4K Laser Projector 150” - Xiaomi and take your electronic device back in hand. On this page are published all the documents necessary for the use of your device. Mi 4K Laser Projector 150” by Xiaomi.
USER MANUAL Mi 4K Laser Projector 150” Xiaomi
Safety Instructions ....5
Package Contents 8
Product Overview 9
Exterior 9
Connection Ports ....10
Power Indicator 11
Remote Control 12
Projection Distance & Screen Size....13
Suspended Ceiling Installation 14
Quick Start Guide ....15
Pairing the Remote Control 15
Image Focus 16
Keystone Correction 16
Network & Internet 17
Smart Temperature Control ....17
Safety & Protection ....18
Bluetooth Speakers ....19
Care & Maintenance 20
Heat Dissipation Maintenance ....20
Cleaning & Maintenance ....20
Specifications 21
Troubleshooting 23
Product Certifications 24
User Notice
Thank you for choosing the Mi 4K Laser Projector 150".
Read this manual carefully before use, and retain it for future reference.
Illustrations of product, accessories, and user interface in the user manual are for reference purposes only. Actual product and functions may vary due to product enhancements.
Legal Notice

All products bearing this symbol are waste electrical and electronic equipment (WEEE as in directive 2012/19/EU) which should not be mixed with unsorted household waste. Instead, you should protect human health and the environment by handing over your waste equipment to a designated collection point for the recycling of waste electrical and electronic equipment, appointed by the government or local authorities. Correct disposal and recycling will help prevent potential negative consequences to the environment and human health. Please contact the installer or local authorities for more information about the location as well as terms and conditions of such collection points.

Hereby, Fengmi (Beijing) Technology Co., Ltd declares that the radio equipment type Mi 4K Laser Projector 150" is in compliance with Directive 2014/53/EU. The full text of the EU declaration of conformity is available at the following internet address: http://www.mi.com/global/service/support/declaration.html
This device is restricted to indoor use when operating in the 5150 to 5350 MHz frequency range.
Operating Frequency: 2.4 GHz–2.4835 GHz (for Bluetooth)
Maximum RF Power Output: < 20 mW (for Bluetooth)
Operating Frequency: 2.4 GHz–2.4835 GHz (for Wi-Fi 2.4 GHz)
Maximum RF Power Output: < 100 mW (for Wi-Fi 2.4 GHz)
Operating Frequency: 5.15 GHz–5.35 GHz and 5.47 GHz–5.725 GHz (for Wi-Fi 5 GHz)
Maximum RF Power Output: < 200 mW (for Wi-Fi 5 GHz)

Note: Under normal use conditions, this equipment should be kept at a separation distance of at least 20 cm between the antenna and the body of the user.
Laser Safety Information
Laser Information Label

The product complies with IEC 60825-1:2014 Class 1 and RG2 IEC 62471-5:2015. As with any bright light source, do not stare into the beam, RG2 IEC 62471-5:2015
Safety Instructions
Before using the product, please carefully read the following safety instructions.
Safety Label Description

This warning symbol informs the user that this product contains non-insulated voltage sources that can cause an electric shock. Coming into contact with any internal component may result in an electric shock.

This symbol informs the user about important handling and maintenance related information. Please read this information carefully to ensure proper use.

This symbol informs the user to be aware of high temperatures.

This symbol informs the user to avoid touching this part.

Grounding Warning: This product must be grounded when in use.

Transportation Instructions: It is recommended to transport this projector in its original or similar packaging.

Preventing Electric Shocks and Fire Hazards:
- Using an incorrect power cord may result in decreased product performance and even electric shock or fire. To ensure the projector's performance and safety, only use its original power cord or an identical replacement.
- If you use an extension cord, it must not have a current rating lower than the projector's original power cord. Failure to heed this warning may result in the extension cord overheating and could pose hazards such as electric shock and fire.
- To avoid damage caused by a power surge or lightning strike, unplug the projector from the power outlet during thunderstorms or when it is not in use for a long time.
- Do not place any flammable objects near this projector so as to avoid fire.
- Do not block the lens with any object when the projector is turned on. Any object placed close to the lens may get very hot and/or deformed, and may even cause a fire.
- Do not block any of the vents of the projector, as this may cause a buildup of heat within the product and result in a fire.

Safety Precautions:
- Do not place this projector on an unstable platform, stand or table so as to prevent it from falling and causing serious damage or personal injury.
- Do not look directly into the lens when the projector is turned on to avoid eye damage.
- Do not attempt to disassemble this projector as it may contain dangerous high voltage components. This projector must only be maintained and repaired by a qualified or authorized technician.
- Do not place this projector in an upright position, as it may fall over and cause injury or damage.
- Do not expose this projector to rain or moisture (operating humidity is 20%–80%).
- Do not immerse this projector in, nor expose it to water or other liquids. Immediately unplug the projector if any liquid or object got into its housing, and have it checked by a qualified technician before using it again.
- Do not place this projector in any of the following environments:
• In poorly ventilated or narrow spaces. • Near devices that produce a strong magnetic field. • In direct sunlight. • Close to a fire alarm. • In extremely hot, cold or humid environments.
Package Contents
When opening the packaging, check the contents of the box against the list below. If there is anything missing, please contact the seller in time.
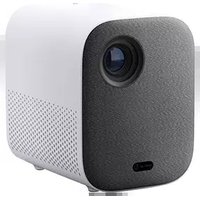
Laser Projector, Remote Control, Power Cord


User Manual, Warranty Notice
Cleaning Cloth

Note:
- The actual contents may vary depending on the country (or region) of sale, please refer to the actual product.
- Retain the original packaging for future storage or transportation.
Product Overview
Exterior


Caution
- Do not place any flammable objects near the heat dissipation vent.
- Do not place any objects near the vents, as this may cause heat to build up inside the projector.
- Do not look directly into the lens so as to avoid eye damage as this projector emits strong light during use.
Connection Ports![graph LR A["①"] --> B["②"] B --> C["HDMI input 1"] C --> D["HDMI input 2"] D --> E["HDMI 3 ARC"] E --> F["USB 2.0"] F --> G["Audio Output"] G --> H["AV Input"] H --> I["S/PDIF"] I --> J["⊕"]](/content/2026/06/1356408/images/6e56a66bc26c0f280a5126320ed53cbc7dd223013c93d662d0d0fc96f79509a4.jpg)
① Power Port ② HDMI input port 1 ③ HDMI input port 2 ④ HDMI input port 3
Audio return channel port
⑤ Supports USB 2.0 communication protocol ⑥ Audio output port (supports subwoofers) ⑦ AV input port (3.5 mm composite AV port) ⑧ Optical digital audio signal output port ⑨ Ethernet port
Power Indicator

The power indicator (a white light) corresponding to the projector's status is as follows:
- Connect to the power outlet, the projector automatically turns on.
- The indicator blinks when the projector is turning on.
Remote Control
Power Button:
When the projector is turned
projector is on, press to select
speaker mode or Screenshot.
Directional Pad (Up):
Move Up
Directional Pad (Left):
Move Left
App:
Access the app interface
Volume + :
Increase the volume

Note: With Mi 4K Laser Projector 150" and the Google Assistant, quickly access entertainment, control smart devices, get answers on screen, and more using your voice.
Google Assistant:
Press the Assistant button on your remote to talk to Google Assistant
OK: Confirm the selected option or setting
Directional Pad (Right): Move Right
Directional Pad (Down): Move Down
Home: Return to the home screen
Return: Return to the previous menu
Volume - : Decrease the volume
Battery Cover:
Slide down the battery cover, and install or replace the batteries with two new AAA batteries.

Note:
- Pay attention to the positive and negative poles when installing batteries in the remote control.
- When battery leaks, immediately wipe away any fluid with a dry cloth and replace the batteries with new ones.
- Dispose of used batteries according to local waste disposal rules and regulations of the country or area you live in.
Projection Distance & Screen Size
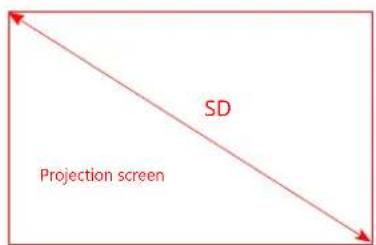

Determine the distance between the projector and the wall or screen according to the desired screen size.
| Screen Dimensions (SD) | Projection Distance (D) | Relative Height (H) |
| 80" 14 cm 29 cm | ||
| 90" 19 cm 32 cm | ||
| 100" 24 cm 35 cm | ||
| 120" 34 cm 41 cm | ||
| 150" 49 cm 50 cm |
Screen Dimensions (SD):
The diagonal size of the projection screen (in inches).
Projection Distance (D):
The distance between the projector and the wall or screen (in cm).
Relative Height (H):
The distance from the bottom of the projector to the
bottom edge of the projected image (in cm).
Note: The dimensions in the table above are for reference only, they are approximate and may slightly differ from the actual values.
Suspended Ceiling Installation
Suspended ceiling installation is one of the installation methods that you hang the projector in an overhead location, for example, on a high ceiling, through a ceiling mount. A projector supporting suspended ceiling installation has threaded holes on the bottom, you can install the project on the mount by attaching the screws into the holes.
The installation steps are as follows:
- Install the mount.
Make sure the mount used to install the projector onto can support at least five times the weight of the projector. It requires a professional to carry out the installation.
- When installing the projector onto a ceiling mount, make sure the screws meet the following specifications:
Screw Type: Non self-tapping screw M4 × 10 (diameter: 4 mm, length: 10 mm), 4 pcs.
Assembly Dimensions: See the figure on the right.
- Adjust the mount depending on your needs and firmly fix the screws to complete the installation.

Cautions:
- To avoid the convective heat transfer between the air inlets and air outlets, make sure there are no obstructions within 50 cm of the air inlets and heat dissipation vents.
- Keep the bottom of the projector 10 cm away from the ceiling when suspending it.
- Damage caused by incorrect installation will void the warranty.
Quick Start Guide
Pairing the Remote

After installing the batteries in the remote control, press the OK button to start pairing.

Place the remote control close to the bottom right corner of the projector, then simultaneously press and hold the Home and the App buttons. Release the buttons once you hear a beep, then the remote control is pairing with the projector. Ensure they are close to each other until the pairing completes.

A notification will appear on the projected image once the remote control has been paired successfully.
Note: Keep the remote control within 20 cm of the projector during the pairing process.
Image Focus
Go to Settings > Image > Focus, then press the left and right buttons on the remote control to manually fine-tune.
![graph TD A["North"] --> B["Process Node"] C["North"] --> D["Process Node"] B --> E["Feedback Loop"] D --> E E --> F["Output"] style A fill:#f9f,stroke:#333 style C fill:#f9f,stroke:#333 style B fill:#ccf,stroke:#333 style D fill:#ccf,stroke:#333 style E fill:#cff,stroke:#333 style F fill:#cff,stroke…](/content/2026/06/1356408/images/719f6d81798328142bd12cd9b2d4fdc363892ed58bbb01c8ae0b23d18352f75a.jpg)
Keystone Correction
To perform keystone correction, go to Settings > Image > Keystone Correction. Use the left and right buttons to select 8-Point Keystone Correction, Fine Tune, or Reset. Press the OK button to select a mode, then use the remote's directional pad to adjust the shape of the projected image.

Network & Internet Smart Temperature Control
Go to Settings > Network & Internet. Select a wireless network to connect to, enter the password, and wait for the projector to connect.

The projector automatically monitors the ambient temperature (operating temperature range is 0°C to 40°C), projector temperature, and color wheel temperature, and the projector's fan speed is automatically adjusted based on the detected temperature values.
- The projector has three brightness modes to choose from when operating at a normal temperature. To adjust the projector's brightness level, go to Settings > Image > Brightness Mode.
- If the projector gets too hot, an overheating warning will appear and the projector will automatically switch to low brightness mode. Temperature and error warnings will be displayed automatically whenever the temperature exceeds its maximum range to inform you that the projector will be automatically turned off.
Safety & Protection
The projector comes with an infrared sensor which is able to intelligently detect and protect the human eye from damage caused by strong light within the projected area.
The projector will reduce its brightness to the lowest possible value when the sensor is triggered and issue the following notification: "Do not look directly at the light source." Press any button on the remote to exit.
Human infrared sensor & fresnel optical lens
Front sensor range: Approximately 55°
Left and right side sensor range: Approximately 70°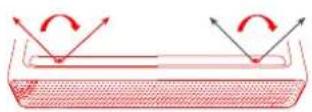
Bluetooth Speakers
The projector has four high-quality built-in speakers with a total output of about 30 W. The speakers can also be used as a standalone Bluetooth stereo.
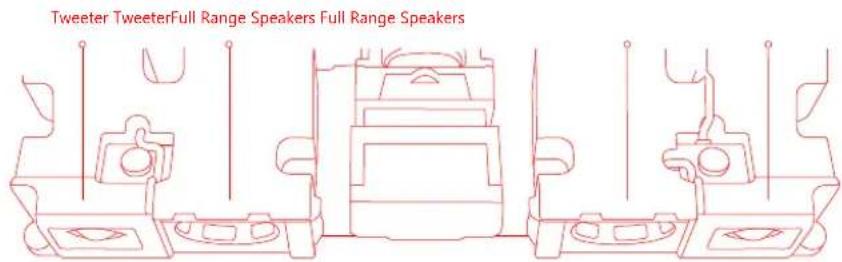
To use speakers as the Bluetooth stereo, press the Home button, then select Settings > Remotes & Accessories > Bluetooth speaker mode from the home screen. Enable the Bluetooth function on your phone. Search and locate the projector name in the Bluetooth list, then pair the projector with your phone.
Note:
To connect and pair with other Bluetooth devices such as speakers and earphones, select Settings > Remotes & Accessories > Add accessory. Make sure the device is in an awaiting connection mode with its Bluetooth function enabled.
Heat Dissipation Maintenance


Note: Do not touch the heat dissipation vent or ventilation vents as temperatures can reach up to 65°C.

Cleaning & Maintenance

Only use the cleaning cloth that comes with the projector or a professional grade cleaning cloth to clean the projector's glass.
Do not use any abrasive cleaning products, solvents, chemicals, or other rough objects so as to avoid scratches or corrosion.

Note:
- The projector is not water resistant. Do not allow liquids to penetrate the projector, especially areas such as the power indicator, glass cover, air vents, connection ports, and speaker grilles.
- Only use the cleaning cloth that comes with the projector or a professional grade cleaning cloth to clean the projector's lens.
Specifications
| Basic Information | Name Mi 4K Laser Projector 150" | |
| Model XMJGTYDS01FM | ||
| Item Dimensions 410 × 291 × 88 mm | ||
| Net Weight 7.0 kg | ||
| Electrical SpeciPcations | Power Consumption < 300 W (High Brightness Mode) | |
| Rated Input | 100-120/200-240 V ~, 3/2.5 A, 50/60 Hz | |
| Standby Power Consumption < 0.5 W | ||
| Optical Parameters | Display Technology 0.47" DMD | |
| Light Source Technology ALPD | ||
| Standard Resolution 4K (3840 × 2160) | ||
| Projection Parameters | Throw Ratio (TR) 0.233 (*actual result may vary) | |
| Screen Size 80" to 150" | ||
| Lens Focus Motor Focus | ||
| Keystone Correction 8-point Keystone Correction | ||
| RAM | RAM 2GB DDR3 | |
| Built-in Storage 16 GB eMMC High-speed Flash Memory | ||
| System Software | Operating System | Android TV |
| App | Pre-installed Third-party Apps | |
| Brightness Mode | High Brightness Mode, View Mode | |
| Bluetooth | Bluetooth 4.1/BLE | |
| Speaker Audio | Audio Effects Dolby Audio/ | DTS-HD |
| Speaker Full Range × 2/Tweeters × 2 | ||
| Power Supply Built-in | Power Supply Built-in AC-DC, DC-DC | |
| Safety & Protection | Smart Temperature Control Automatic Brightness Adjustment/Smart Fan Speed Adjustment | |
| Temperature Switch Overheating Auto Turn-off | ||
| Laser Projector Eye Protection Human Body Detection Sensor (can be disabled) | ||
| Others | Noise Level | ≤32 dB (Vnade at an ambient temperature of 25°C) |
| Remote Control Bluetooth Remote Control | ||
| Indicator White light | ||
| Storage Temperature -20°C to 55°C | ||
| Operating Temperature 0°C to 40°C | ||
| Operating Humidity 20%-80% | ||
Troubleshooting
| Fault Solution | |
| Remote control is missing or not paired and the projector cannot be turned on remotely. | and turn on the projector. After the projector has been restarted, pair the remote control again. |
| If the projector overheats, | Please remove any obstacles from the air inlets and outlets so as to ensure a smooth airBow through the projector. Follow the instructions above to restart the projector. |
| Other Internal System Errors | Please contact a qualified technician to service the device, or return the projector to the after-sales department. |
Product Certifications
HDMI™
HIGH-DEFINITION MULTIMEDIA INTERFACE
The terms HDMI, HDMI High-Definition Multimedia Interface, and the HDMI Logo are trademarks or registered trademarks of HDMI Licensing Administrator, Inc.

For DTS patents, see http://patents.dts.com. Manufactured under license from DTS Licensing Limited. DTS, the Symbol, DTS and the Symbol together; DTS-HD, and the DTS-HD logo are registered trademarks and/or trademarks of DTS, Inc. in the United States and/or other countries. © DTS, Inc. All Rights Reserved.


The Bluetooth® word mark and logos are registered trademarks owned by Bluetooth SIG, Inc. and any use of such marks by (Xiaomi Inc.) is under license. Other trademarks and trade names are those of their respective owners.

Manufactured under license from Dolby Laboratories. Dolby, Dolby Audio, and the double-D symbol are trademarks of Dolby Laboratories.
CERTIFIED
Manufactured for: Xiaomi Communications Co., Ltd.
Manufactured by: Fengmi (Beijing) Technology Co., Ltd.
(a Mi Ecosystem company)
Address: 301, 3F, Building 3, No.10, Barracks South Street, Renhe Town, Shunyi District, Beijing, China
For further information, please go to www.mi.com


Brand : Xiaomi
Model : Mi 4K Laser Projector 150”
Category : Projector