
DCD-2010AE - CD Player DENON - Free user manual and instructions
Find the device manual for free DCD-2010AE DENON in PDF.
| Product type | CD player / Super Audio CD |
| Brand | DENON |
| Model | DCD-2010AE |
| Dimensions (W x H x D) | 434 x 137 x 335 mm |
| Power supply | AC mains (via included cord) |
| Power consumption | 20 W |
| Compatible disc formats | CD, Super Audio CD (stereo), CD-R/RW (finalized) |
| Analog outputs | RCA (L/R) - 2.0 V / 10 kΩ |
| Digital outputs | Optical (Toslink) and Coaxial (RCA) - 0.5 Vp-p/75 Ω |
| Frequency response (Super Audio CD) | 2 - 50,000 Hz (-3 dB) |
| Frequency response (CD) | 2 - 20,000 Hz |
| Signal-to-noise ratio (CD) | 119 dB |
| Dynamic range (CD) | 100 dB |
| Harmonic distortion (CD) | 0.0017% (1 kHz) |
| Playback functions | Normal play, Pause, Forward/backward search, Program (30 tracks), Random, Repeat (one or all) |
| Pure Direct mode | Disables digital output and display for better audio quality |
| Remote control | Supplied (RC-997), R03/AAA batteries, 8 m range |
| Display | Text display for Super Audio CD (title, artist, track) |
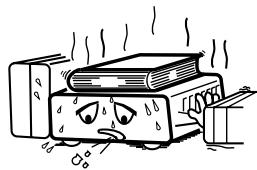
| Maintenance | Clean disc with soft cloth from center outward; do not use solvents. |
| Safety | Do not open, avoid liquids, do not place objects containing liquid on the device. |
| Spare parts | Not specified by manufacturer. Contact DENON customer service. |
| Repairability | In case of problem, contact DENON dealer. Do not open. |
Frequently Asked Questions - DCD-2010AE DENON
User questions about DCD-2010AE DENON
0 question about this device. Answer the ones you know or ask your own.
Ask a new question about this device
Download the instructions for your CD Player in PDF format for free! Find your manual DCD-2010AE - DENON and take your electronic device back in hand. On this page are published all the documents necessary for the use of your device. DCD-2010AE by DENON.
USER MANUAL DCD-2010AE DENON
TO PREVENT FIRE OR SHOCK HAZARD, DO NOT EXPOSE THIS APPLIANCE TO RAIN OR MOISTURE.
CAUTION
RISK OF ELECTRIC SHOCK
DO NOT OPEN

CAUTION:
TO REDUCE THE RISK OF ELECTRIC SHOCK, DO NOT REMOVE COVER (OR BACK). NO USER SERVICEABLE PARTS INSIDE. REFER SERVICING TO QUALIFIED SERVICE PERSONNEL.
The lightning flash with arrowhead symbol, within an equilateral triangle, is intended to alert the user to the presence of uninsulated "dangerous voltage" within the product's enclosure that may be of sufficient magnitude to constitute a risk of electric shock to persons.

The exclamation point within an equilateral triangle is intended to alert the user to the presence of important operating and maintenance (servicing) instructions in the literature accompanying the appliance.
CLASS 1 LASER PRODUCT
LUOKAN 1 LASERLAITE
KLASS 1 LASERAPPARAT
CLASS 1
LASER PRODUCT
ADVARSEL: USYNLIG LASERSTRÁLING VED ÅBNING, NAR
SIKKERHEDSAFBRYDERE ER UDE AF FUNKTION.
UNDGA UDSAETTALSE FOR STRALING.
VAROITUS! LAITTEEN KÄYTTÄMINEN MUULLA KUIN TÄSSÄ
KAYTTOOHJEESSA MAINITULLA TAVALLA SAATTAA
ALTISTAA KAYTTAJAN TURVALLISUUSLUOKAN 1
YLITTVALLE NAKYMÄMTTÖMÄLLE LASERSÄTEILLYLLE.
WARNING: OM APPARATEN ANVÄNDS PÄ ANNAT SÄTT ÄN I DENNA
BRUKSANVISNING SPECIFICERATS, KAN ANVÄNDAREN
UTSÄTTAS FÖR OSYNLIG LASERSTRÄLNING SOM
OVERSKRIDER GRÄNSEN FÖR LASERKLASS 1.
ATTENZIONE: QUESTO APPARECCHIO E' DOTATO DI DISPOSITIVO OTTICO CON Raggio LASER.
L'USO IMPROPrio DELL'APPARECCHIO PUO' CAUSARE PERICOLOSE
USE OF CONTROLS OR ADJUSTMENTS OR PERFORMANCE OF PROCEDURES OTHER THAN THOSE SPECIFIED HEREIN MAY RESULT IN HAZARDOUS RADIATION EXPOSURE.
THE SUPER AUDIO CD PLAYER SHOULD NOT BE ADJUSTED OR REPAIRED BY ANYONE EXCEPT PROPERLY QUALIFIED SERVICE PERSONNEL.
- DECLARATION OF CONFORMITY
We declare under our sole responsibility that this product, to which this
declaration relates, is in conformity with the following standards:
EN60065, EN55013, EN55020, EN61000-3-2 and EN61000-3-3.
Following the provisions of 73/23/EEC, 89/336/EEC and 93/68/EEC Directive.
* (For apparatuses with ventilation holes)
- Do not obstruct the ventilation holes.
Die Beluftungsöffnungen dürfen nicht verdeckt werden. - Ne pas obstruer les trouss d'airation.
Non coprite i fori di ventilazione. - No obstruya los orificios de ventilación.
- De ventilatieopeningen mogen nicht worden beblokkeerd.
- Tapp inte till ventilationsöppningarna.

- Do not let foreign objects into the apparatus.
- Keine fremden Gegenstände in das Gerätkommenlassen.
- Ne pas laisser des objets étrangers dans l'appareil.
- E' importante che Nessun oggetto è inserto all'interno dell'unità.
- No deje objetos extraños dentro del equipo.
- Laat geen vreemde voorwerpen in dit apparaat vallen.
- Se till att främande foremål inte Tränger in i apparaten.
- Do not let insecticides, benzene, and thinner come in contact with the apparatus.
- Lassen Sie das Gerät nicht mit Insektiziden, Benzin oder Verdünningsmitteln in Berührung kommt.
- Ne pasmettre en contact des insecticides, du benzene et un diluant avec l'appareil.
- Assicuratevvi che l'unità non venga in contatto con insetticidi, benzolo o solventi.
- No permitted contact of insecticidas, gasolina y diluyentes con el equipo.
- Laat geen insetkenverdelende middelen, benzine of verfverdunner met dit apparaat inkontakt komen.
- Se till att inte insetksmedel på spraybruk, bensen och thinnerkommen ikontakt med apparatens hölje.
- Never disassemble or modify the apparatus in any way.
Versuchen Sie niemals das Gerat auseinander zu-.
nehmen oder auf jegliche Art zu verändern. - Ne jamais démonter ou modifier l'appareil d'une manière ou d'une autre.
- Non smontate mai, né modificate l'unità in dessun modo.
- Nunca desarme o modifie el equipo de tinguna mantra.
- Nooit dit apparaat demonteren of op andere wijze modifierten.
- Tainte isär apparaten och försök inte bygga om den.
A NOTE ABOUT RECYCLING:
This product's packaging materials are recyclable and can be reused. Please dispose of any materials in accordance with the local recycling regulations.
When discarding the unit, comply with local rules or regulations.
Batteries should never be thrown away or incinerated but disposed of in accordance with the local regulations concerning chemical waste.
This product and the accessories packed together constitute the applicable product according to the WEEE directive except batteries.
HINWEIS ZUM RECYCLING:
- Minimum distances around the apparatus for sufficient ventilation.
- The ventilation should not be impeded by covering the ventilation openings with items, such as newspapers, table-cloths, curtains, etc..
- No naked flame sources, such as lighted candles, should be placed on the apparatus.
- Attention should be drawn to the environmental aspects of battery disposal.
- The use of apparatus in tropical and/or moderate climates.
ACHTUNG:
Thank you for purchasing this DENON Super Audio CD Player. Please read the operation instructions thoroughly in order to acquaint yourself with the Super Audio CD player and achieve maximum satisfaction from it.
Be sure to keep these instructions for future reference, should any questions or problems arise.
Contents
Getting Started
Accessories 1
Before using 1
Caution on handling
Discs 2
Holding discs 2
Cleaning discs 2
Cautions on handling discs 2
Inserting the batteries
Operating range of the remote control unit 3
Part names and functions
Front panel 4
Rear panel 4
Display 5
Remote control unit 5
Connections
Connections to the analog output terminal 6
Connections to the digital output terminal
(COAXIAL/OPTICAL) 6
Operation
Normal playback
Opening and closing the disc holder and loading discs ....7
Setting the top priority playback layer for
Super Audio CDs 7
Starting playback 8
Stopping playback 8
Various playback functions
Direct play 8
Pause 8
Automatic search. 8
Manual search 9
Programmed play. 9
Random play. 9
Repeat play 10
To display text (Super Audio CD only) 10
Timer-controlled playback 10
Troubleshooting 11
Main Specifications 12
Accessories
- Please check to make sure the following items are included with the main unit in the carton:
① Remote control unit (RC-997)
② R03/AAA batteries 2
③ RCA pin-plug cord. 1
④ Power supply cord. 1
⑤ Operating instructions 1
⑥ Service station list. 1
Before using
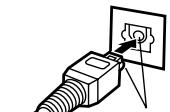
- Handle the power supply cord carefully
Do not damage or deform the power supply cord. If it is damaged or deformed, it may cause electric shock or malfunction when used. When disconnecting the power supply cord from the wall outlet, hold the plug and do not pull on the cord.
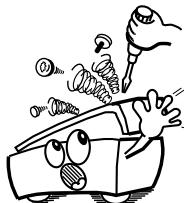
- Do not open the top cover
In order to prevent electric shock, do not open the top cover. If problems occur, contact your DENON dealer.
- Do not place anything inside
Prevent metal objects from entering the Super Audio CD player and avoid spilling liquids on it.
Electric shock or malfunction may result.
NOTE:
- This Super Audio CD player uses a semiconductor laser.
To ensure stable operation, it is recommended to use the set indoors at a temperature of 5^ (41^) 35^ (95^)
Please, record and retain the Model name and serial number of your set shown on the rating label.
Model name : DCD-2000AE
Serial No.
Caution on handling
Discs
Super Audio CD
Only Super Audio CD discs containing one of the logos shown at the right can be played on this set.

SUPER AUDIO CD

There are three types of Super Audio CDs.
① Single layer disc
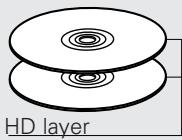
Single layer Super Audio CD with only an HD layer.
② Dual layer disc
Super Audio CD with a double HD layer, offering extended playing time and high sound quality.
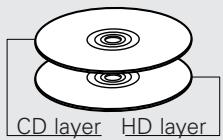
③ Hybrid disc
Two-layer Super Audio CD with an HD layer and a CD layer. The signals on the CD layer can be played on a regular CD player.
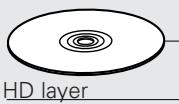
- About the HD layer
All Super Audio CDs contain an HD (High Density) layer with high density Super Audio CD signals. This layer can contain a stereo channel area, a multi-channel area, or both a stereo channel and multi-channel area.
Types of Super Audio CDs
Single layer disc
Dual layer disc
Hybrid disc
NOTE:
- This set is not equipped for multi-channel playback.
Compact Disc
Only CD discs containing the logo shown at the right can be played on this set.

CD-R/-RW Disc
It may not be possible to play CD-R or CD-RW discs, due to scratches, dirt, the recording condition or the recorder's properties. Discs that have not been finalized cannot be played.
NOTE:
- CD's with special shapes (heart-shaped CDs, octagonal CDs, etc.) cannot be played on this set.
Attempting to do so may damage the set. Do not use such CDs.


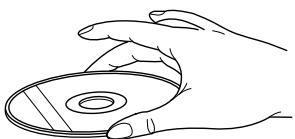
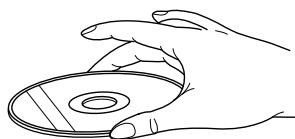
Holding discs
Avoid touching the surface of discs when loading and unloading them.
Be careful not to get fingerprints on the signal surface (the side which shines in rainbow colors).
Cleaning discs
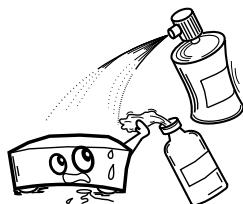
- Fingersprints or dirt on the disc may lower sound and picture quality or cause breaks in playback. Wipe off fingerprints or dirt.
- Use a commercially available disc cleaning set or a soft cloth to wipe off fingerprints or dirt.
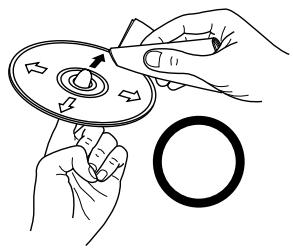
Wipe gently from the middle outwards.
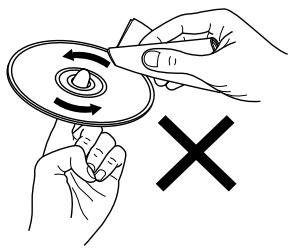
Do not wipe with a circular motion.
NOTE:
- Do not use record spray or antistatic. Also do not use volatile chemicals such as benzene or thinner.
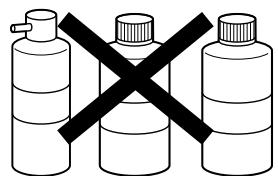
Record spray
Thinner
Benzene
Cautions on handling discs
- Do not get fingerprints, grease or dirt on discs.
- Be especially careful not to scratch discs when removing them from their cases.
- Do not bend discs.
- Do not heat discs.
- Do not enlarge the center hole.
- Do not write on the labeled (printed) side with a ball-point pen or a pencil.
- Do not stick a label etc. on a disc.
- Do not use discs on which the adhesive part of cellophane tape or glue used to attach the label is exposed, or discs with traces of tape or labels that have been peeled off. Such discs may get stuck inside the player, resulting in damage.
- Water droplets may form on the surface if the disc is moved suddenly from a cold place to a warm one. Do not use a hairdryer, etc., to dry the disc.
Getting Started
Inserting the batteries
- The DCD-2000AE can be controlled from a distance using the included remote control unit (RC-997).
① Remove the remote control unit's rear cover.

② Place 2 R03/AAA batteries in the battery compartment in the direction indicated by the marks.
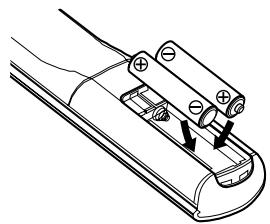
③ Close the rear cover.

Cautions on Batteries:
- Use R03/AAA batteries in this remote control unit.
- Replace the batteries with new ones approximately once a year, though this depends on the frequency with which the remote control unit is used.
- If the remote control unit does not operate from close to the main unit, replace the batteries with new ones, even if less than a year has passed.
- The included batteries are only for verifying operation. Replace it with a new battery as soon as possible.
- When inserting the batteries, be careful to do so in the proper direction, following the and marks in the remote control unit's battery compartment.
-
To prevent damage or battery fluid leakage:
-
Do not use a new battery with an old one.
- Do not use two different types of batteries.
- Do not short-circuit, disassemble, heat or dispose of batteries in flames.
- Remove the batteries when not planning to use the remote control unit for a long period of time.
- If the batteries should leak, carefully wipe off the fluid from the inside of the battery compartment, then insert new batteries.
Operating range of the remote control unit
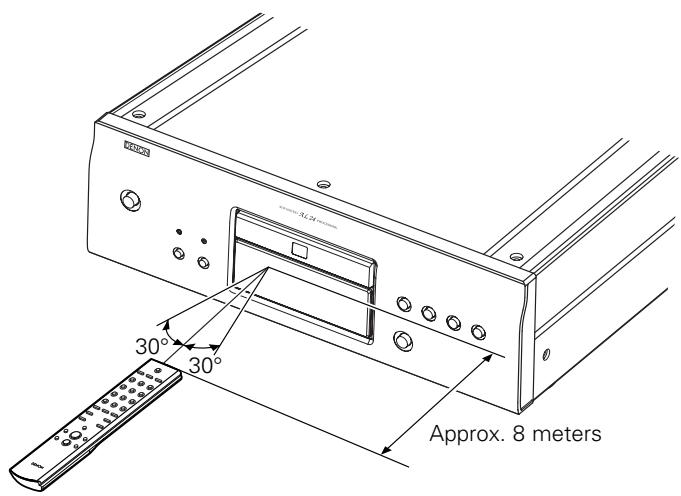
- When operating the remote control unit, point it at the remote control sensor as shown in the figure.
- The remote control unit can be used from a direct distance of approximately 8 meters. This distance will be shorter, however, if there are obstacles in the way or if the remote control unit is not pointed directly at the remote control sensor.
- The remote control unit can be operated at a horizontal angle of up to 30^ with respect to the remote control sensor.
NOTE:
- It may be difficult to operate the remote control unit if the remote control sensor is exposed to direct sunlight or strong artificial light.
- Do not press the buttons on the main unit and on the remote control unit at the same time. Doing so will result in malfunction.
Part names and functions
Front panel
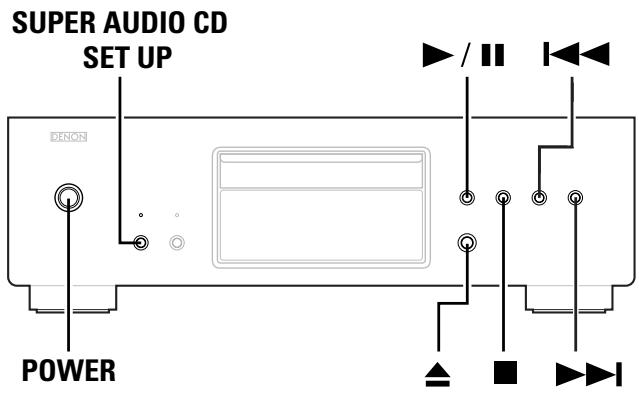
1 POWER switch
- Press once to turn the power on.
- If a disc is loaded when the power is turned on, playback starts automatically.
- Press again to set to the "OFF" position and turn the power off.
2 SUPER AUDIO CD SETUP button
- Use this button to switch the layer of the Super Audio CD and to set the top priority playback layer.
- The name of the newly set layer is shown on the display
STEREO CD
STEREO:
The Super Audio CD's layer (stereo) is played.
CD:
The CD layer is played.
- For details on "Setting the Top Priority Playback Layer for Super Audio CDs" (12 page 7).
PURE DIRECT button
- Both the digital output and the display are turned off. In the PURE DIRECT mode, you can't use the DISPLAY button on the remote control unit function.
Remote control sensor
- This sensor receives the infrared light transmitted from the wireless remote control unit.
- For remote control, point the supplied remote control unit RC-997 towards this sensor.
⑤ Display
(1 page 5)
Disc holder open/close button ()
- Press this button to open and close the disc holder.
Automatic search forward button (▶▶I)
- Press this button to move the pickup forward to the beginning of the next track. Press again to move ahead to other tracks.
Automatic search reverse button (I
- Press this button to return the pickup to the beginning of the present track. Press again to return to other tracks.
Stop button (■)
- Press this button to stop playback.
10 Play/Pause button (▶/II)
- Press this button to start playback the disc.
- When pressed while the disc holder is open, the disc holder closes and playback starts.
- Press this button to stop playback temporarily.
1 Disc holder
- Load discs here. (12 page 7)
- Press the disc holder open/close button ⑥ to open and close the disc holder.
- The disc holder can also be closed by pressing the play/pause button 10.
Super Audio CD indicator
- This indicator lights when playing a Super Audio CD.
13 Advanced AL24 Processing indicator
- When a CD is loaded or the Super Audio CD's CD layer mode is set, the Advanced AL24 Processing circuit (which reproduces analog waveforms) is activated and this lights.
Rear panel
14 ANALOG OUT terminal
- Connect these to the amplifier's input terminal.
- Connect using the included RCA pin-plug cord or a commercially available connection cord.
15 OPTICAL terminal
- Digital data is output in optical form from this terminal.
-
Connect using an optical fiber cable (commercially available).
-
With Super Audio CDs, no digital signals are output.
16 COAXIAL terminal
- This terminal outputs digital data.
- Connect using a 75 Ω/ohms coaxial pin-plug cord (commercially available) intended for digital audio connections.
- With Super Audio CDs, no digital signals are output.
17 Power input (AC IN)
- Connect to an AC power supply using the included power supply cord.
Getting Started
Display
This lights when a CD is loaded or the Super Audio CD's CD layer mode is set.
19 This lights when the track number is displayed.
This lights to indicate the time display mode.
21 There light to indicate the currently playing audio.
L:Left channel
R:Right channel
This lights in the random play mode.
23 Lights in the repeat play mode.
REPEAT ALL : This lights when the all-track repeat play mode is set.
REPEAT 1: This lights when the one-track repeat play mode is set.
24 Displays the title, track number and elapsed time during playback
This lights in the pause mode.
26 This lights in the programmed play mode.
This lights in the playback mode.
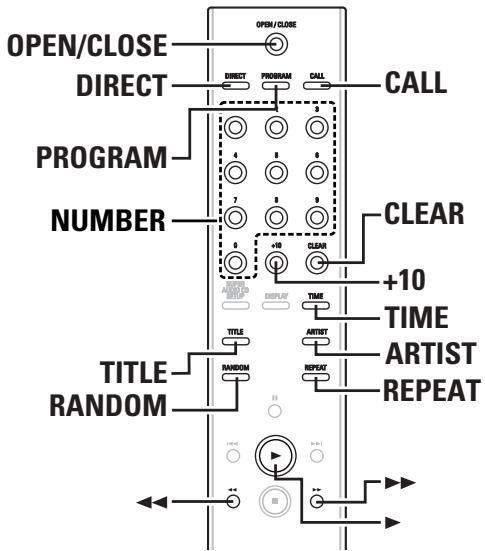
Remote control unit
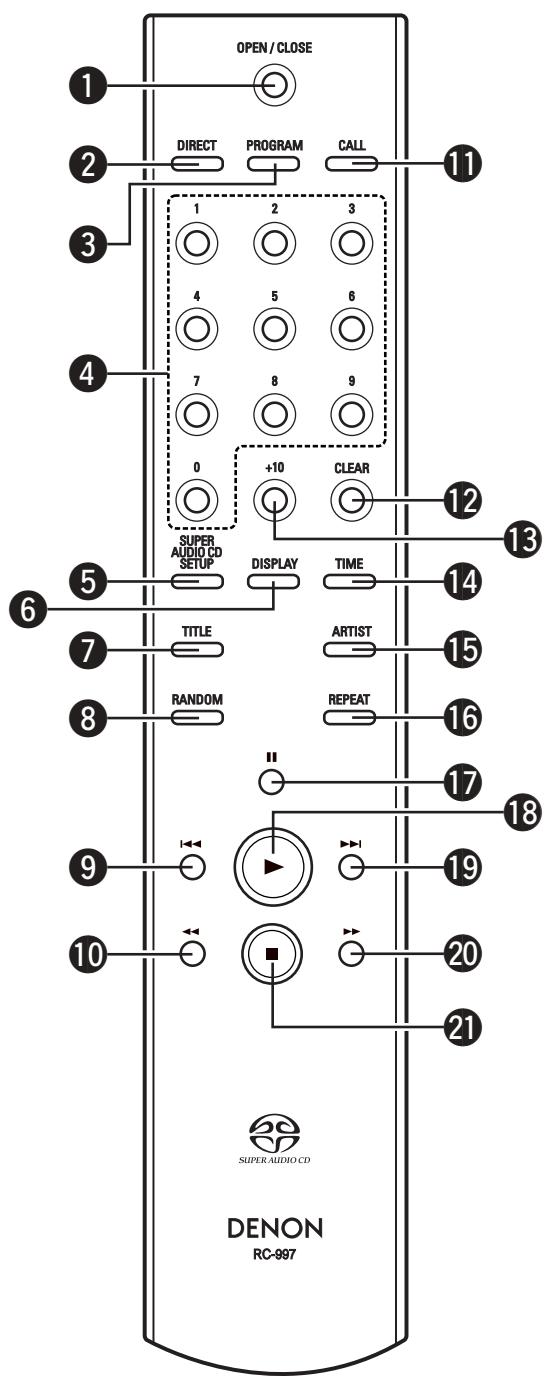
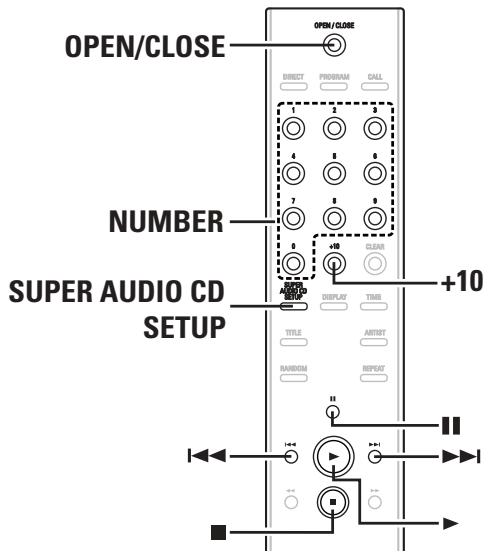
1 Disc holder open/close button (△)
2 DIRECT button
3 PROGRAM button
Number buttons (0 9)
SUPER AUDIO CD SETUP button
⑥ DISPLAY button
7 TITLE button
RANDOM button
Automatic search reverse button (I
10 Manual search reverse button (▲)
1CALL button
12 CLEAR button
13 +10 button
14 TIME mode button
15 ARTIST button
16 REPEAT button
17 Pause button (II)
13 Play button (▶)
19 Automatic search forward button (▶▶I)
20 Manual search forward button (▶)
Stop button (■)

MEMO
- If the automatic search forward button (▶▶), automatic search reverse button (I▶) or +10 button are held in, the function of these button will be repeated.
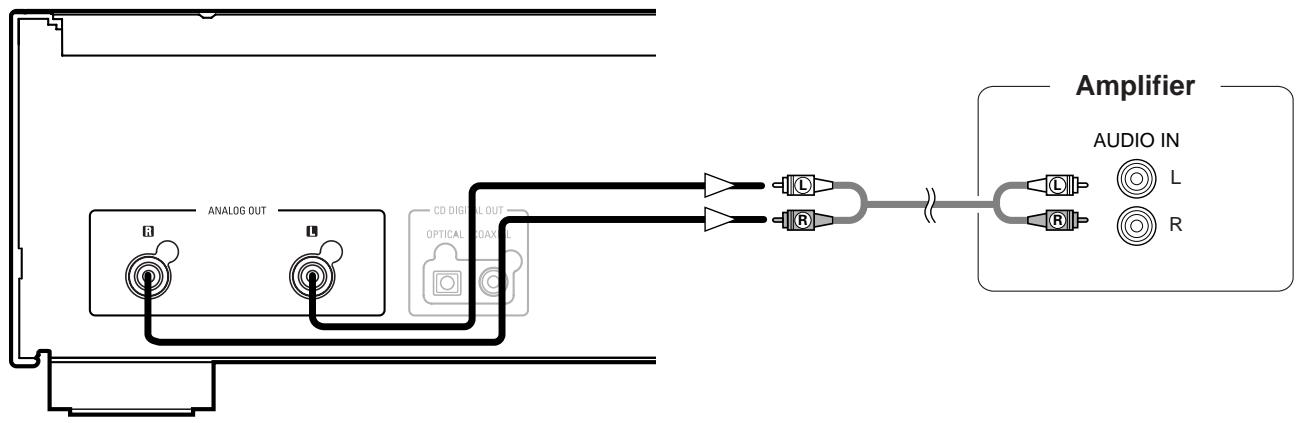
Connections to the analog output terminal
- Use the included RCA pin-plug cord to connect the left (L) and right (R) output terminal (ANALOG OUT) of the DCD-2000AE to the CD, AUX or TAPE PLAY left (L) and right (R) input terminal of the amplifier.
Connections to the digital output terminal (COAXIAL/OPTICAL)
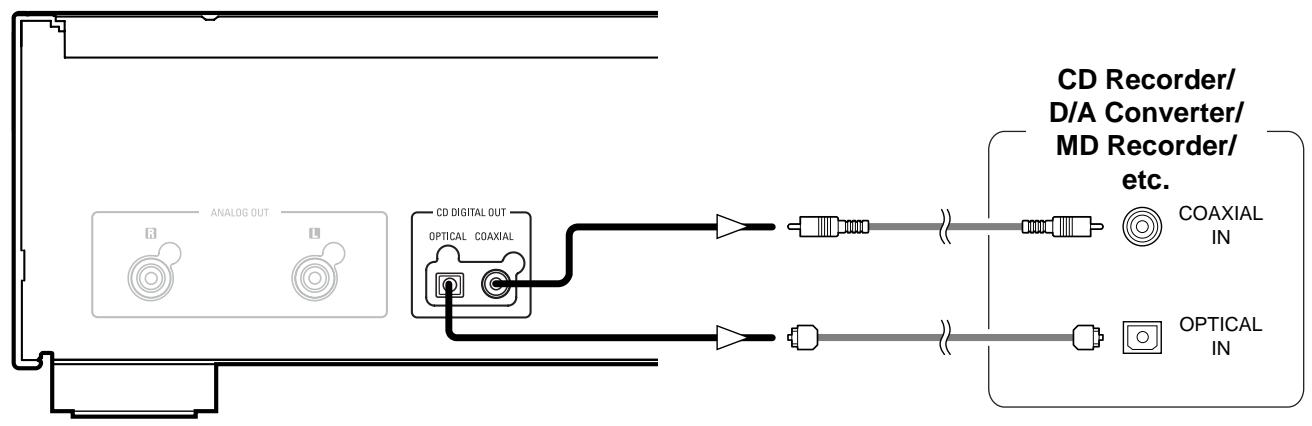
NOTE:
- With Super Audio CDs, no digital signals are output.
- Digital signals are output from optical terminal and coaxial terminal with parallel.
Signal direction

AUDIO Signal
- Connecting an optical fiber cable (commercially available) to the digital audio input connector (OPTICAL)
Dust cap
Line up in proper direction
Remove the dust cap, line up the cable in the proper directly, then insert it securely as far as it goes.
NOTE:
- Store the dust cap in a safe place, and be careful not to lose it.
When not using the terminal, attach the cap to protect the terminal from dust.
Normal playback
- The layer for top priority playback after the disc is loaded can be set.
- The layer set for top priority playback upon shipment from the factory (default setting) is the Super Audio CD (stereo) layer.
Opening and closing the disc holder and loading discs
1 Press the POWER switch to turn on the power.
Press the button.
- Pick up the disc carefully so as not to touch the signal surface and hold it with the labeled side facing up.
- With the disc holder fully open, set the disc in the disc holder.
- Set 12 cm discs in the outer disc guide, 8 cm discs in the inner disc guide.
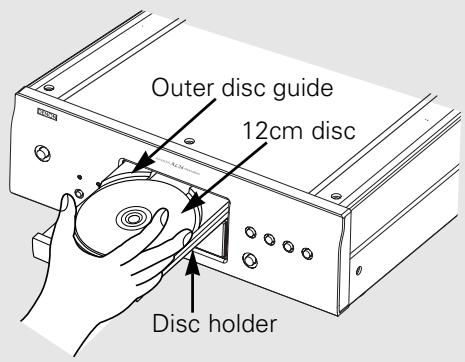
3 Press the button. The disc is automatically loaded.
※ The disc holder closes automatically if the / 口 button is pressed.
NOTE:
- If your finger should get caught in the disc holder when it closes, press the button.
Setting the top priority playback layer for Super Audio CDs
1 Press the POWER switch to turn on the power.
2 Check that no disc is loaded.
※ If the layer is switched while the disc is being loaded, the playback layer switches for that disc, but the top priority playback layer setting itself does not change.
3 Press the SUPER AUDIO CD SETUP button and switch to the layer you want to set.
※ When a disc is loaded after the setting has been made, the contents recorded on the set layer are displayed.
※ If a disc that does not contain the layer set for top priority playback is loaded, the contents recorded on another layer are displayed automatically.
※ This setting is stored in the memory and is not cleared even when the disc holder is opened or closed or the power is turned off. To change the setting, repeat the procedure above.
Starting playback
1 Press the POWER switch to turn on the power.
Press the button.
- The disc holder opens.
3 Load the disc you want to play.
※ For instructions on loading discs, refer to "OPENING AND CLOSING THE DISC HOLDER AND LOADING DISCS" (12 page 7).
4 For Super Audio CDs, use the SUPER AUDIO CD SETUP button to set the layer to be played, as necessary.
※ To check the currently playing layer, press the SUPER AUDIO CD SETUP button once. "STEREO" or "CD" is displayed. Press the button again while one of these is displayed to switch the layer to be played.
Press the / or button.
- Playback starts.
※Playback stops automatically after the last track on the disc has been played.
Stopping playback
During playback, press the button.
- Playback stops.
Various playback functions
Playing a specific track (Remote control unit only) [Direct play]
Use the number buttons and the +10 button to select the desired track.
Ex.:To select track 4 : 4 To select track 12 +10,2 To select track 30 +10,+10,+10,0
Playback starts from the selected track.
Stopping playback temporarily [Pause]
- Use this function to stop playback temporarily, and later resume playback from that point.
During playback, press the / 口 button (or the I button on the remote control unit).
- Playback pauses.
※ To resume playback from the position at which the disc is paused, press the button (the button, or the button on the remote control unit).
Automatic search
■ Moving ahead to the beginning of the next track
Press the button.
- Press the button more than once to move ahead to the beginning of subsequent tracks.
※ When the button is pressed during random playback, the next track is selected at random and played.
■ Moving back to the beginning of the current track
Press the button.
- Press the button more than once to move back to the beginning of previous tracks.
Operation

Finding the desired spot while listening to the sound (Remote control unit only) [Manual search]
- Use this function to skip forward or backward while listening to the sound. This function comes in handy for finding the desired spot in the middle of long tracks.
Searching forward
During playback, press and hold in the button.
- When the button is released, normal playback resumes from that point.
Searching backward
During playback, press and hold in the button.
- When the button is released, normal playback resumes from that point.
NOTE:
- The sound may be interrupted momentarily when resuming normal playback from the manual search mode. This is not a malfunction.
Playing the tracks in the desired order (Remote control unit only) [Programmed play]
- Use this function to select the desired tracks on the disc and play them in the desired order.
- Up to 30 tracks can be programmed.
1 In the stop mode, press the PROGRAM button. The "PROGRAM" indicator lights.
2 Press the NUMBER and +10 buttons to select the track to be programmed.
- For example, to program the 3rd track and the 12th track, press PROGRAM, 3, +10 and 2.
Press the or / 口 button.
- The tracks are played in the programmed order.
※ To confirm the programmed playing order, press the CALL button in the stop mode. The programmed playing order appears in the display.
※ To cancel the entire program, press the DIRECT button or the button in the stop mode.
※ If you program the wrong track, press the CLEAR button, and then program the right track. (The last track in the program is erased each time the CLEAR button is pressed.)
Playing the tracks in random order (Remote control unit only) [Random play]
- Use this function to play all the tracks on the disc once in random order.
1 In the stop mode, press the RANDOM button. The "RANDOM" indicator lights.
※ If pressed during playback, random play starts from that track.
Press the or button.
- A track is selected automatically and playback starts.
During programmed playback: The programmed tracks are played in random order.
During repeat playback: The tracks are played once in random order, then played again in a different order, and this is repeated.
※ To cancel random playback, press the RANDOM button in the stop mode. Normal playback resumes.
Repeat play (Remote control unit only)
Playing all the tracks repeatedly [All-track Repeat]
1 In the stop mode, press the REPEAT button once.
- The "REPEAT ALL" indicator lights.
2 Press the or button.
※ The all-track repeat mode can also be set by pressing the REPEAT button during playback.
※ The one-track repeat mode is set if the REPEAT button is pressed again during repeat playback.
※ If the REPEAT button is pressed during programmed playback, the programmed tracks are played repeatedly.
※ To cancel the all-track repeat mode, press the REPEAT button twice.
Playing a single track repeatedly [One-track Repeat]
During playback, press the REPEAT button twice.
- The "REPEAT 1" indicator lights.
When the REPEAT button is pressed twice while in the stop mode, the set is readied for playback of the first track. Press the button to start playback.
※ Press the REPEAT button once again to cancel the one-track repeat mode. The display and playback return to normal.
To display text (Super Audio CD only)
- With Super Audio CDs that contain text information, the text information included on the disc can be displayed while in the stop or play mode.
- The album title, artist name and track titles can be displayed.
- Displayable characters are capital and small letters, numbers and some symbols.
Text display in the stop mode
1 Press the TITLE button.
The album title scrolls on the display.
Press the ARTIST button.
The album's artist name scrolls on the display.
Text display in the play mode
Press the TITLE button.
- The title of the currently playing track scrolls on the display.

- To switch to the display of the recorded time while text information is being displayed, press the TIME mode button.
- When the TITLE or ARTIST button is pressed, the text scrolls once, then only the first 13 characters of the text are displayed.
- When the track is switched while the track title is being displayed, the title of the new track is scrolled.
- "NO TEXT" is displayed if the TITLE or ARTIST button is pressed when a disc that does not contain text information is loaded.
Timer-controlled playback


1 Turn on the power of all system components.
2 Set the input selector on the amplifier to correspond to the inputs the CD player is connected to.
3 Make sure a disc has been loaded in the disc holder.
4 Check the time on the timer and then set the desired turn-on time.
5 Turn the audio timer ON.
※ Power is turned off automatically in all components connected to the timer.
6 When the preset turn-on time is reached, power is turned on in the system components and CD playback starts from the first track.
Troubleshooting
Check again before assuming the player is malfunctioning
1. Are all the connections correct?
2. Are you following the instructions in the operating instructions?
3. Are the amplifier and speakers operating properly?
If the DCD-2000AE does not seem to be functioning properly, check the table below. If this does not solve the problem, the DCD-2000AE may be defective. Turn off the power, unplug the power cord from the power outlet, and contact your store of purchase or nearest Denon sales office.
| Symptom | Check | Page |
| Disc holder does not open or close. | ● Is the power on? | 7 |
| When a disc is loaded, "NO DISC" is displayed. | ● Is the disc loaded properly? | 2, 7 |
| When a disc is loaded, "00m 00s" is displayed. | ● Are you attempting to play a disc other than a CD or Super Audio CD? | 2 |
| When the▶ button is pressed, playback does not start. | ● Is the disc dirty or scratched? | 2 |
| There is no sound or it is distorted. | ● Is the output cord properly connected to the amplifier? ● Have the amplifier controls been set correctly? | 6 - |
| No data is output from the digital output terminal (OPTICAL/COAXIAL). | ● With Super Audio CDs, no digital signals are output. ● Is the PURE DIRECT mode on? | 6 4 |
| A specific section of the disc will not play. | ● Is the disc dirty or scratched? | 2 |
| Programmed playback does not work. | ● Has programming been properly done? | 9 |
| CD-R and CD-RW discs cannot be played. | ● For CD-R/-RW discs, has the disc been finalized? | 2 |
| Incorrect operation when buttons on the remote control are pressed. | ● Is the remote control unit being operated too far from the CD player? ● Are there obstacles blocking the ray? ● Is the remote control sensor exposed to strong light? ● Are the batteries exhausted? | 3 - - - |
| ■ Audio | [Super Audio CD] | [CD] |
| • Analog output | ||
| Number of channels: | 2 channels | 2 channels |
| Frequency response: | 2 ~ 100,000 Hz | 2 ~ 20,000 Hz |
| Frequency response range: | 2 ~ 50,000 Hz (-3 dB) | 2 ~ 20,000 Hz |
| Signal-to-noise ratio: | 113 dB | 119 dB |
| Dynamic range: | 110 dB | 100 dB |
| Harmonic distortion: | 0.0006 %(1 kHz) | 0.0017 %(1 kHz) |
| Wow and flutter: | Below measurable limit | Below measurable limit |
| Output voltage: | 2.0 V (10k Ω/ohms) | 2.0 V (10k Ω/ohms) |
| Signal system: | 1-bit DSD | 16-bit linear PCM |
| Sampling frequency: | 2.822 MHz | 44.1 kHz |
| Discs: | Super Audio CD format | Compact Disc format |
| • Digital output | ||
| Coaxial: | - | 0.5 Vp-p/75Ω/ohms |
| Optical: | - | -15 ~ 21 dBm |
| Light emission wavelength: | - | 660 nm |
| ■ General characteristics | |
| Power supply: | AC 230 V, 50 Hz |
| Power consumption: | 20 W |
| Maximum external dimensions: | 434 (width) x 137 (height) x 335 (depth) mm (including protruding parts) |
| Mass: | 13.3 kg |
| ■ Remote control unit: | RC-997 |
| Type: | Infrared pulse system |
| Power supply: | DC 3 V, 2 R03/AAA batteries |
| Maximum external dimensions: | 44 (width) x 233 (height) x 22 (depth) mm |
| Mass: | 165 g (including batteries) |
* Design and specifications are subject to change without notice.
Erste Schritte
Signalfläche gelangen (die in
Regenbogenfarben
schimmernde Seite).
Reinigung von Discs
- La lecture commence.
General characteristics
Alimentation:
230 V CA, 50 Hz
(Parties protubérantes incluses)
Poids:
13,3 kg
Telecommande:
RC-997
Type:
2,0 V (10k Ω/ohmios)
16 bit PCM lineal
44,1 kHz
Formato de disco compaco
0,5 Vp-p/75 Ω/ohmios
-15 ~ 21 dBm
660 nm
- Characteristicas generales
- "PROGRAM"-indikatornalands.

Harmonisk distorsion:
Svaj:
Utgangsspanning:
Signalsystem:
Samplingsfrekvens:
Skivor:
Digitalutgang
Koaxial:
Optisk:


- CAUTION
- RISK OF ELECTRIC SHOCK
- DO NOT OPEN
- CAUTION:
- CLASS 1
- LASER PRODUCT
- A NOTE ABOUT RECYCLING:
- HINWEIS ZUM RECYCLING:
- ACHTUNG:
- Contents
- Getting Started
- Connections
- Operation
- Normal playback
- Various playback functions
- Accessories
- Before using
- NOTE:
- Caution on handling
- Discs
- Super Audio CD
- Compact Disc
- CD-R/-RW Disc
- Holding discs
- Cleaning discs
- Cautions on handling discs
- Inserting the batteries
- Cautions on Batteries:
- Operating range of the remote control unit
- Part names and functions
- Front panel
- POWER switch
- SUPER AUDIO CD SETUP button
- STEREO:
- CD:
- PURE DIRECT button
- Remote control sensor
- ⑤ Display
- Disc holder open/close button ()
- Automatic search forward button (▶▶I)
- Automatic search reverse button (I
- Stop button (■)
- Play/Pause button (▶/II)
- Disc holder
- Super Audio CD indicator
- Advanced AL24 Processing indicator
- Rear panel
- ANALOG OUT terminal
- OPTICAL terminal
- COAXIAL terminal
- Power input (AC IN)
- Display
- Remote control unit
- MEMO
- Connections to the analog output terminal
- Connections to the digital output terminal (COAXIAL/OPTICAL)
- Signal direction
- Starting playback
- Stopping playback
- Stopping playback temporarily [Pause]
- Automatic search
- Finding the desired spot while listening to the sound (Remote control unit only) [Manual search]
- Searching forward
- During playback, press and hold in the button.
- Searching backward
- During playback, press and hold in the button.
- Playing the tracks in the desired order (Remote control unit only) [Programmed play]
- In the stop mode, press the PROGRAM button. The "PROGRAM" indicator lights.
- Press the NUMBER and +10 buttons to select the track to be programmed.
- Press the or / 口 button.
- Playing the tracks in random order (Remote control unit only) [Random play]
- In the stop mode, press the RANDOM button. The "RANDOM" indicator lights.
- Press the or button.
- Repeat play (Remote control unit only)
- Playing all the tracks repeatedly [All-track Repeat]
- Press the or button.
- Playing a single track repeatedly [One-track Repeat]
- During playback, press the REPEAT button twice.
- To display text (Super Audio CD only)
- Text display in the stop mode
- Text display in the play mode
- Press the TITLE button.
- Timer-controlled playback
- Troubleshooting
- Check again before assuming the player is malfunctioning
- Are all the connections correct?
- Are you following the instructions in the operating instructions?
- Are the amplifier and speakers operating properly?
- Erste Schritte
- Reinigung von Discs
- General characteristics
- Telecommande:
Brand : DENON
Model : DCD-2010AE
Category : CD Player